NVIDIA® GPU Cloud(NGC) with E2E Cloud Compute
NVIDIA GPU Cloud (NGC) is a GPU-accelerated cloud platform optimized for deep learning and scientific computing. NGC includes NGC containers, the NGC container registry, the NGC website, and platform software for running the deep learning containers. This document provides an overview of how to use NGC with E2E Cloud Infrastructure.
NVIDIA makes available on E2E Cloud Infrastructure a customized Compute image optimized for the NVIDIA® Tesla Volta™ and Turing™ GPUs . Running NGC containers on this instance provides optimum performance for Deep learning, Data Science and HPC.
Prerequisites
Sign-up on Myaccount portal
Launching an instance based on the NGC image
Using the Console
The first step will be to Signing In to the Myaccount Console.
Navigate to Node create page
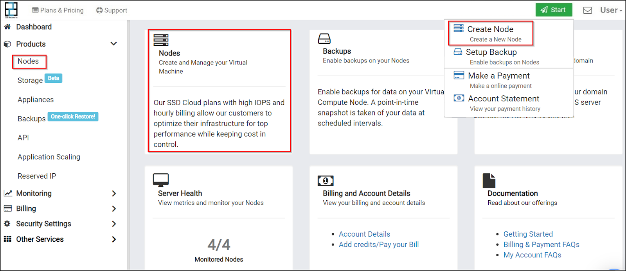
- After you log in to the E2E Networks ‘My Account’, you can click on any of the following options.
Green Start button in the top right to open the quick start menu.
On the left side of the MyAccount dashboard, click on the “Nodes” sub-menu available under the Products section.
You may also click on “Nodes” header on the dashboard.
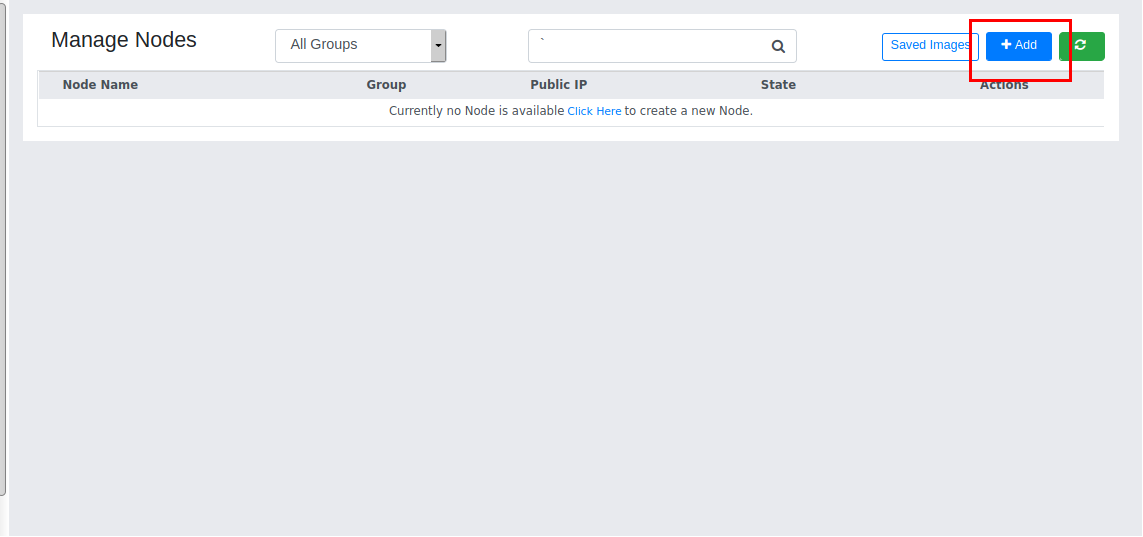
You will be routed to the ‘Manage Nodes’ page. Now, you have to Click on the ‘Create Node‘ button to create a node that takes you to the ‘Create Compute Node’ page.
Choosing an NVIDIA GPU Cloud (NGC) Image

Once you have selected the Node image, then click the “Create” Button. It will take you to the final stage of the ‘Create Compute Node’ page.
Finalize and Create a Node
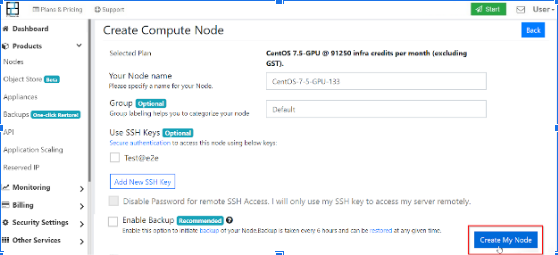
Here, you can specify the node name and additional options for the Node you’re creating.
- Choose a SSH Authentication:
Use SSH Keys, which provide more secure than password based access.Once you select “Use SSH Keys” you can tick Disable Password for remote SSH Access, the Only SSH key is required to access your Node remotely. One-time password, which is a single-use password shared to you via an auto-generated email by-default and will require you to reset your own password once you access the server.
Enable Backup – you can enable automatic backups of the node by ticking the Enable backup checkbox.
Once you have selected your options, click Create. It will take a few minutes to set up the Node and you will take to the ‘Manage Node’ page.Also, you will receive a notification email along with your Node login credentials. Now, you can access and manage your nodes from the ‘Manage Node’ page.
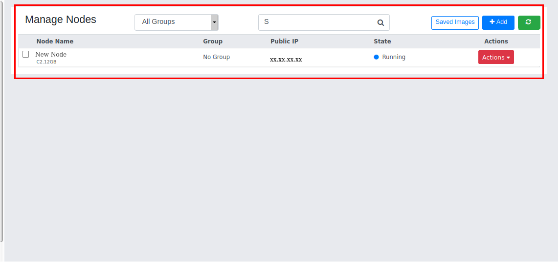
You should see the NGC instance with the state Running. you can connect to the instance. For general information about launching Compute instances, see Creating an Instance
Connect to your NGC instance
You can use Putty for Windows,ssh or any another SSH client.
The default user is root

Start with your NGC container
Once you are logged into the instance, you can start pulling and running the ngc container.
The list of available containers (TensorFlow, Caffe2, DIGITS, Matab, MXNet, PyTorch, RAPIDS, etc…) is available here with your required versions tags and complete instructions to up and running of container:
https://ngc.nvidia.com/catalog/containers
Example:

xx.yy is the container version. For example, 19.01.
pyN is the Python version. For example, py3.