CDP Backups
Introduction
CDP Backups can help you manage a node’s backup policy to save files and folders of your E2E Node and also, rolling back to a previous backup recovery point anytime. We recommend you to subscribe for CDP backup service for all your nodes, especially the servers for a production environment. CDP backups secure your data from accidental data loss or modifications along with the option of retaining data for a longer period without consuming the server’s disk space. They are helpful in projects or milestones to back up the complete data or a set of files containing important information.
How does CDP Backup work?
Backups are created as a replica of your file system which is taken automatically at periodic intervals. Each backup recovery point contains all the data which was backed up to restore from the provisioning till the most recent data block update. This allows point-in-time to restore from any of the recovery points present in the archive. Before you enable CDP backup service, we recommend familiarizing yourself with concepts and terminologies.
Completely Secure
The backups are created and stored in our backup servers. The connections to these are encrypted using SSL to ensure the security of the data being backed up.
Incremental in nature
The backup server takes a complete snapshot of the entire filesystem for the first time and from the next run, it only copies over the differential Deltas (data that has changed since the last backup run) thus speeding up the backup process.
Database Backups
It is always important to backup all your databases stored in your server.
- The CDP for MySQL Add-On integrates Continuous Data Protection with an online hot backup (snapshot) of MySQL databases to provide fast, efficient, and safe MySQL backups.
- MySQL add-on ensures that tables are locked and flushed before a backup operation can take place. MySQL Add-On coordinates with the point-in-time file system snapshot.
- The only requirement for MySQL Add-On is a MySQL account with administrative privileges that is used by the Agent to flush tables with the read lock before the file system snapshot is taken and the lock must be held until the snapshot completes. Click here to check more details.
Backup Frequency
We do have pre-configured backup plans. You can choose one which matches up your requirement.
Backup Recovery Points
A recovery point is created as a result of data replication. The first recovery point is called an initial replica because it is performed only one time. In simple words, a Recovery Point appears like a Full backup as each Recovery Point only contains block-level Deltas or changes since the last Synchronization (recovery point creation). In other words, a Recovery Point is a point-in-time backup of the node (or selected files/folders on devices).
Each recovery point is all-inclusive i.e it contains all the data and can be used for a restore independently.
Backup Recovery Points Retention Policy
The Recovery Point Retention policy is default defined and it is applicable for each server for which backup service is enabled. The retention policy will be set as per the backup schedule chosen which will define at which recovery point the backups will be merged and retained.
After exceeding the defined recovery/archive point number, the old Archive Points will subsequently be replaced by the new ones.
Archive Backup Recovery Point
Archive backups are considered a best practice to protect your data from natural disasters, malware, and malicious acts. Even enterprises often need to retain long-term backups for business continuity, compliance, customer contracts, and e-Discovery.
An Archive Point is a snapshot of a backup recovery point that is stored in another location (object storage-bucket) for long-term data storage to provide further integrity and safe-keeping of data. It will significantly reduce costs while retaining a snapshot of backup recovery point backup for long-term availability.
With Archive, you can expand your backup policy to create and manage off-site snapshots of backup recovery points on the E2E Object storage. Archive backup policy can be configured to create a snapshot on a daily, weekly, or monthly schedule in accordance with your retention requirements. According to these configurations, an Archive is created once the policy runs.
- Daily, the last recovery point of the day is archived.
- Weekly, the last recovery point of the week is archived.
- Monthly, the last recovery point of the month is archived.
So your backup schedule must be at least daily to archive daily recovery points. You need to adjust the retention policy because the retention policy automatically decides on how many numbers of backup recovery points needed to retain and when to merge old recovery points and archived recovery points.
Restore functionality
The backup restore rates are inversely proportional to the load on your system. In an ideal environment, Our backup systems can restore at an avg rate of 20 MB/s which translates to 65-70 GB per hour. However, the actual rates may vary and we have seen better speeds than this. The way to request a rollback/restore is to select the files/folders from the recovery points and initiate the restore process.
Plans & Prices
Please check here for our Backups pricing.
How to activate CDP Backup service for nodes?
- Logging into E2E Networks MyAccount Portal
- Navigate to the CDP Backups page either from the dashboard or from the Side menu.
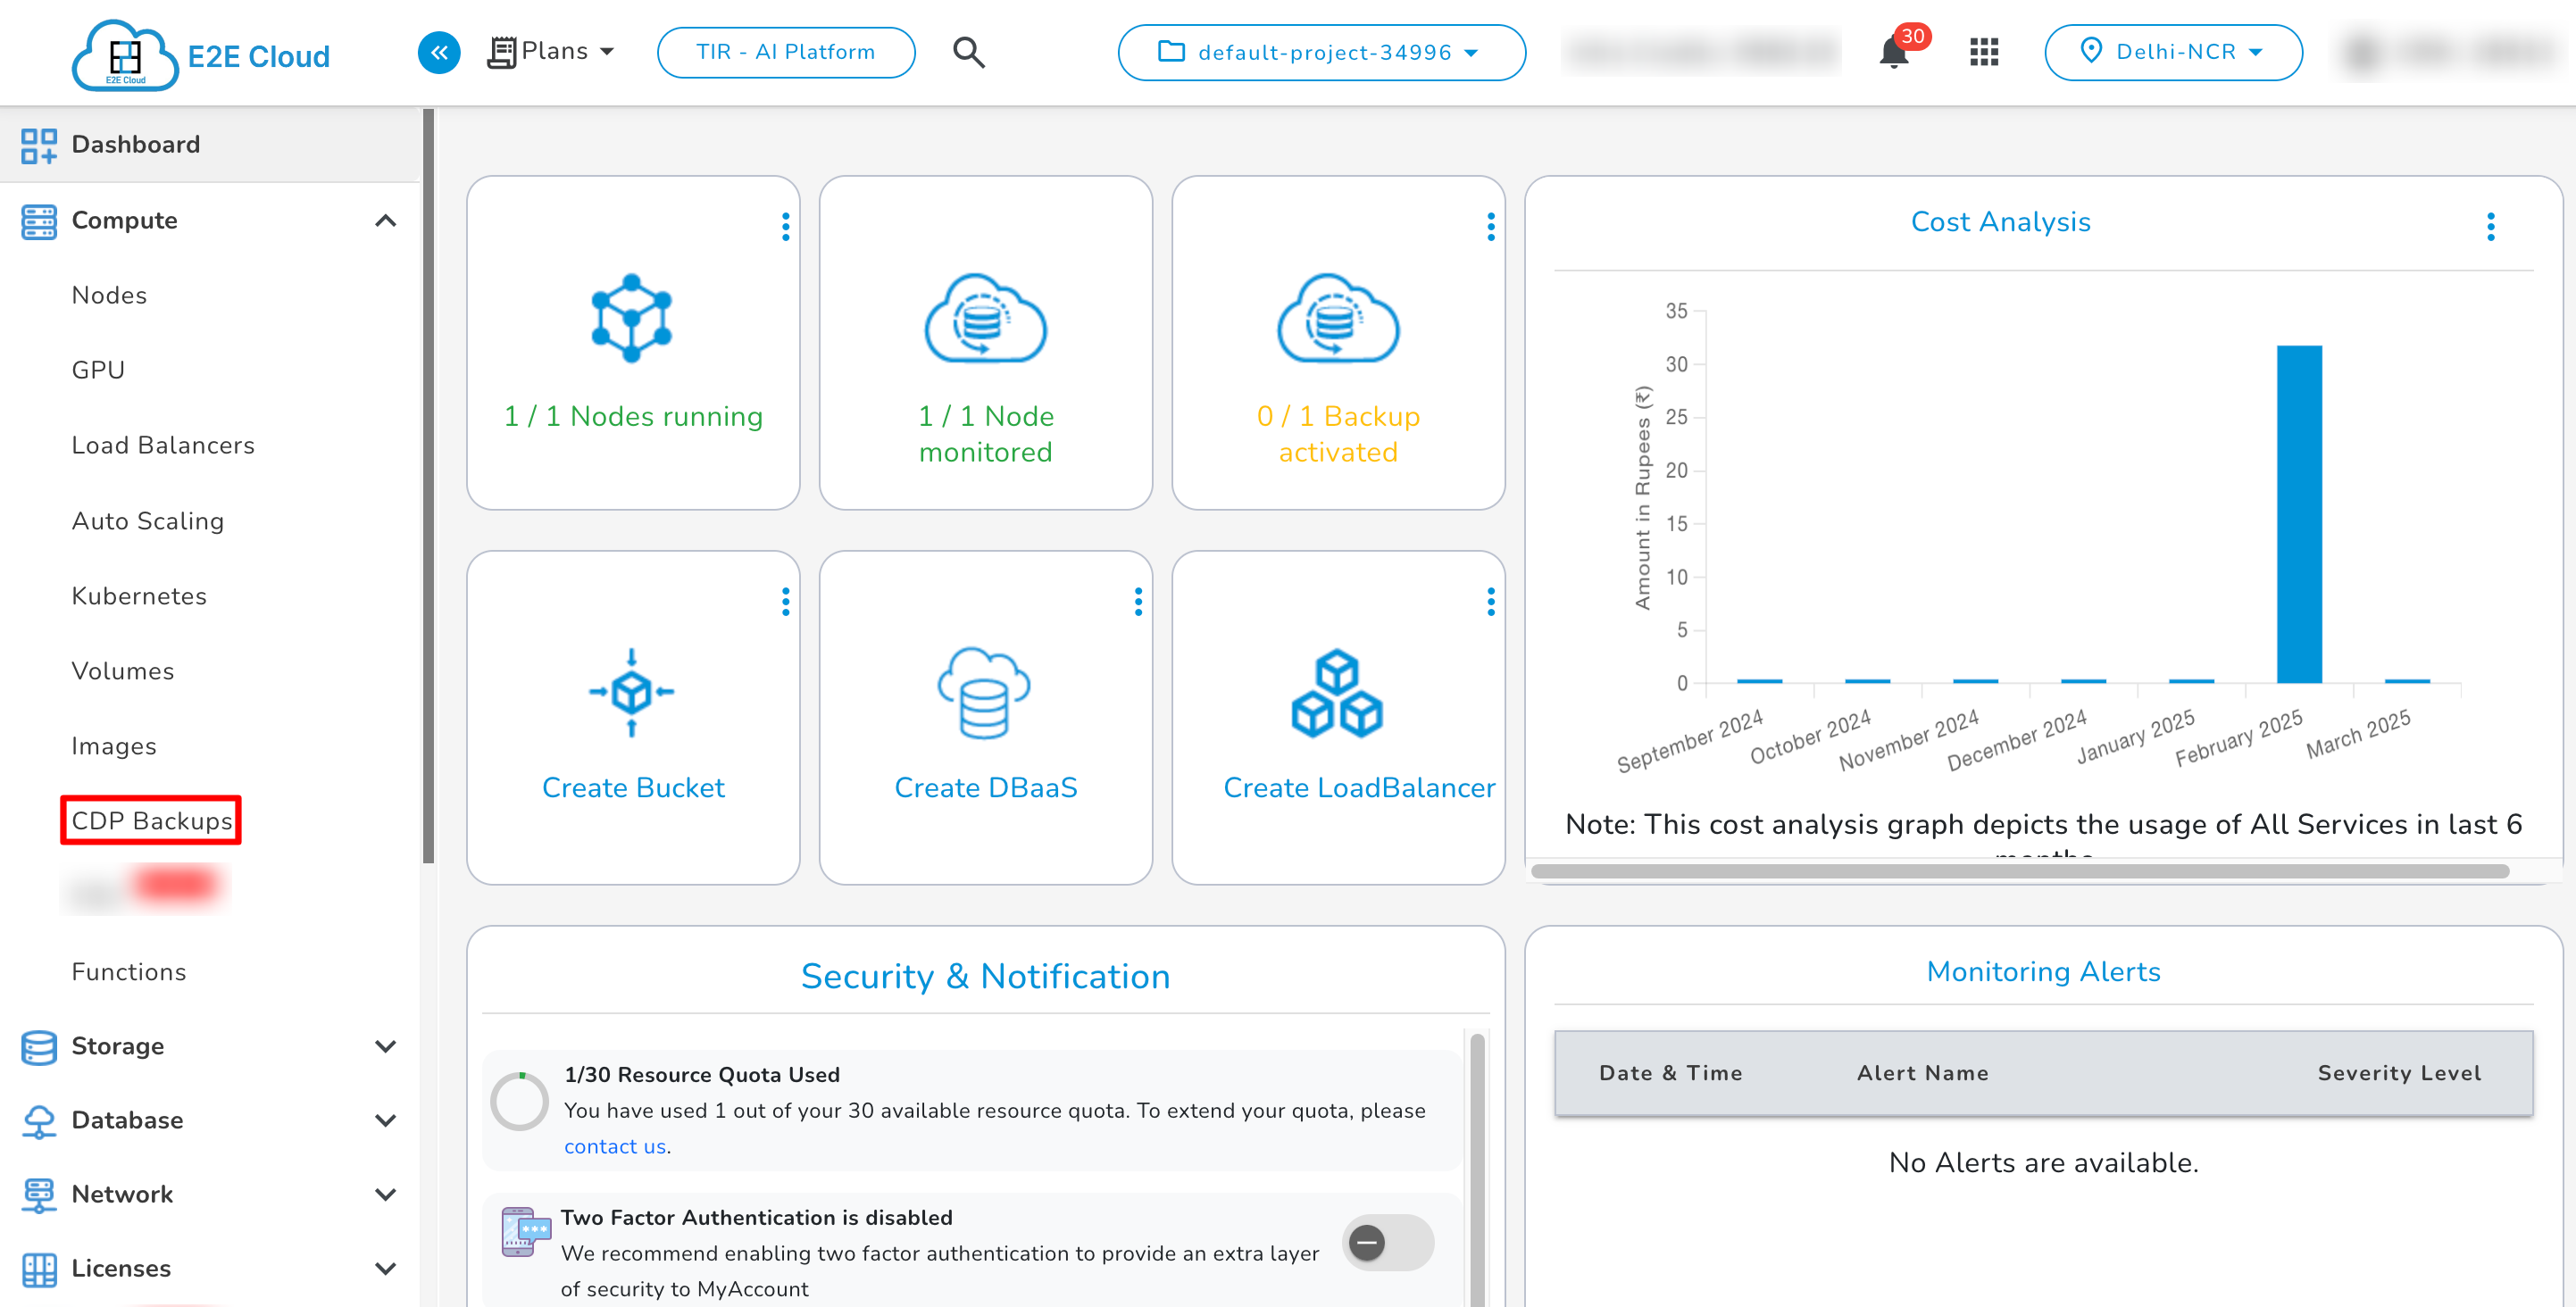
- The number of E2E Nodes currently created by you will be listed on the ‘Manage Backups’ page.
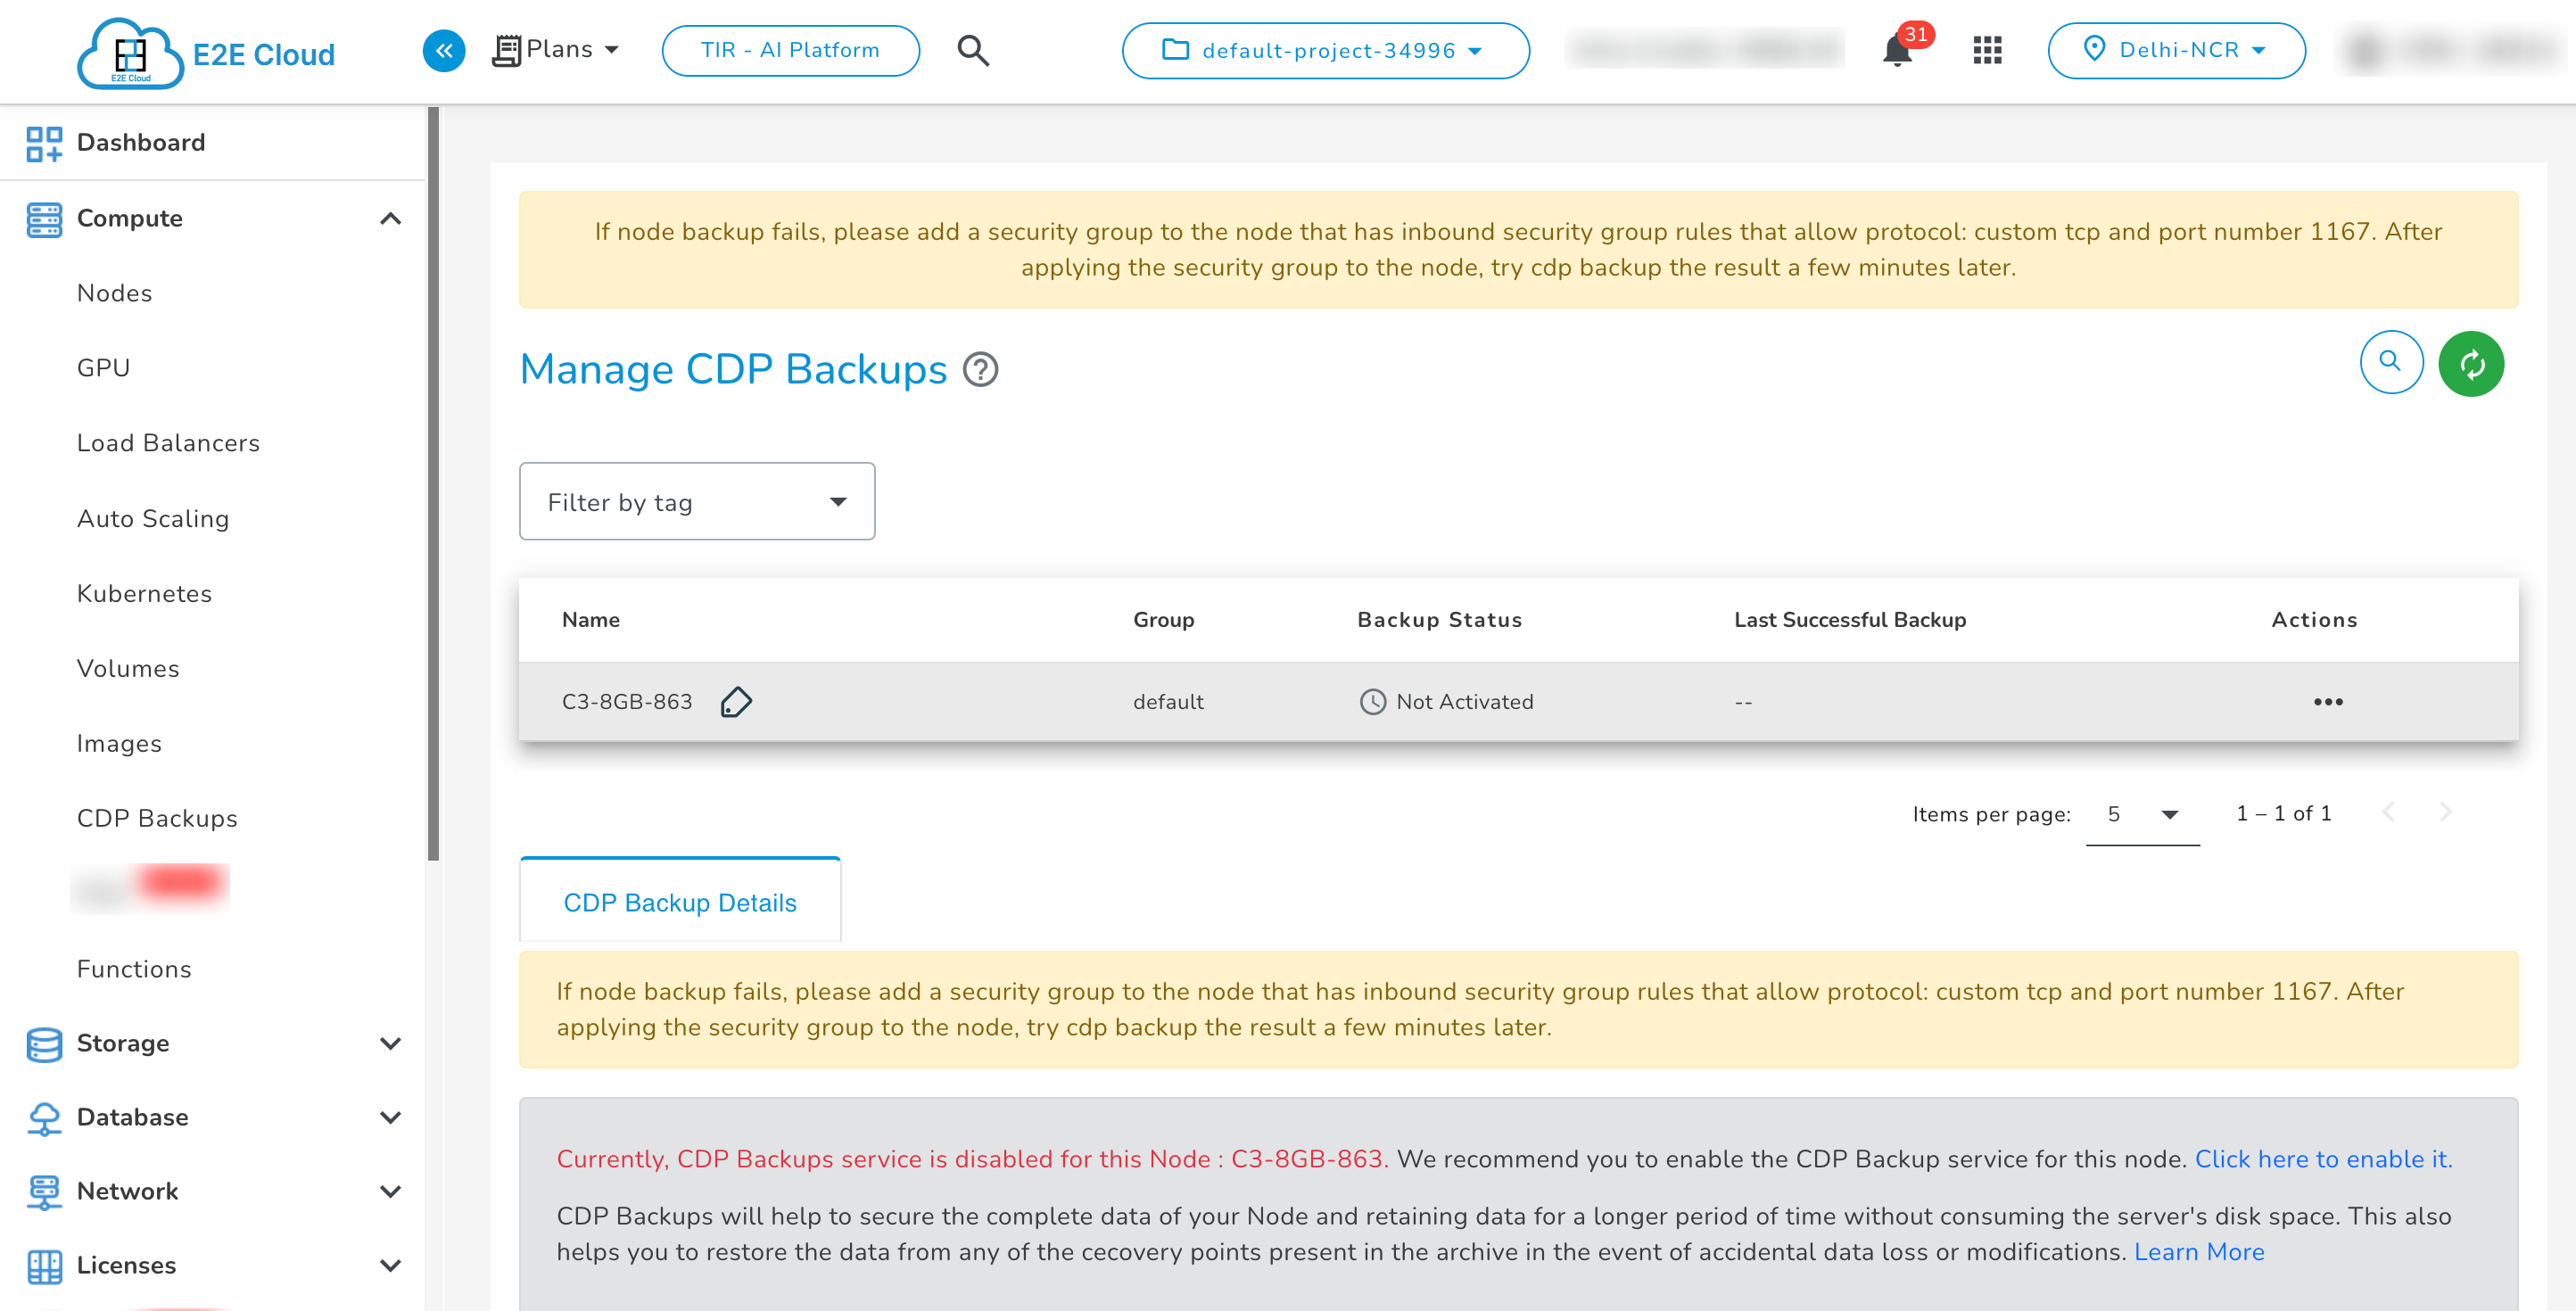
-
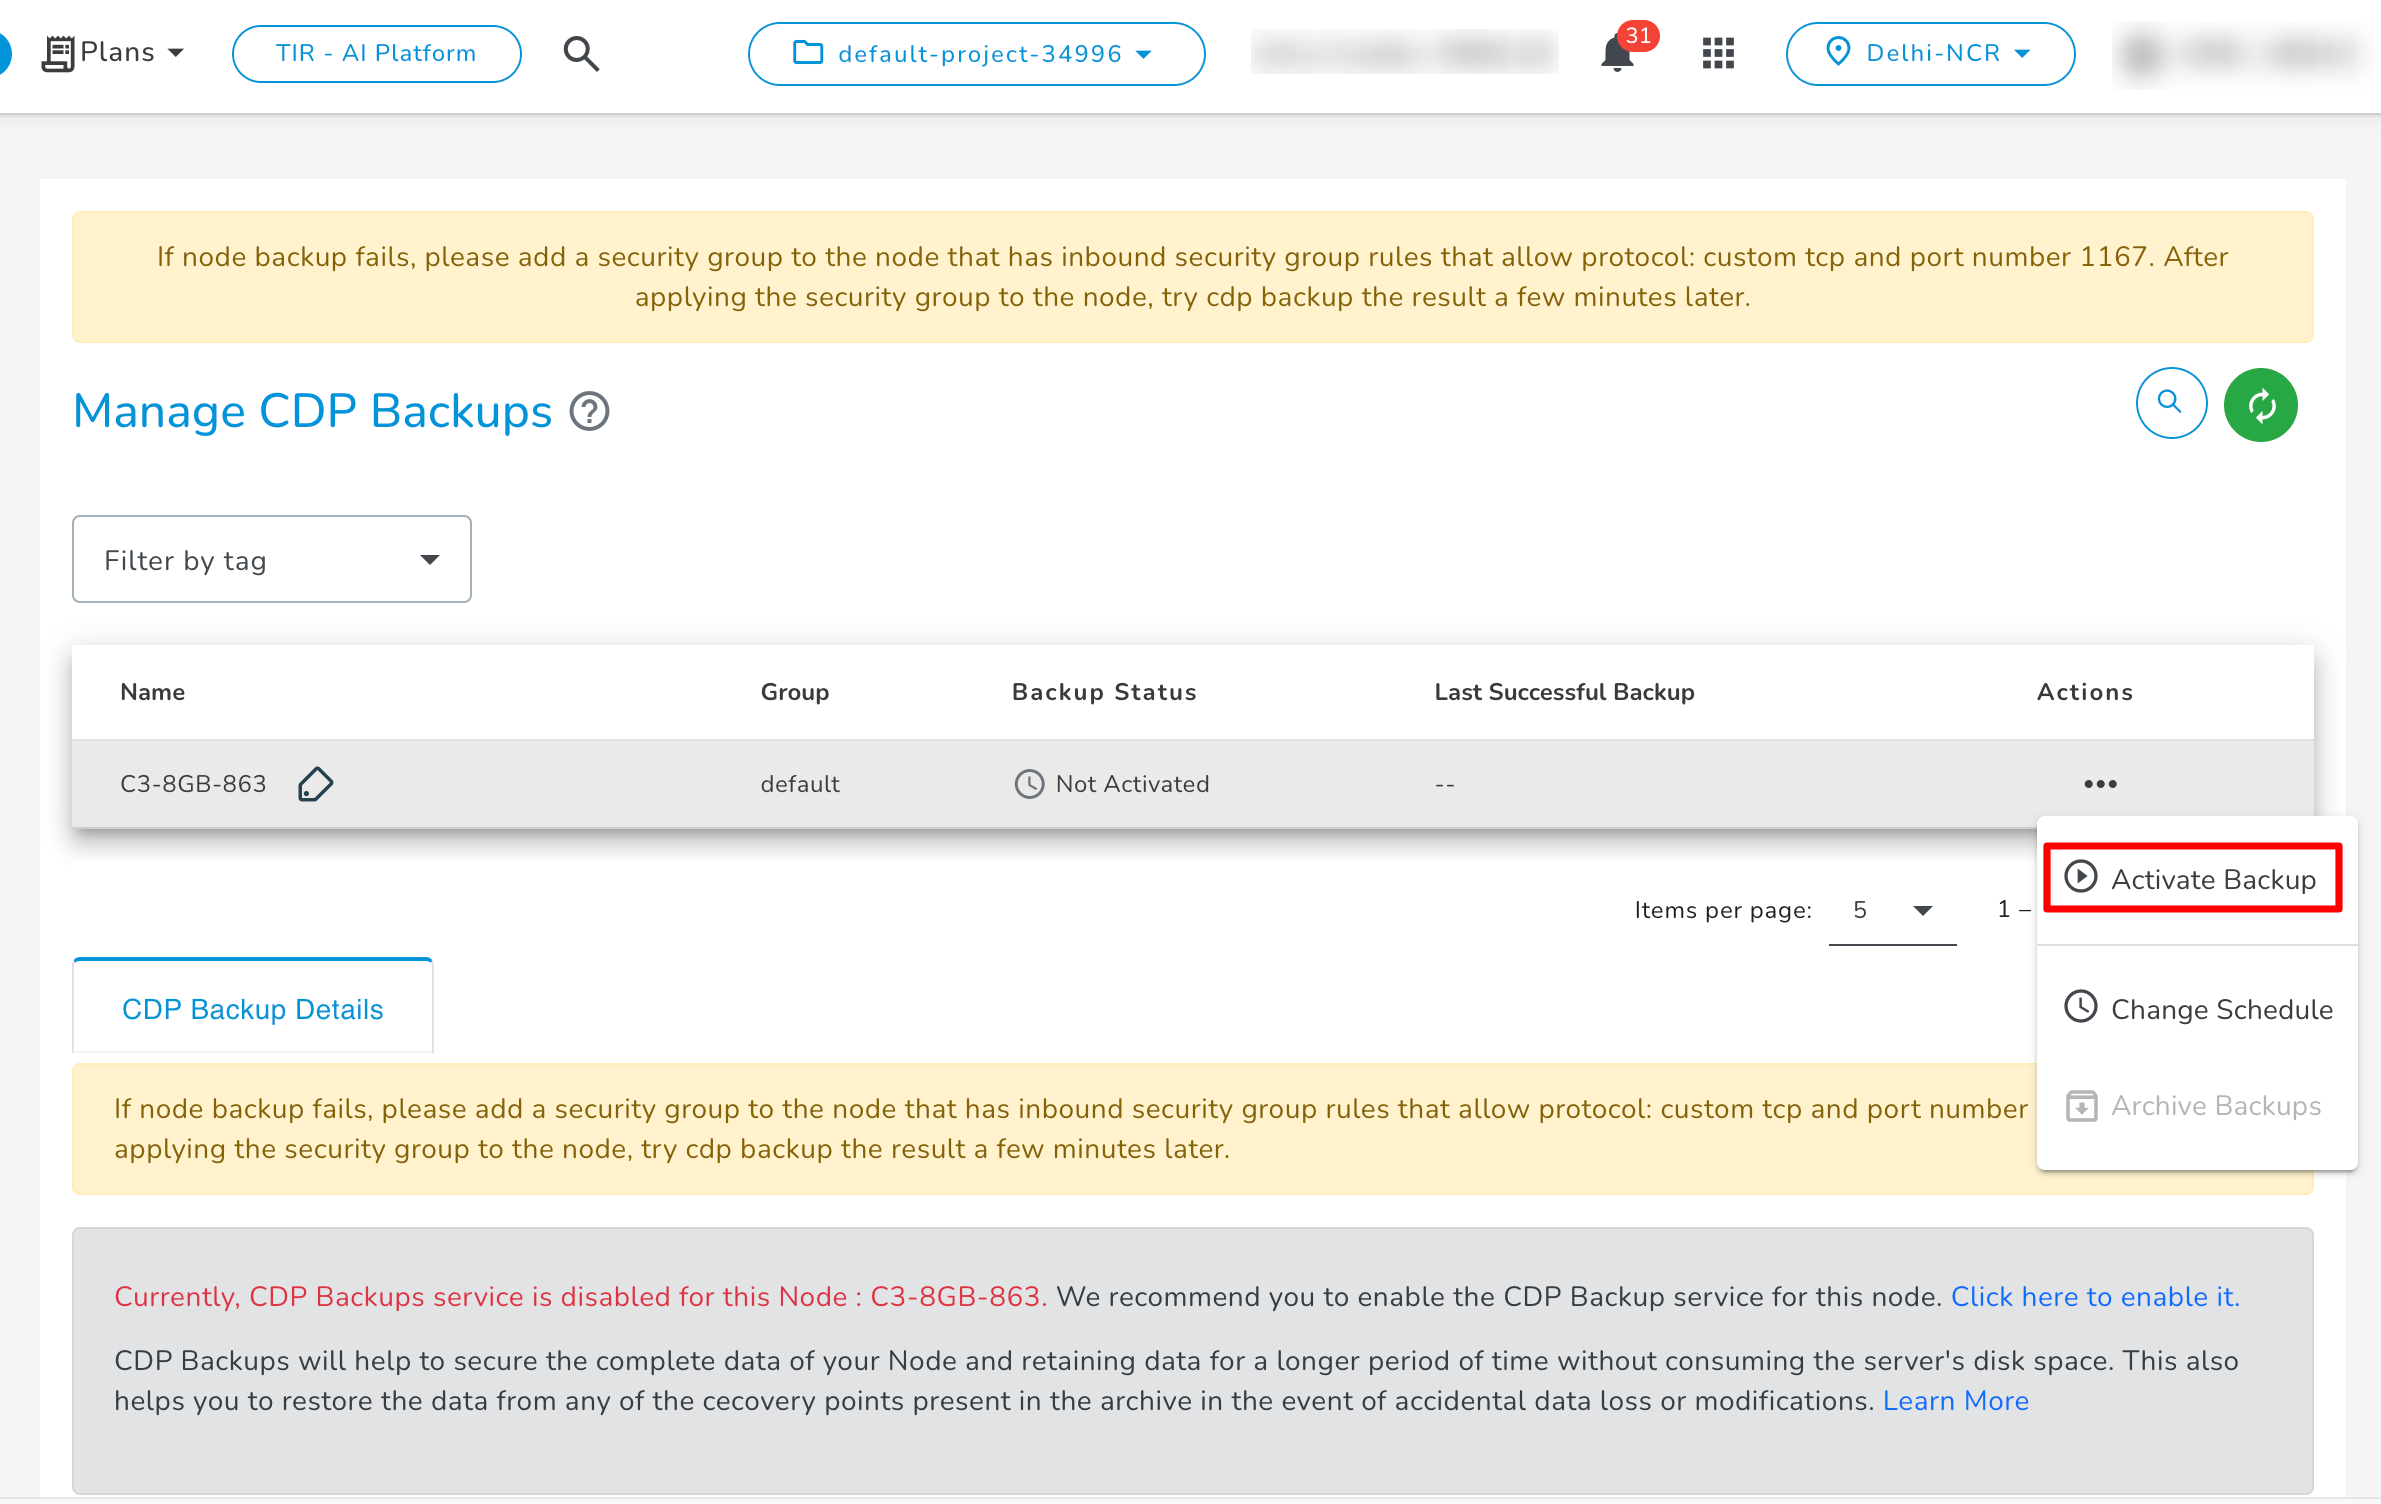
If you have not enabled the backups for your E2E Node while creating then the backup status will be ‘Backup Not Activated’. To enable CDP backup service for your E2E Node you will need to click on the ‘Activate Backup’ action.
-
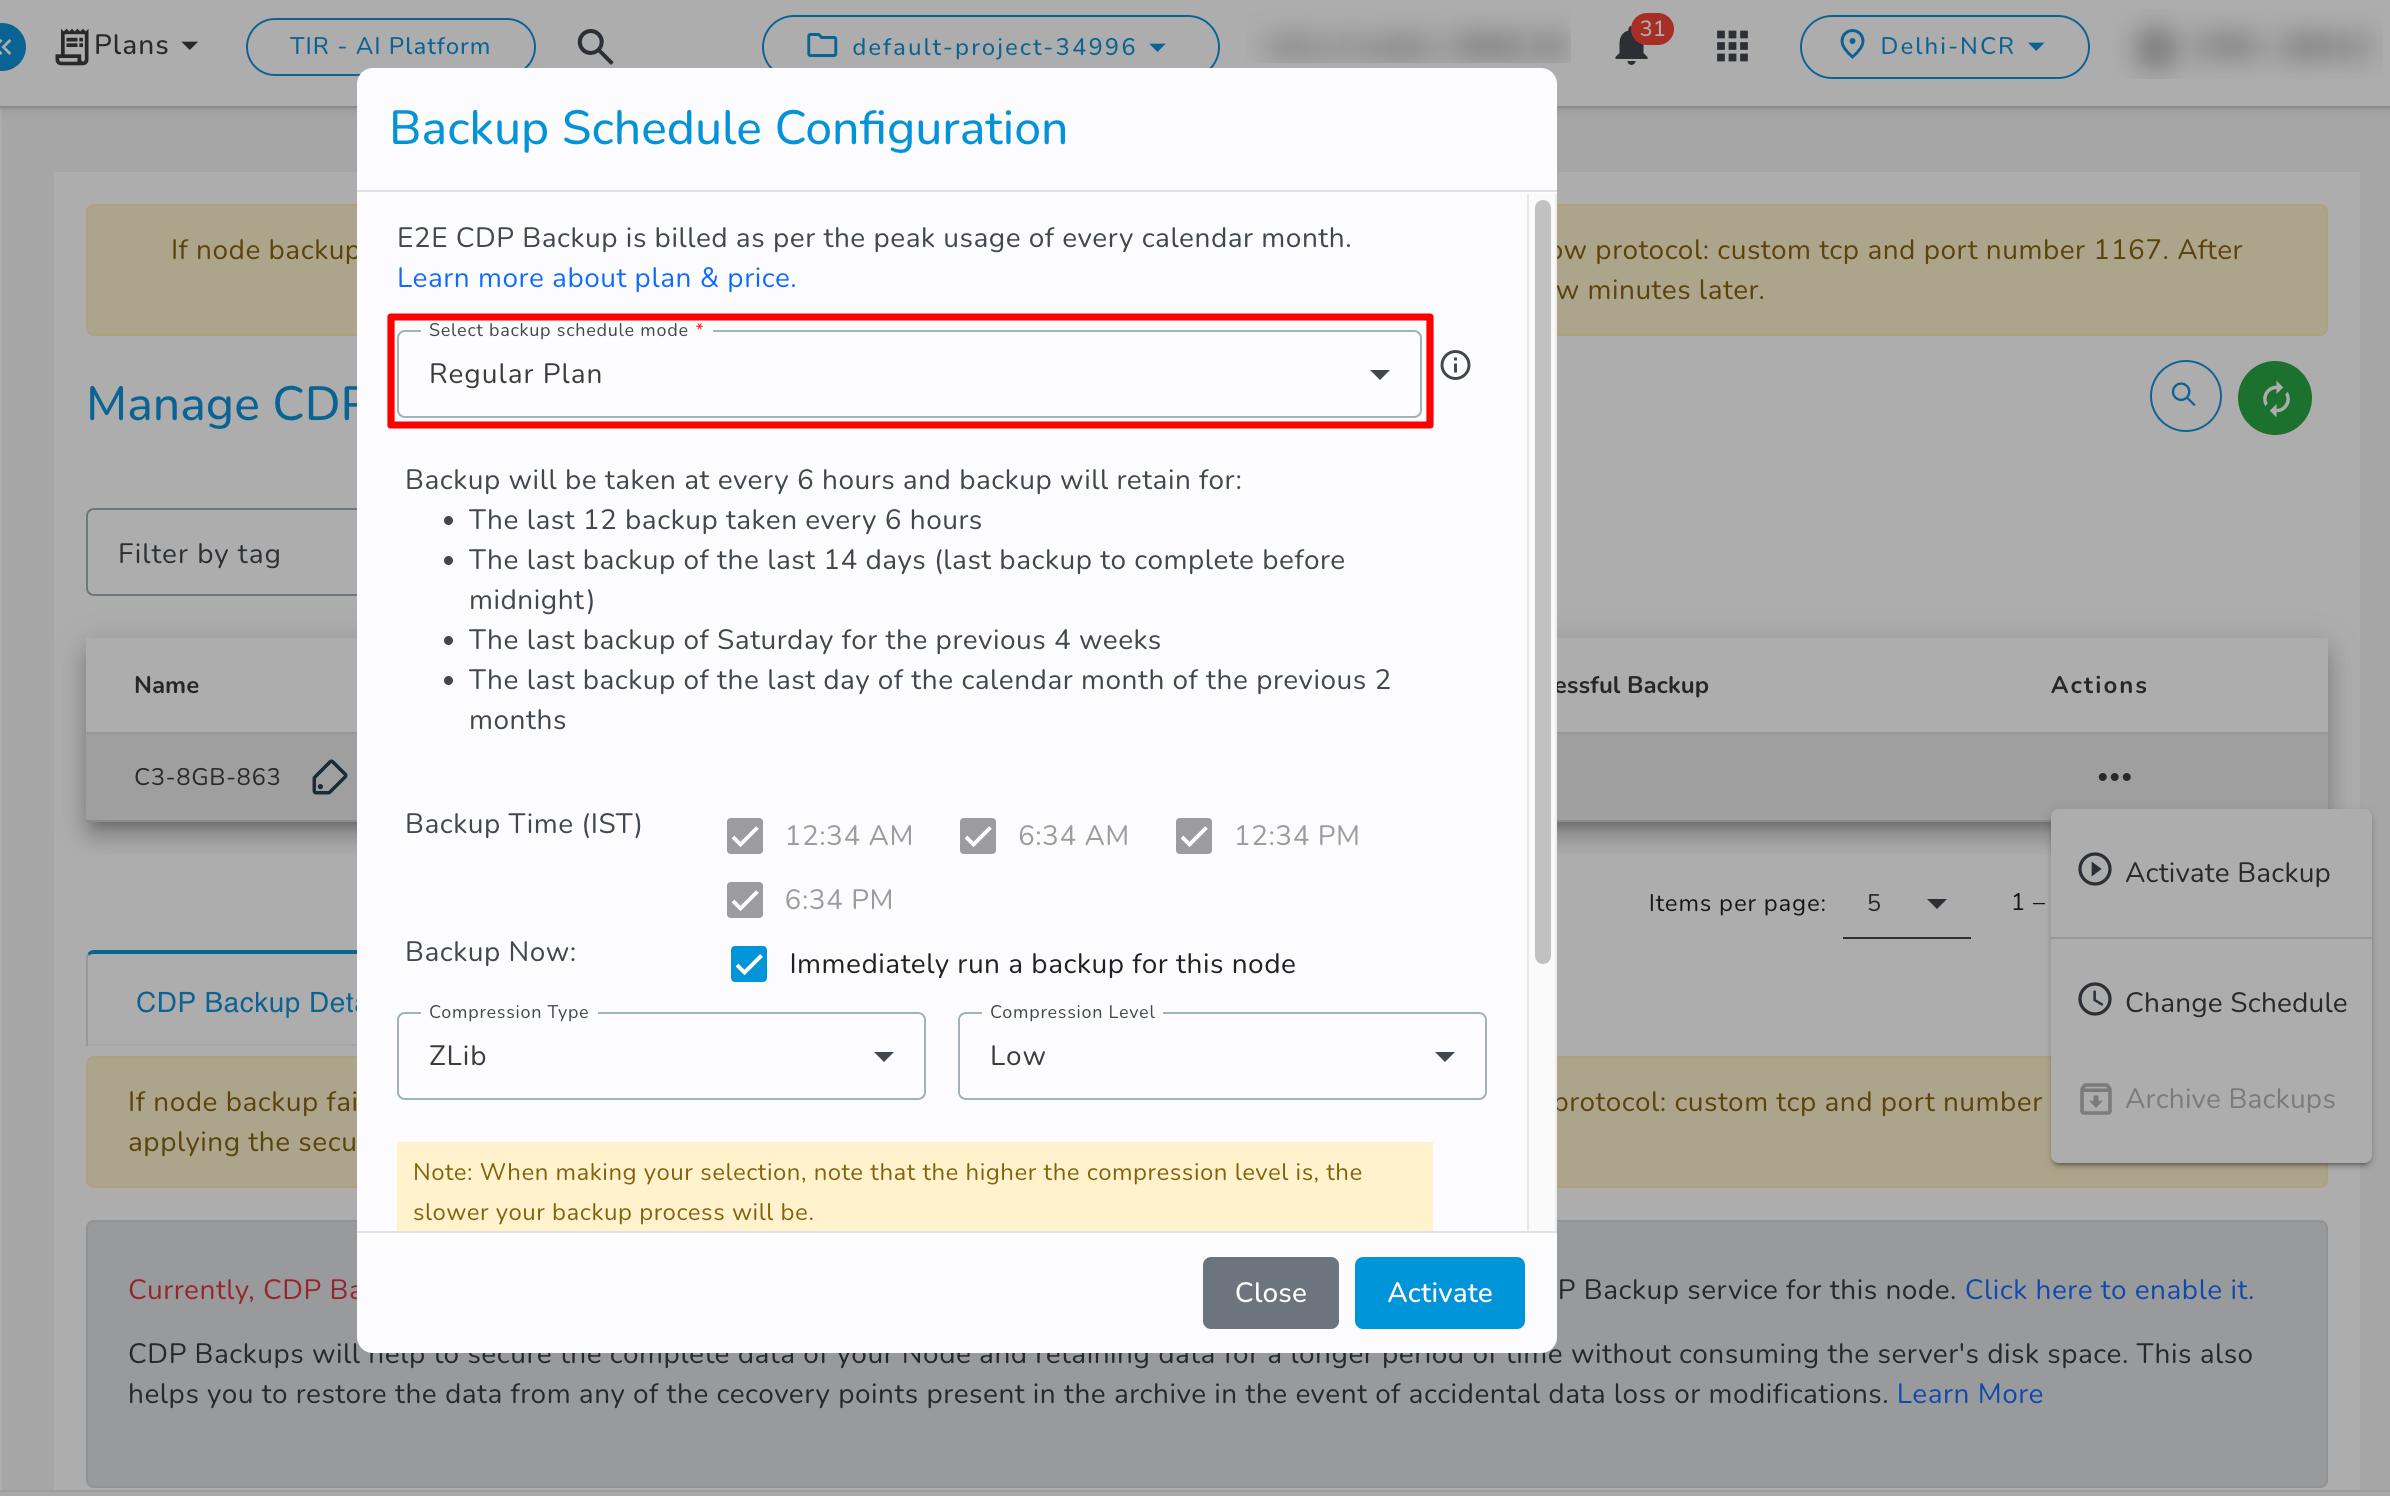
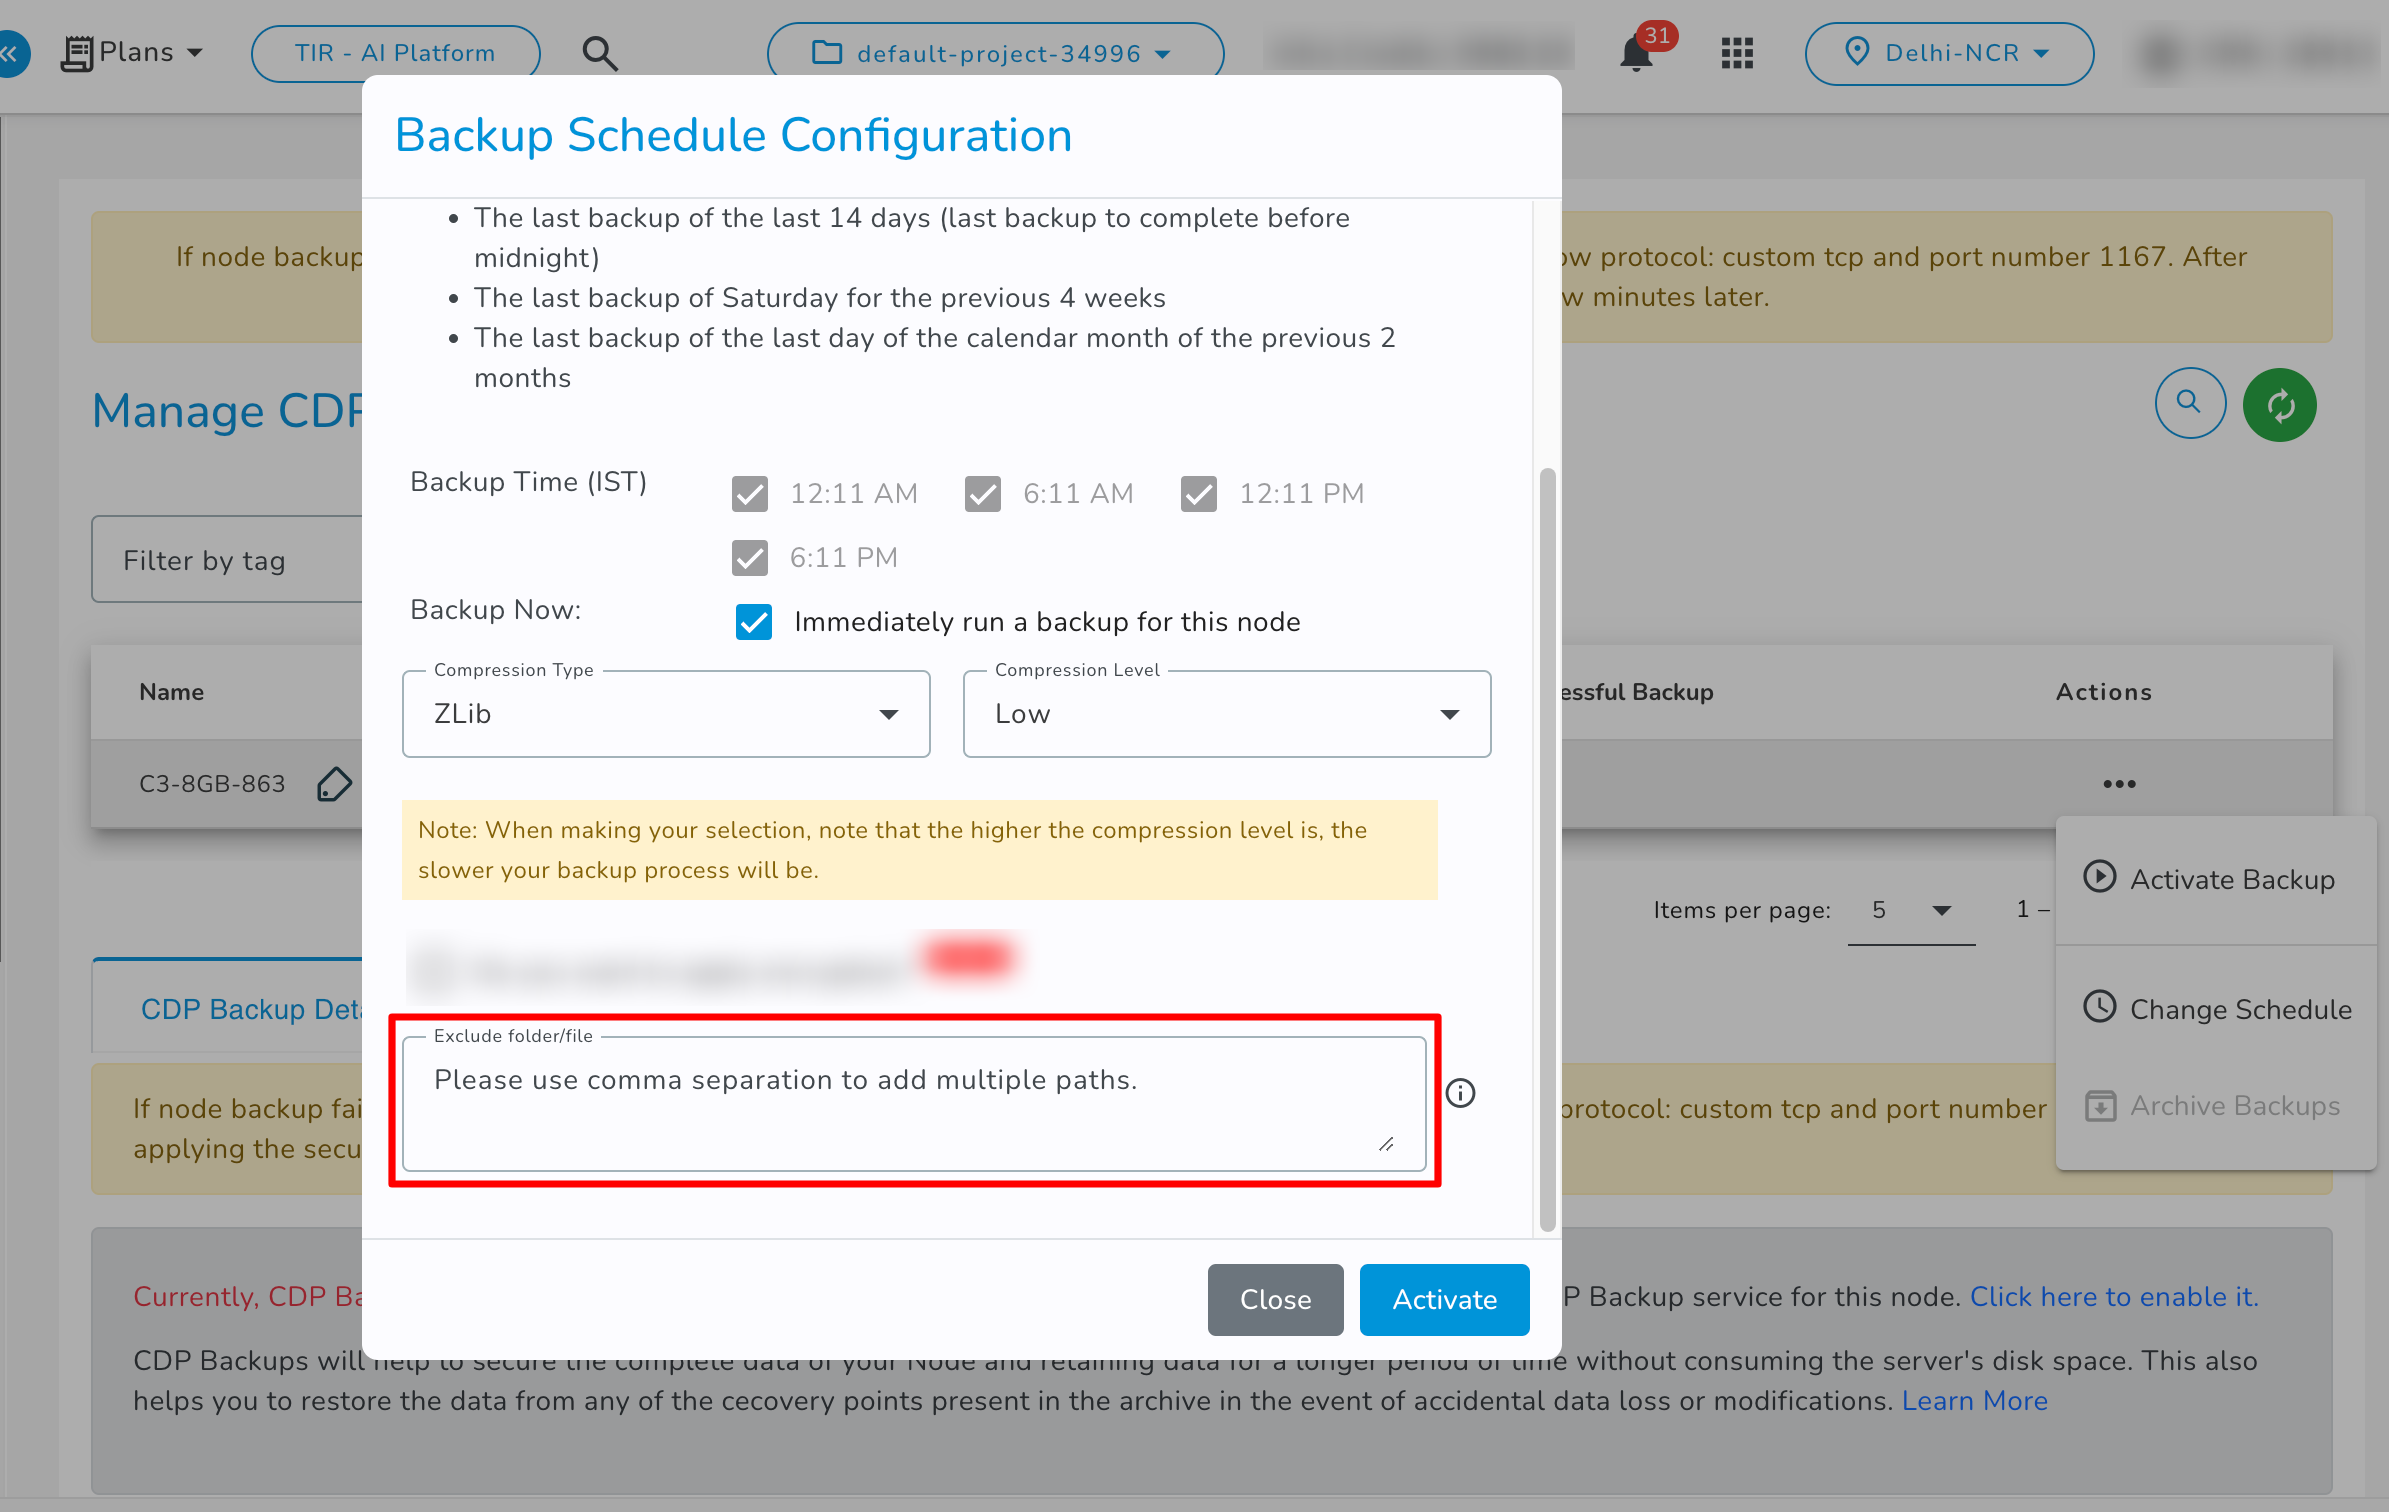
Backup Schedule Configuration pop-up window will appear on the screen.
Backup Schedule Configuration
Choose Schedule Plan- Please select the plan as per your requirement.
The scheduled backup run time may vary based on the number of backup policies running at that point in time on our backup server.
- Regular Plan: If you select the Regular Plan backup schedule it will create a backup every 6 hours and it will store the data as per these retention policies.
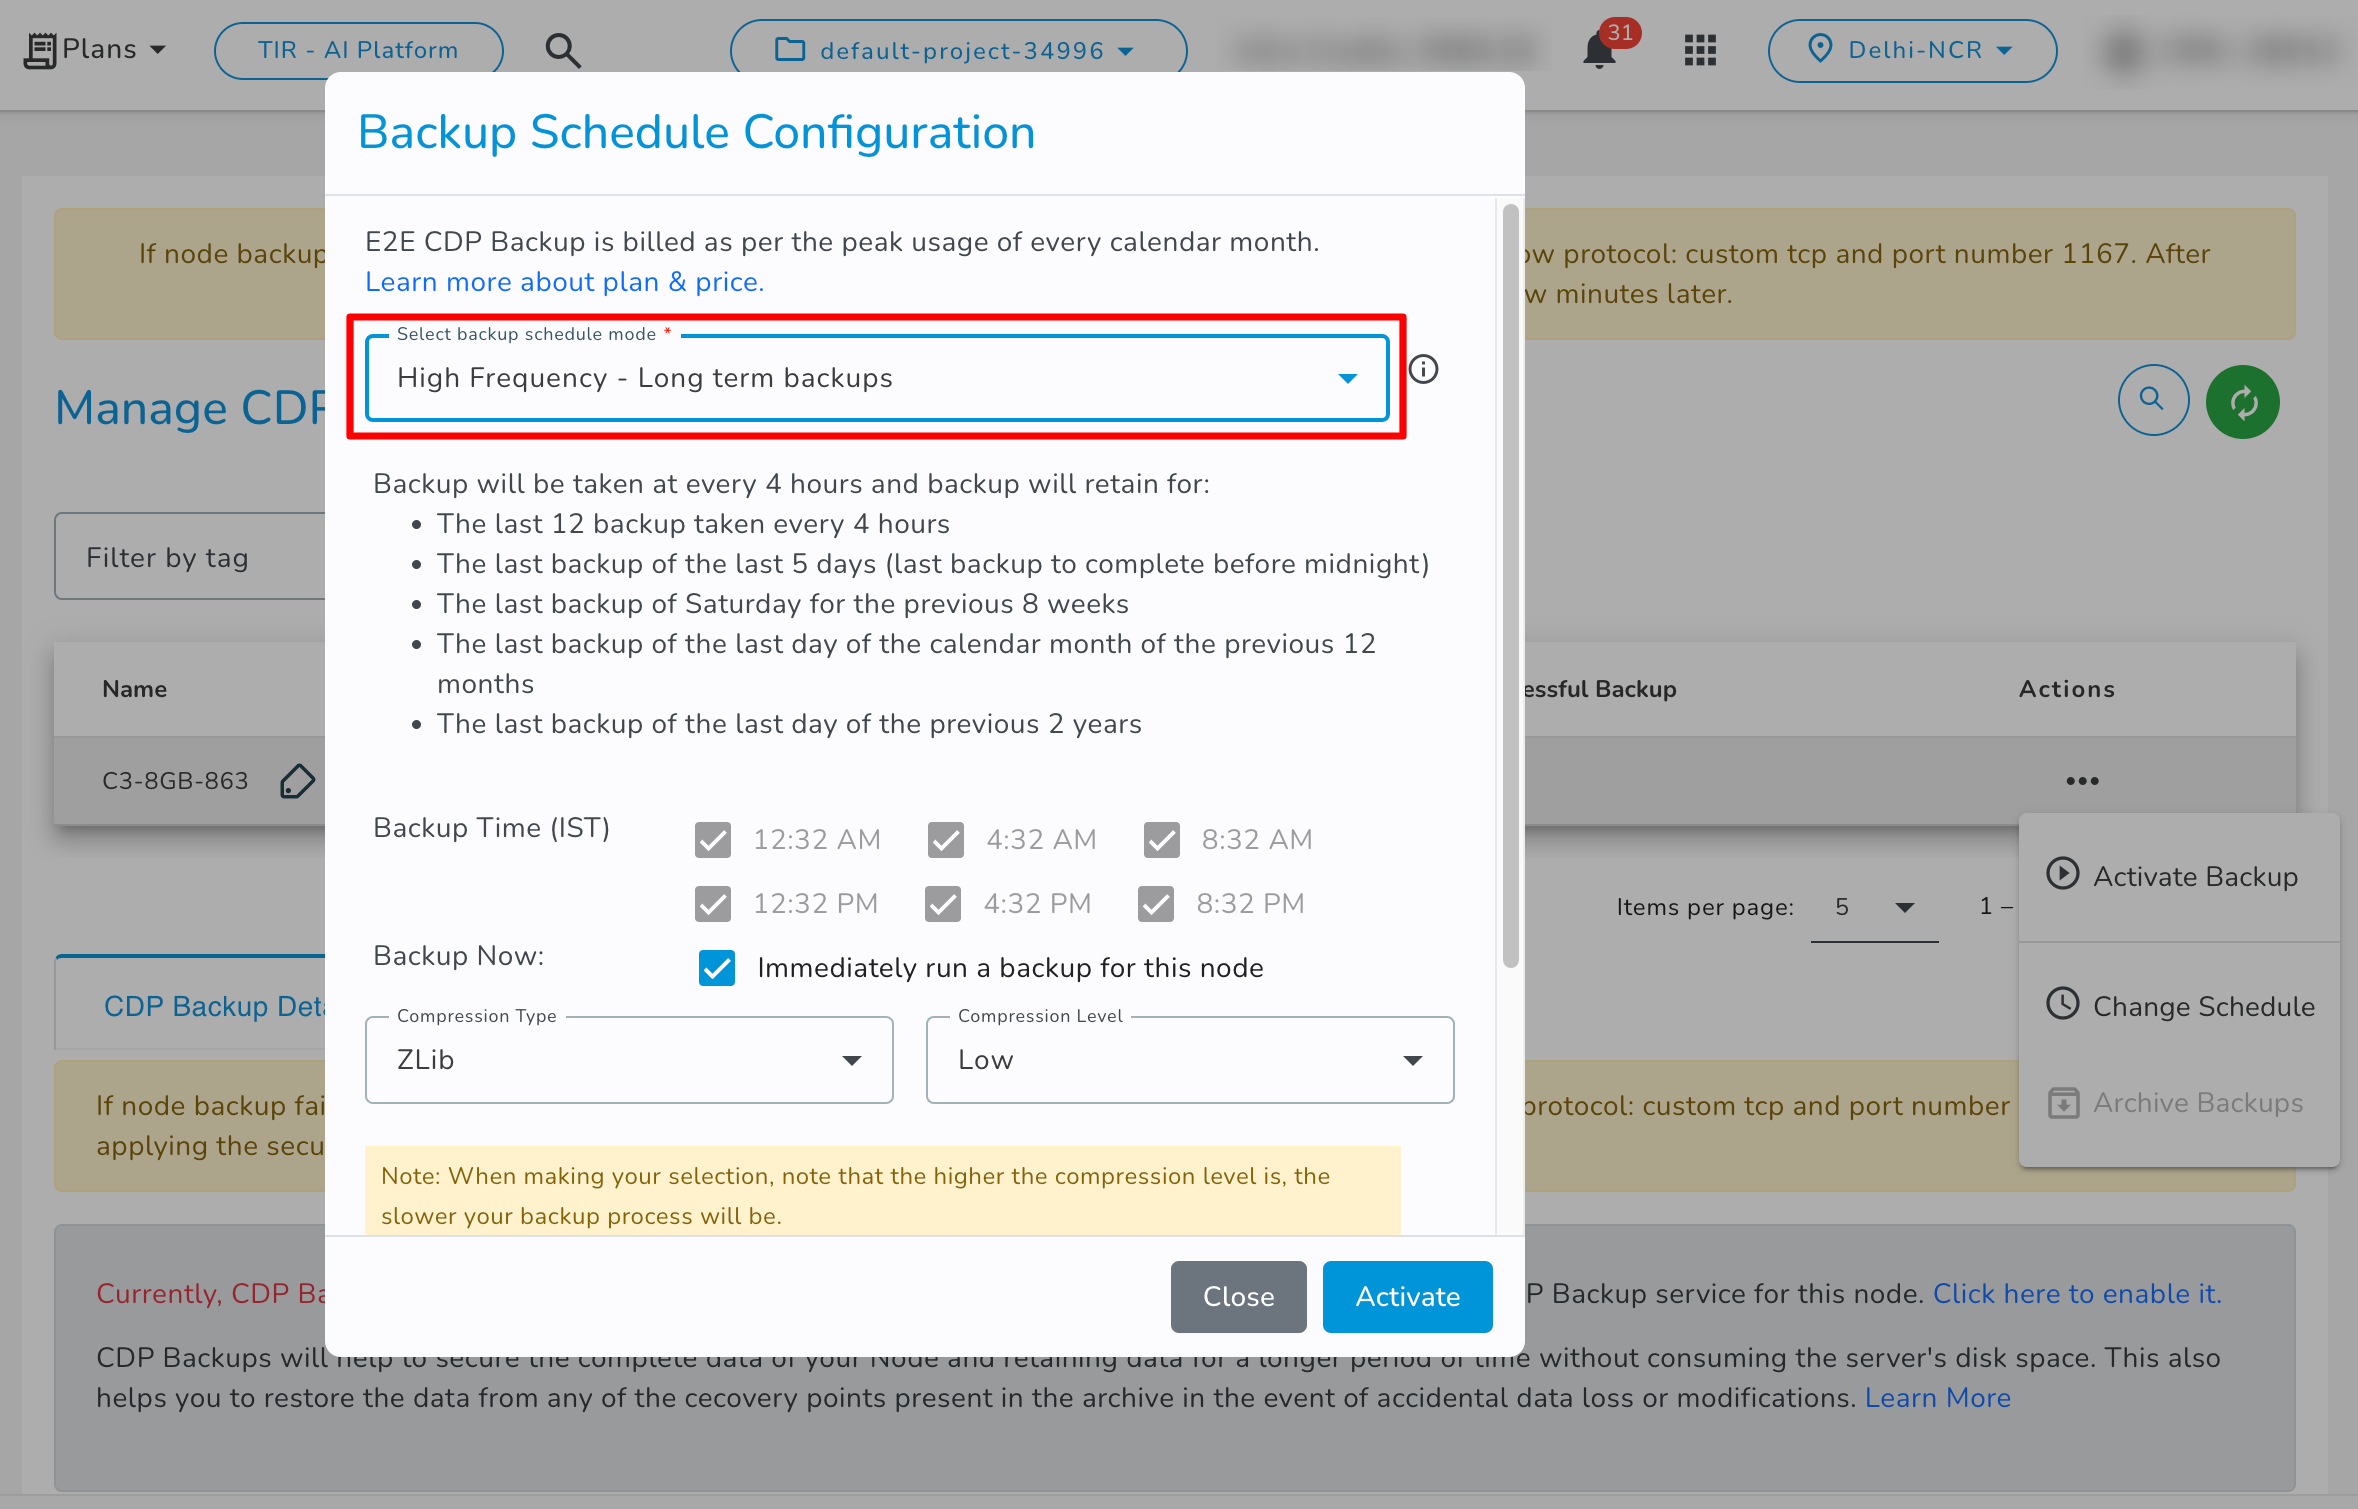
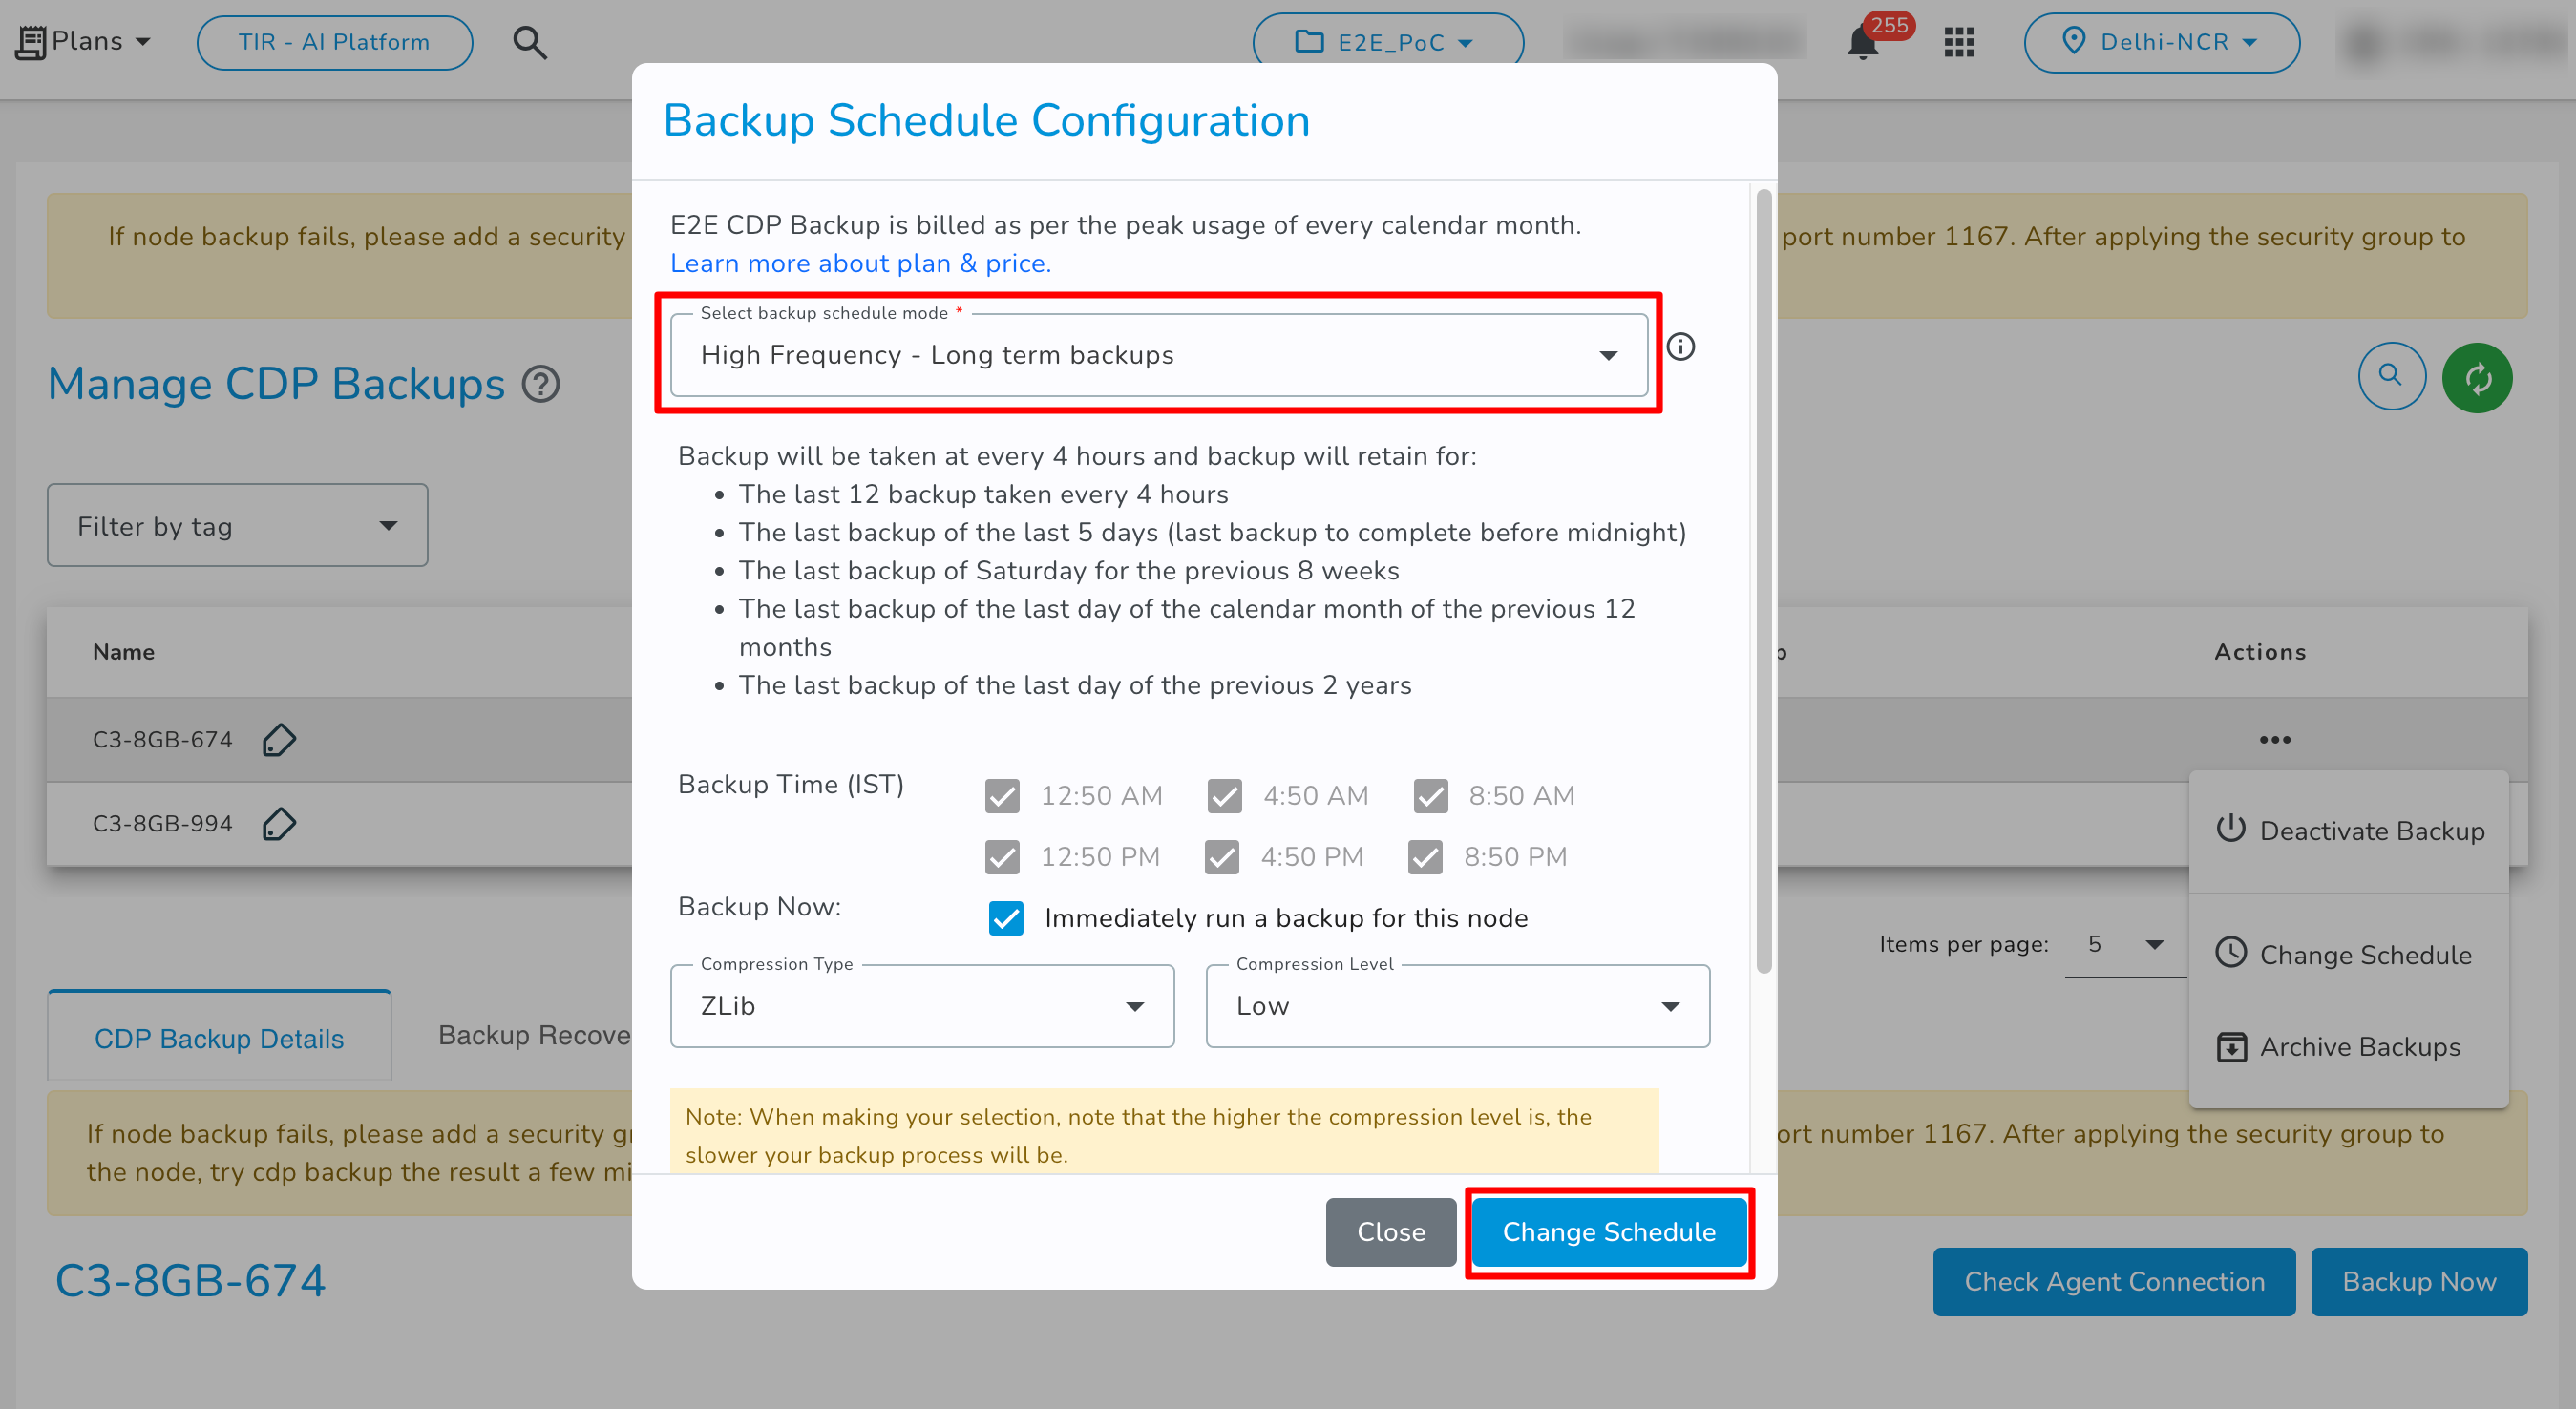
- High Frequency - Long terms backups: If you select the High Frequency - Long terms backups backup schedule then it will create backup every 4 hours and it will store the data as per these retention policies.
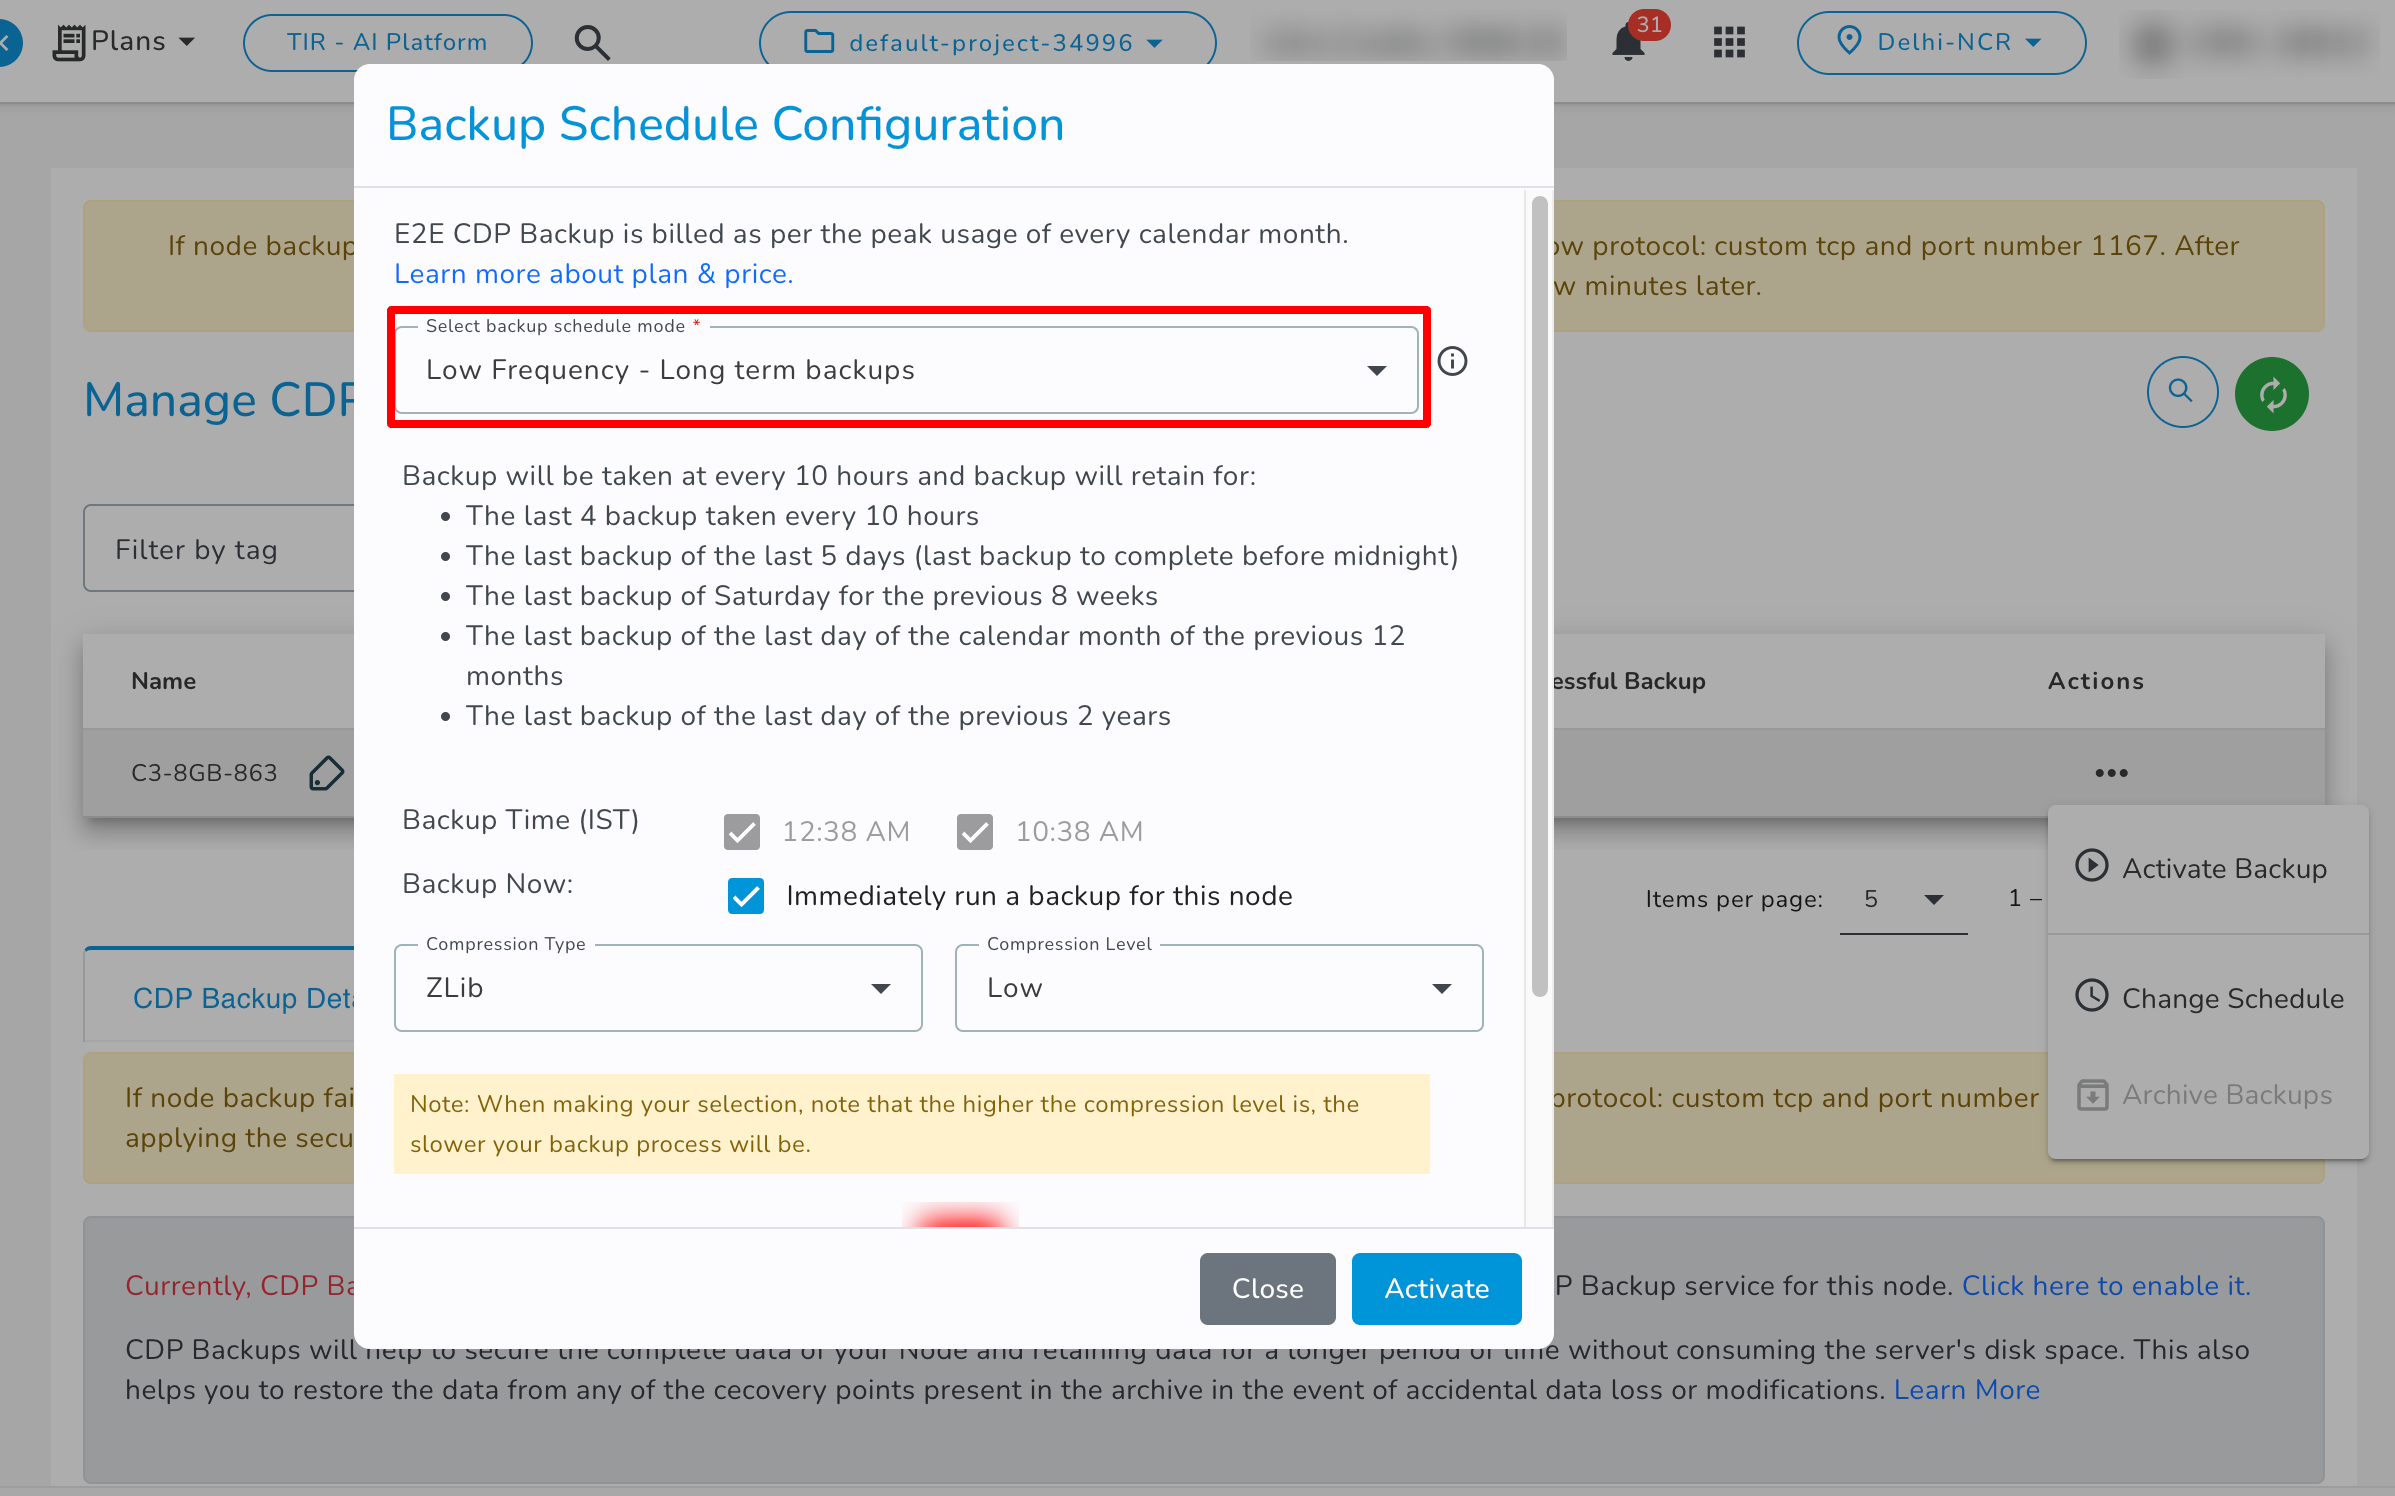
- Low Frequency - Long terms backups: If you select the Low Frequency - Long terms backups backup schedule then it will create backup every 10 hours and it will store the data as per these retention policies.
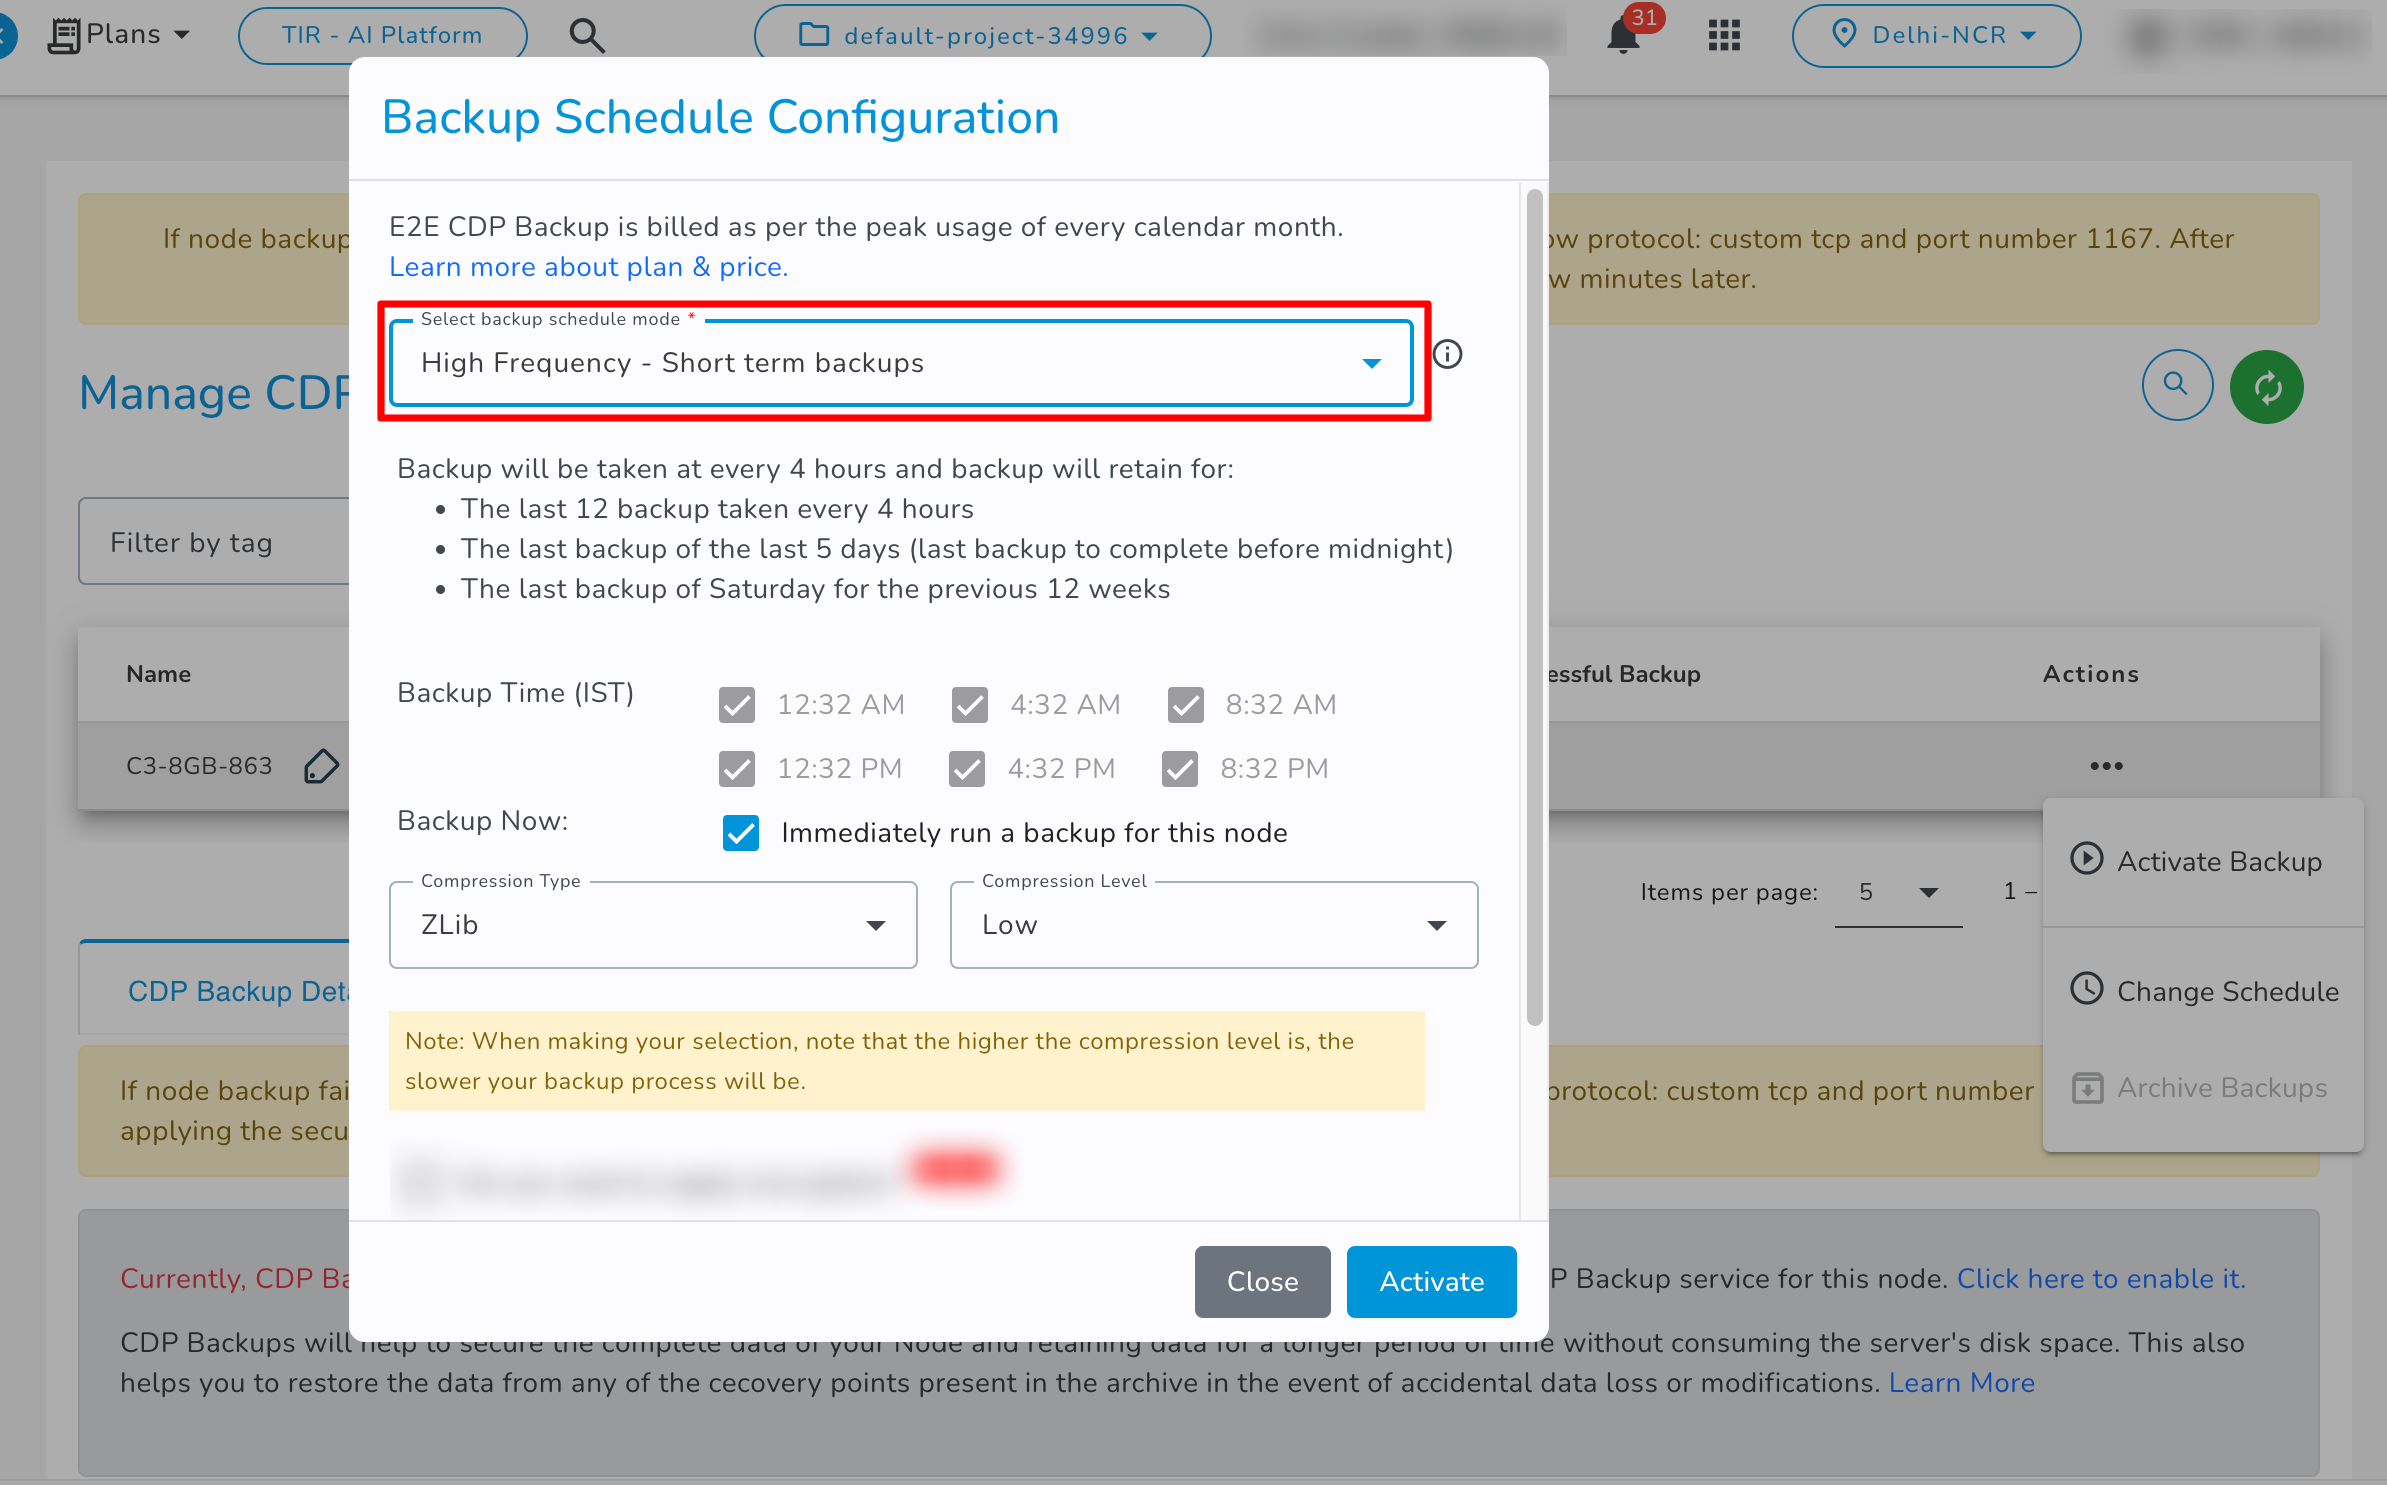
- High Frequency - Short terms backups: If you select the High Frequency - Short terms backups backup schedule then it will create backup every 4 hours and it will store the data as per these retention policies.
- Low Frequency - Short terms backups: If you select the Low Frequency - Short terms backups backup schedule then it will create backup every 10 hours and it will store the data as per these retention policies.
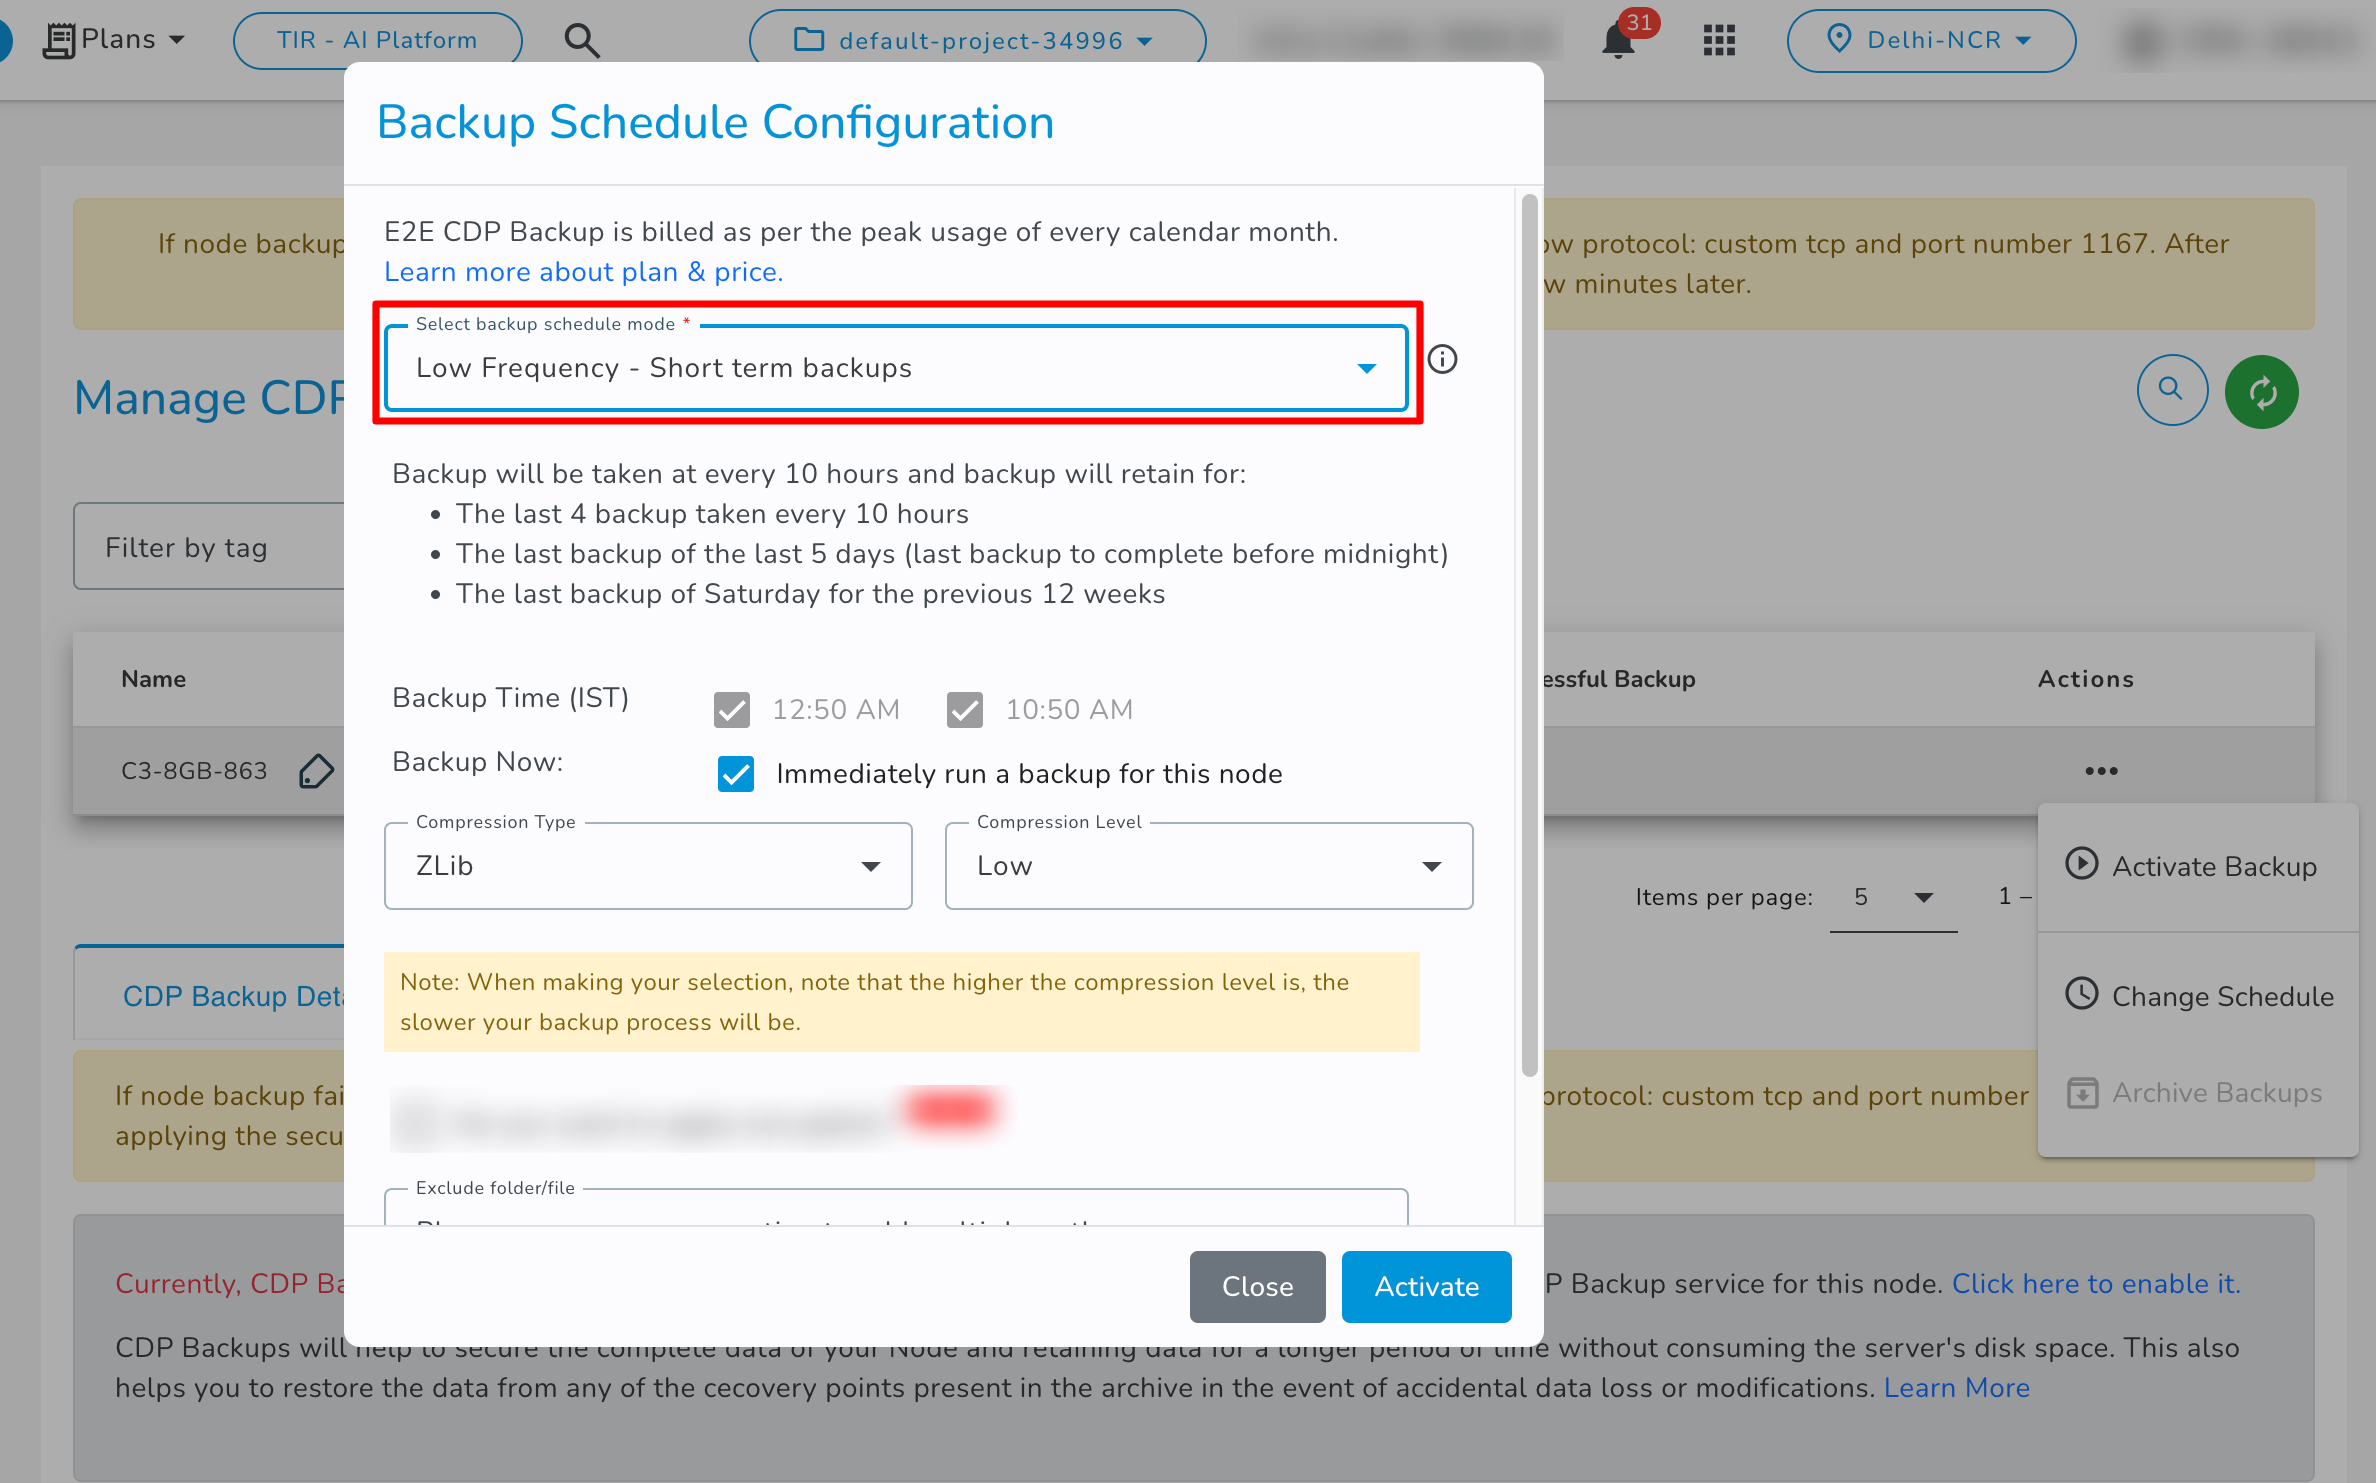
- Exclude File/Folder: By default, all files and folders located on your node are replicated. However, if you want to ignore specific files/folders during backup, you can exclude them by specifying the path of the file/folder. You can use comma separation to add multiple paths.
- You will receive notification emails for backup service activation and after the first backup recovery point creation.
Backup Status
- Backup Unsupported: Represents that CDP backup service is not available for the respective Node type.
- Backup Not Activated: Represents that CDP backup service is disabled for the respective Node type.
- Backup Provisioning Failed: Represents that activation of backup service is failed for the respective node.
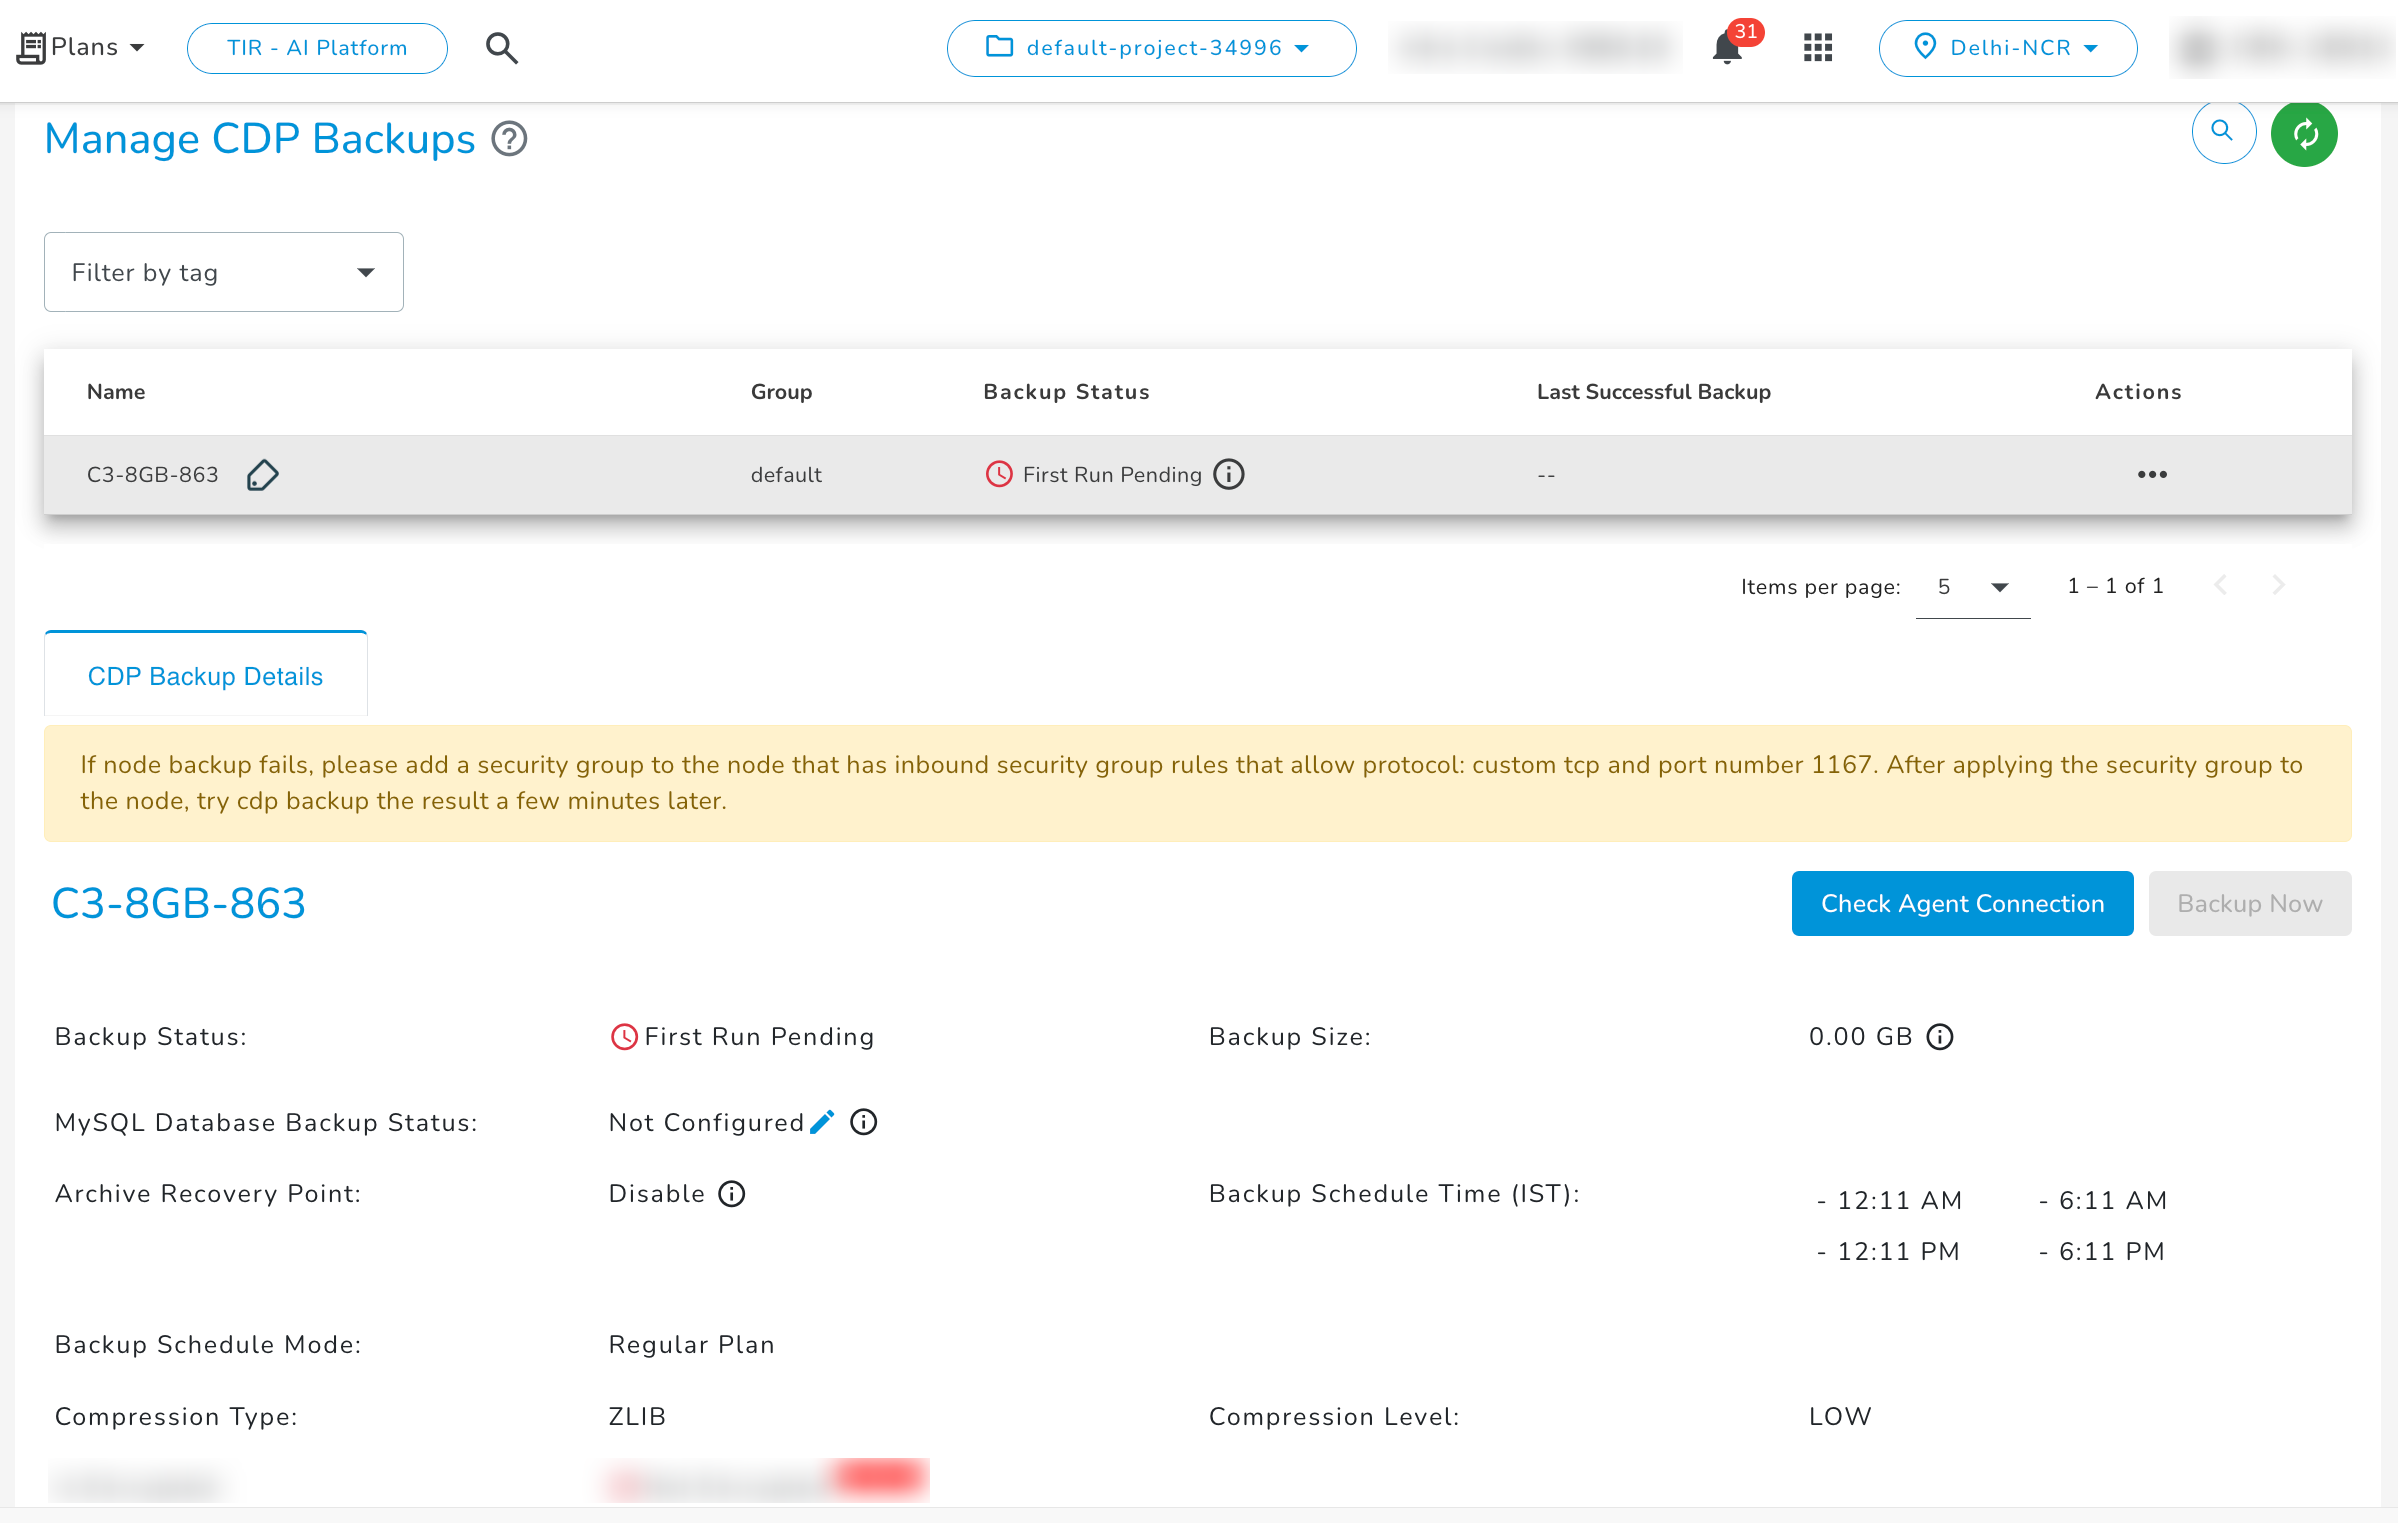
- First Run Pending: Represents that Backup service has activated for the respective node and first backup recovery point creation is pending as per your scheduled time.
- Backup Available: Represents that backup service is active and backup recovery points are available.
- Powered Off: Represents that backup service is turned off due to the respective node being powered off.
- Backup Failed: Represents that the last backup recovery point creation is failed for the respective node.
Manage CDP Backup Service
Once the CDP backup service is enabled and status changes from 'First Run Pending' to 'Backup Available' after initial recovery point creation for the respective E2E Node then you will be able to manage and check backup details & actions as described.
Actions
You can perform the following actions for the backup service:
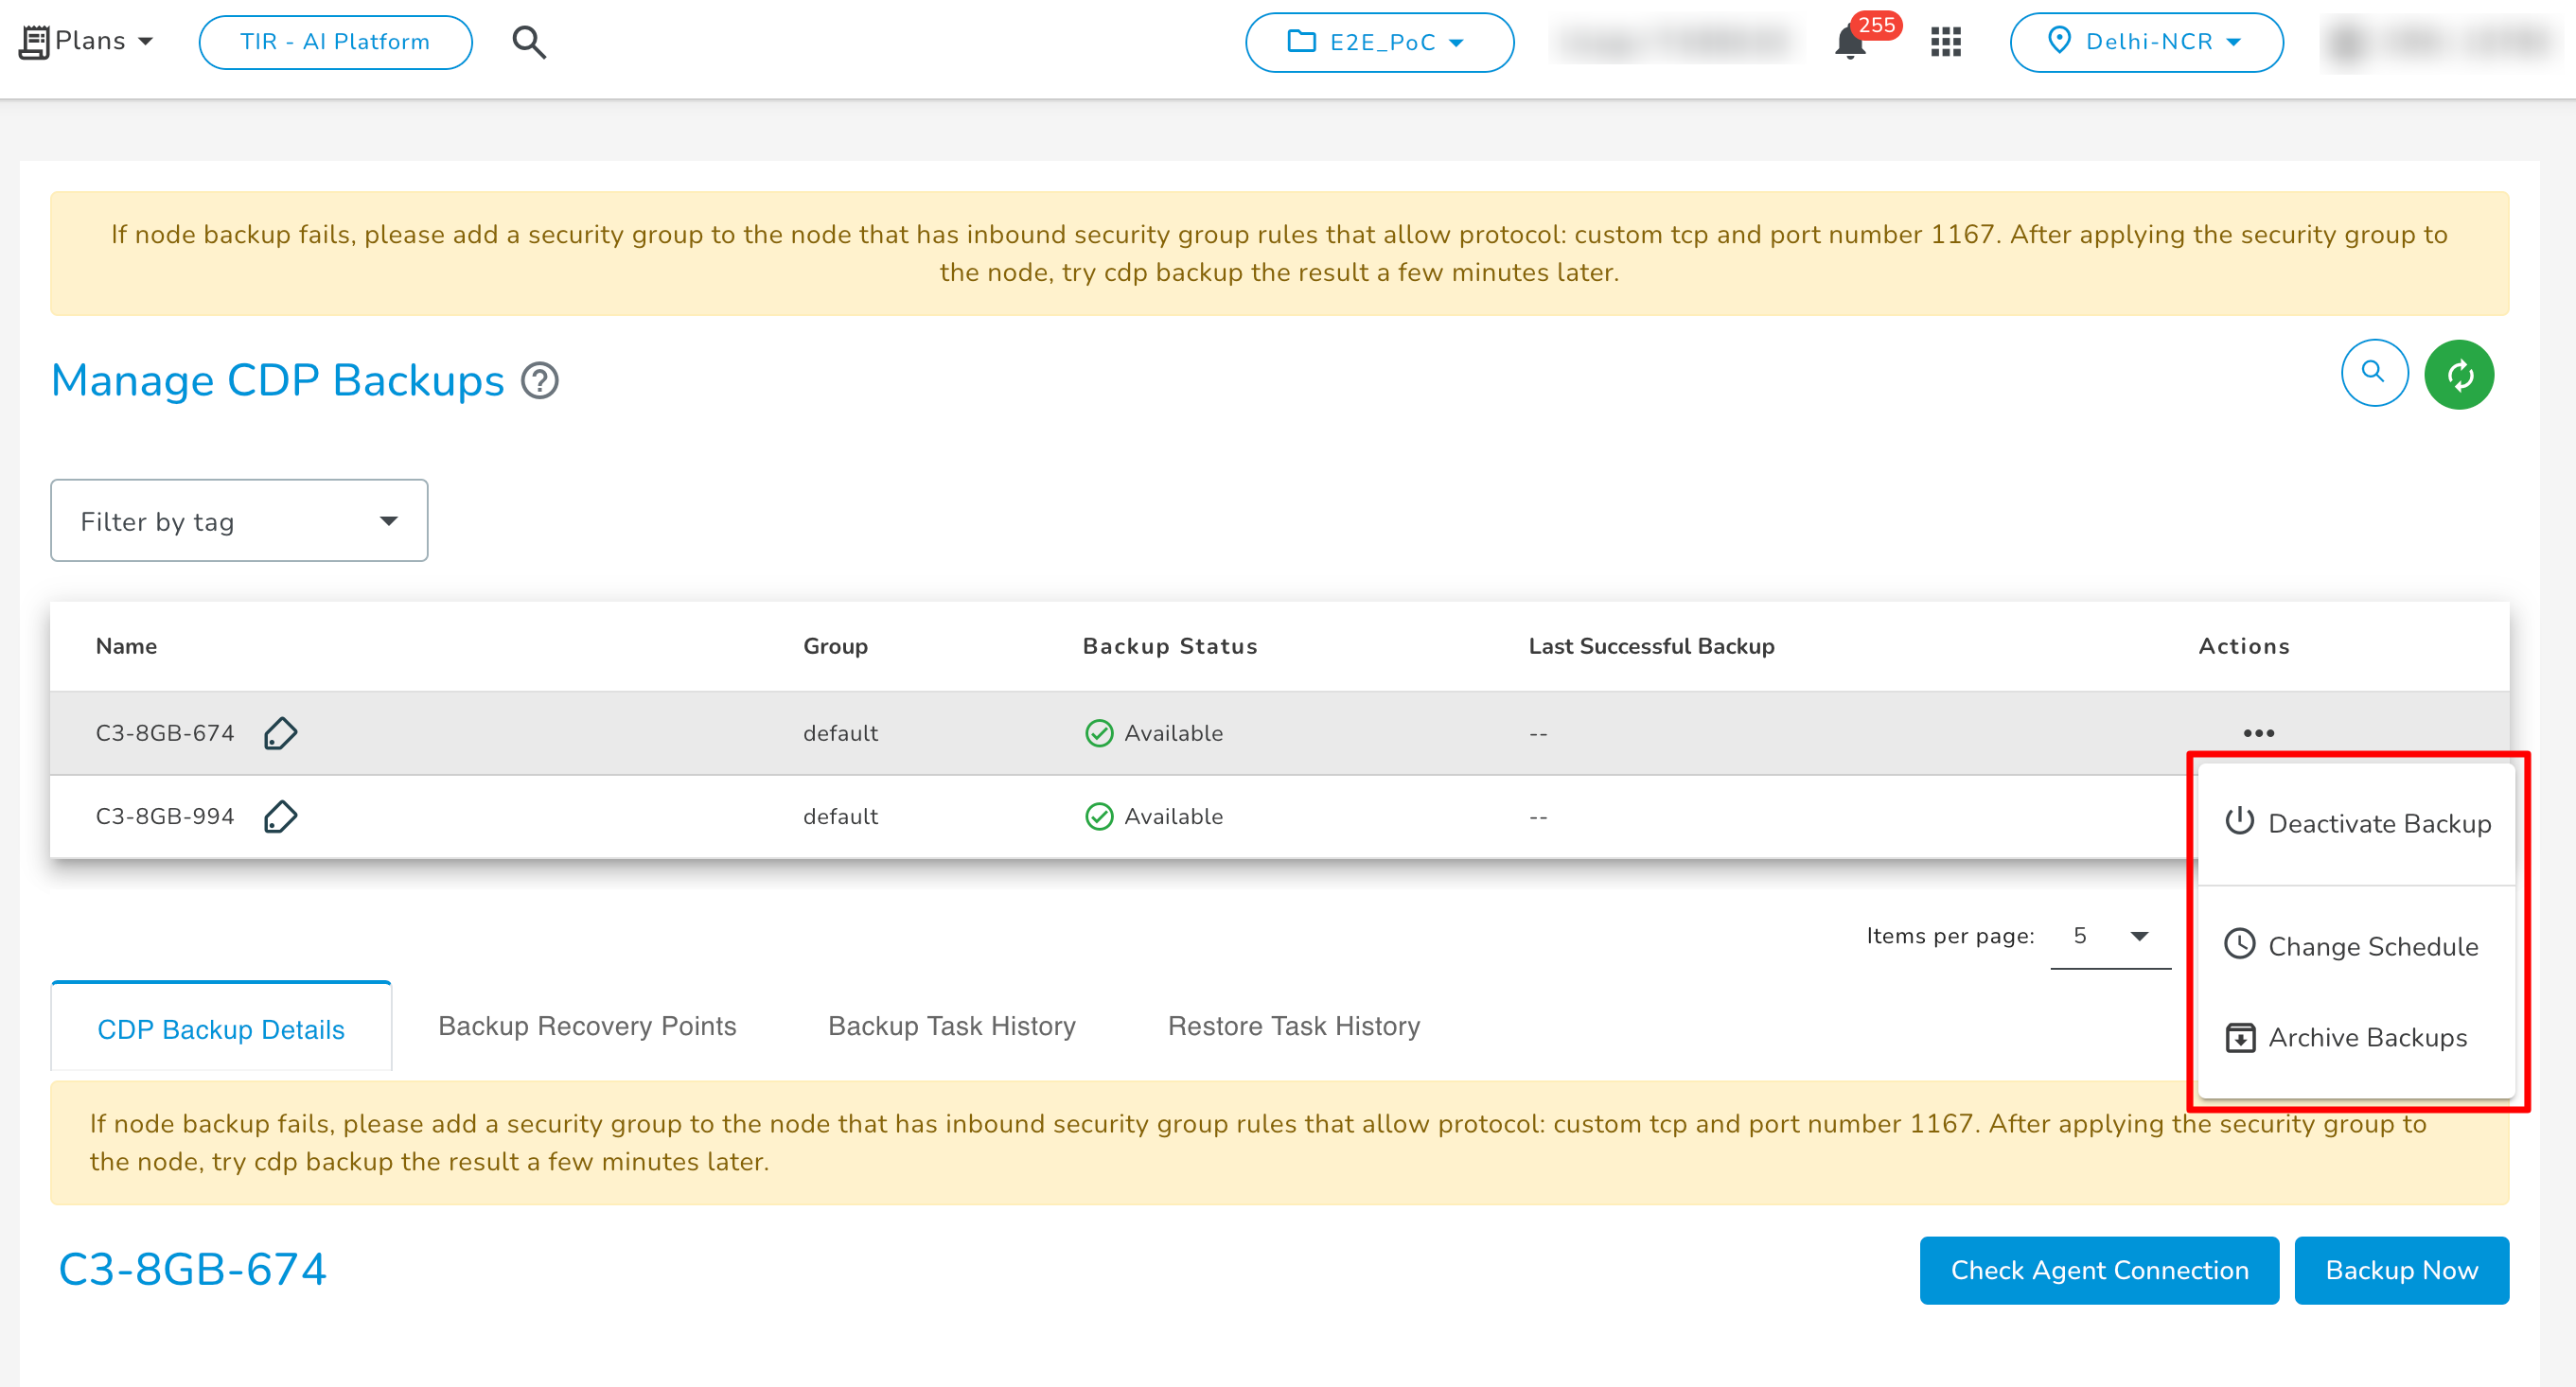
- Change Backup Schedule Or Exclude File/Folder
Click on the Change Schedule button to modify the current backup schedule type & frequency, and to change/add exclude files/folders paths.
- Exclude File/Folder- By default, all files and folders located on your node are replicated. However, if you want to ignore specific files/folders during backup, you can exclude them by specifying the path of the file/folder.
- Archive Backups
To archive the recovery point of backups, you have to click on the ‘Archive Backup’. A popup will appear.
You can disable the toggle button and click Save button.
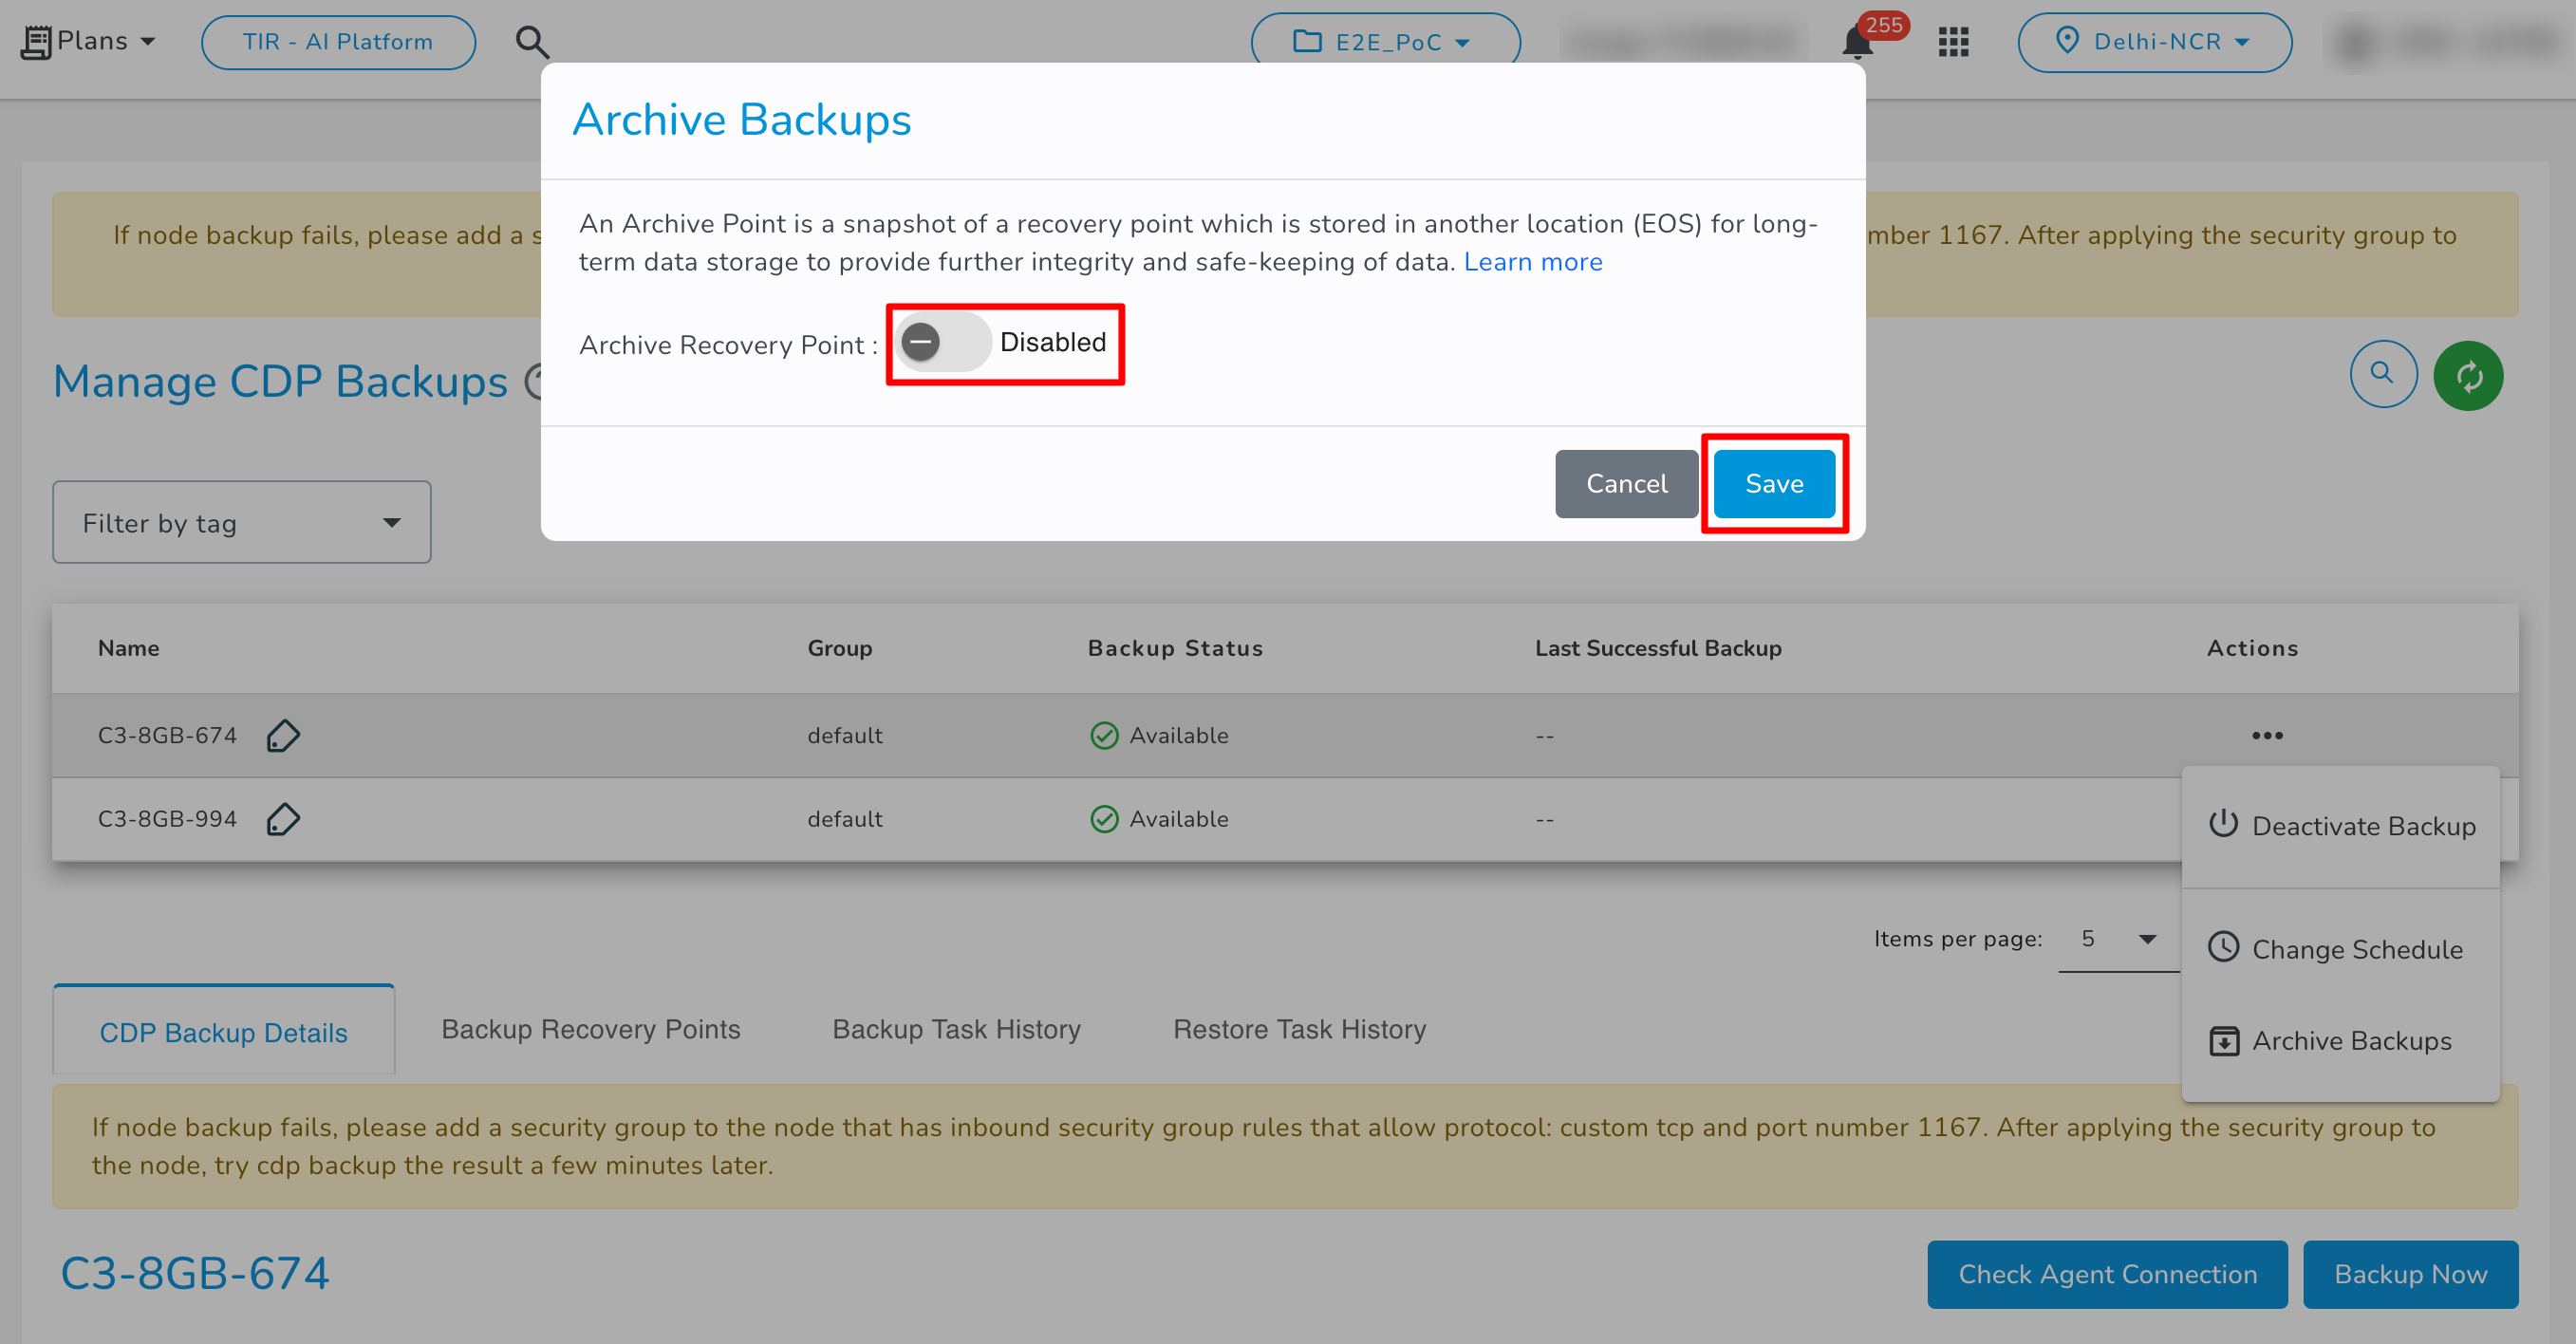
You can enable and enter the details.
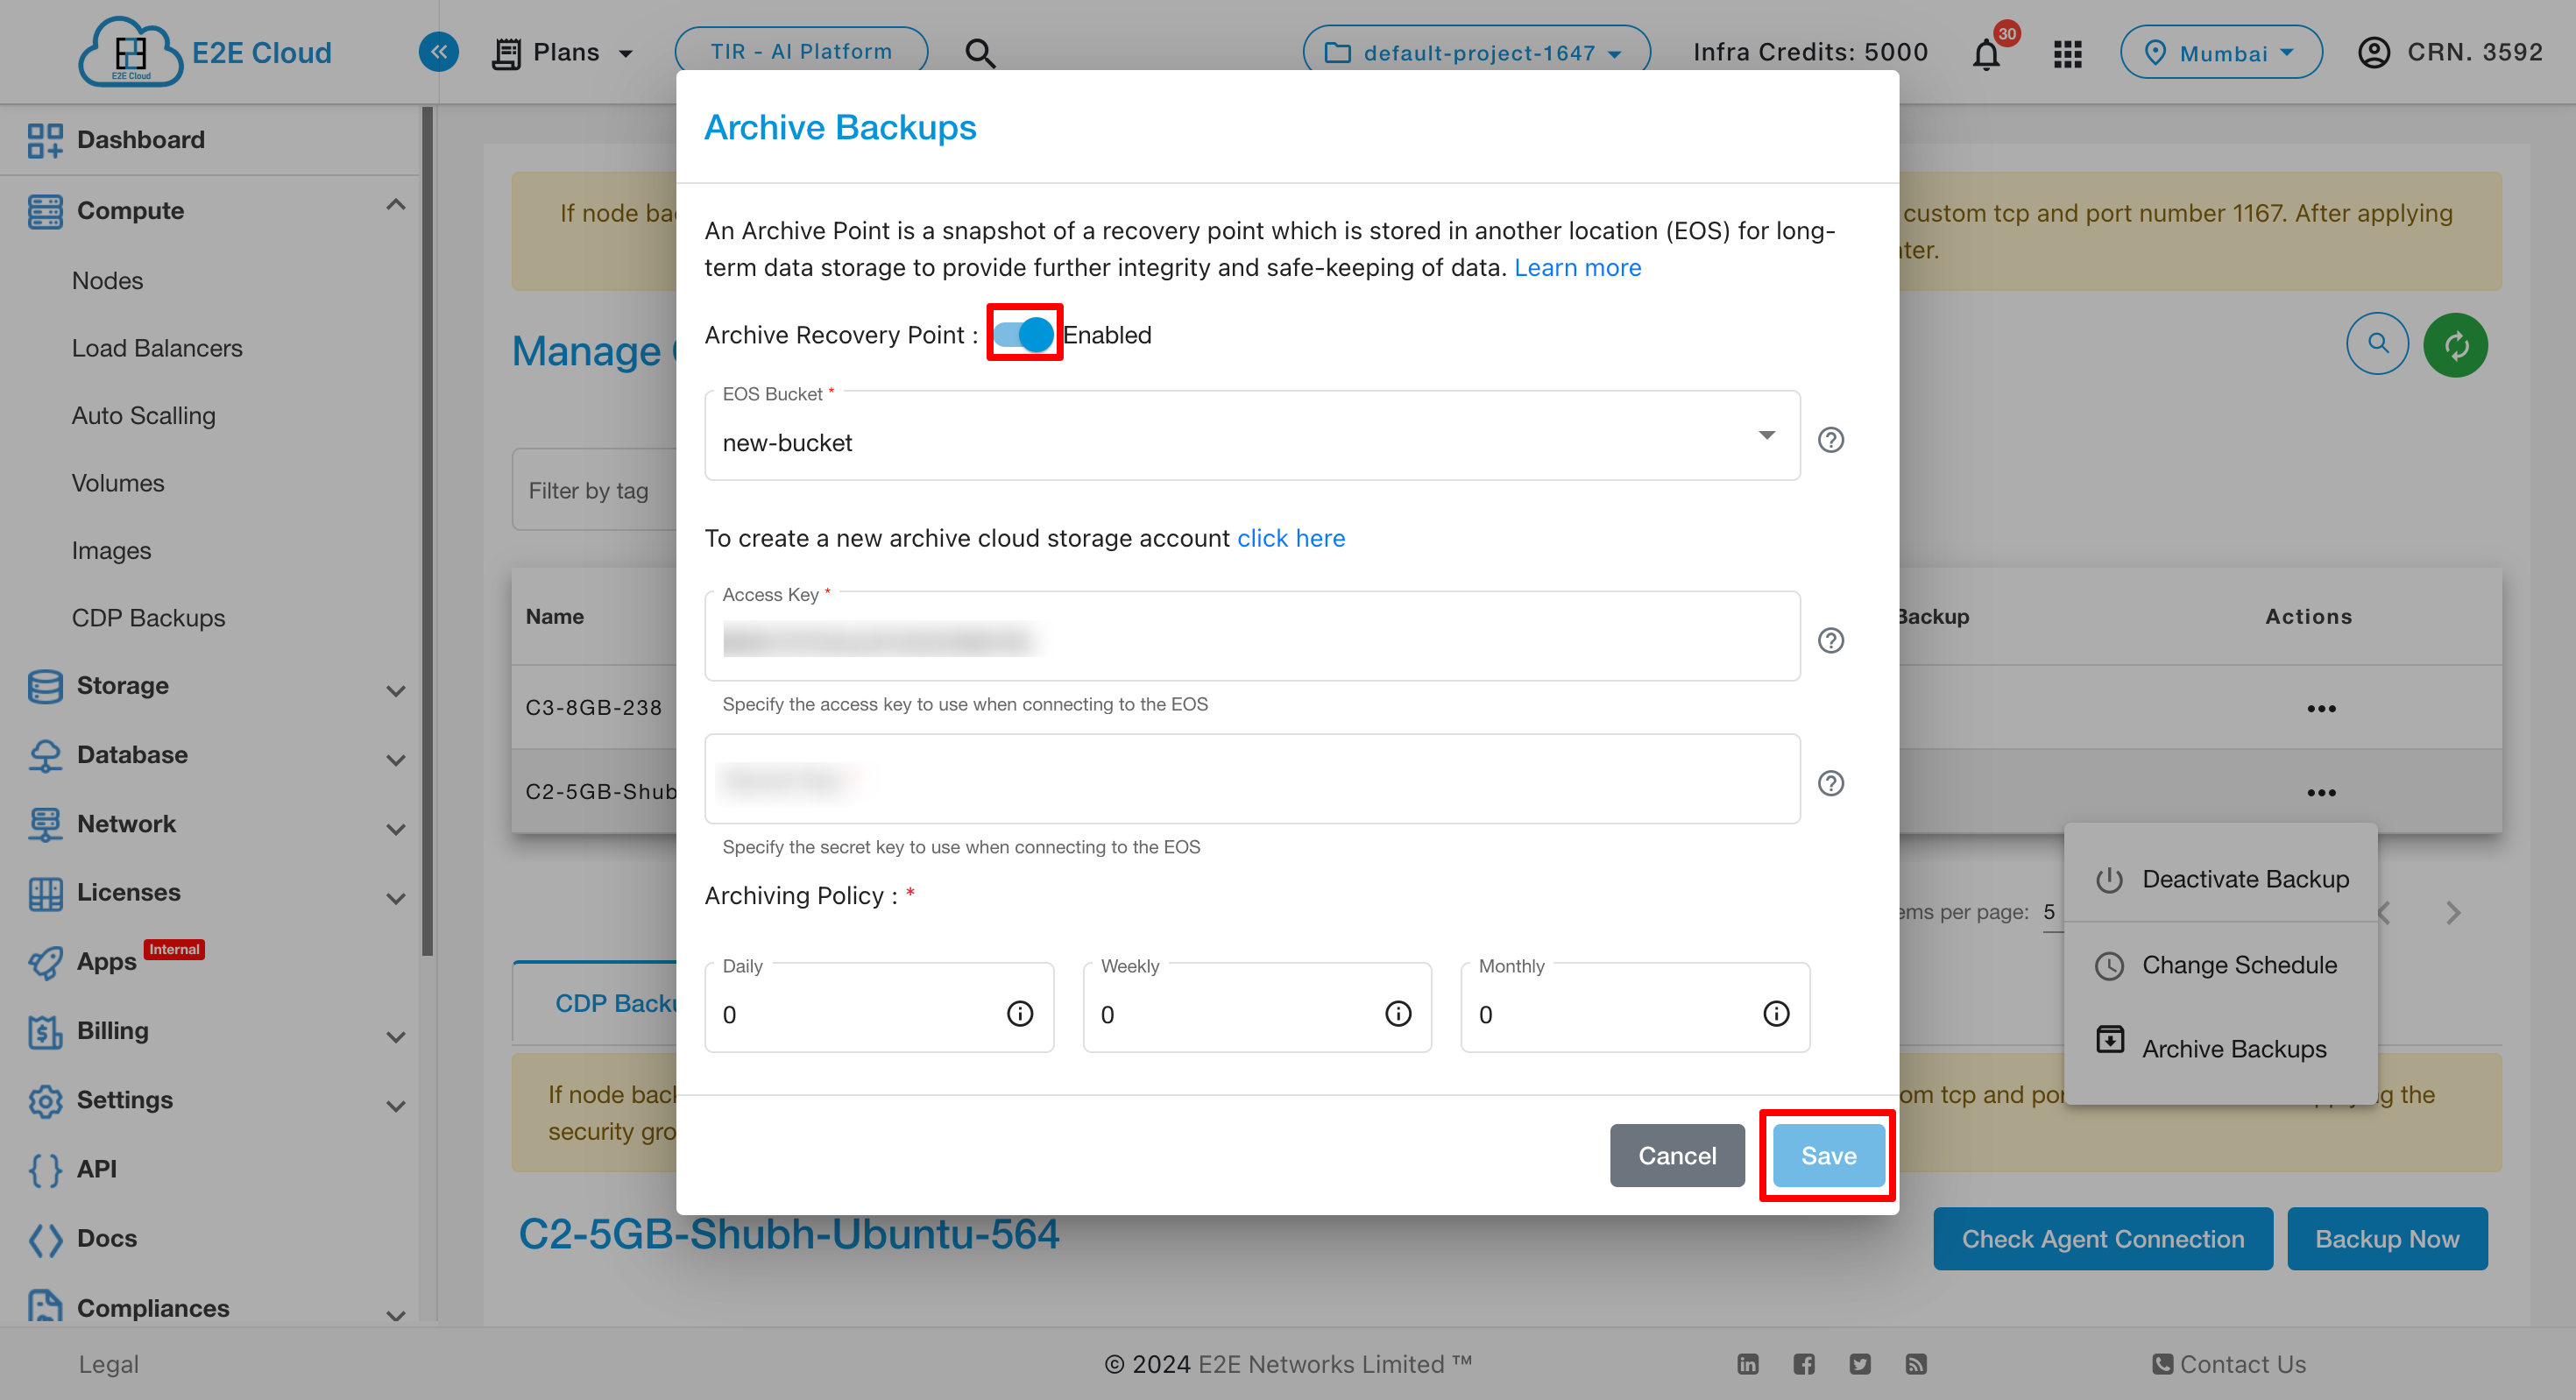
Choose Archive Recovery Point- Select either Enable or Disable based on your use case. Archiving can be enabled/disabled for the protected compute node.
Choose EOS Bucket- Please select the object storage bucket (archiving destination) to archive the recovery point snapshot.
Access Key- Please Specify the access key to use when connecting to the object storage bucket.
Secret Key- Please Specify the secret key to use when connecting to the object storage bucket.
Archiving Policy- Archive backup policy can be configured to create a snapshot on a daily, weekly, or monthly schedule in accordance with your retention requirements. According to these configurations, an Archive is created once the policy runs.
-
Daily, the last recovery point of the day is archived.
-
Weekly, the last recovery point of the week is archived.
-
Monthly, the last recovery point of the month is archived.
-
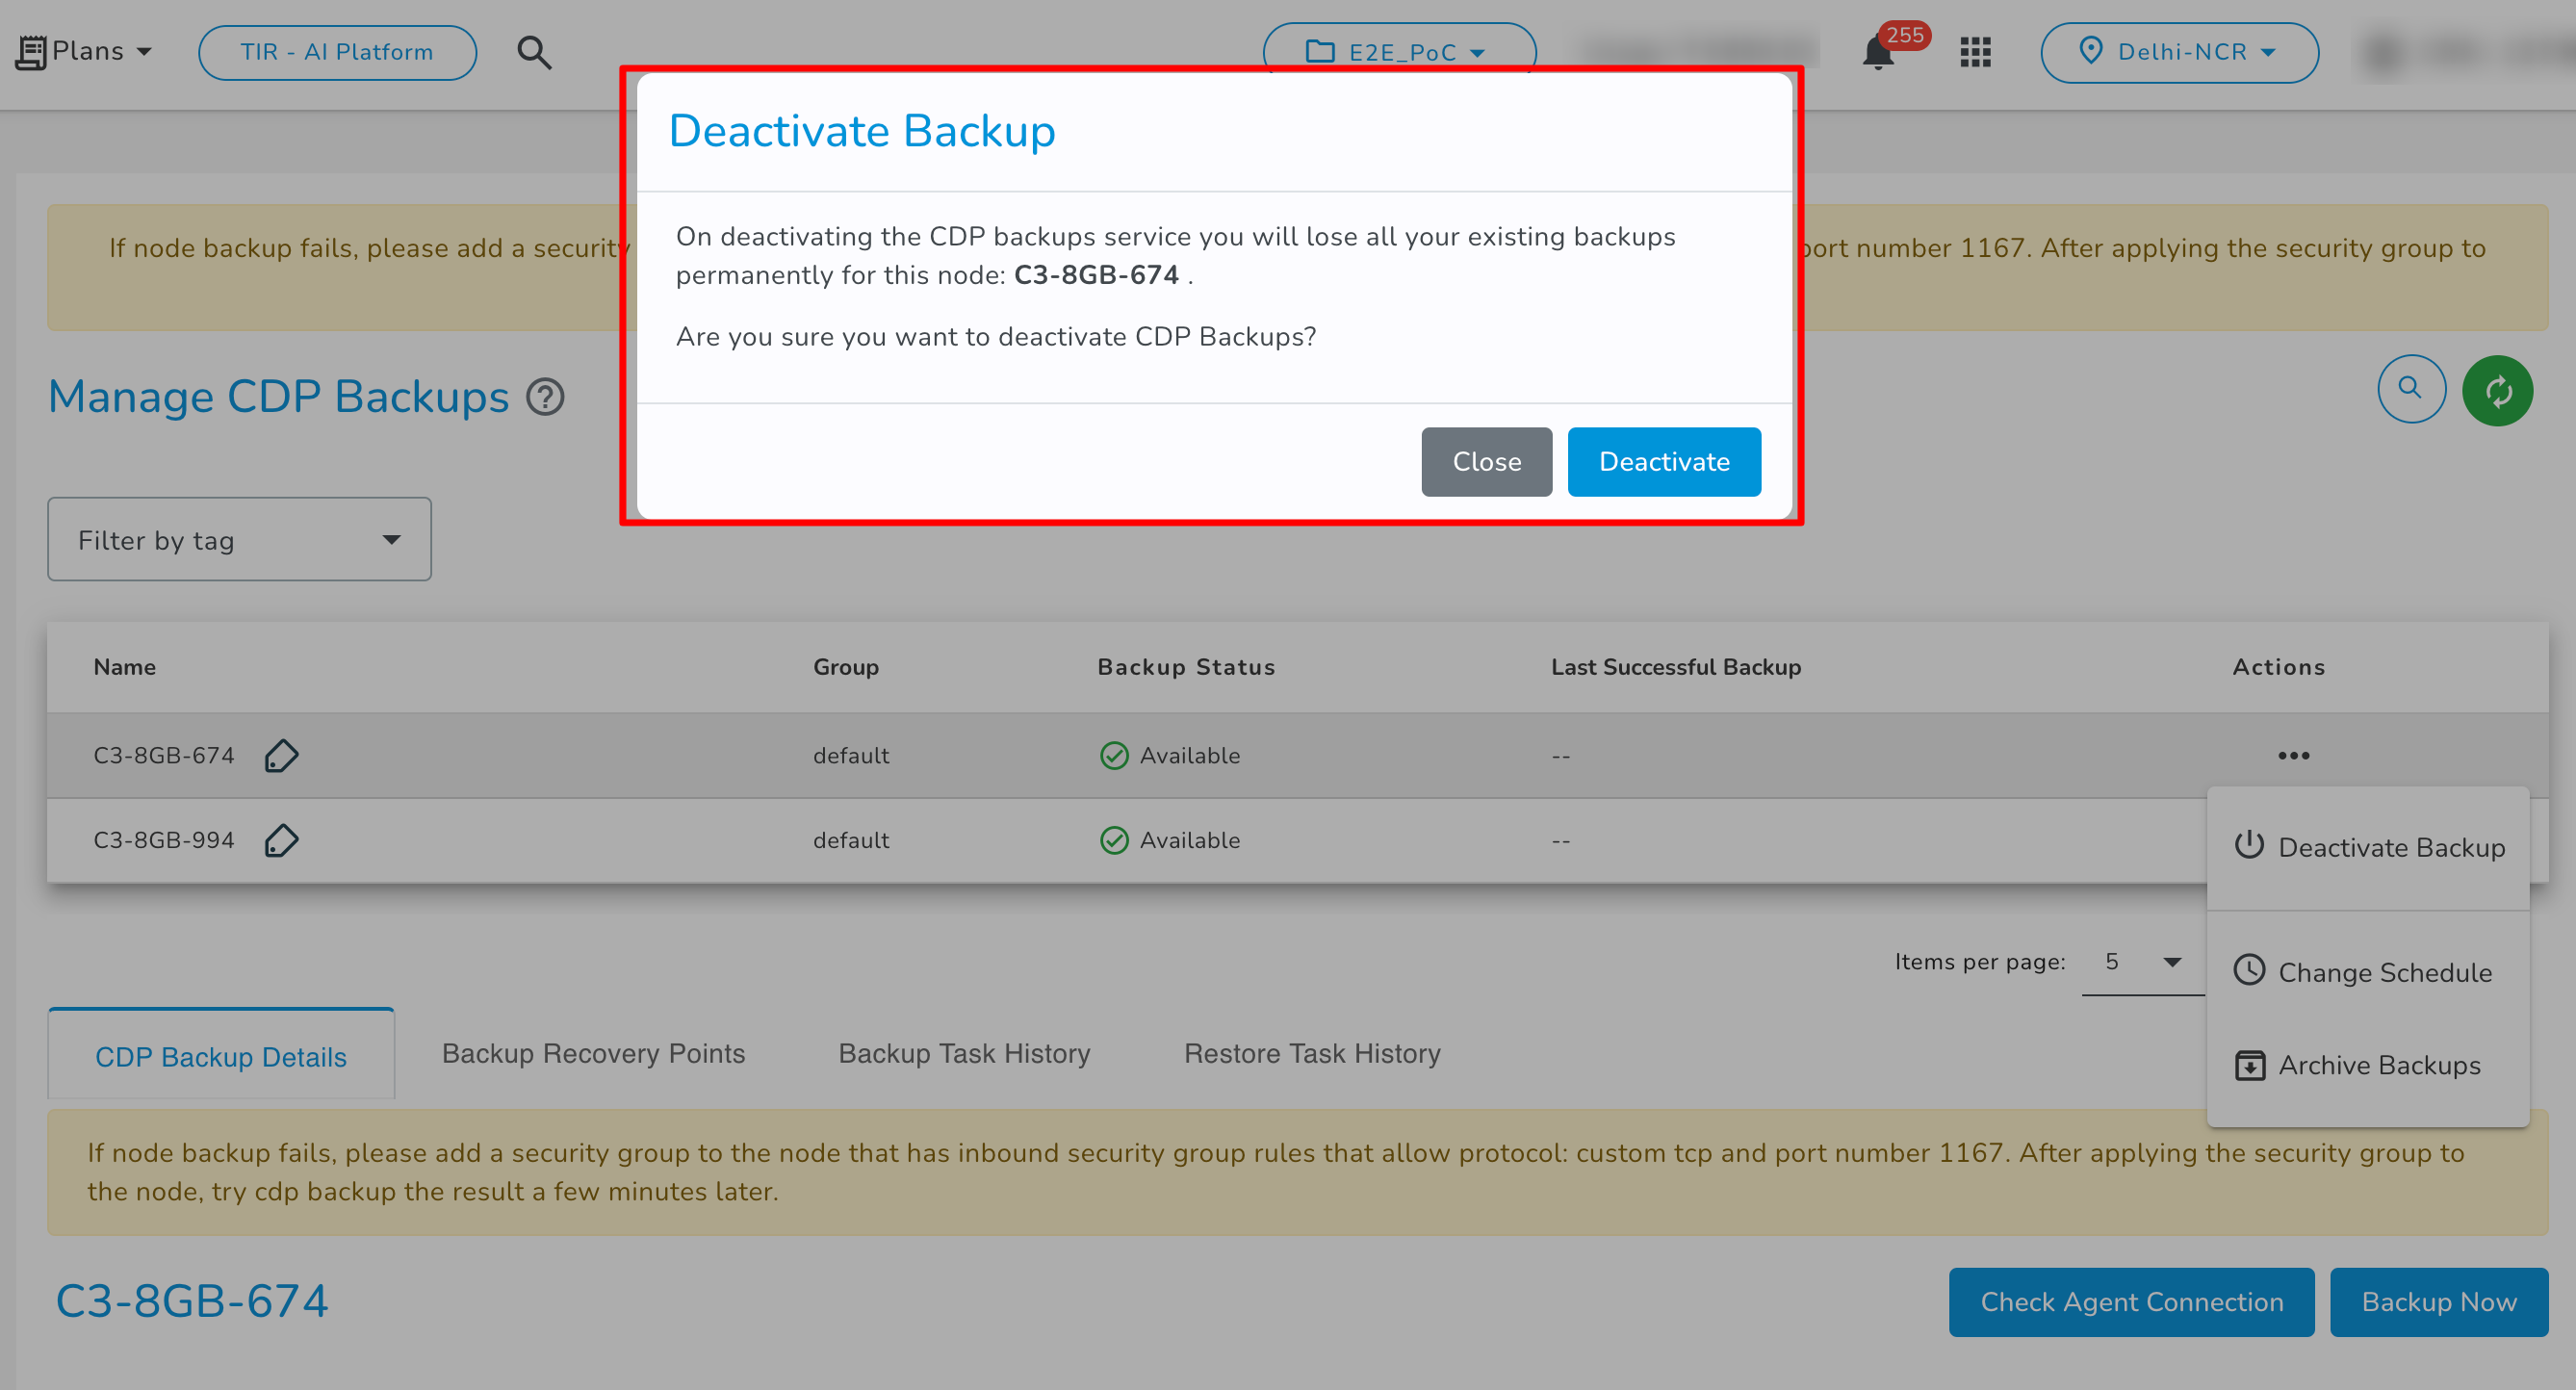
Deactivate Backups
To deactivate CDP backup service, you have to click on the Deactivate Backup switch to disable the backup service for your E2E Networks E2E Node. A confirmation popup will appear, click on the ‘Deactivate’ button to stop your E2E Node backups.
- MySQL Backups
If MySQL server running on this E2E Node, then you may provide the Admin credentials of MySQL server for activating backup to protect the following MySQL objects:
- Databases
- Tables
- Indexes
- Constraints
- Triggers
- Events
- Views
- Stored procedures
- Click on the edit button to configure MySQL.
- Enter the MySQL Server Username and MySQL Server Password.
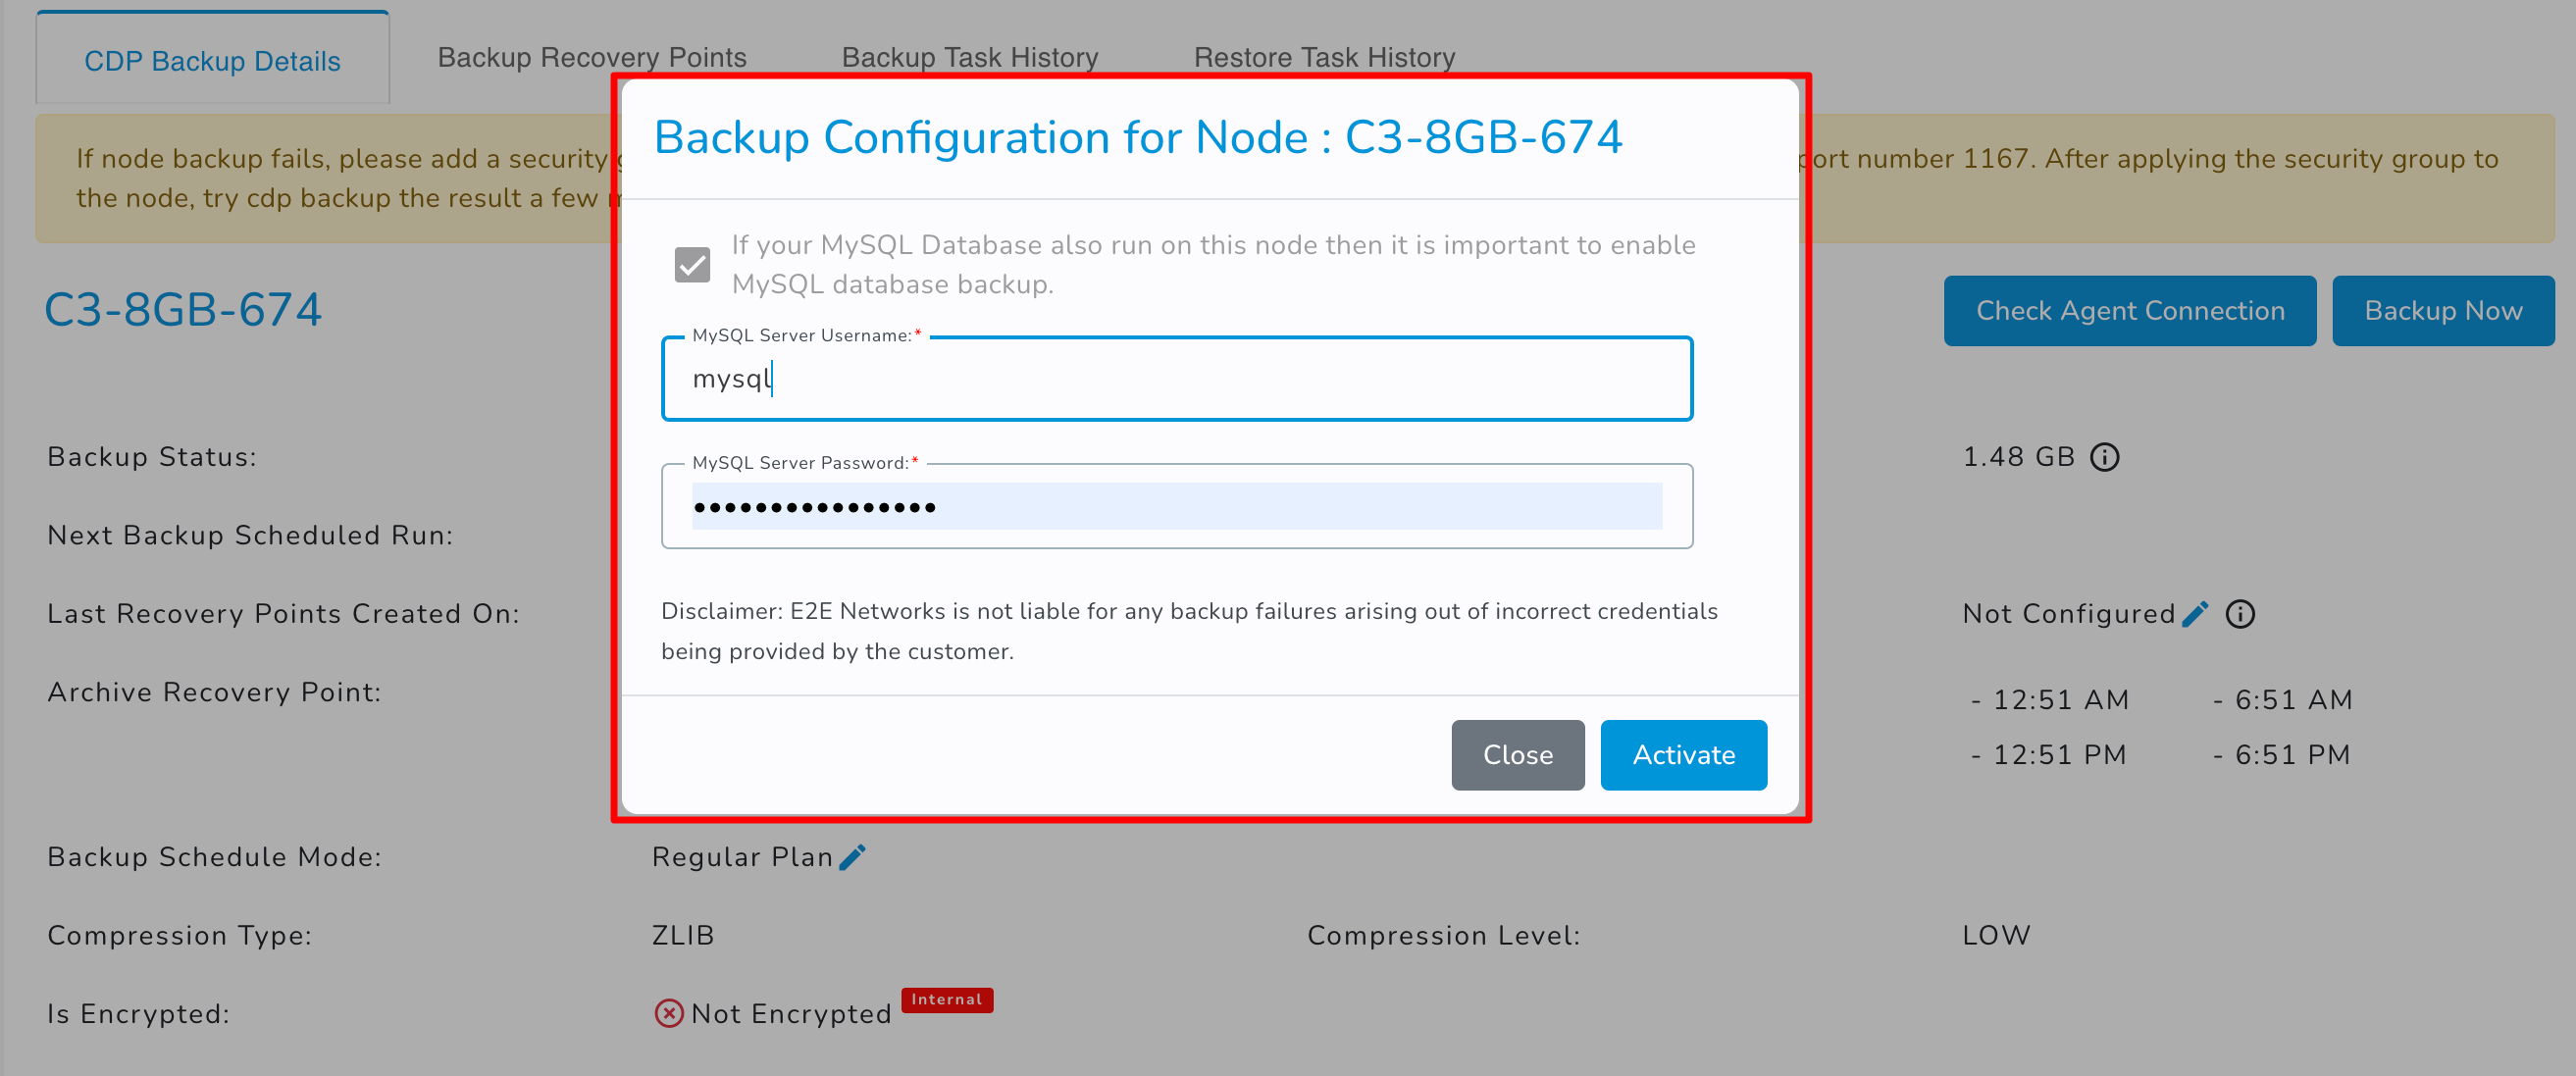
- Click on the activate button.
E2E Networks is not responsible for backup failures caused by incorrect customer-provided credentials.
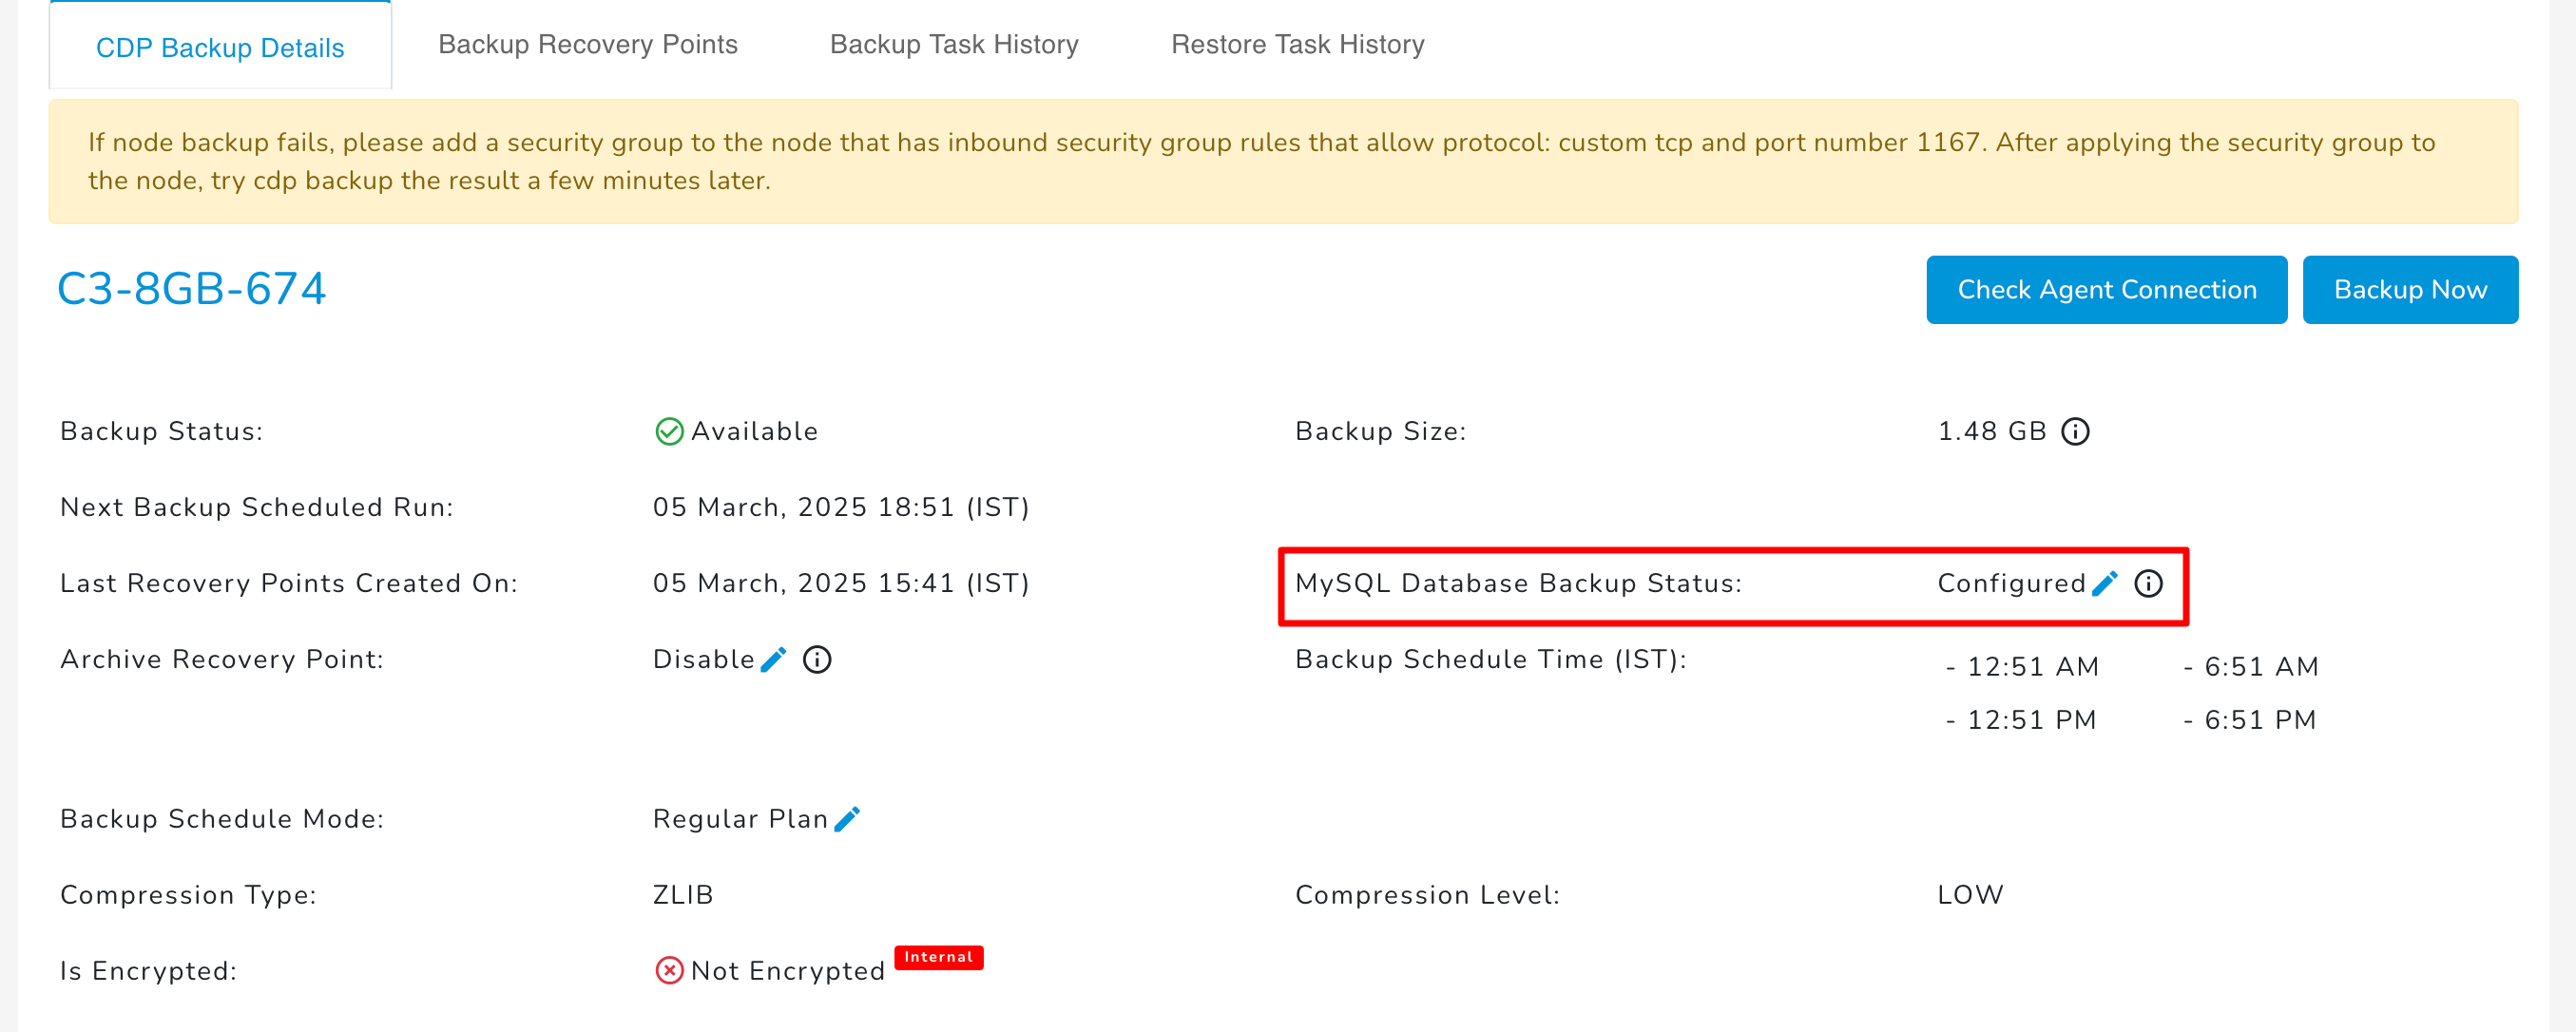
CDP Backup Details
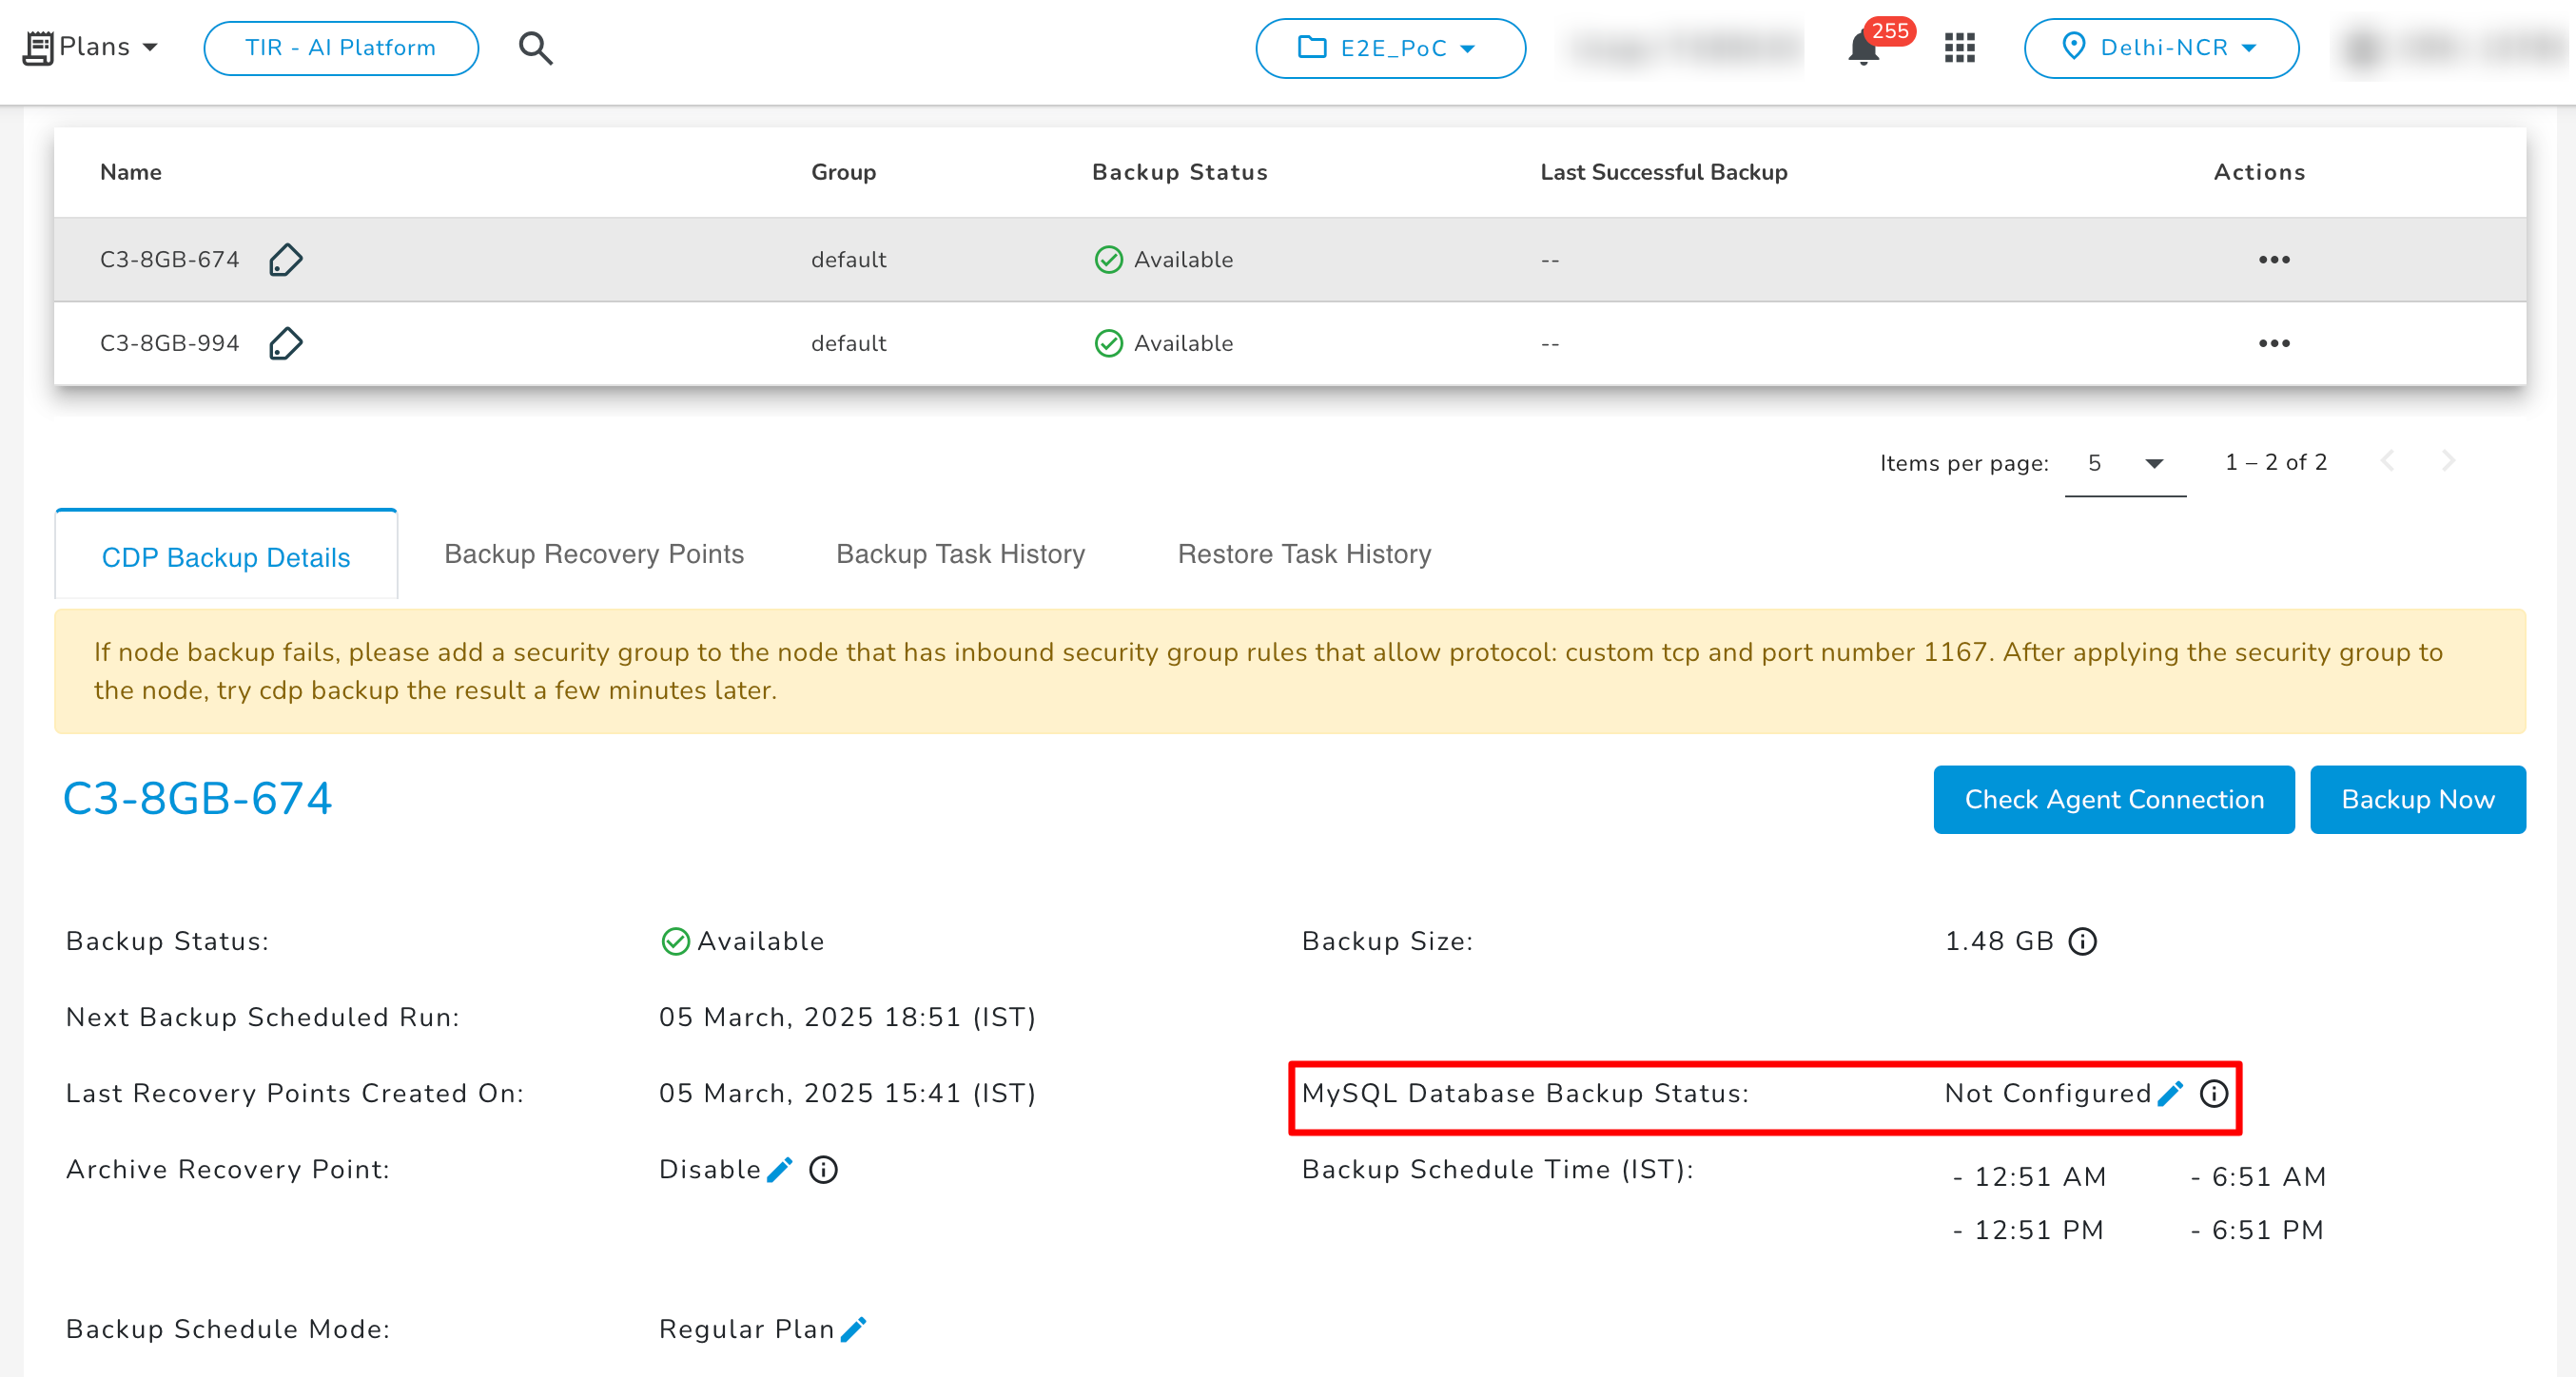
The CDP Backup Details tab contains information about the Backup status, Backup Size, Backup Schedule & frequency, Last Recovery Points Created On, Next Backup Scheduled Run, and MySQL Database for the respective E2E Node.
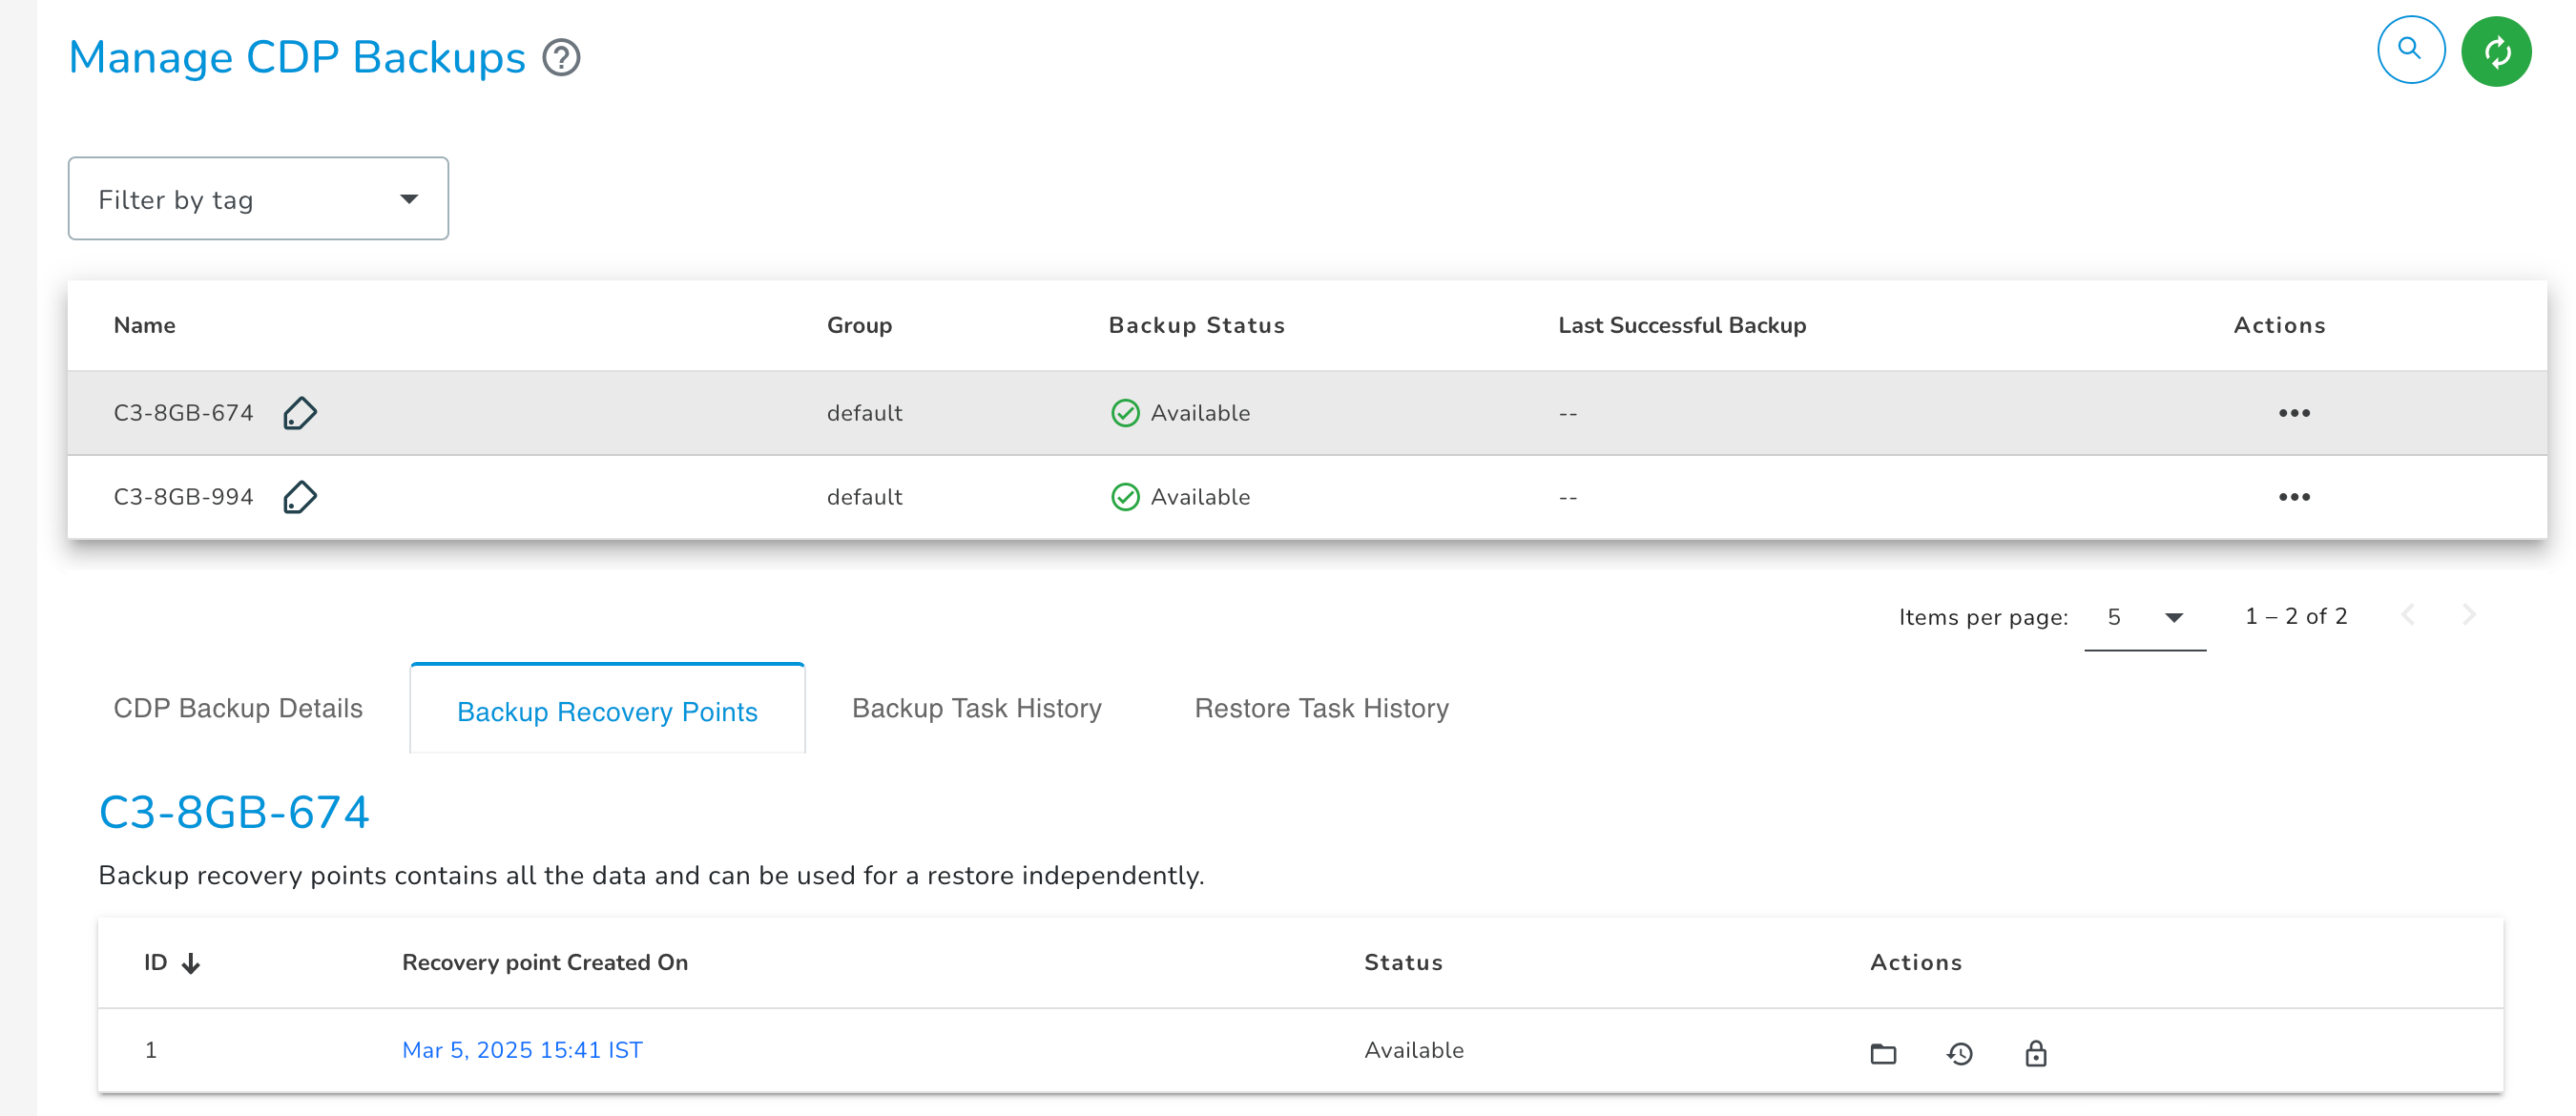
Backup Recovery Points
The Backup Recovery Points tab having information about backup recovery points created for the respective E2E Node in chronological order. You can select any backup recovery points to restore files/folders to the respective node.
Actions
You can perform the following actions for the backup service.
Change Backup Schedule Or Exclude File/Folder
Click on the Change Schedule button to modify the current backup schedule type & frequency, and to change/add exclude files/folders paths.
Exclude File/Folder - By default, all files and folders located on your node are replicated. However, if you want to ignore specific files/folders during backup, you can exclude them by specifying the path of the file/folder.
Archive Backups
To archive the recovery point of backups, you have to click on the ‘Archive Backup’. A popup will appear.
You can disable the toggle button and click on Save.
You can enable and enter the details.
Choose Archive Recovery Point - Select either Enable or Disable based on your use case. Archiving can be enabled/disabled for the protected compute node.
Choose EOS Bucket - Please select the object storage bucket (archiving destination) to archive the recovery point snapshot.
Access Key - Please Specify the access key to use when connecting to the object storage bucket.
Secret Key - Please Specify the secret key to use when connecting to the object storage bucket.
Archiving Policy - Archive backup policy can be configured to create a snapshot on a daily, weekly, or monthly schedule in accordance with your retention requirements. According to these configurations, an Archive is created once the policy runs.
- Daily, the last recovery point of the day is archived.
- Weekly, the last recovery point of the week is archived.
- Monthly, the last recovery point of the month is archived.
Deactivate Backups
To deactivate CDP backup service, you have to click on the Deactivate Backup switch to disable the backup service for your E2E Networks E2E Node. A confirmation popup will appear, click on the ‘Deactivate’ button to stop your E2E Node backups.
MySQL Backups
If MySQL server is running on this E2E Node, then you may provide the Admin credentials of MySQL server for activating backup to protect the following MySQL objects:
- Databases
- Tables
- Indexes
- Constraints
- Triggers
- Events
- Views
- Stored procedures
- Click on the edit button to configure MySQL.
- Enter the MySQL Server Username and MySQL Server Password.
- Click on the activate button.
Note: E2E Networks is not responsible for backup failures caused by incorrect customer-provided credentials.
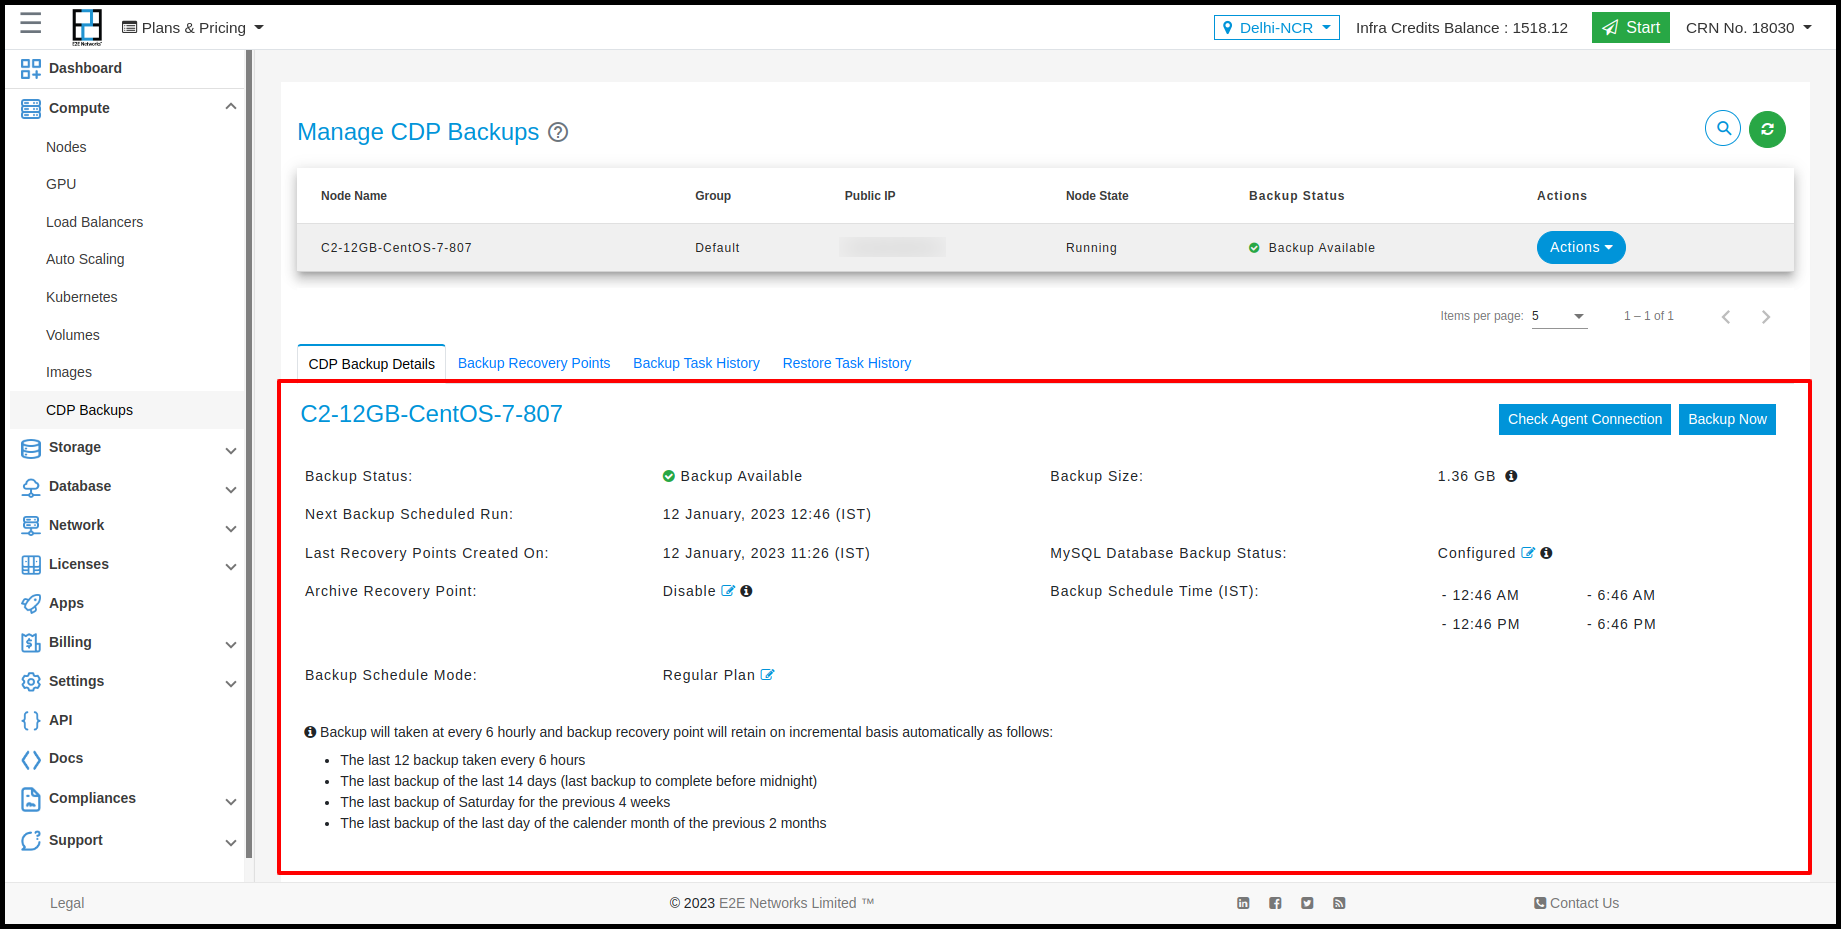
CDP Backup Details
The CDP Backup Details tab contains information about the Backup status, Backup Size, Backup Schedule & frequency, Last Recovery Points Created On, Next Backup Scheduled Run, and MySQL Database for the respective E2E Node.
Backup Recovery Points
The Backup Recovery Points tab has information about backup recovery points created for the respective E2E Node in chronological order. You can select any backup recovery points to restore files/folders to the respective node.
Actions
You can perform the following actions for the backup recovery points.
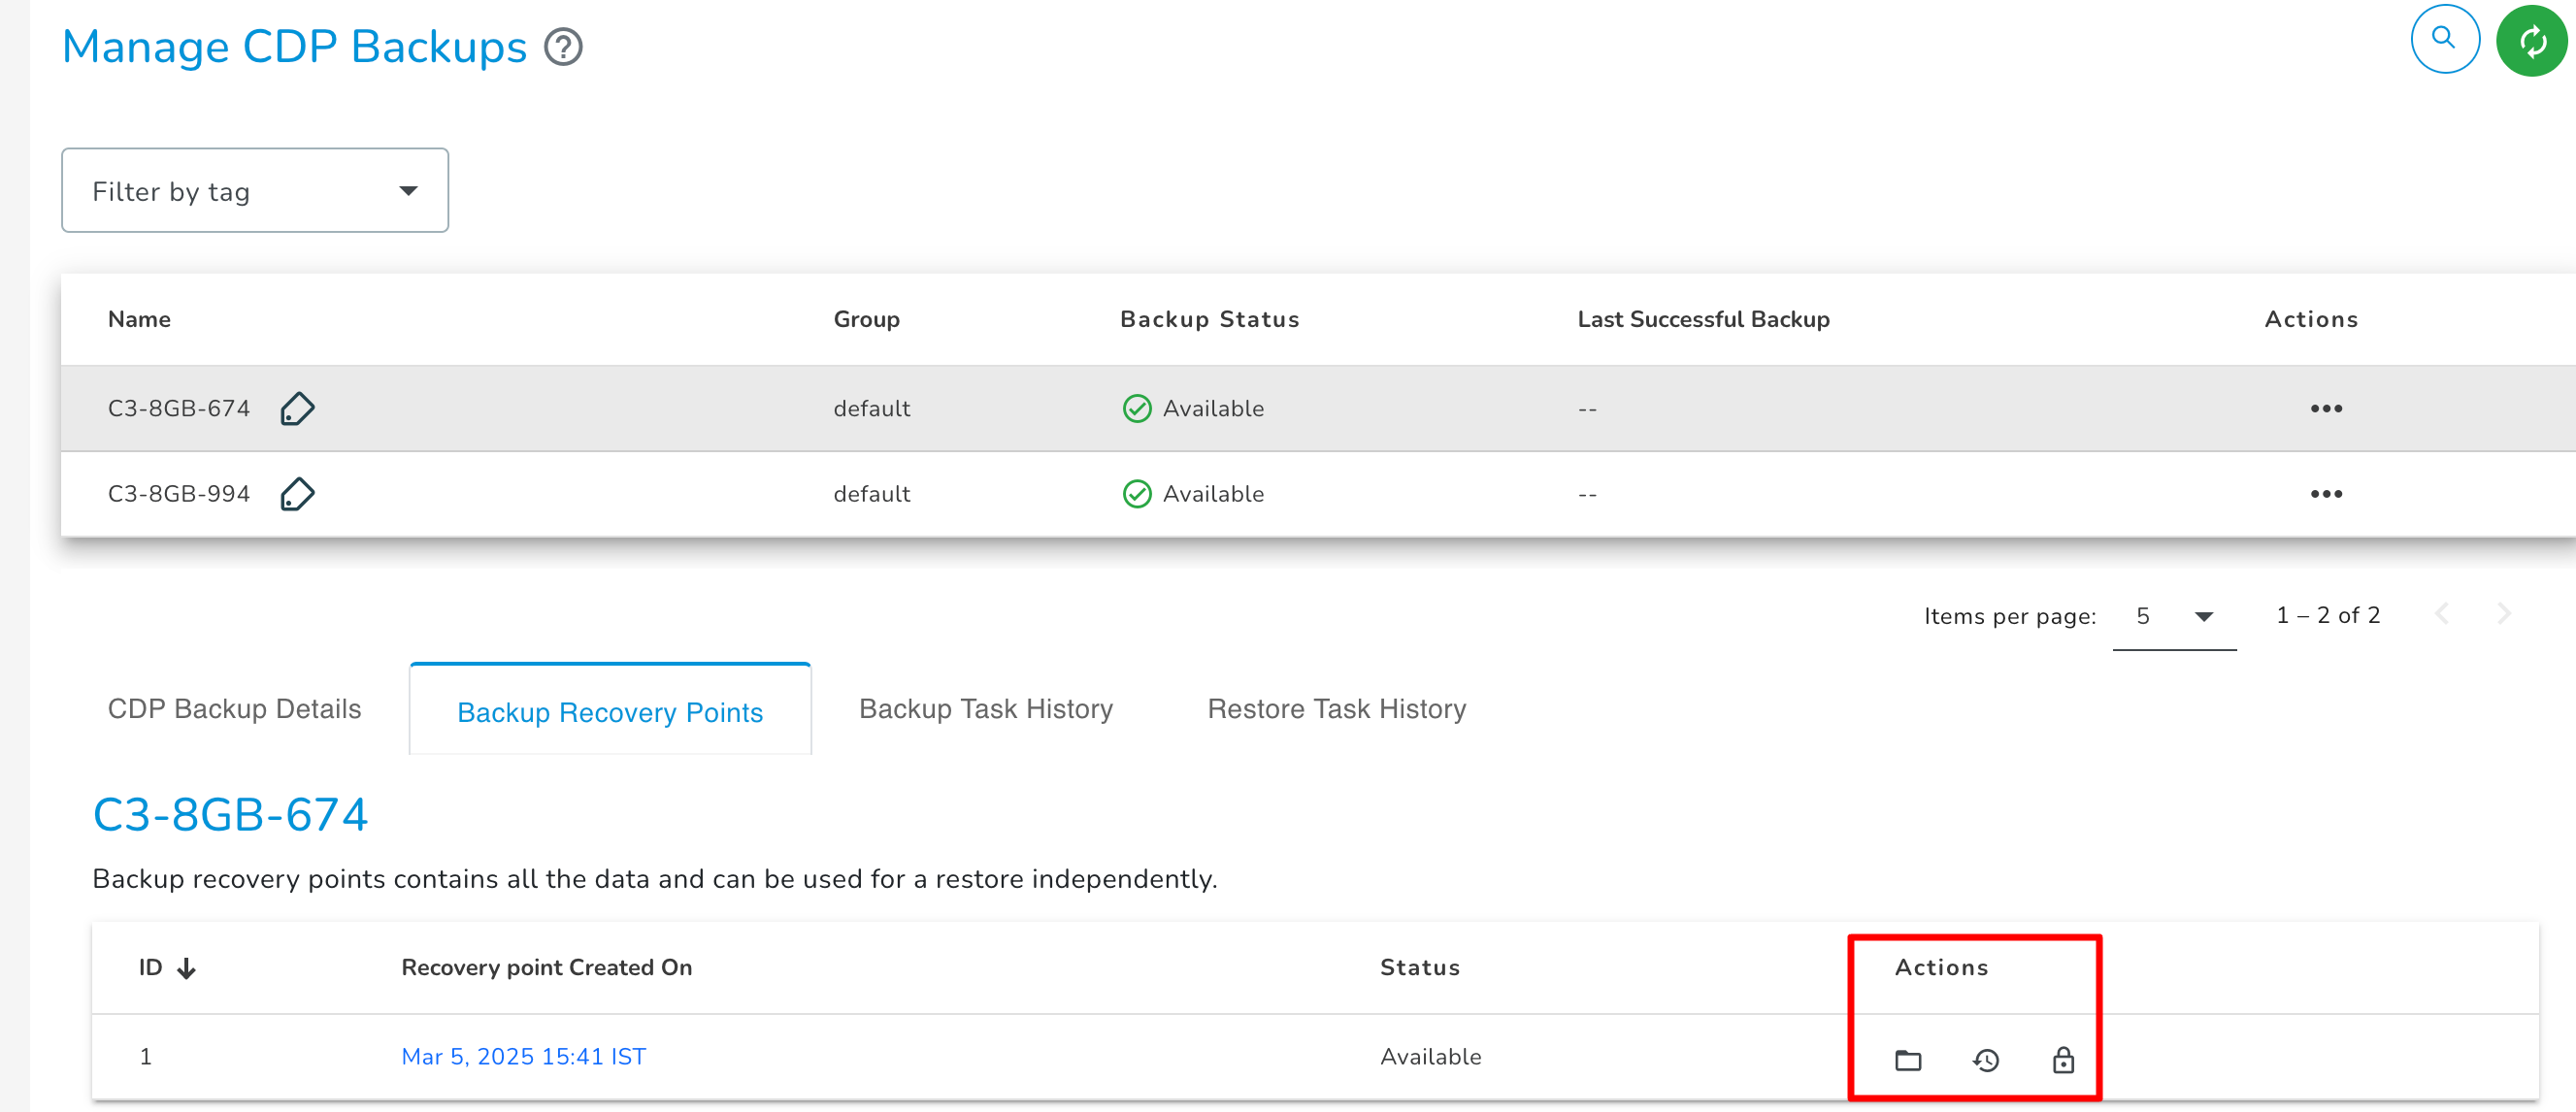
Backup Retention Policy
Backup recovery point retention policy is default defined. The retention policy automatically decides on how many numbers of Recovery Points needed to retain and when to merge old recovery points. You can change the default policy according to your requirement to retain recovery points based on recovery point age.
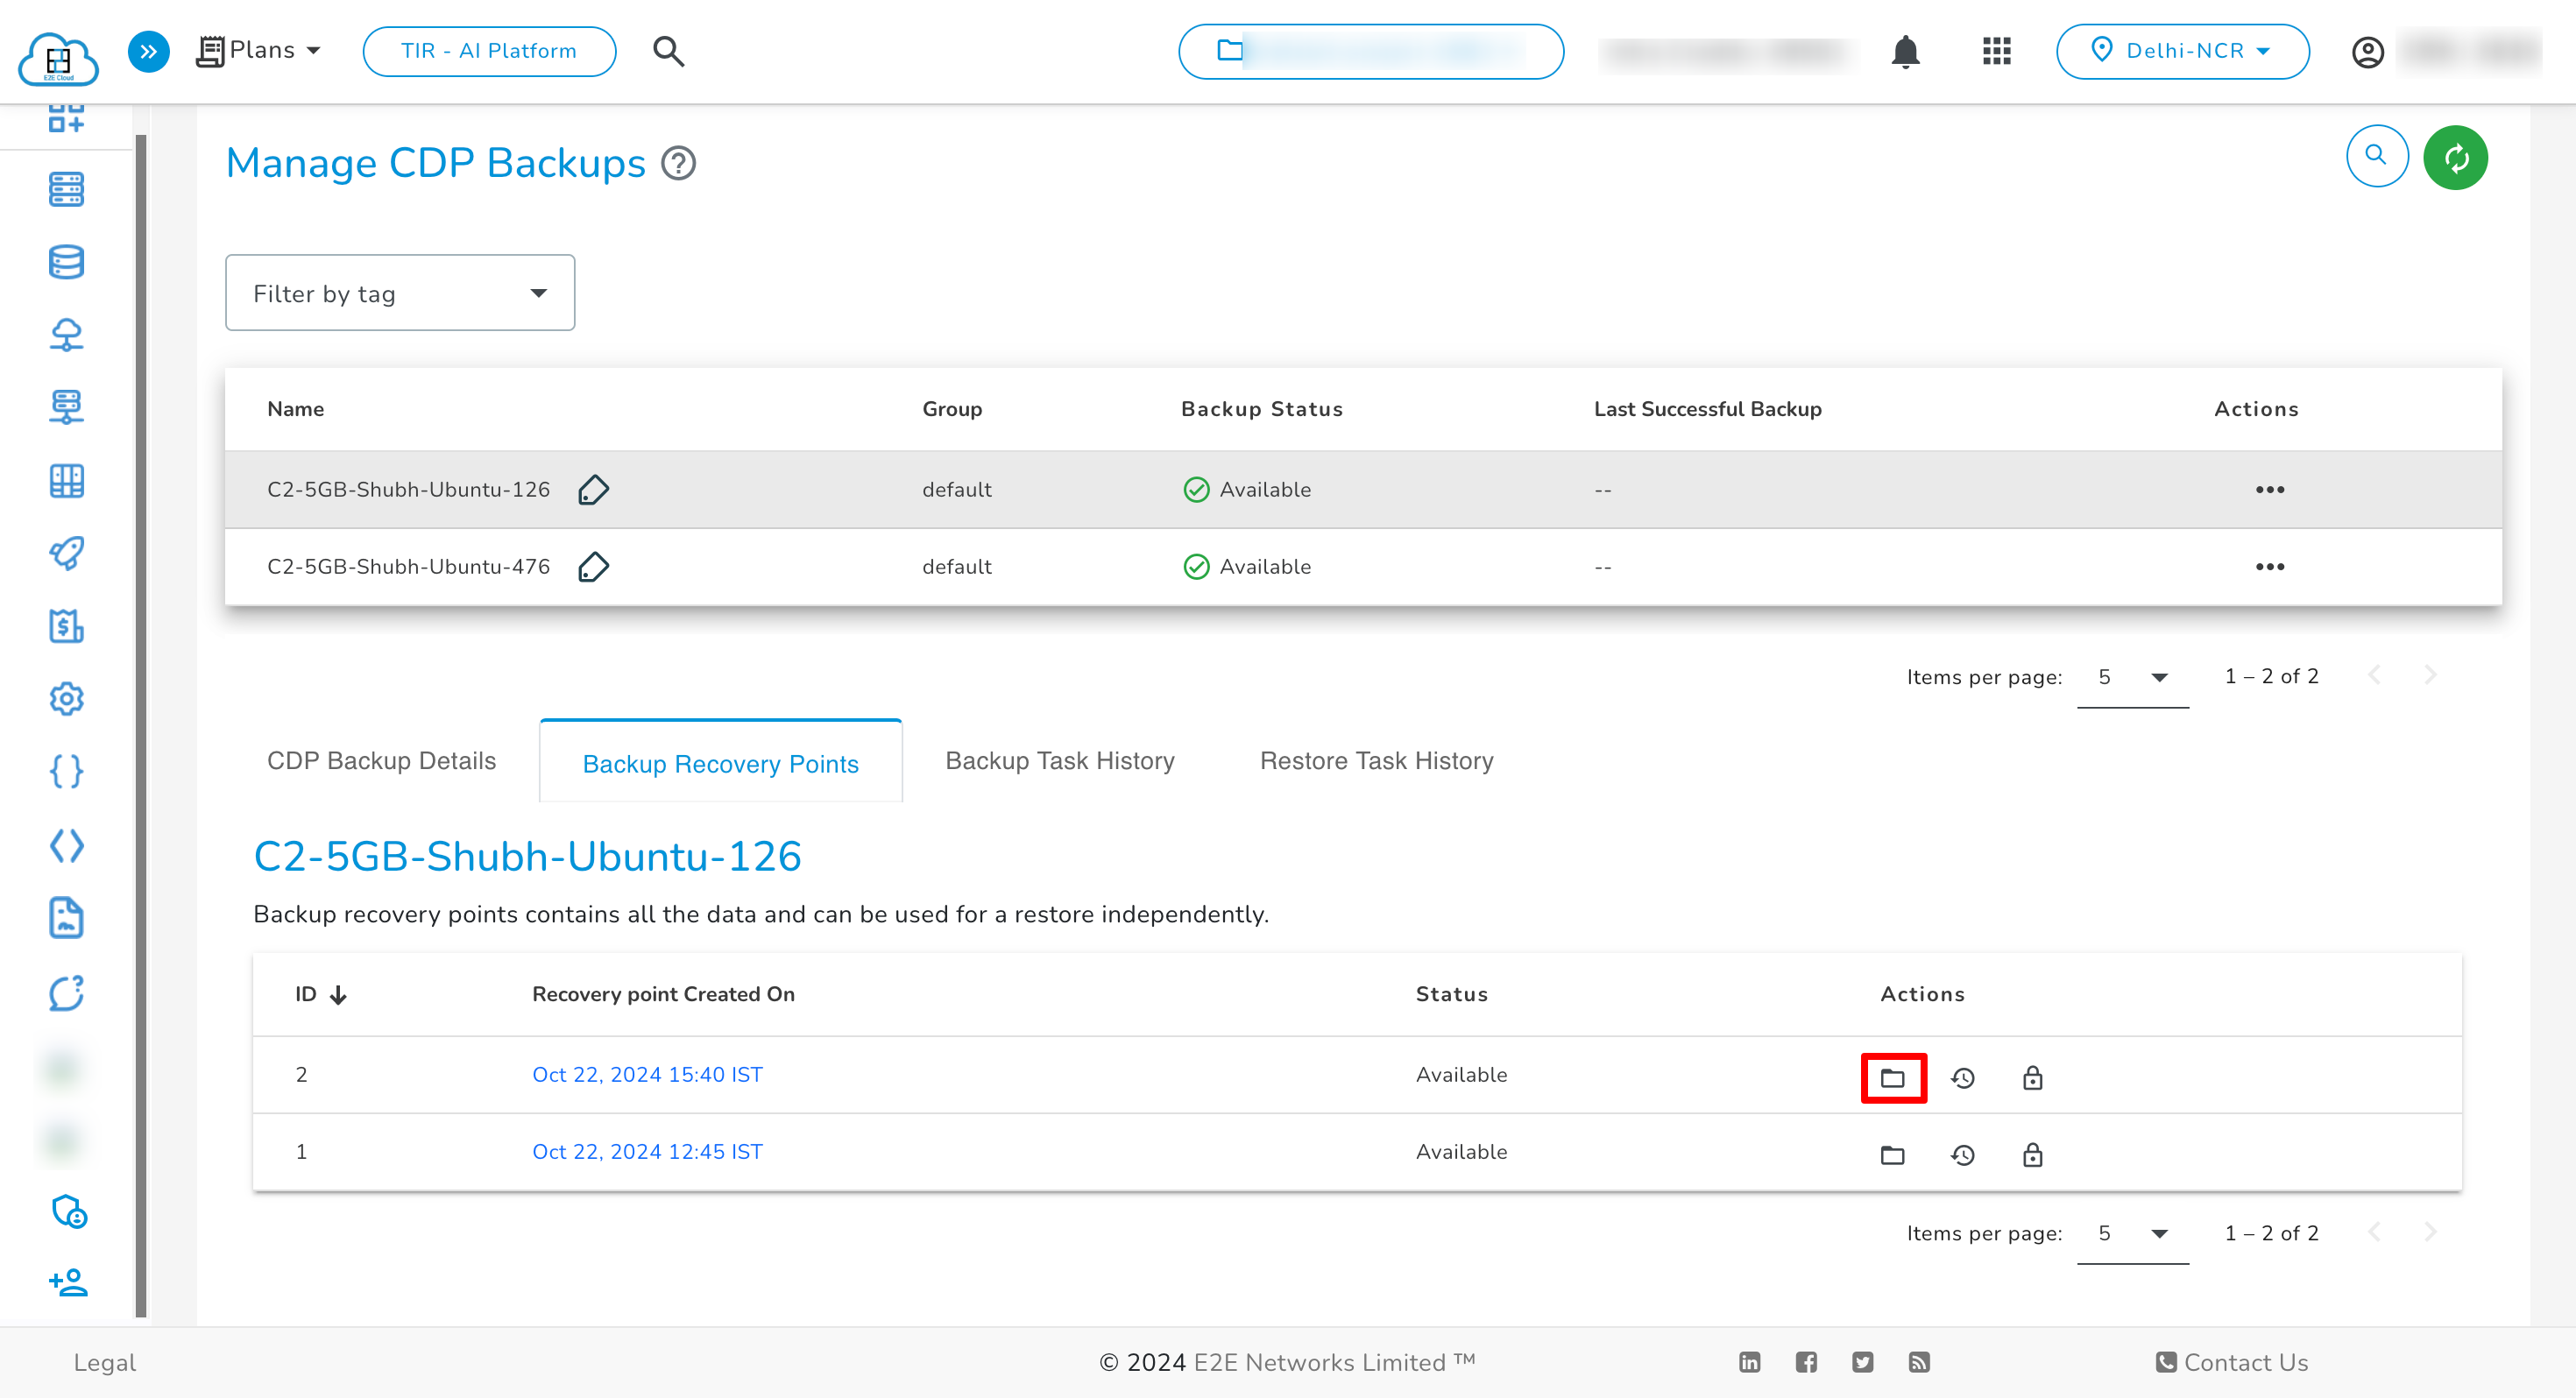
Browse
You can use the browse action to search & select files/folders from the Recovery Point for restoration.
You can select the desired node for restoring the backup. The node list will display only nodes with an active CDP backup and the same operating system (OS) as the backup source node.
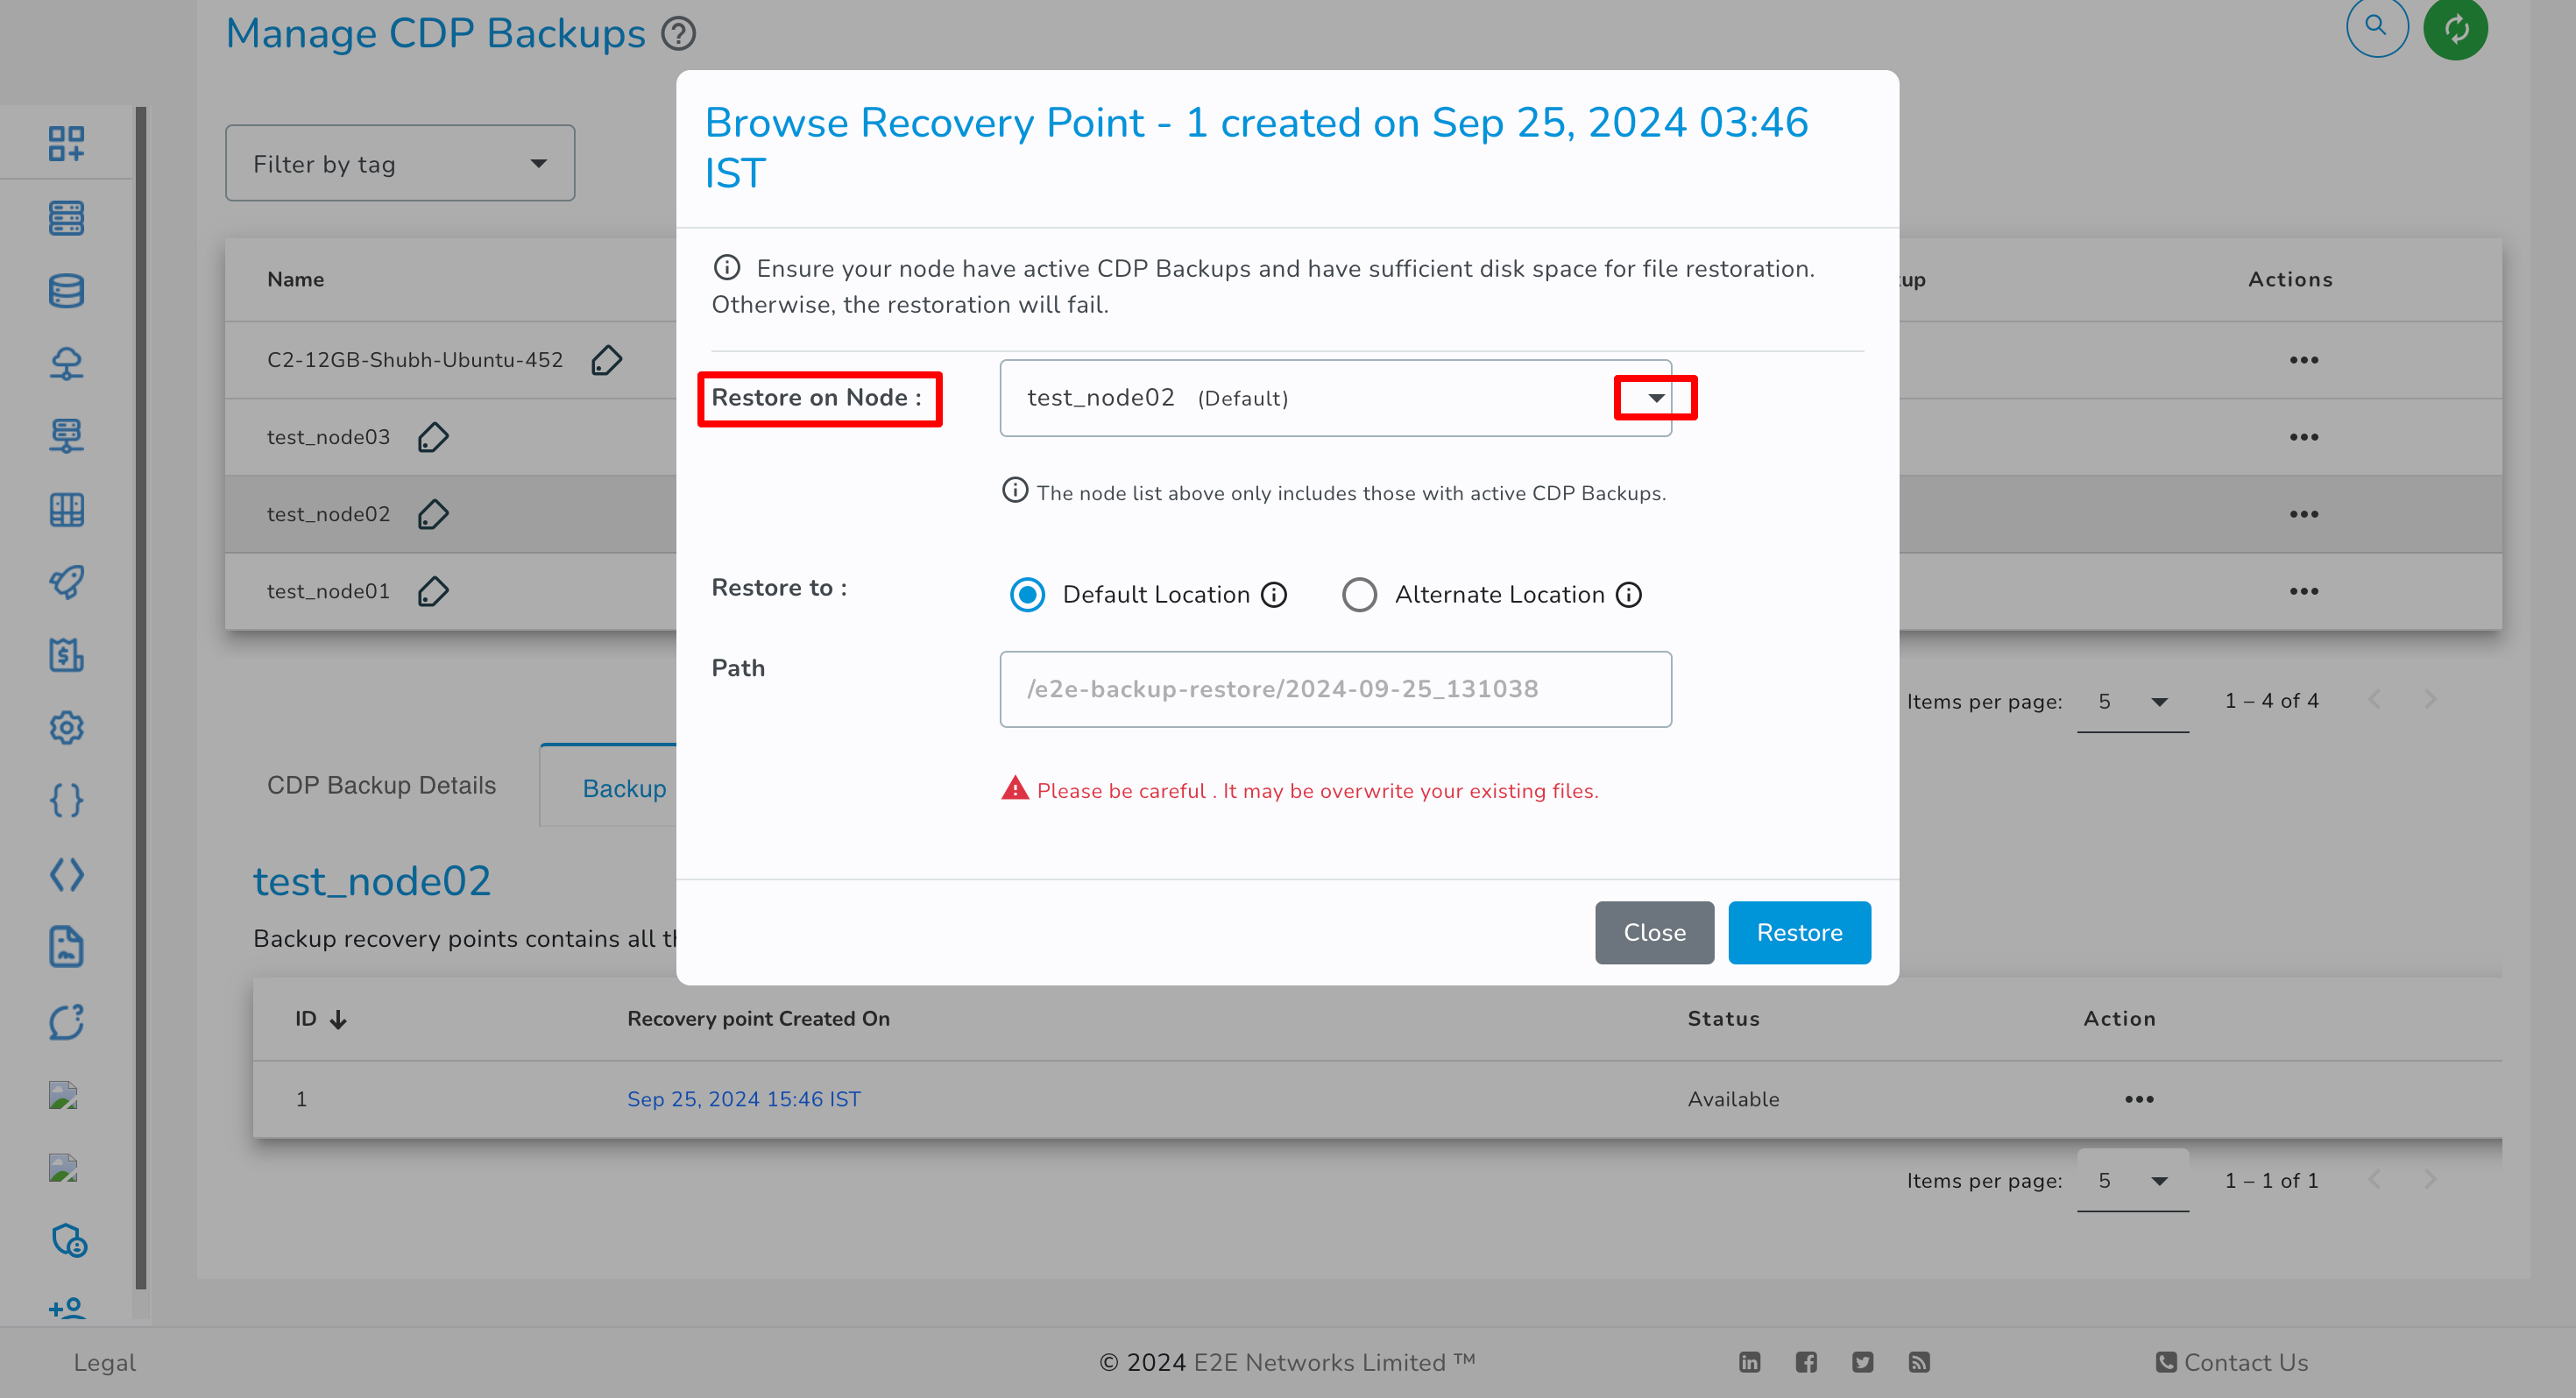
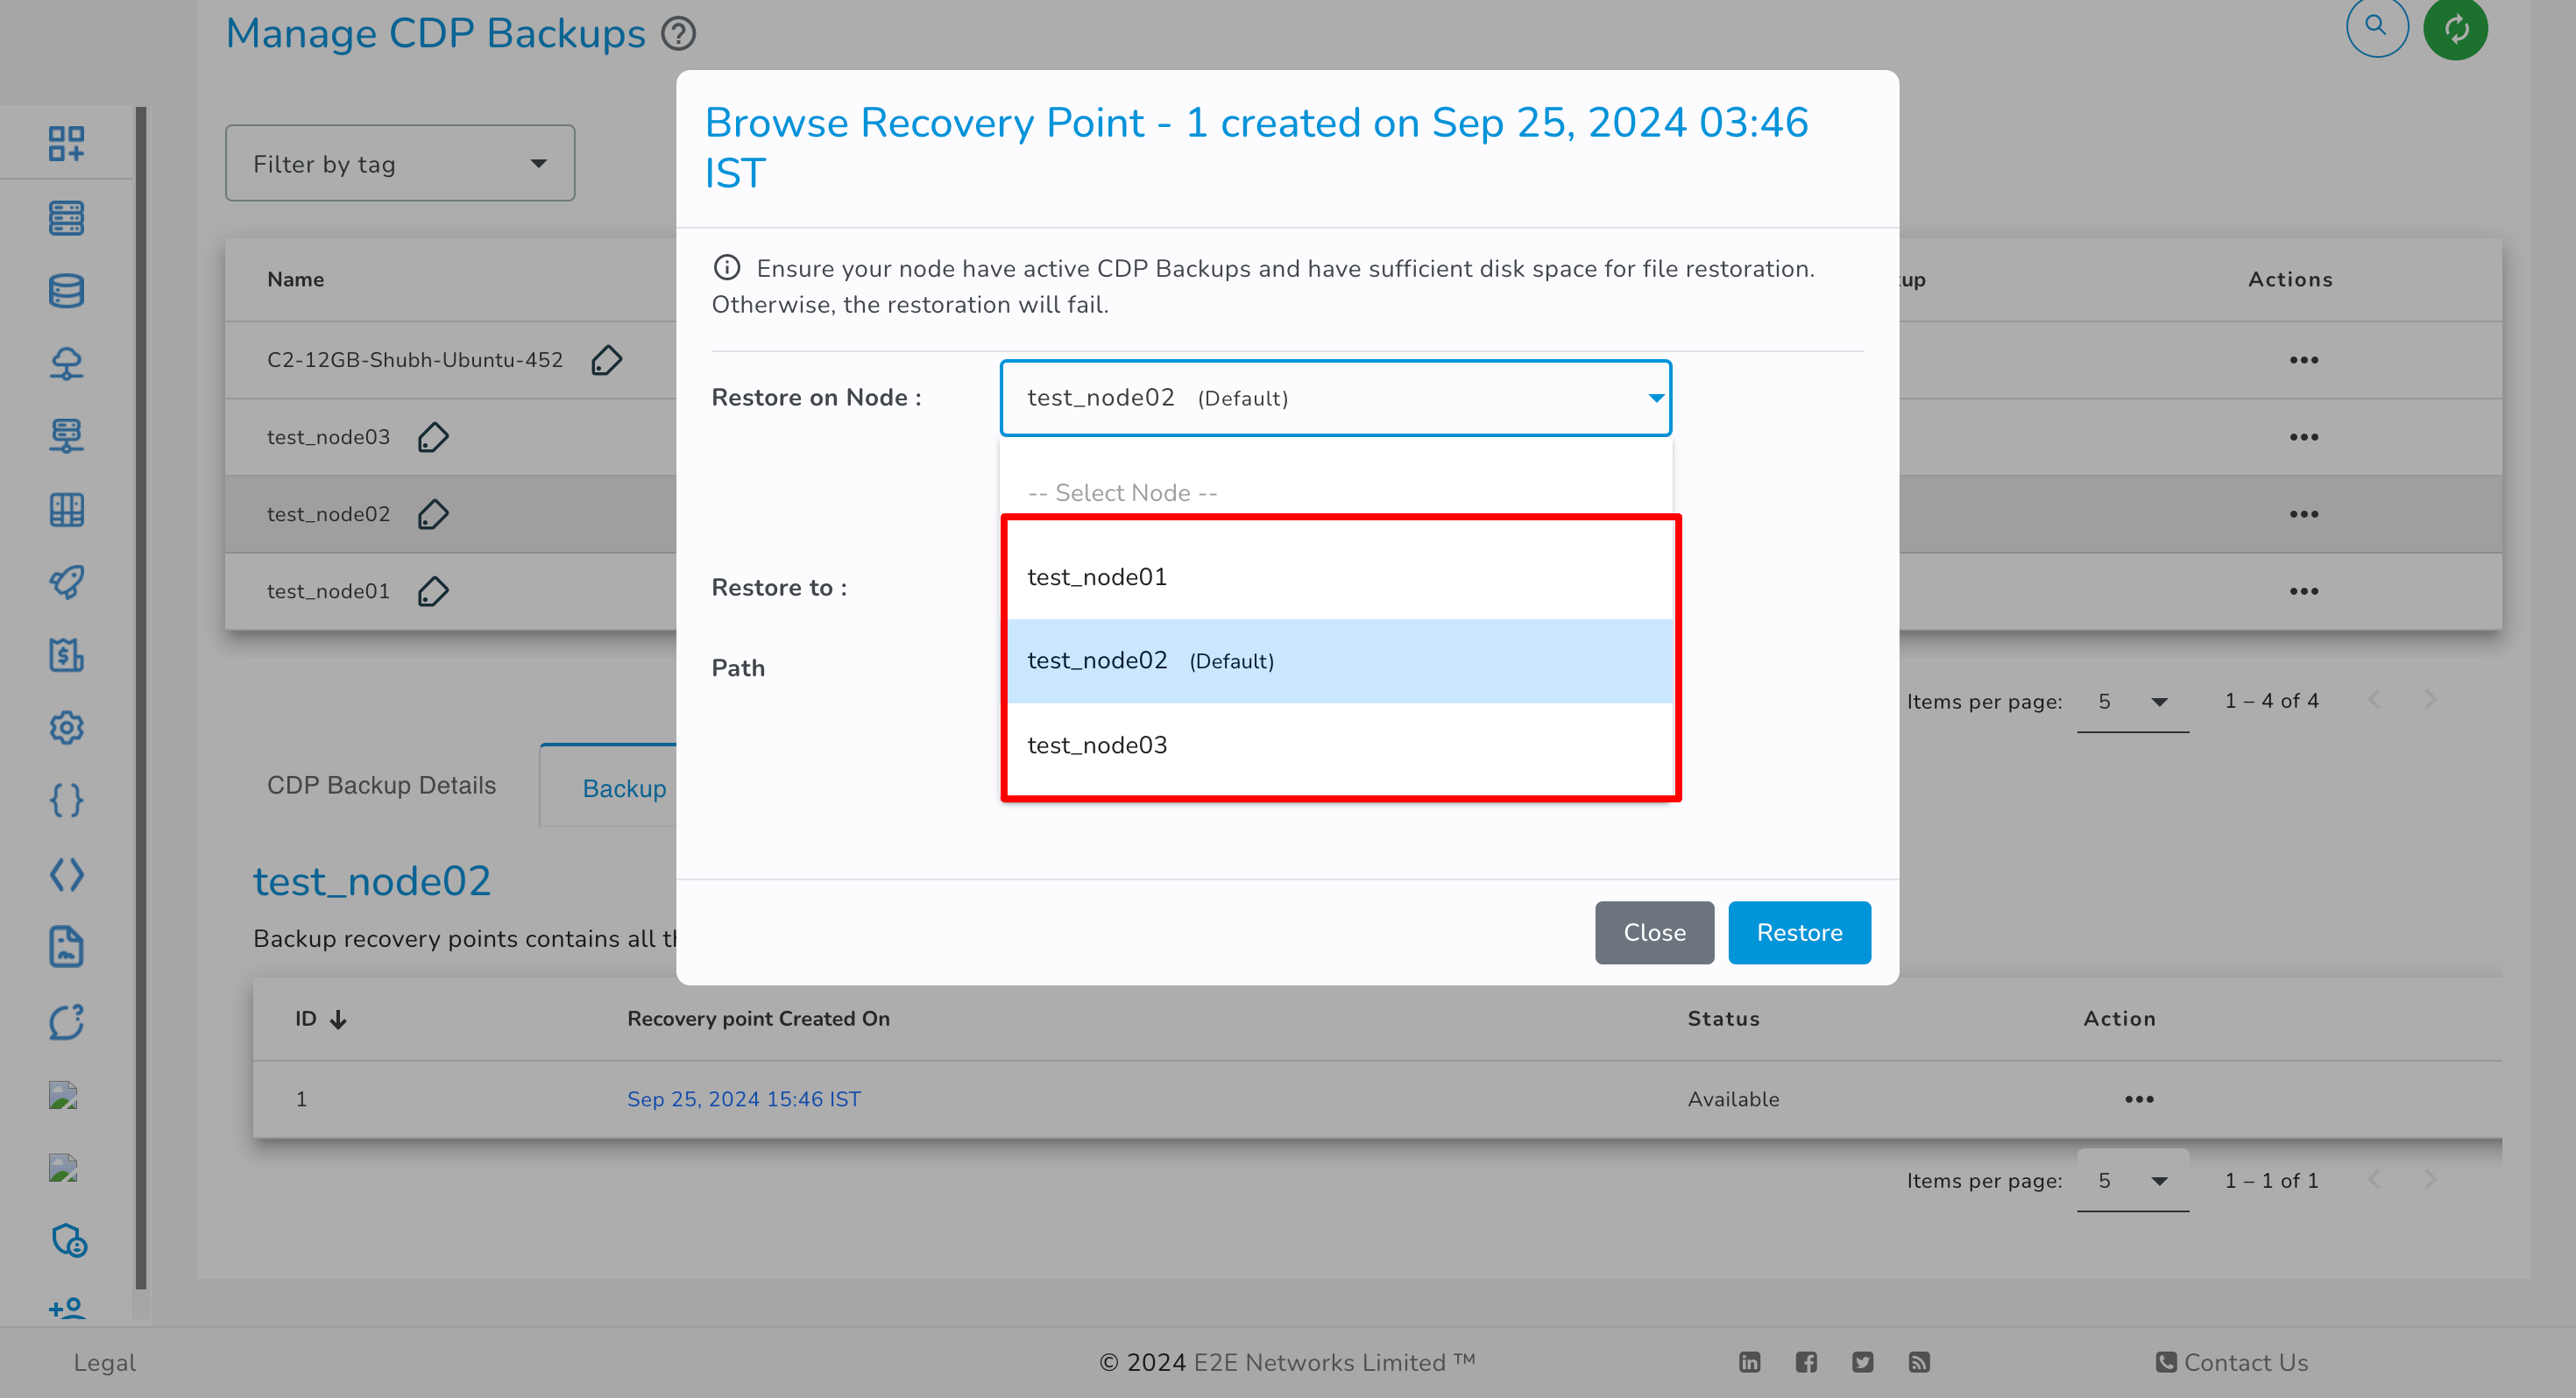
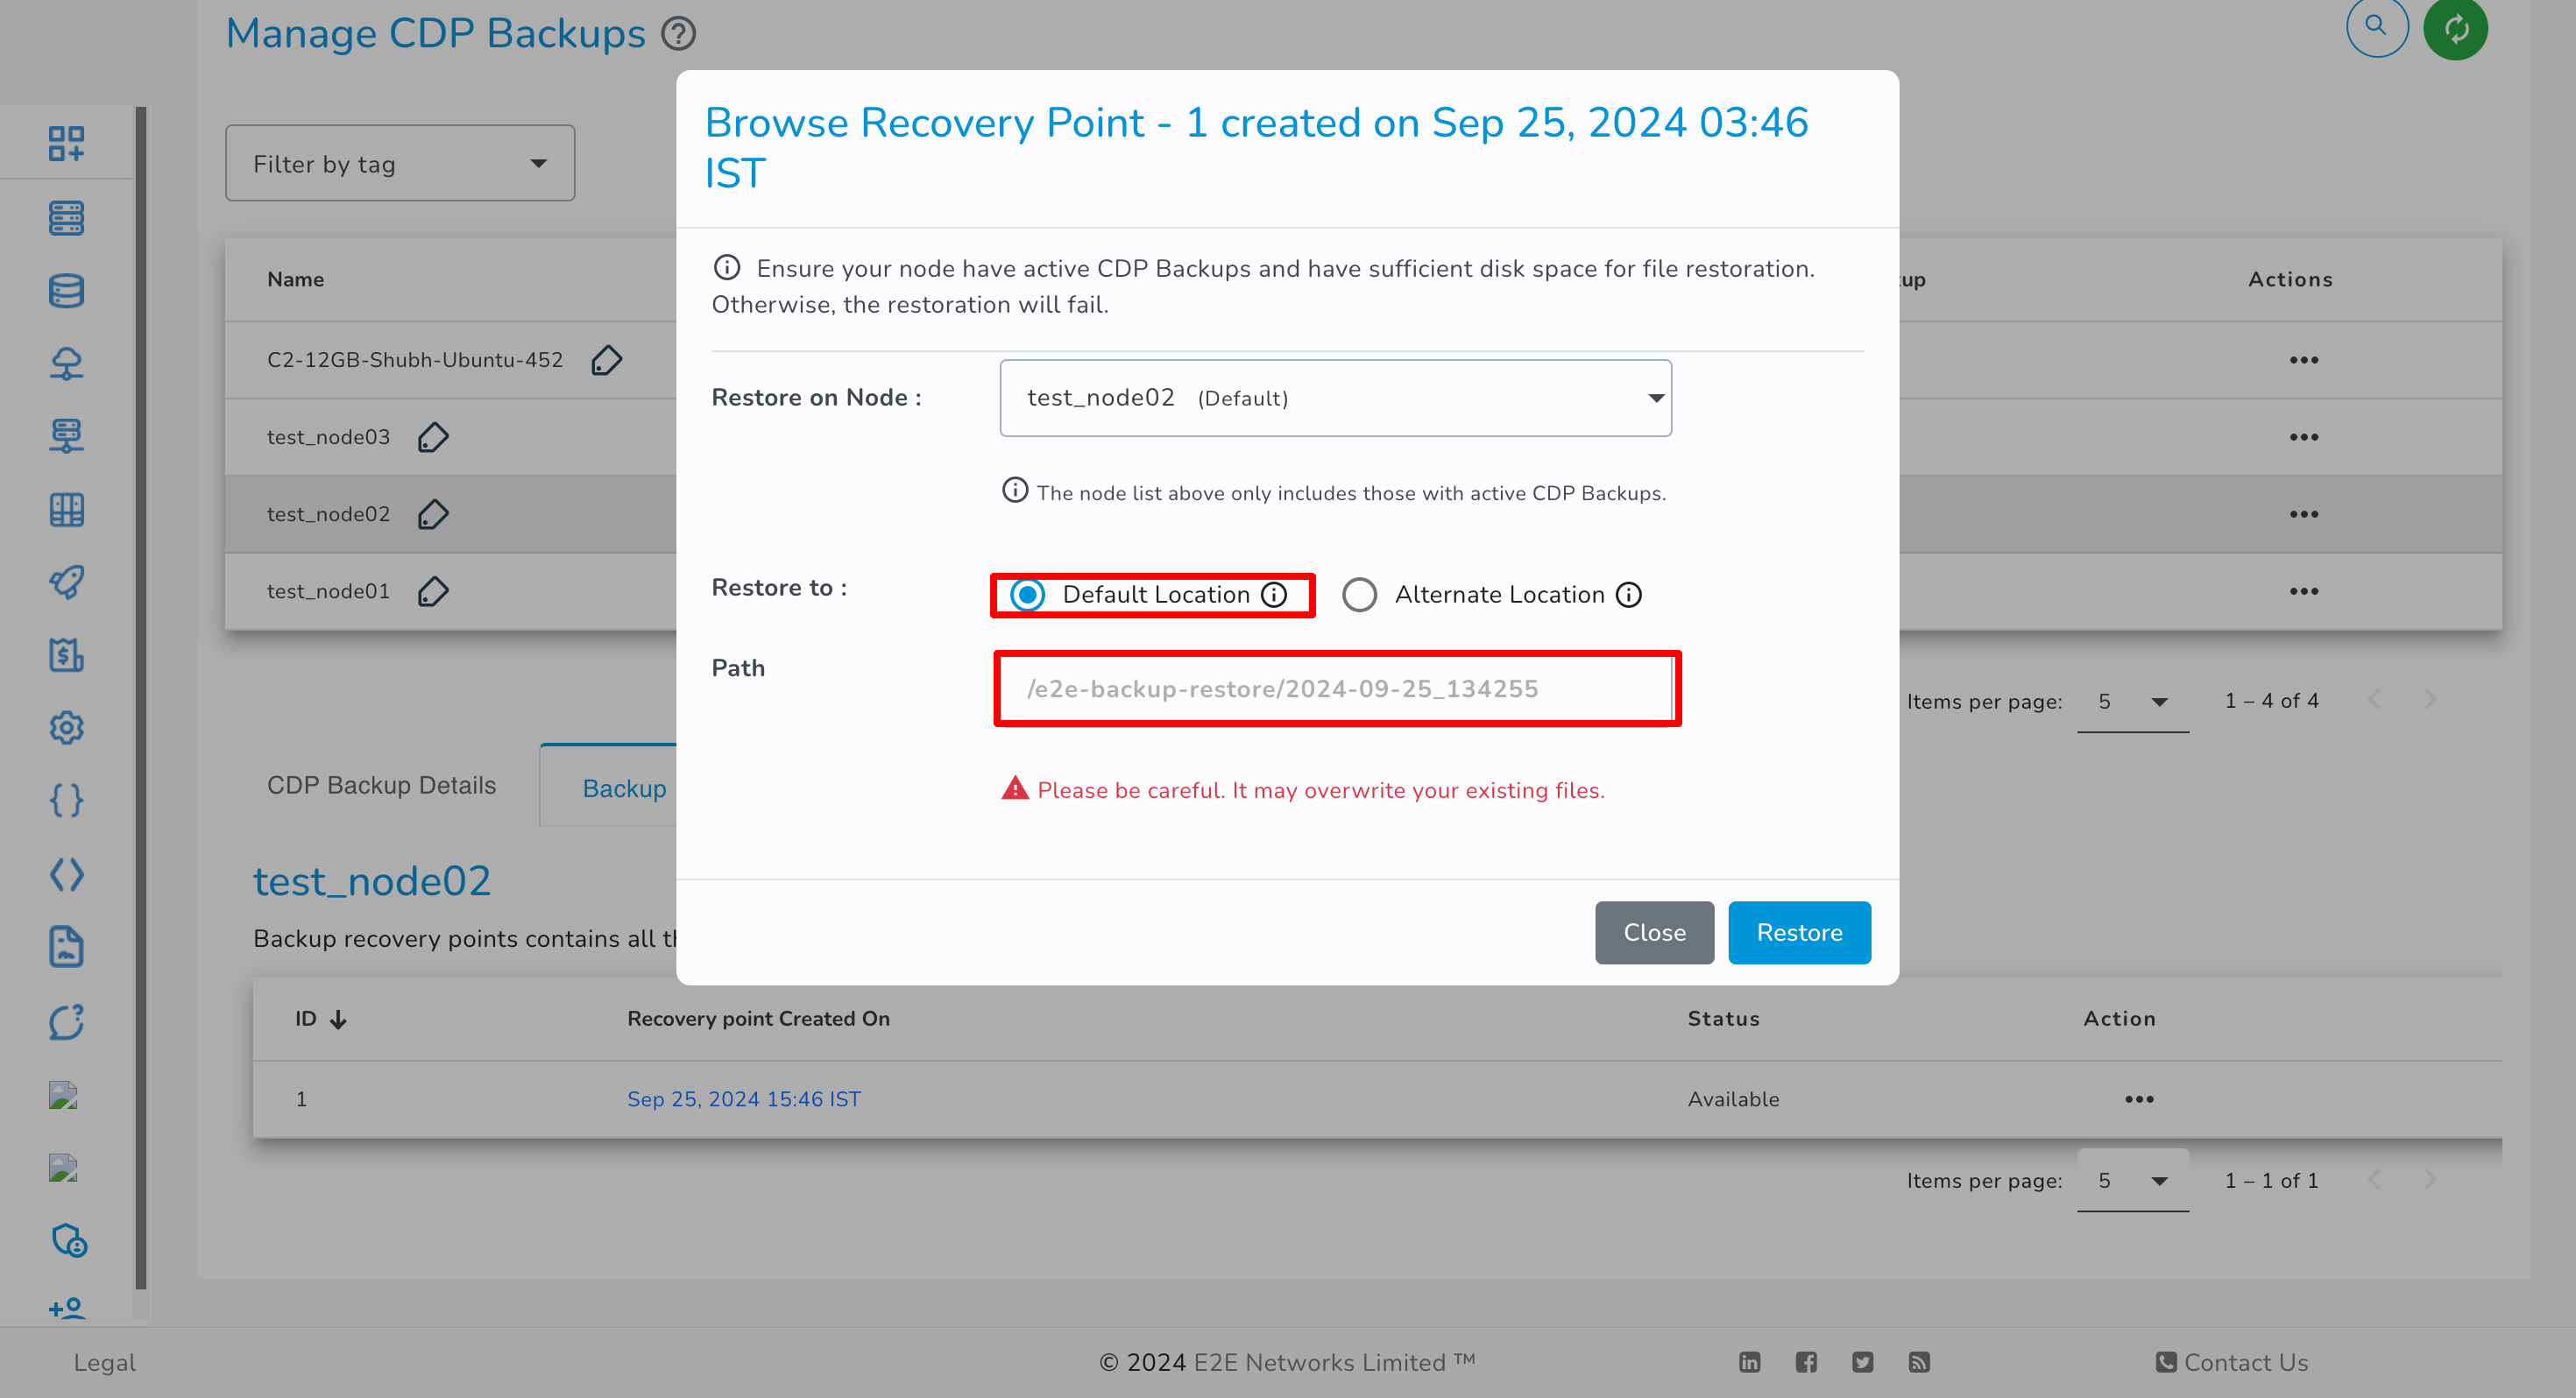
You have the option to select either the Default Location or an Alternate Location for restoration, based on your preference.
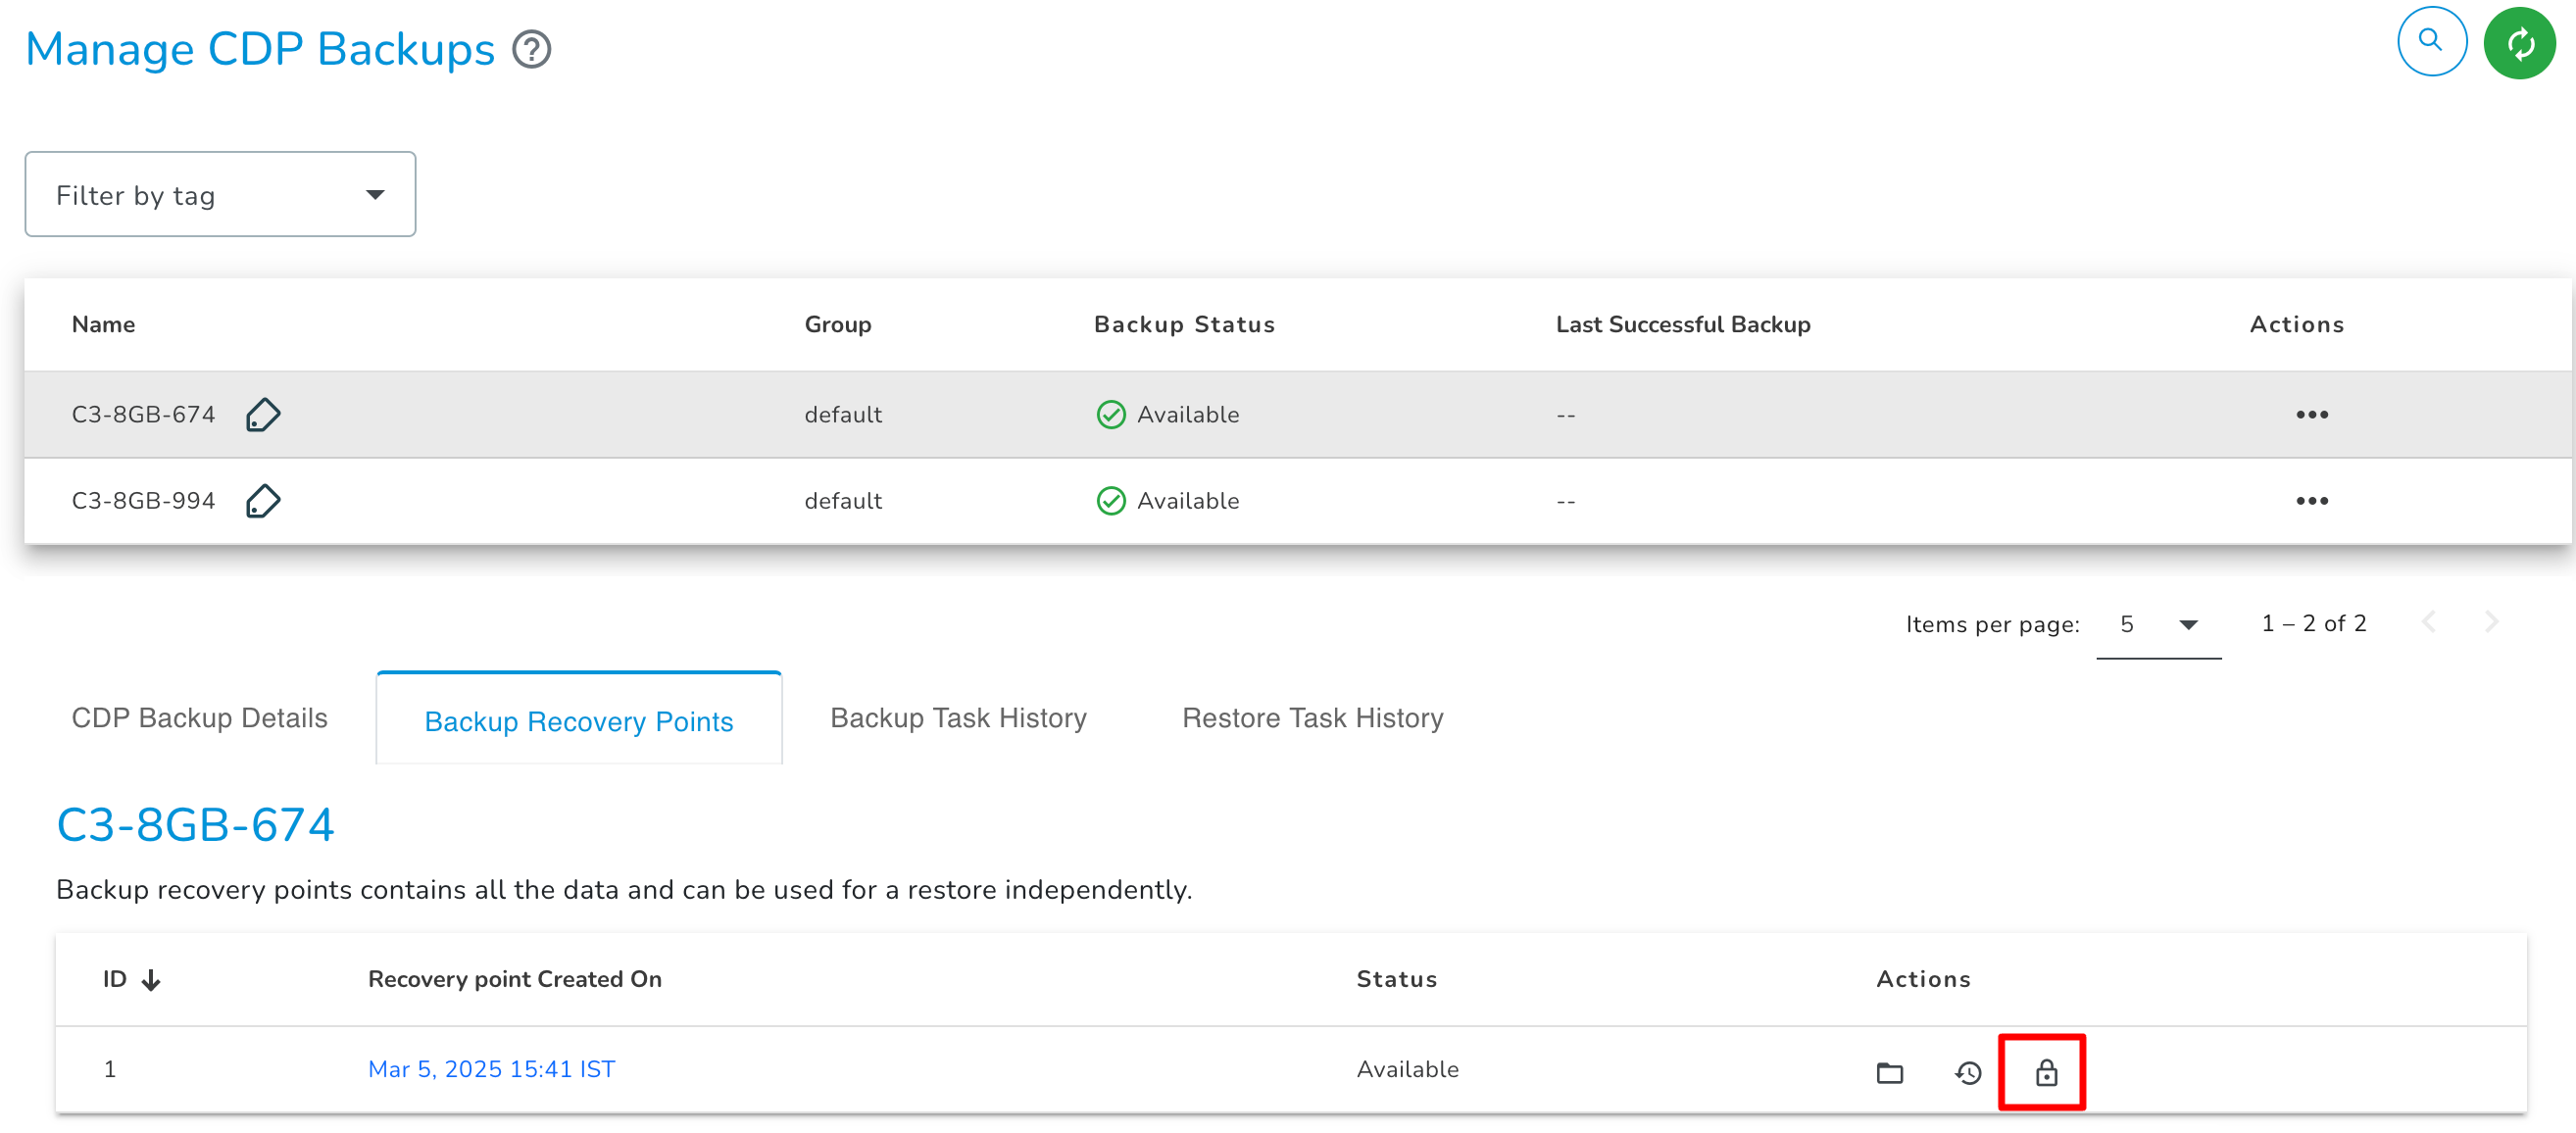
Lock
You can use lock action to prevent backup recovery point from being merged automatically as per the recovery point protection policy.
![]()
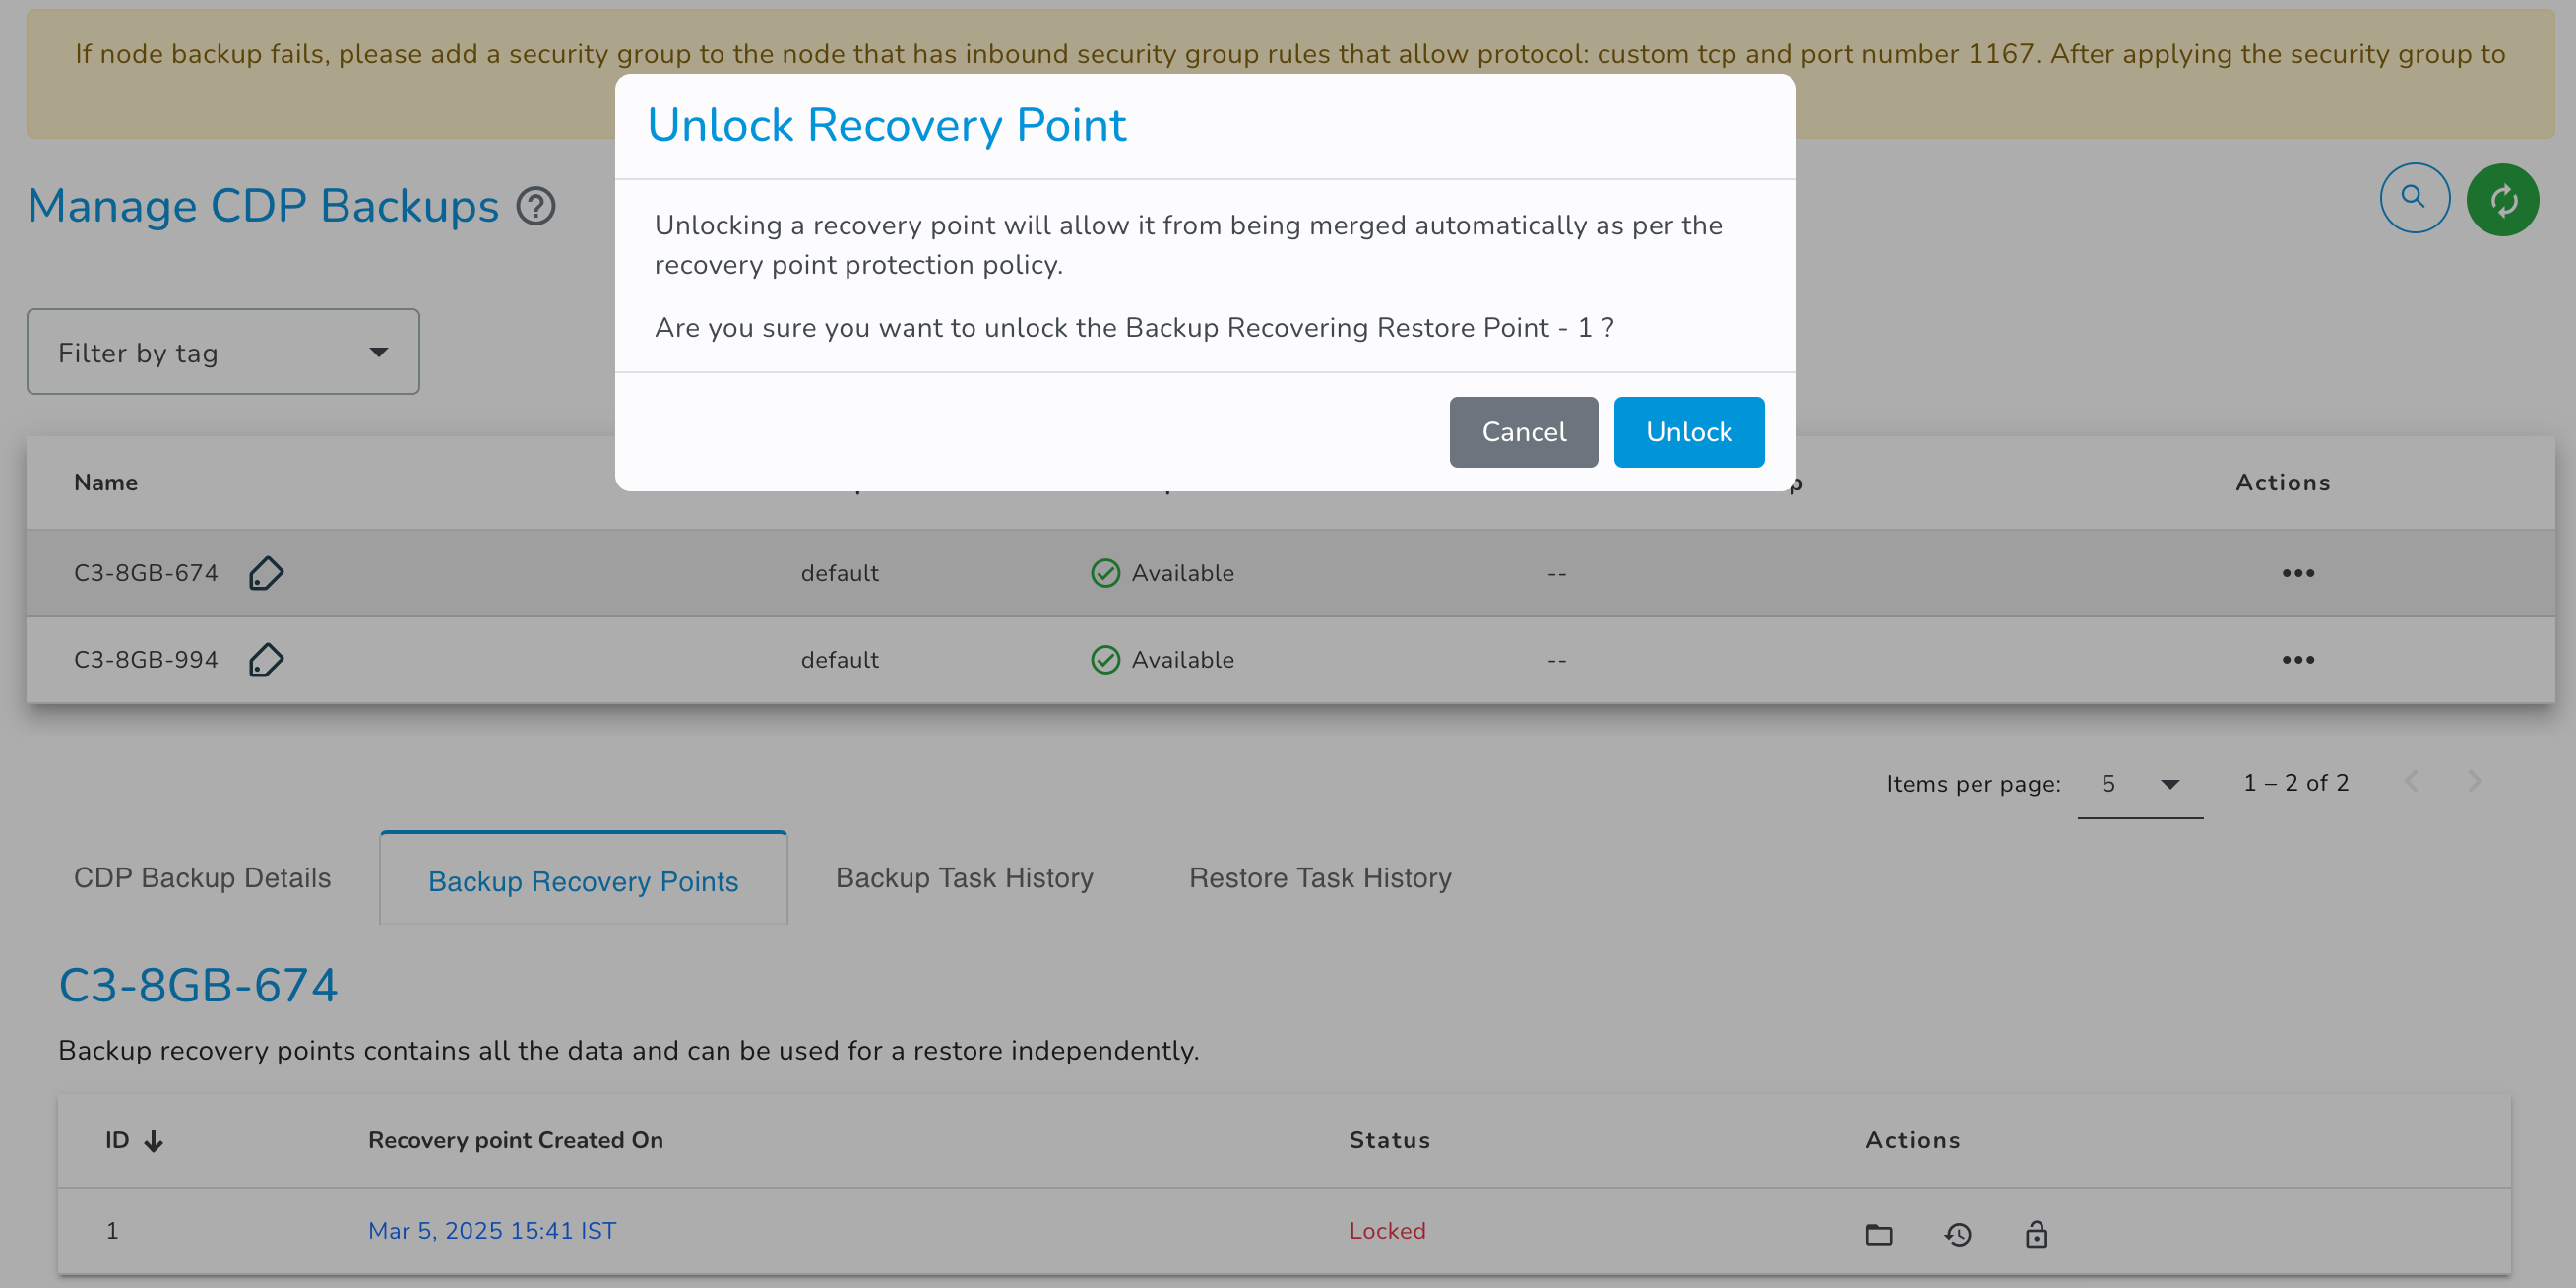
Unlock
You can use unlock action to unlock the locked backup recovery point to allow it to be merged automatically as per the recovery point protection policy.
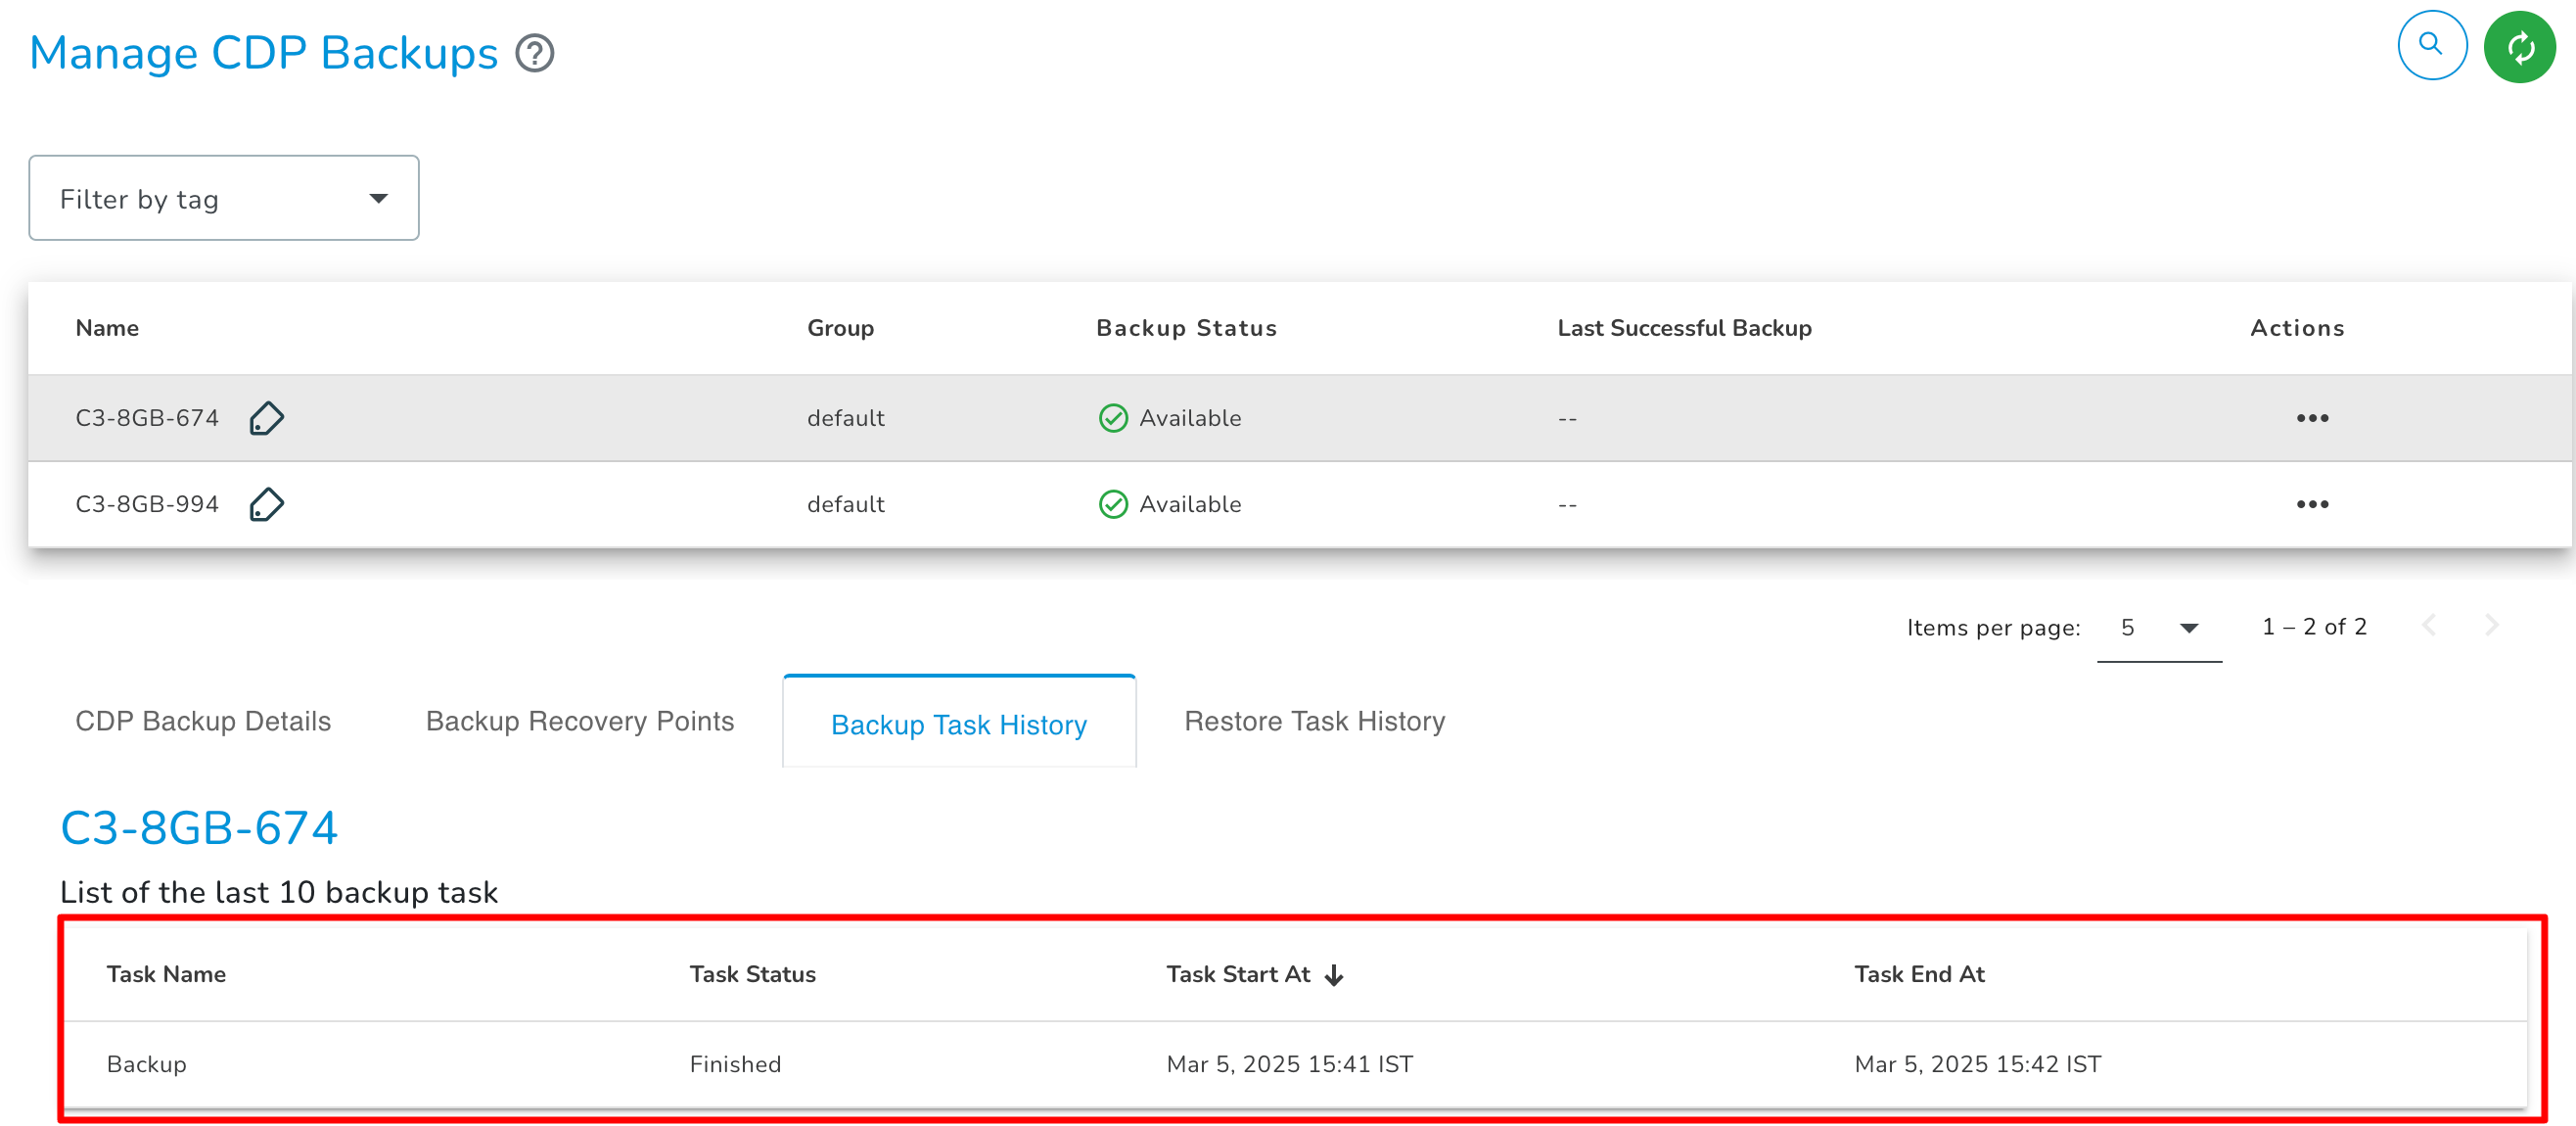
Backup Task History
The Backup Task details tab has information about start and end (with the date and time stamp) of backup scheduled Tasks in a grid format.
Status
- Finished: 'Finished' status represents that the backup recovery point is created.
- Failed: 'Failed' status represents that backup recovery point creation failed for the respective node.
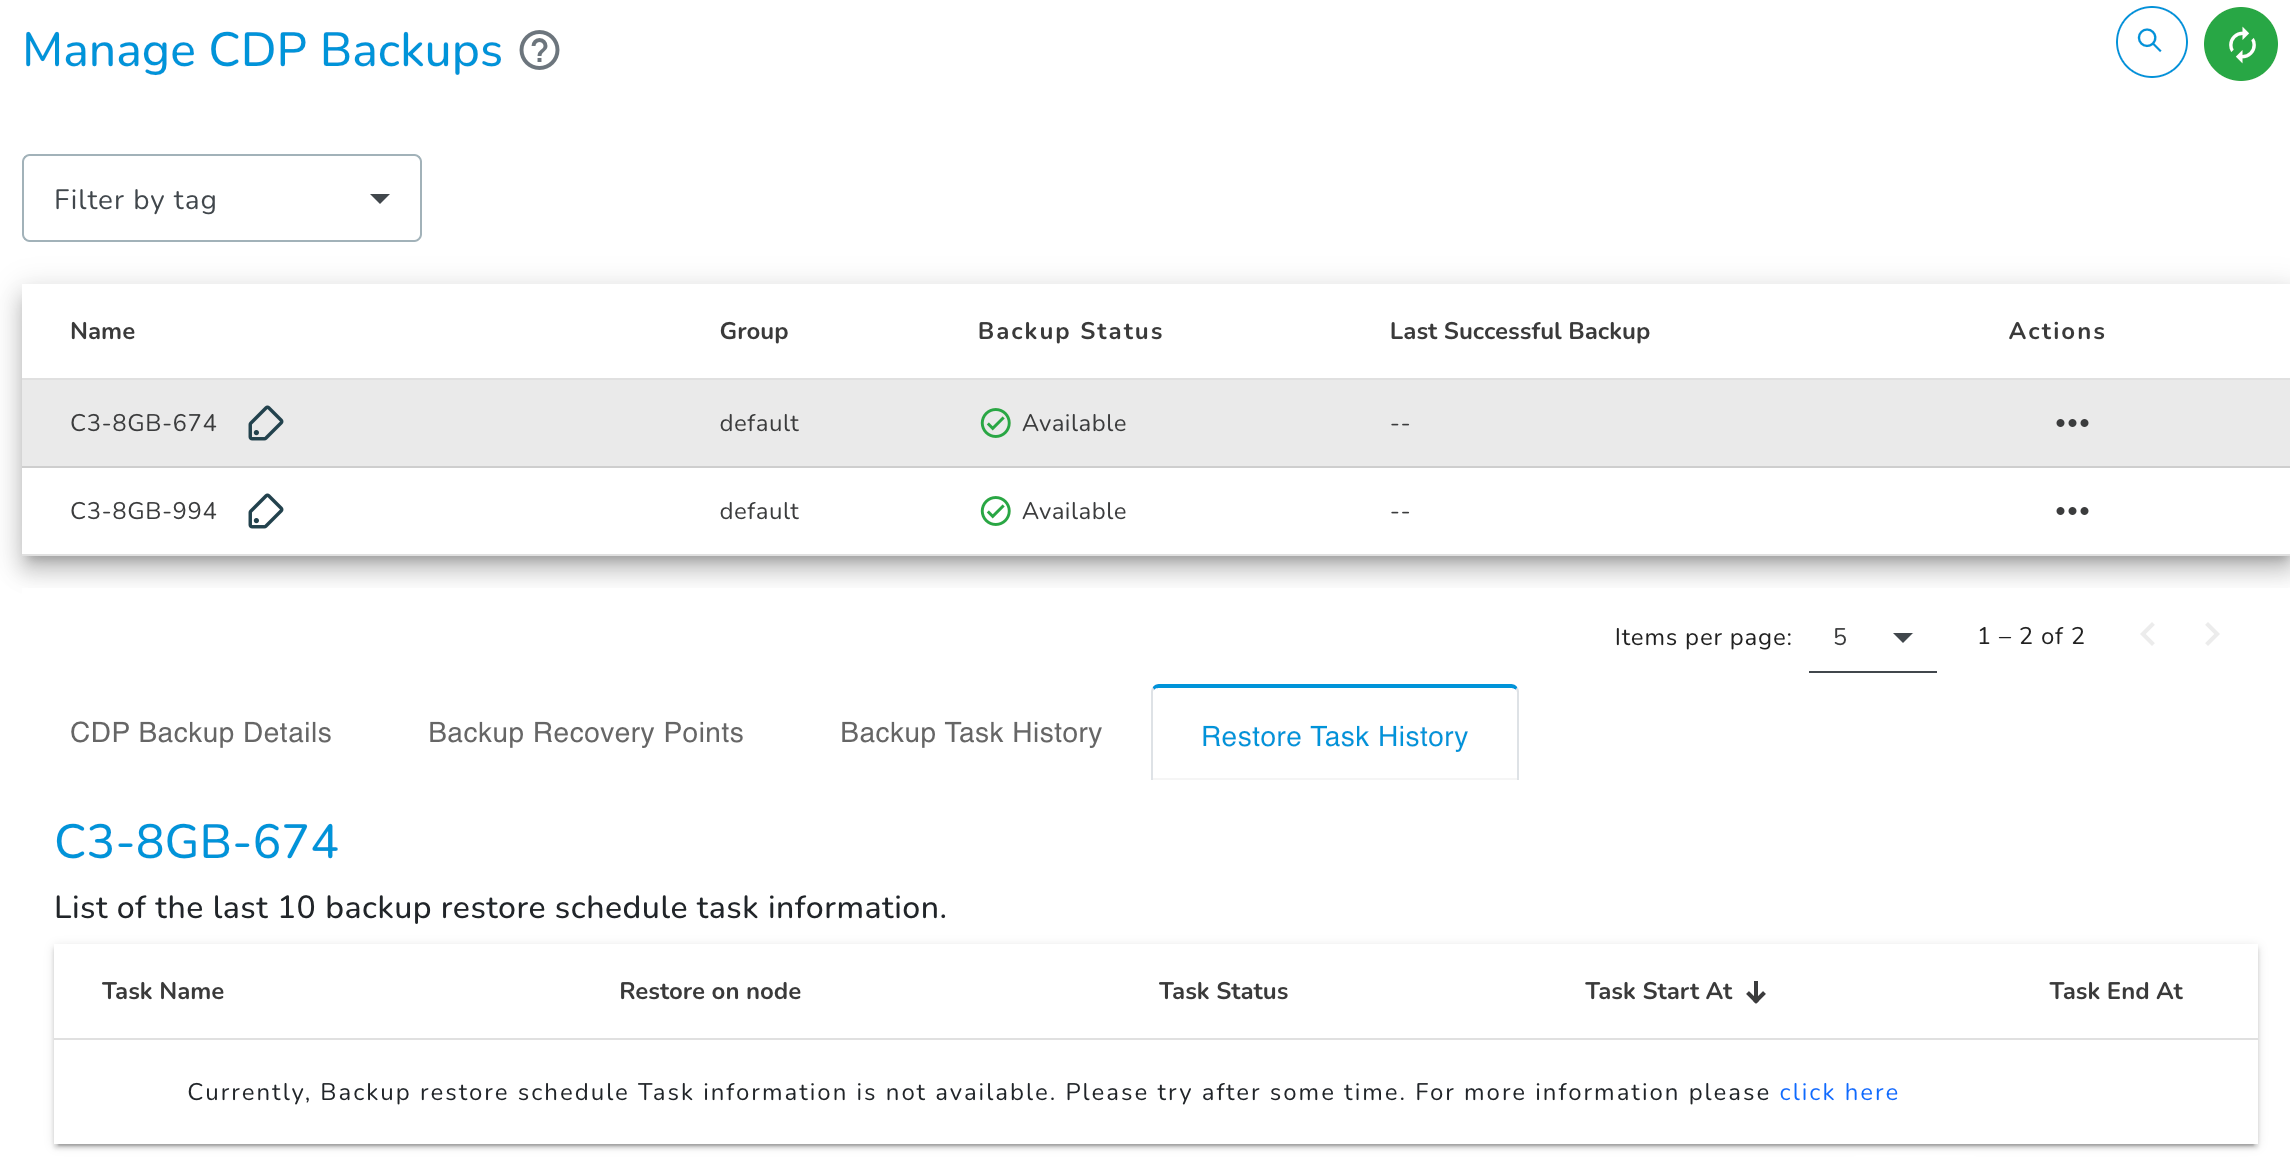
Restore Task History
The Restore Task details tab has information about start and end (with the date and time stamp) of file/folder restore scheduled Tasks in a grid format.
Status
- Finished: Finished status represents that the file/folder restored successfully.
- Failed: Failed status represents that the file/folder restore failed.
- Warning: Warning status represents that the file/folder restored but the respective node's disk space is running low.
How to Restore Files/ Folders?
Restore backups feature provides you with the facility to restore the entire file system or selected files and folders into your E2E Node from any available Backup Recovery Point. To know the process of restoring a database in MySQL click here
- Go to the Backup Recovery Point tab and select the backup recovery point.
- Click on the browse action to browse the file system.
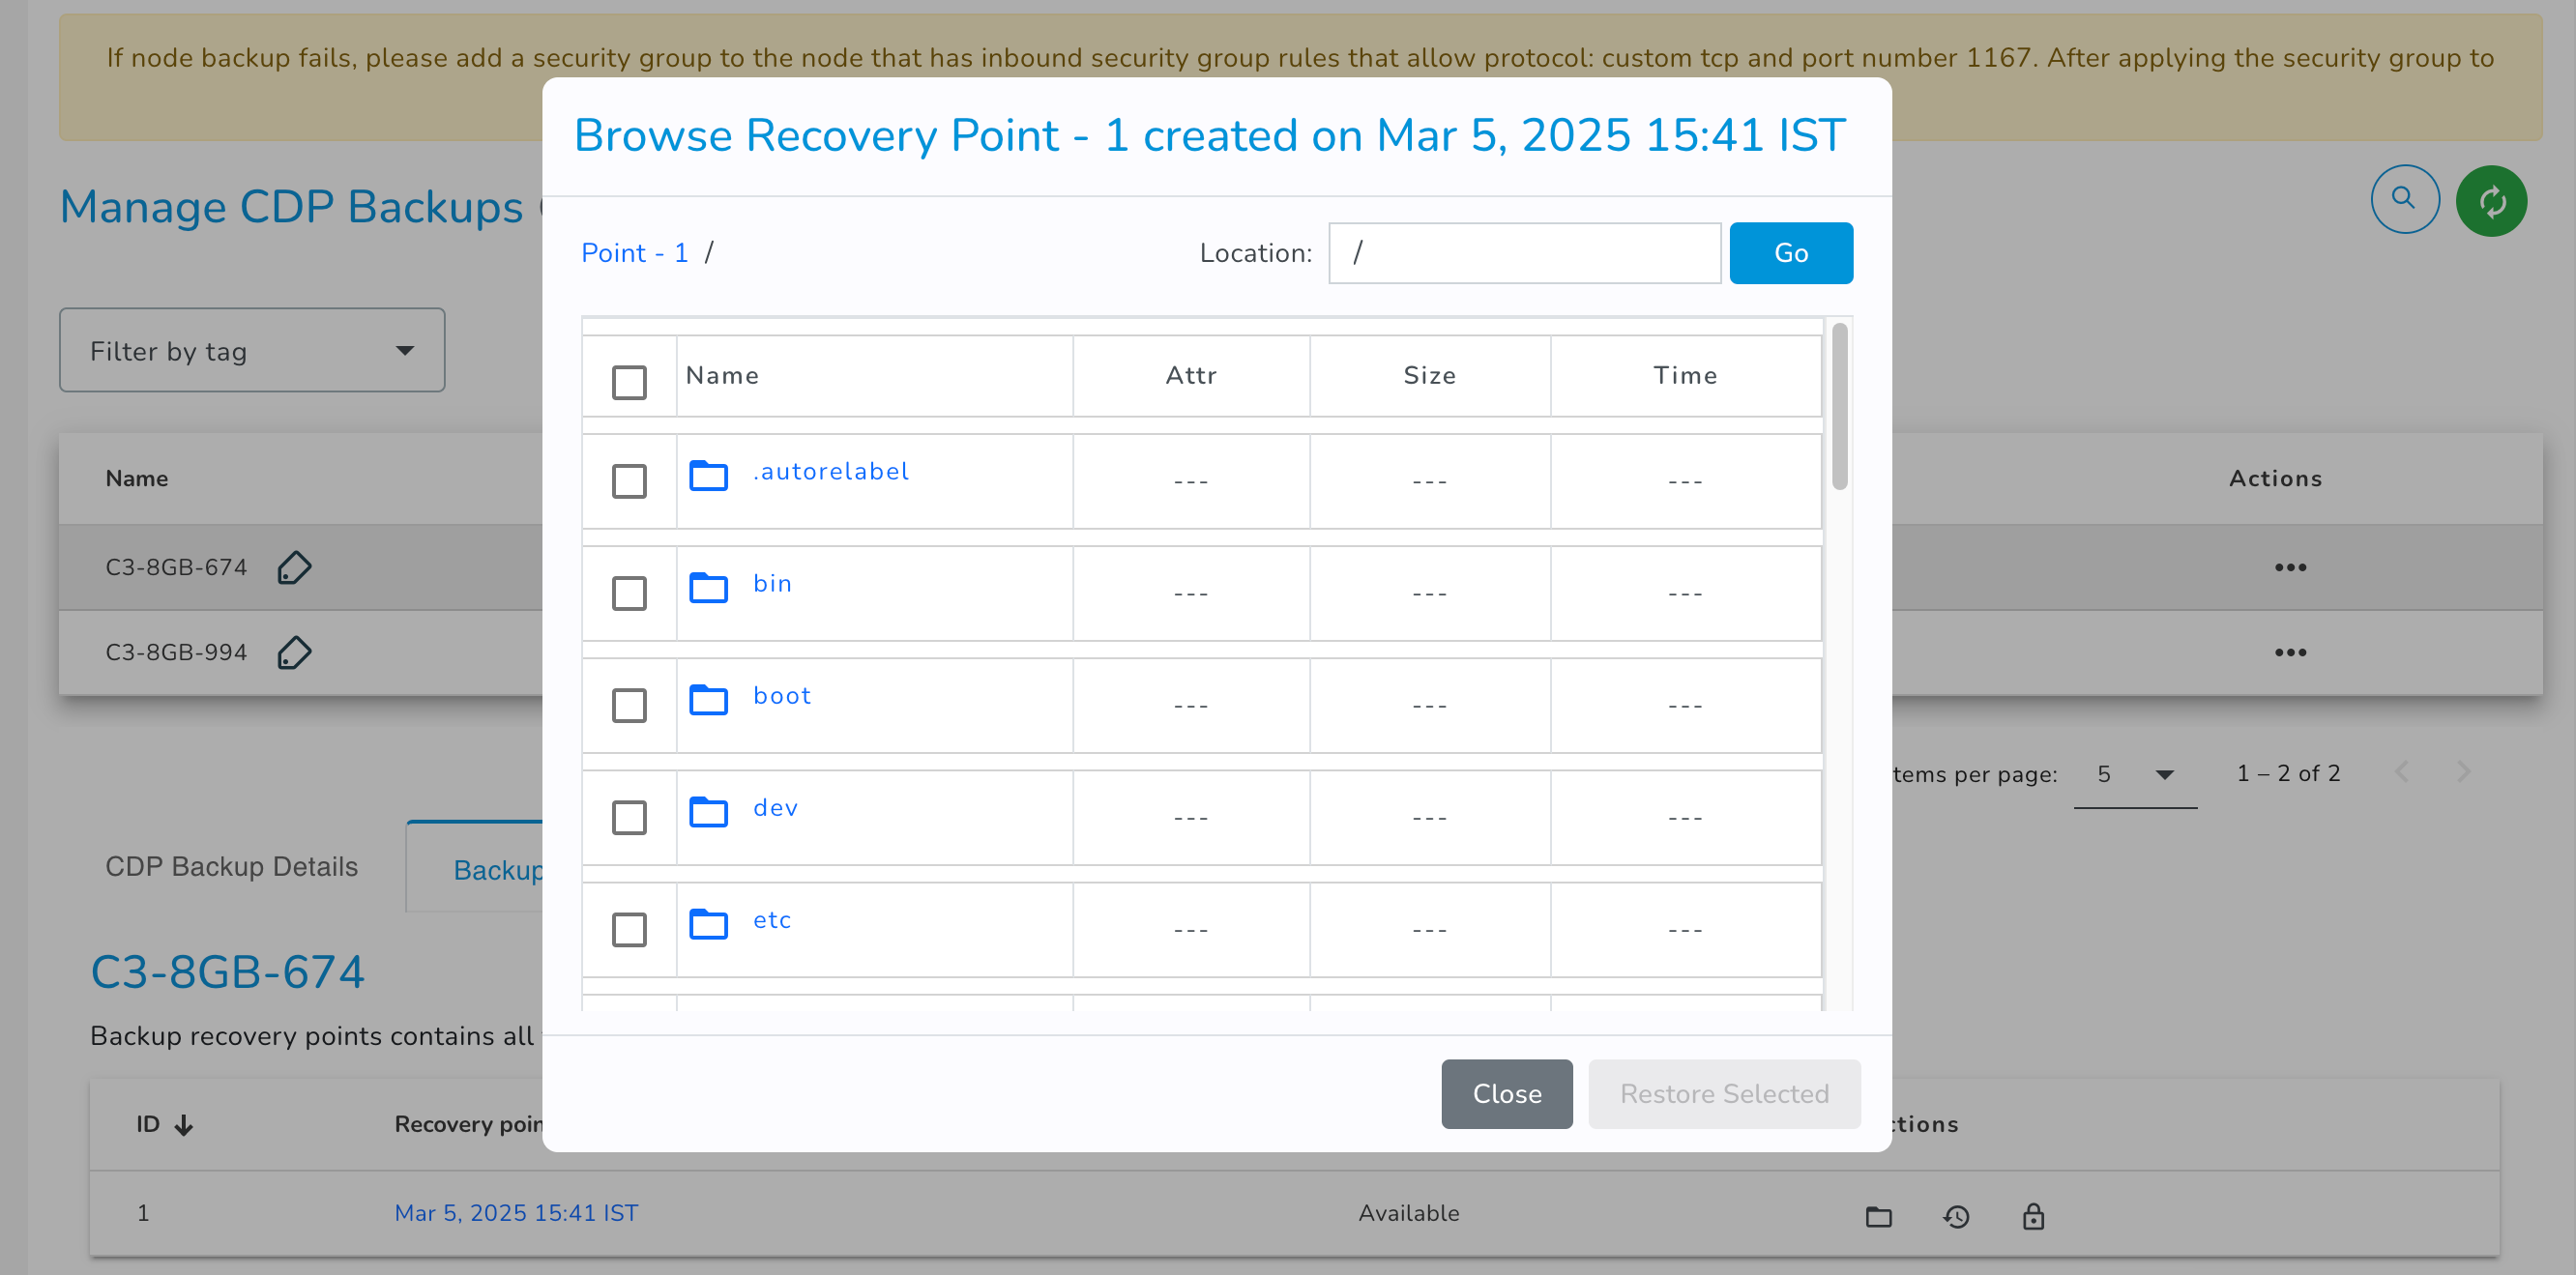
- The "Browse Recovery Point" pop-up window will appear on the screen.
- Select the required files/folders.
- After selecting the files/folder, click the Restore selected button.
- Now, you need to select the restore location radio button.
You can select the desired node for restoring the backup. The node list will display only nodes with an active CDP backup and the same operating system (OS) as the backup source node.
You have the option to select either the Default Location or an Alternate Location for restoration, based on your preference.
Default Location
If you selected the default location radio button, the selected files/folders will be restored at a different path, which is /e2e-backup-restore/ instead of the original path. You need to manually move folders/files from the restore path to the original path.
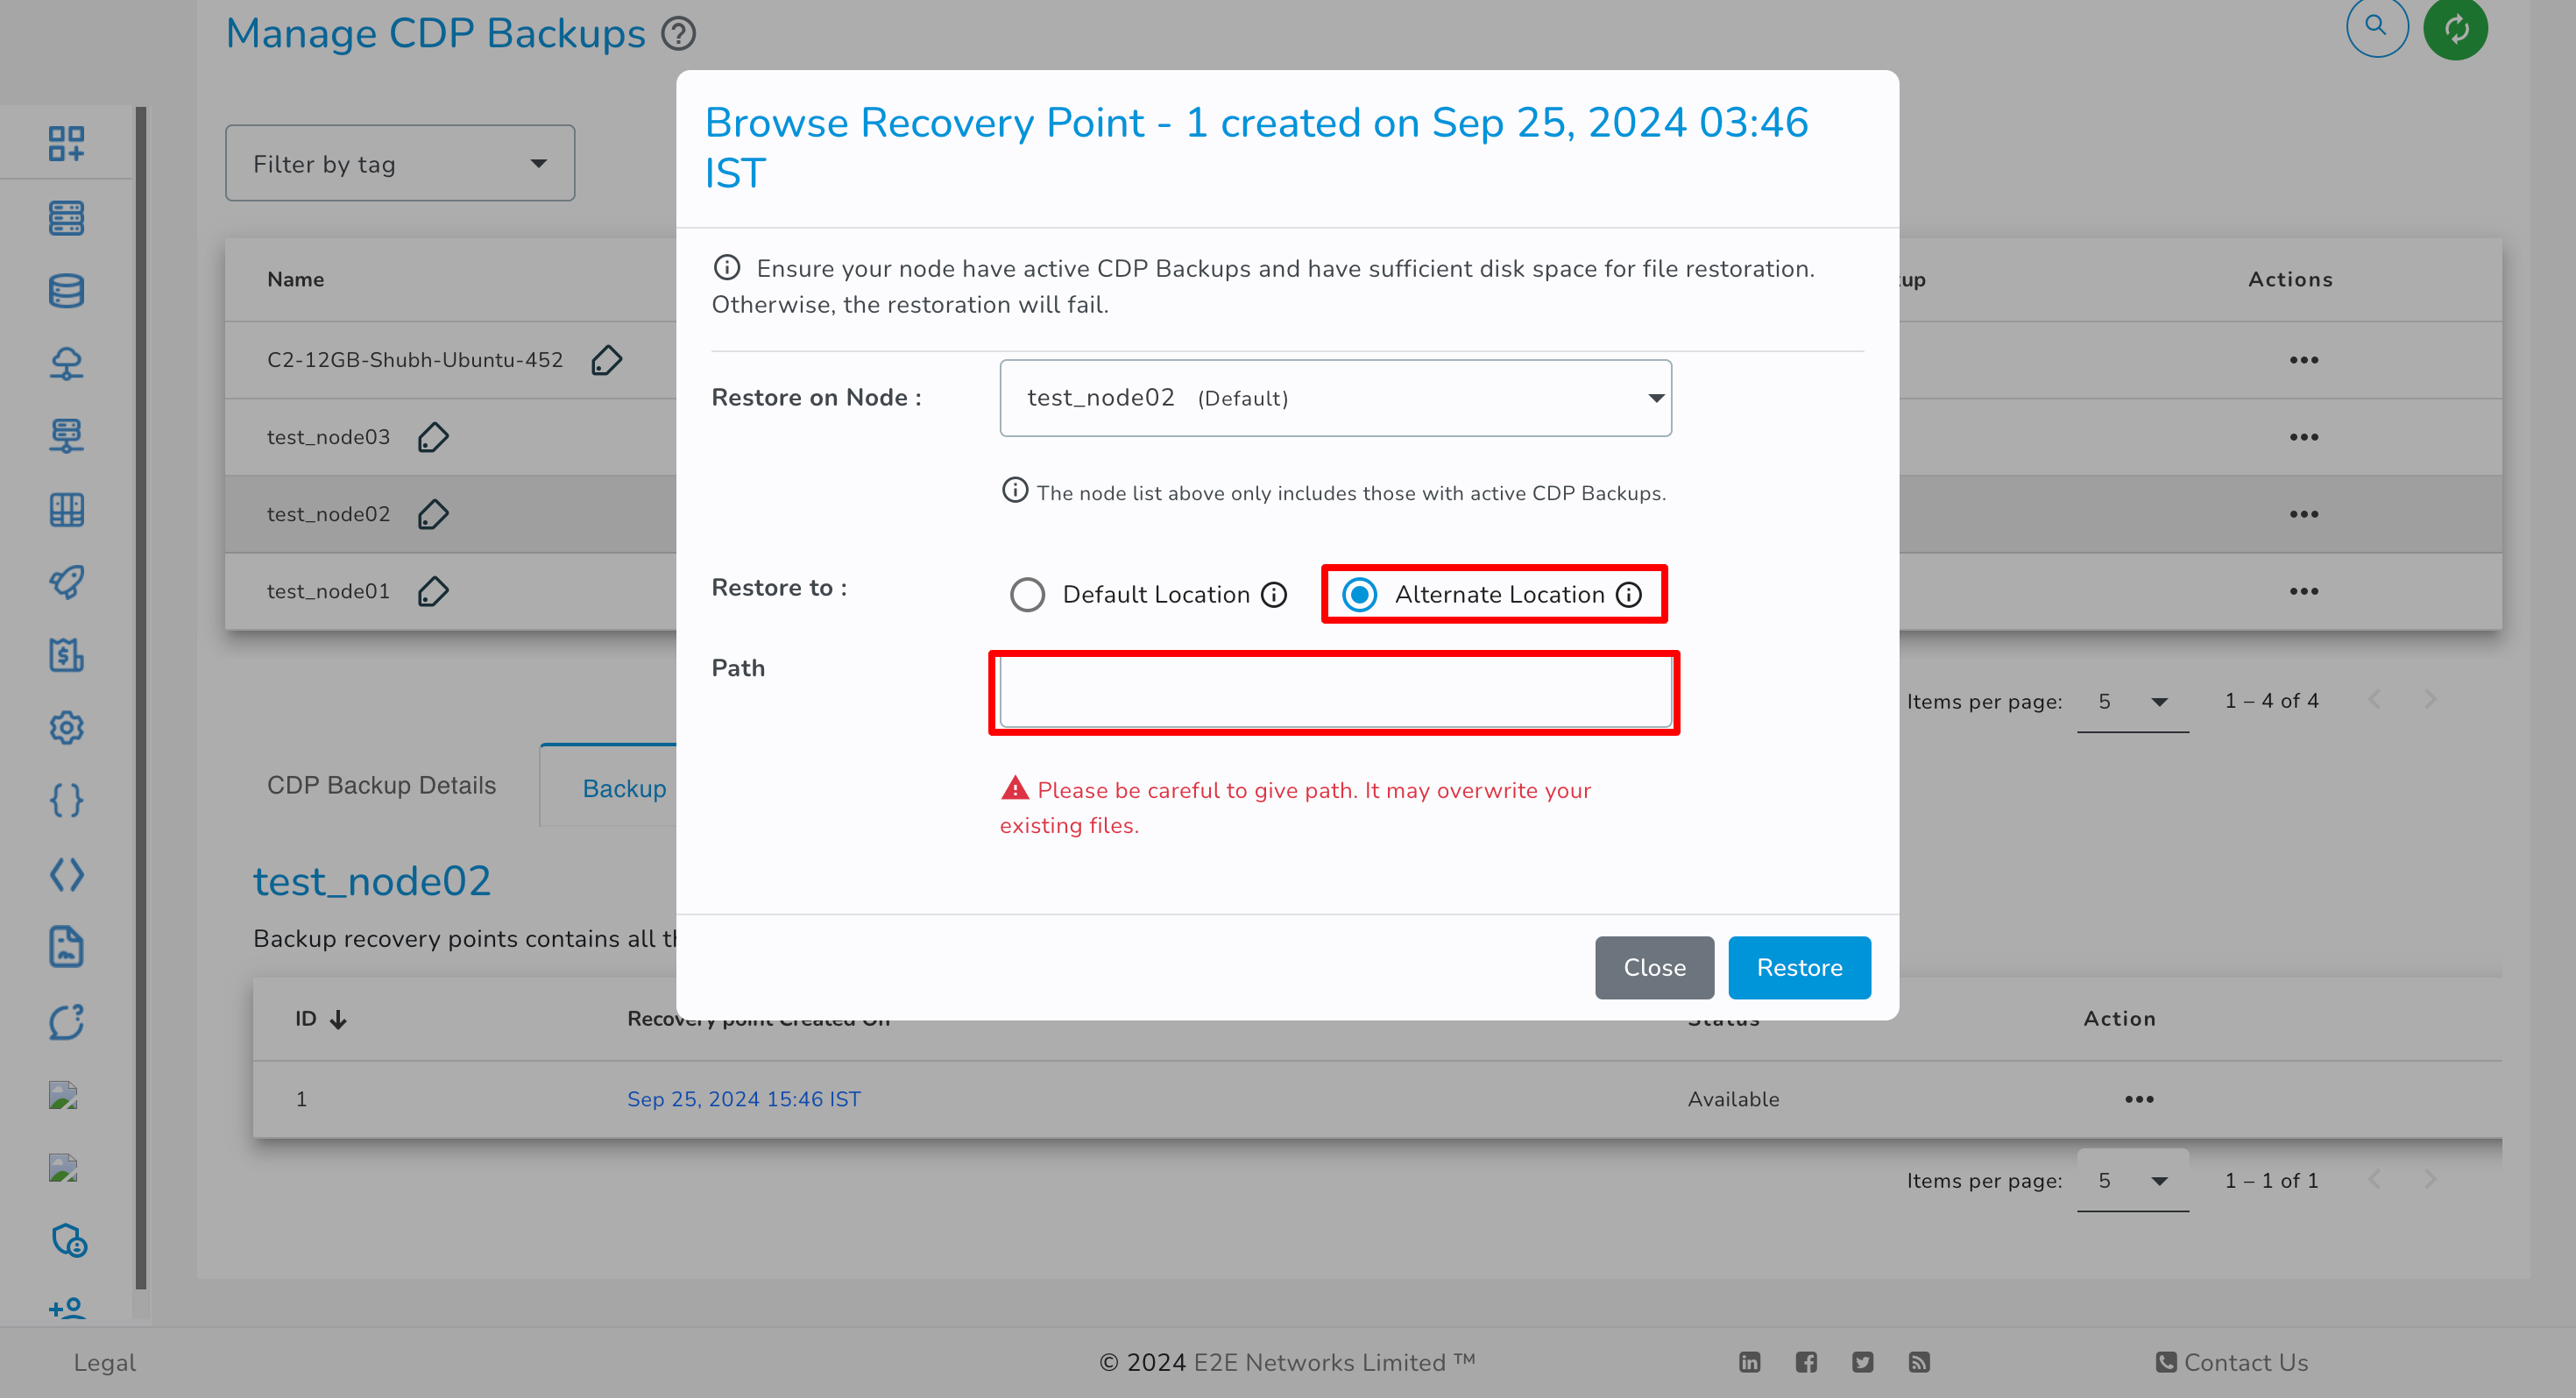
Alternate Location
If you selected the alternate location radio button, the selected files/folders will be restored at your specified location on a disk in your Node.
Note: Please ensure that enough disk space is available on your node to restore files. Otherwise, the restoration will fail, and due to restore failure, the node might face downtime. You will be solely responsible for this.
- An Information message will appear when the restoration process is initiated.
- The restoration process will take a few minutes for completion. It will depend on the size of files/folders you have selected for restoration.
- Once, Backup Restoration is completed successfully for your E2E Node, you will be notified via email, and the selected files/folders will be available in your E2E Node.
How to Take a Complete cPanel Backup
Introduction to cPanel
cPanel is a Linux-based web hosting control panel that simplifies website hosting. To take a complete backup of the website using cPanel, follow these steps:
- Log in to your cPanel.
- Select Backups in the Files section.

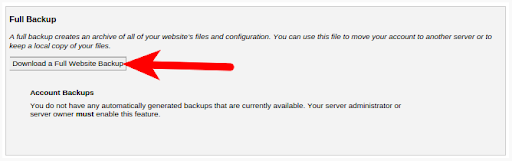
- In the Full Backup section, click the Download a Full Website Backup button.
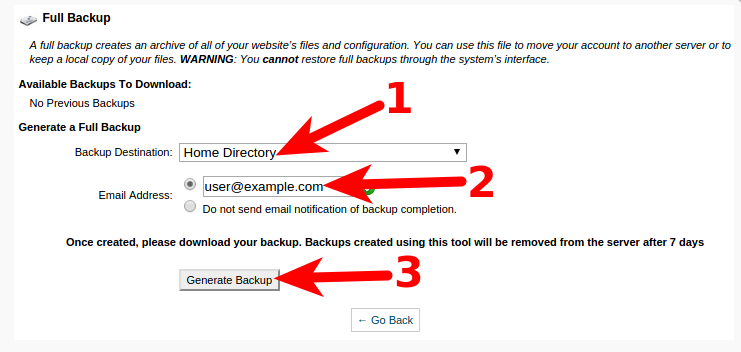
- On the next screen, make sure the Home Directory option is selected.
- If you want an email notification when the backup completes, enter your email address.
- Click the Generate Backup button to begin the Full cPanel Backups.
Step 7: Download the file from your cPanel located in the /home directory, which will start with backup and include the date, for example, backup-10.9.2015_15-52-08_example99.tar.gz.
You will now have a complete backup of your cPanel website.
Full cPanel Backup
Backup includes all website files, databases, and email accounts associated with your website hosted on cPanel.
cPanel backups are not automatically enabled on your E2E Node. You need to manually take a backup through the cPanel interface and follow the above steps.