
 E2E Cloud
Run ProteinMPNN on an instance
Install ProteinMPNN in your instance’s workspace and design new amino-acid sequences for a protein’s backbone, saved as a FASTA file. ProteinMPNN is an open-source model that takes the backbone of a protein structure and predicts sequences that fold into that same structure.
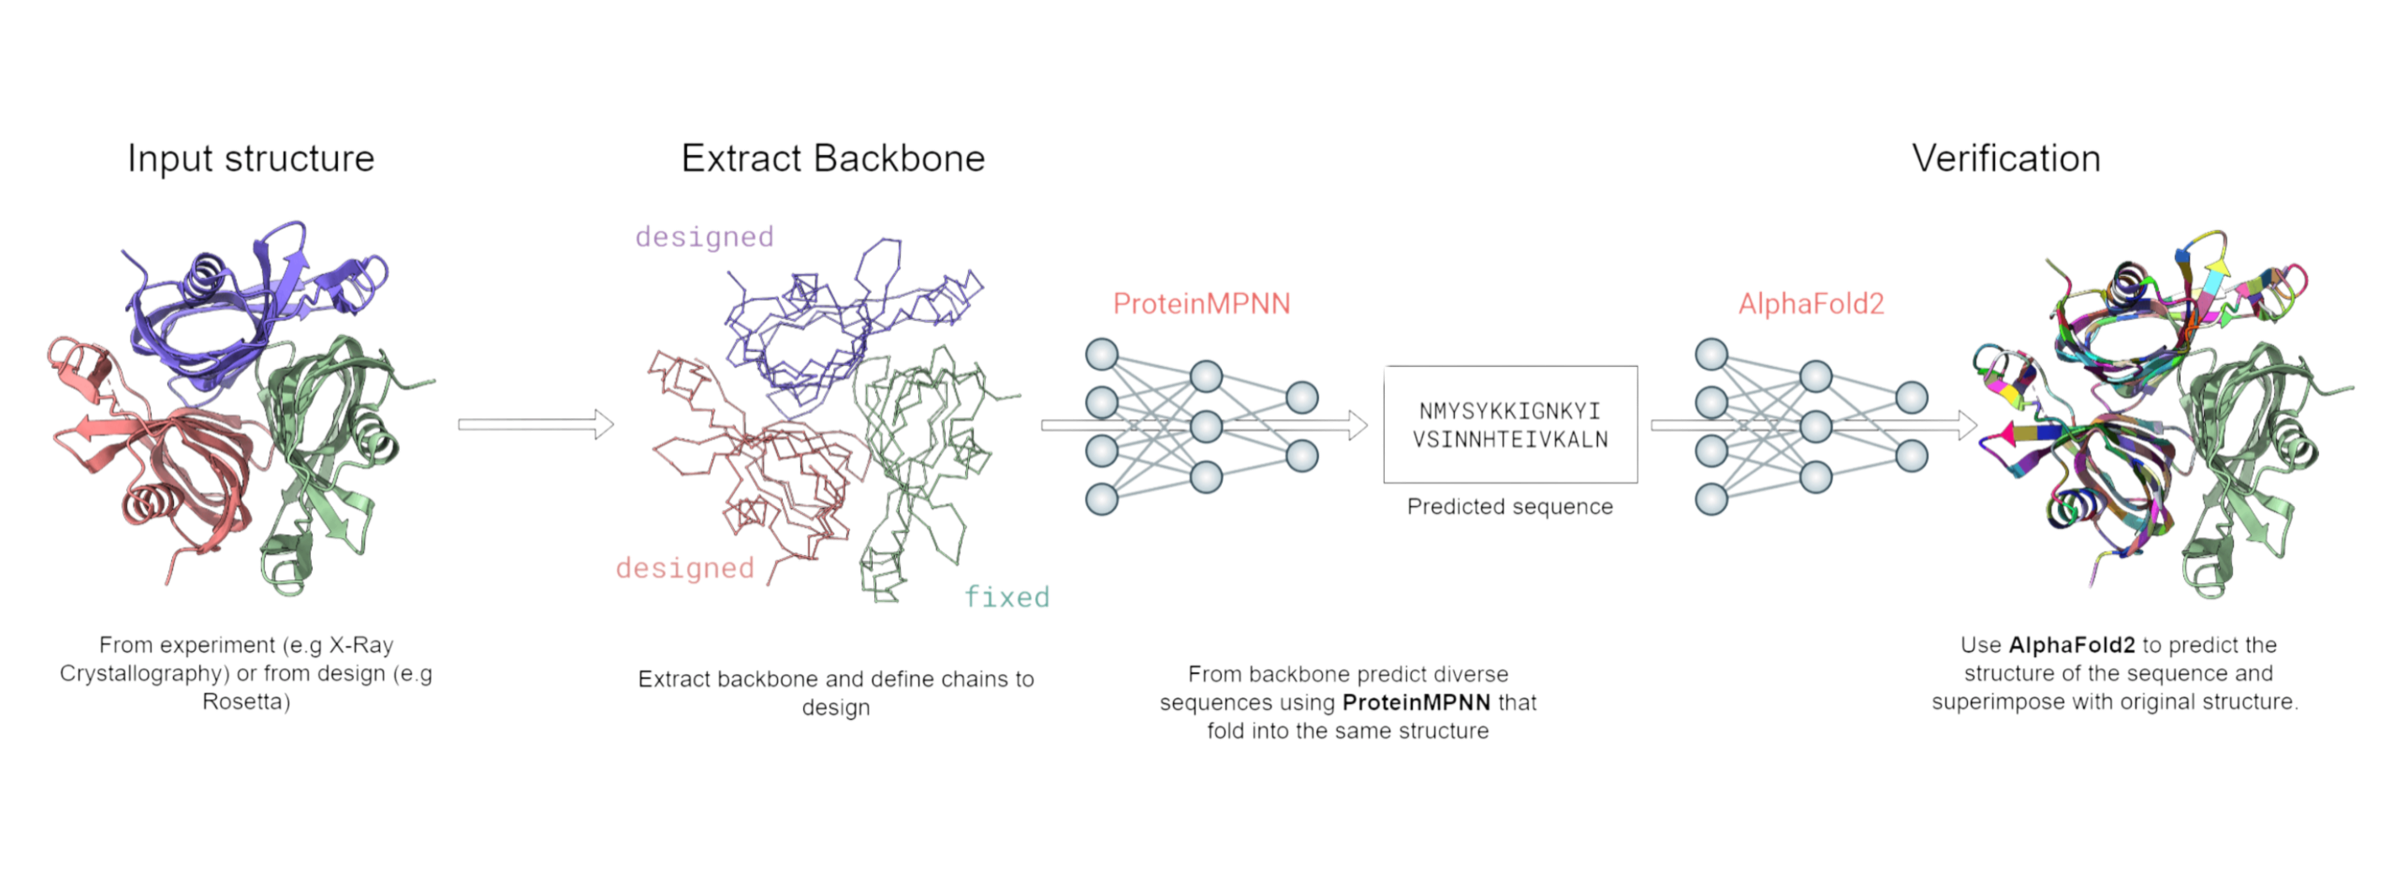
A design runs in four stages. You start from a protein structure, from an experiment such as X-ray crystallography or from a design tool such as Rosetta. Its backbone is extracted, and you choose which chains ProteinMPNN designs and which stay fixed. ProteinMPNN then predicts sequences for the designed chains that fold into the same structure. Finally, AlphaFold2 predicts the structure of each new sequence, and you superimpose it on the original to check the design.
Before you begin
Section titled “Before you begin”- An instance in the Running state. ProteinMPNN runs on a CPU or a GPU, and the install steps
below cover both. For a GPU, run
nvidia-smion the instance and check that CUDA Version shows 12 or later. See Create an instance. - A terminal on the instance: a JupyterLab terminal (File > New > Terminal), or an SSH
session as
root. See Connect to an instance over SSH. Run these commands in a terminal: a conda environment you activate there stays active until you close it, while in a notebook it lasts for one cell. gitandwgeton the image. If either is missing, install them asrootover SSH withapt-get update && apt-get install -y git wget. Packages installed withapt-getare lost at the next restart, so run that line again after one.
Install everything in the workspace at /home/jovyan, where it survives restarts and stops. The rest of the container is emptied each time the instance restarts. See
Where your files live on an instance.
Download ProteinMPNN
Section titled “Download ProteinMPNN”In the terminal, clone the ProteinMPNN repository into the workspace:
cd /home/jovyangit clone https://github.com/dauparas/ProteinMPNN.gitcd ProteinMPNNThe trained model weights come with the code, in three folders inside the ProteinMPNN folder. They hold the vanilla models, the soluble-protein models, and the models that read only the backbone’s alpha-carbon atoms. The steps here use the vanilla models, so the code is all you need to download.
Install conda in the workspace
Section titled “Install conda in the workspace”Install your own conda, Miniforge, in the workspace, so conda and the environment you create with
it survive restarts whatever the image includes. If you already installed it for
AlphaFold2, go straight to the eval
line. Otherwise, download and install it:
cd /home/jovyanwget https://github.com/conda-forge/miniforge/releases/latest/download/Miniforge3-Linux-x86_64.shbash Miniforge3-Linux-x86_64.sh -b -p /home/jovyan/miniforge3The -b option runs the install unattended and leaves your shell’s startup files unchanged. Then
make the conda command available in this terminal:
eval "$(/home/jovyan/miniforge3/bin/conda shell.bash hook)"Run this line in every new terminal before you use conda. A line added to .bashrc, by you or by
conda init, is lost at the next start.
Create the environment and install PyTorch
Section titled “Create the environment and install PyTorch”Create an environment with Python 3.11 in the workspace and activate it:
conda create -y -p /home/jovyan/envs/mlfold -c conda-forge --override-channels python=3.11conda activate /home/jovyan/envs/mlfoldThe PyTorch pre-built image pins every pip install, even inside a conda environment, to its own
build of PyTorch, so clear that pin before you install anything:
unset PIP_CONSTRAINTThen install PyTorch and NumPy. Run the CPU line on a CPU instance, or the two GPU lines on a GPU instance:
# CPUpip install torch torchvision numpy --index-url https://download.pytorch.org/whl/cpu# GPUpip install torch torchvision --index-url https://download.pytorch.org/whl/cu126pip install numpyThe GPU packages bring their own CUDA libraries, so you skip a separate CUDA install. Everything
goes into the environment in /home/jovyan/envs/mlfold and stays through restarts. In a new
terminal, run the eval line, then conda activate /home/jovyan/envs/mlfold.
Check that the model loads (optional)
Section titled “Check that the model loads (optional)”To check the install before a design run, load the default model. In the terminal, with the environment active, go to the ProteinMPNN folder and start Python:
cd /home/jovyan/ProteinMPNNpythonThen paste these lines at the Python prompt:
import torchfrom protein_mpnn_utils import ProteinMPNN
checkpoint_path = "/home/jovyan/ProteinMPNN/vanilla_model_weights/v_48_020.pt"device = torch.device("cuda:0" if torch.cuda.is_available() else "cpu")checkpoint = torch.load(checkpoint_path, map_location=device)model = ProteinMPNN(    ca_only=False, num_letters=21, node_features=128, edge_features=128, hidden_dim=128,    num_encoder_layers=3, num_decoder_layers=3, augment_eps=0.0,    k_neighbors=checkpoint["num_edges"],)model.load_state_dict(checkpoint["model_state_dict"])model.to(device).eval()print("Model loaded")
It prints Model loaded. Press Ctrl+D to leave Python.
Design sequences
Section titled “Design sequences”Give ProteinMPNN a structure in PDB format and the chains to design. This example designs chain A
of 5L33.pdb, a structure that comes with ProteinMPNN:
cd /home/jovyan/ProteinMPNNpython protein_mpnn_run.py \ --pdb_path inputs/PDB_monomers/pdbs/5L33.pdb \ --pdb_path_chains "A" \ --out_folder /home/jovyan/proteinmpnn-outputs \ --num_seq_per_target 1 \ --sampling_temp "0.1" \ --batch_size 1 \ --model_name v_48_020Change these options for your own design:
--pdb_path the structure to design for, in PDB format--pdb_path_chains the chains to design, separated by spaces, such as "A B"--out_folder where the results go--num_seq_per_target how many sequences to design--sampling_temp how varied the sequences are; higher values give more varied sequences--batch_size how many sequences to design at once; a larger batch uses more memory--model_name which model in the vanilla weights folder to useProteinMPNN redesigns only the chains you list and keeps every other chain fixed. For your own structure, put its PDB file in the workspace
and give its path. Keep the results folder under /home/jovyan so that the
results survive restarts.
Read the designed sequences
Section titled “Read the designed sequences”The sequences are written to /home/jovyan/proteinmpnn-outputs/seqs/5L33.fa, in FASTA format. The
first record is the input structure’s own sequence, with its scores and the run’s settings. Each
designed sequence follows as its own record:
>5L33, score=..., global_score=..., fixed_chains=[], designed_chains=['A'], model_name=v_48_020, git_hash=..., seed=...<input sequence>>T=0.1, sample=1, score=..., global_score=..., seq_recovery=...<designed sequence>In each designed record, T is the sampling temperature and sample is the sample’s number. The
score is the model’s score for the designed chains, and the global score is its score for the whole
structure. A lower score means the model was more confident in that part of the sequence. The
sequence recovery is the share of positions where the designed sequence matches the input sequence.
Check the designs with AlphaFold2
Section titled “Check the designs with AlphaFold2”To check that a designed sequence folds into the structure you started from, predict its structure with AlphaFold2 and superimpose the prediction on the original. Save the designed sequence as a FASTA file and see Run AlphaFold2 on an instance.
Find structures to design for
Section titled “Find structures to design for”You can download structures in PDB format from:
- RCSB Protein Data Bank, which holds experimentally determined structures, single chains and complexes.
- CASP14, the targets of the 14th structure prediction contest, such as target 41.
Researchers use protein design and structure prediction in work such as finding drug candidates, designing enzymes that break down plastic, and breeding drought-resistant crops.
Your designed sequences
Section titled “Your designed sequences”Your designed sequences are in /home/jovyan/proteinmpnn-outputs, and ProteinMPNN and its
environment stay in the workspace for the next run. To move the results to your computer, see
Copy files to and from an instance.
For lost files after a restart and other instance problems, see
Troubleshooting TIR Instances. For the other
design options, see the ProteinMPNN repository.