
 E2E Cloud
Set up a site-to-site VPN to Google Cloud
Connect your E2E VPC to a Google Cloud VPC with a site-to-site IPsec VPN. Private resources in your E2E VPC reach resources in your Google Cloud VPC directly. The traffic travels in an encrypted tunnel, so nobody on the internet can read it.
On the E2E side, the tunnel ends on an E2E Firewall, a FortiGate placed in your VPC. On the Google Cloud side, it ends on a Classic VPN gateway. A node in the E2E VPC sends traffic for Google Cloud to the firewall’s private IP, and the firewall sends it through the tunnel.
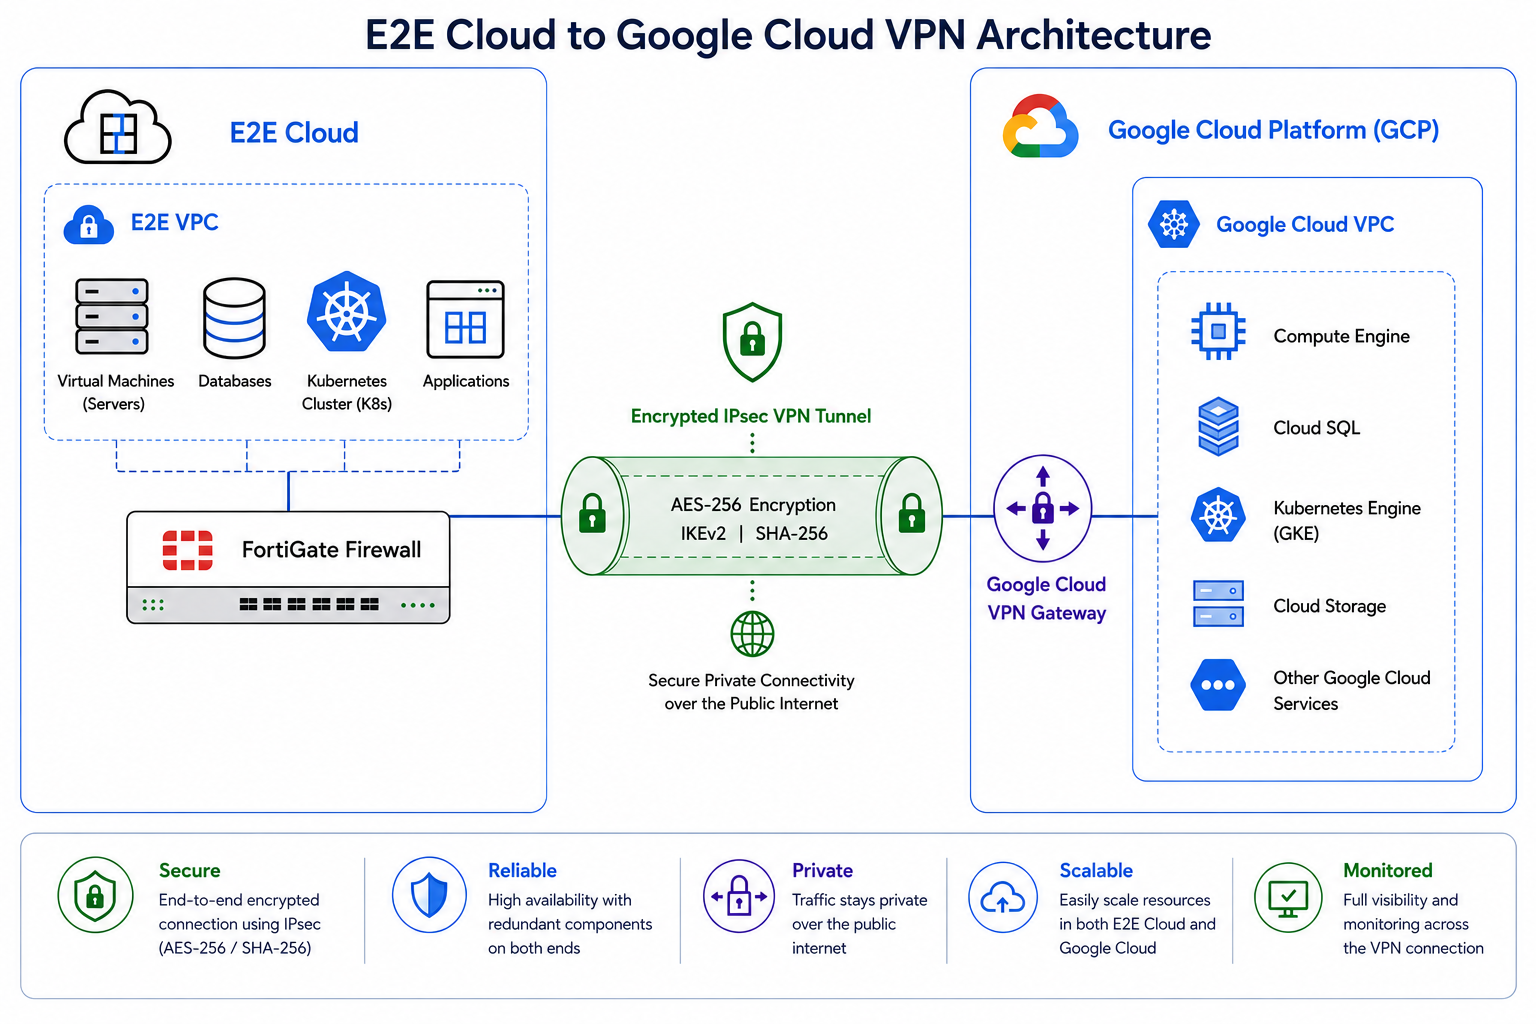
The tunnel uses Google Cloud’s Classic VPN, where you enter each network’s address range by hand. Google Cloud’s HA VPN, which shares routes automatically with a routing protocol called BGP, is set up differently.
Before you begin
Section titled “Before you begin”You need:
- An E2E Firewall with the status Running, in your E2E VPC. See Create a firewall. Its public IP is one of your reserved IPs. For what a reserved IP costs, see Reserved IP.
- The firewall’s public IP, under Public IP on Manage Firewall. In MyAccount, it is under Network > Firewall.
- Your E2E VPC’s private address range. See VPC.
- A node in your E2E VPC to test with. See Create a node.
- Access to the Google Cloud console, with permission to manage VPC networks, Compute Engine, and VPN.
Example values
Section titled “Example values”The steps use these placeholders. Write down each value as you get it.
| Placeholder | What goes there |
|---|---|
<public-ip> |
The firewall’s public IP, a reserved IP, such as 203.0.113.10. It is under Public IP on Manage Firewall. |
<firewall-private-ip> |
The firewall’s address in your E2E VPC. It is under Private IP on Manage Firewall. |
<e2e-vpc-range> |
Your E2E VPC’s address range, a /23 range when E2E picked it. It is under CIDR on Manage Virtual Private Cloud. |
<gcp-subnet-range> |
The range you give the Google Cloud subnet, a private /20 range. Choose one that shares no addresses with <e2e-vpc-range>. |
<gcp-vpn-gateway-ip> |
The static public IP you reserve in Google Cloud for the VPN gateway, such as 203.0.113.20. |
<pre-shared-key> |
The pre-shared key for the tunnel. You set it in Google Cloud and enter the same key on the FortiGate. |
<gcp-vm-ip> |
The Google Cloud test VM’s internal IP. |
<e2e-node-private-ip> |
The E2E test node’s private IP. It is on the node’s details in MyAccount. |
<interface> |
The E2E node’s network interface in the VPC, such as ens9. |
<gke-pod-range> |
Your GKE cluster’s Pod range, only for the optional GKE section. |
Set up Google Cloud
Section titled “Set up Google Cloud”Do these steps in the Google Cloud console. The names, such as
e2e-gcp, are examples. Later steps use them, so if you pick your own, use your names throughout.
The examples use the asia-south1 region, which is Google Cloud’s Mumbai region. Pick the
Google Cloud region closest to your work, and use the same one in every step.
Create a VPC network
Section titled “Create a VPC network”- In the left menu, go to VPC network > VPC networks.
- Click Create VPC network.
- Enter Name
e2e-gcp, and set Subnet creation mode to Custom. - Under New subnet, enter Name
e2e-gcp, Regionasia-south1, and IP range<gcp-subnet-range>. - Click Create. The subnet details page shows when the network is ready.
Create a test VM in Google Cloud
Section titled “Create a test VM in Google Cloud”You use this VM to check the tunnel once it is up.
- Go to Compute Engine > VM instances.
- Click Create instance.
- Enter Name
e2e-gcp-test-vm, and choose Regionasia-south1, the same region as the subnet. - Under Networking, attach the instance to the new VPC: Network
e2e-gcpand Subnetworke2e-gcp IPv4 (<gcp-subnet-range>). - Click Create. The VM reaches Running in one to two minutes.
- Note its Internal IP, your
<gcp-vm-ip>.
Reserve a static public IP
Section titled “Reserve a static public IP”The Classic VPN gateway needs a static external IP address.
- Go to VPC network > IP addresses.
- Click Reserve external.
- Enter Name
vpn-gateway, set Type to Regional, and choose Regionasia-south1. - Click Reserve.
The new address appears in the list of IP addresses. Note it: it is your <gcp-vpn-gateway-ip>,
and the VPN gateway uses it.
Create the Classic VPN gateway and tunnel
Section titled “Create the Classic VPN gateway and tunnel”-
In the search bar, search for VPN, and go to Network Connectivity > VPN.
-
Click Create VPN connection.
-
Select Classic VPN, and click Continue.
-
Under VPN Gateway, enter Name
e2e-gcp, Networke2e-gcp, Regionasia-south1, and IP addressvpn-gateway, the address you reserved. -
Under Tunnels, set:
- Tunnel name:
e2e-gcp-tunnel - Remote peer IP address:
<public-ip> - IKE version: IKEv2
- IKE pre-shared key: enter a strong key, or click Generate. Write it down as your
<pre-shared-key>. You enter the same key on the FortiGate. - VPN cipher selection: Custom
- Tunnel name:
-
Set the ciphers:
Phase Setting Value IKE Phase 1 Encryption AES-GCM-16-256 IKE Phase 1 PRF PRF-HMAC-SHA2-256 IKE Phase 1 Diffie-Hellman Group modp_2048 (Group 14) IKE Phase 2 Encryption AES-GCM-16-256 IKE Phase 2 PFS modp_2048 (Group 14) The Phase 1 and Phase 2 ciphers in Google Cloud must match the FortiGate settings exactly. A cipher mismatch is the most common reason a tunnel fails.
-
Set the routing:
- Routing option: Policy-based
- Remote network IP ranges:
<e2e-vpc-range> - Local subnetworks:
e2e-gcp - Local IP ranges:
<gcp-subnet-range>
-
Click Create. Google Cloud creates the VPN gateway and the tunnel.
Before you move on, write down <gcp-vpn-gateway-ip>, <pre-shared-key>, and
<gcp-subnet-range>.
Check the VPN route
Section titled “Check the VPN route”- Go to VPC network > Routes.
- Select the network
e2e-gcpand the regionasia-south1, and click View. - Check that a static route for
<e2e-vpc-range>is listed, with Next hop the VPN tunnele2e-gcp-tunnel.
The route can show the warning Next hop VPN tunnel is not in the ESTABLISHED state. That is expected at this point. The warning goes away once the FortiGate side is set up and the tunnel connects.
Allow traffic from E2E in the Google Cloud firewall
Section titled “Allow traffic from E2E in the Google Cloud firewall”This rule lets traffic from your E2E VPC into Google Cloud. Without it, the tunnel connects but Google Cloud drops that traffic, with no error.
-
In the left menu, go to VPC network > Firewall.
-
Click Create firewall rule.
-
Enter these settings:
Field Value Name e2e-vpcNetwork e2e-gcpDirection of traffic Ingress Action on match Allow Targets All instances in the network Source IPv4 ranges <e2e-vpc-range>Protocols and ports TCP: 22, 80, 443, and ICMP -
Click Create.
Port 22 is for the SSH test, and ports 80 and 443 are for web traffic. Add any other ports your application needs.
Set up the FortiGate
Section titled “Set up the FortiGate”Sign in to the FortiGate
Section titled “Sign in to the FortiGate”- In a browser, go to
https://<public-ip>. - Sign in with the username
adminand the password from the launch email E2E sent when the firewall first ran.
The FortiGate’s screen opens. For more on the first sign-in, see Sign in to the FortiGate.
Move the FortiGate’s screen to port 444
Section titled “Move the FortiGate’s screen to port 444”The FortiGate’s screen uses port 443, and the VPN tunnel uses it too. Move the screen to port 444 before you create the tunnel.
- Go to System > Settings.
- Under Administration Settings, change HTTPS port from
443to444. - Click Apply.
- Sign in again at
https://<public-ip>:444.
You can also make this change on the FortiGate’s command line. See Before you build an IPsec VPN on the same address.
Create a custom IPsec tunnel
Section titled “Create a custom IPsec tunnel”- Go to VPN > VPN Tunnels.
- Click Create new, and select Custom IPsec tunnel.
Set the network and authentication settings
Section titled “Set the network and authentication settings”In the Network section, enter:
| Setting | Value |
|---|---|
| Name | e2e-gcp |
| Remote gateway | Static IP Address |
| IP address | <gcp-vpn-gateway-ip> |
| Interface | port1 |
| NAT traversal | Enable |
| Keepalive frequency | 10 |
| Dead peer detection | Enable |
| DPD retry count | 3 |
| DPD retry interval | 20 seconds |
port1 carries the firewall’s public IP, and port2 its VPC address.
With NAT traversal set to Enable, the FortiGate uses it only if a device between the two gateways translates addresses.
In the Authentication section, enter:
| Setting | Value |
|---|---|
| Method | Pre-shared Key |
| Pre-shared key | <pre-shared-key> |
| IKE version | Version 2 |
Set Phase 1
Section titled “Set Phase 1”In the Phase 1 proposal section, enter:
| Setting | Value |
|---|---|
| Encryption | AES256GCM |
| PRF | PRFSHA256 |
| Diffie-Hellman group | 14 |
| Key lifetime | 86400 seconds |
Google Cloud and the FortiGate name the same settings differently:
| Google Cloud | FortiGate |
|---|---|
| AES-GCM-16-256 | AES256GCM |
| PRF-HMAC-SHA2-256 | PRFSHA256 |
| modp_2048 | Diffie-Hellman group 14 |
Set Phase 2
Section titled “Set Phase 2”-
In the Phase 2 selectors section, click Create new.
-
Enter the selector:
Setting Value Name e2e-gcpEncapsulation Tunnel Mode IP version IPv4 Local address <e2e-vpc-range>Remote address <gcp-subnet-range> -
In the Advanced section, enter:
Setting Value Encryption AES256GCM Replay detection Enable Perfect Forward Secrecy (PFS) Enable Diffie-Hellman group 14 -
Enter the remaining Phase 2 settings:
Setting Value Local port All Remote port All Protocol All Auto-negotiate Enable Autokey keep alive Enable Key lifetime 43200seconds -
Click OK to save the Phase 2 selector, and then OK to save the tunnel.
Add a static route to Google Cloud
Section titled “Add a static route to Google Cloud”- Go to Network > Static Routes, and click Create New.
- Set Destination to
<gcp-subnet-range>and Interface to the VPN tunnele2e-gcp. - Click OK.
This sends all traffic for Google Cloud into the tunnel.
Create the firewall policies
Section titled “Create the firewall policies”You need both policies for traffic to flow in both directions.
-
Go to Policy & Objects > Firewall Policy, and click Create New.
-
Enter Policy 1, E2E to Google Cloud, and click OK:
Field Value Name E2E-to-GCPIncoming interface port2, the internal sideOutgoing interface e2e-gcp, the VPN tunnelSource The address object for your E2E network Destination The address object for the Google Cloud subnet Service ALL Action ACCEPT NAT Disable -
Click Create New again, enter Policy 2, Google Cloud to E2E, and click OK:
Field Value Name GCP-to-E2EIncoming interface e2e-gcp, the VPN tunnelOutgoing interface port2, the internal sideSource The address object for the Google Cloud subnet Destination The address object for your E2E network Service ALL Action ACCEPT NAT Disable
Check that the tunnel is up
Section titled “Check that the tunnel is up”- In Google Cloud, go to Network Connectivity > VPN > Cloud VPN tunnels. The
e2e-gcp-tunnelstatus is Established. - On the FortiGate, go to VPN > VPN Tunnels. The
e2e-gcptunnel status is Up.
Test connections once the tunnel shows Established in Google Cloud and Up on the FortiGate. If either side shows another status, check that the pre-shared key and the cipher settings match exactly on both sides.
Send the E2E node’s traffic through the firewall
Section titled “Send the E2E node’s traffic through the firewall”-
In MyAccount, open your node list and note the E2E node’s Private IP, your
<e2e-node-private-ip>. The Google Cloud test VM’s internal IP is<gcp-vm-ip>. -
Sign in to the E2E node over SSH, and add a route to the Google Cloud subnet:
sudo ip route add <gcp-subnet-range> via <firewall-private-ip> dev <interface><gcp-subnet-range>is the Google Cloud subnet range.<firewall-private-ip>is the FortiGate’s private IP on the E2E side.<interface>is the node’s network interface in the E2E VPC, such asens9.
Traffic for Google Cloud now goes to the FortiGate, which sends it through the tunnel.
Test the connection
Section titled “Test the connection”Ping in both directions
Section titled “Ping in both directions”From the E2E node, ping the Google Cloud VM:
ping <gcp-vm-ip>From the Google Cloud VM, using the browser SSH in the Google Cloud console, ping the E2E node:
ping <e2e-node-private-ip>Replies in both directions show that the tunnel is up and the routes are right.
Sign in over SSH from the E2E node to the Google Cloud VM
Section titled “Sign in over SSH from the E2E node to the Google Cloud VM”-
On the E2E node, create an SSH key, and press Enter to accept the defaults:
ssh-keygen -t ed25519 -C "e2e-gcp-vpn" -
Show the public key, and copy it:
cat ~/.ssh/id_ed25519.pub -
In the Google Cloud console, go to Compute Engine > VM Instances. Select the test VM, and click Edit.
-
Under SSH Keys, click Add Item, paste the public key, and click Save.
-
From the E2E node, sign in to the Google Cloud VM:
ssh e2e-gcp-vpn@<gcp-vm-ip>
The sign-in succeeds over the tunnel.
(Optional) Reach E2E from GKE Pods
Section titled “(Optional) Reach E2E from GKE Pods”Follow these steps when Pods in a GKE cluster need to reach your E2E VPC through the same tunnel.
Pods use their own range, separate from <gcp-subnet-range>, so add that range to the tunnel too.
Without it, Pod traffic to E2E is dropped with no error.
Find the GKE Pod range
Section titled “Find the GKE Pod range”Run this, with your cluster’s name in place of cluster-1 and its location in place of
asia-south1:
gcloud container clusters describe cluster-1 \ --location asia-south1 \ --format="value(ipAllocationPolicy.clusterIpv4CidrBlock)"The output is the cluster’s Pod range, your <gke-pod-range>. The later steps use it.
Add the Pod range to the Google Cloud tunnel
Section titled “Add the Pod range to the Google Cloud tunnel”-
Go to Network Connectivity > VPN, and open the tunnel
e2e-gcp-tunnel. -
In Local IP ranges, add
<gke-pod-range>next to the existing subnet range.Before After Remote network <e2e-vpc-range><e2e-vpc-range>, unchangedLocal networks <gcp-subnet-range><gcp-subnet-range>and<gke-pod-range> -
Click Save.
Add a Phase 2 selector for the Pod range
Section titled “Add a Phase 2 selector for the Pod range”-
On the FortiGate, go to VPN > VPN Tunnels, and open
e2e-gcp. -
Click Create New Phase 2, and enter:
Setting Value Name e2e-gcp-gke-pod-cidrLocal Address <e2e-vpc-range>Remote Address <gke-pod-range>Encryption AES256GCM PFS Enable DH Group 14 Auto-Negotiate Enable Auto Key Keep Alive Enable -
Click OK.
Add a static route for the Pod range
Section titled “Add a static route for the Pod range”- Go to Network > Static Routes, and click Create New.
- Set Destination to
<gke-pod-range>and Interface to the tunnele2e-gcp. - Click OK.
Create an address object for the Pod range
Section titled “Create an address object for the Pod range”- Go to Policy & Objects > Addresses, and click Create New.
- Enter Name
gke-pod-cidrand Subnet<gke-pod-range>. - Click OK.
Add the Pod range to the firewall policies
Section titled “Add the Pod range to the firewall policies”- Go to Policy & Objects > Firewall Policy.
- Edit
E2E-to-GCP, addgke-pod-cidrto Destination Address, and click OK. - Edit
GCP-to-E2E, addgke-pod-cidrto Source Address, and click OK.
Add a route to the Pod range on the E2E node
Section titled “Add a route to the Pod range on the E2E node”Sign in to the E2E node over SSH, and add a route to the Pod range through the FortiGate’s private IP:
sudo ip route add <gke-pod-range> via <firewall-private-ip> dev <interface><gke-pod-range>is the GKE Pod range.<firewall-private-ip>is the FortiGate’s private IP.<interface>is the E2E node’s private network interface, such asens9.
Test from a GKE Pod
Section titled “Test from a GKE Pod”-
Start a test Pod:
kubectl run test --image=busybox:1.36 -it --rm -- sh -
From inside the Pod, ping a private IP in your E2E VPC:
ping <e2e-node-private-ip>
Replies show that GKE Pods reach your E2E VPC through the same tunnel.
Your E2E VPC and your Google Cloud VPC are now joined by a site-to-site VPN. Each E2E node that needs Google Cloud gets the same route to the Google Cloud subnet. To put another of your E2E networks behind the tunnel, see Attach a VPC to a firewall. For help with a tunnel that is not Up, see The site-to-site VPN tunnel does not come up.