
 E2E Cloud
Set up a site-to-site VPN to AWS
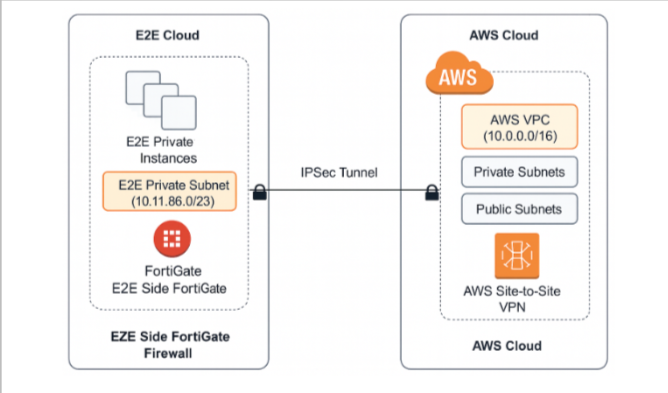
Connect your E2E VPC to a VPC on Amazon Web Services (AWS) with a site-to-site IPsec VPN. Resources on each side reach each other on their private IPs, and the traffic between them is encrypted. Use it to reach private services across both clouds, or to run one application across E2E and AWS.
On the E2E side, the tunnel ends on an E2E Firewall, a FortiGate placed in your VPC. On the AWS side, it ends on a virtual private gateway attached to the AWS VPC. A node in the E2E VPC sends traffic for AWS to the firewall’s private IP. The firewall sends it through the tunnel from its public IP, and AWS delivers it into the AWS VPC.
Before you begin
Section titled “Before you begin”You need:
- An Active VPC on E2E, and its address range. See VPC.
- A reserved IP for the firewall’s public address. A reserved IP is billed separately, for as long as you keep it. See Reserved IP for how to reserve one and what it costs.
- An AWS account that can create VPCs, subnets, gateways, VPN connections, and EC2 instances.
Example values
Section titled “Example values”The steps use these placeholders. Write down each value as you get it.
| Placeholder | What goes there |
|---|---|
<public-ip> |
The firewall’s public IP, a reserved IP, such as 203.0.113.10. It is under Public IP on Manage Firewall. |
<firewall-private-ip> |
The firewall’s address in your E2E VPC. It is under Private IP on Manage Firewall. |
<e2e-vpc-range> |
Your E2E VPC’s address range, a /23 range when E2E picked it. It is under CIDR on Manage Virtual Private Cloud. |
<aws-vpc-range> |
The address range you give the AWS VPC, a private /16 range. Choose one that shares no addresses with <e2e-vpc-range>. |
<aws-public-subnet-range> |
A /24 block inside <aws-vpc-range> for the public subnet. |
<aws-private-subnet-range> |
Another /24 block inside <aws-vpc-range> for the private subnet. |
<aws-outside-ip> |
The AWS end of the tunnel, a public address, from the VPN configuration file you download from AWS. |
<pre-shared-key> |
The pre-shared key for the tunnel, from the same file. |
<interface> |
The E2E node’s network interface in the VPC, such as ens4. |
<e2e-node-private-ip> |
The E2E test node’s private IP. It is on the node’s details in MyAccount. |
<aws-instance-private-ip> |
The AWS test instance’s private IP, from the AWS console. |
Create the firewall
Section titled “Create the firewall”- In MyAccount, under Network, click Firewall, and on Manage Firewall, click Add New Firewall. Create Firewall Appliance opens.
- Choose a plan.
- Enter Your Firewall name.
- Under Network, in Select VPC, pick your E2E VPC. The firewall gets a private IP in it.
- In Select IP, pick your reserved IP. It becomes the firewall’s public IP.
- Click Create My Firewall.
- Wait until the firewall’s Status is Running.
For every choice on the form, see Create a firewall.
On Manage Firewall, note the firewall’s Public IP, your <public-ip>, and its
Private IP, your <firewall-private-ip>.
Sign in to the FortiGate
Section titled “Sign in to the FortiGate”- In a browser, go to
https://<public-ip>. - Sign in with the username
adminand the password from the launch email E2E sent when the firewall first ran.
The FortiGate’s screen opens. For more on the first sign-in, see Sign in to the FortiGate.
Set up the AWS side
Section titled “Set up the AWS side”Do these steps in the AWS console. The names, such as E2E-AWS, are examples. If you change one,
use your name in every later step.
Create the AWS VPC
Section titled “Create the AWS VPC”- Go to VPC > Your VPCs, and click Create VPC.
- Enter Name
E2E-AWS, IPv4 CIDR<aws-vpc-range>, and Tenancy Default. - Click Create VPC.
Create the subnets
Section titled “Create the subnets”- Go to VPC > Subnets, and click Create Subnet.
- For the public subnet, enter Name
E2E-AWS-Public-Subnet, AZus-east-1a, and CIDR<aws-public-subnet-range>. Create it. - Create another subnet for the private side, with Name
E2E-AWS-Private-Subnet, AZus-east-1aorus-east-1b, and CIDR<aws-private-subnet-range>.
Create an internet gateway
Section titled “Create an internet gateway”- Go to Internet Gateways and create an internet gateway named
E2E-IGW. - Attach it to the
E2E-AWSVPC.
Create a NAT gateway
Section titled “Create a NAT gateway”The NAT gateway lets instances in the private subnet reach the internet, for updates, while staying unreachable from it.
- Go to NAT Gateways and click Create NAT Gateway.
- Enter Name
E2E-AWS-NAT-GW, set Availability-Mode to Regional, select theE2E-AWSVPC, and choose SubnetE2E-AWS-Public-Subnet. - Set Method of Elastic IP (EIP) allocation to Automatic.
- Click Create.
Set up the route tables
Section titled “Set up the route tables”- In the public route table, add a route with Destination
0.0.0.0/0and TargetE2E-IGW. - In the private route table, add a route with Destination
0.0.0.0/0and TargetE2E-AWS-NAT-GW. - Associate
E2E-AWS-Public-Subnetwith the public route table, andE2E-AWS-Private-Subnetwith the private route table.
Create a security group
Section titled “Create a security group”- Go to Security Groups and click Create Security Group.
- Name it
E2E-VPN-SG. - Add inbound rules for SSH (22), ICMP, and any ports your application needs.
Create a customer gateway
Section titled “Create a customer gateway”The customer gateway is how AWS knows the E2E end of the tunnel.
- Go to Customer Gateways and click Create.
- Enter Name
E2E-AWS-CGWand IP Address<public-ip>. - Click Create.
Create a virtual private gateway
Section titled “Create a virtual private gateway”- Go to Virtual Private Gateways and click Create.
- Name it
E2E-VGW. - Attach
E2E-VGWto theE2E-AWSVPC.
Create the site-to-site VPN connection
Section titled “Create the site-to-site VPN connection”- Go to VPN Connections and click Create.
- Enter Name
E2E-VPN-Connection, Target GatewayE2E-VGW, and Customer GatewayE2E-AWS-CGW. - Set Routing to Static, and under Static IP Prefixes, add
<e2e-vpc-range>. - Keep Target gateway type at Virtual private gateway and Customer gateway at
Existing. In Local IPv4 network CIDR, enter
<e2e-vpc-range>, and in Remote IPv4 network CIDR, enter<aws-vpc-range>: the same two ranges as the FortiGate’s Phase 2 selector. - Create the connection.
Download the VPN configuration
Section titled “Download the VPN configuration”- Select the VPN connection and click Download Configuration.
- Choose Vendor Fortinet, Platform Fortigate 40+ Series, Software the newest FortiOS (GUI) version listed, such as FortiOS 6.4.4+ (GUI), and IKE version ikev2, to match the firewall’s Phase 1 settings. Click Download.
The file holds what the FortiGate needs: the tunnel outside IPs, including <aws-outside-ip>, the
pre-shared keys, the inside IPs, and the Phase 1 and Phase 2 settings. Keep it open for the next
section.
Add routes to the E2E VPC
Section titled “Add routes to the E2E VPC”In both the public and the private route tables, add a route with Destination
<e2e-vpc-range> and Target the virtual private gateway, E2E-VGW.
Set up the FortiGate
Section titled “Set up the FortiGate”Do these steps on the FortiGate’s screen, taking each value from the configuration file you downloaded from AWS. These values are examples; wherever your file shows a different value, use yours.
Move the FortiGate’s screen to port 444
Section titled “Move the FortiGate’s screen to port 444”The FortiGate’s screen uses port 443, which an IPsec VPN on the same public IP also uses. Once the tunnel is up, the screen can stop opening on 443. Move the screen to port 444 before you set up Phase 1.
-
Open the FortiGate’s command line: on the screen, or over SSH:
ssh admin@<public-ip> -
Run:
config system globalset admin-sport 444end -
Sign in again at
https://<public-ip>:444. Use this address from now on.
You can also change the port on the screen. See Move the FortiGate’s screen to port 444.
Set up Phase 1
Section titled “Set up Phase 1”-
Go to VPN > VPN Tunnels, click Create new, and choose Custom IPsec tunnel.
-
Name the tunnel
E2E-AWS. Later steps use this name for the tunnel interface. -
Enter these settings:
Setting Value IP Version IPv4 Remote Gateway Static IP IP Address <aws-outside-ip>Local Interface port1 Pre-Shared Key <pre-shared-key>IKE Version IKEv2 Encryption AES128 Authentication SHA1 DH Group 2 Key Lifetime 28800 -
Turn NAT Traversal off. The firewall’s public IP sits on the FortiGate itself, with no address translation in between.
port1 carries the firewall’s public IP, and port2 its VPC address.
Set up Phase 2
Section titled “Set up Phase 2”-
Go to VPN > VPN Tunnels, select the
E2E-AWStunnel, and under Phase 2 Selectors, click Create New. -
Enter these settings:
Setting Value Name The name the AWS configuration gives Local Address <e2e-vpc-range>Remote Address <aws-vpc-range>Encryption AES128 Authentication SHA1 PFS Enabled DH Group 2 Key Lifetime 3600 Auto-negotiate Enabled
Set the tunnel interface addresses
Section titled “Set the tunnel interface addresses”- Go to Network > Interfaces, and edit the tunnel interface
E2E-AWS. - In IP, enter the FortiGate’s inside IP from the AWS file, a
169.254.x.xaddress. - In Remote IP/Netmask, enter the AWS inside IP from the file, a
169.254.x.x/30address. - Under Administrative Access, turn on PING, so that you can ping across the tunnel.
Add a static route to AWS
Section titled “Add a static route to AWS”- Go to Network > Static Routes, and click Create New.
- Set Destination to
<aws-vpc-range>and Interface to the VPN tunnel interface,E2E-AWS.
This sends all traffic for the AWS VPC into the tunnel.
Create the firewall policies
Section titled “Create the firewall policies”You need two policies, one for each direction. Go to Policy & Objects > Firewall Policy, and click Create New for each.
Give each policy a name; the FortiGate needs one to save it.
Policy 1, E2E to AWS:
| Field | Value |
|---|---|
| Name | E2E-AWS |
| Incoming Interface | port2 |
| Outgoing Interface | VPN tunnel E2E-AWS |
| Source | all |
| Destination | all |
| Service | ALL |
| Action | ACCEPT |
| NAT | Disable |
Policy 2, AWS to E2E, is the reverse of Policy 1:
| Field | Value |
|---|---|
| Name | AWS-E2E |
| Incoming Interface | VPN tunnel E2E-AWS |
| Outgoing Interface | port2 |
| Source | all |
| Destination | all |
| Service | ALL |
| Action | ACCEPT |
| NAT | Disable |
Click OK to save each policy.
Check that the tunnel is up
Section titled “Check that the tunnel is up”Check the tunnel status on both sides:
- In AWS, open the VPN connection and its Tunnel details. AWS lists two tunnels. These steps set up one, so Tunnel 1 reads Up and Tunnel 2 stays Down, and AWS warns that the connection is not using both tunnels. That is expected with one tunnel.
- On the FortiGate, go to VPN > VPN Tunnels. The
E2E-AWStunnel is Up.
If either side shows another status, check that the pre-shared key and the Phase 1 and Phase 2 settings match the AWS file exactly.
Create a test server on each side
Section titled “Create a test server on each side”To test private traffic over the tunnel, create:
- One node in your E2E VPC. See Create a node.
- One EC2 instance in the
E2E-AWSVPC.
Note each one’s private IP: <e2e-node-private-ip> and <aws-instance-private-ip>.
To sign in to the E2E node over SSH from the internet, it needs a public IP. Give it one in either of these ways:
- When you create the node, pick the VPC and turn on Enable this option to assign a static public IPv4 address for this node. This option is offered on node families other than E1.
- After you create it, attach a reserved IP to it, then sign in over SSH as usual. See Attach a reserved IP to a node. For what a reserved IP costs, see Reserved IP.
Send the node’s traffic through the firewall
Section titled “Send the node’s traffic through the firewall”Before the node can reach <aws-instance-private-ip>, it needs a route that sends traffic for AWS
to the firewall.
-
Sign in to the E2E node over SSH and list its routes:
ip route show -
A route to another private range through the VPC’s gateway, such as one on
ens4, can send AWS traffic the wrong way. If the node does not use that route, remove it:sudo ip route del <unused-range><unused-range>is the range of the route you are removing, asip route showlists it.
-
Add a route that sends traffic for the AWS VPC to the firewall:
sudo ip route add <aws-vpc-range> via <firewall-private-ip> dev <interface><aws-vpc-range>is the AWS VPC’s range.<firewall-private-ip>is the FortiGate’s private IP in your E2E VPC.<interface>is the node’s interface connected to the FortiGate’s network, such asens4.
All traffic for the AWS VPC now goes to the FortiGate, which sends it into the tunnel.
Test the connection
Section titled “Test the connection”Ping in both directions
Section titled “Ping in both directions”From the E2E node, ping the AWS instance’s private IP:
ping <aws-instance-private-ip>From the AWS instance, ping the E2E node’s private IP:
ping <e2e-node-private-ip>Replies in both directions show that the VPN works both ways.
Sign in over SSH from the E2E node to the AWS instance
Section titled “Sign in over SSH from the E2E node to the AWS instance”-
On the E2E node, create a key pair, if you do not have one, and show its public key:
ssh-keygen -t rsa -f ~/.ssh/e2e_aws_keycat ~/.ssh/e2e_aws_key.pub -
Sign in to the AWS instance with its PEM key, and add the public key to the end of this file:
~/.ssh/authorized_keys -
On the AWS instance, set the permissions:
chmod 700 ~/.sshchmod 600 ~/.ssh/authorized_keys -
From the E2E node, sign in to the AWS instance over the tunnel.
ubuntuis the user on an Ubuntu instance:ssh -i ~/.ssh/e2e_aws_key ubuntu@<aws-instance-private-ip>
The sign-in succeeds over the private IP.
Your E2E VPC and your AWS VPC now reach each other privately through the firewall, for ping in both directions and SSH from E2E to AWS. To add more nodes, give each one the route to the AWS VPC. To connect another VPC to the firewall, see Attach a VPC to a firewall. For help with a tunnel that stays down, see The site-to-site VPN tunnel does not come up.