Quick Start Guide
Create a Model Endpoint and send your first inference request. This guide is for developers and ML engineers using the TIR Dashboard and works for both first-time setup and team onboarding.
What you need before you start
| Requirement | Details for you |
|---|---|
| Account | Active account with access to Inference and at least one project and region. |
| Model source | Either a Model Repository linked to your project (object storage) or a Hugging Face model. For Hugging Face, you will need a Hugging Face access token (see below). |
| Framework | Know which framework/runtime your model needs (e.g. vLLM, Triton, PyTorch). Use the search bar in the UI to filter supported options. |
| Budget | Decide whether you want Hourly (can scale to 0 when idle) or Committed (always-on, fixed term) billing. |
About your Hugging Face token
If you choose Download from Hugging Face when creating your endpoint, the platform needs a Hugging Face (HF) access token to pull the model. Here is what you need to know.
| Topic | What you need to do |
|---|---|
| What it is | A personal or project token from Hugging Face that allows the platform to download the model (and, for gated models, to verify your agreement to the model license). |
| Where to create it | On Hugging Face: go to Settings → Access Tokens (https://huggingface.co/settings/tokens), then Create new token. Give it a name (e.g. "TIR Model Endpoints") and choose the right scope. |
| Recommended scope | For public models: Read is enough. For gated/private models: you need Read and you must accept the model license on the model page on Hugging Face before the platform can pull it. |
| Where to enter it | After creating your Hugging Face token, go to External Integration and create a new Hugging Face integration where you enter your token and save it. When you select Download from Hugging Face in the endpoint creation flow, the UI will prompt you to choose your HF Token Integration. The token is used only to download the model at deploy time (and for any re-pull if the endpoint is recreated). |
| Gated models | For models that require license acceptance (e.g. Llama, Mistral), accept the license on the model Hugging Face page with the same HF account that owns the token, then use that token in the platform. Otherwise the download will fail. |
| Troubleshooting | If endpoint creation fails with a Hugging Face error, check: (1) token is valid and not revoked, (2) token has Read scope, (3) for gated models, license is accepted, and (4) model ID (e.g. org/model-name) is correct and accessible. |
Step 1: Create a Model Endpoint
-
In the TIR Dashboard, go to Inference → Model Endpoints.
-
Click CREATE ENDPOINT.
-
Choose a framework/runtime and version
- Use the search bar to filter by name (e.g. vLLM, SGLang, Triton, PyTorch).
- Pick the version that matches your model (e.g. specific vLLM or Triton version). The UI shows supported frameworks for your region.
-
Choose how the model will be provided:
- Link with Model Repository — Attach a repository from your project (e.g. object storage or a pre-registered model). Select the repository and path. Use this when your model is already in your project storage.
- Download from Hugging Face — Pull a model snapshot directly from Hugging Face. Enter the Hugging Face model ID (e.g.
meta-llama/Llama-2-7b-chat-hf) and select your HF Token Integration when prompted. The platform will use the integration to download the model when the endpoint is deployed. See About your Hugging Face token above for token creation and integration setup.
- For a first endpoint, Download from Hugging Face is often fastest if your model is on HF: no need to upload to object storage. Have your HF token and model ID ready.
- If you use a Model Repository, ensure the model files are already uploaded and the path is correct; you can use the Validate option (if shown) before creating the endpoint.
- The framework you select must support your model type (e.g. LLM, embedding). Check the framework description in the UI or the product supported frameworks list.
Step 2: Pick a machine and plan
-
Choose a machine type
- Select CPU or GPU (and a specific GPU type, e.g. A100, L4) that fits your model size and latency needs. Larger or heavier models typically need a larger GPU.
- Availability and options depend on your region; switch the region in the dashboard if you do not see the instance you want.
-
Pick a billing plan
- Hourly billed — You pay per hour of endpoint uptime per replica. You can scale down to 0 workers when the endpoint is idle, so you pay nothing when it is not in use. Best for dev, test, or variable traffic.
- Committed — You reserve capacity for a fixed term (e.g. 1 or 3 months). Workers stay running (always-on availability); you cannot stop the endpoint during the commitment. Often a lower effective hourly rate. Best for production workloads with steady traffic.
- For evaluation or dev, start with Hourly and 1 replica so you can stop the endpoint when not in use.
- Committed is a commitment for the full term; choose it when you are sure you need always-on capacity.
Step 3: Configure scaling (optional)
-
Set worker counts
- Active Workers (minimum) — Number of replicas that are always running (when the endpoint is running). Set to 0 only if the plan allows scale-to-zero (typically Hourly); otherwise set at least 1.
- Max Workers (maximum) — Upper limit of replicas. Prevents runaway scale-up and caps cost.
-
When Active ≠ Max
- Autoscaling is enabled: the platform will scale between the minimum and maximum based on the policy you choose.
-
Choose a scaling policy
- Concurrent Request Count — Adjusts workers based on the total number of requests in the queue and those currently in progress. Good for workloads with variable request durations.
- Request Rate per Second — Adjusts workers based on the number of incoming requests per second. Good for steady, high-throughput API workloads.
- Custom — Adjusts workers based on a user-defined configuration. Note: the number of active workers must always be greater than zero to ensure the service remains available.
- For a first test, you can leave Active = Max = 1 (no autoscaling) to keep things simple.
- If you expect variable traffic, set a minimum (e.g. 1) and a higher max (e.g. 4), and pick a request-based or custom-metrics policy so the endpoint scales with load.
Step 4: Deploy and test
-
Deploy
- Click Create (or Deploy) to start endpoint creation. The endpoint will appear in the list with status Deploying (or similar). The first deployment can take 5–15+ minutes while the platform pulls the model (e.g. from Hugging Face or your repository) and starts the runtime.
-
Wait for healthy status
- When the endpoint status is Running (or Ready / Healthy), it is ready to accept requests. You can see status on the endpoint detail page. If it stays in Deploying for a long time, check Logs and Deployment events for errors (e.g. bad Hugging Face token, wrong model ID, or insufficient quota).
-
Send a test request
- Open the endpoint detail page and copy the Root Endpoint URL (and API key or auth token if required).
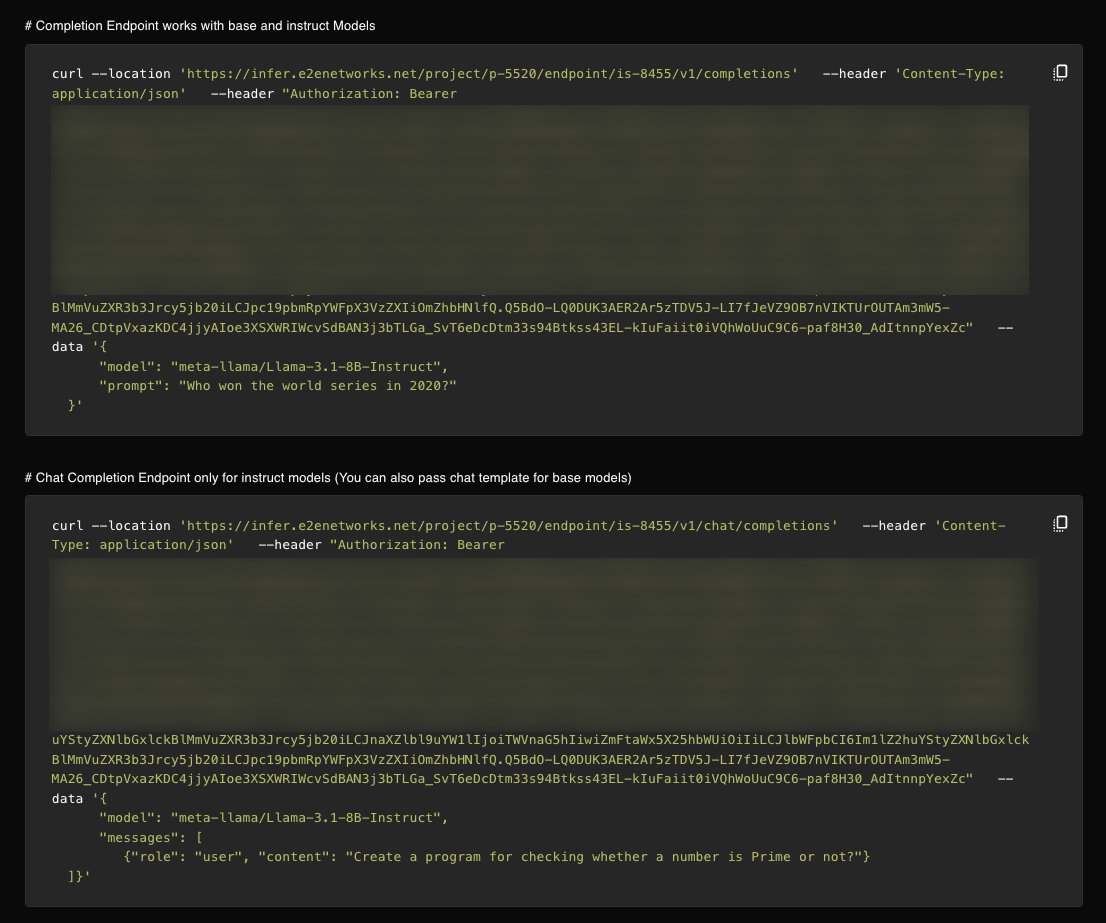
The Root Endpoint is the base URL of your deployed model and serves as the prefix for all routes. To call a specific route, append it to the Root Endpoint. For example:
- Root Endpoint:
https://infer.e2enetworks.net/project/p-5520/endpoint/is-8528/ - To call
/v1/chat/completions, use:https://infer.e2enetworks.net/project/p-5520/endpoint/is-8528/v1/chat/completions
- Use your preferred client to send a request:
- cURL — Example below for an OpenAI-compatible endpoint.
- OpenAI SDK — Point the client at your endpoint URL (e.g. set
base_urlto your endpoint) and use the samemodel,messages, and other parameters you use with OpenAI.
- Your app — Use the endpoint URL and auth in your application code the same way you would for any REST inference API.
-
Use the endpoint page for visibility
- Logs — Inference logs and (when available) per-replica logs to debug failures or slow responses.
- Deployment events — When the endpoint was created, updated, or restarted.
- Hardware and service metrics — CPU, GPU, memory, request rate, latency, errors.
- Request logs — When enabled, see who called the endpoint and when (useful for compliance and usage analysis).
Example: cURL (OpenAI-compatible endpoint)
Replace YOUR_ROOT_ENDPOINT with the Root Endpoint from your endpoint detail page (e.g. https://infer.e2enetworks.net/project/p-5520/endpoint/is-8528/):
curl -X POST "YOUR_ROOT_ENDPOINT/v1/chat/completions" \
  -H "Authorization: Bearer YOUR_AUTH_TOKEN" \
  -H "Content-Type: application/json" \
  -d '{
    "model": "your-model",
    "messages": [{"role": "user", "content": "Hello, say something short."}]
  }'
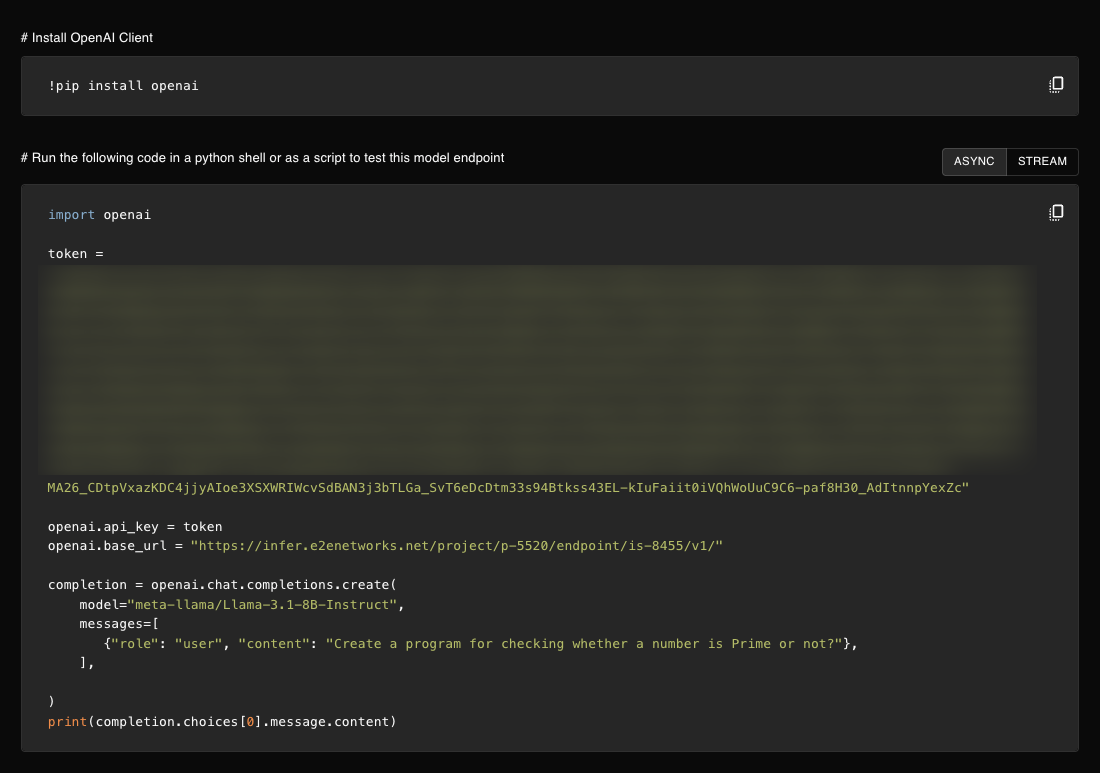
Example: OpenAI Python SDK
For OpenAI-compatible endpoints, you can use the official OpenAI client with a custom base URL:
from openai import OpenAI

client = OpenAI(
    base_url="YOUR_ROOT_ENDPOINT/v1",  # Root Endpoint + /v1
    api_key="YOUR_AUTH_TOKEN"
)

response = client.chat.completions.create(
    model="your-model",
    messages=[{"role": "user", "content": "Hello!"}]
)
print(response.choices[0].message.content)
Async invocation: For long-running or batch workloads, you can enable async invocation so requests are queued and processed in the background; when done, the response is stored at a destination you specify. See Async Invocation for setup and usage.
Next steps after your first request
- Integrate the endpoint into your app (sync or async; for OpenAI-compatible endpoints, point your OpenAI client at the endpoint URL).
- Adjust scaling (min/max workers, scaling policy) if traffic grows or varies.
- Enable request logs and monitoring for production; set up security groups and private IPs if required.
- Manage cost: for Hourly endpoints, stop or scale to 0 when idle; for Committed, plan your term and use the billing dashboard to track usage.