Custom Containers
Deploy your own custom container image for model inference using an API handler of your choice.
Overview
Use a fully custom container when you need to:
- Control how inference requests are processed
- Add preprocessing/postprocessing logic
- Serve a model not supported by prebuilt containers
This guide covers:
- Writing a custom API handler
- Packaging it into a container
- Launching as a Model Endpoint
- Using uploaded model weights for faster startup
Step 1: Create an API Handler
Use KServe protocol for predict API structure.
from kserve import Model, ModelServer
from typing import Dict

class MyCustomModel(Model):
    def __init__(self, name: str):
        super().__init__(name)
        self.ready = False
        self.load()

    def load(self):
        self.model = ...  # Load from disk or remote
        self.ready = True

    def predict(self, payload: Dict, headers: Dict = None) -> Dict:
        inputs = payload["instances"]
        text = inputs[0]["text"]
        output = ...  # Inference
        return {"predictions": output}

if __name__ == "__main__":
    model = MyCustomModel("custom-model")
    ModelServer().start([model])
Save this file as:
model_server.py
Step 2: Package Into Docker Image
Create a Dockerfile:
FROM pytorch/torchserve-kfs:0.8.1-gpu

WORKDIR /app
COPY requirements.txt ./
RUN pip install --no-cache-dir -r requirements.txt
COPY model_server.py ./

CMD ["python", "model_server.py"]
Build & push image:
docker build -t <docker-user>/custom-kserve-model .
docker push <docker-user>/custom-kserve-model
Step 3: Launch Custom Container Endpoint
- Create new Model Endpoint
- Select Custom Container
- Choose compute plan (GPU recommended)
- Enter Container Image URL
- Add environment variables if required
- Launch and wait until status is Running
When ready, call endpoint using the standard REST API.
Step 4: Optional — Faster Startup Using Uploaded Weights
Upload model weights via Object Storage:
mc cp -r <local-model-folder> custom-model/
Modify load() to fetch from /mnt/models instead of remote hosting.
Example — API Request
curl -X POST https://your-endpoint-url/v1/models/custom-model:predict \
  -H "Authorization: Bearer YOUR_AUTH_TOKEN" \
  -H "Content-Type: application/json" \
  -d '{"instances": [{"text": "Hello!"}]}'
Notes
- Keep image size small to reduce startup time
- GPU instances recommended for large transformer models
- Always validate endpoint logs for readiness
Your custom container model server is now operational and ready for API integration!
Deploy from GitHub Repository
AI Cloud now supports deploying model endpoints directly from GitHub repositories with custom frameworks. This feature enables you to:
- Deploy your own custom models directly from GitHub repositories
- Automatically restart inference when pull requests are merged
Prerequisites
Before deploying from a GitHub repository, you need to set up GitHub integration:
- Navigate to Labs Experimental → External Integrations
- Create a GitHub integration with your Personal Access Token
- For detailed instructions, see External Integrations documentation
Step 1: Create Model Endpoint from GitHub Repository
Follow these steps to deploy a model endpoint directly from your GitHub repository:
-
Navigate to Model Endpoints
Go to Inference → Model Endpoints from the sidebar. -
Initiate Endpoint Creation
Click CREATE ENDPOINT to begin the configuration process. -
Select Framework
Choose Custom Framework from the available options. -
Configure GitHub Integration
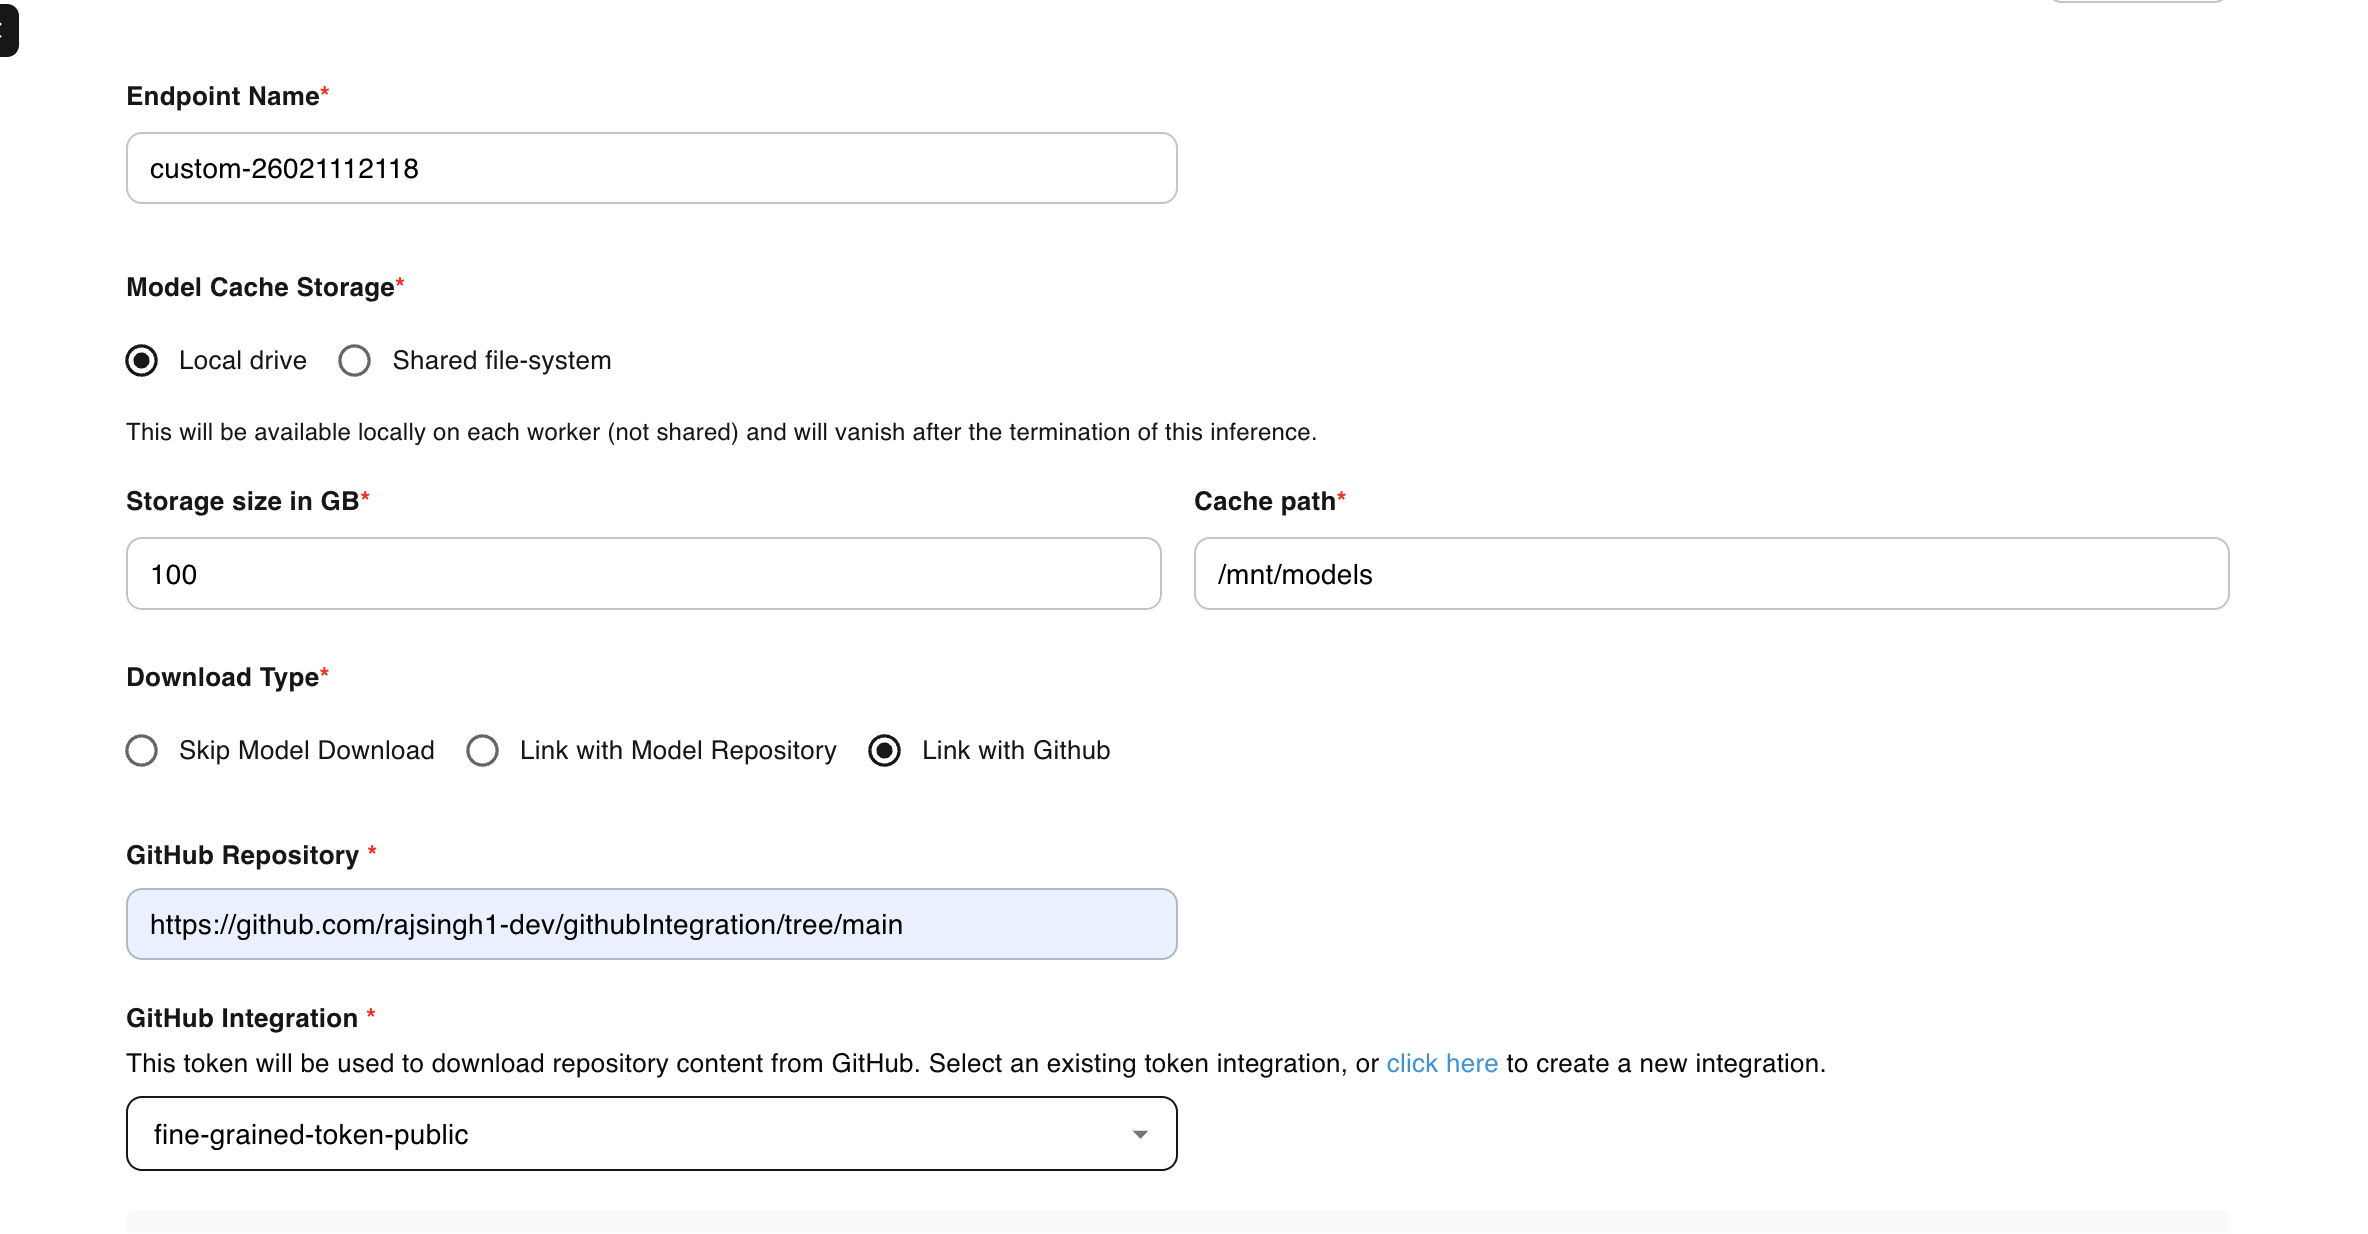
Set the download type to Link with Github to enable repository-based deployment.
-
Specify Repository Details
Enter the complete GitHub repository URL, including the branch:https://github.com/<username>/<repo>/tree/<branch>Example:
https://github.com/myorg/ml-inference/tree/main -
Select GitHub Integration
Choose your pre-configured GitHub integration from the dropdown menu. -
Select Image
Specify whether your container image is Public or Private. -
Define Startup Command
Configure the bash command to execute on container startup. This typically includes installing dependencies and launching your application:["sh", "-c", "pip3 install -r /mnt/models/<repo-name>/requirements.txt && python3 /mnt/models/<repo-name>/app.py"]Example:
["sh", "-c", "pip3 install -r /mnt/models/flask-app-inference/requirements.txt && python3 /mnt/models/flask-app-inference/app.py"] -
Configure Resources and Scaling
Select appropriate compute resources (CPU/GPU) and configure scaling settings based on your workload requirements. -
Deploy Endpoint
Click CREATE and monitor the deployment status until the endpoint reaches Running state.
Step 2: Set Up Auto-Restart on Pull Request Merge
You can configure automatic inference restarts when pull requests are merged to your main branch. This ensures your model endpoint always runs the latest code.
Add GitHub Workflow
Create a workflow file in your repository:
.github/workflows/deploy.yaml
Workflow Configuration
name: Auto-restart E2E Inference on PR Merge

on:
  pull_request:
    types: [closed]
    branches:
      - <your-branch-name>  # Replace with your target branch (e.g., main, master, develop)

jobs:
  restart-inference:
    if: github.event.pull_request.merged == true
    runs-on: ubuntu-latest

    steps:
      - name: Restart inference via E2E API
        env:
          API_KEY: ${{ secrets.E2E_API_KEY }}
          AUTH_TOKEN: ${{ secrets.E2E_AUTH_TOKEN }}
        run: |
          echo "Restarting inference after merge..."

          URL="https://api.e2enetworks.com/myaccount/api/v1/gpu/github-inferences/restart/?apikey=${API_KEY}"

          curl --fail --show-error -X PUT "$URL" \
            -H "Authorization: Bearer ${AUTH_TOKEN}" \
            -H "Content-Type: application/json" \
            -d '{
              "inference_uuids": [
                "uuid-1",
                "uuid-2",
                "uuid-3"
              ]
            }'
Configuration Steps
-
Add GitHub Secrets:
- Go to your GitHub repository → Settings → Secrets and variables → Actions
- Add
E2E_API_KEYwith your E2E Cloud API key - Add
E2E_AUTH_TOKENwith your E2E Cloud authentication token
-
Update Inference UUIDs:
- Replace
"uuid-1","uuid-2","uuid-3"with your actual model endpoint UUIDs - Find UUIDs in the E2E Cloud dashboard under Inference → Model Endpoints
- Replace
-
Commit and Push:
git add .github/workflows/deploy.yaml
git commit -m "Add auto-restart workflow"
git push origin main
How It Works
- When a pull request is merged to the
mainbranch, the GitHub Action triggers - The workflow calls the E2E Cloud API to restart specified inference endpoints
- The model endpoints automatically pull the latest code from your repository
- Your inference service restarts with the updated code
Benefits
- Continuous Deployment: Automatically deploy code changes without manual intervention
- Version Control: Track all changes through Git commits and pull requests
- Team Collaboration: Multiple developers can contribute with automated deployments
- Custom Frameworks: Use any framework or custom code your project requires