Launching LLAMA 3 Inference Using TensorRT-LLM on TIR
This is an end-to-end tutorial for deploying LLAMA 3 8B Instruct on Nvidia's Triton Inference Server using its tensorrt_llm backend. The backend uses TensorRT-LLM to build TensorRT engines that contain state-of-the-art optimizations to perform inference efficiently on NVIDIA GPUs.
The following services will be used on TIR:
- Nodes: Provides pre-built and fully configured ready-to-use JupyterLab notebooks.
- Model Repository: Object Storage to store your model weights and config files.
- Model Endpoints: Provides pre-built containers to launch inference using open-source models or custom fine-tuned models easily.
Build Engine
Step 1: Request Access to Model
-
Open the Llama-3-8B-Instruct model card here.
-
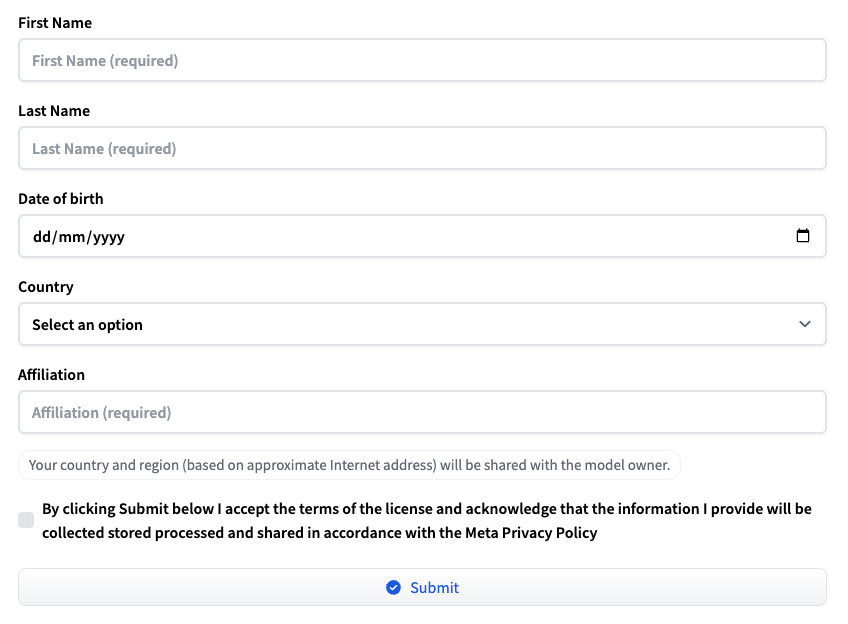
Fill out the META LLAMA 3 COMMUNITY LICENSE AGREEMENT form and submit it.
-
Go to Hugging Face settings and then to the Access Tokens section here.
-
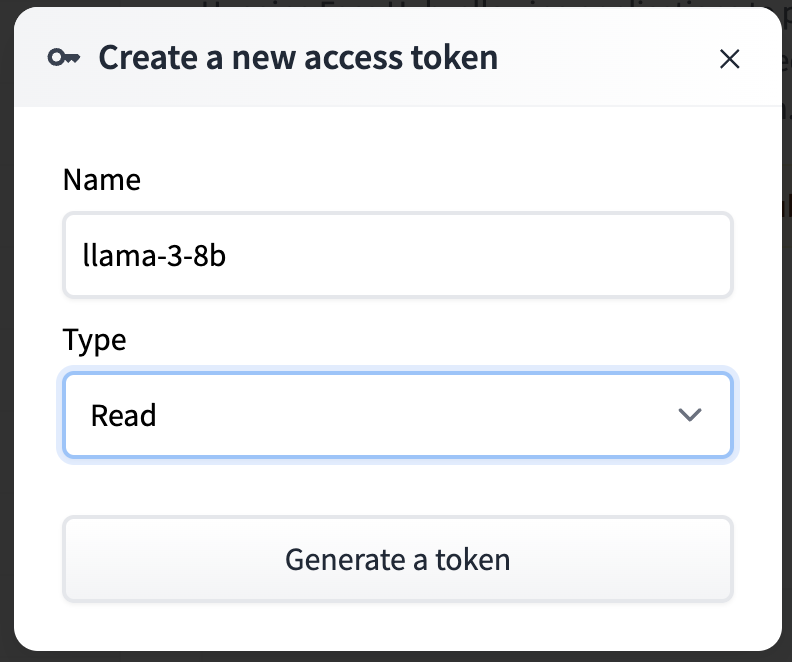
Create a New Token; make sure the token type is read.
-
Copy and save the Hugging Face token. The token will be used to download the model.
Step 2: Creating Node
-
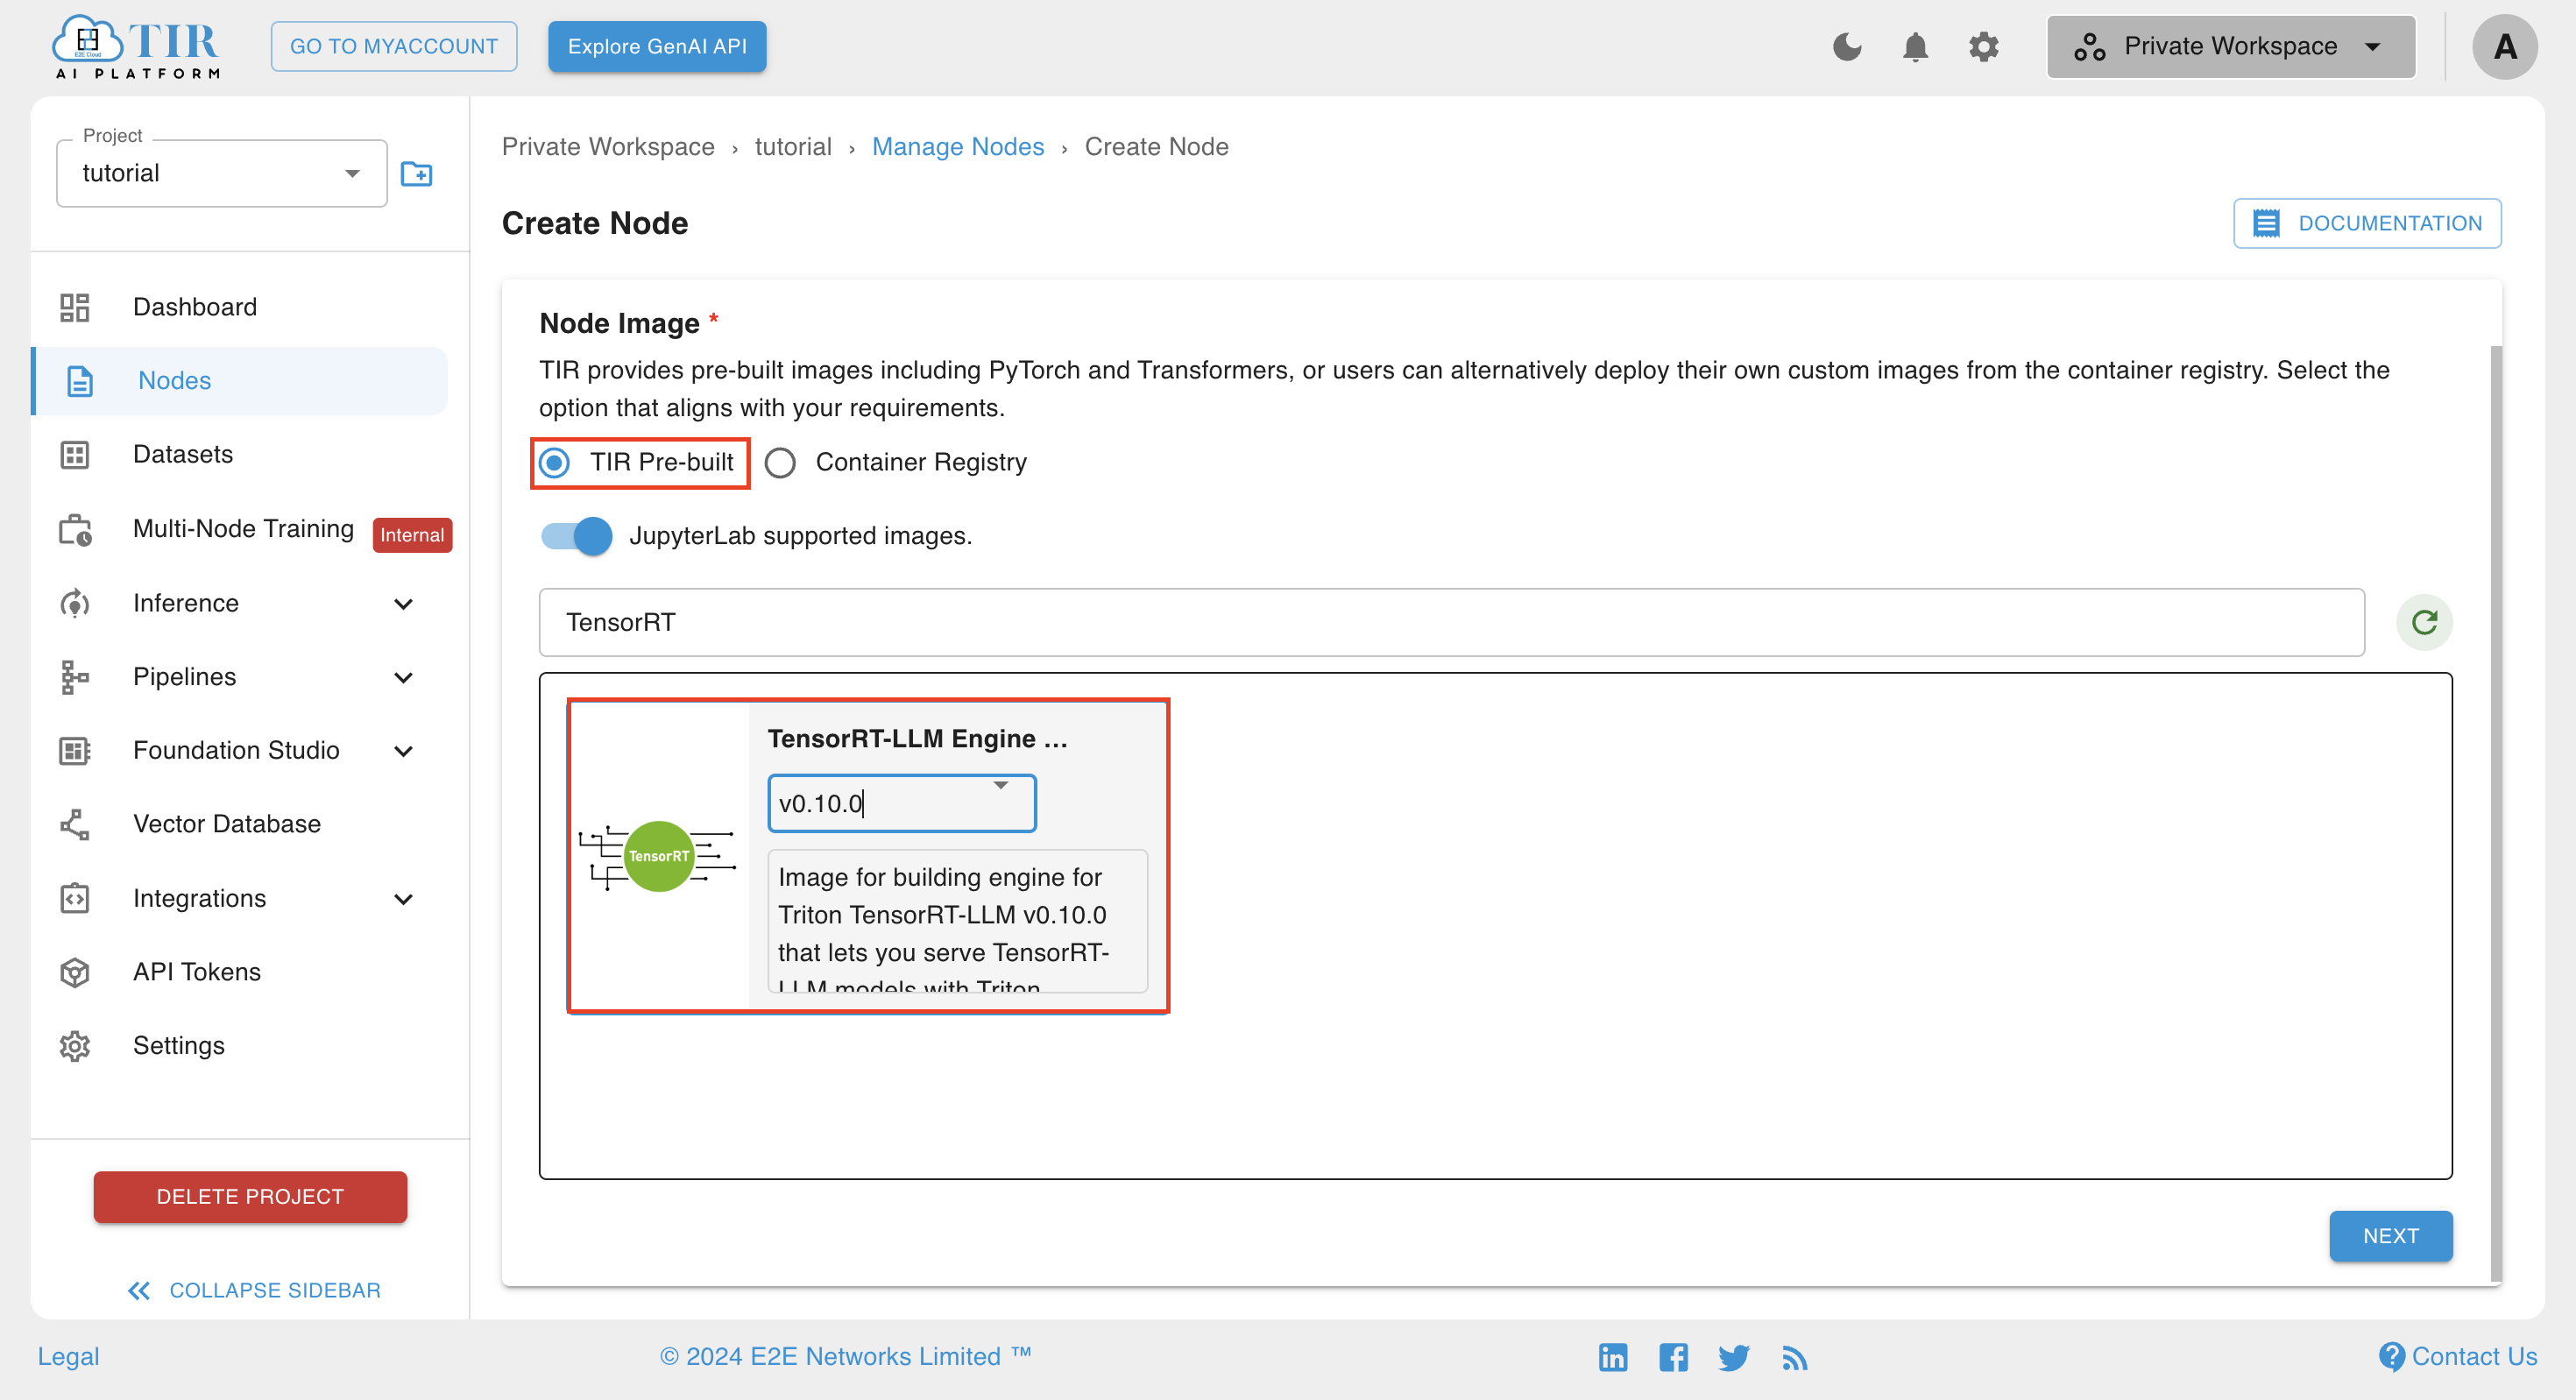
Go to the Nodes section of the TIR platform and select TensorRT-LLM Engine Builder v0.10.0 in the pre-built image.
-
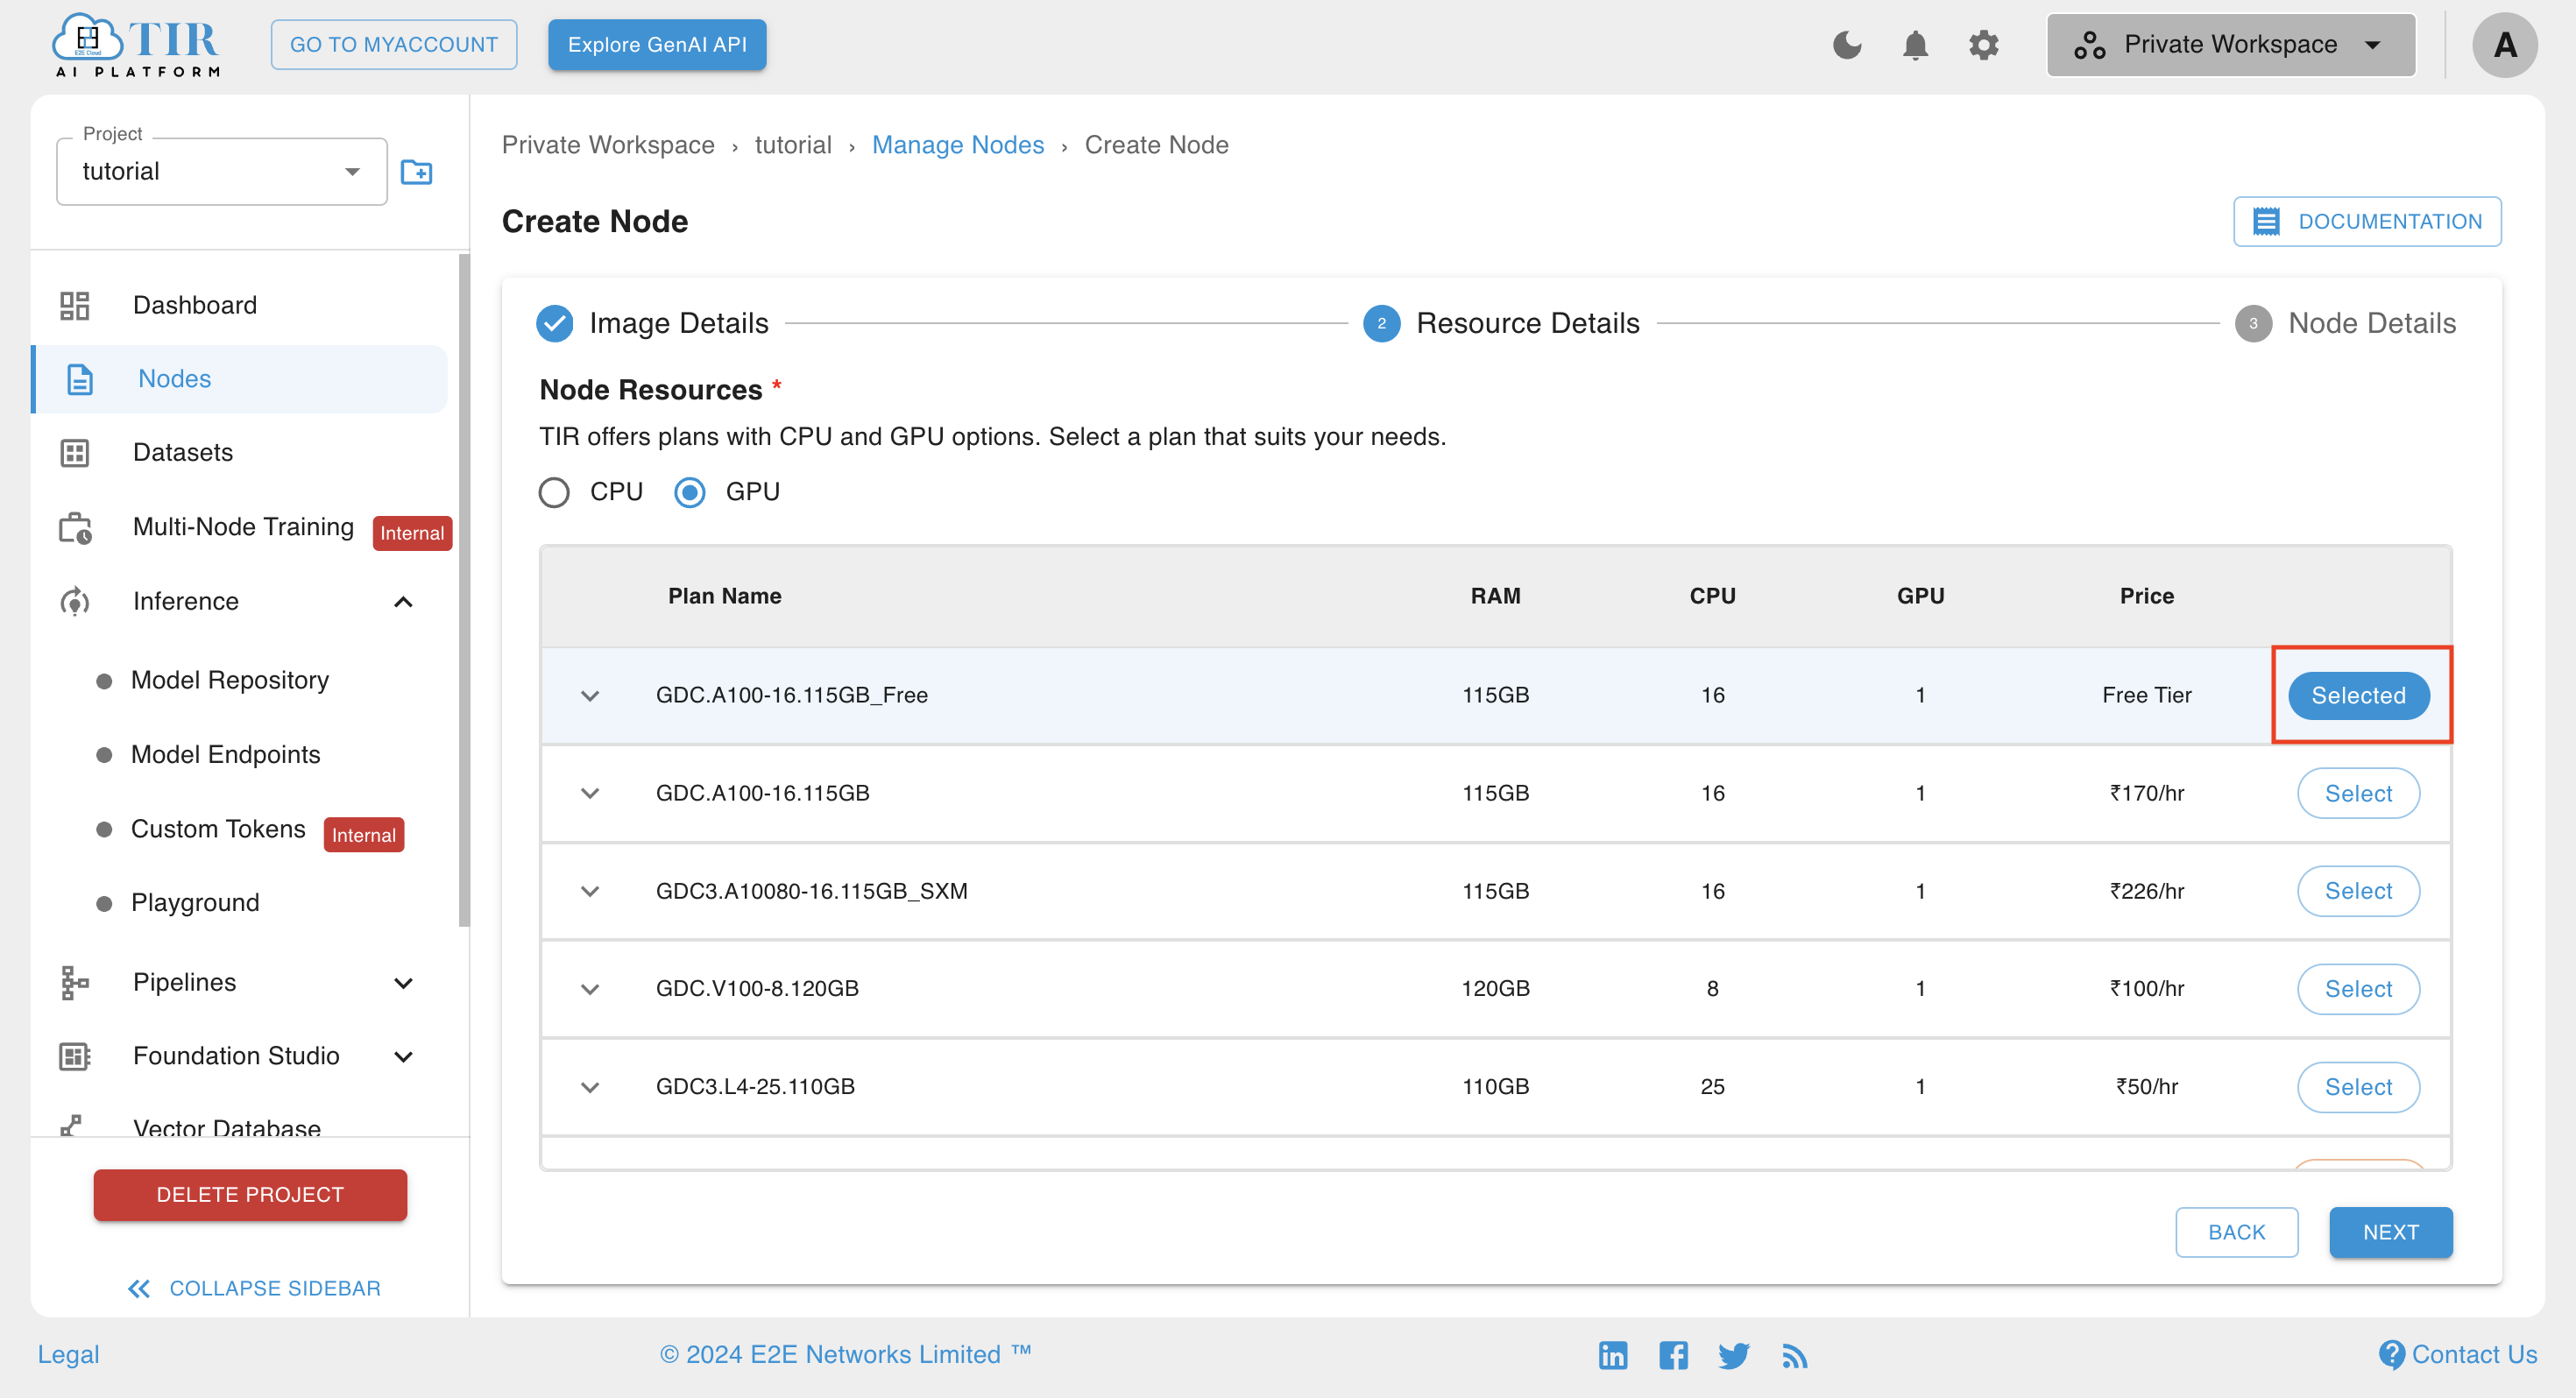
Select GPU resource. This pre-built image requires GPU to run.
-
Set Disk size to 100GB.
-
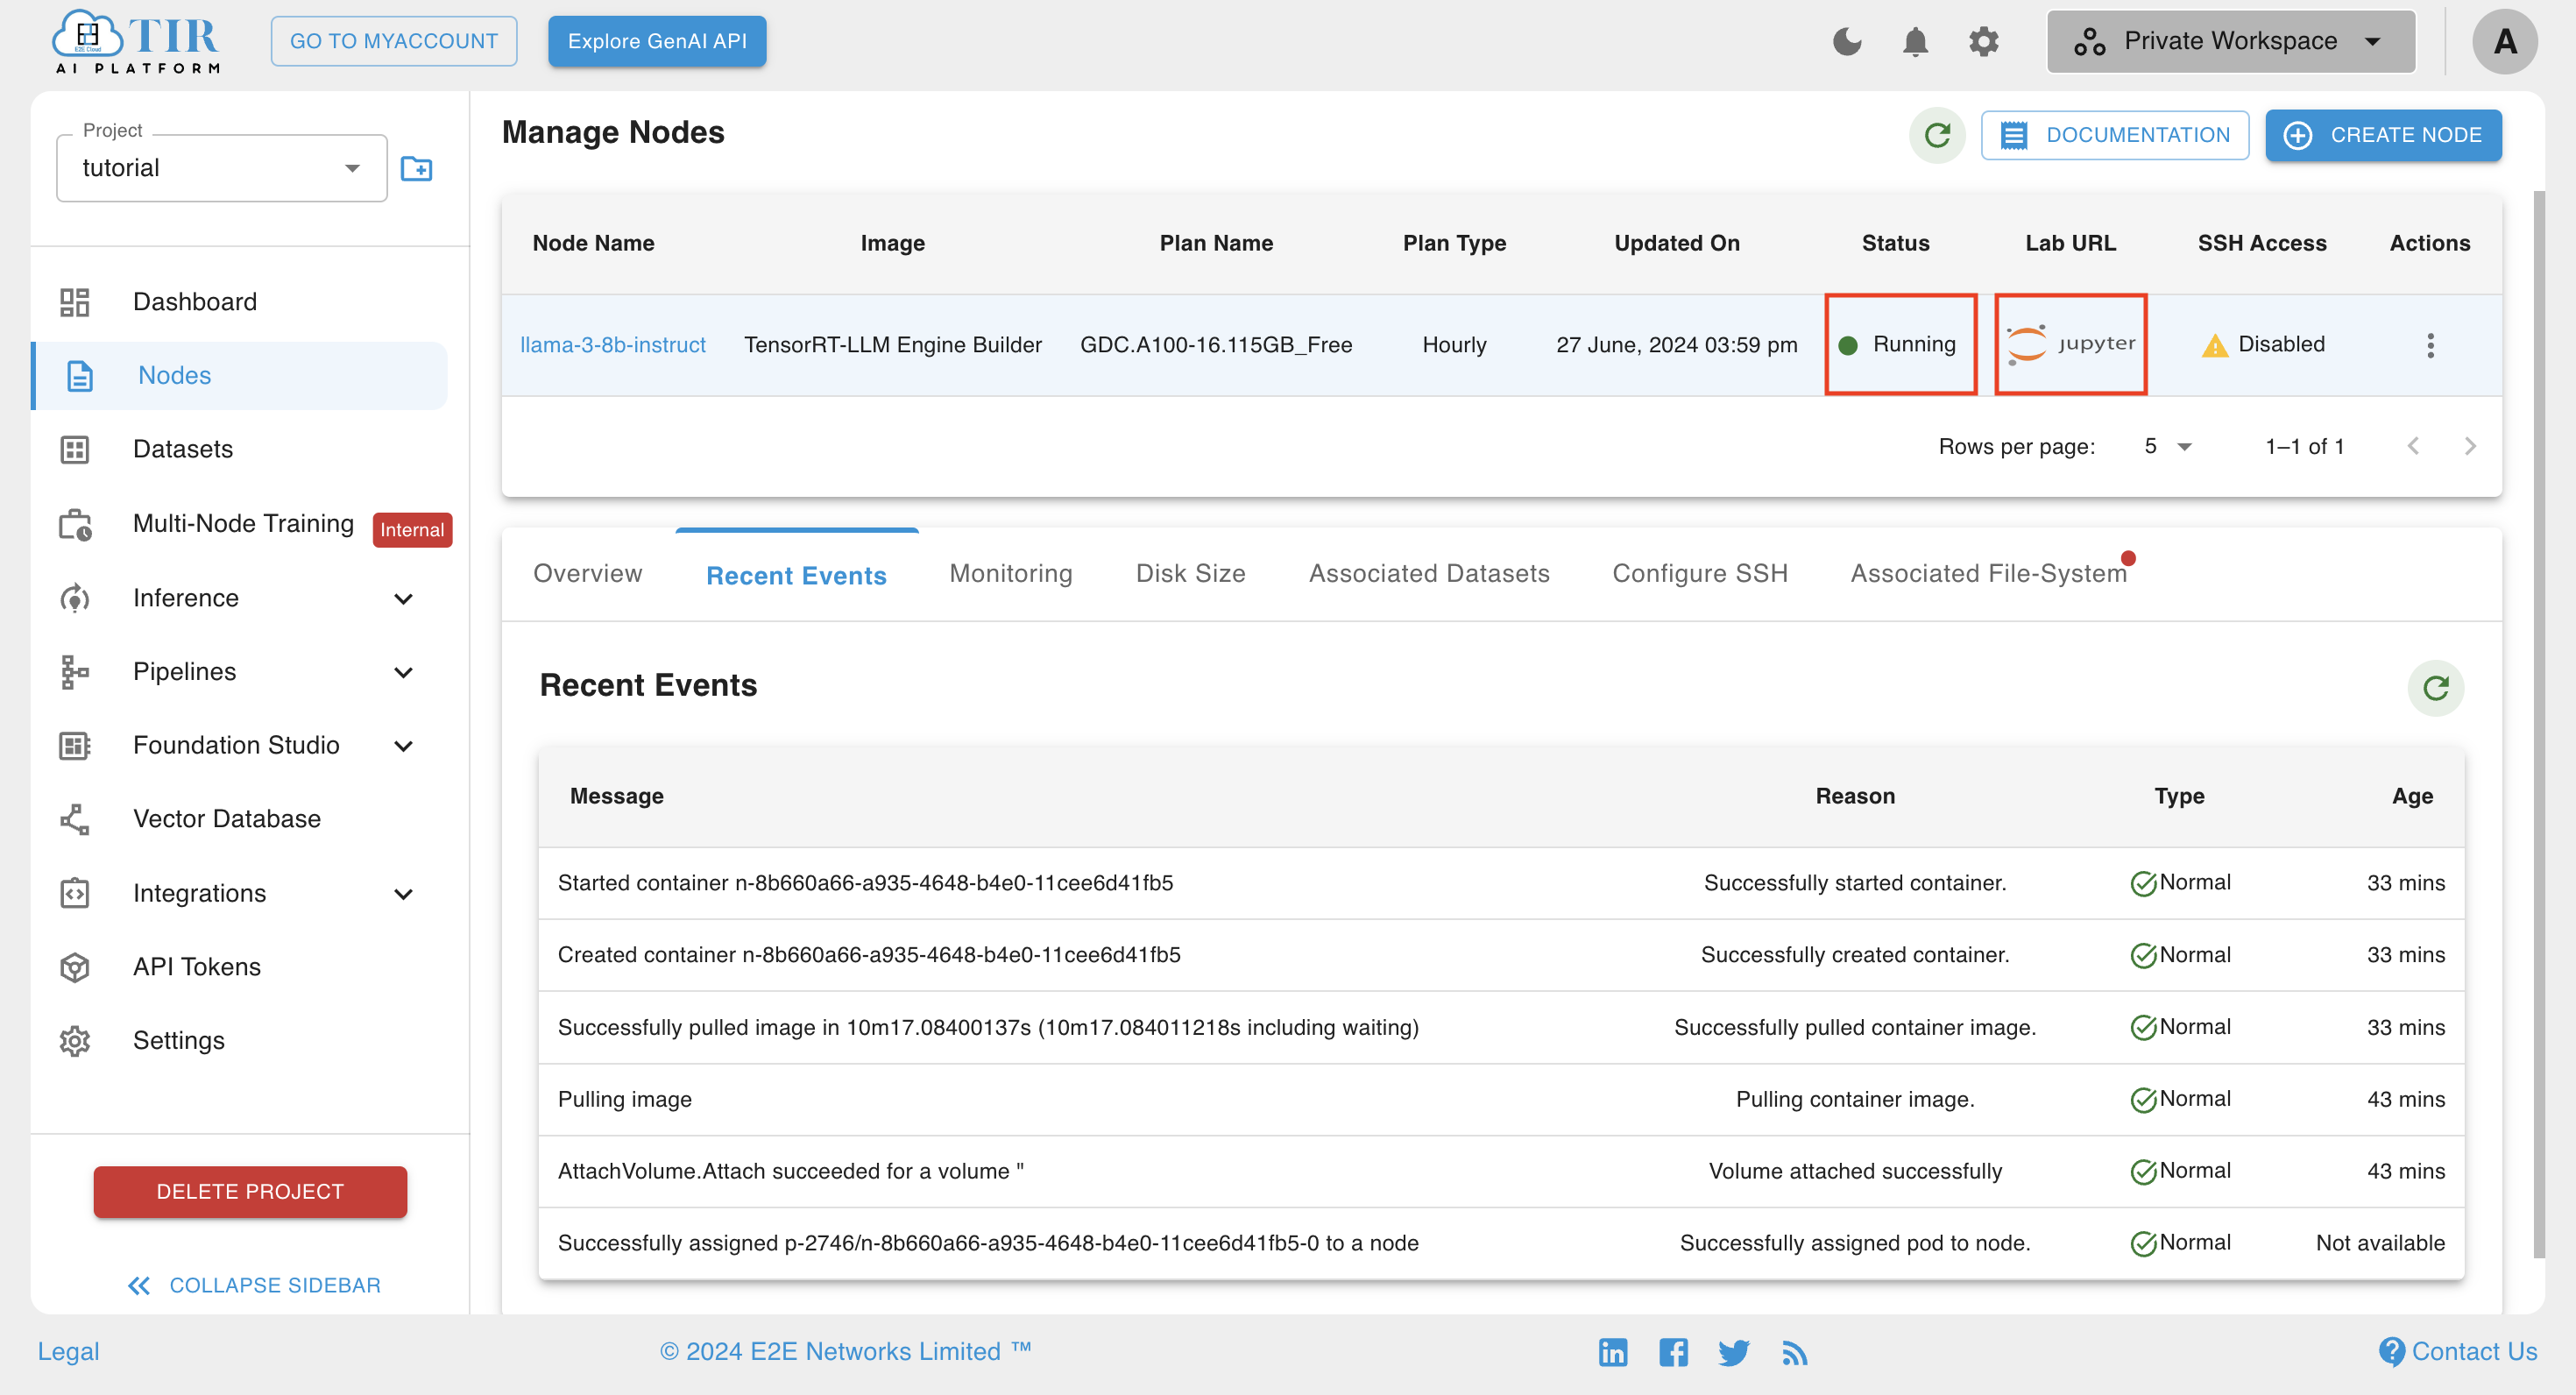
Complete the remaining steps and create the node. It will take a few minutes to create the node. You can check the recent events tabs to track the progress.
-
Once the Node is in running state, open the lab URL.
All the commands in the tutorial will be run in the JupyterLab terminal. To open the terminal in JupyterLab, follow these steps:
#. In the JupyterLab interface, click the "+" icon in the top left corner to open the Launcher tab. #. Find the "Terminal" section in the Launcher tab and click the "Terminal" icon. This will open a new terminal window where you can run the commands.
Step 3: Download Model from Huggingface
-
Create a model directory to store the downloaded model:
mkdir -p $CWD/model -
Install Huggingface CLI:
pip install -U "huggingface_hub[cli]" -
Replace our-hf-token in the command below to set the Huggingface token generated in Step 1:
export HF_TOKEN=<your-hf-token> -
Set the Huggingface cache directory:
export HF_HOME=$CWD -
Download the model:
huggingface-cli download meta-llama/Meta-Llama-3-8B-Instruct --local-dir=$CWD/model --local-dir-use-symlinks=False
Step 4: Create a directory and set Environment variables
-
Set Environment Variables for directories:
export MODEL_DIR=$CWD/model
export UNIFIED_CKPT=$CWD/unified_ckt
export ENGINE_DIR=$CWD/engine_dir
export TOKENIZER_DIR=$CWD/tokenizer_dir
export MODEL_REPO=$CWD/model_repository -
Create a tokenizer_dir to store model tokenizer, unified_ckt to store unified checkpoint, engine_dir to store engine, and model_repository to store inference server config files:
mkdir -p $MODEL_DIR $UNIFIED_CKPT $ENGINE_DIR $TOKENIZER_DIR $MODEL_REPO
Step 5: Create a Unified checkpoint from the HF model
All the tensorrt llm scripts are present at the path /app
- Installing requirements
pip install -r /app/tensorrt_llm/examples/llama/requirements.txt --no-cache-dir - Run Convert Checkpoint script
python /app/tensorrt_llm/examples/llama/convert_checkpoint.py --model_dir ${MODEL_DIR} \
                         --output_dir ${UNIFIED_CKPT} \
                         --dtype float16
Step 6: Create an Engine from a Unified checkpoint
trtllm-build --checkpoint_dir ${UNIFIED_CKPT} \
             --remove_input_padding enable \
             --gpt_attention_plugin float16 \
             --context_fmha enable \
             --gemm_plugin float16 \
             --output_dir ${ENGINE_DIR} \
             --paged_kv_cache enable \
             --max_batch_size 64
Step 7: Prepare Tokenizer Directory
- Copy the tokenizer file to TOKENIZER_DIR
cp $MODEL_DIR/{tokenizer.json,tokenizer_config.json,special_tokens_map.json,config.json} $TOKENIZER_DIR
Step 8: Test Build Engine (optional)
-
Run an inference Task
python /app/tensorrt_llm/examples/run.py --max_output_len 1000 \
                                    --tokenizer_dir ${TOKENIZER_DIR} \
                                    --engine_dir ${ENGINE_DIR} \
--input_text "What are llm ?" -
Run a Summarization Task
python /app/tensorrt_llm/examples/summarize.py --test_trt_llm \
                    --hf_model_dir ${TOKENIZER_DIR} \
                    --data_type fp16 \
                    --engine_dir  ${ENGINE_DIR}
Create Backend Configuration files
Step 1: Download Inflight Batcher
-
Clone tensorrtllm_backend repository
git clone https://github.com/triton-inference-server/tensorrtllm_backend.git $CWD/tensorrtllm_backend -
Change directory
cd $CWD/tensorrtllm_backend -
Checkout to version v0.10.0 as we use v0.10.0 version TensorRT LLM builder in this tutorial
git checkout v0.10.0 -
Copy the Inflight batcher to the model repository
cp -r $CWD/tensorrtllm_backend/all_models/inflight_batcher_llm/* $MODEL_REPO
Step 2: Configure Inflight Batcher.
Model Data will be downloaded on the /mnt/models path when inference is launched using TIR's Model Endpoint. So, all the paths in the inflight batcher config will be set accordingly.
-
Set Environment to configure inflight batcher
export MOUNT_PATH=/mnt/models
export TIR_MODEL_REPO=$MOUNT_PATH
export TIR_TOKENIZER_DIR=$MOUNT_PATH/tensorrt_llm/1/tokenizer_dir
export TIR_ENGINE_DIR=$MOUNT_PATH/tensorrt_llm/1/engine -
Run fill template scripts
python $CWD/tensorrtllm_backend/tools/fill_template.py -i ${MODEL_REPO}/preprocessing/config.pbtxt tokenizer_dir:${TIR_TOKENIZER_DIR},triton_max_batch_size:64,preprocessing_instance_count:1
python $CWD/tensorrtllm_backend/tools/fill_template.py -i ${MODEL_REPO}/postprocessing/config.pbtxt tokenizer_dir:${TIR_TOKENIZER_DIR},triton_max_batch_size:64,postprocessing_instance_count:1
python $CWD/tensorrtllm_backend/tools/fill_template.py -i ${MODEL_REPO}/tensorrt_llm_bls/config.pbtxt triton_max_batch_size:64,decoupled_mode:False,bls_instance_count:1,accumulate_tokens:False
python $CWD/tensorrtllm_backend/tools/fill_template.py -i ${MODEL_REPO}/ensemble/config.pbtxt triton_max_batch_size:64
python $CWD/tensorrtllm_backend/tools/fill_template.py -i ${MODEL_REPO}/tensorrt_llm/config.pbtxt triton_backend:tensorrtllm,triton_max_batch_size:64,decoupled_mode:False,max_beam_width:1,engine_dir:${TIR_ENGINE_DIR},max_tokens_in_paged_kv_cache:2560,max_attention_window_size:2560,kv_cache_free_gpu_mem_fraction:0.5,exclude_input_in_output:True,enable_kv_cache_reuse:False,batching_strategy:inflight_fused_batching,max_queue_delay_microseconds:0
Step 3: Moving Engine and Tokenizer to model repository.
-
Create directories for the engine and tokenizer in the model repository
mkdir -p $MODEL_REPO/tensorrt_llm/1/tokenizer_dir/ $MODEL_REPO/tensorrt_llm/1/engine/ -
Moving files
mv $TOKENIZER_DIR/* $MODEL_REPO/tensorrt_llm/1/tokenizer_dir/
mv $ENGINE_DIR/* $MODEL_REPO/tensorrt_llm/1/engine/
Save Configuration files in the Model Repository
Step 1: Create a Model Repository.
-
Head back to TIR and use the side nav to navigate to the model repository page, in the inference section, and create repository .. image:: launching_llama3_tensorrtllm/3.1_model_repo_home.png
-
Enter the model repo name, select tensorrt model type, and click create .. image:: launching_llama3_tensorrtllm/3.2_model_repo_create.png
Step 2: Uploading Files to the Model Repository.
-
After the model repository is created, go to the using cli tab for the newly created repository .. image:: launching_llama3_tensorrtllm/3.3_model_repo_using_cli.png
-
Copy the host setup command in the Setup Minio Cli dropdown .. image:: launching_llama3_tensorrtllm/3.4_model_repo_setup_host.png
-
Go back to the Node JupyterLabs and paste the command to the terminal. Make sure Environment variables are set in this terminal session .. image:: launching_llama3_tensorrtllm/3.5_node_mdoel_repo_host_setup.png
-
To upload files to the repository. Head back to Setup Minio Cli dropdown and copy the Upload files to Model Repository command .. image:: launching_llama3_tensorrtllm/3.6_model_repo_upload_cmd.png
-
Replace
$LOCAL_FOLDER_NAMEwith${MODEL_REPO}/*and run in the JupyterLab terminal .. image:: launching_llama3_tensorrtllm/3.7_upload_complete.png -
Go back to the TIR model repository and check uploaded files in the Model Files tab .. image:: launching_llama3_tensorrtllm/3.8_check_files.png
Now, you can stop or delete the node used to build the engine, as all necessary configuration files are stored in the model repository.
Create a Model Endpoint for Inference
-
Go to the Model Endpoint page in the inference section and create endpoint .. image:: launching_llama3_tensorrtllm/4.1_create_model_endpoint.png
-
Select TensorRT-LLM framework .. image:: launching_llama3_tensorrtllm/4.2_select_framework.png
Step 1: Model Download Form
-
Select the Model Repository from the dropdown to which you have uploaded configuration files .. image:: launching_llama3_tensorrtllm/4.3_select_model_repo.png
-
Leave the Model Path empty as all the files are in the root directory and click next .. image:: launching_llama3_tensorrtllm/4.4_step1_model_path.png
Step 2: Runtime Details Form
-
Select TensorRT-LLM Engine Builder v0.10.0 Runtime as we used v0.10.0 builder node to build engine .. image:: launching_llama3_tensorrtllm/4.5_step2_server_runtime.png
-
If you have selected a multi-card GPU, then change the world size to the number of GPUs the selected card has and move to next step
Step 3: Resource Details Form
- Select any GPU and avoid selecting a V100 GPU card.
- Adjust the number of replicas and enable autoscaling if required. For this tutorial, we will use default values
Step 4: Complete Remaining Form
- Complete the remaining step and click on finish
- Cross the entered details in the form summary page and click on create
It will take a few minutes to deploy the model endpoint. You can check the recent events and logs tabs for updates. Once the
Testing Deployed Endpoint
Generate Token
-
Go to the API Tokens section and create a token .. image:: launching_llama3_tensorrtllm/5.1_create_token.png
-
Keep the Auth Token handy, this will be used in the Authorization Header in the API request .. image:: launching_llama3_tensorrtllm/5.2_auth_token.png
For all Curl requests given in this tutorial, you must replace auth-token with the auth token generated in the previous step and end-point-url with the Endpoint URL mentioned in the overview tab of Model Endpoint. .. image:: launching_llama3_tensorrtllm/5.3_endpoint_url.png
Model Endpoint Health Check
- Inference server is running if the given below curl request responds with a status code of 200.
Health Check - Readiness
To check the readiness of the API, you can use the following curl command:
curl --location '<end-point-url>/v2/health/ready' \
  --header 'Authorization: Bearer <auth-token>'
Making an Inference Call
To make an inference call to the API, use the following curl command:
curl --location '<end-point-url>/v2/models/ensemble/generate' \
  --header 'Authorization: Bearer <auth-token>' \
  --header 'Content-Type: application/json' \
  --data '{
    "text_input": "<|begin_of_text|><|start_header_id|>user<|end_header_id|>\n\n How are you ? <|eot_id|><|start_header_id|>assistant<|end_header_id|>",
    "max_tokens": 1000,
    "stop_words": ["<|eot_id|>"],
    "temperature": 0.7,
    "repetation_penalty": 1.5
  }'
Response of the Inference Request
When you make an inference request, you may receive a response similar to the following JSON format:
{
  "context_logits": 0.0,
  "cum_log_probs": 0.0,
  "generation_logits": 0.0,
  "model_name": "ensemble",
  "model_version": "1",
  "output_log_probs": [
    0.0,
    0.0,
    0.0,
    0.0,
    0.0,
    0.0,
    0.0,
    0.0,
    0.0,
    0.0,
    0.0,
    0.0,
    0.0,
    0.0,
    0.0
  ],
  "sequence_end": false,
  "sequence_id": 0,
  "sequence_start": false,
  "text_output": "\n\nI'm just a language model, I don't have feelings or emotions like humans do. I'm functioning properly and ready to assist you with any questions or tasks you may have! How can I help you today?"
}
Conclusion
In this tutorial, we successfully deployed the LLAMA 3 8B Instruct model using Nvidia's Triton Inference Server with the TensorRT-LLM backend.
We followed these steps:
- Requested access to the model on Hugging Face.
- Set up the required environment and downloaded the model.
- Created a unified checkpoint and TensorRT engine using the Hugging Face checkpoint.
- Configured the inflight batcher to run the built engine on the TensorRT-LLM backend and stored it in TIR's model repository.
- Launched a model endpoint on TIR and tested it by making an inference call.
This comprehensive guide demonstrated how to leverage advanced services on TIR and optimizations for efficient inference on NVIDIA GPUs.