Troubleshooting Steps
If you are facing any error while enabling CDP Backup from the MyAccount Portal or if your CDP backup has failed, refer to the sections below based on the error you are seeing.
CDP backup issues typically fall into one of three categories:
- Connecting to Agent Failed — the backup server cannot reach the CDP agent on your node due to blocked ports, firewall rules, or the agent not running
- Socket Timeout — the node is under high resource load and cannot respond within the expected timeframe
- HCP Driver Issue — the required kernel driver module is missing or incompatible with your Linux kernel
Error: Connecting to Agent Failed / Timed Out
This error indicates that the E2E CDP Backup server is unable to establish a network connection with the CDP agent running on your node.
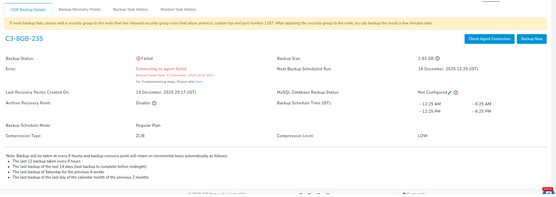
Follow the steps below in the given order.
Step 1: Verify Security Group Rules
The most common cause of this error is port 1167 being blocked at the Security Group level.
- Log in to the E2E MyAccount Portal
- Go to Compute → Nodes
- Select the affected node
- Go to Security Groups
- Verify that an inbound rule for TCP port 1167 exists
If port 1167 is not present, add the following rule:
| Protocol | Port | Source |
|---|---|---|
| Custom TCP | 1167 | Any Network |
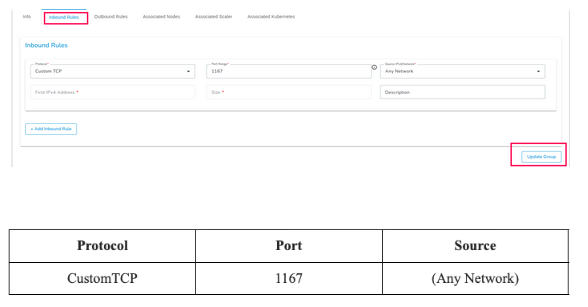
Opening the port at the OS level alone is not sufficient. The Security Group must also allow port 1167.
Step 2: Verify OS-Level Firewall
After confirming the Security Group, verify that the OS-level firewall on the node is not blocking port 1167.
For systems using UFW (Ubuntu):
Check UFW status:
ufw status
If UFW is active, allow port 1167:
ufw allow 1167/tcp
ufw reload
For systems using iptables:
Check existing rules:
iptables -L -n
If port 1167 is not allowed, refer to the iptables configuration guide.
For Windows nodes, refer to Open port on Windows Firewall.
Step 3: Verify Network Connectivity on the Node
If the issue persists after firewall validation, verify that the network interface and routing are properly configured on the node.
Access the node via the MyAccount Portal (Compute → Nodes → Access Console) and run:
ip addr show
Ensure that:
- The network interface (e.g.,
eth0,ens3) is UP - The node has a valid IP address assigned
Step 4: Verify CDP Agent Service
The CDP agent is installed by default on all nodes. Verify it is running:
systemctl status cdp-agent
If stopped, start it:
systemctl start cdp-agent
To restart:
systemctl restart cdp-agent
Verify again after restart:
systemctl status cdp-agent
Step 5: Reinstall CDP Agent (Ubuntu 16.04 to 24.04)
Use this only if the CDP agent service does not come up after a restart and the dashboard continues to show Connecting to agent failed. This indicates a corrupted or broken installation.
Login to the node as root and create the reinstall script:
vi reinstall-cdp-agent.sh
In the vi editor, press i to enter insert mode and paste the following script:
#!/bin/bash
set -e
read -p "This will remove the old CDP agent. Press Enter to continue or Ctrl+C to cancel..."

# Stop and remove old agent
systemctl stop cdp-agent 2>/dev/null || true
systemctl disable cdp-agent 2>/dev/null || true
apt-get remove --purge -y r1soft-cdp-enterprise-agent || true
apt-get autoremove -y
rm -rf /etc/cdp-agent /opt/cdp-agent /var/log/cdp-agent

# Install new agent
wget -qO - http://repo.r1soft.com/r1soft.asc | gpg --dearmor | tee /usr/share/keyrings/r1soft.gpg > /dev/null
echo "deb [signed-by=/usr/share/keyrings/r1soft.gpg] http://repo.r1soft.com/apt stable main" | tee /etc/apt/sources.list.d/r1soft.list
apt-get update -y
apt-get install -y r1soft-cdp-enterprise-agent

# Enable and start service
systemctl enable cdp-agent
systemctl start cdp-agent

# Verify
systemctl status cdp-agent --no-pager
ss -lntp | grep 1167 || echo "Port 1167 not listening yet"
echo "CDP Agent reinstall process completed."
Press Esc, then type :wq! and press Enter to save and exit.
Make the script executable and run it:
chmod +x reinstall-cdp-agent.sh
./reinstall-cdp-agent.sh
After reinstall, go to the MyAccount Portal and re-enable CDP Backup for this node.
Error: Socket Timeout
This error indicates a data transfer timeout during the backup process. It typically occurs when the node is under high load and cannot respond within the expected timeframe.
Check 1: CPU Utilization
High CPU usage on the node can cause socket timeout errors.
top
or
htop
Actions if CPU is high:
- Identify processes consuming high CPU resources
- Verify whether the processes are legitimate and expected
- Terminate or optimize unnecessary processes to free up system resources
- If the load is legitimate, consider upgrading the node to a higher plan
Reference:
- Linux: High Processor Load
- Windows: Monitor Server Load
Check 2: Memory Usage
Low available memory can also cause the agent to be unresponsive.
free -h
Actions if memory is low:
- Stop unnecessary processes consuming memory
- Verify that swap memory is enabled and not fully consumed — CDP backups require sufficient swap space to handle peak operations
- If the load is legitimate, consider upgrading the node to a higher plan
Check 3: Restart CDP Agent
Restarting the agent can resolve temporary issues:
systemctl restart cdp-agent
systemctl status cdp-agent
Check 4: Disk Space
Insufficient disk space can cause the backup process to fail.
df -Th
Actions if disk is full or nearly full:
- Free up space by removing unnecessary files, old logs, or unused data
- Ensure the server has adequate free disk space before retrying the backup
Reference: Running Out of Disk Space
Check 5: I/O Errors
If all the above checks are in order, verify the node's Access Console for any I/O-related issues.
Navigate to Compute → Nodes → Access Console and review the console output carefully.
If you observe any errors such as I/O error or similar critical messages:
- Do not perform any action on the node
- Contact E2E Cloud Platform Support immediately at cloud-platform@e2enetworks.com
Error: One or More Devices Failed – HCP Driver Issue (Linux)
This error occurs when the CDP agent cannot find a suitable HCP (Host Control Protocol) driver module for your kernel. Without the correct driver, the agent cannot access the disk properly, causing backup failures.
Step 1: Try Automatic Module Download
Run the following command on your Linux node to attempt an automatic driver download and installation:
r1soft-setup --get-module
or
serverbackup-setup --get-module
Then restart the CDP agent:
systemctl restart cdp-agent
Try running the backup again. If it still fails, proceed to Step 2.
Step 2: Collect System Information
If the issue continues, gather the following details before contacting support or attempting manual installation:
uname -r                          # Kernel version
uname -a                          # Complete system info
cat /proc/version                 # Kernel version details
cat /etc/*release                 # OS version info
/usr/sbin/r1soft/bin/cdp -v       # CDP agent version
serverbackup-setup --version      # CDP agent version (alternative)
Also create a tarball of your kernel headers:
serverbackup-setup --get-module --tarball-only /tmp/kernel-tarball.tar.gz
Step 3: Check HCP Driver Availability
Visit the R1Soft module repository and search for your kernel version:
https://beta.r1soft.com/modules/
If a matching driver is available, follow the manual installation steps in Step 4 below.
If a compatible driver is not available publicly, raise a support ticket with the outputs from Step 2. The E2E support team will coordinate with the vendor team to obtain the correct module and share the installation steps with you.
Step 4: Install HCP Driver Manually
Use these steps if you have the driver file (either downloaded from the repository or provided by E2E support).
A) Stop the CDP Agent
systemctl stop cdp-agent
B) Navigate to the R1Soft modules directory
cd /lib/modules/r1soft/
C) Download the matching HCP driver
wget http://beta.r1soft.com/modules/hcpdriver-cki-x.xx.x-xx-generic.ko
Replace x.xx.x-xx-generic with your exact kernel version from uname -r. Ensure the filename matches exactly.
D) Remove the existing symlink
unlink hcpdriver.o
E) Create a new symlink
ln -s /lib/modules/r1soft/hcpdriver-cki-x.xx.x-xx-generic.ko hcpdriver.o
F) Start the CDP Agent
systemctl start cdp-agent
G) Verify the service status
systemctl status cdp-agent
H) Trigger backup from the dashboard
- Log in to the MyAccount Portal
- Navigate to the affected node's CDP Backup Details
- Click Backup Now
The backup status (including previously failed states) will be updated and reflected only after the next scheduled backup cron cycle completes.
Windows CDP Agent Reinstall Guide
Use this guide if CDP backup is failing on a Windows node and a full reinstall of the agent is required.
Part 1: Remove Old Agent
Step 1 — Open PowerShell as Administrator
Press Win + X and select Windows PowerShell (Admin).
Step 2 — Check existing agent service
Get-Service *cdp*
If you see cdp (Server Backup Agent) in the output, continue below.
Step 3 — Stop the agent service
Stop-Service cdp -Force
Verify it is stopped:
Get-Service *cdp*
Expected output: Stopped cdp
Step 4 — Delete the Windows service
Use sc.exe, not sc.
sc.exe delete cdp
Expected output: [SC] DeleteService SUCCESS
Step 5 — Verify service is removed
Get-Service *cdp*
Only Microsoft services (CDPSvc, CDPUserSvc) should remain. Server Backup Agent should no longer appear.
Step 6 — Uninstall the program
- Open Control Panel
- Click Programs → Uninstall a program
- Find Server Backup Agent, right-click and select Uninstall
- Click Yes to confirm and wait for completion
Step 7 — Reboot the server
Restart-Computer
Part 2: Install Fresh Agent
Step 8 — Download the installer
Download the Windows agent installer from:
http://repo.r1soft.com/trials/ServerBackup-Windows-Agent-x64.msi
Step 9 — Open firewall port
New-NetFirewallRule -DisplayName "R1Soft-Agent" `
  -Direction Inbound `
  -Protocol TCP `
  -LocalPort 1167 `
  -Action Allow
Step 10 — Install the agent
Run the downloaded .msi file and click Yes when prompted.
Step 11 — Reboot again
Restart-Computer
Step 12 — Verify installation
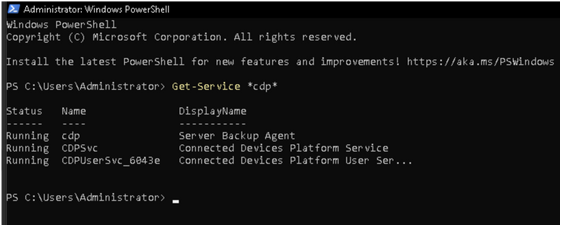
Get-Service *cdp*
Expected output: Running cdp Server Backup Agent
Step 13 — Verify port is listening
netstat -ano | findstr 1167
Expected output: LISTENING
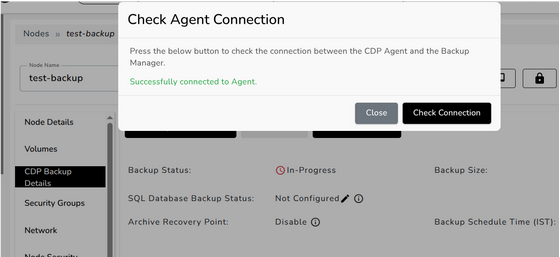
Once the agent is running and the port is listening, verify the connection from the MyAccount Portal by clicking Check Agent Connection on the node's CDP Backup Details page.
Still Facing Issues?
If none of the above steps resolve your issue, raise a support ticket at cloud-platform@e2enetworks.com with the following details:
Node details:
- Node ID and IP address (public and private)
- Screenshot of the backup dashboard showing the exact error
Output of the following commands:
ip a                         # Network interfaces
ip r s                       # Routing table
systemctl status cdp-agent   # CDP agent service status
ss -lntp | grep 1167         # Check if port 1167 is listening
ufw status                   # UFW firewall rules
systemctl status ufw         # UFW service status
iptables -L -n               # iptables rules
systemctl status iptables    # iptables service status
uname -r                     # Kernel version