Argo CD
Introducing Argo CD
Declarative Continuous Delivery for Kubernetes
The Argo project, Argo Workflows, is an open-source container-native workflow engine for Kubernetes. The project is widely used for simple CI/CD pipelines as well as DAG-based machine learning and data analytics workflows and is growing faster than ever.

We also have worked with sample Argo Events to provide an event-based dependency manager for automatically triggering Argo workflows and other actions in Kubernetes.
We are thrilled to announce Argo CD, a new Kubernetes-native open-source project brought to you by the Argo community and Intuit to provide a declarative continuous delivery (CD) system. Argo CD supports a variety of configuration management tools, including ksonnet/jsonnet and Helm.

Why Argo CD?
-
Argo CD extends the benefits of declarative specifications and Git-based configuration management to accelerate the deployment and lifecycle management of applications without compromising security and compliance. The fundamental requirements for Argo CD are:
- Application deployment and lifecycle management should be simple, automated, and auditable.
- Application deployments should be fast, reliable, and idempotent.
- Any deviation from the version-controlled configuration should be immediately detected and remediated.
- Rollbacks should be as simple as deploying a different configuration.
-
Intuit started the Argo CD project to address a need for a fast, reliable continuous delivery service for deploying hundreds of microservices across a fleet of Kubernetes clusters using Git as the source of truth for both application source code and application/environmental deployment configurations.
-
Argo CD is the first step in achieving “continuous operations” based on monitoring, analytics, and automated remediation of operational problems using declarative specifications and automated learning.
-
We examined many existing solutions such as Spinnaker but found that they did not meet our needs:
- Declarative (Kubernetes YAMLs, ksonnet/jsonnet, Helm, kustomize).
- Kubernetes-native.
- Git as the source of truth (GitOps).
- Clear separation between CI/CD (continuous integration/delivery) and continuous deployment (CD) processes.
- Enterprise-friendly (auditability, compliance, security, RBAC, SSO).
How does Argo CD work?
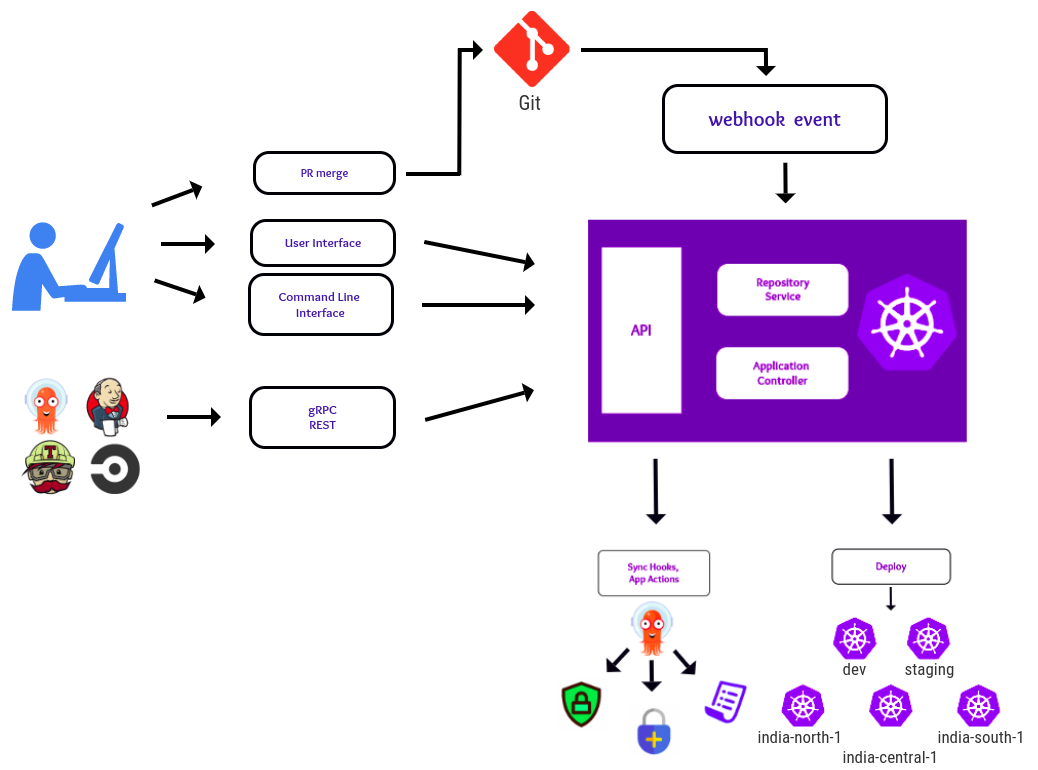
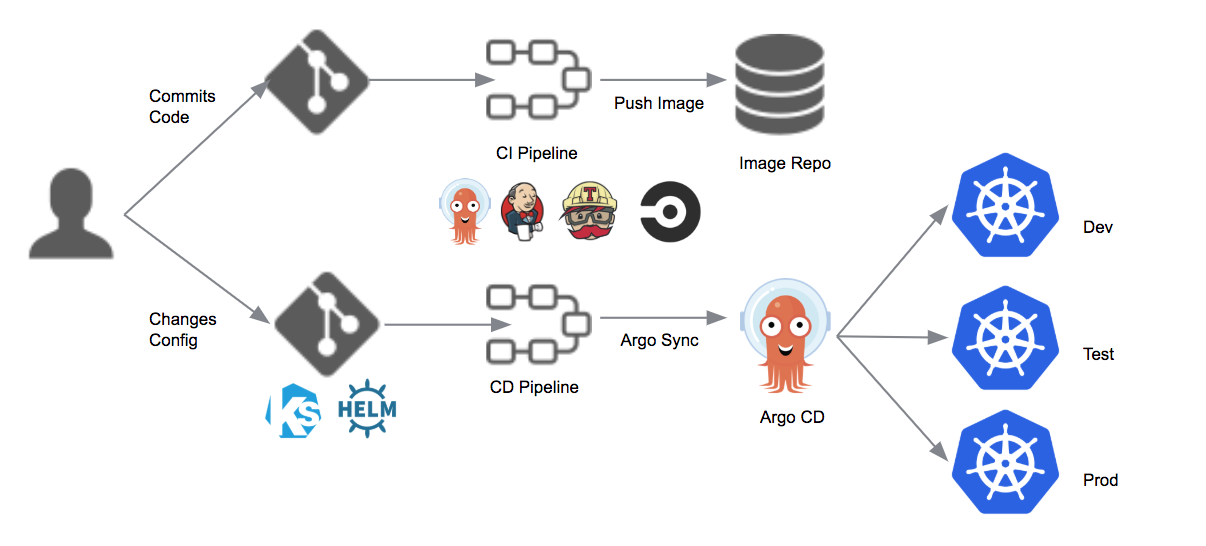
Argo CD uses git repositories as the source of truth for the desired state of applications and the target deployment environments. Kubernetes manifests can be specified as YAML files, ksonnet/jsonnet applications, or Helm packages. Argo CD automates the synchronization of the desired application state with each of the specified target environments. Here is a high-level architectural view:

Argo CD continuously monitors running applications and compares the current, live state against the desired target state (as specified in the git repo). A deployed application whose live state deviates from its target state is considered out-of-sync. Argo CD reports and visualizes any deviation and provides mechanisms to automatically or manually sync the live state to the desired target state. Any modifications made to the desired target state in the git repo can be automatically applied and reflected in the specified target environments.
You can get started in 2 easy steps:
- Define your app and environment configs in a Git repo.
- Argo monitors and syncs your app between Git config and the Kubernetes cluster using any pipeline (Argo CI, Jenkins, etc.), CLI, or UI.
Pull or Push?
There are a couple of different ways to do declarative continuous delivery. The pull model is where the CD system (Argo CD) continuously monitors and updates the application’s state on the Kubernetes cluster to the target state defined in Git. In the push model, a user initiates the update from an external system using a CI pipeline.
Argo CD supports both the pull and push-based GitOps models to sync target environments with desired application states. At Intuit, we follow the push model and invoke Argo CD from a CD pipeline (Jenkins) for security and compliance reasons.

Argo CD Features
- Syncing of applications to their desired state as defined in Git using a variety of configuration management tools such as ksonnet/jsonnet, Helm, and kustomize.
- Automated deployment of applications to specified target environments.
- Continuous monitoring of deployed applications.
- Web and CLI-based visualization of applications and differences between current and target states.
- Rollback/Roll-anywhere to any application state committed in the git repository.
- PreSync, Sync, and PostSync hooks to support complex application rollouts (e.g., blue/green & canary upgrades).
- SSO Integration (OIDC, LDAP, SAML 2.0, GitLab, Microsoft, LinkedIn).
- Webhook integration (GitHub, BitBucket, GitLab).
- Can be used standalone or as part of existing pipeline tools such as Argo Workflows, Jenkins, etc.
- Future support for Kubernetes Application CRD once it is released.
Deploy to Kubernetes using Argo CD and GitOps
Getting Started
Requirements
- Installed kubectl command-line tool.
- Have a kubeconfig file (default location is
~/.kube/config). - CoreDNS. Can be enabled for MicroK8s by running:
1. Install Argo CD
To install Argo CD, run the following commands:
kubectl create namespace argocd
kubectl apply -n argocd -f https://raw.githubusercontent.com/argoproj/argo-c
This will create a new namespace, argocd, where Argo CD services and application resources will live.
If you are not interested in UI, SSO, multi-cluster features then you can install core Argo CD components only:
  [kubectl create namespace argocd]
  [kubectl apply -n argocd -f https://raw.githubusercontent.com/argoproj/argo-cd/stable/manifests/core-install.yaml]
This default installation will have a self-signed certificate and cannot be accessed without a bit of extra work. Do one of:
• Follow the instructions to configure a certificate (and ensure that the client OS trusts it).
• Configure the client OS to trust the self signed certificate.
• Use the --insecure flag on all Argo CD CLI operations in this guide.
Use argocd login –core to configure <https://argo-cd.readthedocs.io/en/stable/user-guide/commands/argocd_login/>_ CLI access and skip steps 3-5.
- Download Argo CD CLI
Download the latest Argo CD version from https://github.com/argoproj/argo-cd/releases/latest.
More detailed installation instructions can be found via the CLI installation documentation <https://argo-cd.readthedocs.io/en/stable/cli_installation/>_.
Also available in Mac, Linux and WSL Homebrew:
[brew install argocd]
- Access The Argo CD API Server
By default, the Argo CD API server is not exposed with an external IP. To access the API server, choose one of the following techniques to expose the Argo CD API server:
Service Type Load Balancer
Change the argocd-server service type to LoadBalancer:
[kubectl patch svc argocd-server -n argocd -p '{"spec": {"type": "LoadBalancer"}}']
Ingress
Follow the ingress documentation <https://argo-cd.readthedocs.io/en/stable/operator-manual/ingress/>_ on how to configure Argo CD with ingress.
Port Forwarding
Kubectl port-forwarding can also be used to connect to the API server without exposing the service.
[kubectl port-forward svc/argocd-server -n argocd 8080:443]
The API server can then be accessed using https://localhost:8080
Login Using The CLI
The initial password for the admin account is auto-generated and stored as clear text in the field password in a secret named argocd-initial-admin-secret in your Argo CD installation namespace. You can simply retrieve this password using kubectl:
[kubectl -n argocd get secret argocd-initial-admin-secret -o jsonpath="{.data.password}" | base64 -d; echo]
Using the username admin and the password from above, log in to Argo CD's IP or hostname:
[argocd login <ARGOCD_SERVER>]
Change the password using the command:
[argocd account update-password]
- Register A Cluster To Deploy Apps To (Optional)
This step registers a cluster's credentials to Argo CD, and is only necessary when deploying to an external cluster. When deploying internally (to the same cluster that Argo CD is running in), https://kubernetes.default.svc should be used as the application's K8s API server address.
First list all clusters contexts in your current kubeconfig:
[kubectl config get-contexts -o name]
Choose a context name from the list and supply it to argocd cluster add CONTEXTNAME. For example, for docker-desktop context, run:
[argocd cluster add docker-desktop]
The above command installs a ServiceAccount (argocd-manager), into the kube-system namespace of that kubectl context, and binds the service account to an admin-level ClusterRole. Argo CD uses this service account token to perform its management tasks (i.e. deploy/monitoring).
The rules of the argocd-manager-role role can be modified such that it only has create, update, patch, delete privileges to a limited set of namespaces, groups, kinds. However get, list, watch privileges are required at the cluster-scope for Argo CD to function.
6. Create An Application From A Git Repository
An example repository containing a guestbook application is available at https://github.com/argoproj/argocd-example-apps.git to demonstrate how Argo CD works.
Creating Apps Via CLI
First we need to set the current namespace to argocd running the following command:
[kubectl config set-context --current –namespace=argocd]
Create the example guestbook application with the following command:
[argocd app create guestbook --repo https://github.com/argoproj/argocd-example-apps.git --path guestbook --dest-server https://kubernetes.default.svc --dest-namespace default]
How to create applications (Using User-Interface)
Open a browser to the Argo CD external UI, and login by visiting the IP/hostname in a browser and use the credentials set in step 4.
.. image:: ../images/agro_install1.png
Login into the ArgoCD server
The password for admin is stored in secret with the name- argocd-initial-admin-secret and also decodes the password.
  [kubectl get secrets -n argocd argocd-initial-admin-secret -o yaml]

  [echo ZVF1ZHVZU21OR1RqTFViWg== | base64 --decode]
Copy this password and paste it into the UI and ignore the % sign
.. image:: ../images/agro_install2.png
Now, Sign In
.. image:: ../images/agro_install3.png
Currently, it is empty
Let’s start creating applications
Firstly, through UI
Click on +NEW APP and fill in the details like:-
• application name- demo
• project- default
• sync policy- manual
• repository URL- where your application is present
• path- in which the YAML files are located
• cluster URL- select the cluster URL you are using
• namespace- default
Leave the rest of the spaces empty for the time being
.. image:: ../images/agro_install4.png
.. image:: ../images/agro_install5.png
.. image:: ../images/agro_install6.png
Our application is created
Moreover, for this out of sync status, we have to enable the auto-sync policy which is present inside the APP DETAILS by clicking on this demo application.
.. image:: ../images/agro_install7.png
.. image:: ../images/agro_install8.png
The status of our application is now HEALTHY
So, this is the first way of creating the application through UI.
Let’s, create the application using CLI
For the CLI, first, we have to install the argocd binary
[wget https://github.com/argoproj/argo-cd/releases/download/v2.4.2/argocd-linux-amd64]
Change the name of the binary(optional)
[mv argocd-linux-amd64 argocd]
Change permissions
[chmod +x argocd]
Move this file to another directory
[sudo mv argocd /usr/local/bin]
Now, type argocd help to check the available commands
Login to the server using your cluster IP and the port, in my case the service is LoadBalancer so I am using the External-IP
[argocd login [external-ip]]
.. image:: ../images/agro_install9.png
Provide the same username and password that you used for the UI login
Now, let’s create the application. Therefore, I am using the same example that I have used in the UI demo but with the different application name
  [argocd app create [app-name] --project [name] --repo [git repo URL] --path [app folder] --dest-namespace [namespace] --dest-server [server URL]]

  [argocd app create demo1 --project default --repo https://github.com/Jasmine-Harit/gitops-certification-examples.git --path ./simple-app --dest-namespace default --dest-server https://kubernetes.default.svc]
KEY POINTS:-
• app-name- is the name you want to give your app(like demo1)
• project- is the name of the project created or default
• app folder- the path to the configuration for the application in the repository
• git repo- it is the URL of the git repository where the configuration file is located
• dest-namespace- the name of the target namespace in the cluster where the application is deployed
• server URL- use https://kubernetes.default.svc to reference the same cluster where ArgoCD has been deployed
.. image:: ../images/agro_install10.png
.. image:: ../images/agro_install11.png
Now, let’s check the list of apps and the information of a particular app
  [argocd app list]

  [argocd app get [app-name]]

  [argocd app get demo1]
.. image:: ../images/agro_install12.png
So, this is how you can create applications using CLI
Another way to create applications is by writing a YAML file
I am going to use the Gitlab example for this demo.
(a) Clone the repository and Create a YAML file as below mentioned.
  [apiVersion: argoproj.io/v1alpha1

  kind: Application

 metadata:

  name: argo-application

  namespace: argocd

  spec:

  project: default

  source:

    repoURL: https://gitlab.com/*******url******/argocd-app-config.git

    targetRevision: HEAD

    path: dev

  destination:

    server: https://kubernetes.default.svc

    namespace: myapp

  syncPolicy:

    syncOptions:

    - CreateNamespace=true

    automated:

      selfHeal: true

      prune: true]
Points to remember** :- Inside automated, there are two things selfHeal is used for when you make changes directly to the cluster so argocd will automatically detect it and prune is used for when you remove or delete files from your repository that also argo will detect.
Now, apply this YAML using below mentioned.
  [kubectl apply -f [yaml file name]]
  [kubectl apply -f application.yaml]
.. image:: ../images/agro_install13.png