
 E2E Cloud
Set up single sign-on with Microsoft Entra ID
Single sign-on lets your team sign in to MyAccount with the account they already use at work, instead of a separate MyAccount password. You set it up once, with any SAML 2.0 identity provider, then invite your team through it. The walk-through uses Microsoft Entra ID; the MyAccount side of the steps is the same for any SAML 2.0 provider.
Before you begin
Section titled “Before you begin”You need:
- A role on your MyAccount account that can create an identity provider. The owner and an Admin can, by default. Another role needs a policy with Create ticked for the Identity Provider service; renaming a provider later needs Update, and deleting one needs Delete. See Create a policy set.
- Admin access to your organization’s identity provider, to create the application and assign users there.
- A phone number on file for each person you will invite through single sign-on, in the identity provider. MyAccount needs this to sign them in; see Set up the connection in Microsoft Entra ID for where to set it.
Create the identity provider in MyAccount
Section titled “Create the identity provider in MyAccount”- Open Identity & Access Management (IAM) from the account menu, then Identity Providers.
- Click Add Identity Provider. On Choose Identity Source, select External identity provider, then click Continue. You keep managing users and groups in your own identity provider, and they sign in there before MyAccount opens.
- On Configure external identity provider, copy the E2E Assertion Consumer Service (ACS) URL and the E2E Issuer URL, or click Download metadata file for the same information as a file. MyAccount generates these values for this setup, and they differ on every account, so copy them from this screen rather than from a document or an earlier setup.
Keep this screen open, or keep the downloaded file to hand. You give these values to your identity provider next.
Set up the connection in Microsoft Entra ID
Section titled “Set up the connection in Microsoft Entra ID”-
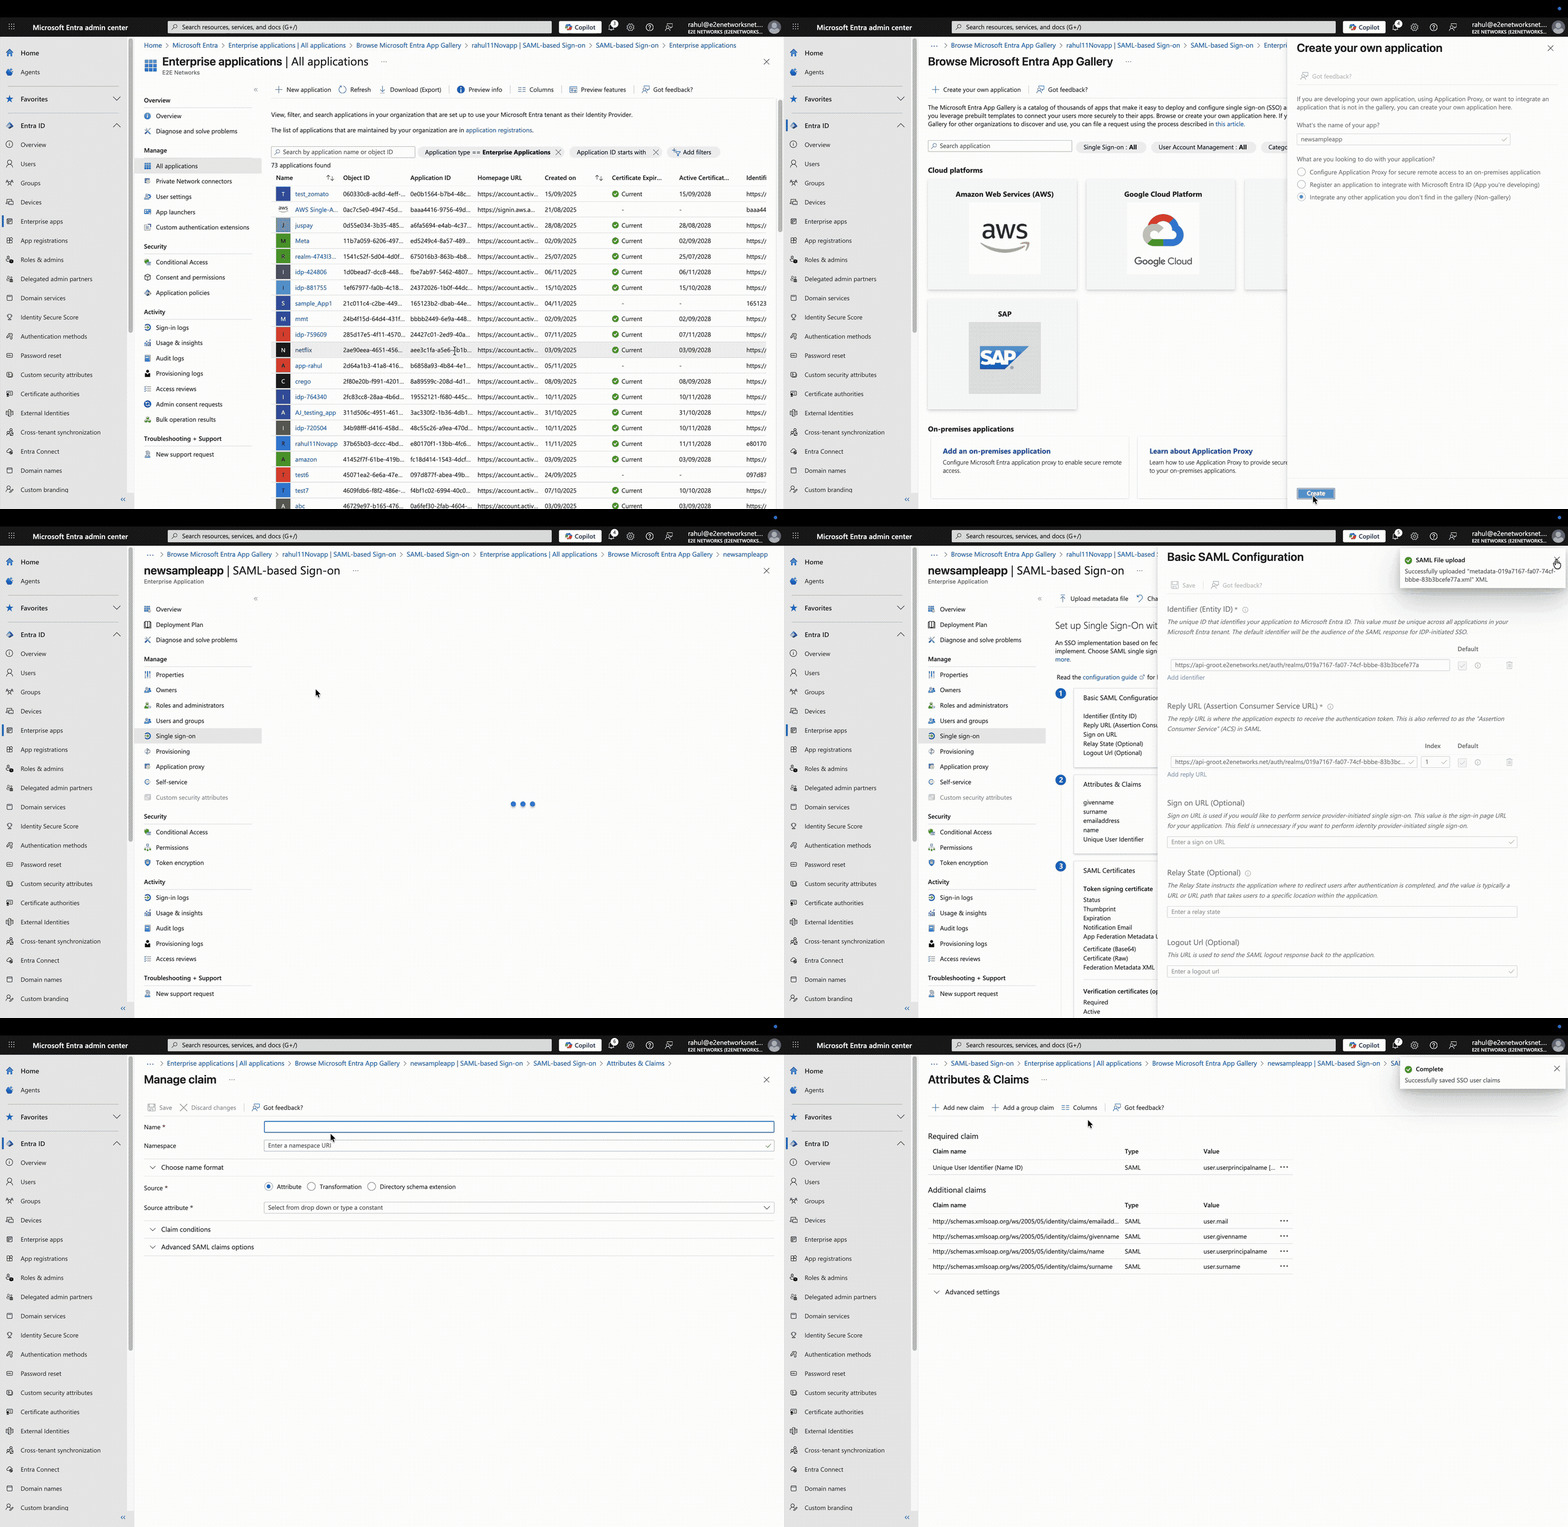
In the Microsoft Entra Admin Center, go to Enterprise Applications → New application → Create your own application. Give it a name, for example
E2E Cloud SSO, and select Create. -
From the application overview, choose Set up single sign-on → SAML.
-
Click Upload metadata file, select the metadata file you downloaded from MyAccount, and click Add. You can also enter the E2E Assertion Consumer Service (ACS) URL and E2E Issuer URL by hand. Basic SAML Configuration opens with Identifier (Entity ID) and Reply URL (Assertion Consumer Service URL) filled in. Click Save.
-
Go to Attributes & Claims → Edit → Add new claim, and enter:
- Name: phone_number, exactly as written, with no other spelling or capitalization.
- Source: Attribute
- Source attribute: user.mobilephone
Click Save. Each person who signs in through this identity provider needs a verified phone number in Microsoft Entra ID for this claim to send; without one, their sign-in is refused. See SSO authentication failed. Please try again..
-
On the application’s SAML setup page, download the Federation Metadata XML file.
Finish the connection in MyAccount
Section titled “Finish the connection in MyAccount”- Back in MyAccount, under IdP SAML Metadata, upload the federation metadata file you downloaded from Microsoft Entra ID.
- MyAccount then runs three checks: testing the configuration, enabling the identity provider, and verifying its SAML metadata. Create Identity Provider becomes available once all three pass.
- Click Create Identity Provider.
MyAccount names the new identity provider for you, such as idp- followed by a number. To give it
a name of your own once it is created, click the pencil beside Identity Provider Name on its
Metadata page.
Invite users through the identity provider
Section titled “Invite users through the identity provider”- In the Microsoft Entra Admin Center, open your E2E Cloud SSO application, then go to Users and groups → Add user/group. Select the users or groups you want to give access to, and click Assign.
- In MyAccount, open Identity & Access Management (IAM) → All Users → Add User. Enter the person’s email, choose the identity provider you created in Identity Provider, and choose their role, then click Add User.
Only someone who is both assigned to the application in Microsoft Entra ID and invited through that identity provider in MyAccount can sign in using single sign-on. Their MyAccount sign-in is created the first time they sign in successfully through the identity provider.
Sign in with single sign-on
Section titled “Sign in with single sign-on”- On the MyAccount sign-in page, click Sign in with SSO.
- Enter the 12-digit Organization ID for this identity provider, then continue. It is in your SSO invitation email, and your administrator can also copy it from Identity Providers or the provider’s Metadata page.
- Your identity provider opens for you to sign in there. Once it verifies you, MyAccount asks for your second sign-in code and Trust this device, the same way as any other sign-in.
Rename or delete an identity provider
Section titled “Rename or delete an identity provider”To rename an identity provider, open it from Identity Providers, then click the pencil beside Identity Provider Name on its Metadata page.
To delete one, first remove every user ever invited through the provider, whether they accepted or not; MyAccount refuses the delete until they are gone. Then open the provider from Identity Providers and click Delete Identity Provider under Actions. Tick the box confirming you understand the risk, type the provider’s name, and click Delete.
Move a user to or from single sign-on
Section titled “Move a user to or from single sign-on”To move someone onto single sign-on, off it, or to a different identity provider, remove them from All Users, then invite them again with the identity provider you want. Their Edit page keeps the Identity Provider they were invited with. See Manage users and Invite a user.
See the new identity provider
Section titled “See the new identity provider”Identity Providers lists the new provider with its Provider name, its Type, SAML, its Organization ID, and when it was created. A user who signs in through it carries a small mark reading SSO enabled user on All Users.
You can now invite the rest of your team through this identity provider. See Invite a user and Choose a role for a user.