Connecting Kubernetes Cluster to E2E DBaaS
This article will guide you on how to integrate Kubernetes with Database as a Service (E2E DBaaS).
Using an external Database as a Service (E2E DBaaS) with Kubernetes reduces the administrative burden on your team, allowing them to focus on application development and deployment.
Benefits of Using E2E DBaaS with Kubernetes
-
High Availability — E2E DBaaS, especially when provided as managed services, often come with built-in high availability features. This means your database can continue to operate even if a pod in your Kubernetes cluster fails, contributing to improved application uptime and reliability..
-
Scalability — Kubernetes allows you to scale your application pods independently of the database. When using an E2E DBaaS as an external database, you can scale your application horizontally to meet increased demand without impacting database performance. This scalability is crucial for handling variable workloads.
-
Data Persistence — Placing the database outside of the Kubernetes cluster ensures data persistence, a fundamental requirement for safeguarding crucial application data. Even when your application pods are temporary and subject to rescheduling or replacement, your data remains securely preserved within the external database.
In this article, we will implement this integration using the MySQL DB engine.
Prerequisites
-
Provision a DBaaS Instance — Create a DBaaS instance using MySQL, selecting the version that suits your project requirements. This will serve as your managed database backend.
-
Create a Virtual Private Cloud (VPC) — Set up a VPC to establish network isolation. Both your DBaaS instance and Kubernetes cluster will be connected within this VPC.
-
Deploy a Kubernetes Cluster — Deploy a Kubernetes cluster inside the same VPC. This cluster will orchestrate your application containers.
Step 1: Configure Kubernetes Cluster to Connect with DBaaS
To allow your Kubernetes cluster to connect with the DBaaS instance:
-
Navigate to your DBaaS instance settings.
-
Go to the Network section.
-
Select the VPC where your Kubernetes cluster is running.
-
Attach the same VPC to the DBaaS instance.
This ensures that Kubernetes nodes within the VPC have network access to the DBaaS endpoint.
Step 2: Create a ConfigMap for Endpoint Configuration
Create a ConfigMap that stores the database host and port. Save the following content to a file named database-configmap.yaml:
apiVersion: v1
kind: ConfigMap
metadata:
  name: database-config
data:
  DB_HOST: "10.12.162.11" # Attached VPC IP address
  DB_PORT: "3306"         # MySQL Standard Database Port
Apply the ConfigMap:
kubectl apply -f database-configmap.yaml
Step 3: Create a Secret for Username and Password
Kubernetes Secrets store sensitive data in base64-encoded format. To encode your DBaaS credentials, run the following commands in your terminal:
echo -n "your-username" | base64
echo -n "your-password" | base64
Use the encoded output values in the Secret file below. Save the following content to a file named database-secret.yaml:
apiVersion: v1
kind: Secret
metadata:
  name: external-db-credentials
type: Opaque
data:
  MYSQL_USERNAME: a3ViZWRiZC5jb20=       # DBaaS Username in base64-encoded format
  MYSQL_ROOT_PASSWORD: Y1gzVWpXRXRRejRmVDRTIQo= # DBaaS Password in base64-encoded format
Apply the Secret:
kubectl apply -f database-secret.yaml
Step 4: Create a DB Client Deployment
Save the following content to a file named deployment.yaml. This deployment creates a MariaDB-based client pod that reads database connection details from the ConfigMap and Secret created in the previous steps:
apiVersion: apps/v1
kind: Deployment
metadata:
  name: mysql-client-deployment
spec:
  replicas: 1
  selector:
    matchLabels:
      app: mysql-client
  template:
    metadata:
      labels:
        app: mysql-client
    spec:
      containers:
        - name: mysql-client
          image: mariadb
          env:
            - name: DB_HOST
              valueFrom:
                configMapKeyRef:
                  name: database-config
                  key: DB_HOST
            - name: DB_PORT
              valueFrom:
                configMapKeyRef:
                  name: database-config
                  key: DB_PORT
            - name: MYSQL_USERNAME
              valueFrom:
                secretKeyRef:
                  name: external-db-credentials
                  key: MYSQL_USERNAME
            - name: MYSQL_ROOT_PASSWORD
              valueFrom:
                secretKeyRef:
                  name: external-db-credentials
                  key: MYSQL_ROOT_PASSWORD
Apply the Deployment:
kubectl apply -f deployment.yaml
Step 5: Verify the DB Client Pod Status
Run the following command to check that the MySQL client pod is running:
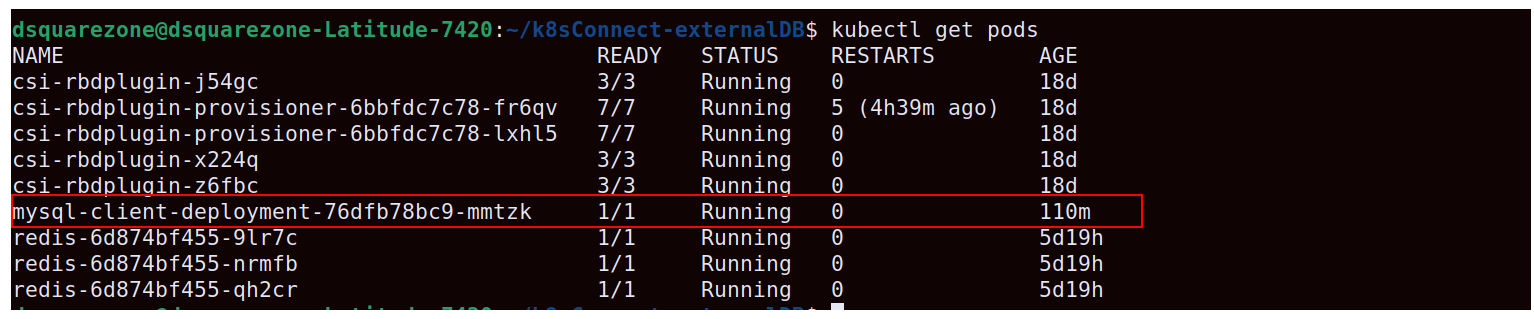
kubectl get pods
The output lists all pods with their current status. Confirm that the mysql-client-deployment pod shows a Running status before proceeding.
Step 6: Test Connectivity from the Pod to DBaaS
Once the pod is running, open an interactive shell inside it. Replace the pod name with the actual name from the previous step's output:
kubectl exec -it mysql-client-deployment-76dfb78bc9-mmtzk -- /bin/bash
From inside the shell, you can connect to the DBaaS instance using the MySQL client to verify connectivity. A successful connection confirms that the Kubernetes cluster can reach the external DBaaS endpoint through the configured VPC.
