CDN
Introduction
E2E CDN is a fast content delivery network (CDN) service that securely delivers data and static content to customers globally with low latency and high transfer speeds.
The idea of a CDN is essentially to have multiple edges in different locations around the world which cache all the static content so that it can be delivered from the customer's closest location. We intend to integrate CDN such that people hosting applications through us can use CDNs to improve their static asset delivery.
With E2E’s CDN, you can take the initial steps to speed up the delivery of your static content (for example, images, JavaScripts, style sheets, and many others). With E2E CDN, you can guarantee your viewers a fast, reliable, and safe experience across the globe. To create a CDN with E2E, please follow the following steps:
How to Create a CDN
Logging into E2E Networks MyAccount
Please go to My Account and log in using your credentials set up at the time of creating and activating the E2E Networks My Account.
Navigate to the CDN page on MyAccount
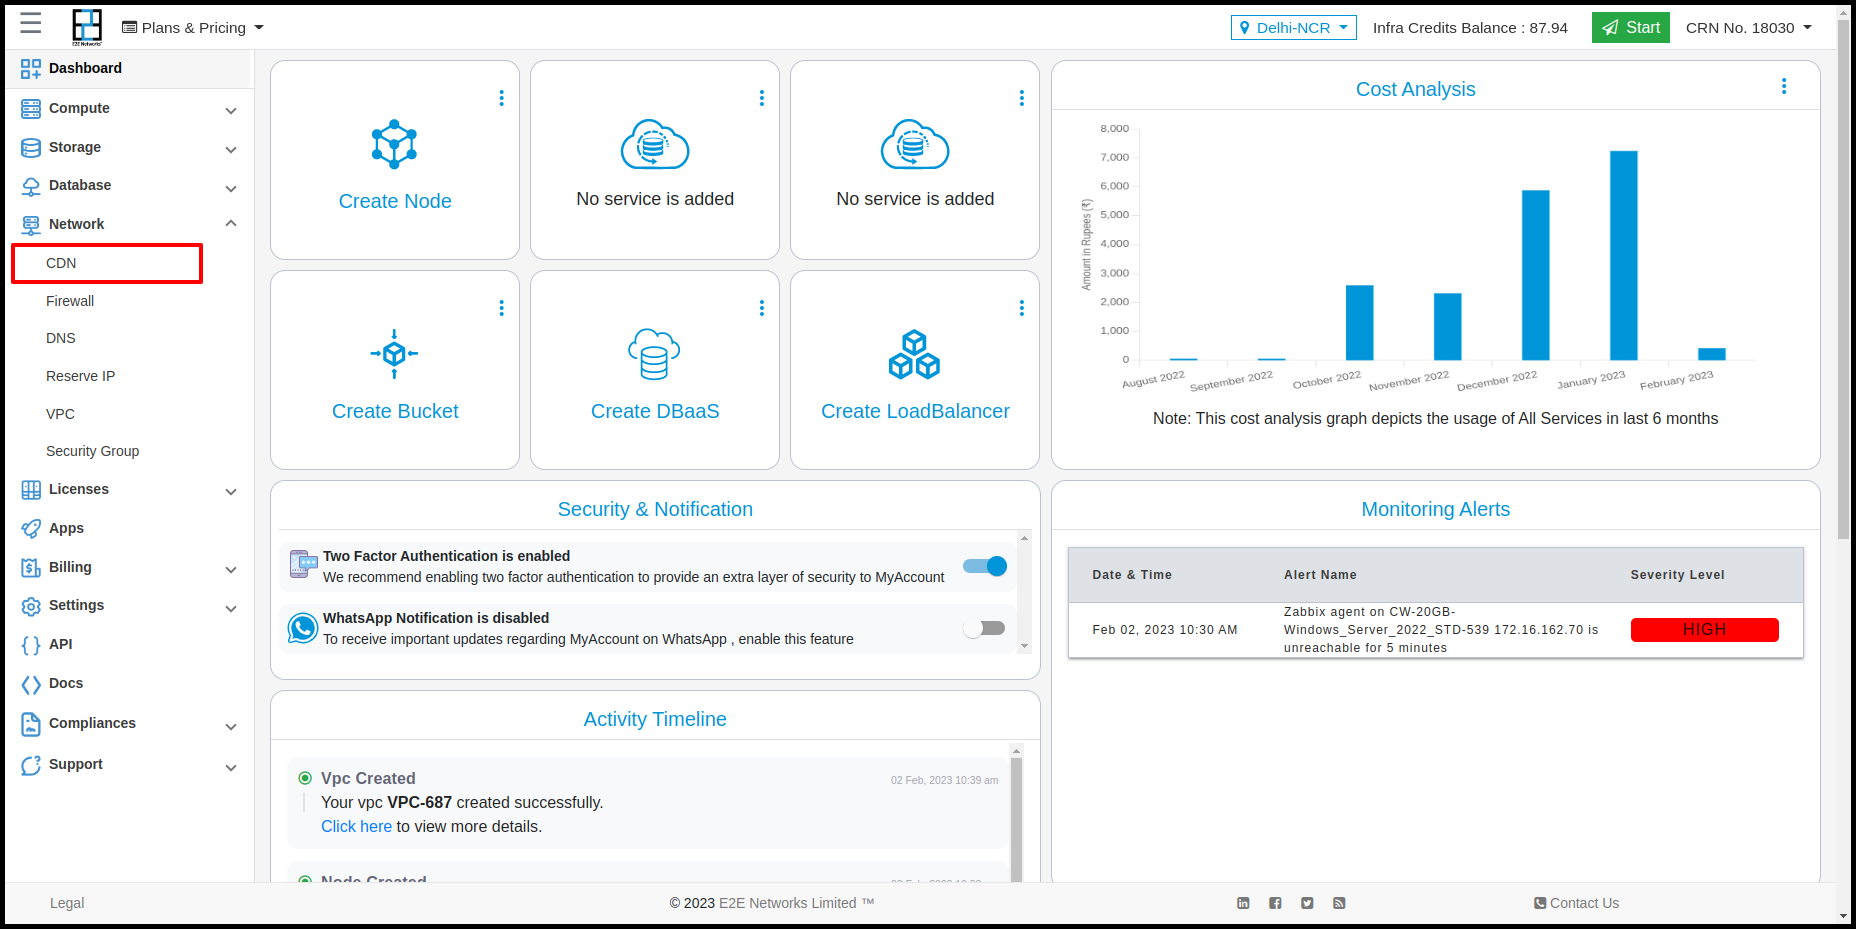
- On the left side of the My Account dashboard, click on the “CDN” sub-menu available under the “Services” section.
-
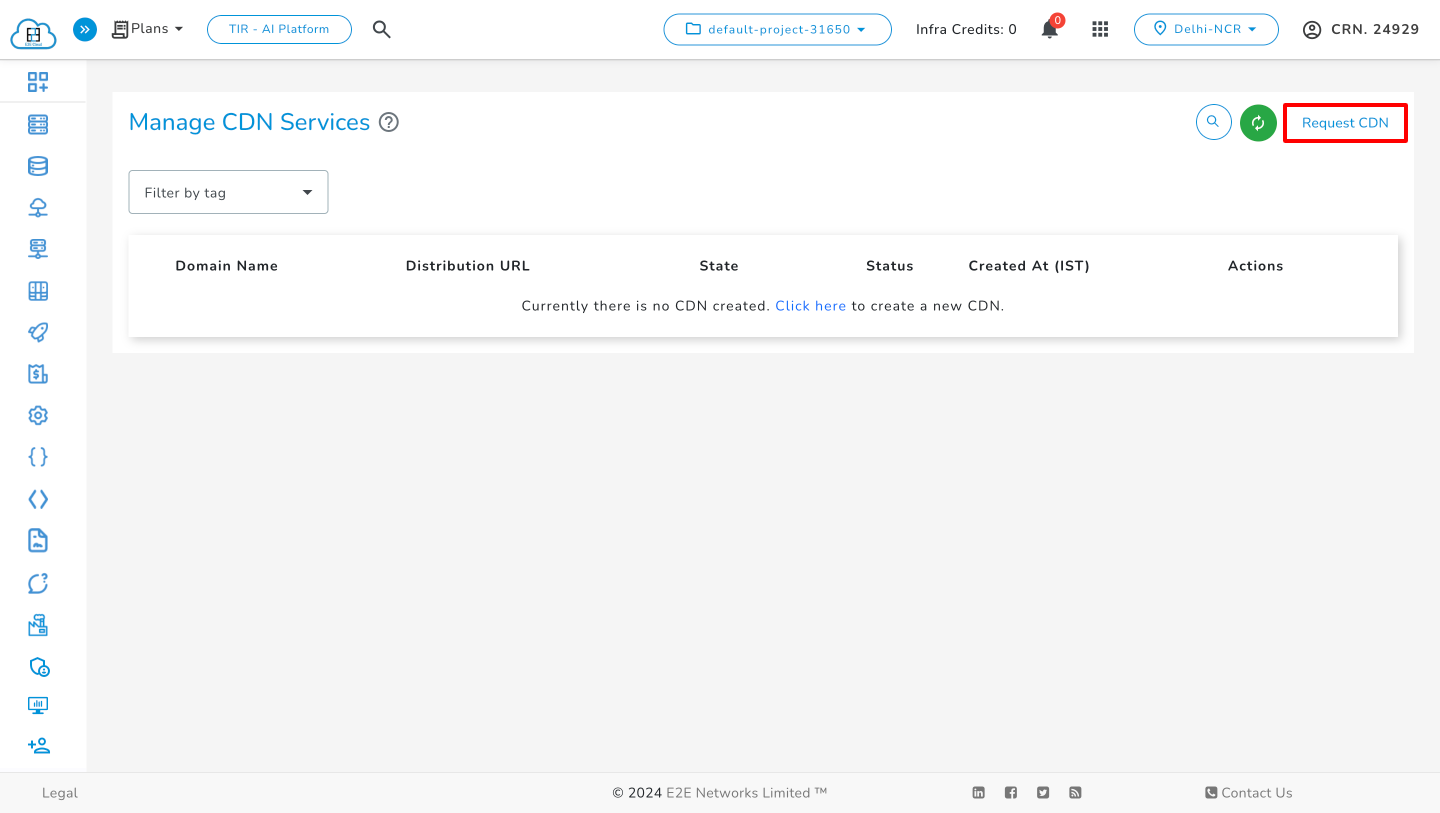
You will be redirected to the CDN page. This page shows all the CDNs created by the user.
-
New users who wish to launch the CDN service must first submit a request by clicking on "Request CDN". Existing customers who are already using CDN services do not need to submit a request; they can continue using the services directly.
Creation of CDN
-
After the request is approved, you can proceed with the CDN creation process.
-
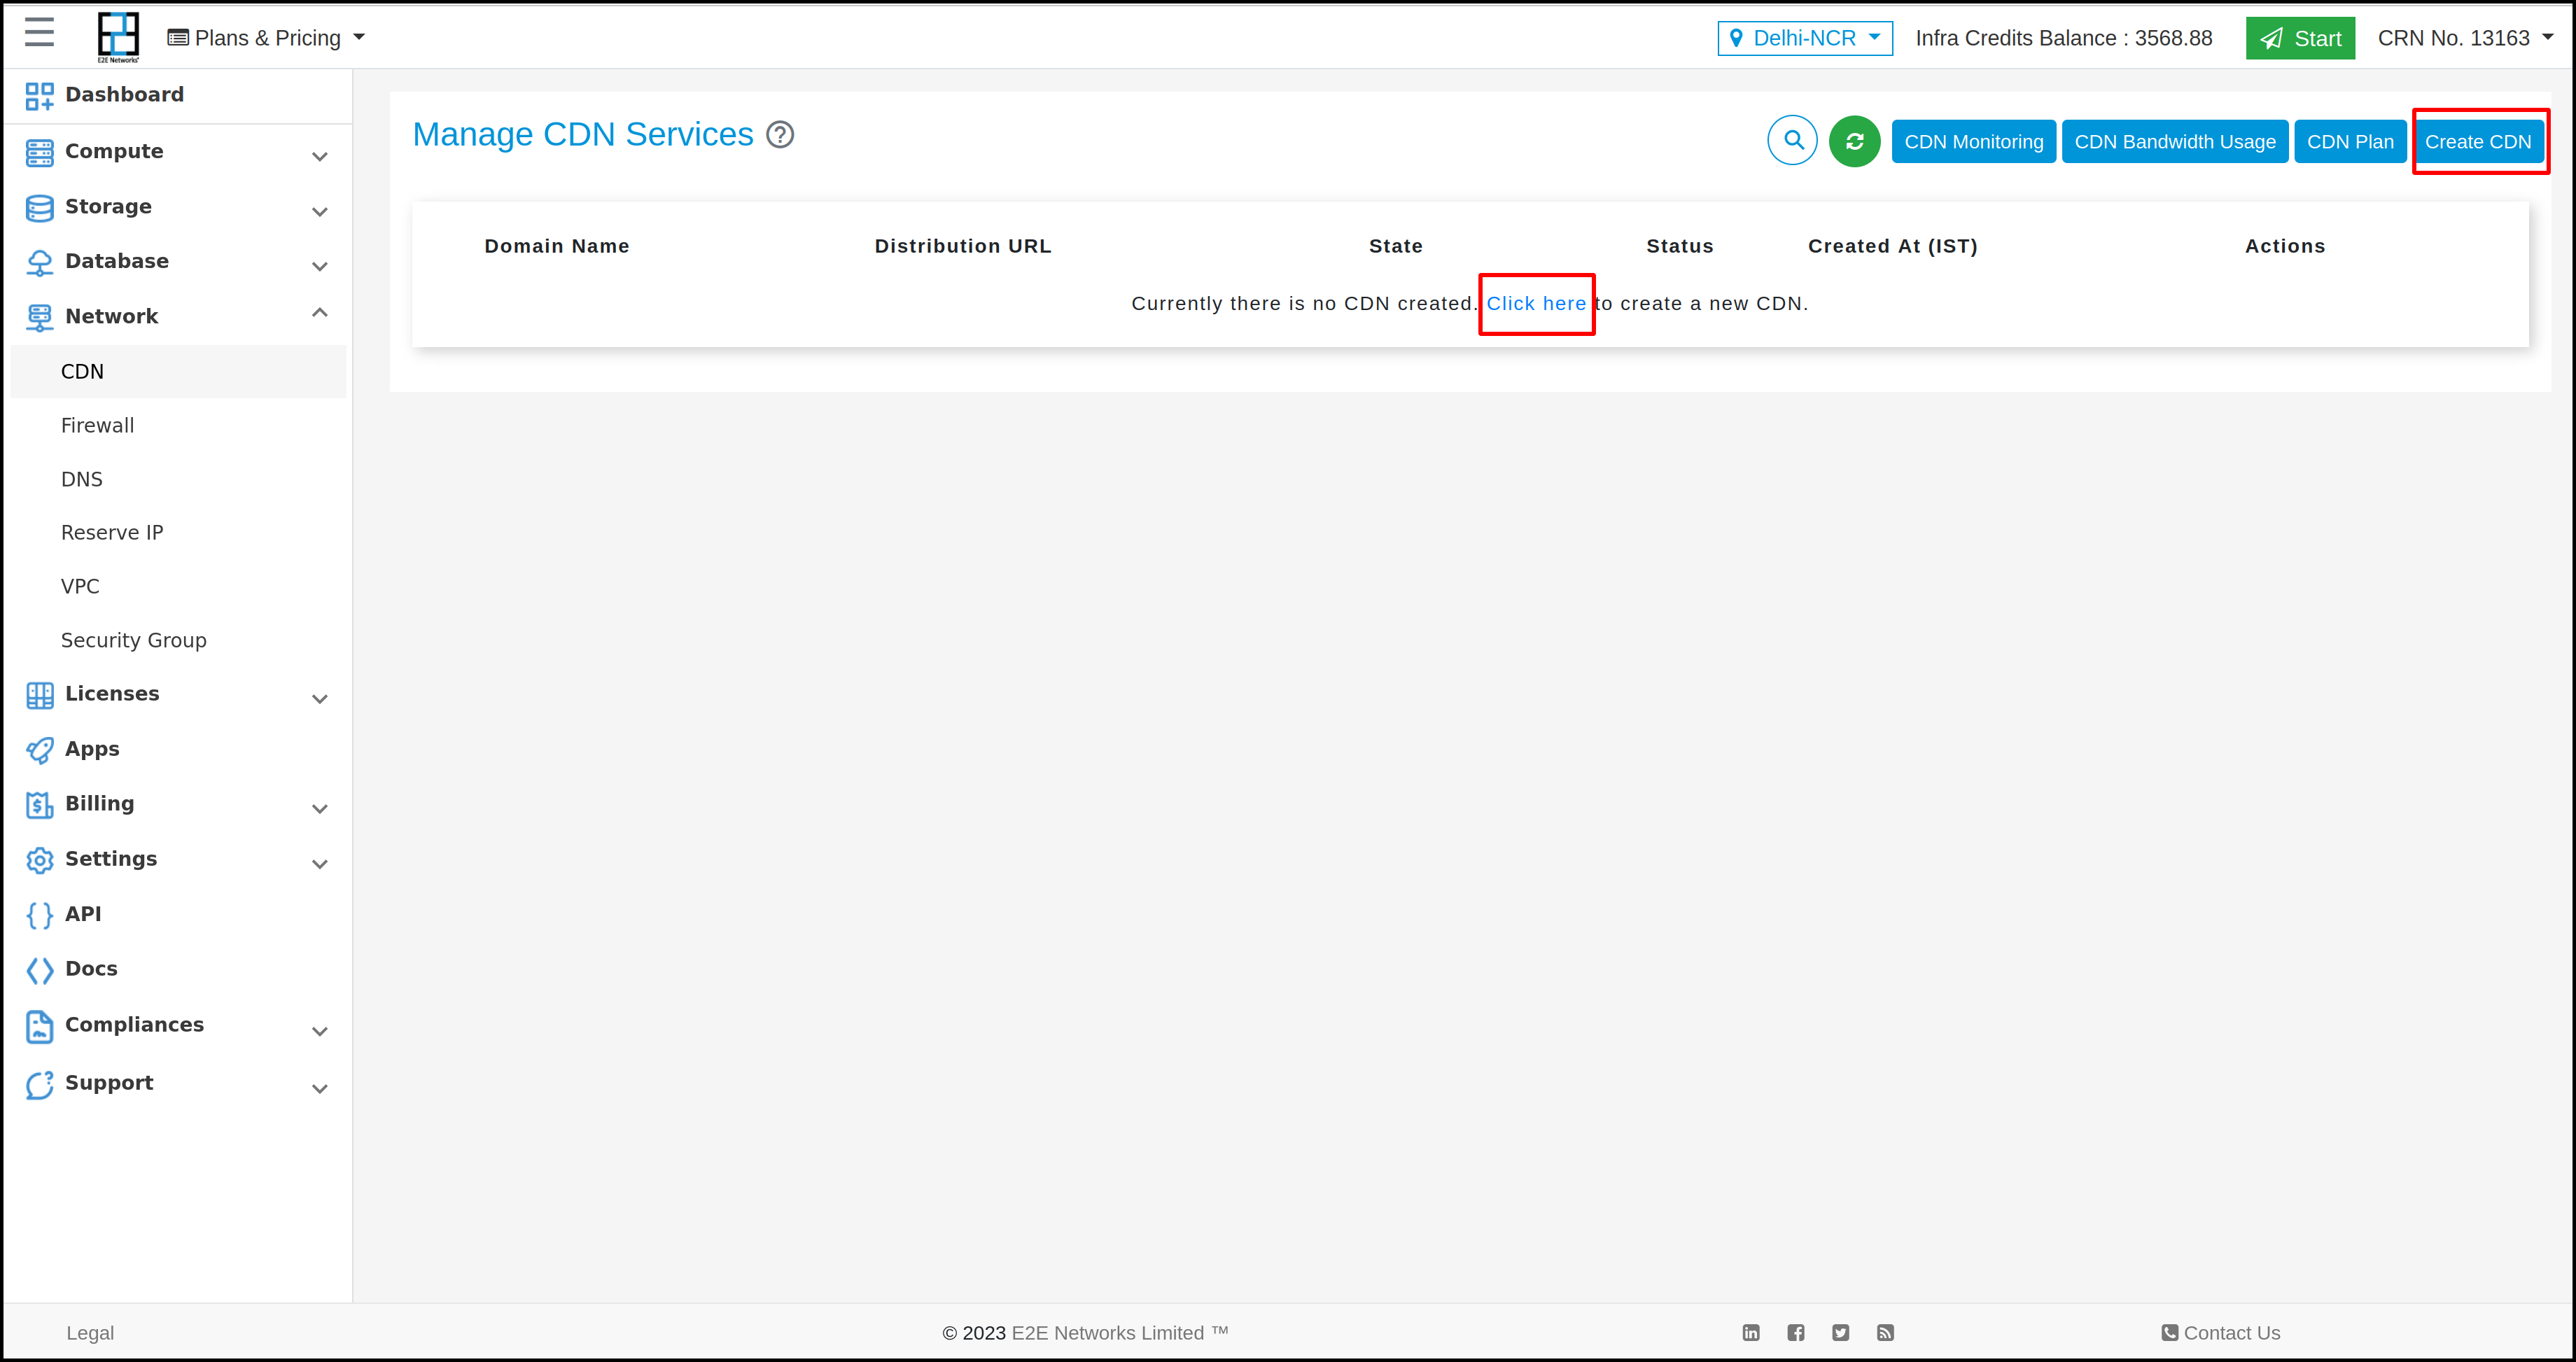
Click on the “Create CDN” button; then the form will open, and you have to enter details. After that, click on the "Create Distribution" button.
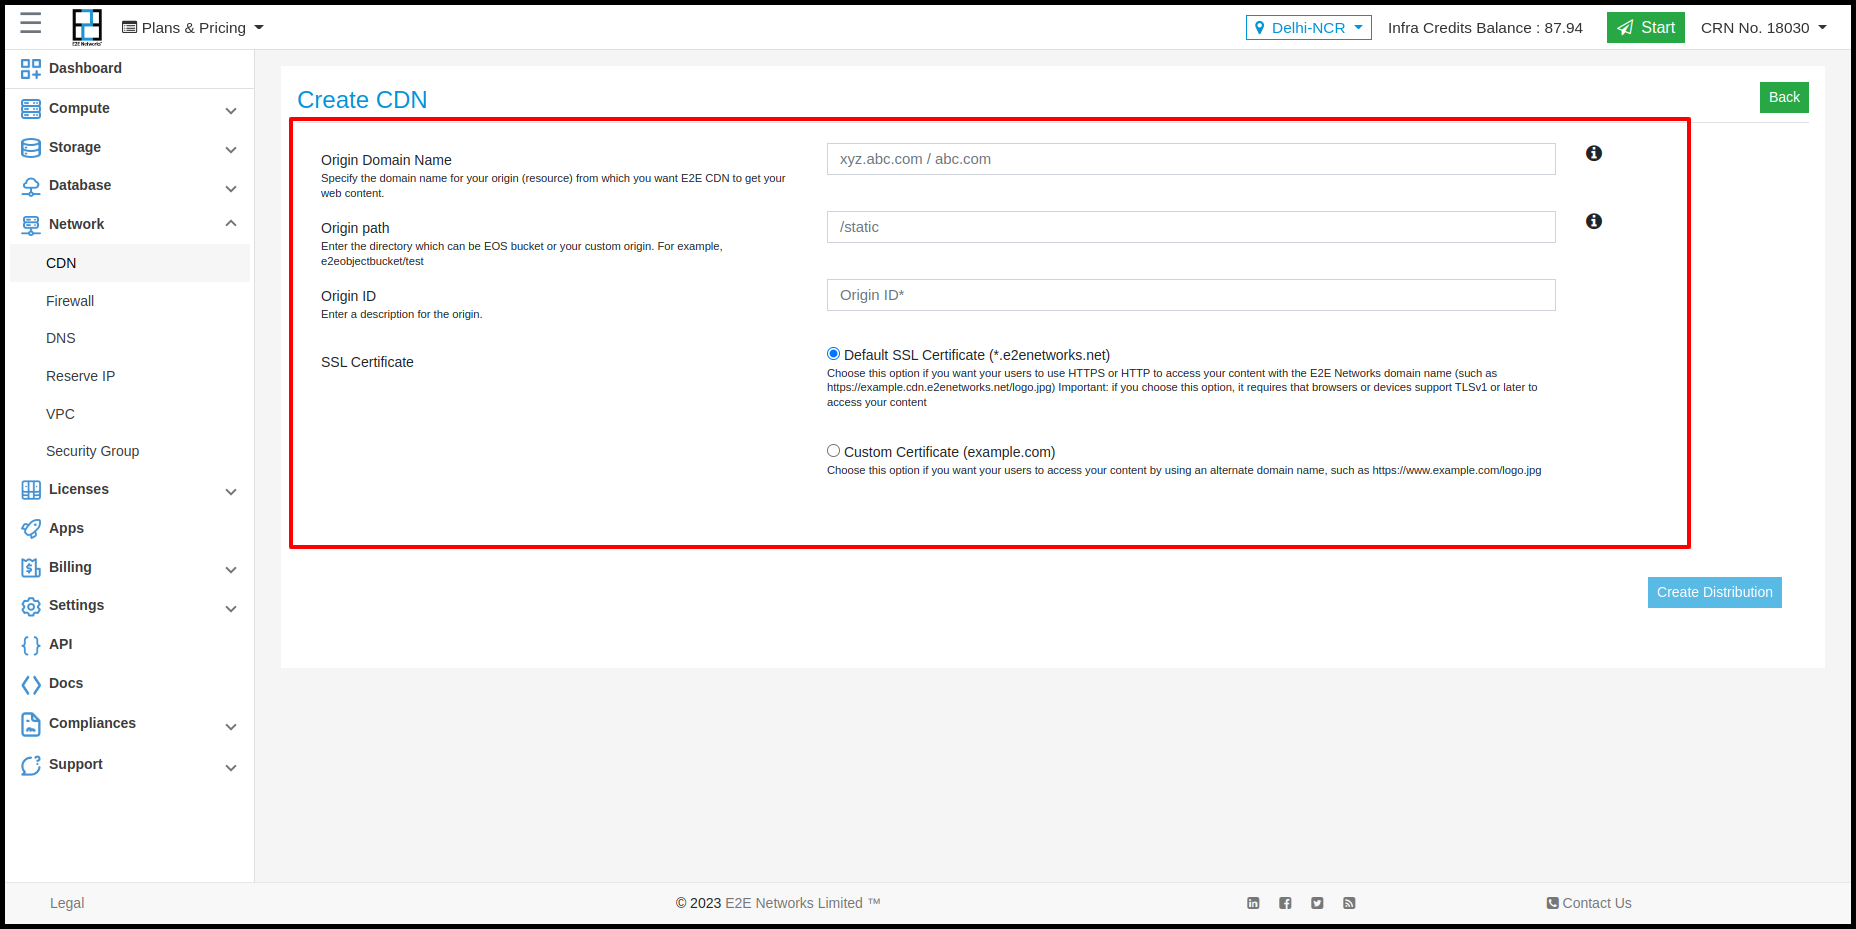
- Here, you need to specify the ‘Origin Domain Name’, ‘Origin Path’, and ‘Origin ID’.
-
Origin Domain Name: Enter the “Origin Domain Name”. For example,
xyz.abc.com/abc.com.
It is the DNS domain name of the HTTP server or E2E Object storage bucket from which your static content gets delivered. The files in your origin must be publicly readable. E2E CDN will contact this origin for the content requested by the user if not found on the CDN edge server cache. -
Origin Path: Enter the “Origin Path” beginning with
/. For example,xyz.com/static. Do not include/at the end of the directory name.
It is the path of the folder or directory from where the content should be delivered. CDN appends the directory name to the value of Origin Domain Name when forwarding the request to the origin. If the content from this directory fails, CDN will give a “Not Found” response to the user. -
Origin ID: Enter a description for the “Origin Path”. This value lets you distinguish multiple origins in the same distribution from one another. The description for each origin must be unique within the distribution. Currently, you can add only a single origin for a distribution.
-
SSL Certificate:
Default SSL Certificate (*.e2enetworks.net): Choose this option if you want your users to use HTTPS or HTTP to access your content with the E2E Networks domain name (such ashttps://example.cdn.e2enetworks.net/logo.jpg). Important: if you choose this option, it requires that browsers or devices support TLSv1 or later to access your content.Custom Certificate (example.com): Choose this option if you want your users to access your content by using an alternate domain name, such as
https://www.example.com/logo.jpg.
If you want to use a custom certificate, then you need to specify the CNAMEs separated by commas or put each on a new line.
Note: Origin Domain and Alternate Domain Names (CNAMEs) (if any provided) should have the same domain names. All the Alternate Domain Names (CNAMEs) on the CDN should be covered by the Subject Alternative Name (SAN) of the certificate.
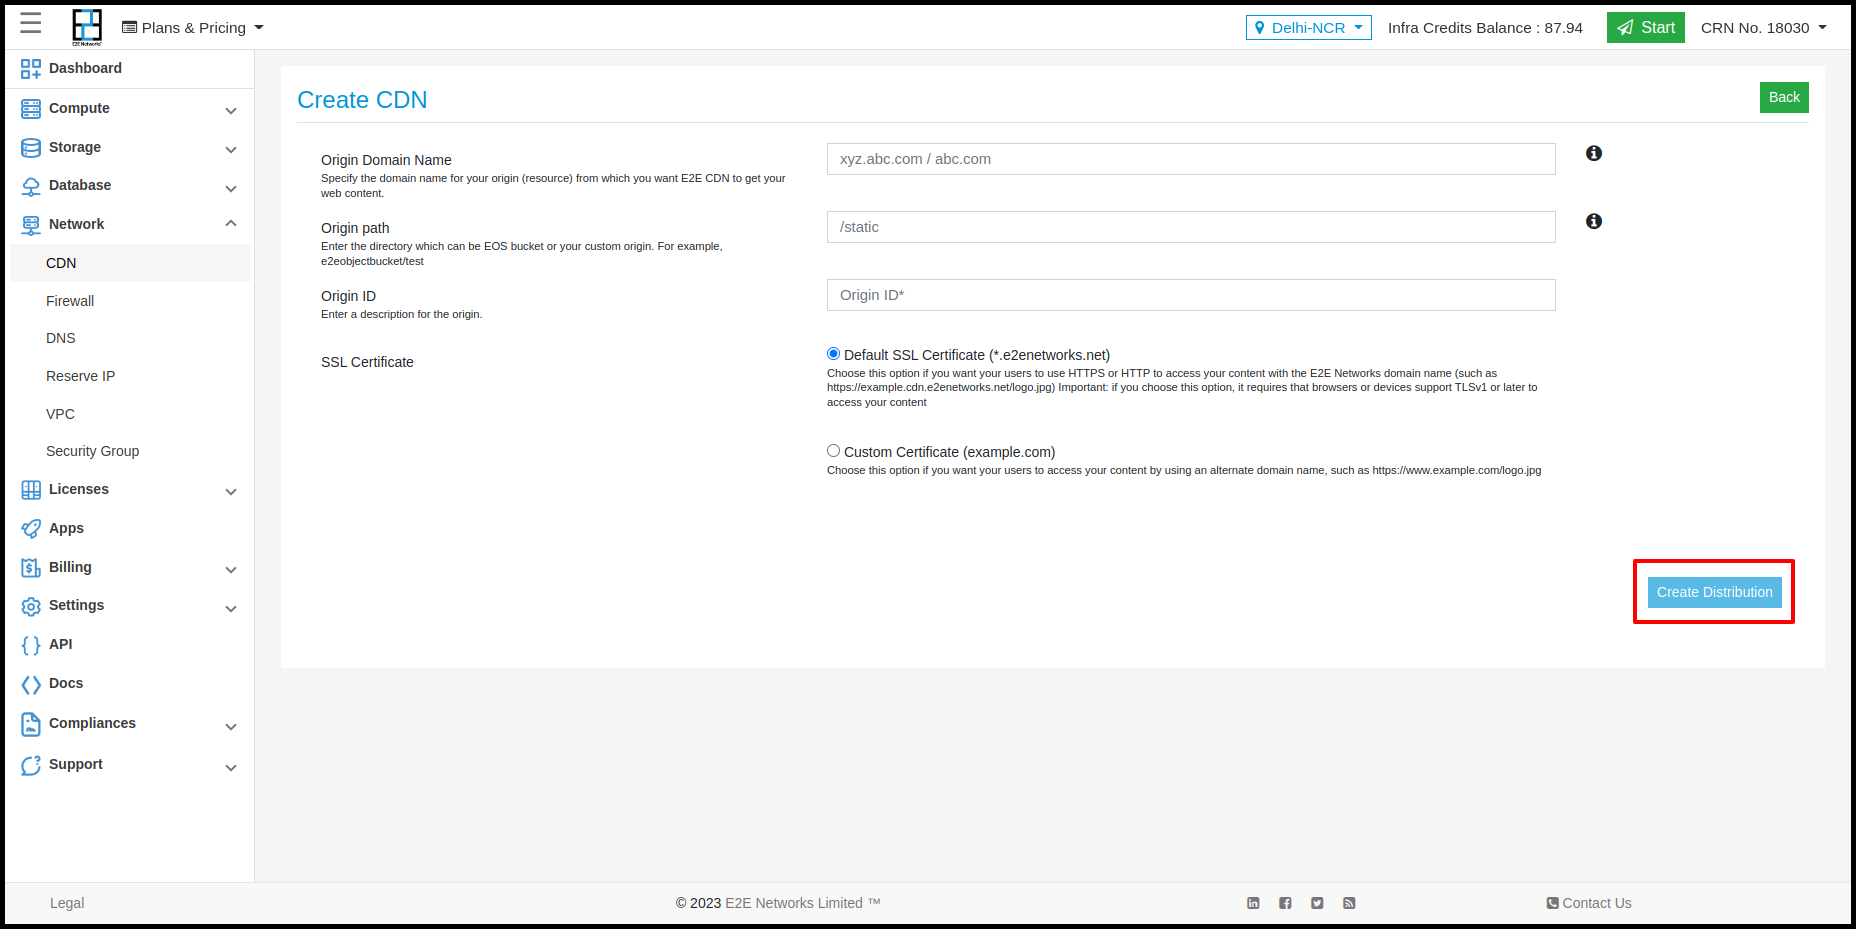
- After specifying the above values, click on the “Create Distribution” button. You will automatically be redirected to the “CDN Services” page, and a confirmation message will appear on the screen.
Note: After the creation of the CDN distribution, it will take up to 30 minutes to deploy the configuration changes on the CDN Edge servers.
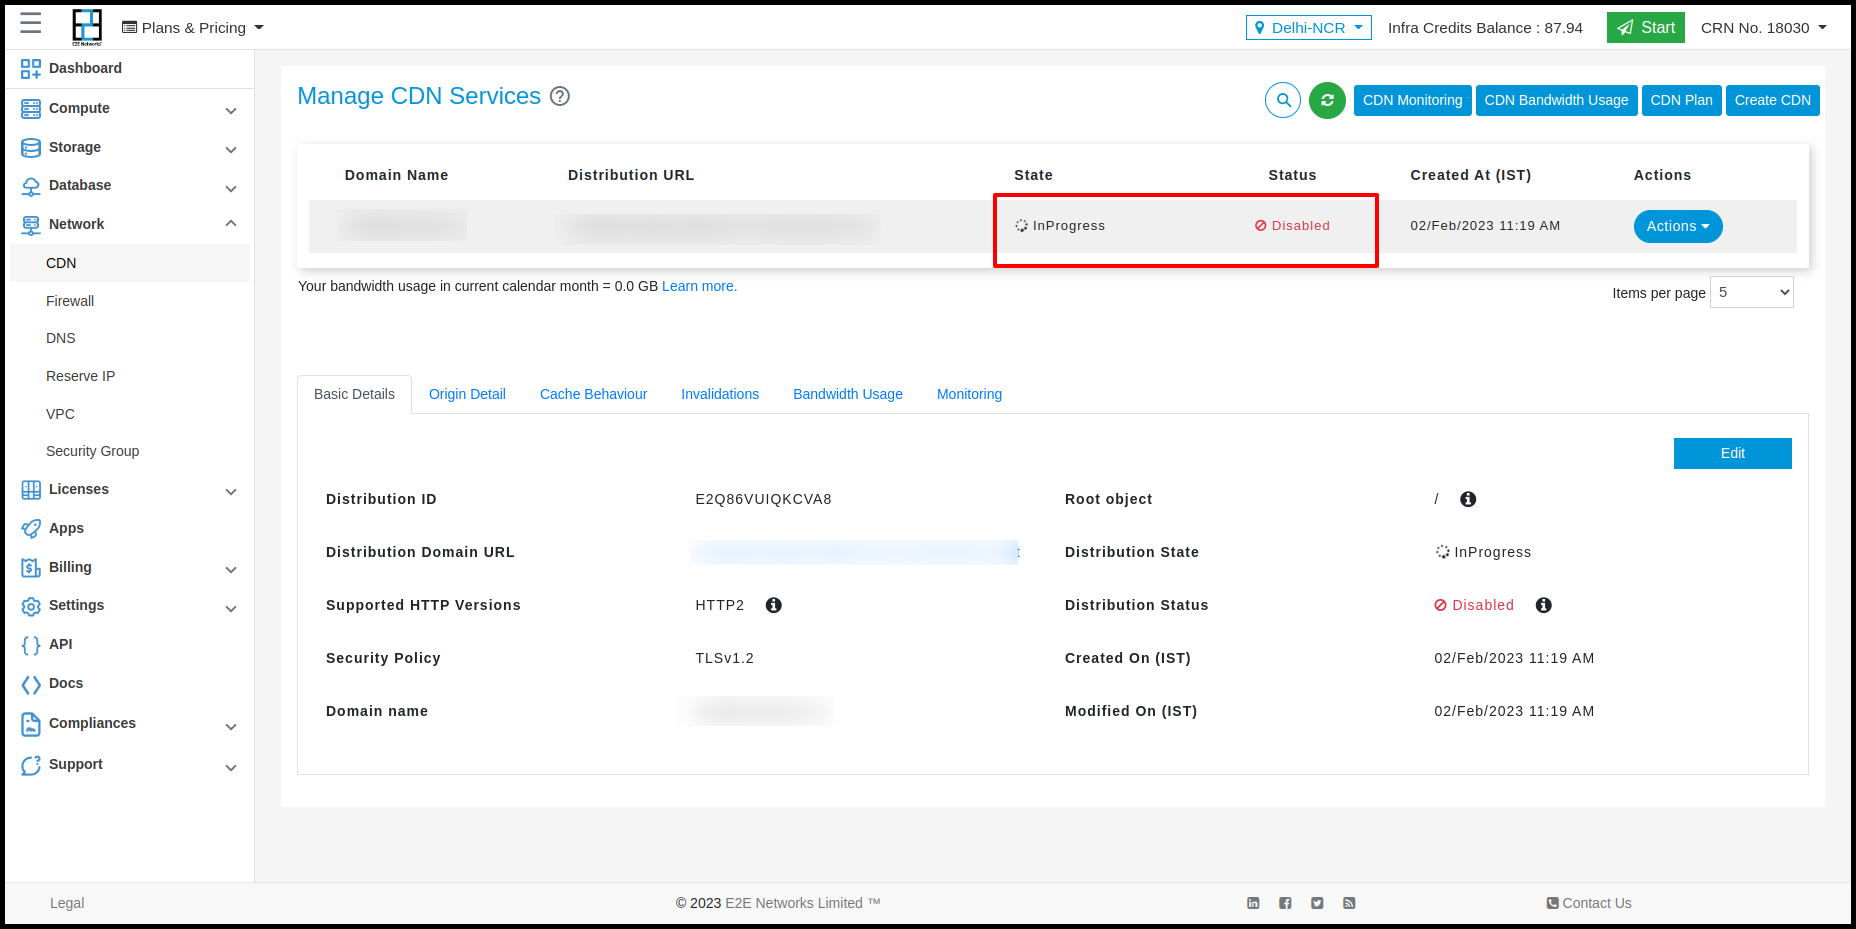
- When the State is ‘InProgress’ and Status is ‘Disabled’.
This signifies that the configuration changes deploy is in progress on the CDN Edge servers and the CDN is inactive; the requests will not be served through the CDN Edge network.
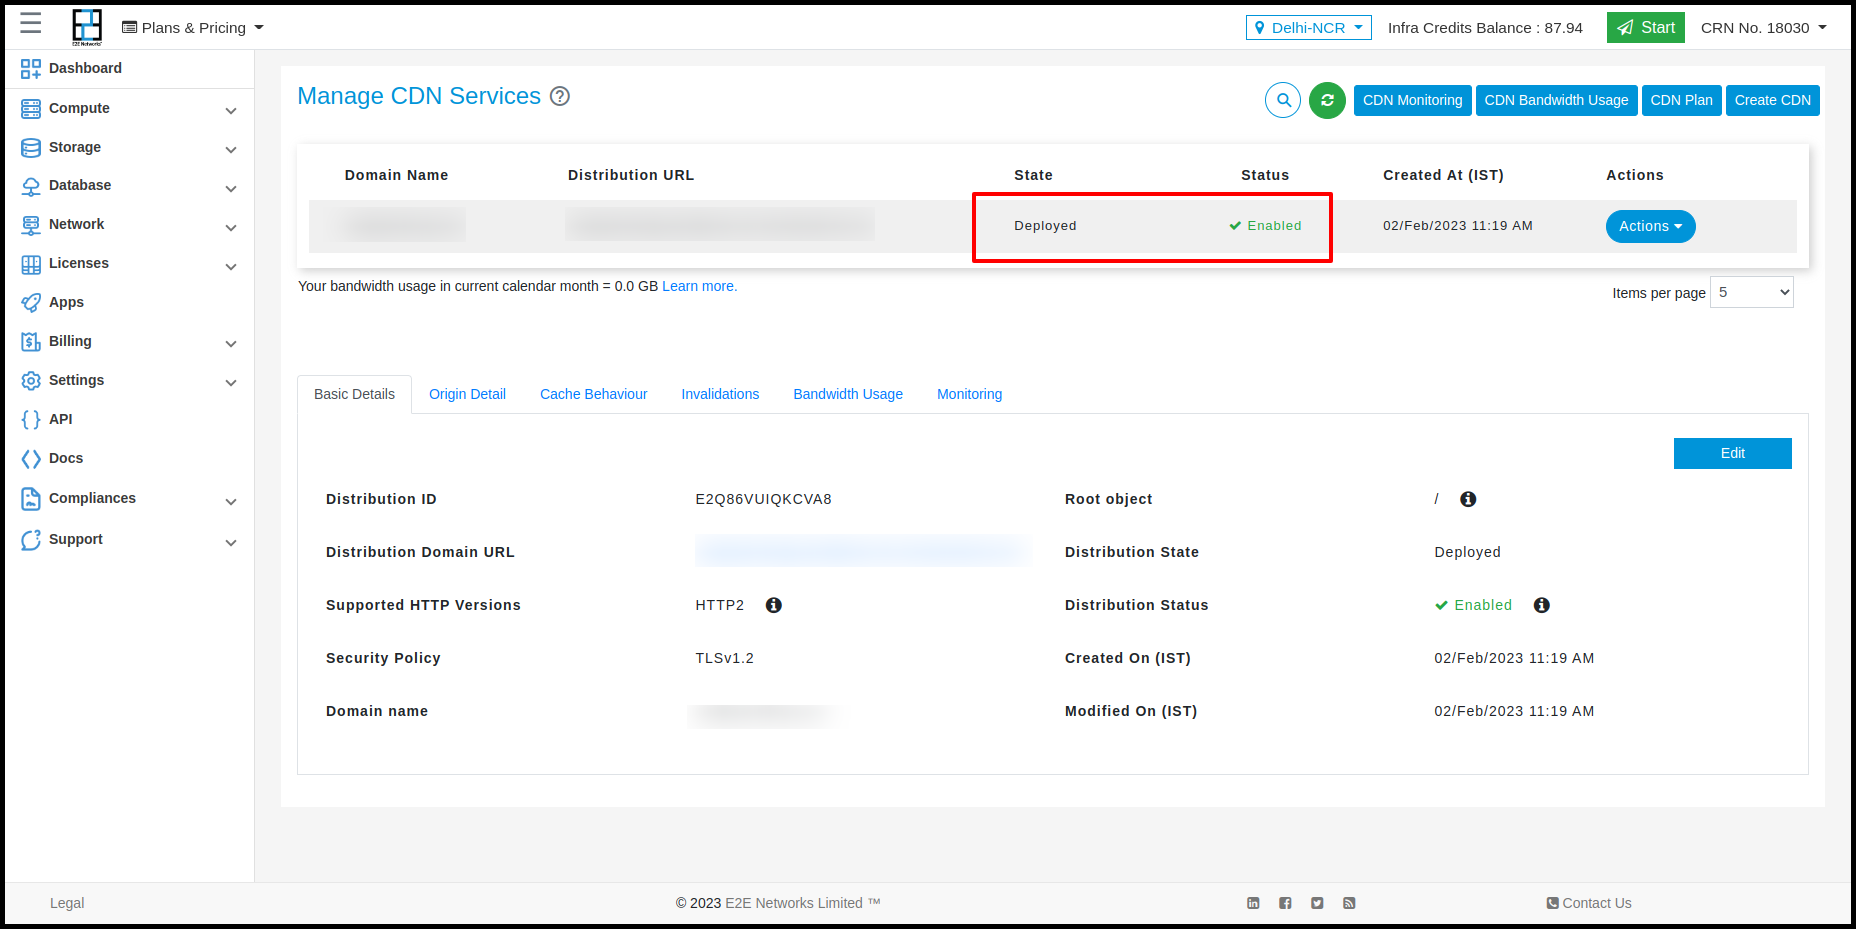
- When State is ‘Deployed’ and Status is ‘Enabled’.
This signifies that the configuration changes are deployed on the CDN Edge servers, and the CDN is active; the requests will be served through the CDN Edge network.
Note: Origin Domain and Alternate Domain Names (CNAMEs) (if any provided) should have the same domain names. All the Alternate Domain Names (CNAMEs) on the CDN should be covered by the Subject Alternative Name (SAN) of the certificate.
Manage/Update CDN settings
There are 5 types of settings that a user can check and update for any CDN:
Basic Details
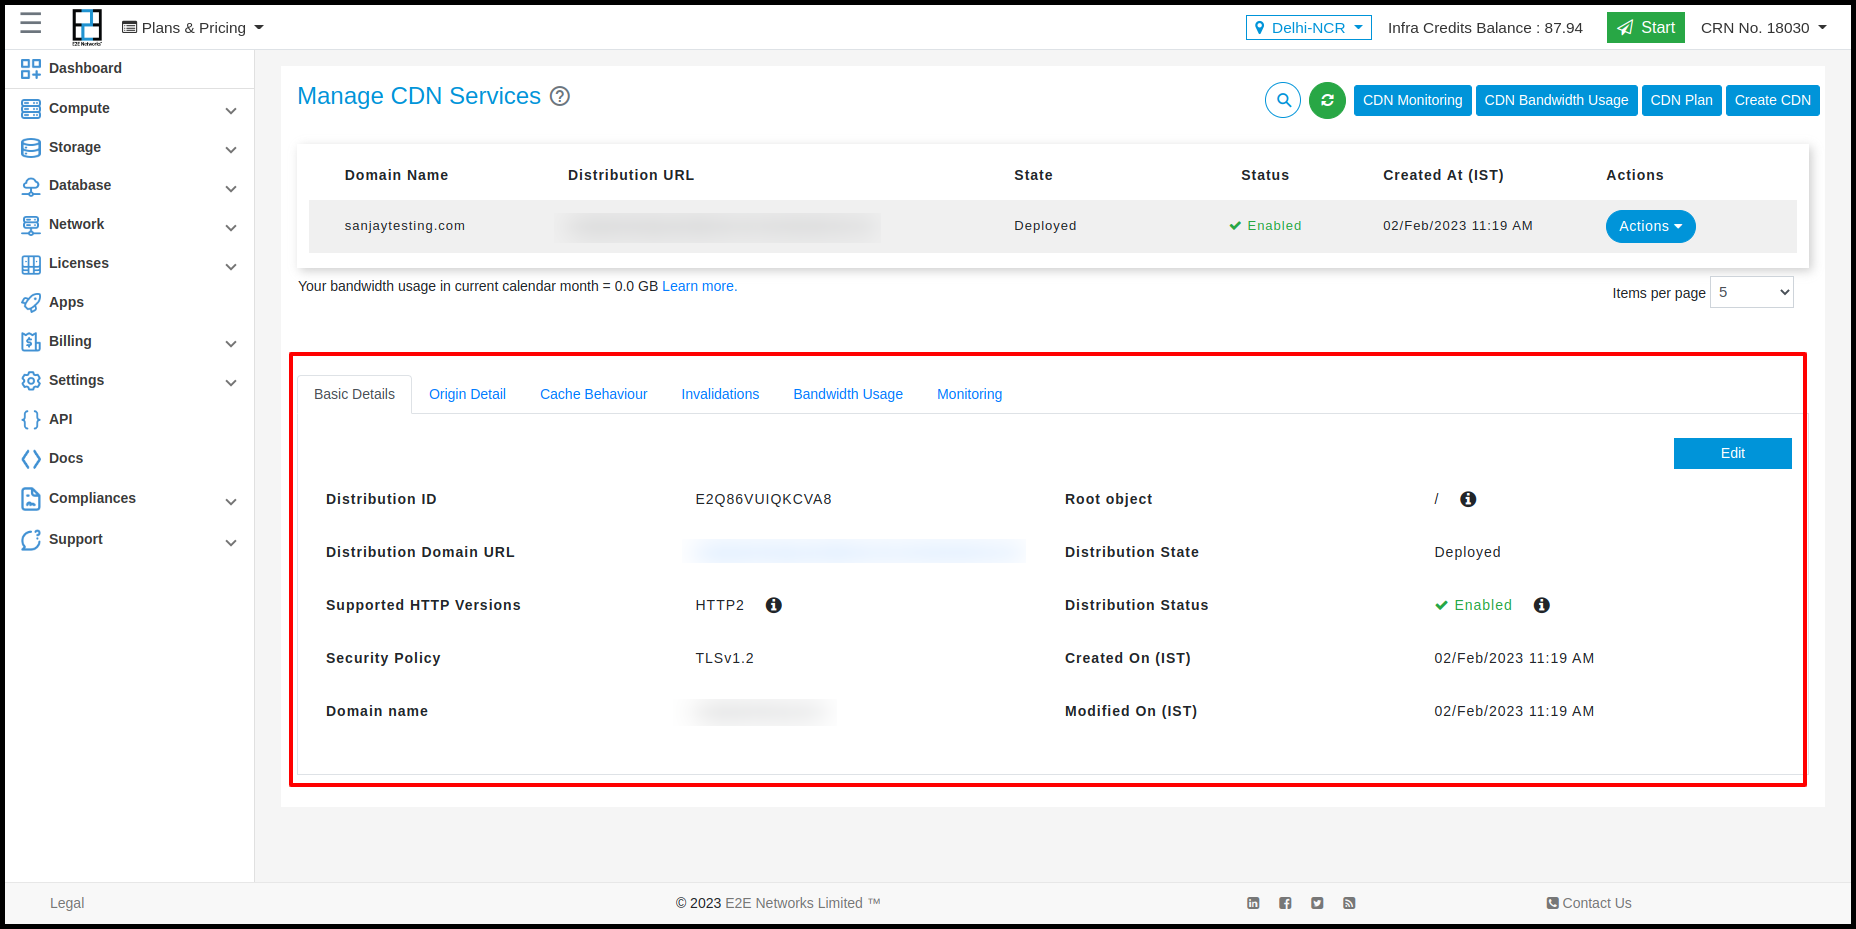
In the Basic detail tab, you will find general information about your CDN, including default settings specified during the creation or update of the CDN. Click on the Edit button to update the basic settings of your distribution.
-
Distribution ID:
When you perform an action on a distribution using the E2E API, you use the distribution ID to specify which distribution to operate on, for example,EJYJR0EOUM6MD. You cannot change the distribution ID. -
Distribution Domain URL:
When a distribution is created, E2E CDN returns a domain name. You can change the distribution's domain URL by updating the SSL certificate. If a default SSL certificate is used, a distribution's domain URL is generated as follows:
d111111abcdef8.cdn.e2enetworks.net.You can use the E2E Networks domain name to serve your files. For example, the URL for a file named
/images/image.jpgwill be:
https://d111111abcdef8.cdn.e2enetworks.net/images/image.jpg -
Distribution Status:
The possible status values for a distribution are:- Disabled: The distribution is disabled, and changes have not yet propagated to edge servers.
- Enabled: The distribution is enabled, and changes have fully propagated to edge servers.
-
Distribution State:
The possible state values for a distribution are:- InProgress: The distribution is being created or updated, and changes have not yet fully propagated to edge servers.
- Deployed: The distribution has been created or updated, and changes have fully propagated to edge servers.
SSL Certificate
-
Default SSL Certificate (
*.e2enetworks.net)
Choose this option if you want users to access your content via HTTPS or HTTP using the E2E Networks domain name (e.g.,https://example.cdn.e2enetworks.net/logo.jpg).
Important: This option requires browsers or devices to support TLSv1 or later. -
Custom Certificate (example.com)
Choose this option if you want users to access your content via a custom domain (e.g.,https://www.example.com/logo.jpg).
If using a custom certificate, specify the CNAMEs, either separated by commas or each on a new line.
Note:
Origin Domain and Alternate Domain Names (CNAMEs) must have the same domain names. All Alternate Domain Names (CNAMEs) on the CDN should be covered by the Subject Alternative Name (SAN) of the certificate.
-
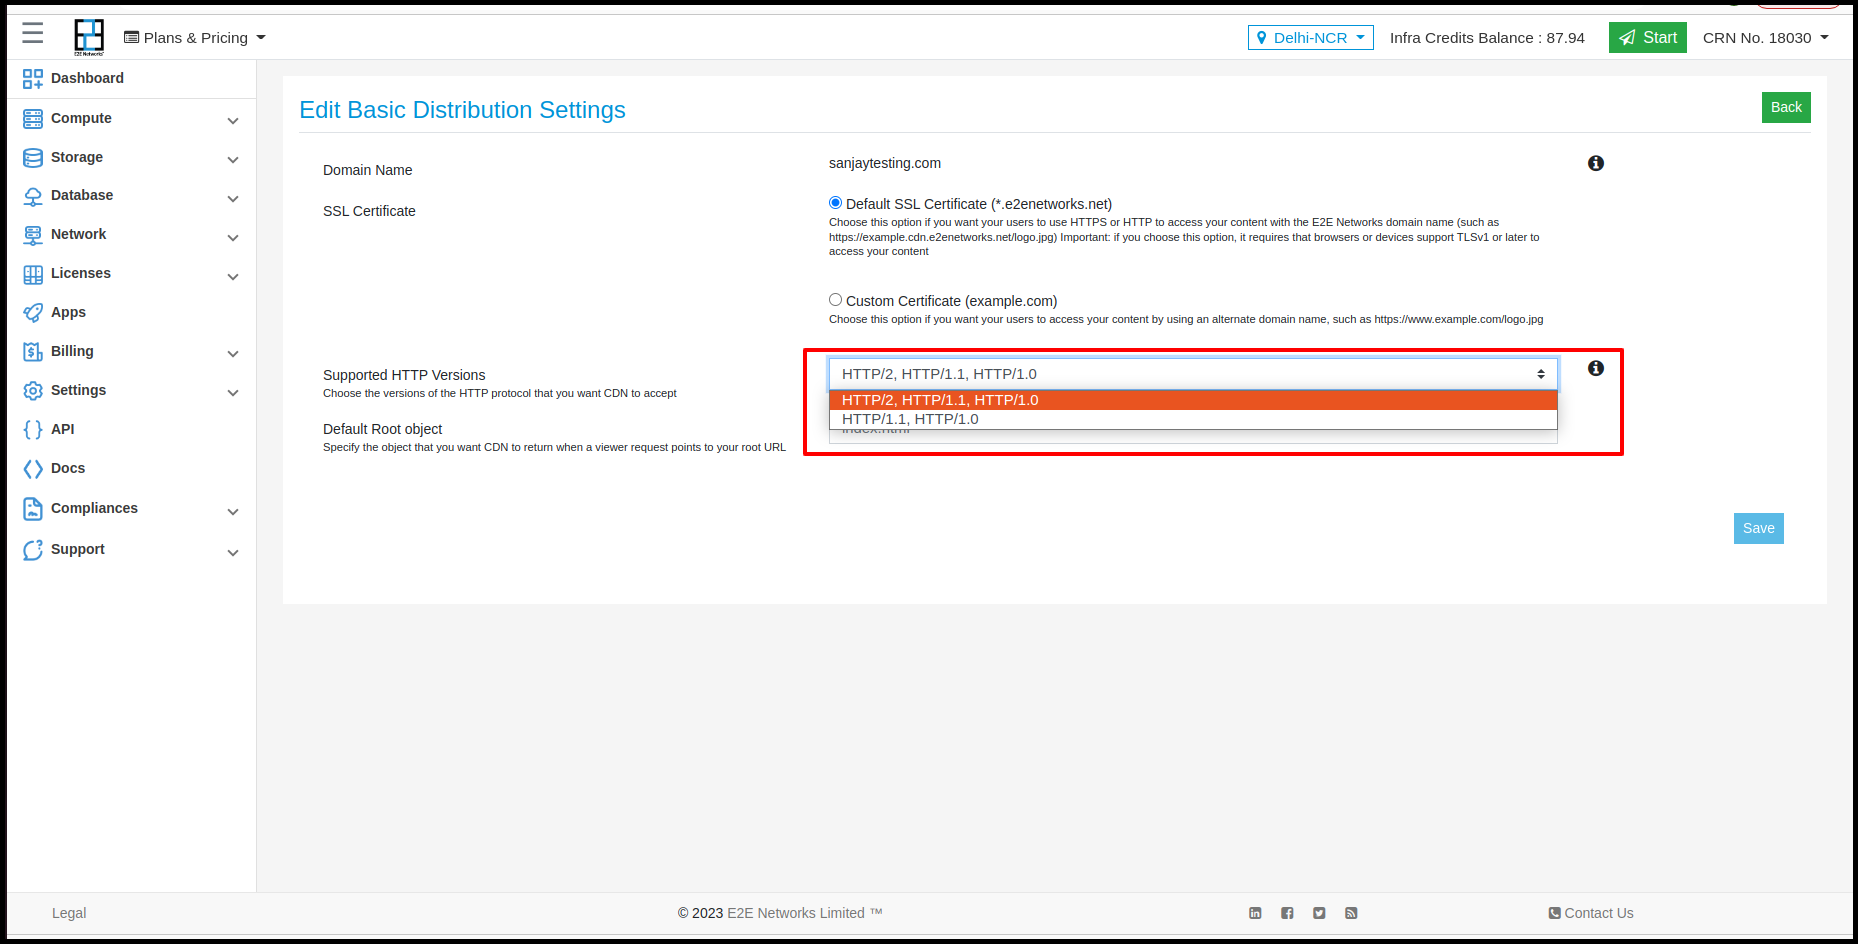
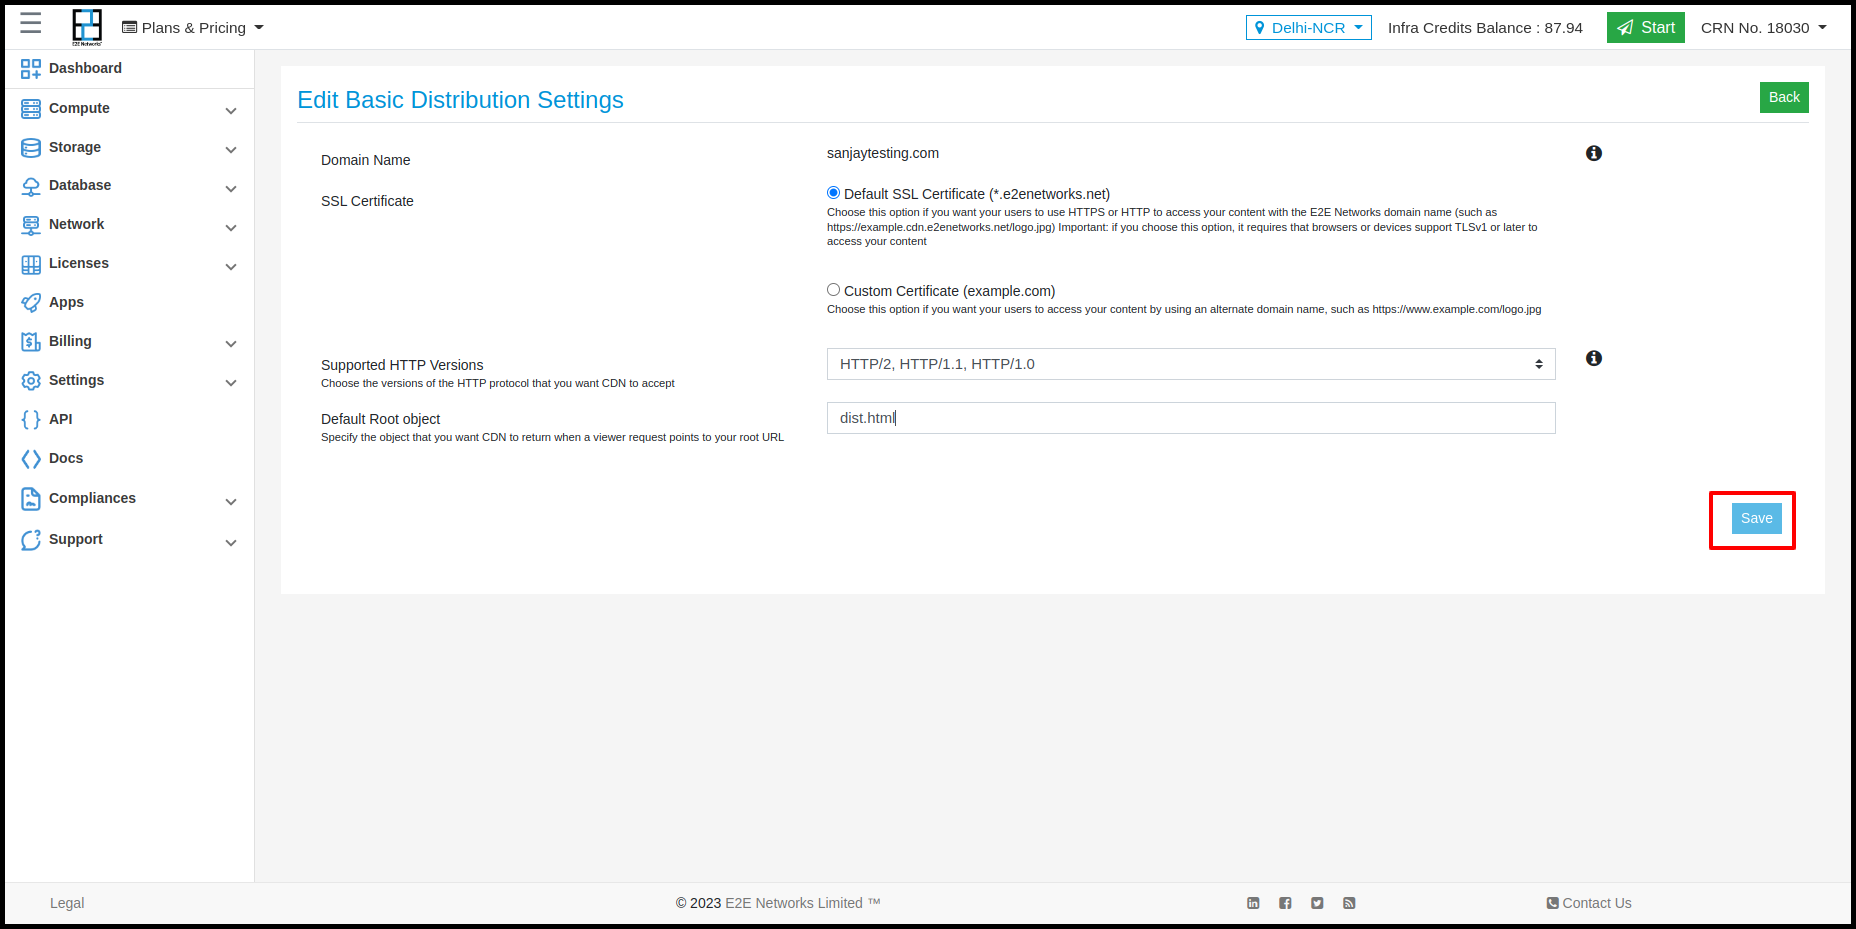
Supported HTTP Versions:
Choose the HTTP versions that your distribution should support. For viewers and CDN to use HTTP/2, viewers must support TLS 1.2 or later, along with Server Name Identification (SNI).
Configuring HTTP/2 generally reduces latency, and performance can be further improved by optimizing for HTTP/2.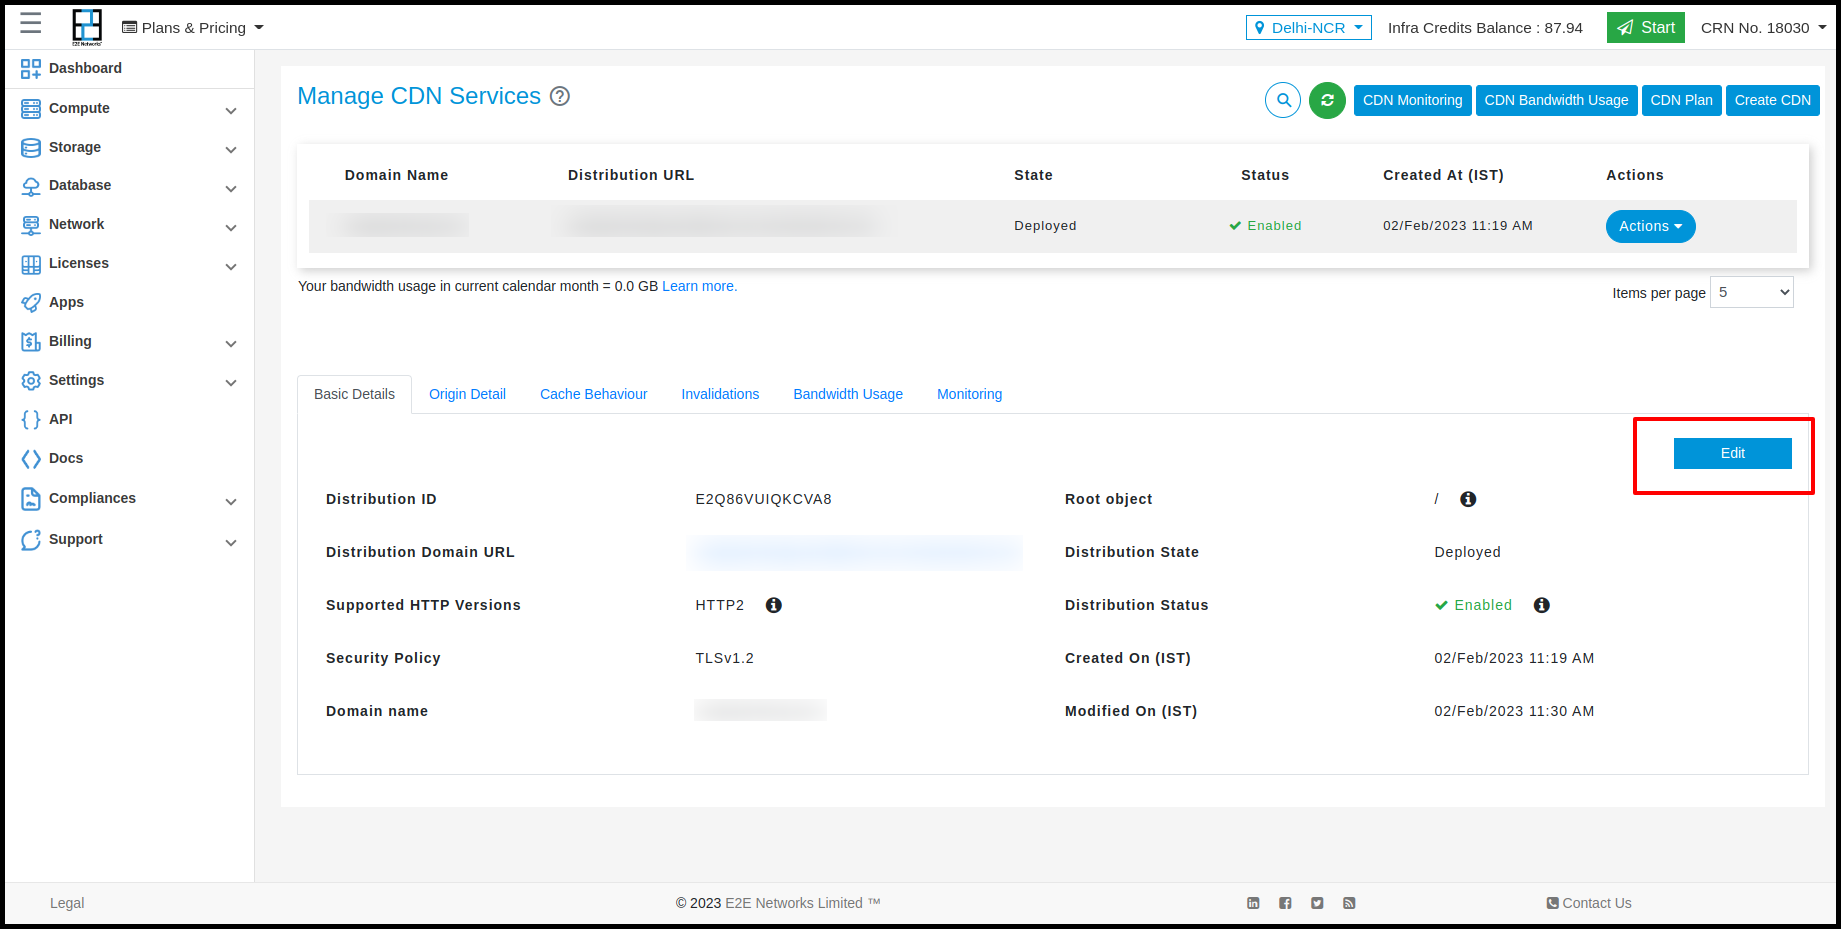
-
Security Policy:
This policy governs HTTPS connections with viewers and is linked to the SSL Certificate. By default, the E2E Networks certificate (*.e2enetworks.net) is used, which automatically enforces the TLSv1.2 security policy. -
Root Object:
Specify the object that E2E CDN should request from the origin (e.g.,index.html) when a viewer requests the root URL of your distribution (http://www.example.com/). This avoids exposing distribution content directly. The maximum length for the object name is 255 characters and it can include the following characters:- A-Z, a-z
- 0-9
_ - . * $ / ~ " ' &(ampersands are passed and returned as&)
When specifying the root object, provide only the name (e.g.,
index.html). Do not prefix it with a/. This field is optional and can be updated anytime. -
Modified on (IST):
The date and time the distribution was last modified. -
Created on (IST):
The date and time the distribution was created.
Origin Detail
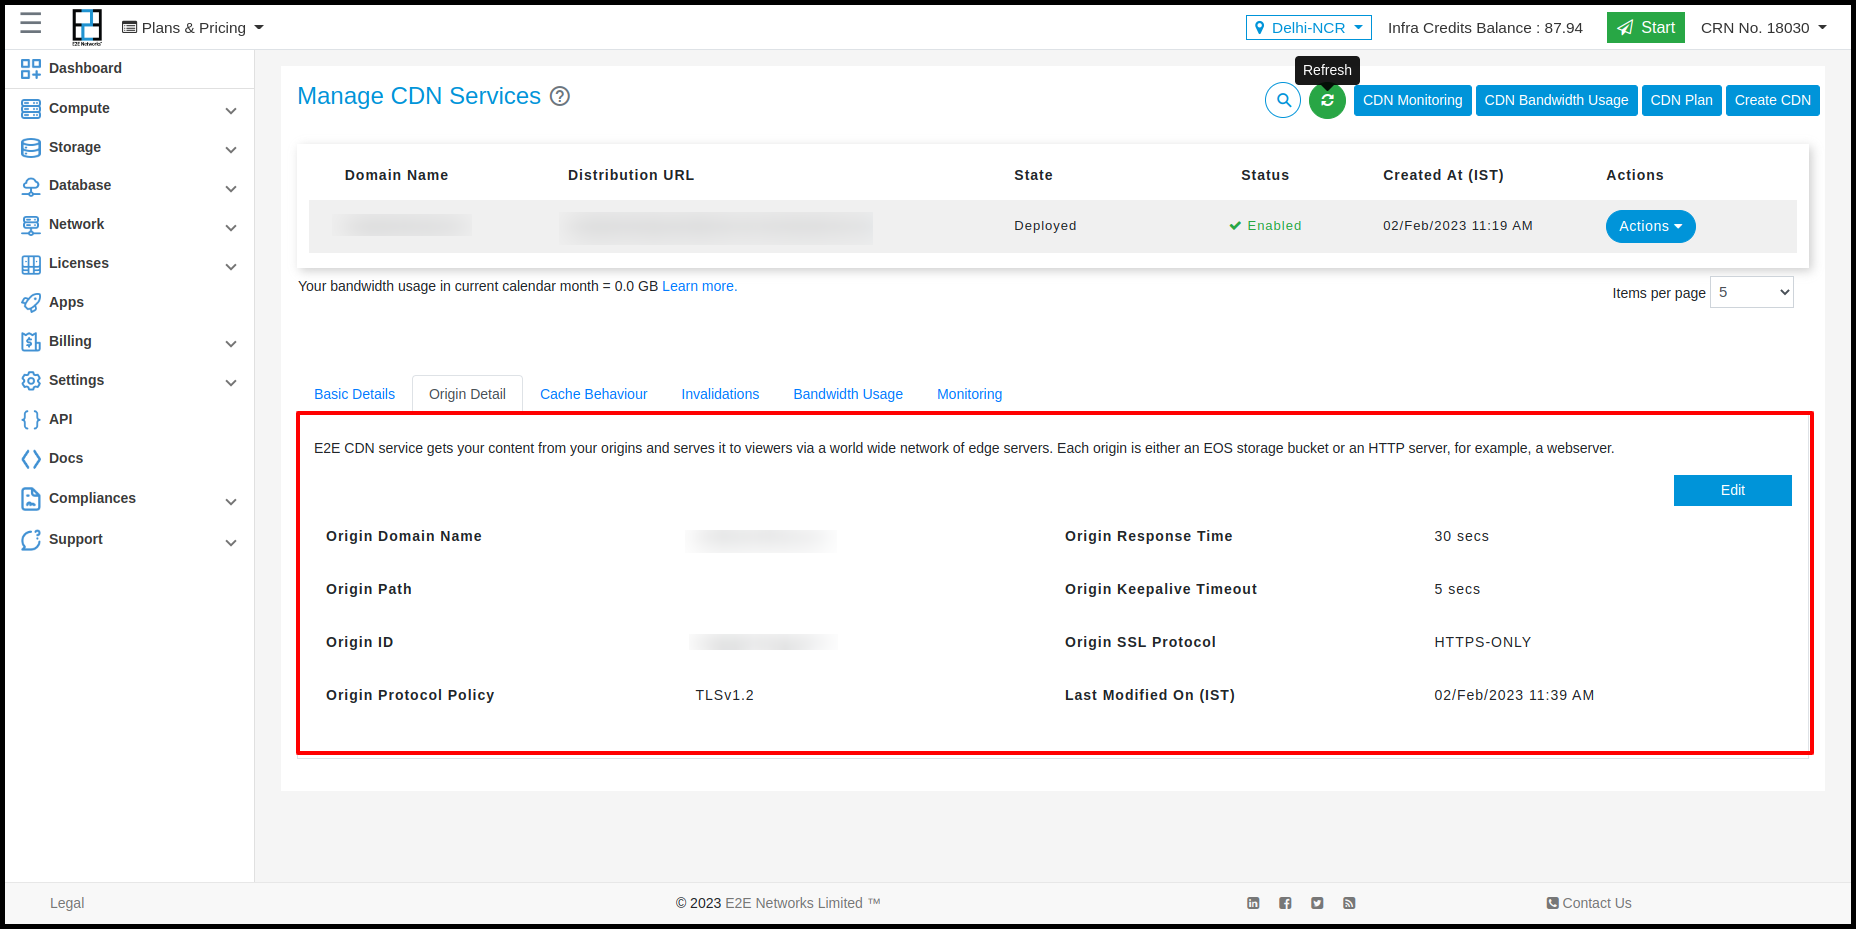
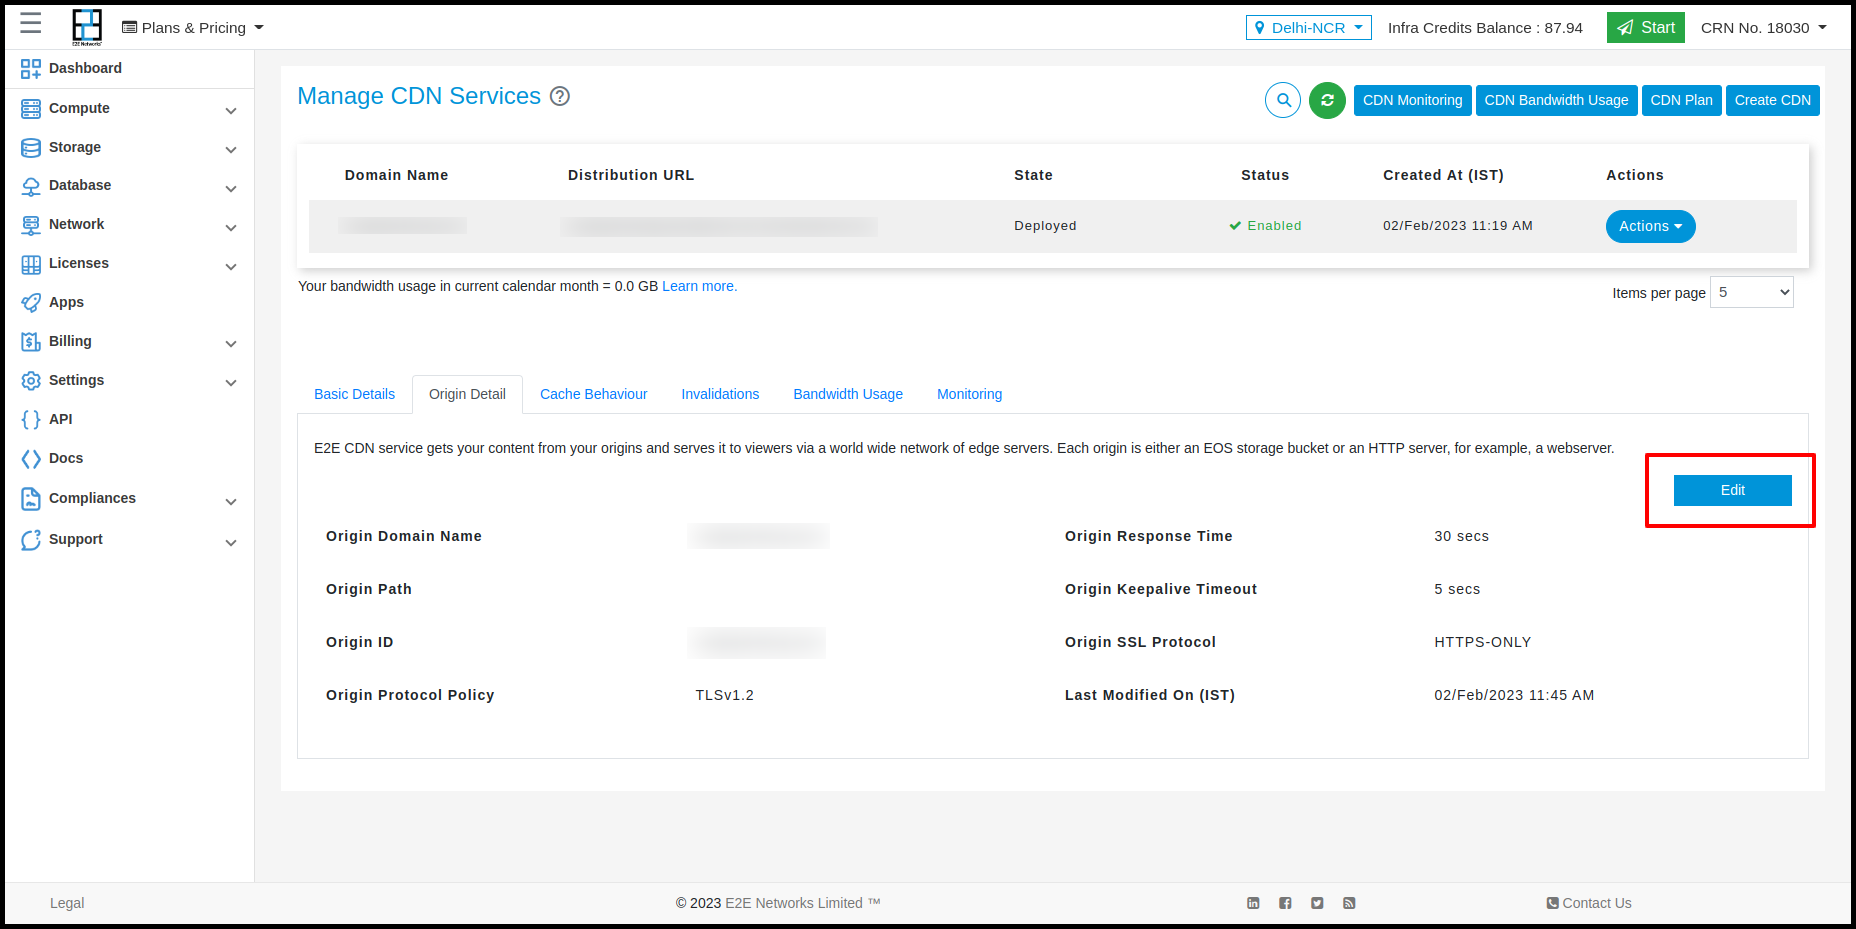
When you create or update a distribution, you provide information about one location—known as origins—where you store the original versions of your web content. E2E CDN gets your web content from your origins and serves it to viewers via a network of edge servers. Each origin is either a storage bucket or an HTTP server, for example, a web server.
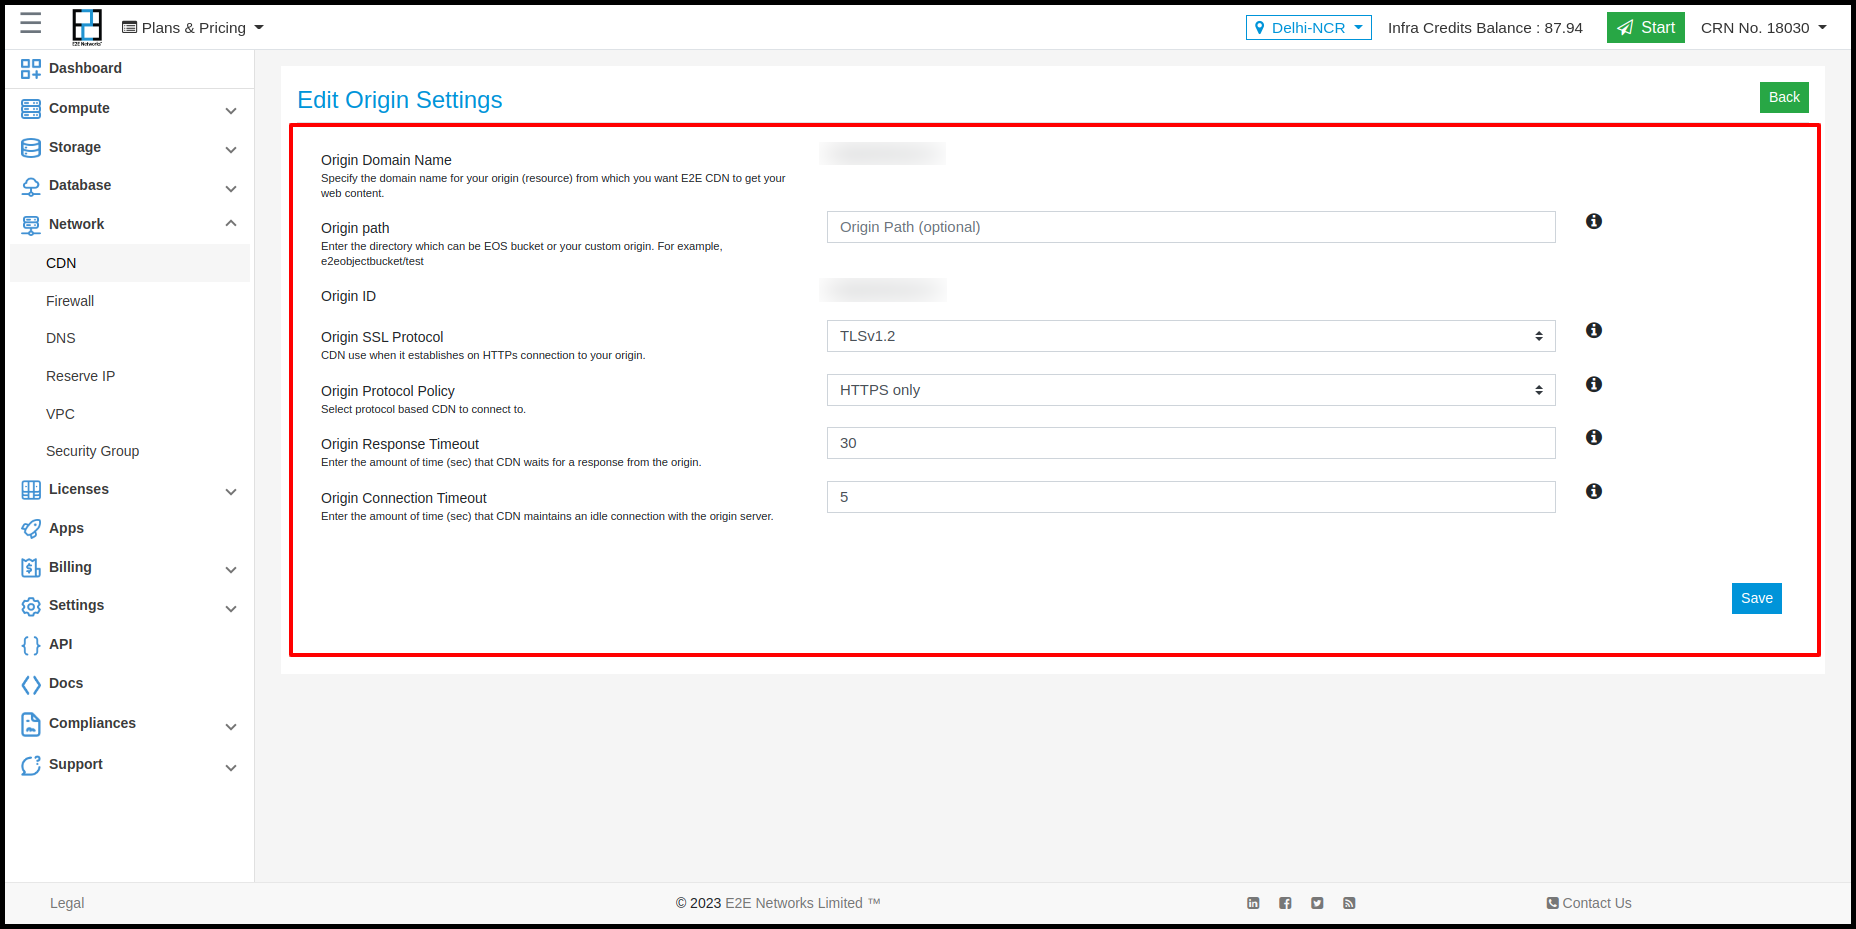
You would not be allowed to delete an origin and currently, the single origin can be used to create E2E CDN distribution. When you create or update a distribution, you specify the following values for the origin. Click on the Edit button to update the origin setting of your distribution.
-
Origin Domain Name:
The DNS domain name of the EOS S3 bucket or HTTP server from which you want E2E CDN to get objects for this origin. You can't change the domain name. This is not an editable value. -
Origin Path:
If you want E2E CDN to request your content from a directory in your E2E resource or your custom origin, enter the directory path, beginning with a slash (/). E2E CDN appends the directory path to the value of Origin Domain Name, for example,cf-origin.example.com/production/images. Do not add a slash (/) at the end of the path.Example Configuration:
-
Origin Domain Name – domain name (CNAMEs) –
test.comor EOS bucket –bucket2.objectstore.e2enetworks.net -
Origin Path –
/directory -
Origin ID –
bucket2.objectstore.e2enetworks.net/directory
- When a user enters
test.com/index.htmlin a browser, E2E CDN sends a request to the EOS storage bucket formybucket/production/index.html. - When a user enters
example.com/acme/index.htmlin a browser, CDN sends a request to EOS storage bucket forbucket2.objectstore.e2enetworks.net/directory/index.html.
-
-
Origin ID:
A string that uniquely distinguishes this origin or origin group in this distribution. Currently, you can add only a single origin for a distribution. -
Origin SSL Protocol:
Choose the minimum TLS/SSL protocol that CloudFront can use when it establishes an HTTPS connection to your origin. Lower TLS protocols are less secure, so we recommend that you choose the latest TLS protocol that your origin supports. The allowed protocol versions are TLSv1, TLSv1.1, or TLSv1.2. -
Origin Protocol Policy:
The protocol policy that you want CDN to use when fetching objects from your origin server. Choose one of the following values:- HTTP Only: CDN uses only HTTP to access the origin.
- HTTPS Only: CDN uses only HTTPS to access the origin.
- Match Viewer: CDN communicates with your origin using HTTP or HTTPS, depending on the protocol of the viewer request. CDN caches the object only once, even if viewers make requests using both HTTP and HTTPS protocols.
Important: For HTTPS viewer requests that CDN forwards to this origin, your origin server must match the domain name that you specify for Origin Domain Name. Otherwise, CDN responds to the viewer requests with an HTTP status code 502 (Bad Gateway) instead of returning the requested object.
-
Origin Response Timeout:
The origin response timeout, also known as the origin read timeout or origin request timeout, applies to both:- How long (in seconds) CDN waits for a response after forwarding a request to the origin.
- How long (in seconds) CDN waits after receiving a packet of a response from the origin and before receiving the next packet.
The default timeout is 30 seconds. You can change the value to be between 1 and 60 seconds.
Tip: If you want to increase the timeout value because viewers are experiencing HTTP 504 status code errors, consider exploring other ways to eliminate those errors before changing the timeout value.
-
Origin KeepAlive Timeout:
How long (in seconds) CDN tries to maintain a connection to your origin after it gets the last packet of a response. Maintaining a persistent connection saves the time required to re-establish the TCP connection and perform another TLS handshake for subsequent requests. Increasing the keep-alive timeout helps improve the request-per-connection metric for distributions. The default timeout is 5 seconds. You can change the value to a number from 1 to 60 seconds.
Note: For the Origin Keep-alive Timeout value to take effect, your origin must be configured to allow persistent connections.
Cache Behaviour
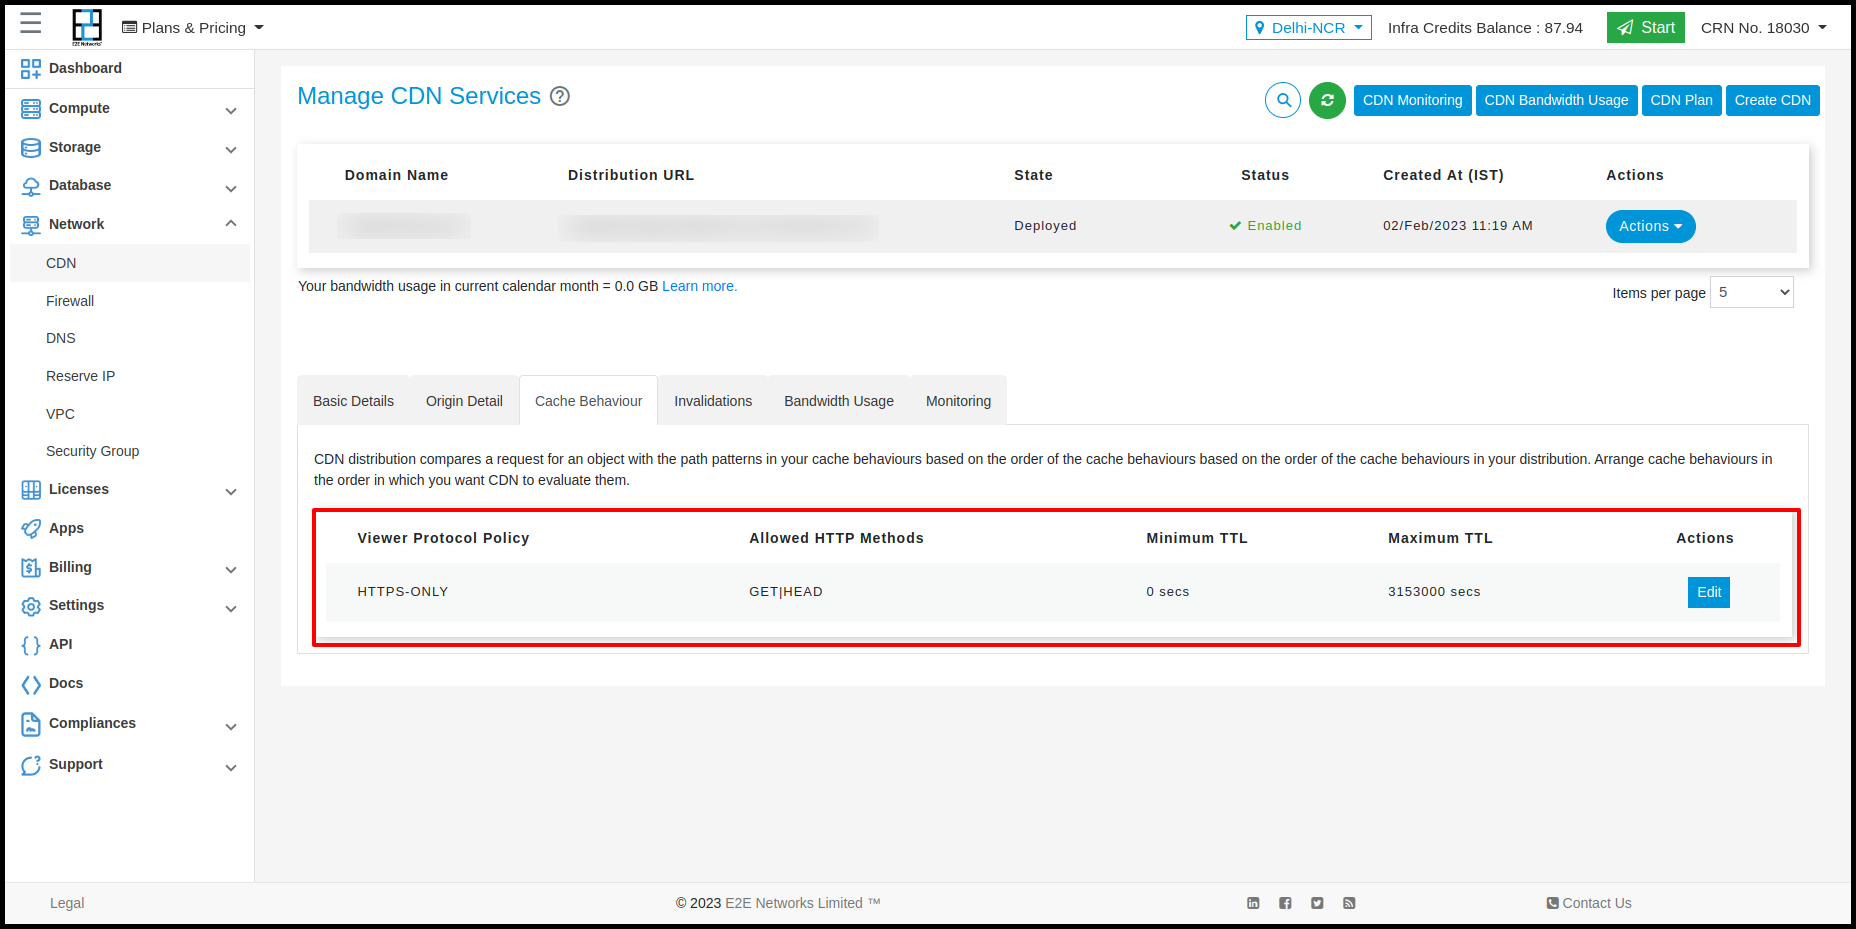
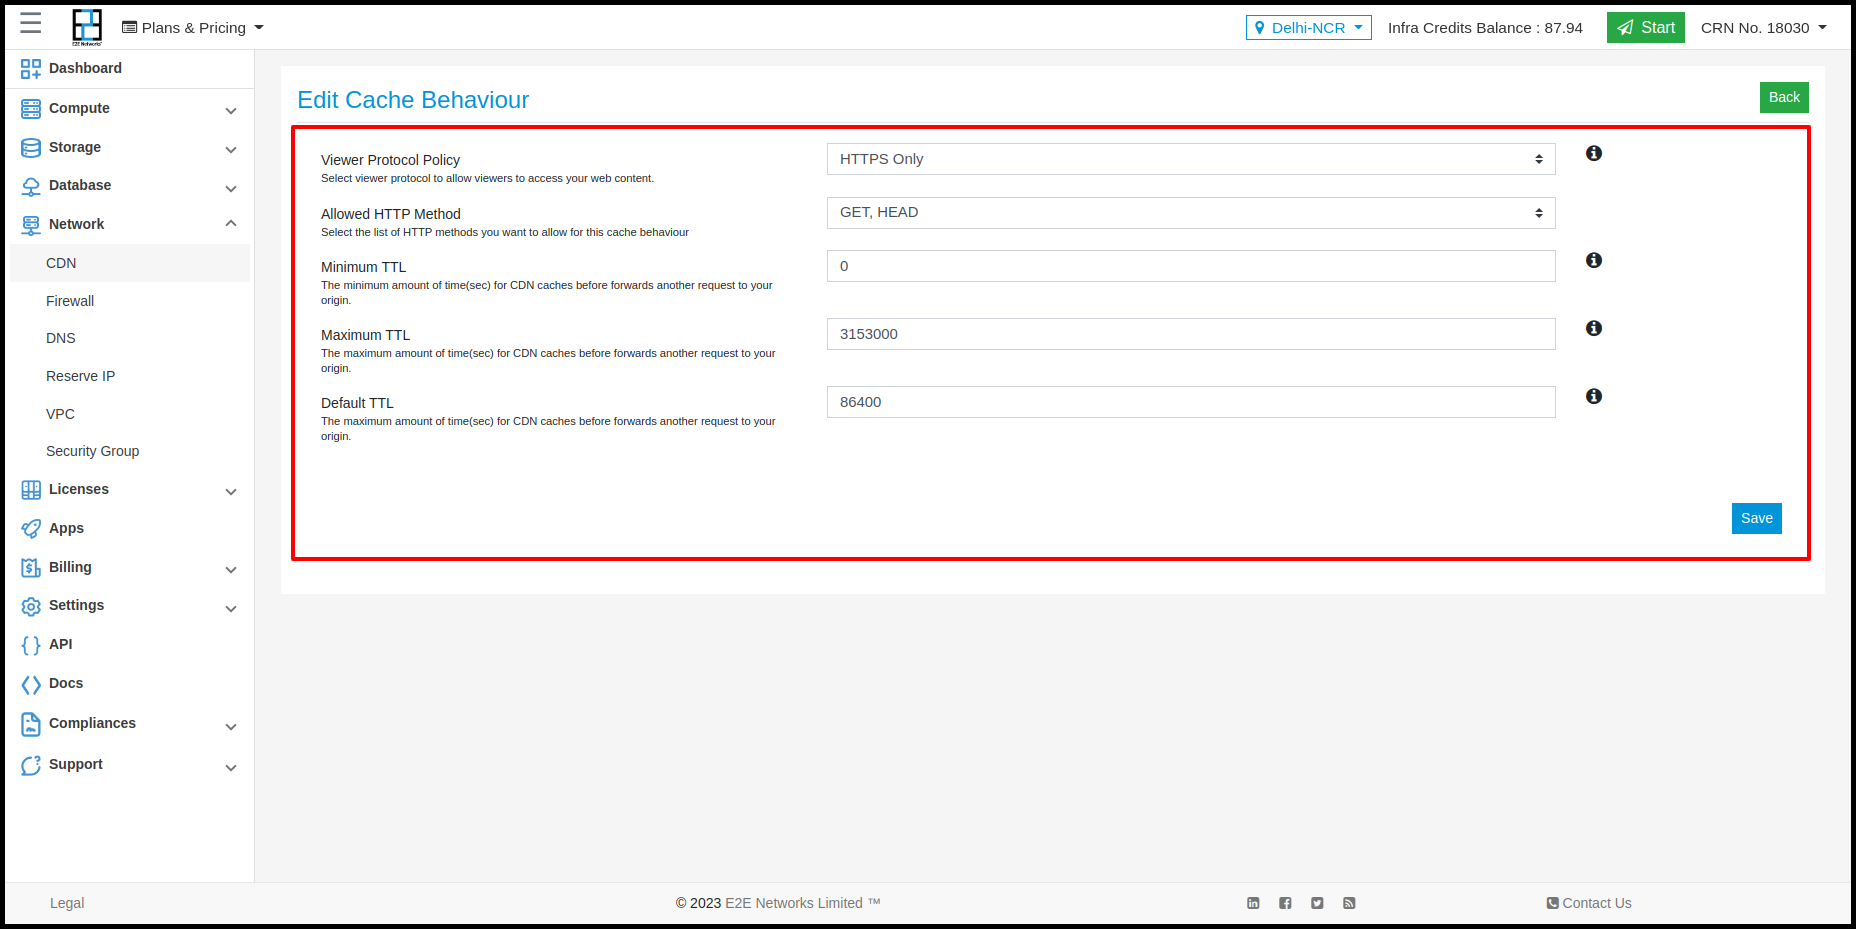
When you create a new distribution, the cache behavior settings are set to default, which automatically forwards all requests to the origin you specify when creating the distribution. After creating a distribution, you can update cache behaviors that define how CDN responds when it receives a request for objects. Currently, you are not allowed to add more cache behaviors for your distribution network. Click on the Edit button to update the cache behavior of your distribution.
-
Viewer Protocol Policy:
Choose the protocol policy that viewers will use to access your content in CDN edge locations:- HTTP and HTTPS: Viewers can use both protocols.
- Redirect HTTP to HTTPS: Viewers can use both protocols, but HTTP requests are automatically redirected to HTTPS.
- HTTPS Only: Viewers can only access your content if they are using HTTPS.
-
Allowed HTTP Methods:
Specify the HTTP methods that CDN will process and forward to your origin:- GET, HEAD: CDN can only get objects from your origin or get object headers.
- GET, HEAD, OPTIONS: CDN can get objects from your origin, get object headers, or retrieve a list of the options that your origin server supports.
- GET, HEAD, OPTIONS, PUT, POST, PATCH, DELETE: CDN can get, add, update, delete objects, and get object headers.
-
Minimum TTL:
The minimum amount of time, in seconds, that objects stay in CDN caches before CDN forwards another request to your origin to determine if the object has been updated. The default value is 0 seconds. -
Maximum TTL:
The maximum amount of time, in seconds, that objects stay in CDN caches before CDN queries your origin to see if the object has been updated. The default value is 31536000 seconds (one year). -
Default TTL:
The default amount of time, in seconds, that objects stay in CDN caches before CDN forwards another request to your origin to determine if the object has been updated. This applies only when your origin does not add HTTP headers. The default value is 86400 seconds (one day).
Invalidations
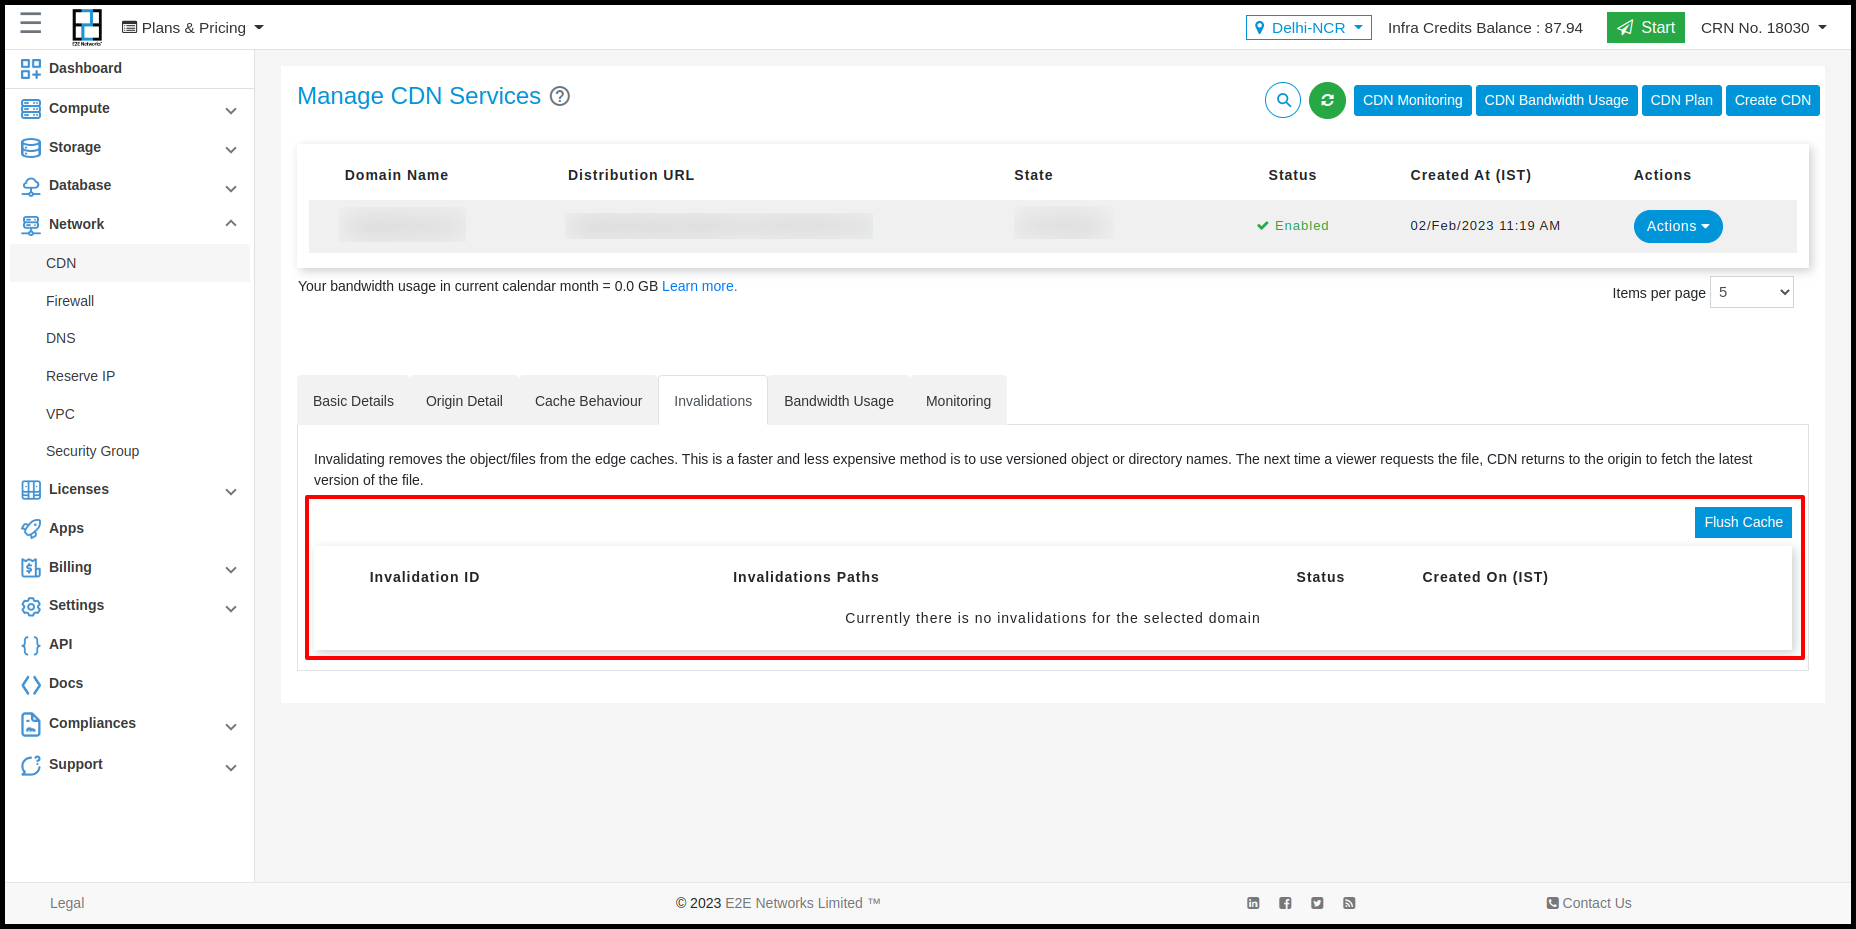
If you need to remove a file from CDN edge caches before it expires, you can:
- Invalidate the file from edge caches. The next time a viewer requests the file, CDN fetches the latest version from the origin.
-
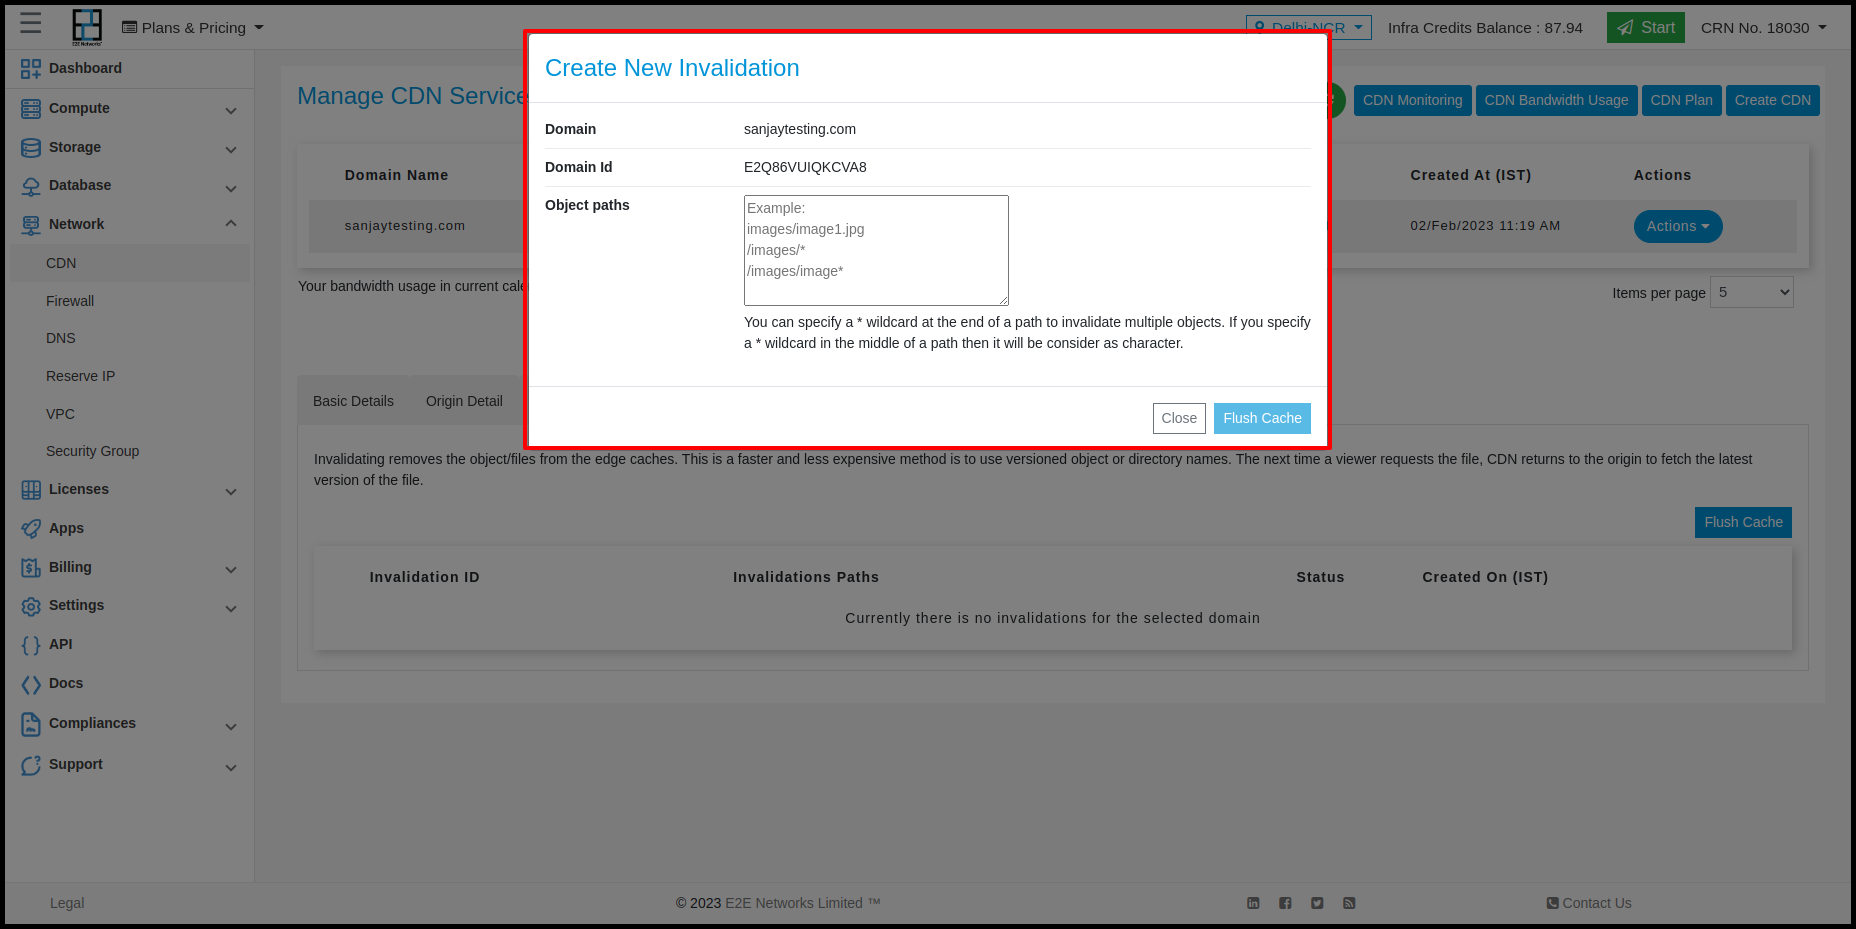
To invalidate files, click the ‘Flush Cache’ button. You can specify the path for individual files or use a wildcard (*) to apply to multiple files, as shown below:
/images/image1.jpg/images/image*/images/*
Bandwidth Usage
-
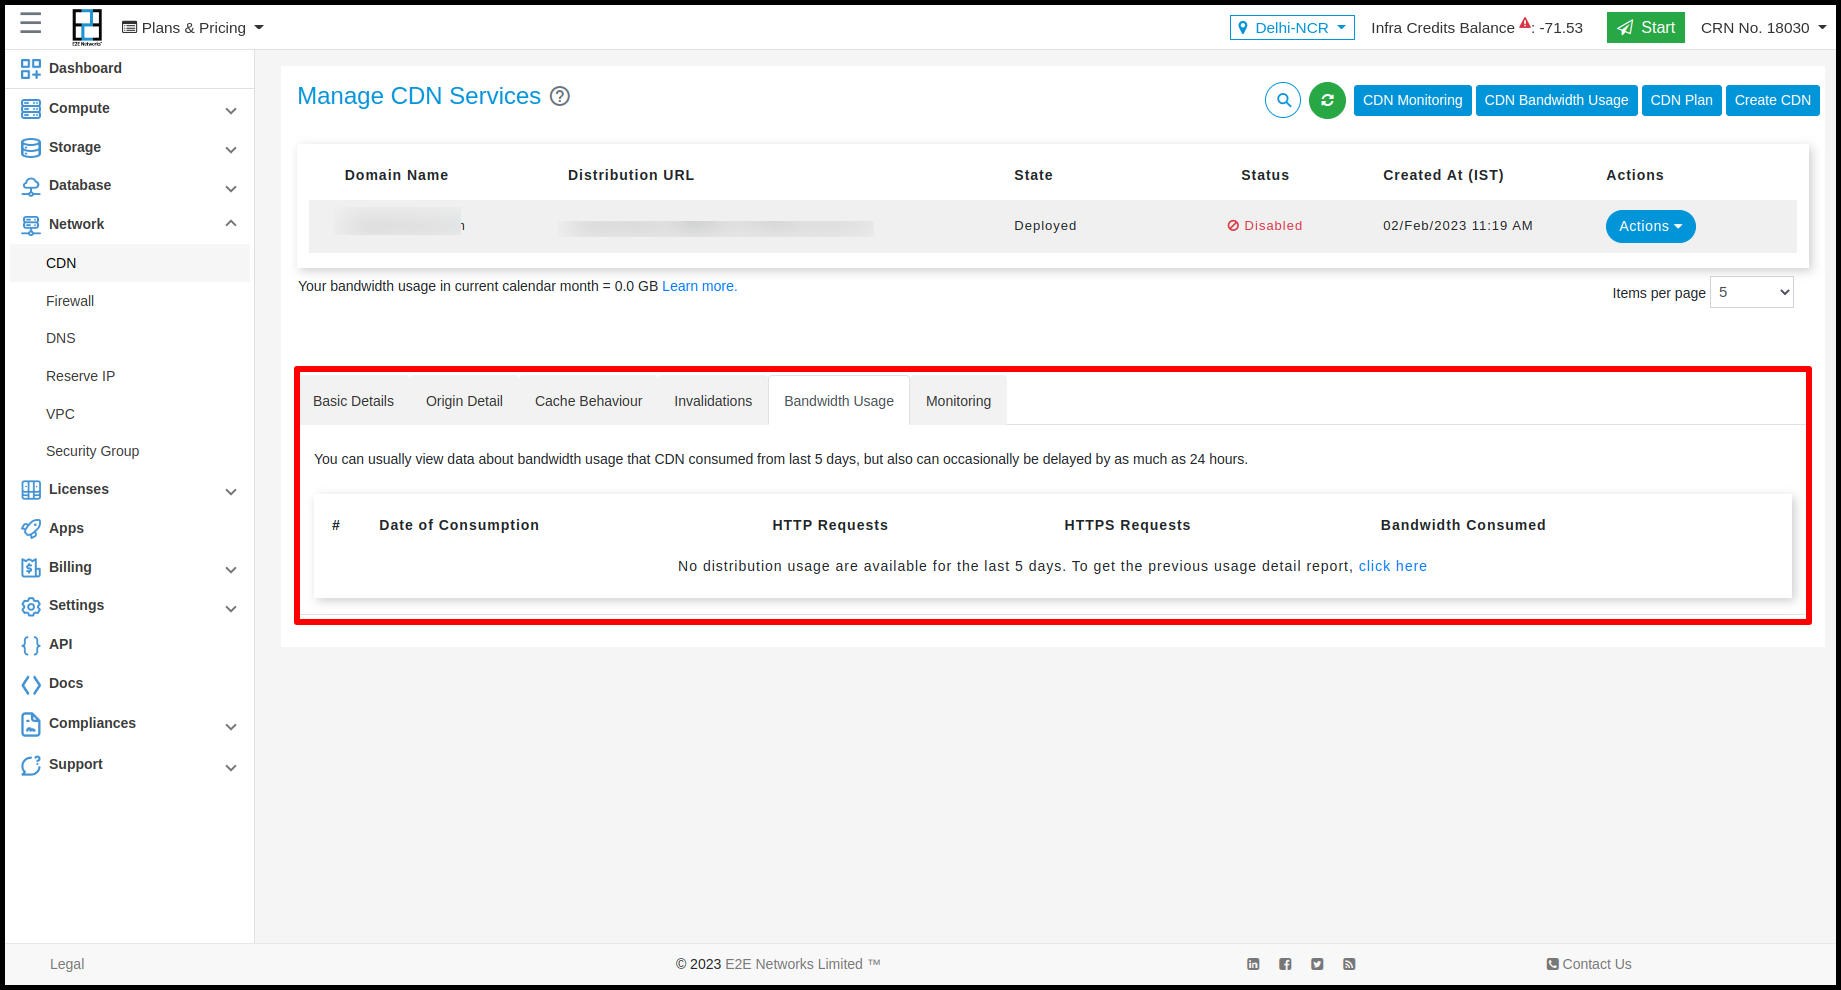
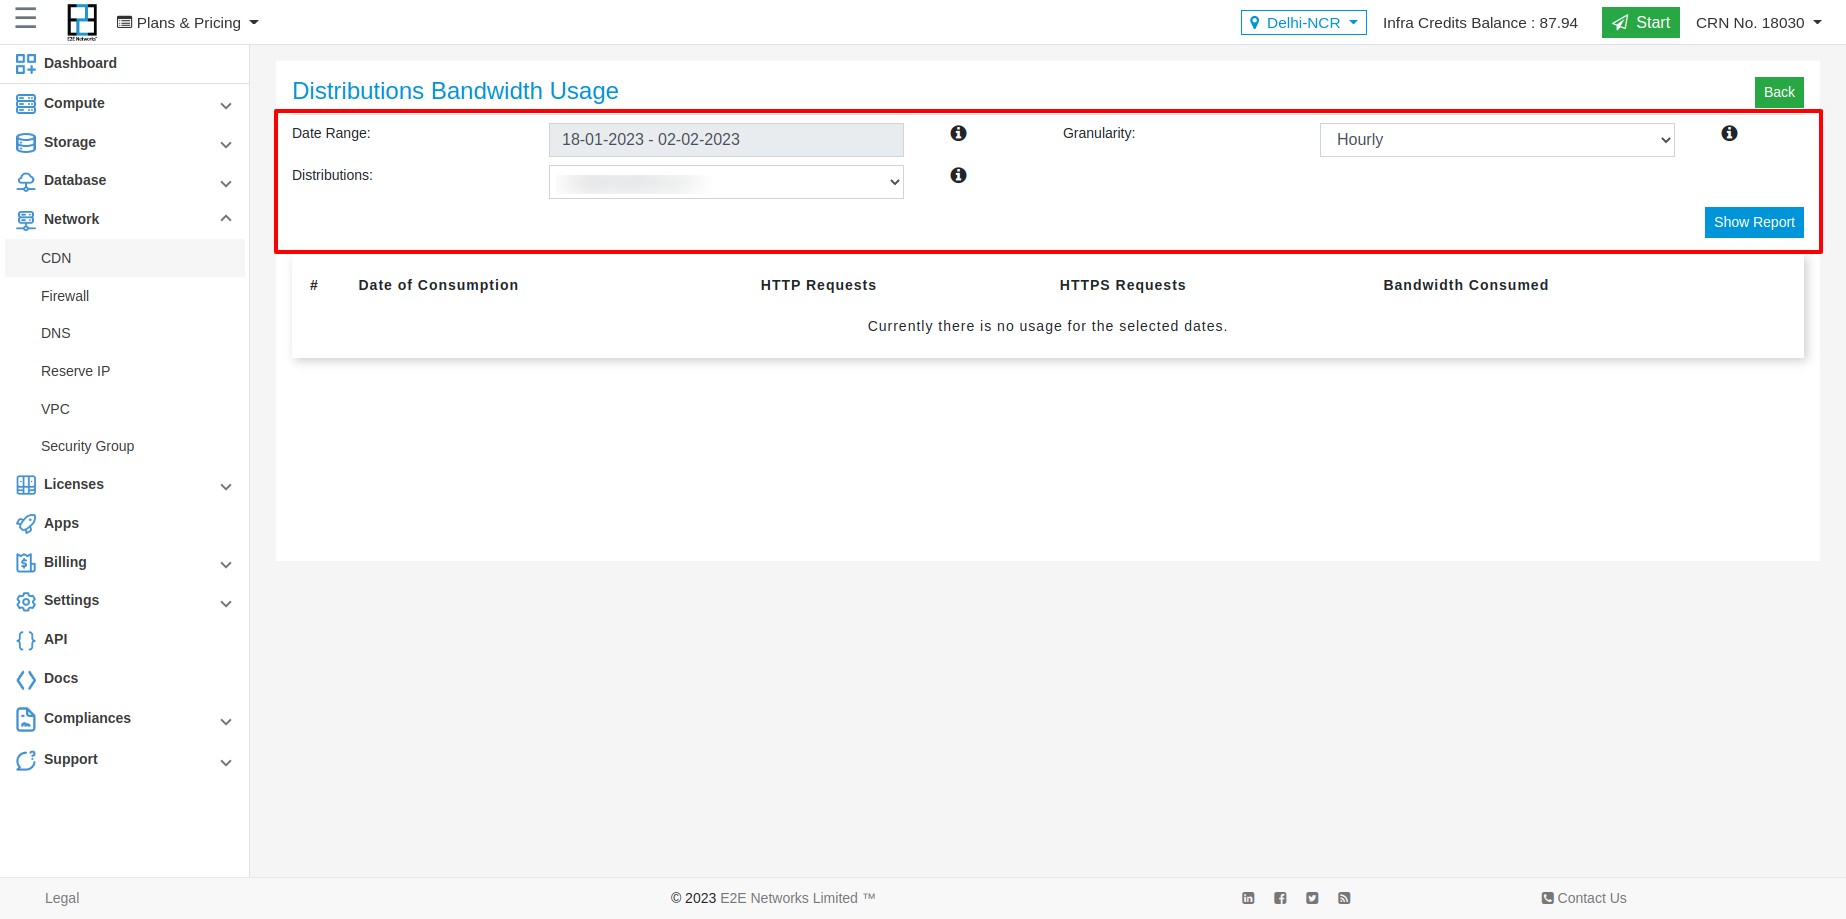
You can view data about requests that CDN received and served by the selected distribution in the last 5 days, but data can occasionally be delayed by as much as 24 hours.
-
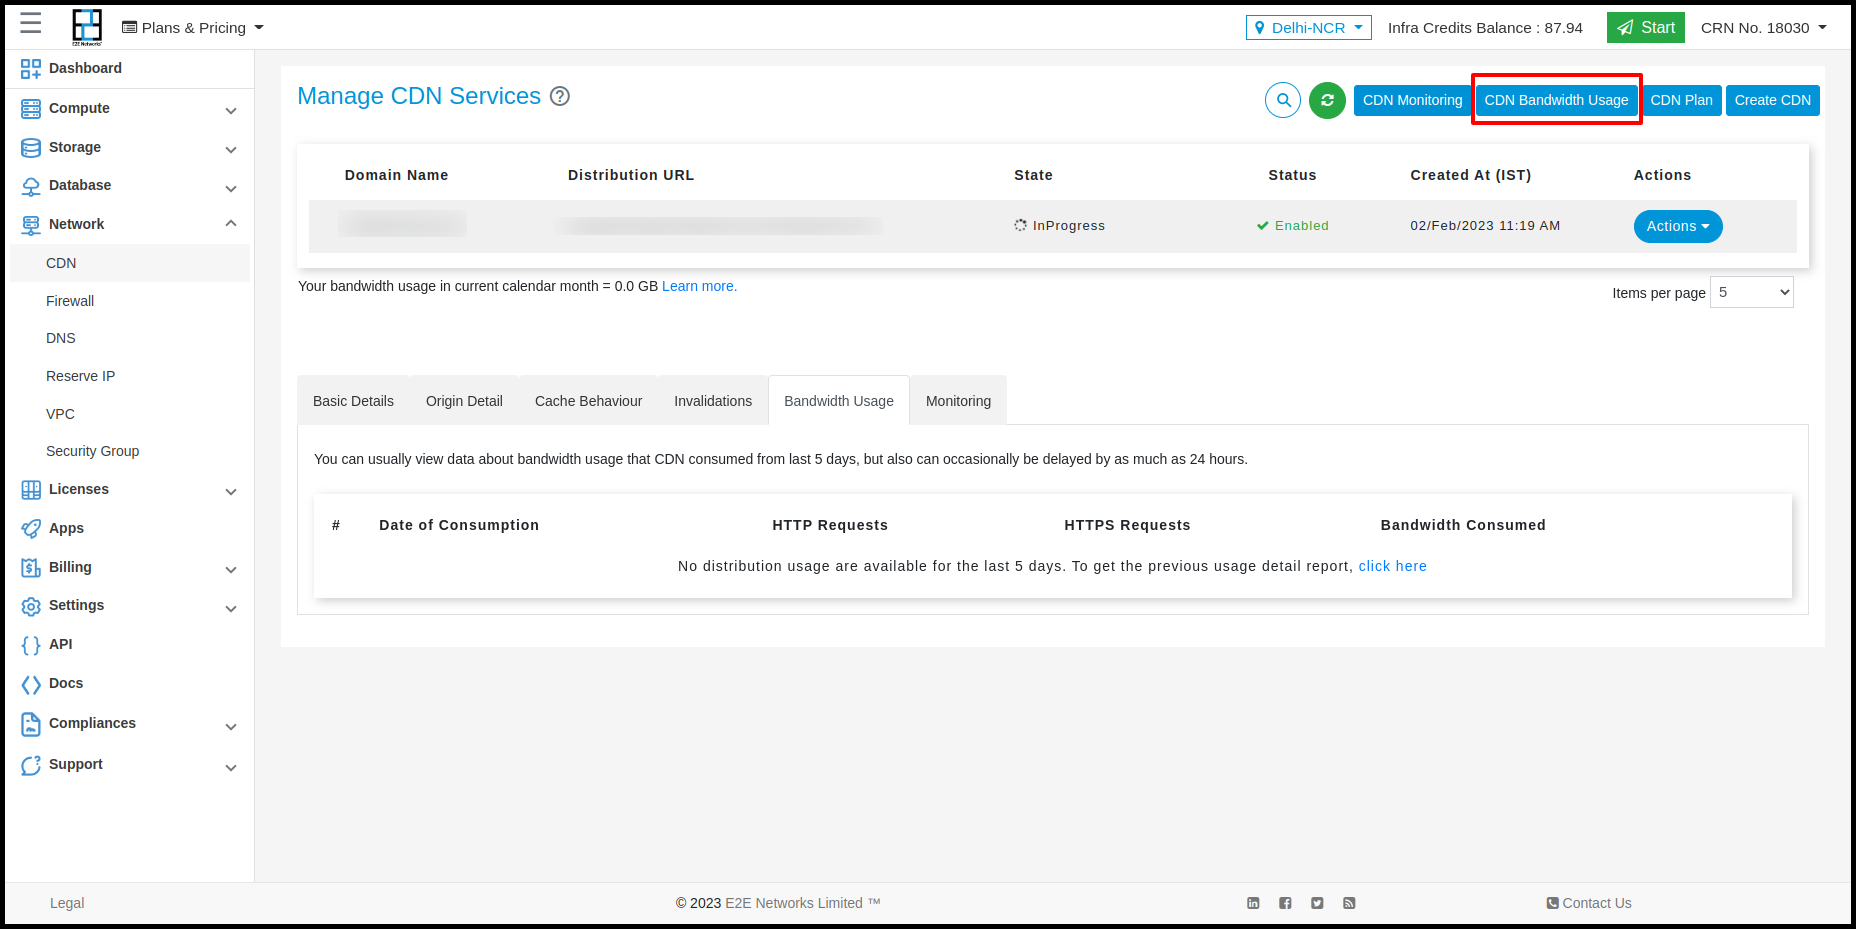
Go to the Distribution Bandwidth usage page by clicking the CDN Bandwidth Usage button.
-
You can view data of any other distribution network that had activity during the specified period, provided you have not deleted it.
CDN Monitoring
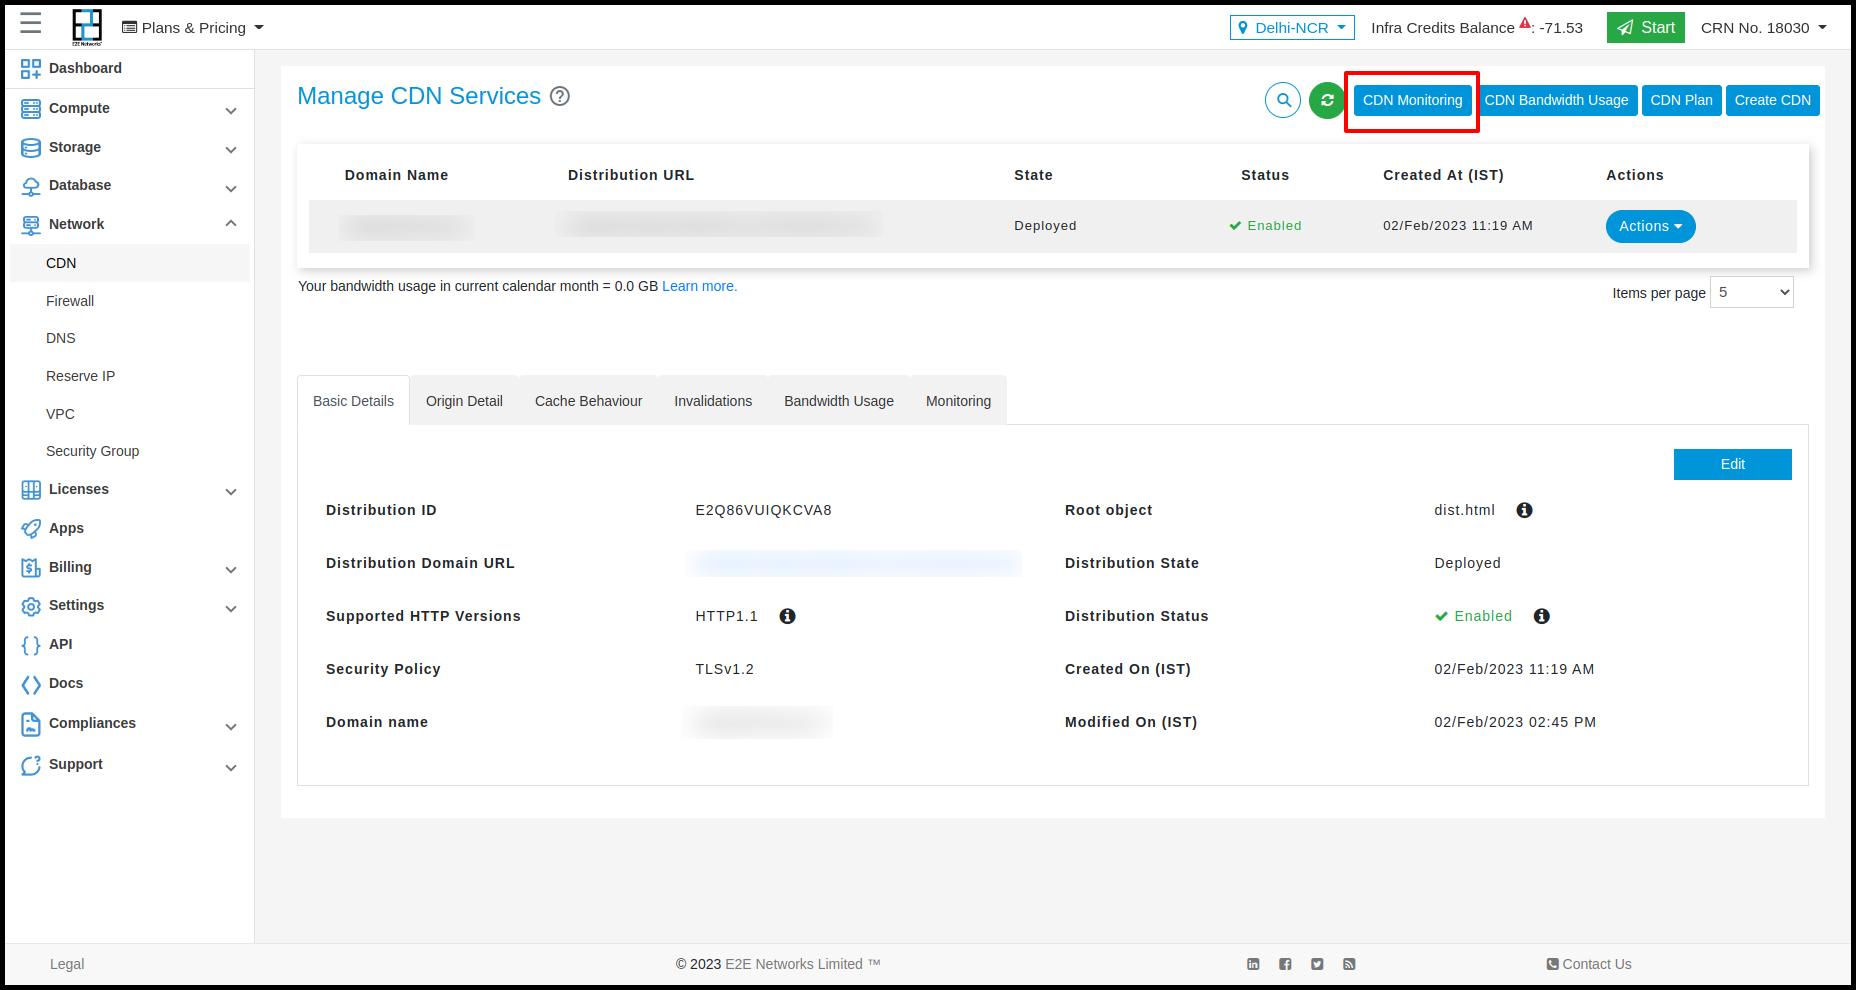
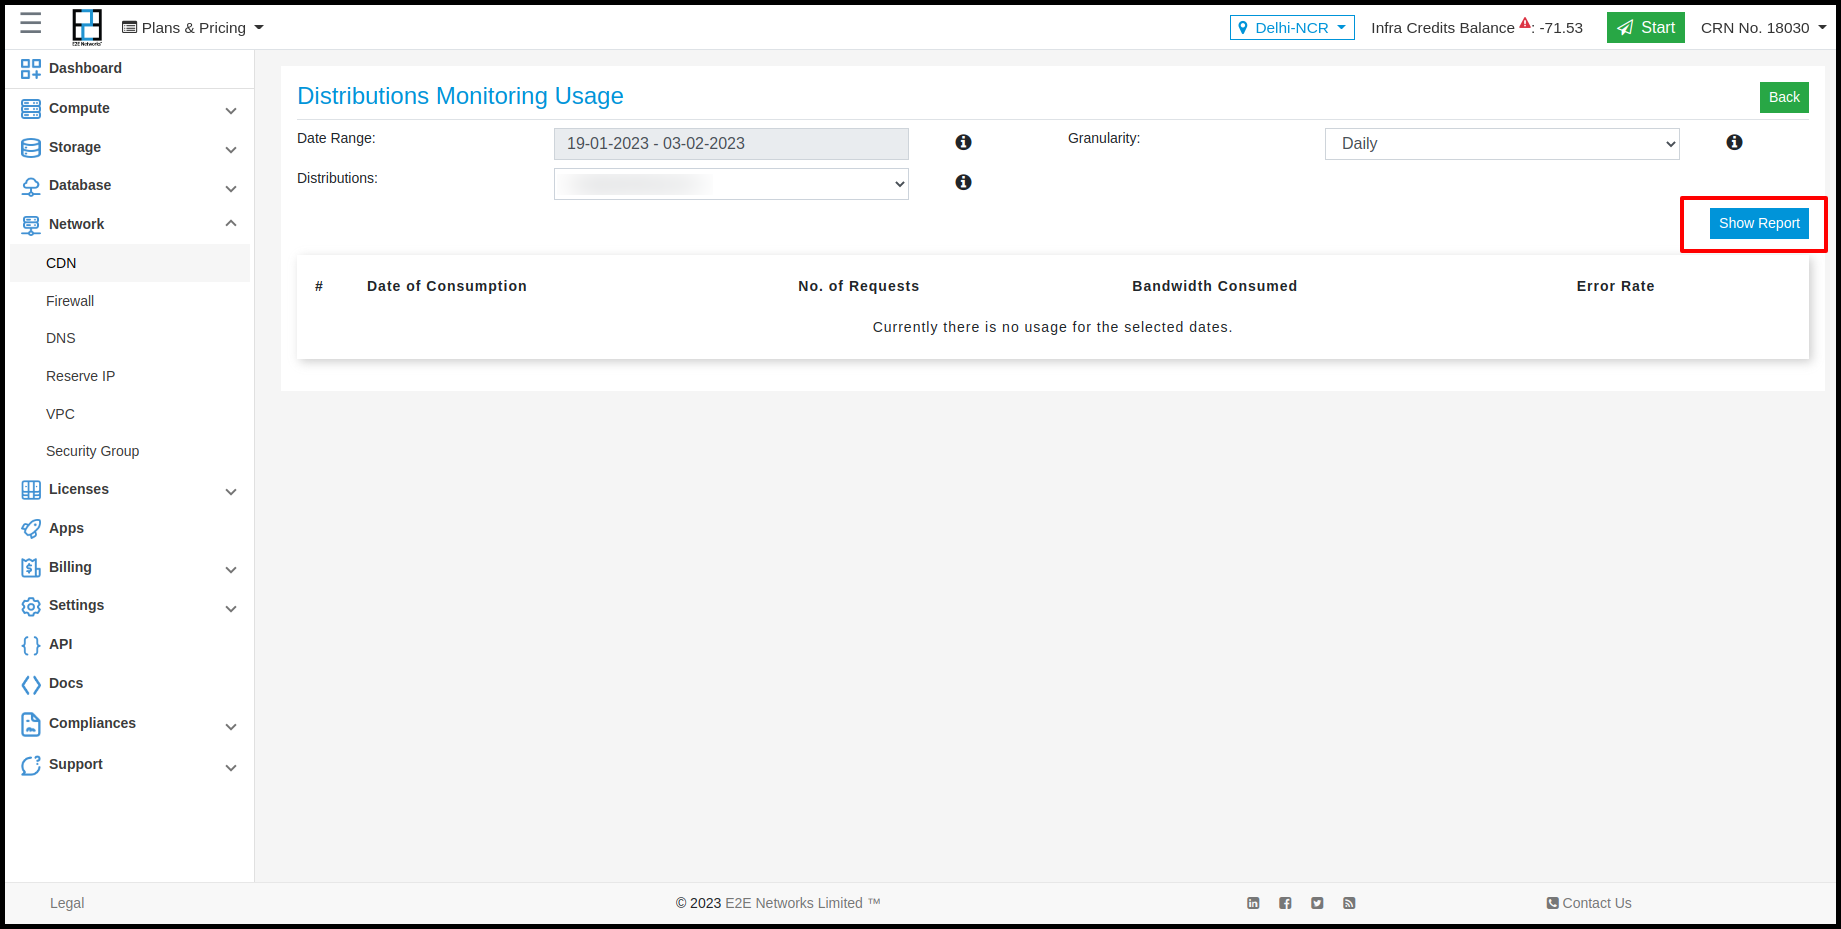
Click the CDN Monitoring button, fill all parameters as required, and then click the Show Report button.
CDN Plan
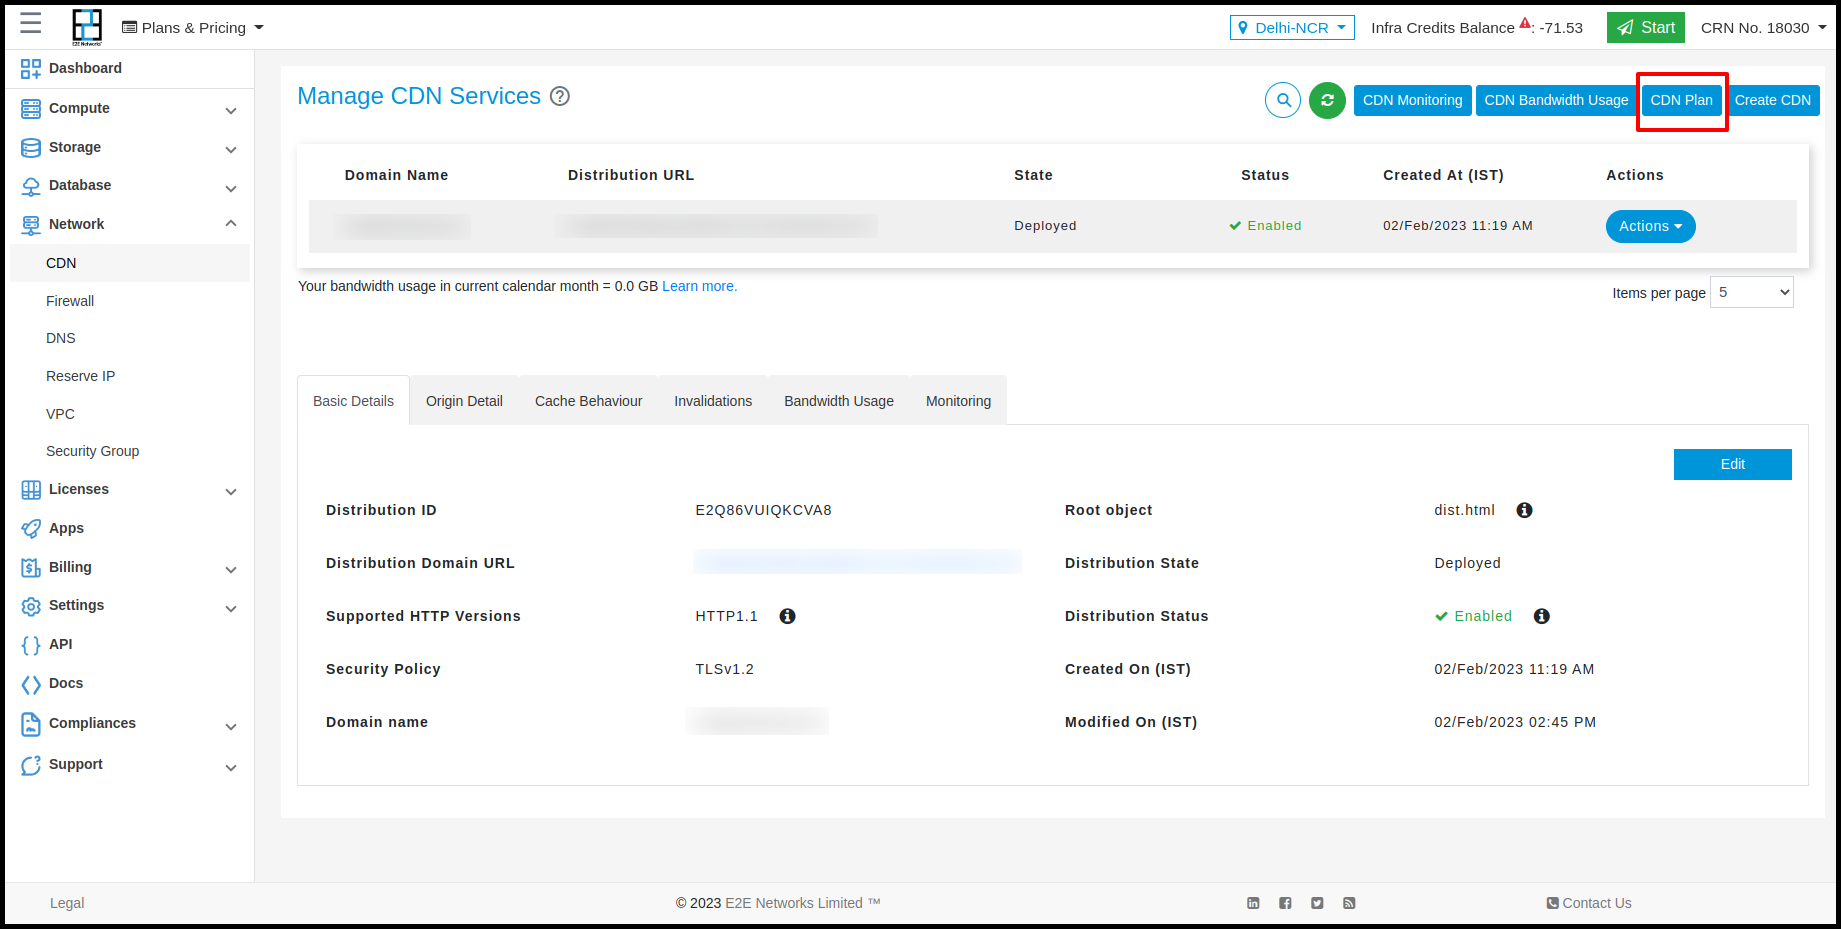
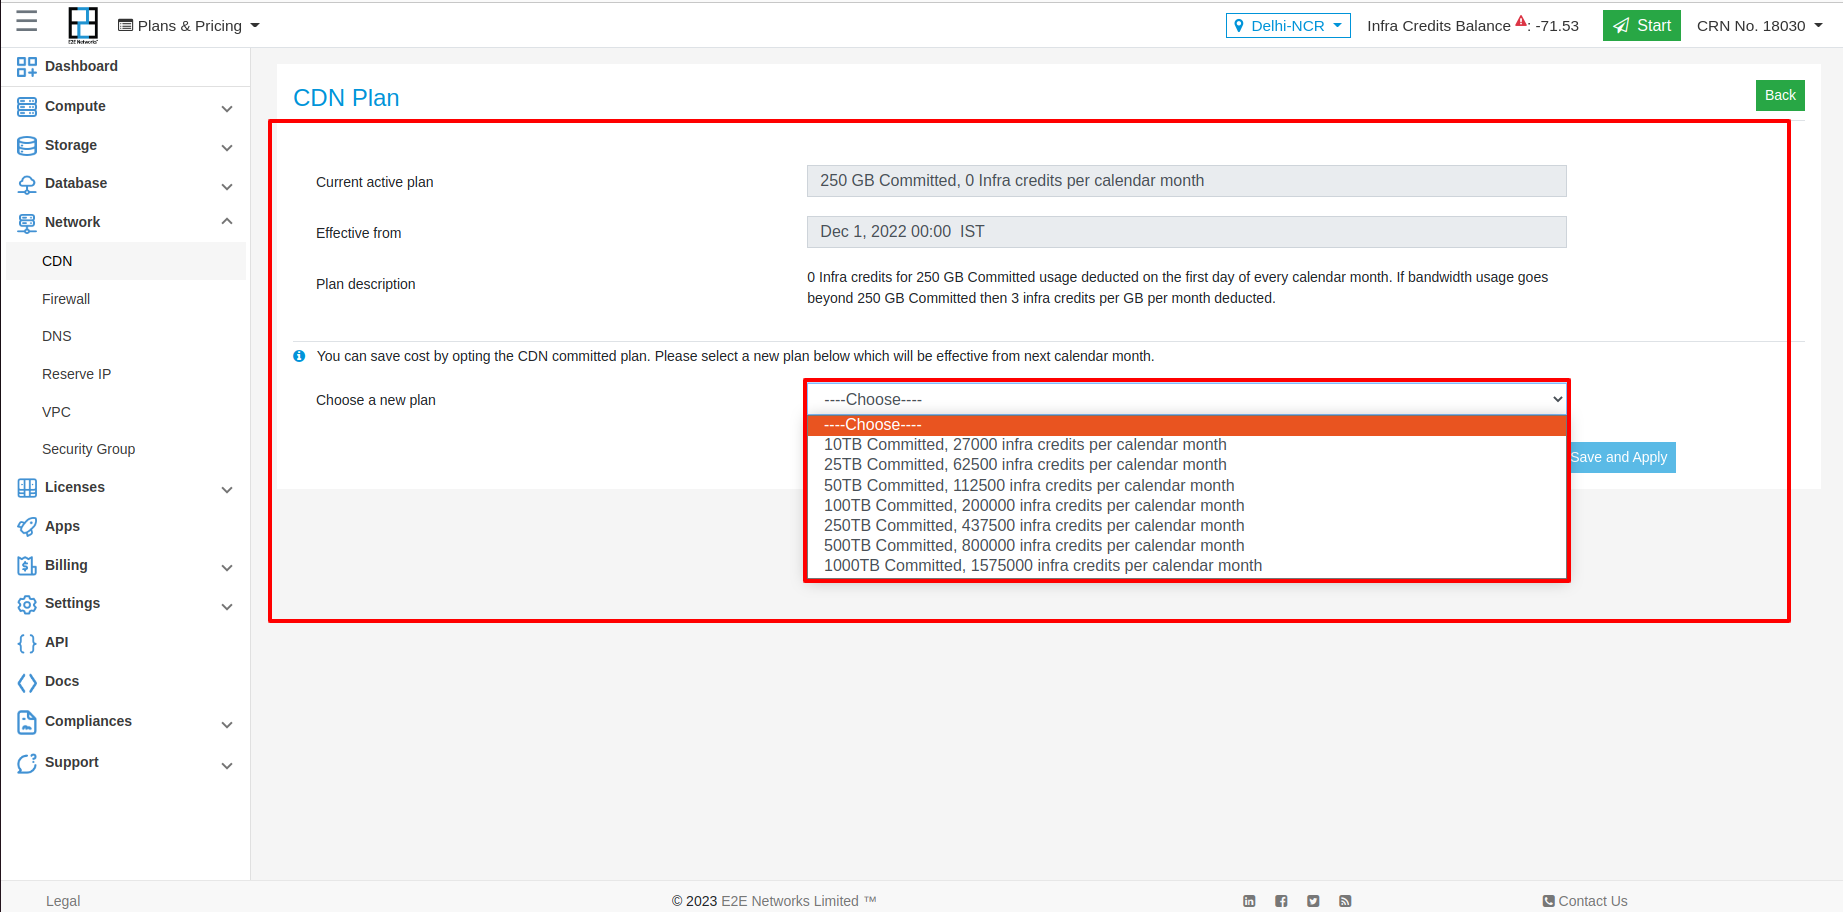
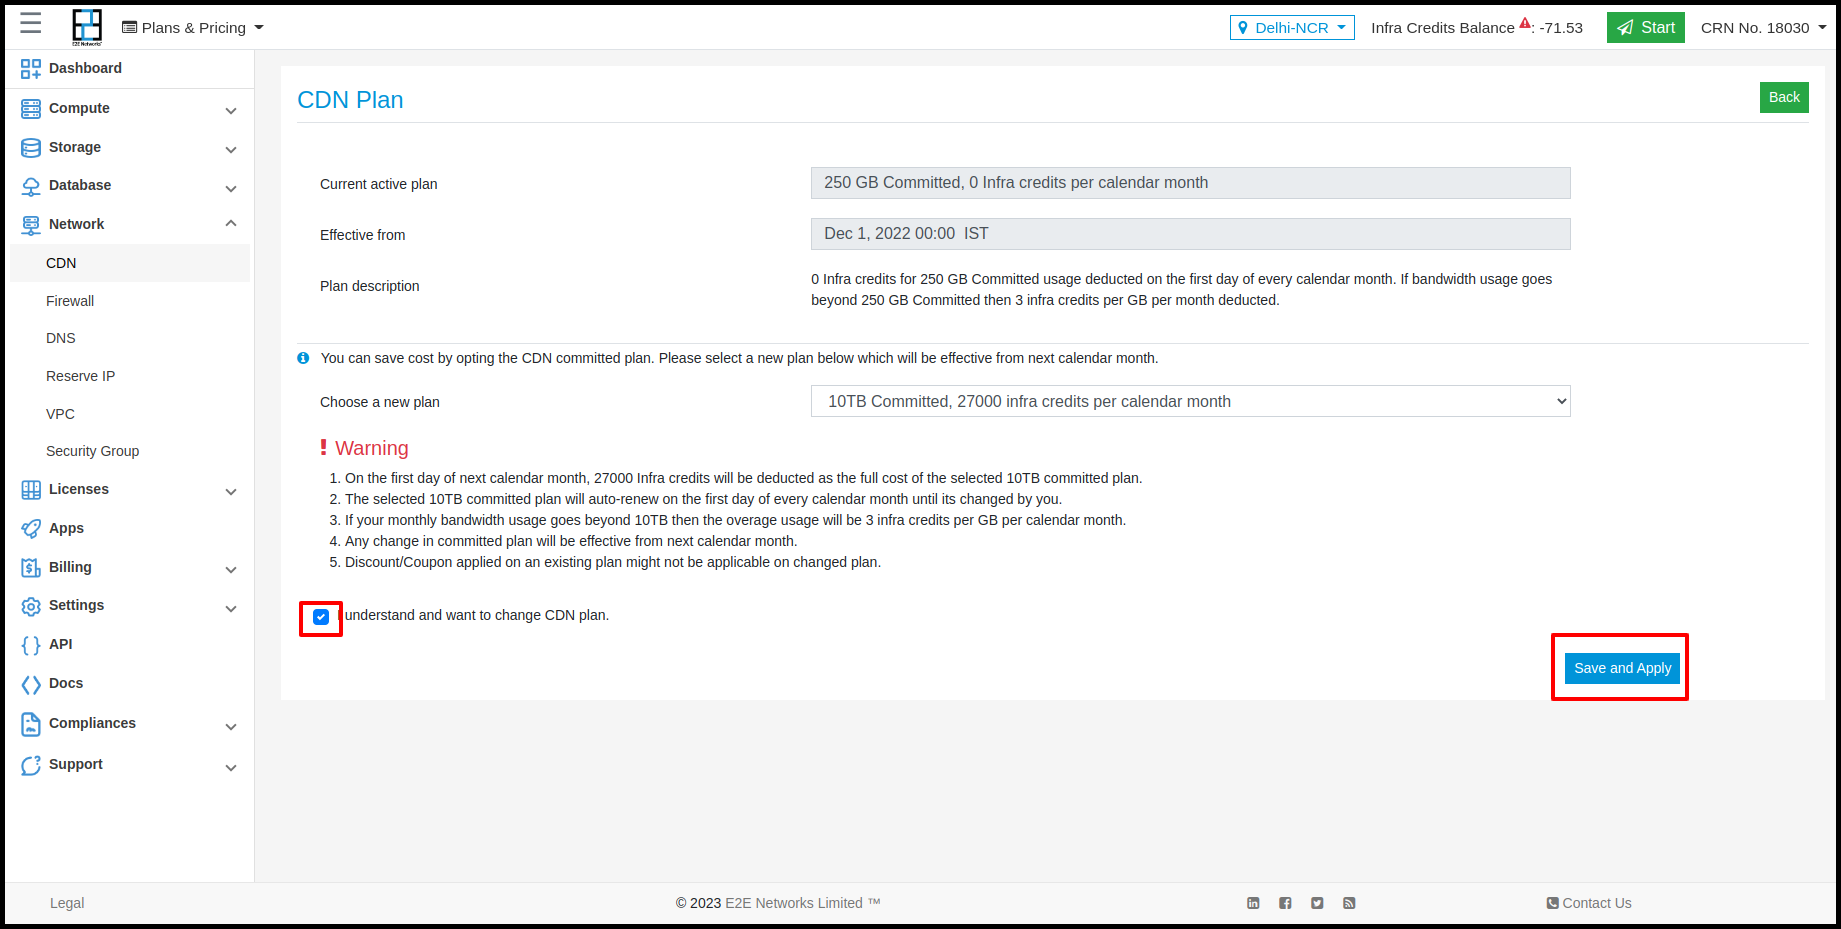
To view the CDN Plan, click the CDN Plan button, select your plan, and then click Save and Apply.
Disable CDN
-
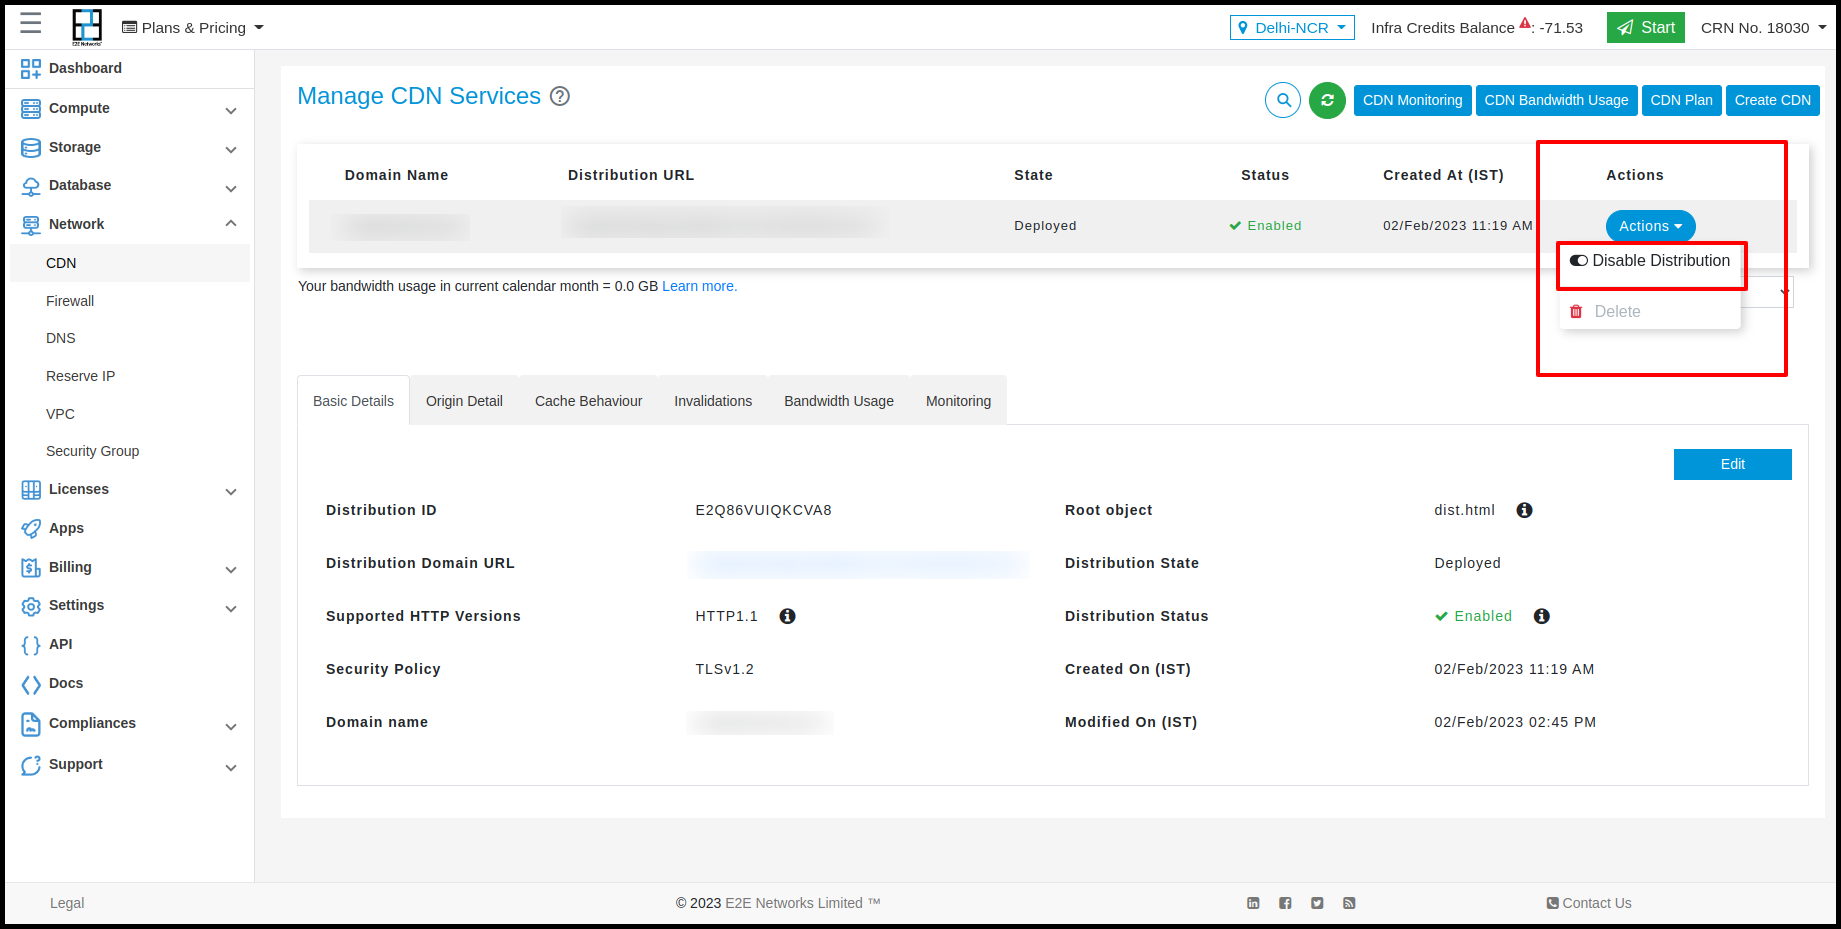
Click the Action button for the CDN you want to disable, then select Disable Distribution.
-
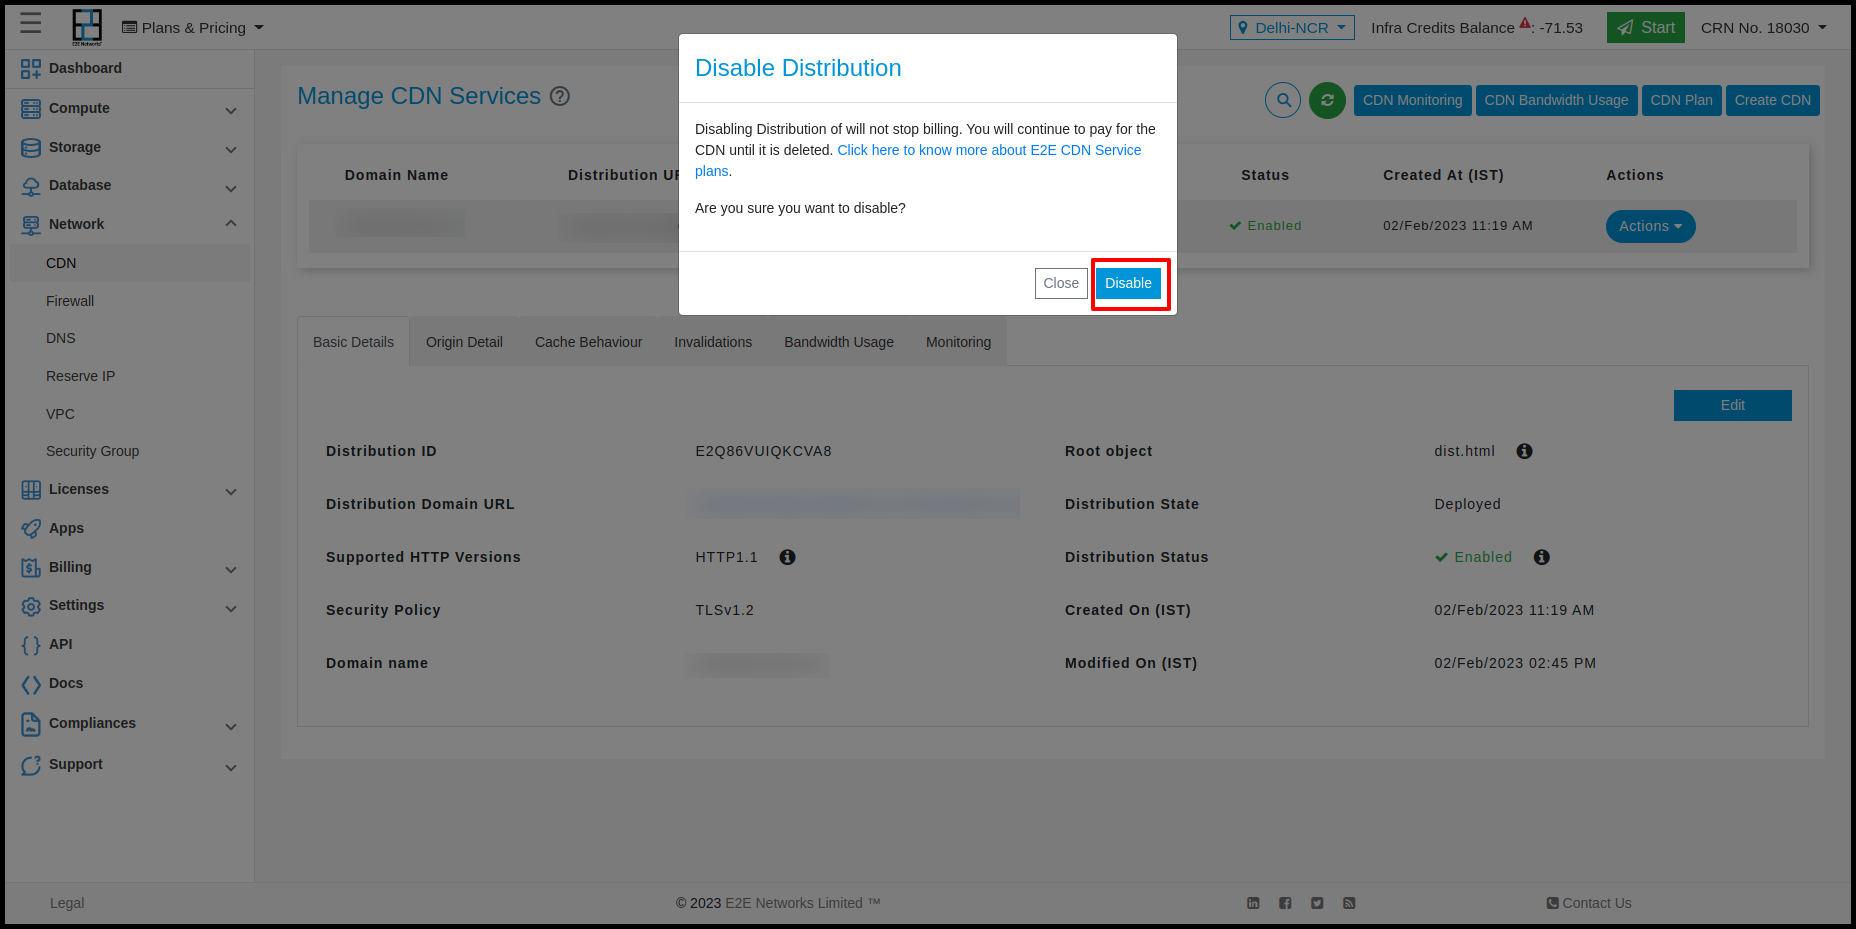
The Disable Distribution window will open. Click the Disable button after reading the information.
-
The state of the CDN will change to InProgress.
Note: It takes approximately 30 minutes to deploy the configuration changes to all CDN Edge servers. Once the changes are complete, the state of the CDN changes to Deployed.
Enable CDN
-
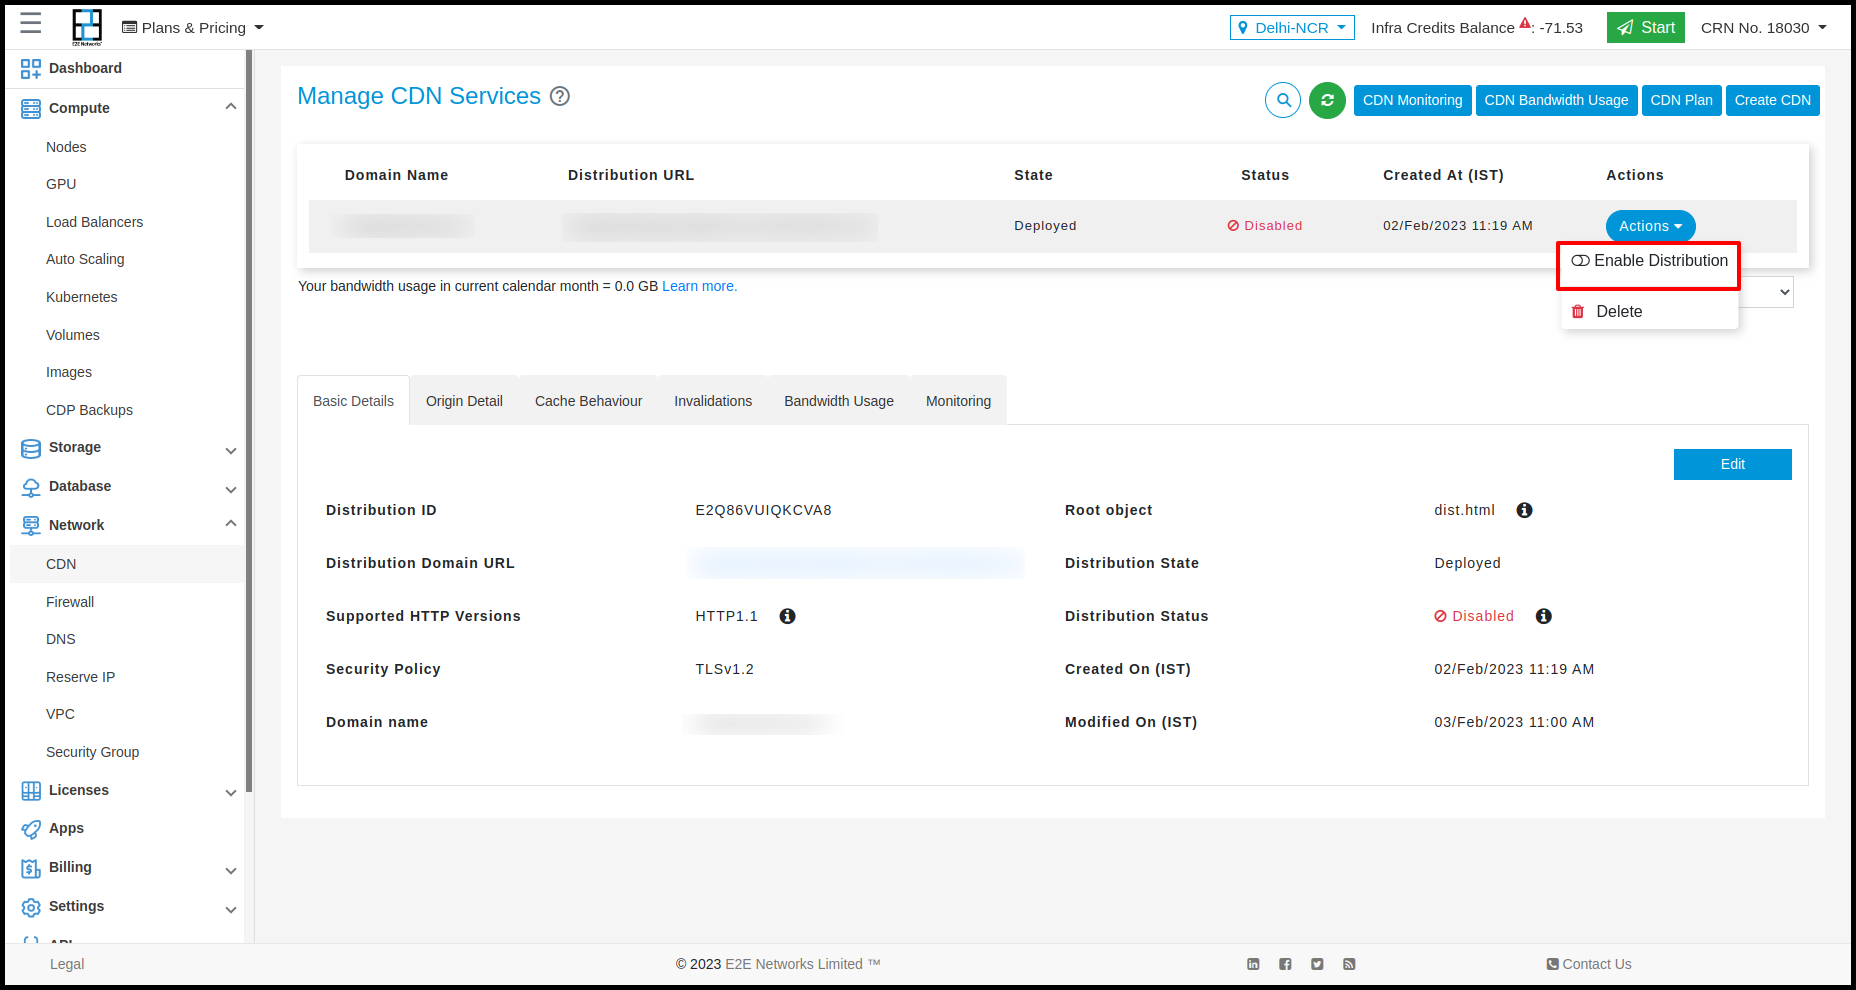
Click the Action button for the CDN you want to enable, then select Enable Distribution.
-
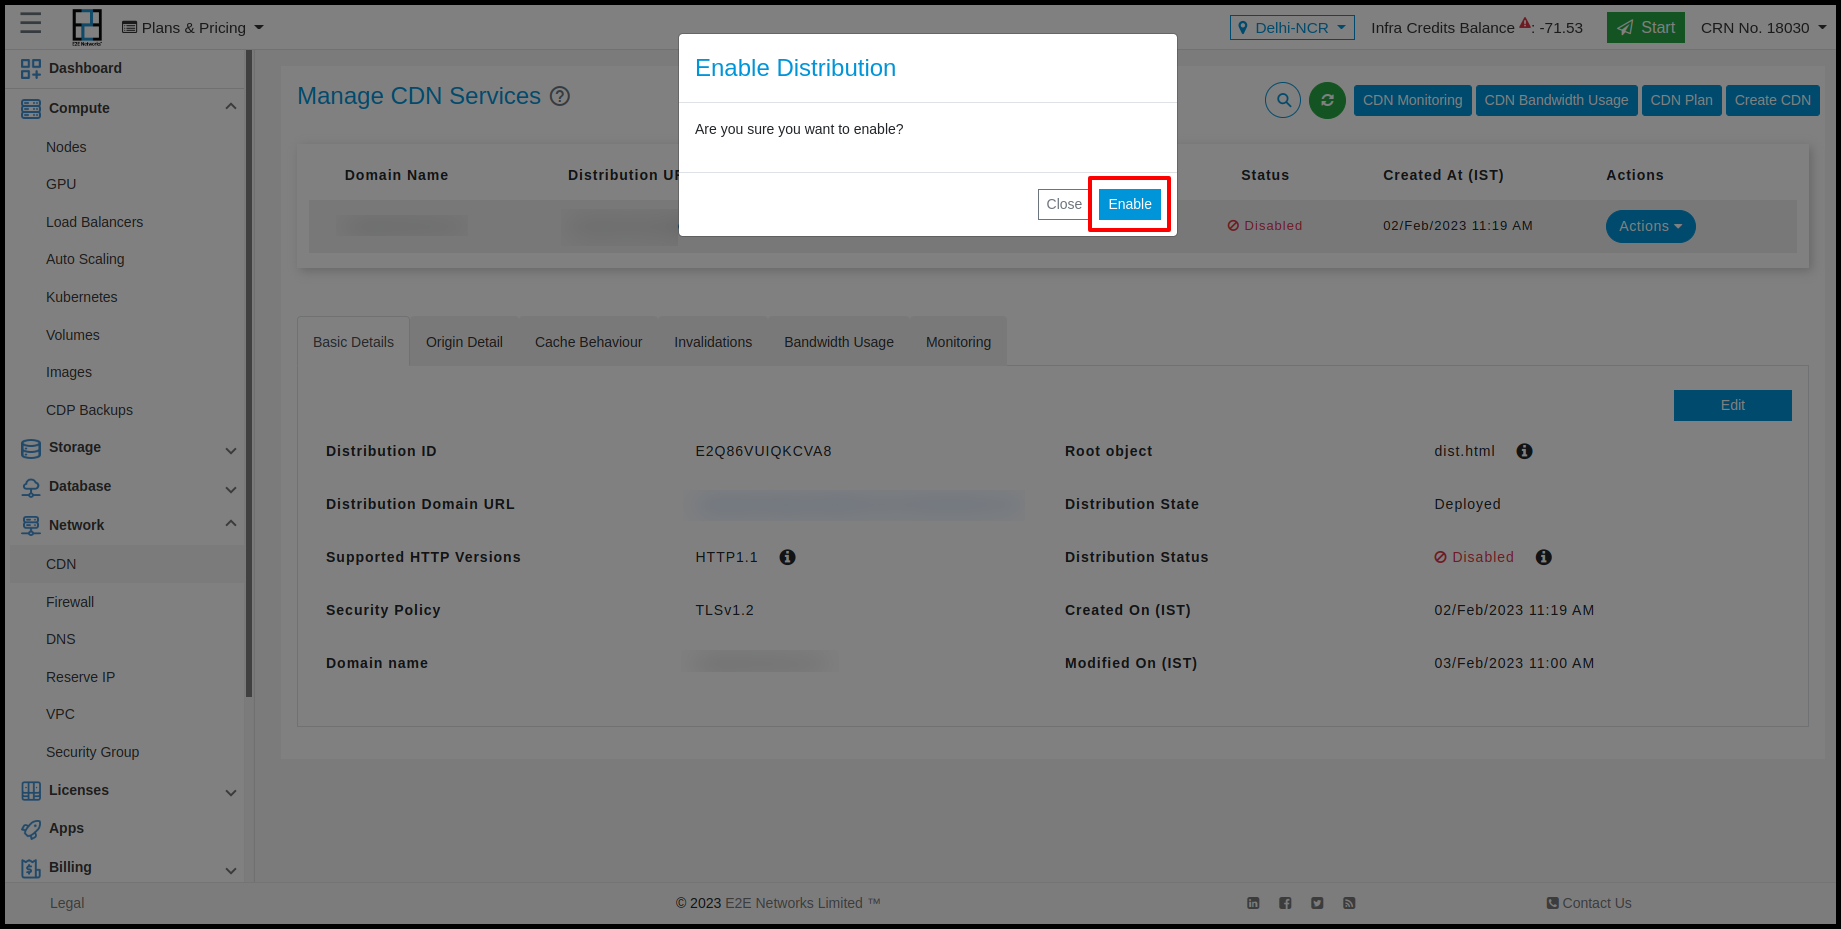
The Enable Distribution window will open. Click the Enable button after reading the information.
-
The state of the CDN will change to InProgress.
Note: It takes approximately 30 minutes to deploy the configuration changes to all CDN Edge servers. Once the changes are complete, the state of the CDN changes to Deployed.
Deleting a CDN
-
Click the Action button for the CDN you want to delete, then select Delete from the dropdown.
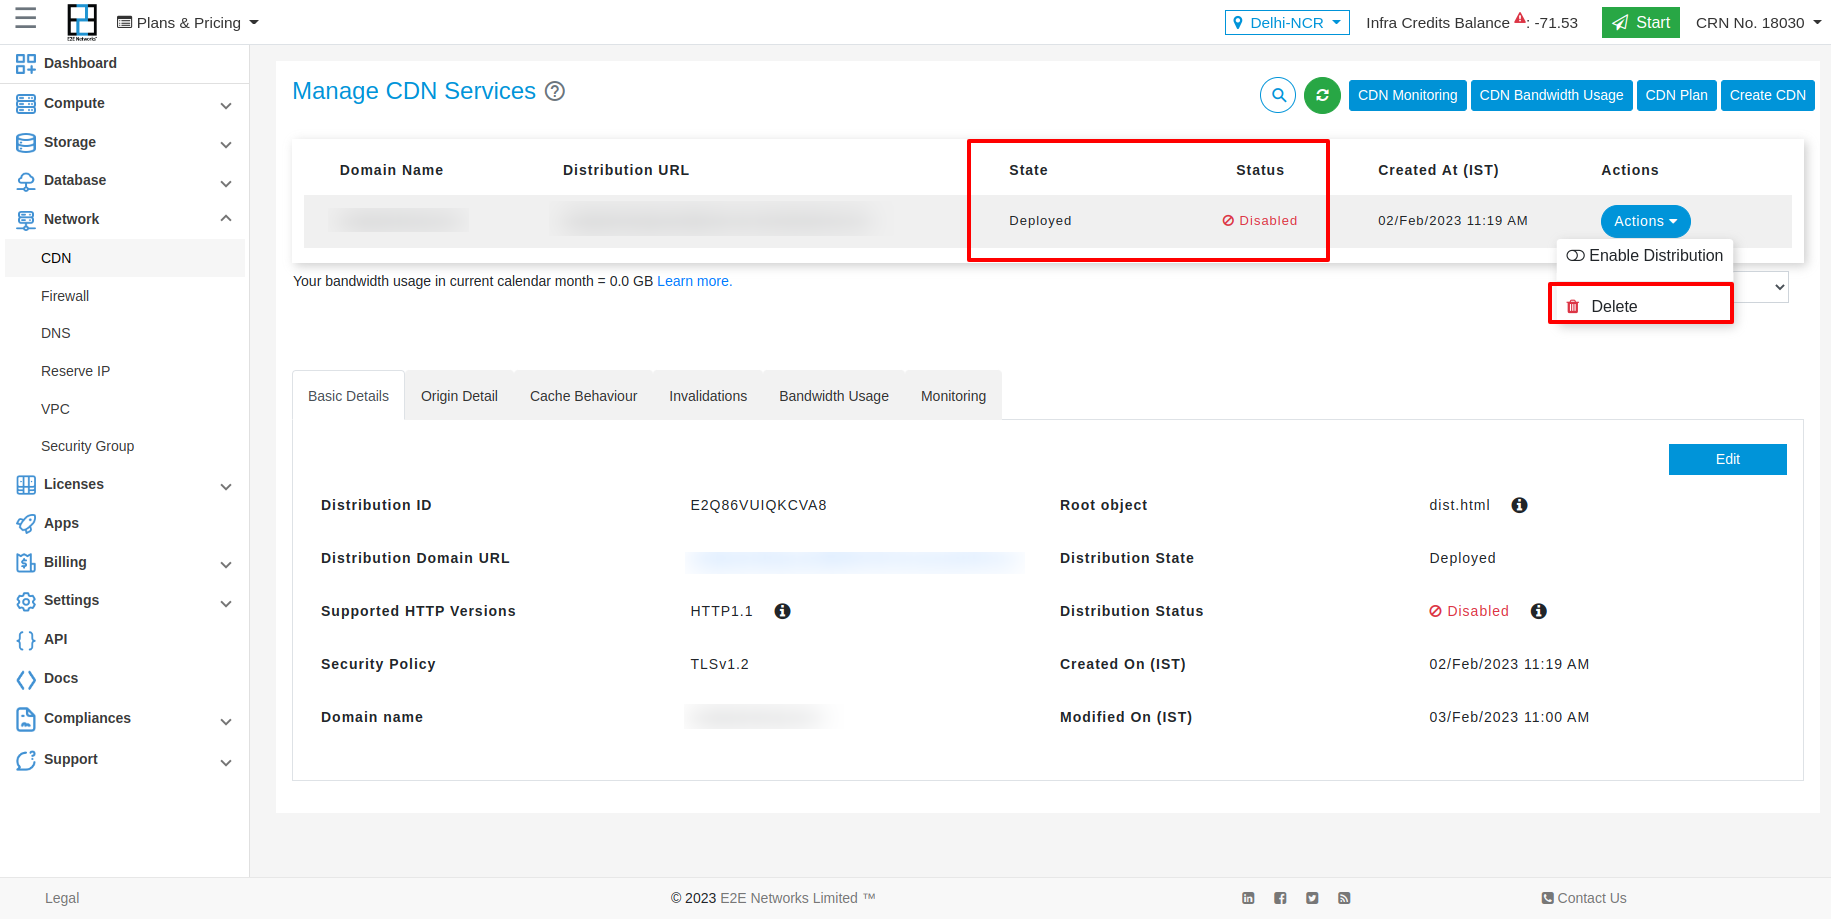
Note: To delete the CDN, it must be in the Deployed state with Disabled status. You cannot delete it if it is in any other state or status.
-
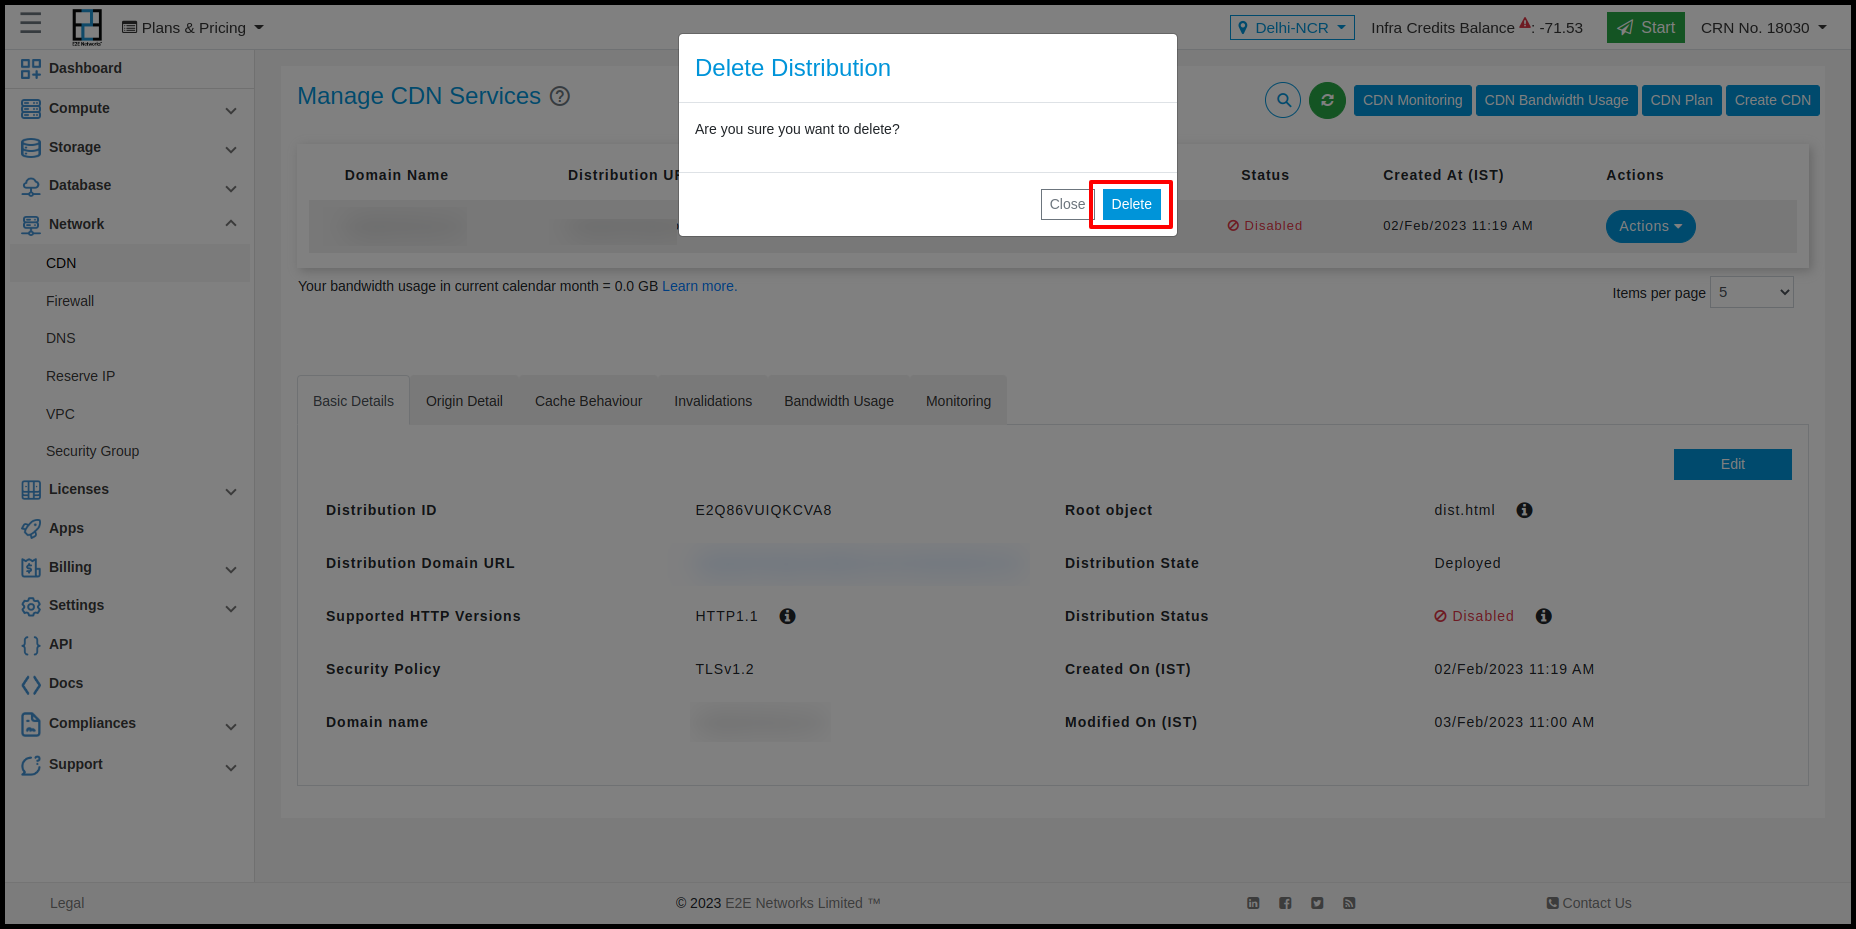
Click the Delete button in the confirmation popup.
-
A confirmation message will appear on the screen.