VPN Setup Guide
Introduction
This document provides a complete step-by-step guide to configure a Site-to-Site (S2S) IPsec VPN between E2E Cloud and Amazon Web Services (AWS). The VPN ensures secure, encrypted communication between the E2E Cloud network and the AWS VPC for private workloads, hybrid cloud setups, and cross-platform connectivity.

E2E Cloud Side Configuration
1- Deploy the FortiGate Firewall
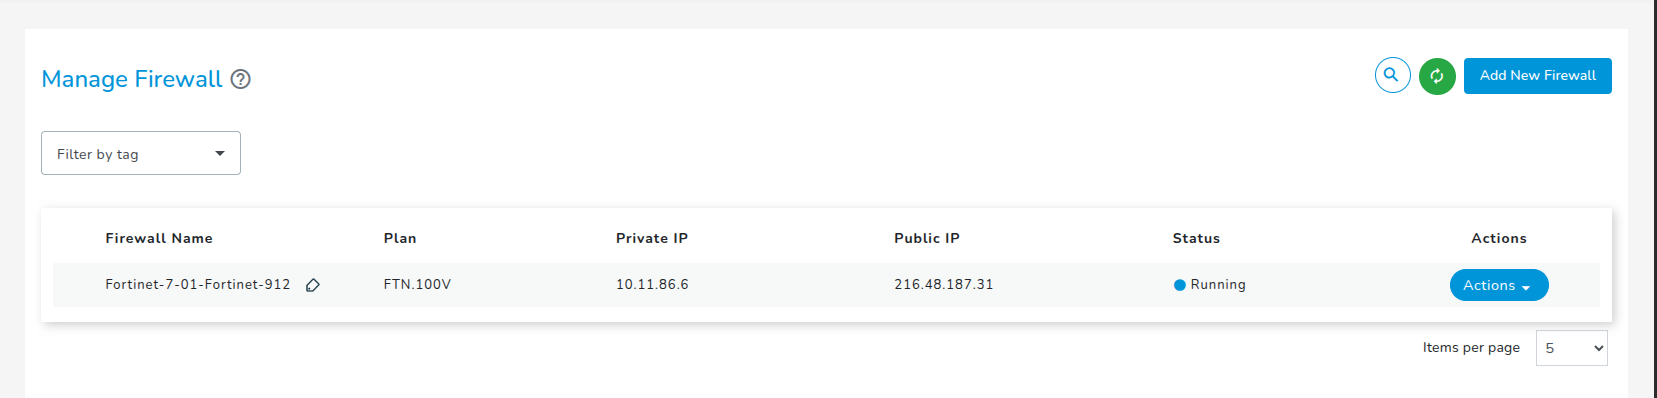
- Log in to the E2E Cloud Console.
- Navigate to Network → Add New Firewall.
- Select the required Plan.
- Enter: Firewall Name, VPC, Public IP Allocation (Enable Public IP)
- Click Create.
- Wait until the firewall status becomes Running.
2- Access the FortiGate Firewall
-
Note the Public IP displayed in the E2E Cloud Console.
-
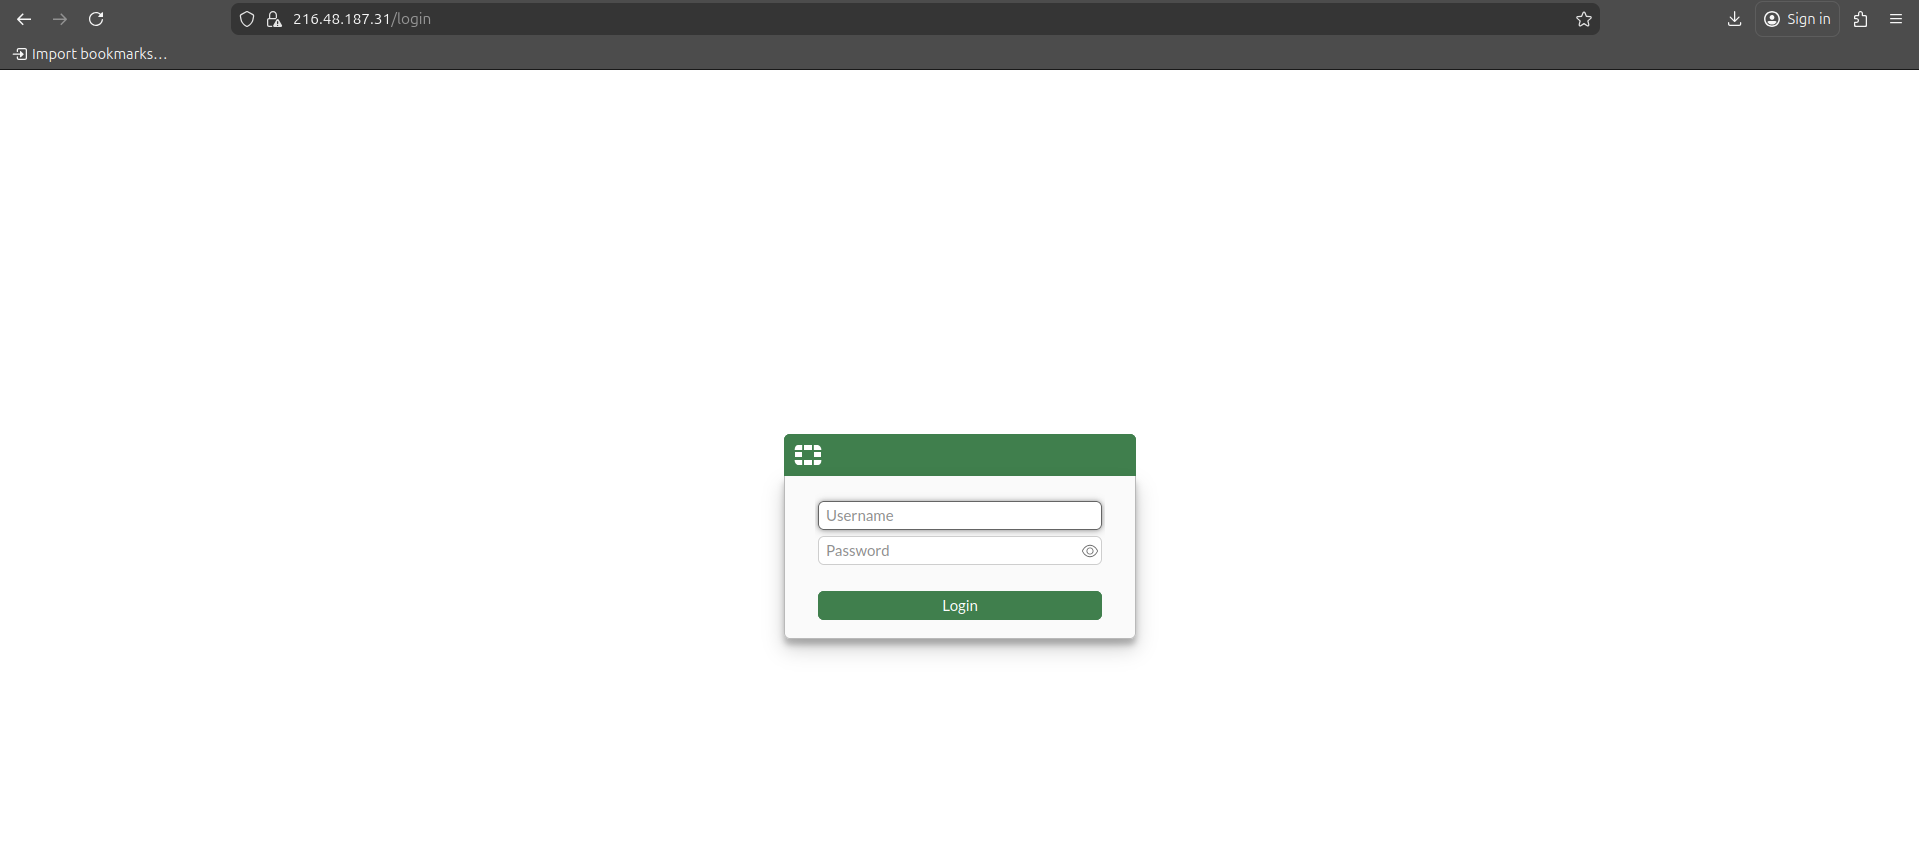
Open a browser and visit:
http://<FortiGate-Public-IP>. -
Log in using: Username : admin , Password: Sent to your E2E Cloud account's registered email.
-
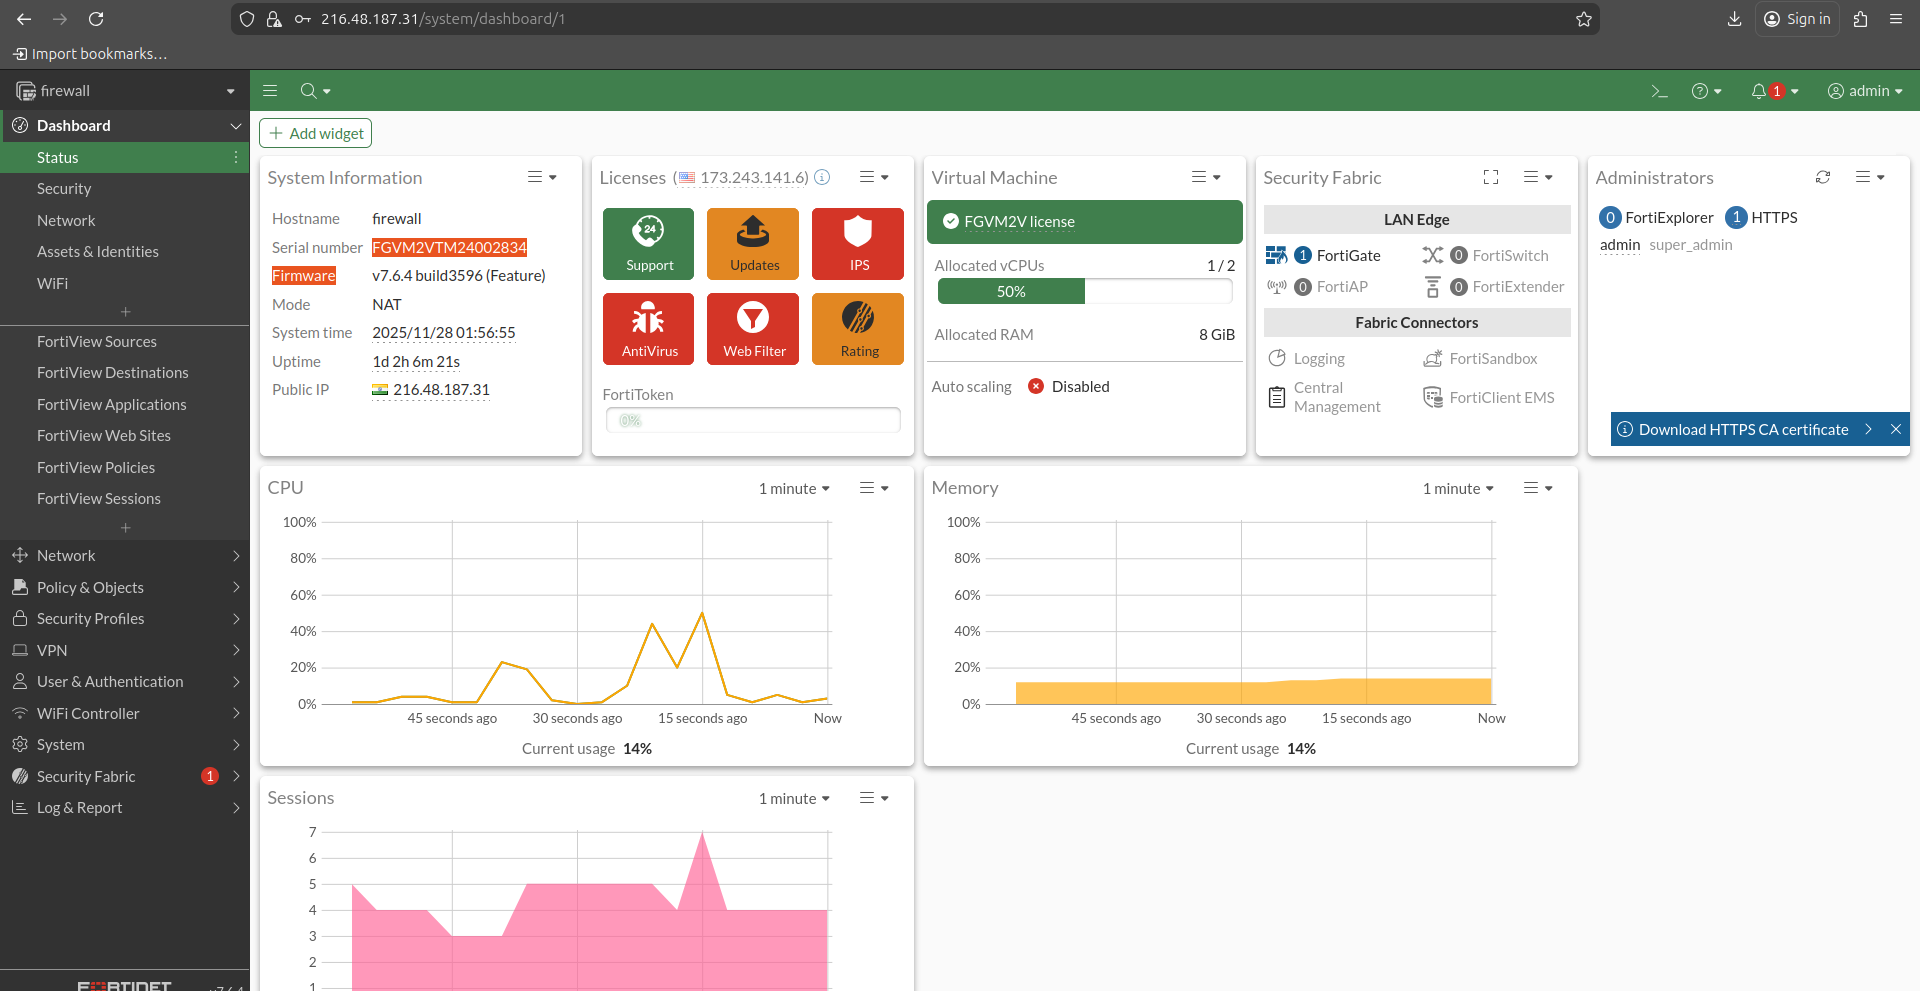
After login, the FortiGate dashboard will appear.
3- AWS Side Configuration
Create VPC
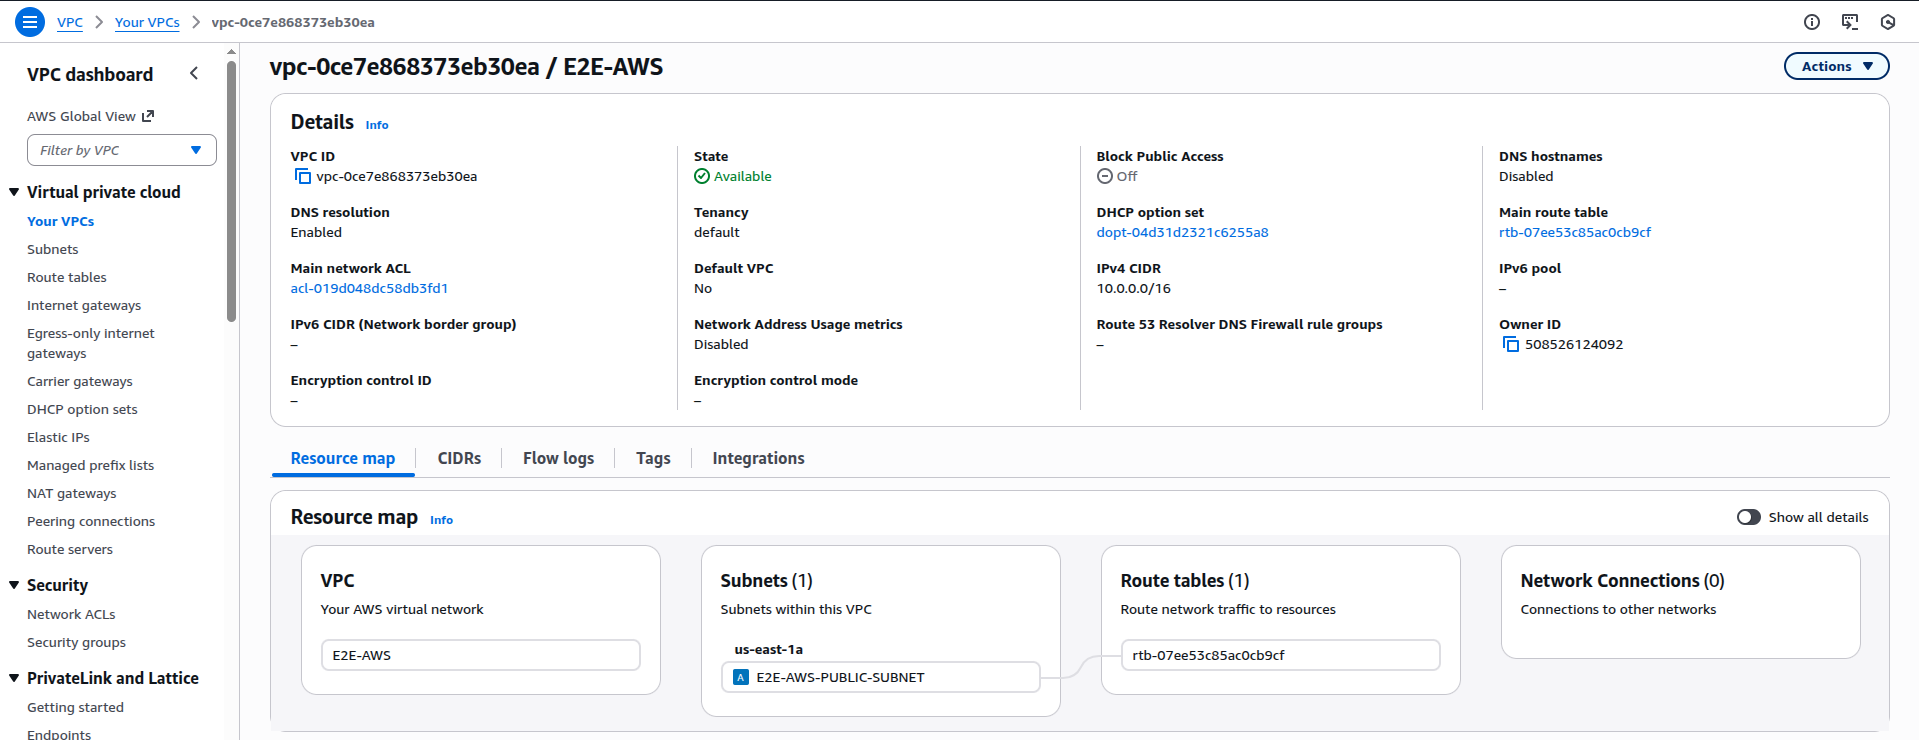
- Go to VPC → Your VPCs → Create VPC.
- Configure: Name: E2E-AWS, IPv4 CIDR: 10.0.0.0/16, Tenancy: Default.
- Click Create VPC.
Create Subnets
A. Public Subnet
- VPC → Subnets → Create Subnet.
- Enter: Name: E2E-AWS-Public-Subnet, AZ: us-east-1a, CIDR: 10.0.1.0/24.
- Create.
B. Private Subnet
- Create another subnet with: Name: E2E-AWS-Private-Subnet, AZ: us-east-1a or 1b, CIDR: 10.0.2.0/24.

Create an Internet Gateway
- Go to Internet Gateways → Create IGW.
- Name: E2E-IGW.
- Attach it to the E2E-AWS VPC.

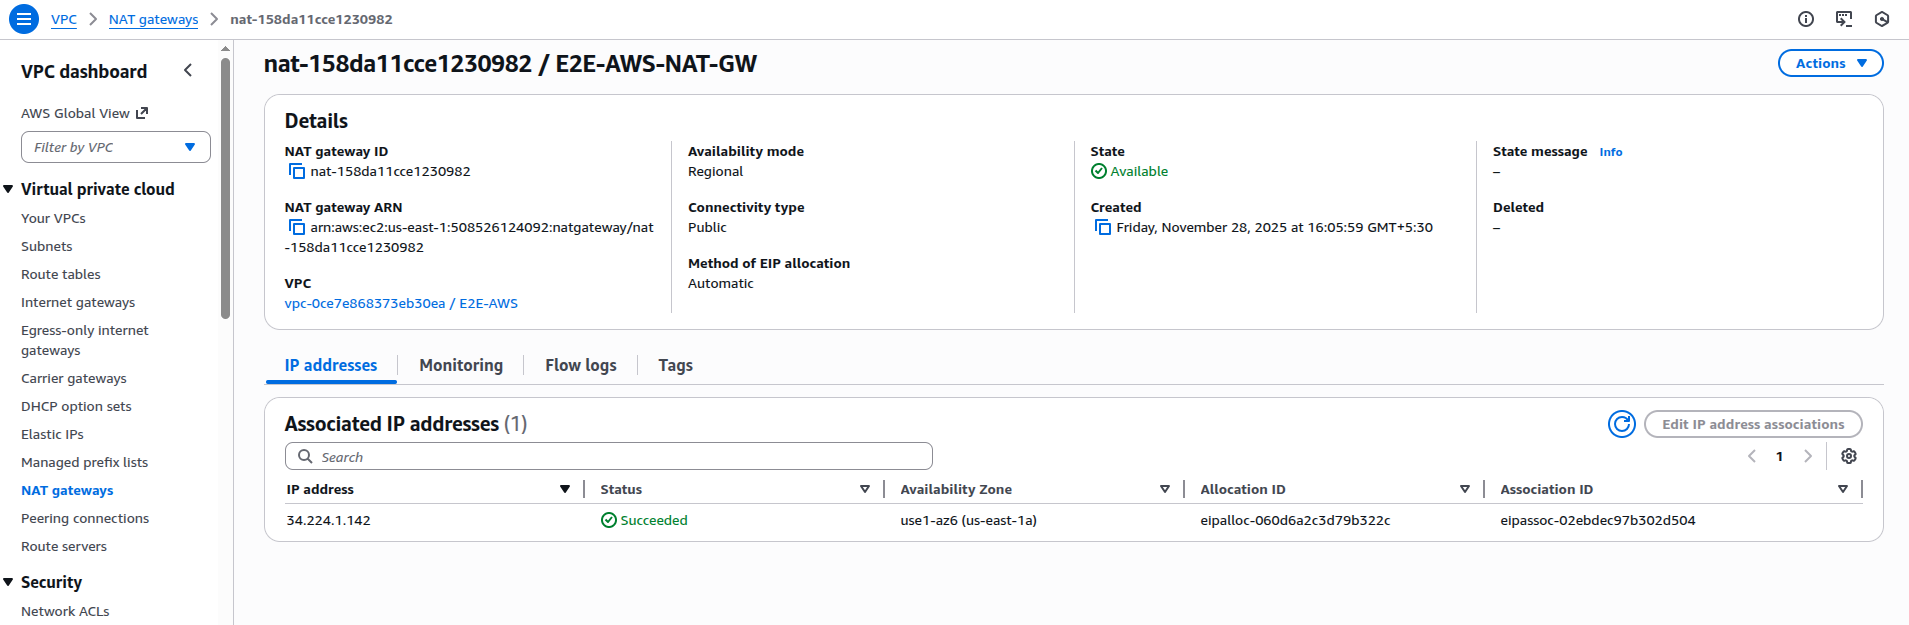
Create NAT Gateway
- Go to NAT Gateways → Create NAT Gateway.
- Configure: Name: E2E-AWS-NAT-GW, Availability-Mode: Regional, Select the vpc, Subnet: E2E-Public-Subnet.
- Method of Elastic IP (EIP) allocation : Automatic.
- Click on Create.
Configure Route Tables
- Public Route Table
Add route: Destination: 0.0.0.0/0, Target: E2E-IGW.

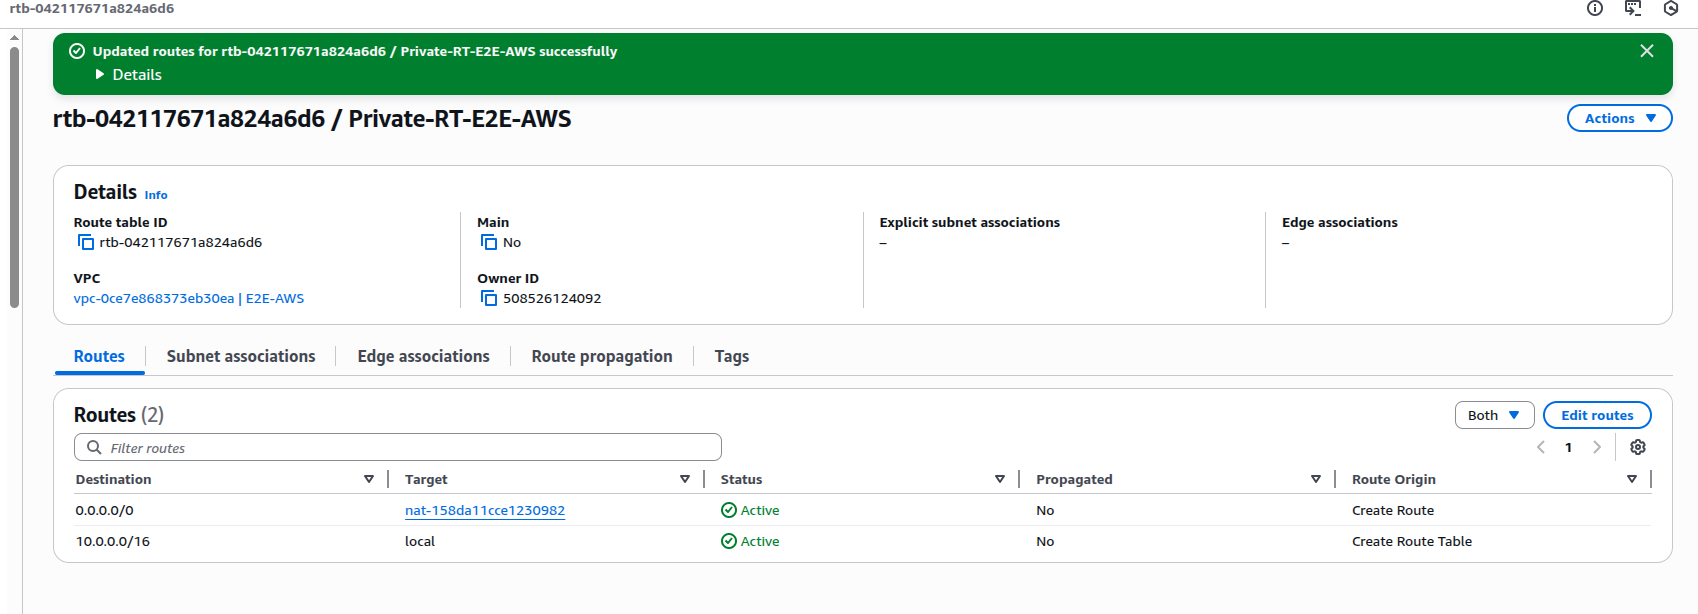
- Private Route Table
Add route: Destination: 0.0.0.0/0, Target: E2E-AWS-NAT-GW
- Associate:
- Public Subnet → Public Route Table

- Private Subnet → Private Route Table

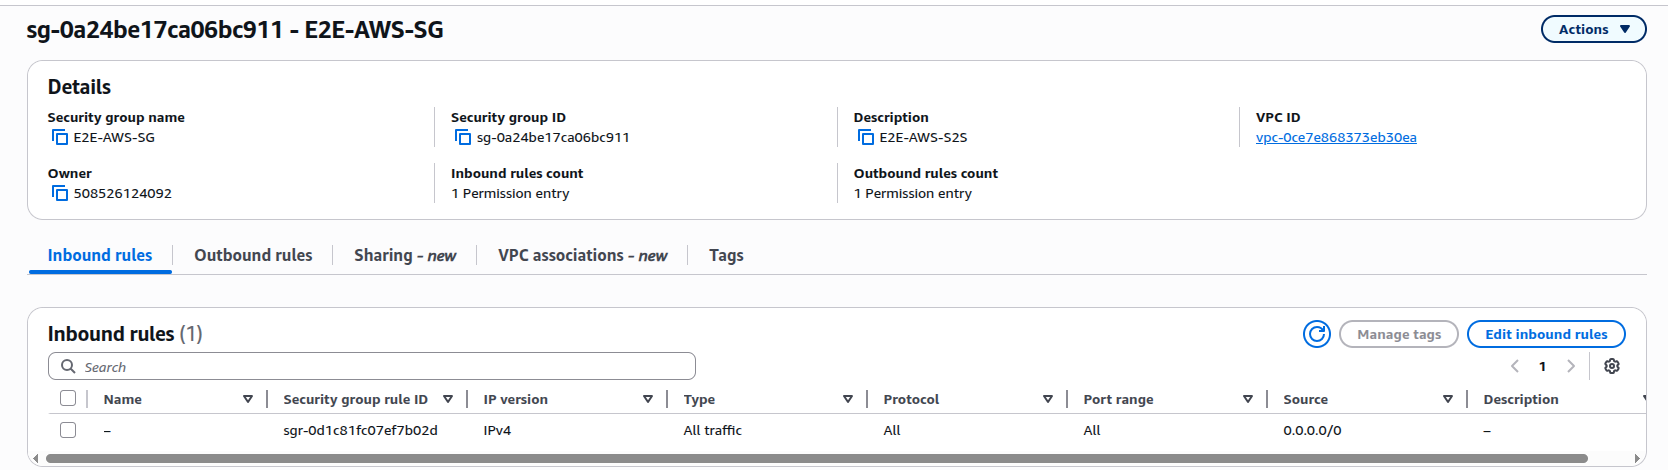
Create Security Group
- Go to Security Groups → Create Security Group.
- Name: E2E-VPN-SG
- Add inbound rules: SSH (22) , ICMP, Application ports (if required).
Create Customer Gateway (CGW)
- Go to Customer Gateways → Create.
- Enter:Name: E2E-AWS-CGW, IP Address: Public IP of E2E FortiGate
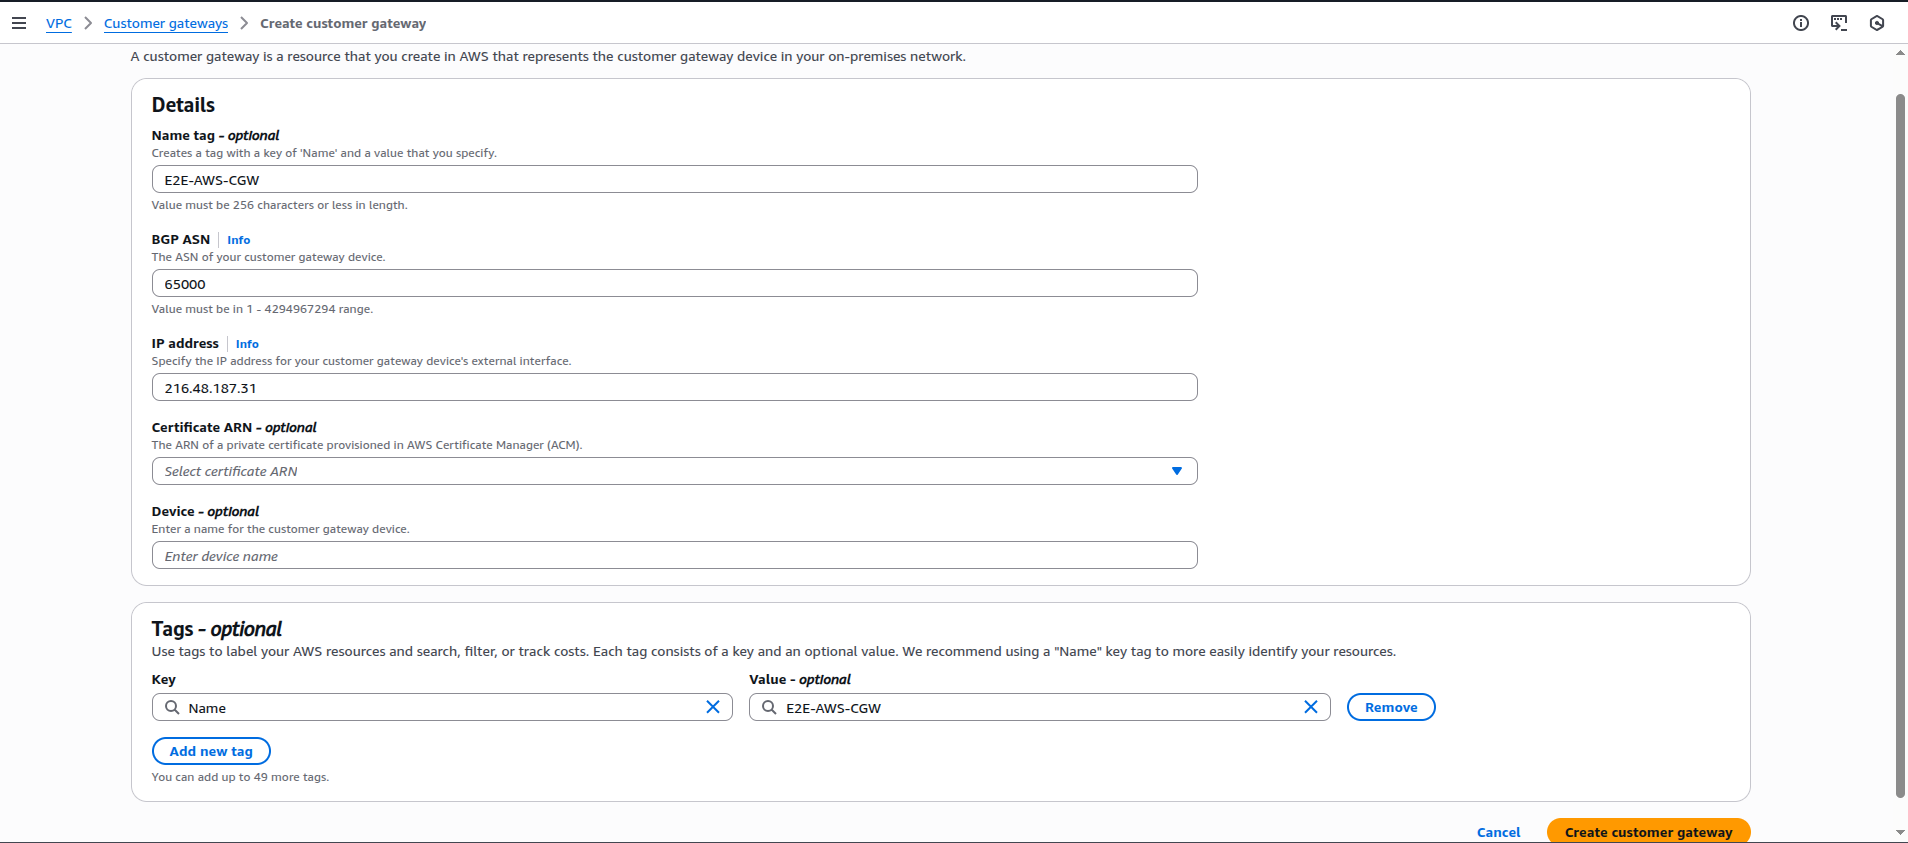
- Click on Create.

Create Virtual Private Gateway (VGW)
- Go to Virtual Private Gateways → Create
- Name: E2E-VGW.
- Attach VGW to E2E-AWS VPC.

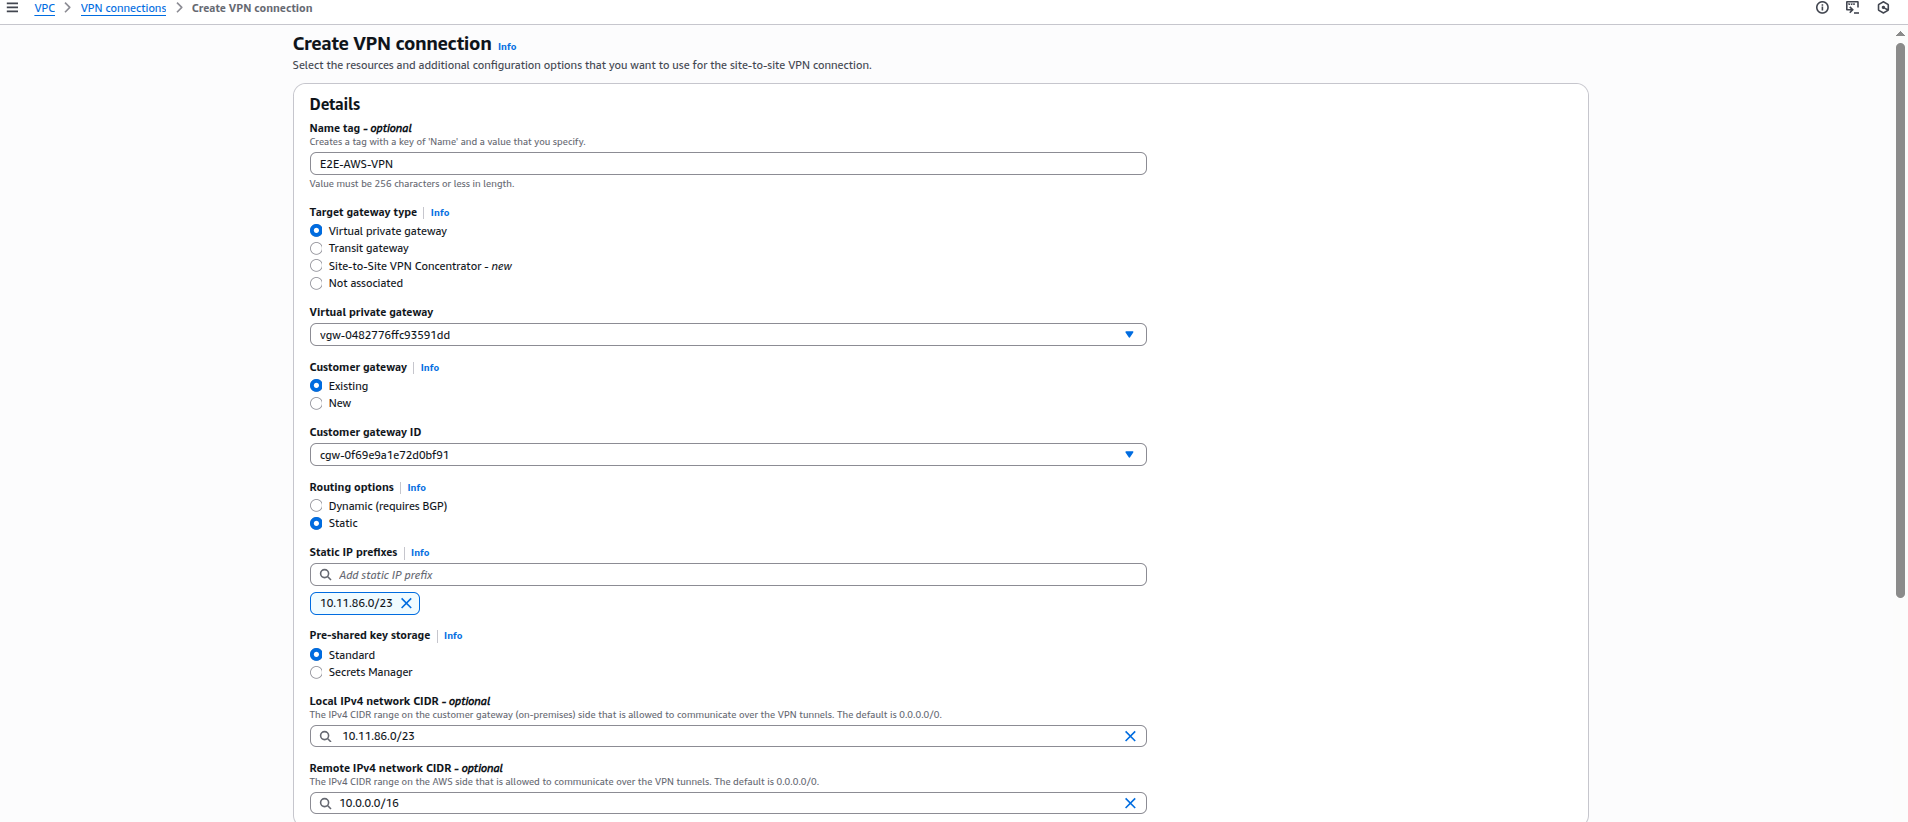
Create Site-to-Site VPN
- Go to VPN Connections → Create.
- Enter: Name: E2E-VPN-Connection, Target Gateway: E2E-VGW, Customer Gateway: E2E-CGW, Routing: Static, Static IP Prefixes : E2E VPC CIDR.
- Add E2E VPC CIDR Range (e.g., 192.168.10.0/24)
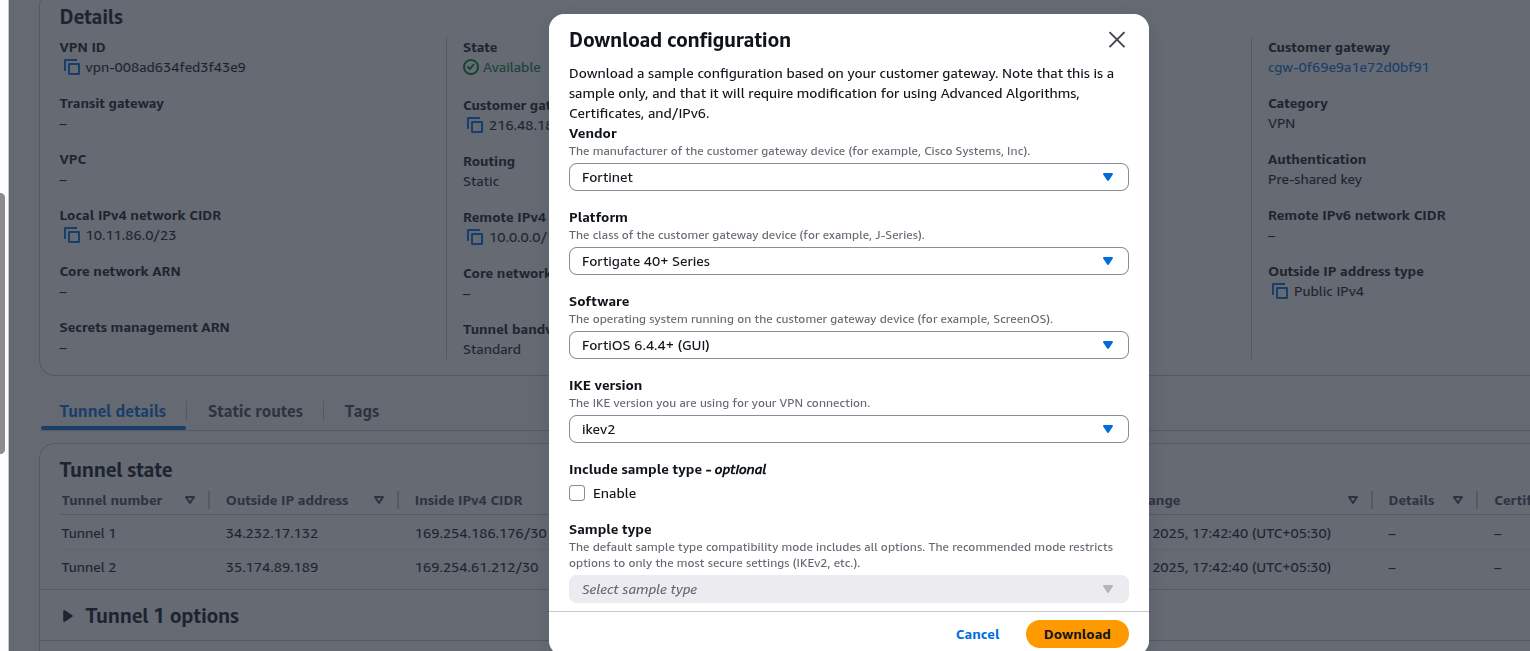
Download VPN Configuration.
- Select VPN Connection → Download Configuration.
- Choose: Vendor: Fortinet, Platform: FortiGate, Software: Latest.
- This file contains: Tunnel outside IPs, PSKs, Inside IPs, Phase-1 & Phase-2 parameters.
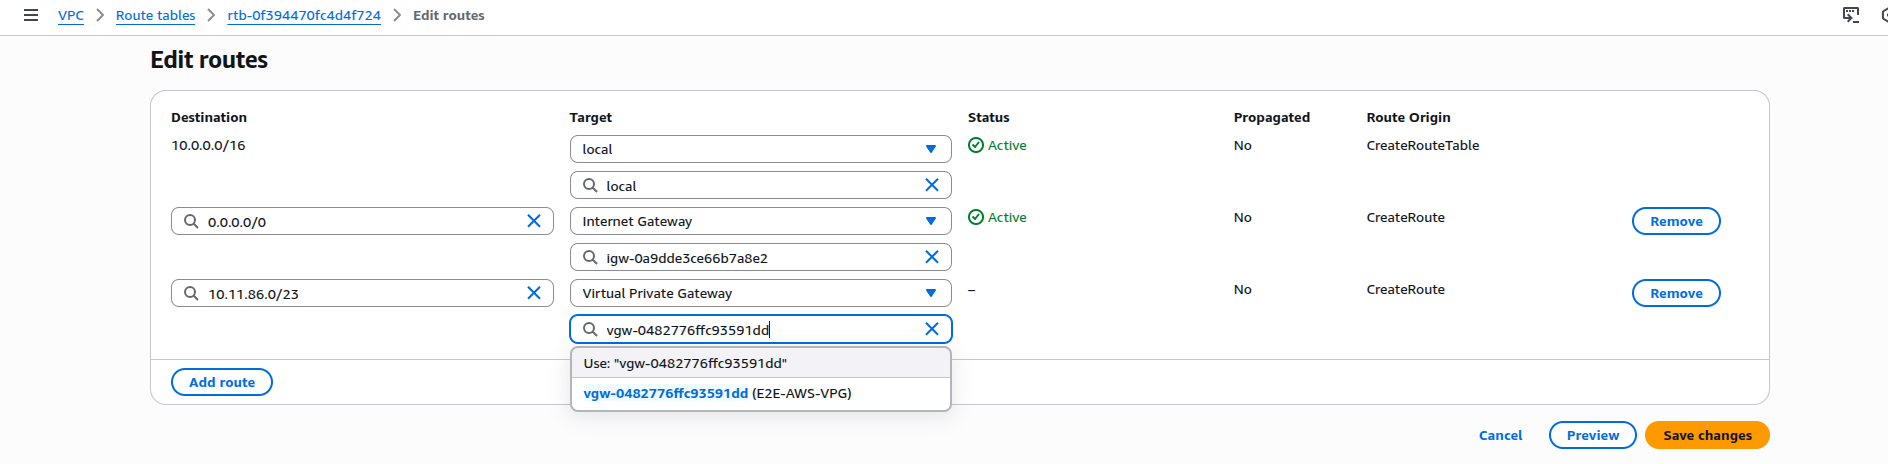
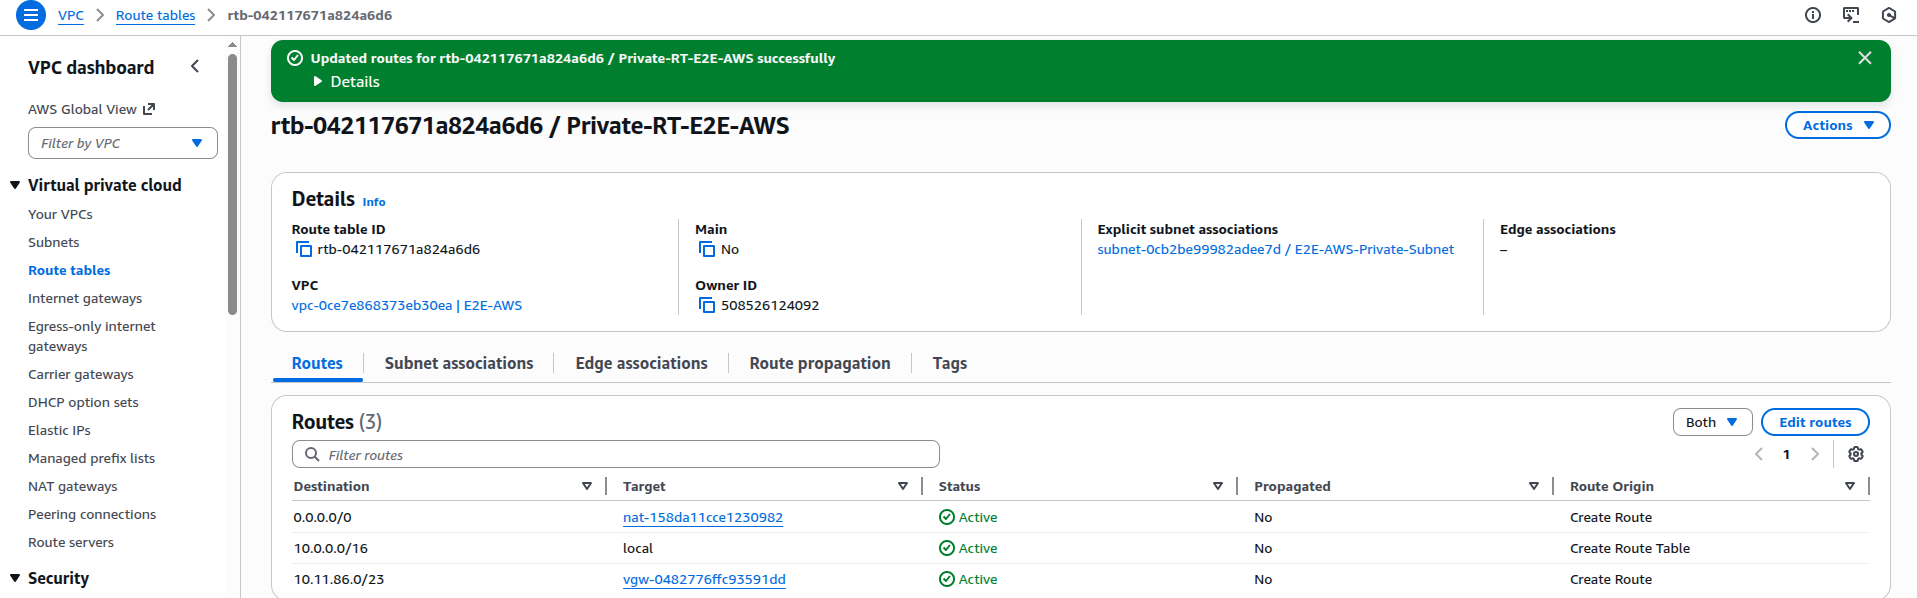
Add Routes in AWS
- Add routes to both Public and Private route tables: Destination : E2E Subnet (e.g., 192.168.10.0/24), Target: Virtual Private Gateway.
4- FortiGate Configuration (E2E Side)
Configure Phase-1 (IKE)
- Go to: VPN → IPsec Tunnels → Create New → Custom.

- Configure:
| Parameter | Value |
|---|---|
| IP Version | IPv4 |
| Remote Gateway | Static IP |
| IP Address | AWS Outside IP |
| Local Interface | port1 |
| Pre-Shared Key | From AWS config |
| IKE Version | IKEv2 |
| Encryption | AES128 |
| Authentication | SHA1 |
| DH Group | 2 |
| Key Lifetime | 28800 |
- Disable NAT Traversal if the firewall is not behind NAT.
- The above details are available in the AWS Configuration File which downloaded in step 3.10


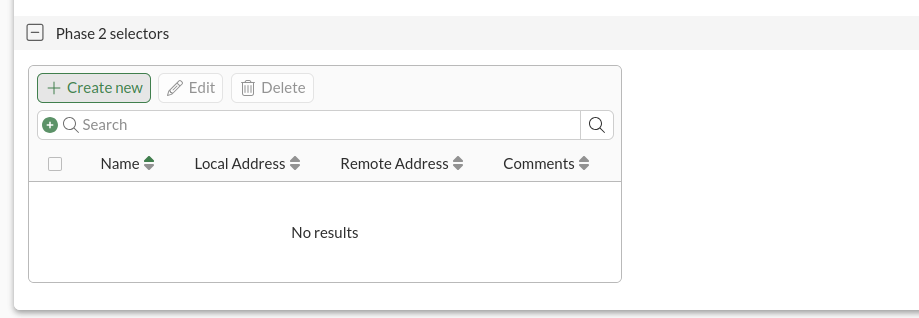
Configure Phase-2
- Go to: VPN → IPsec Tunnels → Select Tunnel → Phase 2 Selectors → Create New
| Parameter | Value |
|---|---|
| Name | As per AWS config |
| Local Address | E2E Subnet |
| Remote Address | AWS VPC CIDR |
| Encryption | AES128 |
| Authentication | SHA1 |
| PFS | Enabled |
| DH Group | 2 |
| Key Lifetime | 3600 |
| Auto-negotiate | Enabled |

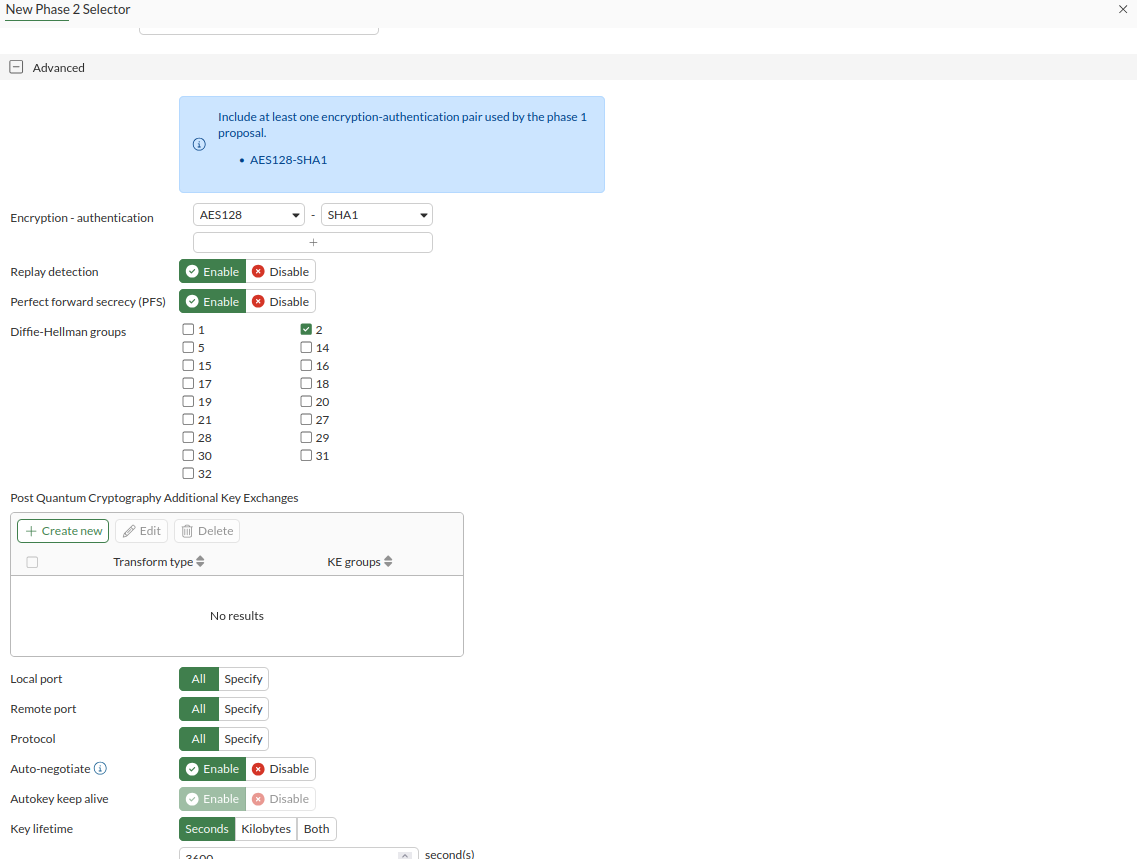
- The above details are also available in the AWS Configuration File which downloaded in step 3.10.
Configure Tunnel Interface
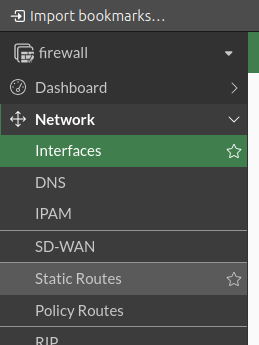
- Go to Network → Interfaces.
- Edit the tunnel interface (E2E-AWS).
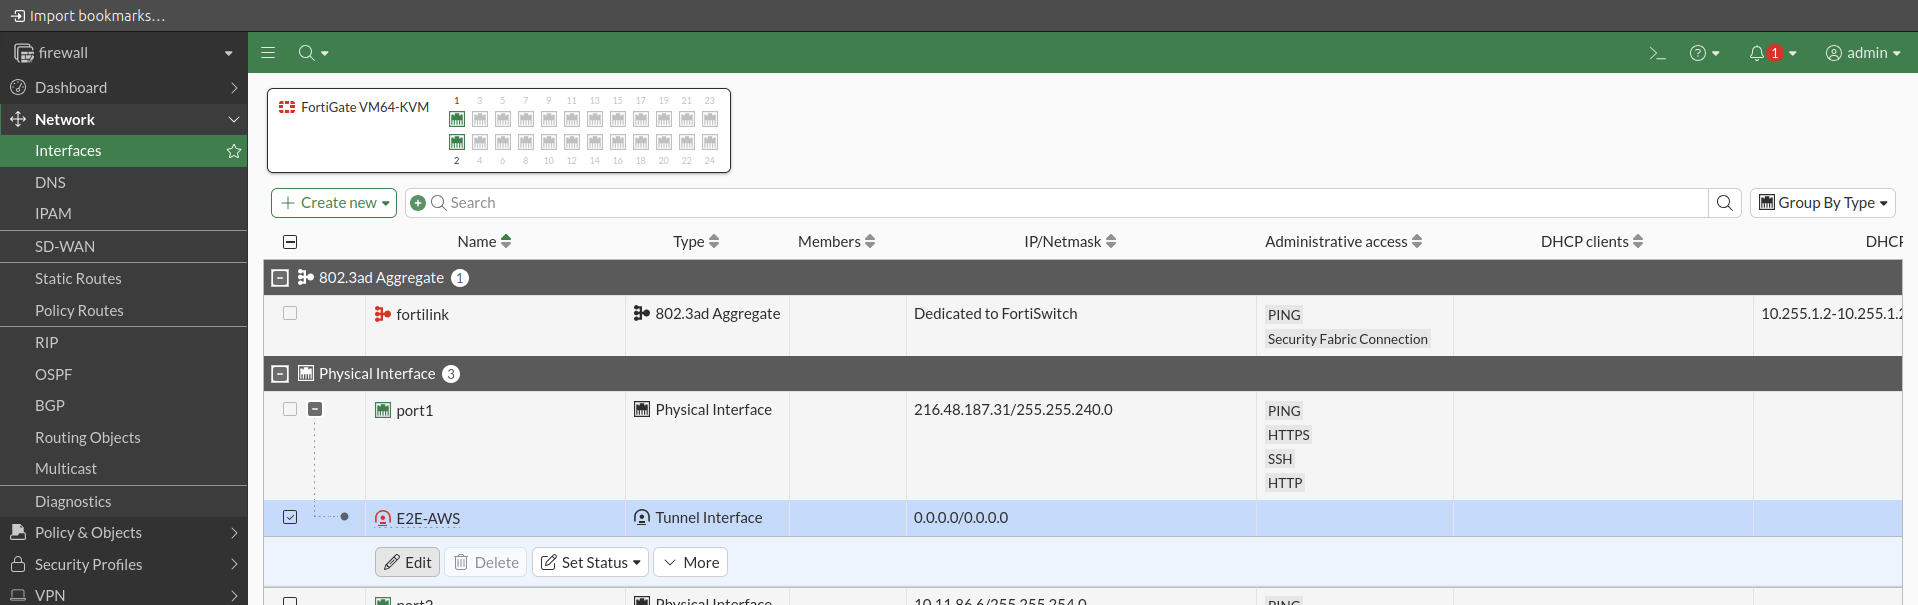
- Set: IP Address: 169.254.x.x(from AWS file), Remote IP: 169.254.x.x/30, Enable Ping
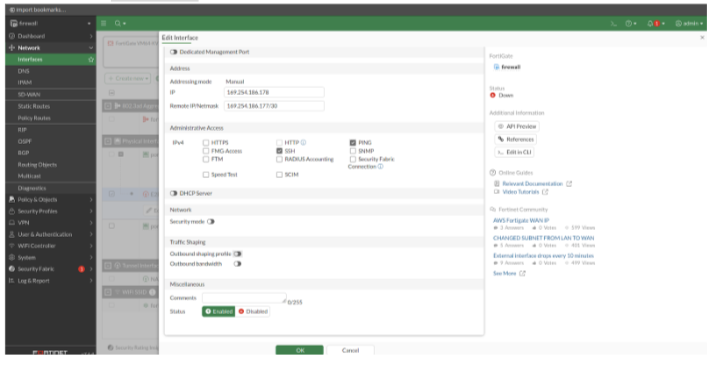
- The above details are also available in the AWS Configuration File which downloaded in step 3.10.
Add Static Route (E2E → AWS)
- Go to: Network → Static Routes → Create New
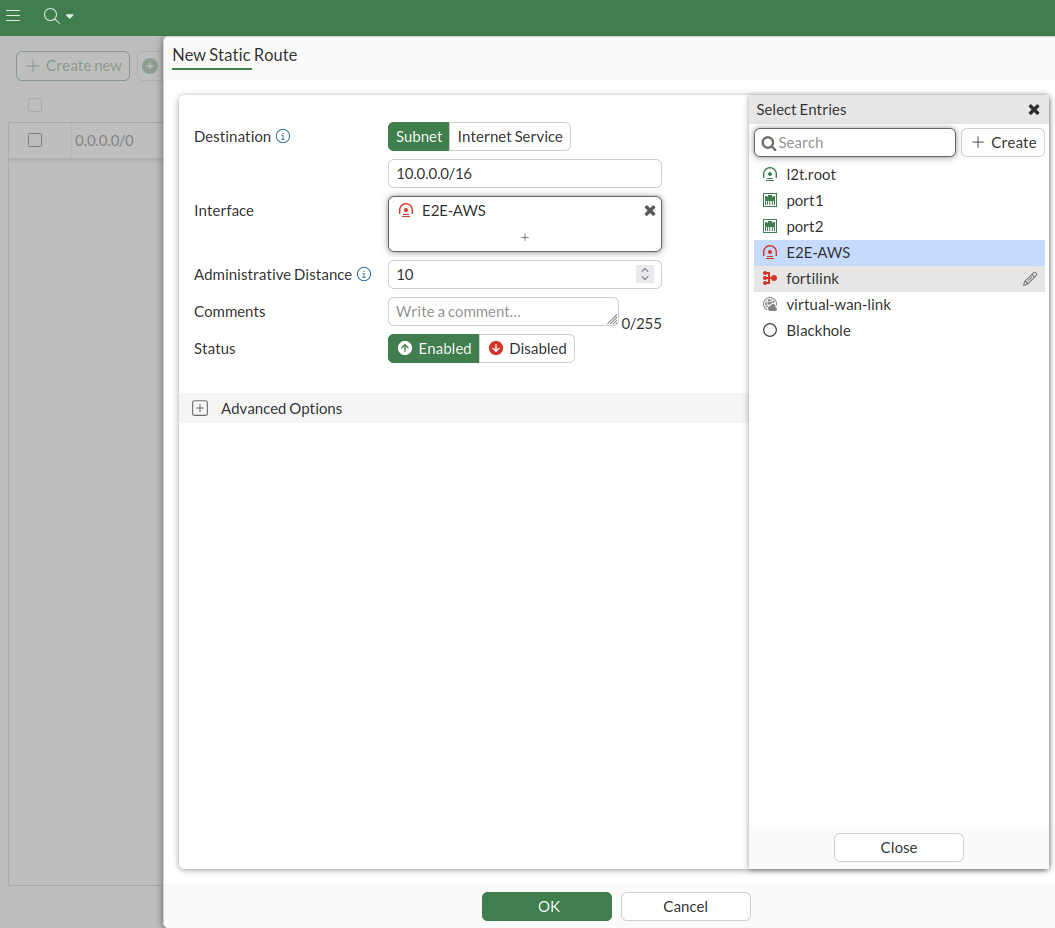
Destination : 10.0.0.0/16 (AWS VPC CIDR) , Interface: VPN tunnel interface

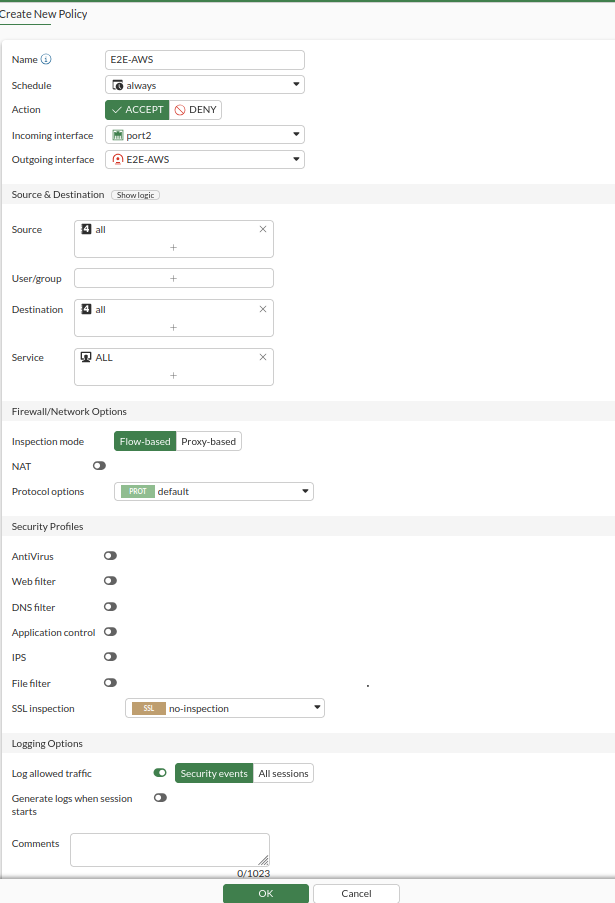
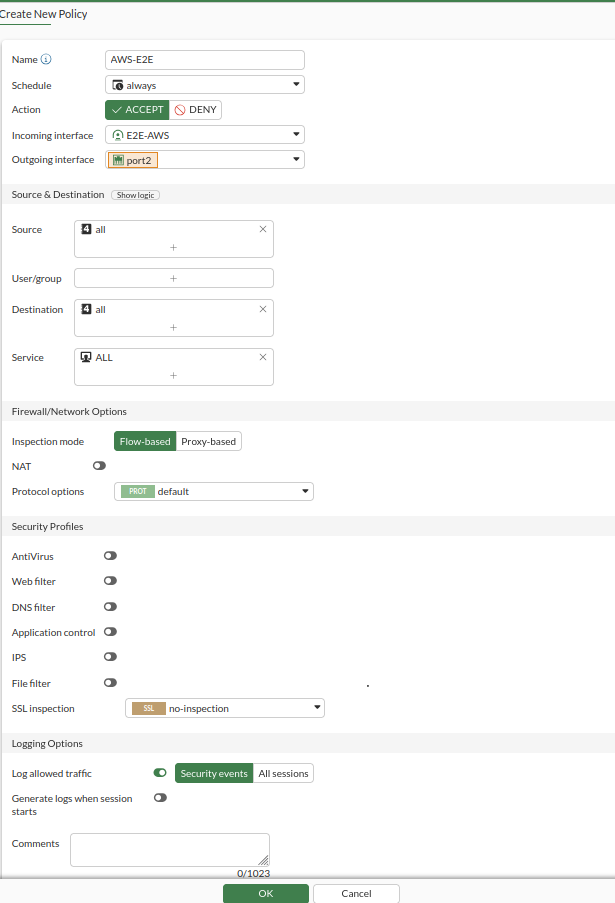
Configure Firewall Policies

- Firewall Policy > Create new.
Policy 1: E2E → AWS
| Field | Value |
|---|---|
| Incoming Interface | Port 2 |
| Outgoing Interface | VPN Tunnel (E2E-AWS) |
| Source | all |
| Destination | all |
| Action | ACCEPT |
| NAT | Disable |
Policy 2: AWS → E2E
- Reverse of Policy 1.

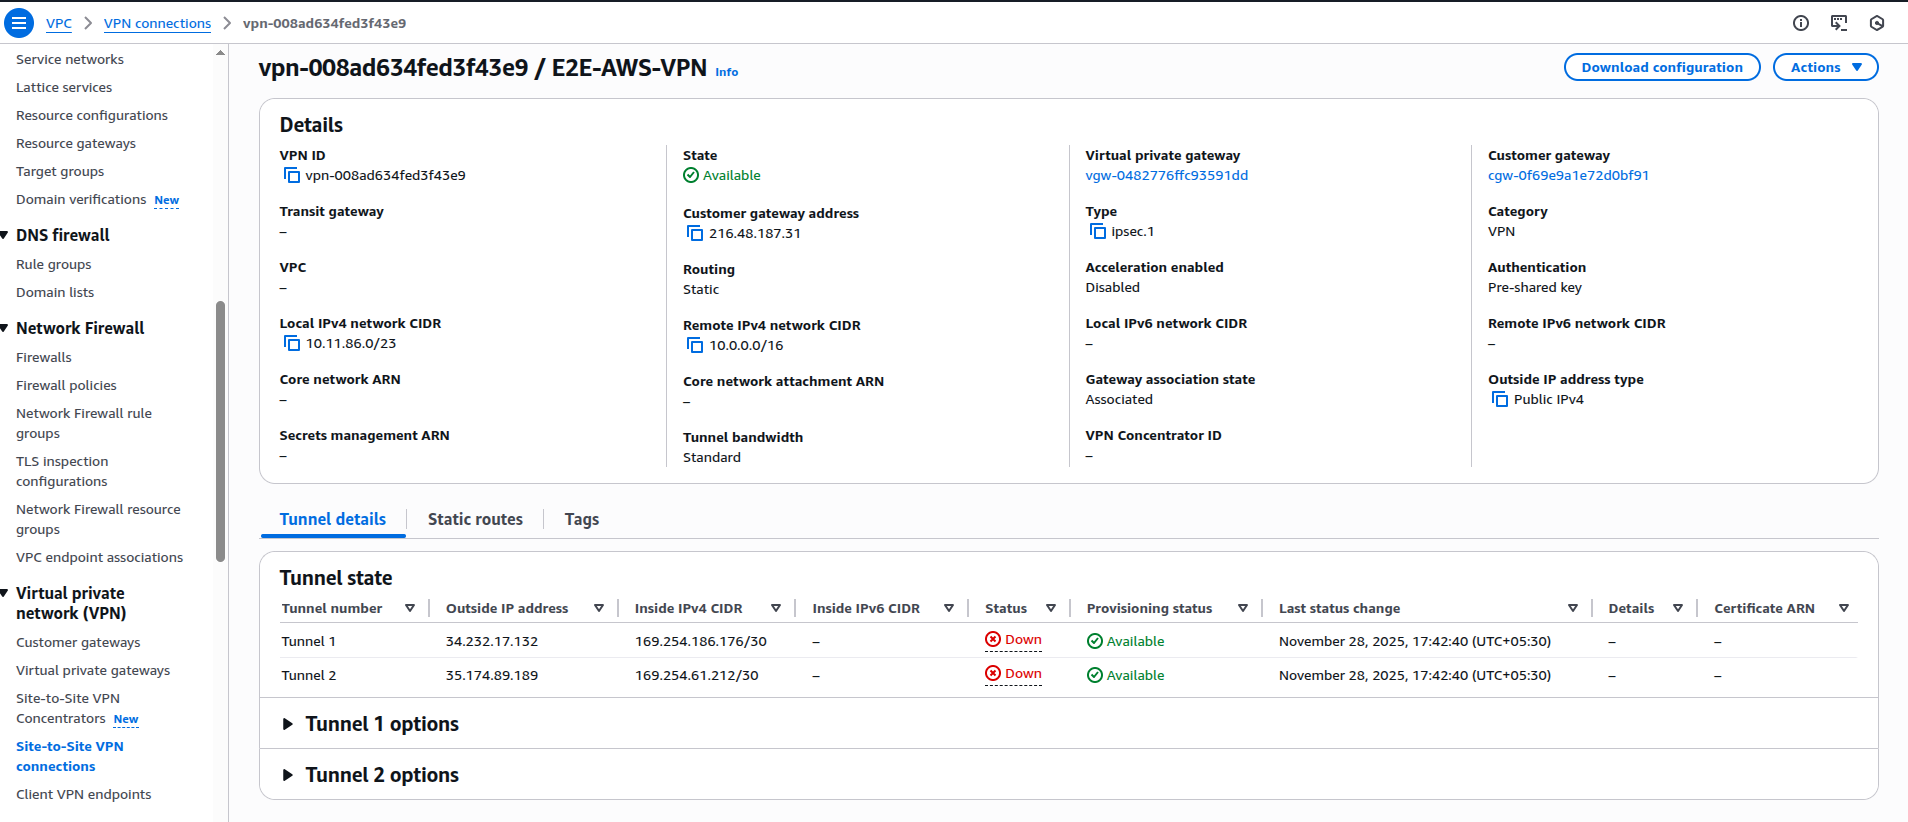
VPN Tunnel Verification
-
The two VPN policies were created successfully.
-
Next, we verified that the Site-to-Site VPN tunnel is UP on both:
-
AWS Side (Virtual Private Gateway).
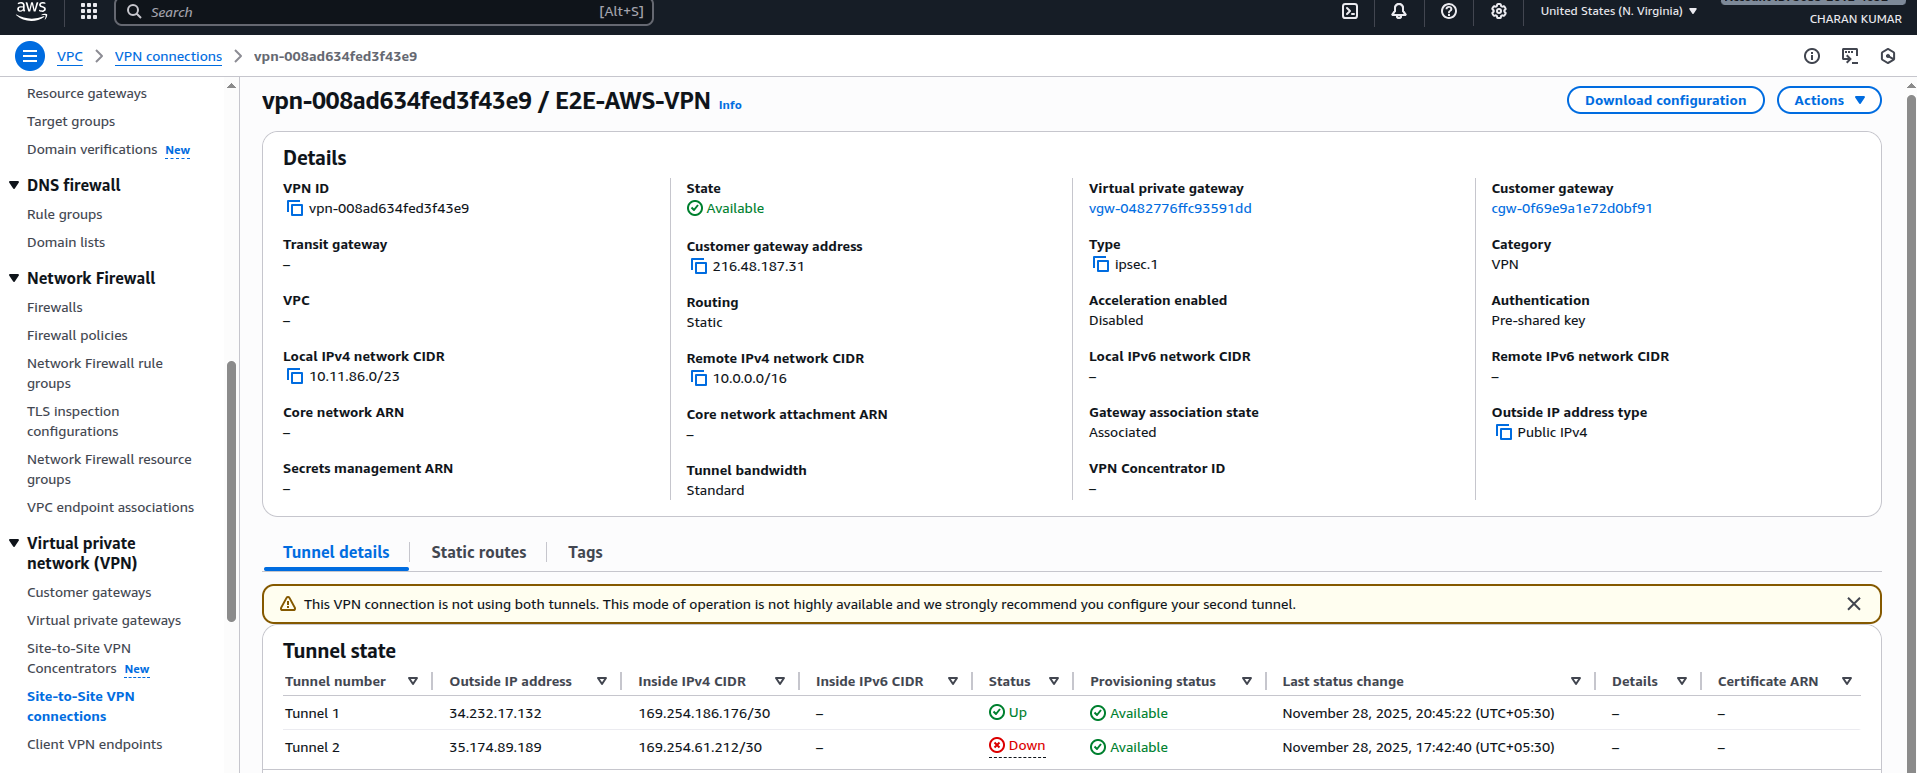
- E2E FortiGate Side

- Both tunnels were established successfully.
5- Create Test Servers on Both Sides
-
We created:
-
One E2E Cloud VM

- One AWS EC2 instance
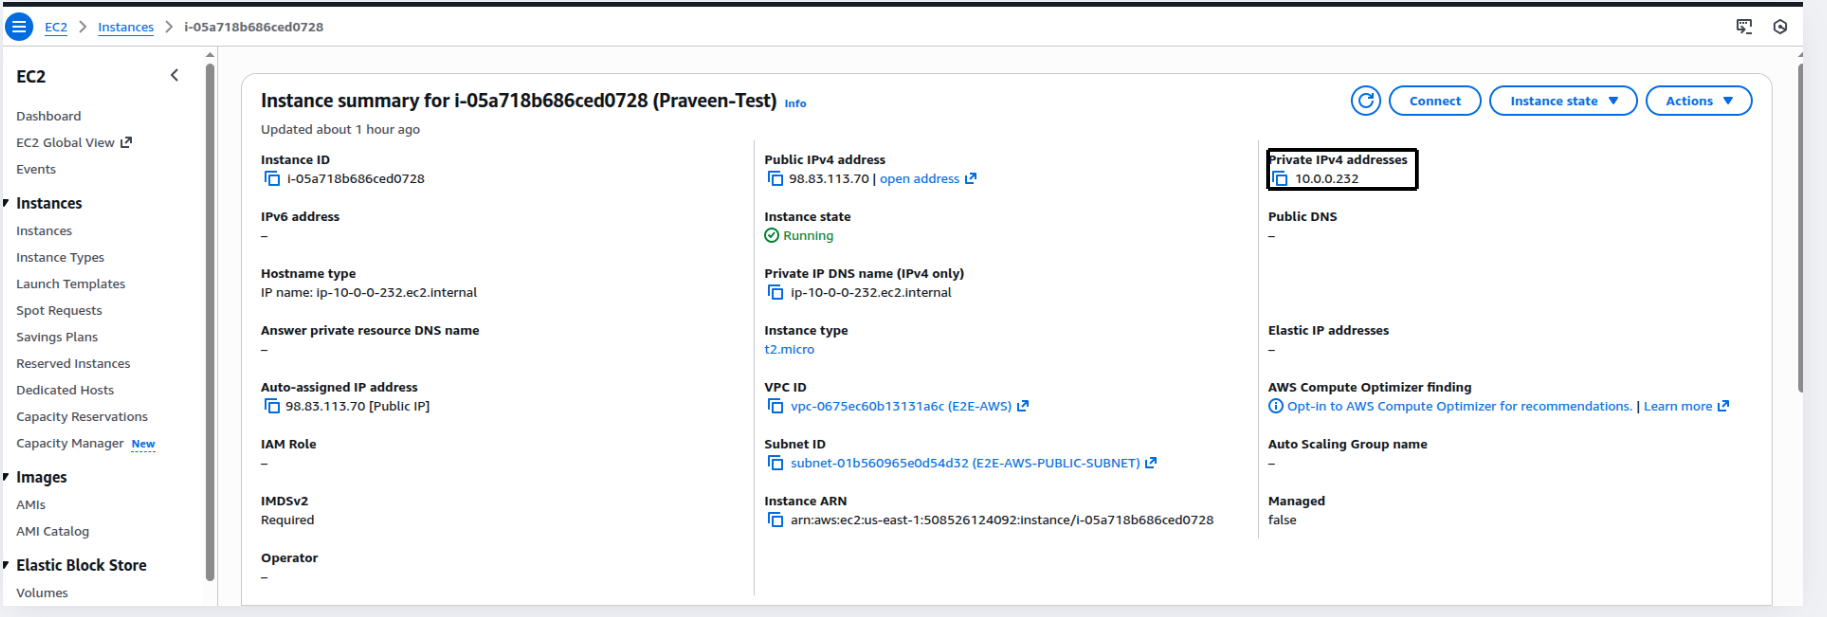
- These servers were used to test private connectivity over the VPN tunnel.
Note on Public IP for E2E Cloud Server
- While creating the E2E Cloud VM, the Public IP option was not enabled under the VPC settings. Therefore, the server was created without a public IP.
Important Information
-
If you want a public IP during node creation, you must:
-
Select VPC.
-
Enable Public IP.
If Node is Created Without Public IP
You must purchase a Reserved IP from E2E Cloud.
Reserved IP Cost: ₹199/month
- After purchasing the Reserved IP:
- Attach it to the server.
- Access the machine through SSH normally.
- In this setup, we purchased a Reserved IP, attached it to the node, and accessed it via SSH.
Ping Test from E2E → AWS
- AWS EC2 Private IP: 10.0.0.232.
- Initially, the ping failed.
- This indicated that routing was not set correctly on the E2E VM

Routing Fix on E2E VM
Incorrect Route Removed.
-
We removed the route: 192.168.0.0/18 via 10.11.86.1.
-
This network is not used for the AWS Site-to-Site VPN and could cause incorrect routing.

Correct Route Added
- We added the correct new route:
sudo ip route add 10.0.0.0/16 via 10.11.86.6 dev ens4

Explanation 10.0.0.0/16 → AWS VPC CIDR.
10.11.86.6 → FortiGate (E2E) private IP
ens4 → Correct interface connected to the FortiGate network.
This ensures all AWS-bound traffic (10.0.0.0/16) goes through the FortiGate, entering the Site-to-Site VPN tunnel.
- After adding the correct route, we pinged the AWS private IP again and it worked successfully.
6- Connectivity Test
E2E → AWS Ping Test
- Ping from the E2E server to AWS EC2 private IP:
ping 10.0.0.232
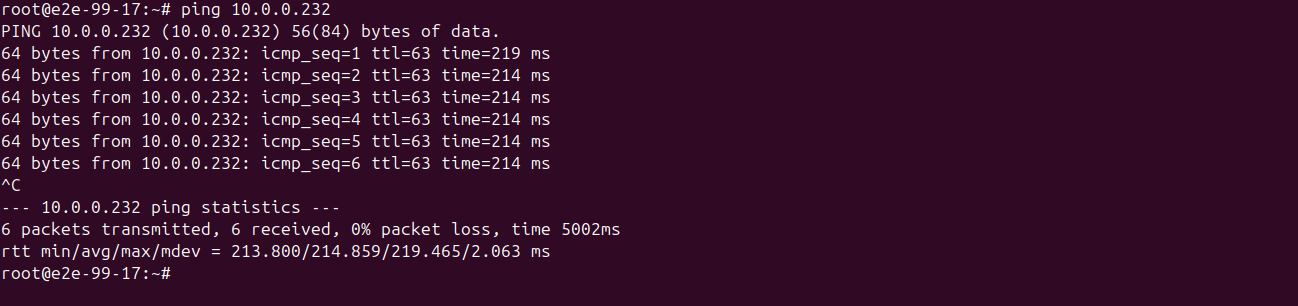
Result: Successful
AWS → E2E Ping Test
- Ping from AWS EC2 to E2E server private IP:
ping <E2E-private-IP>

Result: Successful
- The Site-to-Site VPN is now fully active and bi-directional.
7- SSH from E2E VM to AWS EC2
Generate SSH Key
- On E2E VM:
cat ~/.ssh/e2e_aws_key.pub

- SSH into AWS EC2 using PEM key.
- Add key to:
~/.ssh/authorized_keys
- Set permissions:
chmod 700 ~/.ssh
chmod 600 ~/.ssh/authorized_keys

Test SSH
ssh -i ~/.ssh/e2e_aws_key ubuntu@10.0.1.119

- Successfully logged in.
Conclusion
- The Site-to-Site VPN between E2E Cloud FortiGate Firewall and AWS VPC has been successfully deployed and verified.
- Bi-directional connectivity, including ICMP and SSH traffic, is functional.