VPN Setup Guide — E2E Cloud to Google Cloud Platform
Introduction
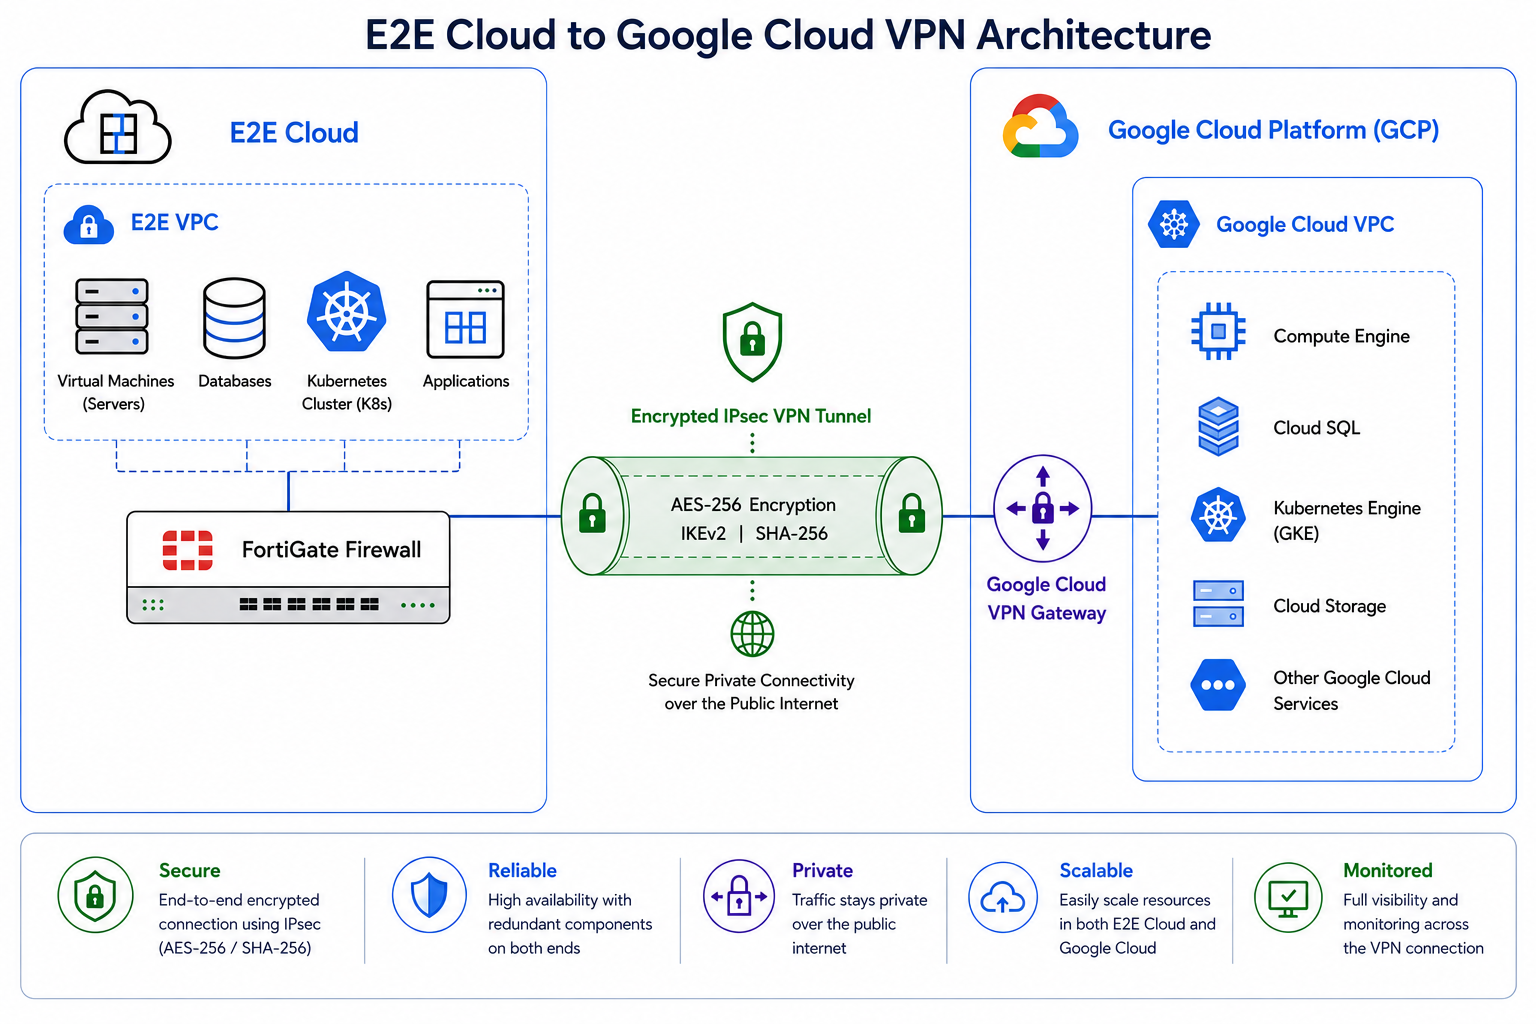
This guide provides a complete step-by-step walkthrough for configuring a Site-to-Site IPsec VPN between an E2E Cloud FortiGate Firewall and Google Cloud Platform (GCP). Once configured, private resources in your E2E Cloud VPC can communicate directly and securely with resources in your GCP VPC over an encrypted IPsec tunnel.
Before You Begin
Ensure the following are in place before starting:
- A FortiGate Firewall already deployed and running on E2E Cloud (status: Running). See Create a Firewall for setup instructions.
- The public IP of your FortiGate (available from the E2E Cloud Console under Network → Firewall).
- The private CIDR of your E2E Cloud VPC (e.g.,
10.11.14.0/23). - Access to the GCP Console with permissions to manage VPC, Compute Engine, and VPN resources.
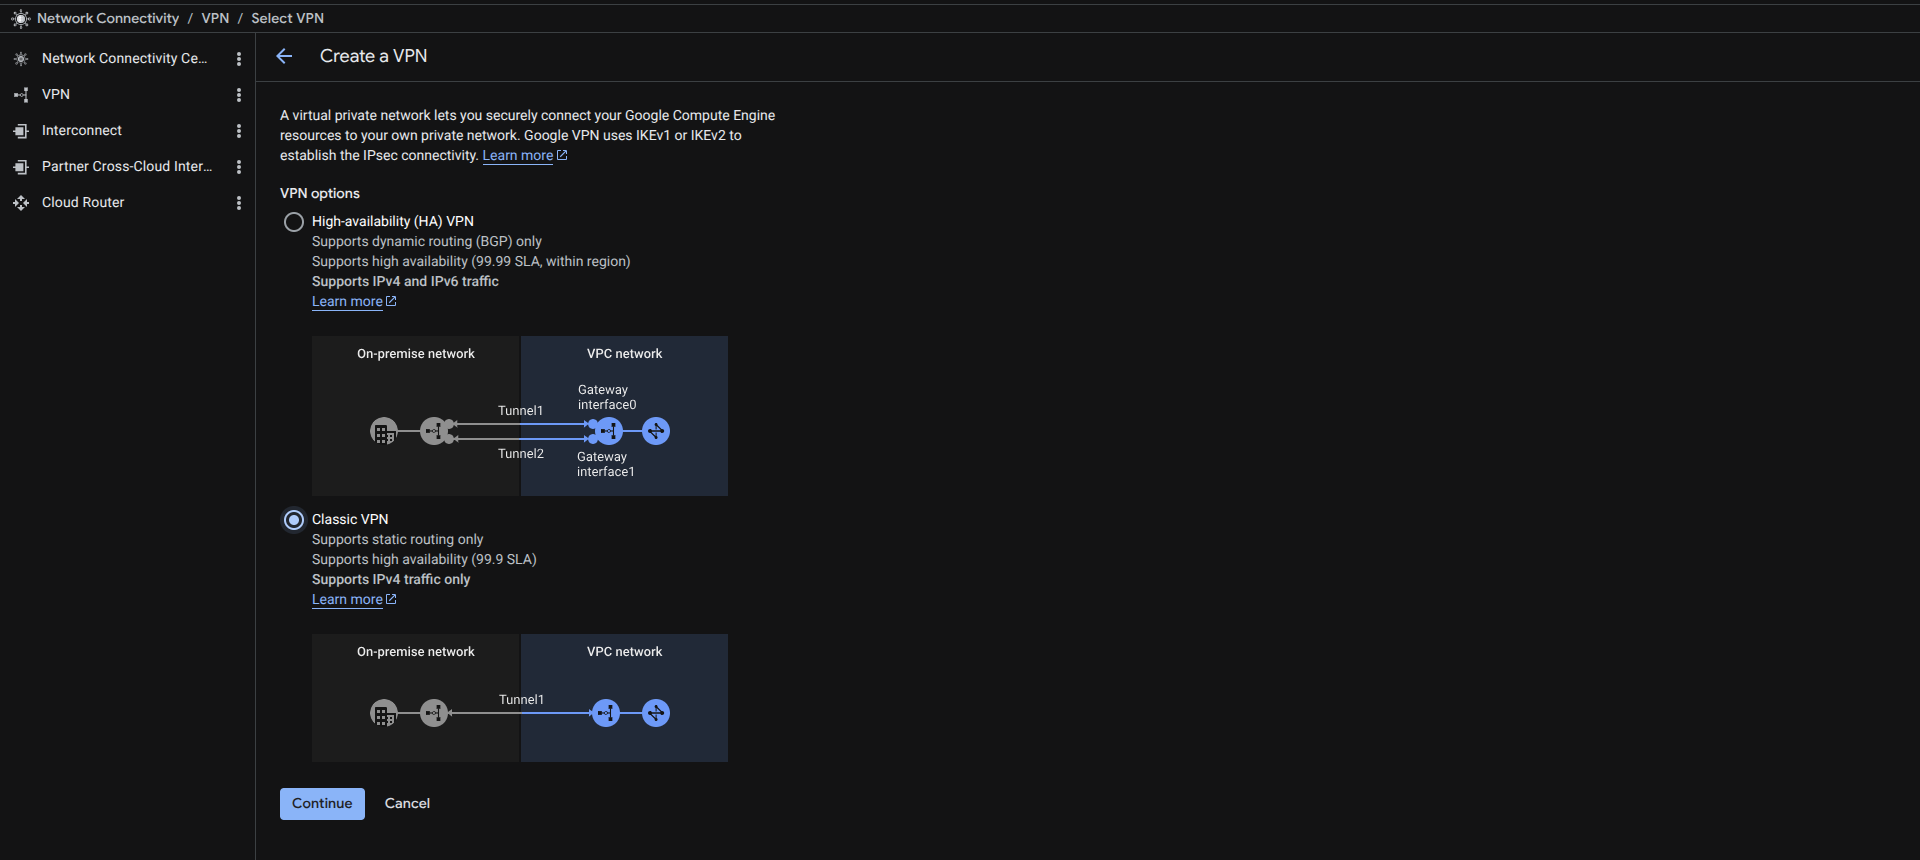
This guide uses Classic VPN with static (policy-based) routing, which is compatible with FortiGate. HA VPN requires BGP dynamic routing and is out of scope for this guide.
Part 1 — Google Cloud Configuration
Step 1 — Create a VPC Network
- Sign in to the Google Cloud Console.
- In the left sidebar, navigate to VPC network → VPC networks.
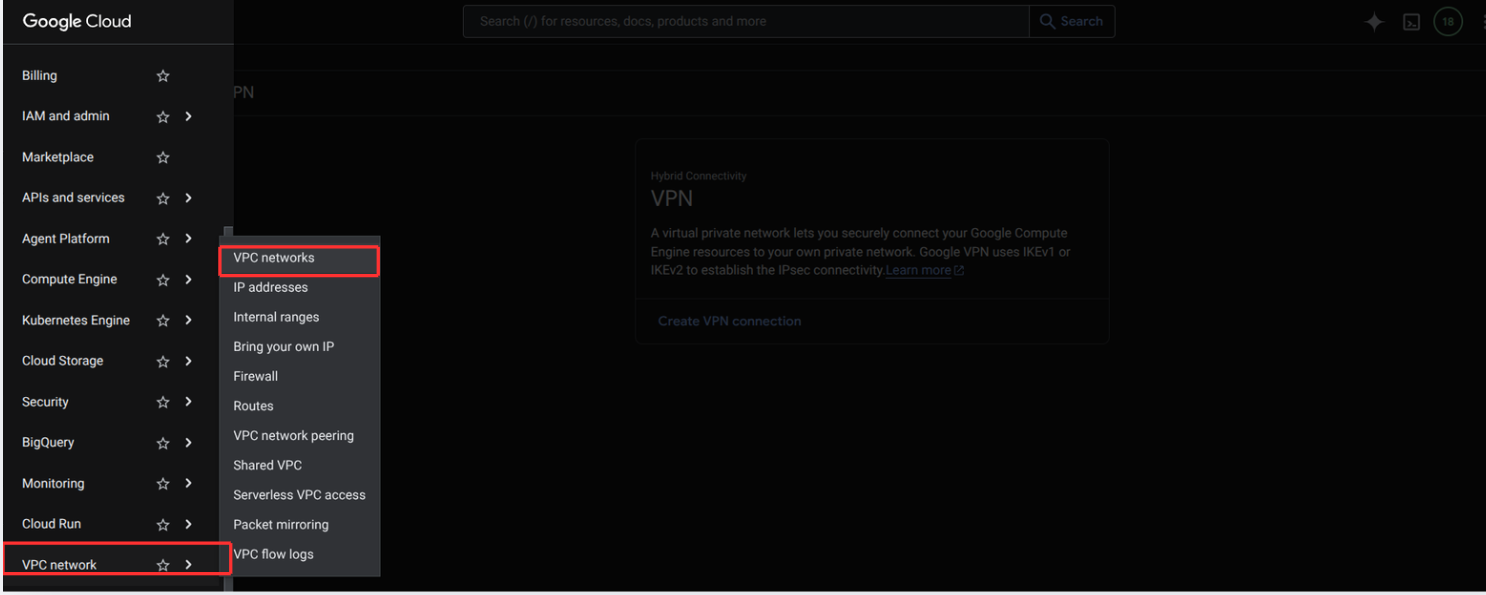
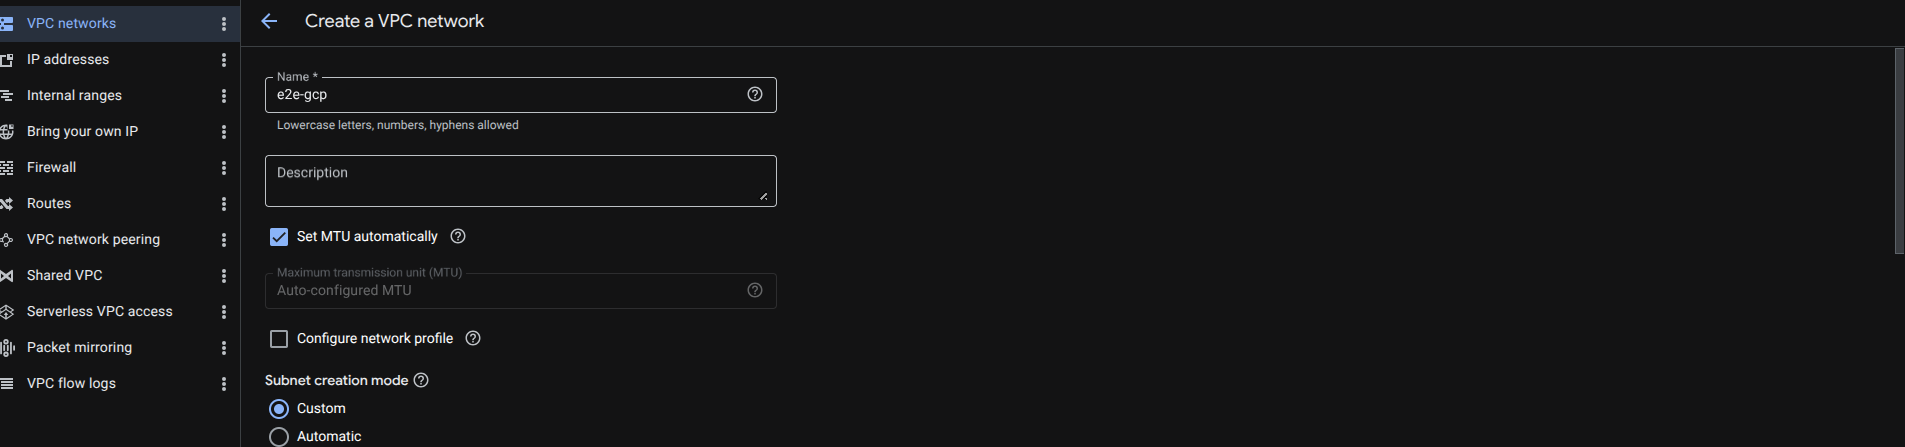
- Click Create VPC network.

- Configure the network:
- Name:
e2e-gcp - Subnet creation mode: Custom
- Name:
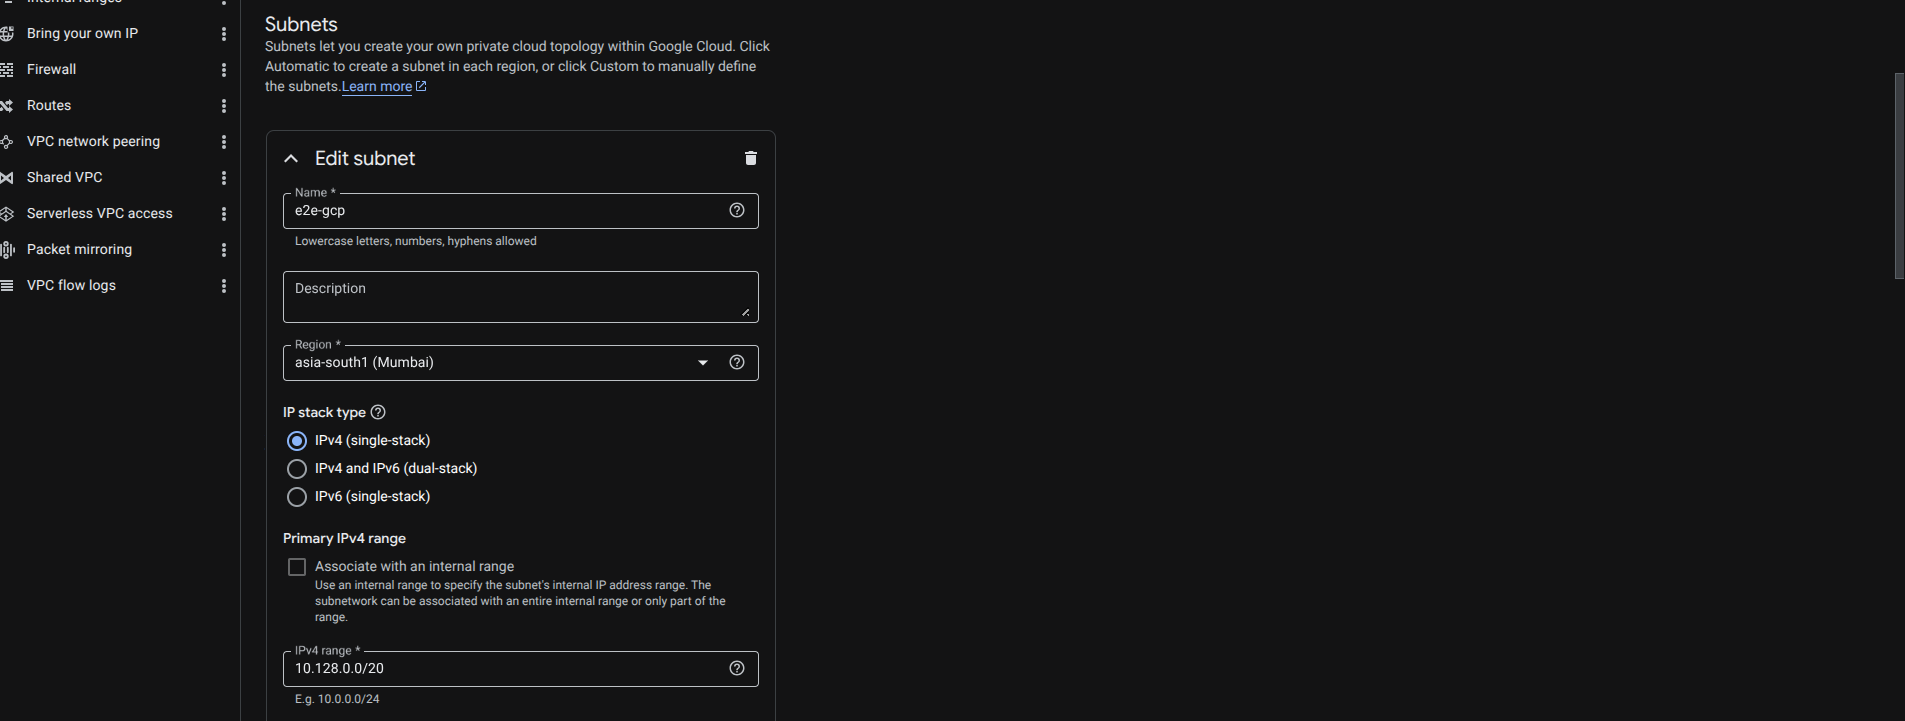
- In the New subnet section, configure:
- Name:
e2e-gcp - Region:
asia-south1 (Mumbai)— select the region closest to your workload - IP range:
10.128.0.0/20
- Name:
- Click Create. Once created, the subnet details page confirms the network is ready.
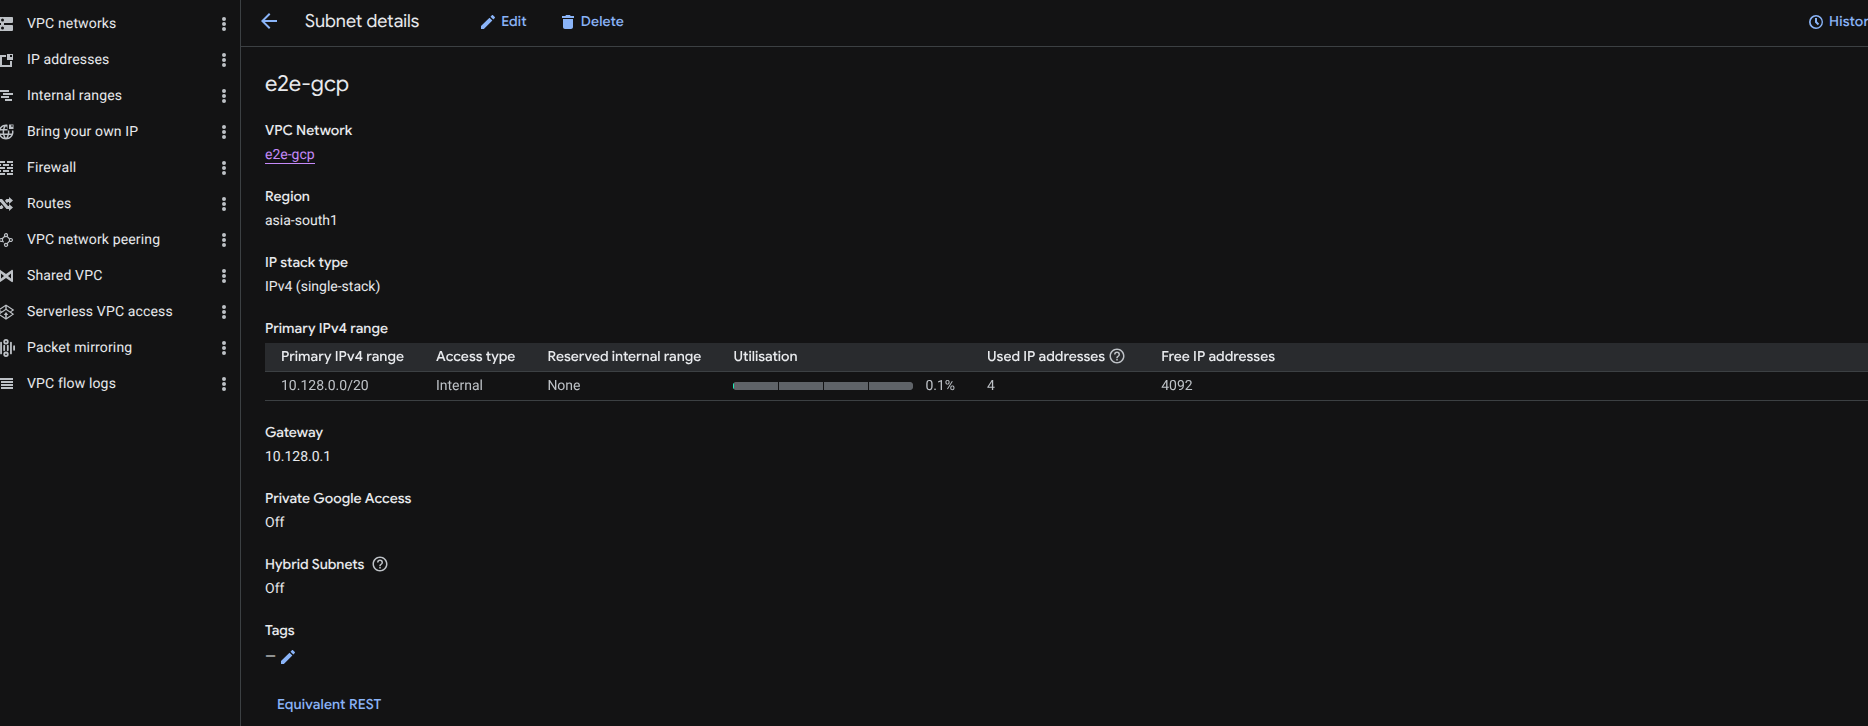
The GCP VPC subnet CIDR (10.128.0.0/20) must not overlap with your E2E Cloud VPC CIDR (10.11.14.0/23).
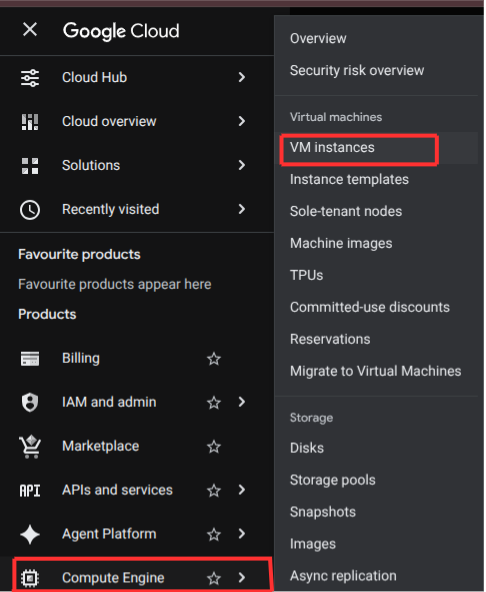
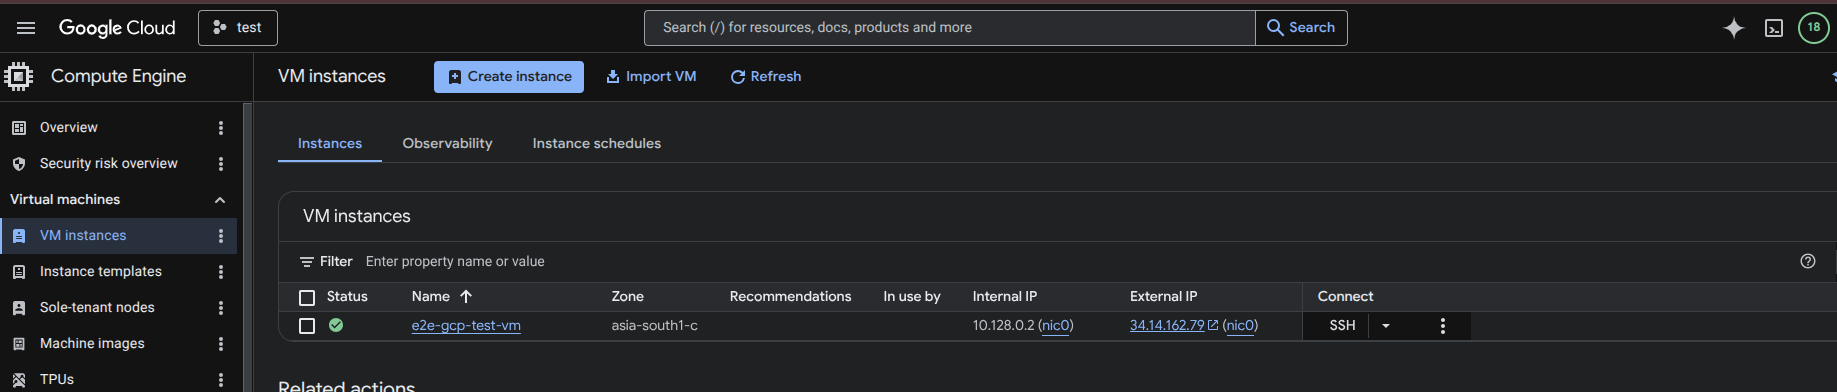
Step 2 — Create a Test Virtual Machine in GCP
This VM will be used to verify connectivity through the VPN tunnel after setup.
- Navigate to Compute Engine → VM instances.
- Click Create instance.

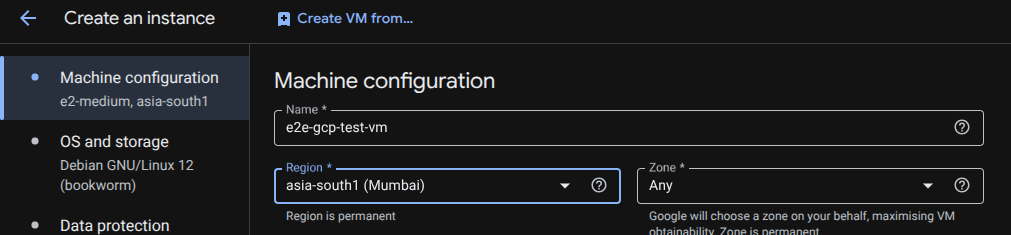
- Configure the instance:
- Name:
e2e-gcp-test-vm - Region:
asia-south1 (Mumbai)— same region as the VPC subnet
- Name:
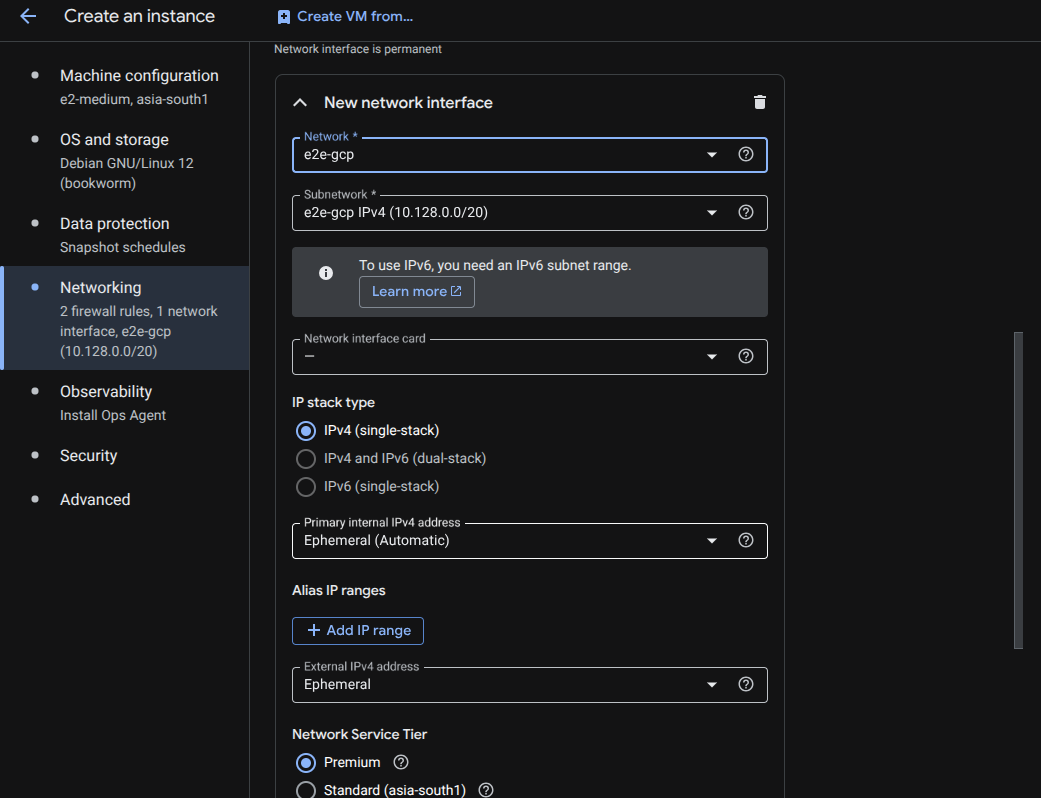
- In the Networking section, attach the instance to the VPC created in Step 1:
- Network:
e2e-gcp - Subnetwork:
e2e-gcp IPv4 (10.128.0.0/20)
- Network:
-
Click Create. Wait 1–2 minutes for the VM to reach the Running state.
-
Note the Internal IP (e.g.,
10.128.0.2) — you will use this to test connectivity later.
Step 3 — Reserve a Static Public IP Address
The Classic VPN Gateway requires a static external IP address.
- Navigate to VPC network → IP addresses.
- Click Reserve external.

- Configure:
- Name:
vpn-gateway - Type: Regional
- Region:
asia-south1 (Mumbai)
- Name:
- Click Reserve.
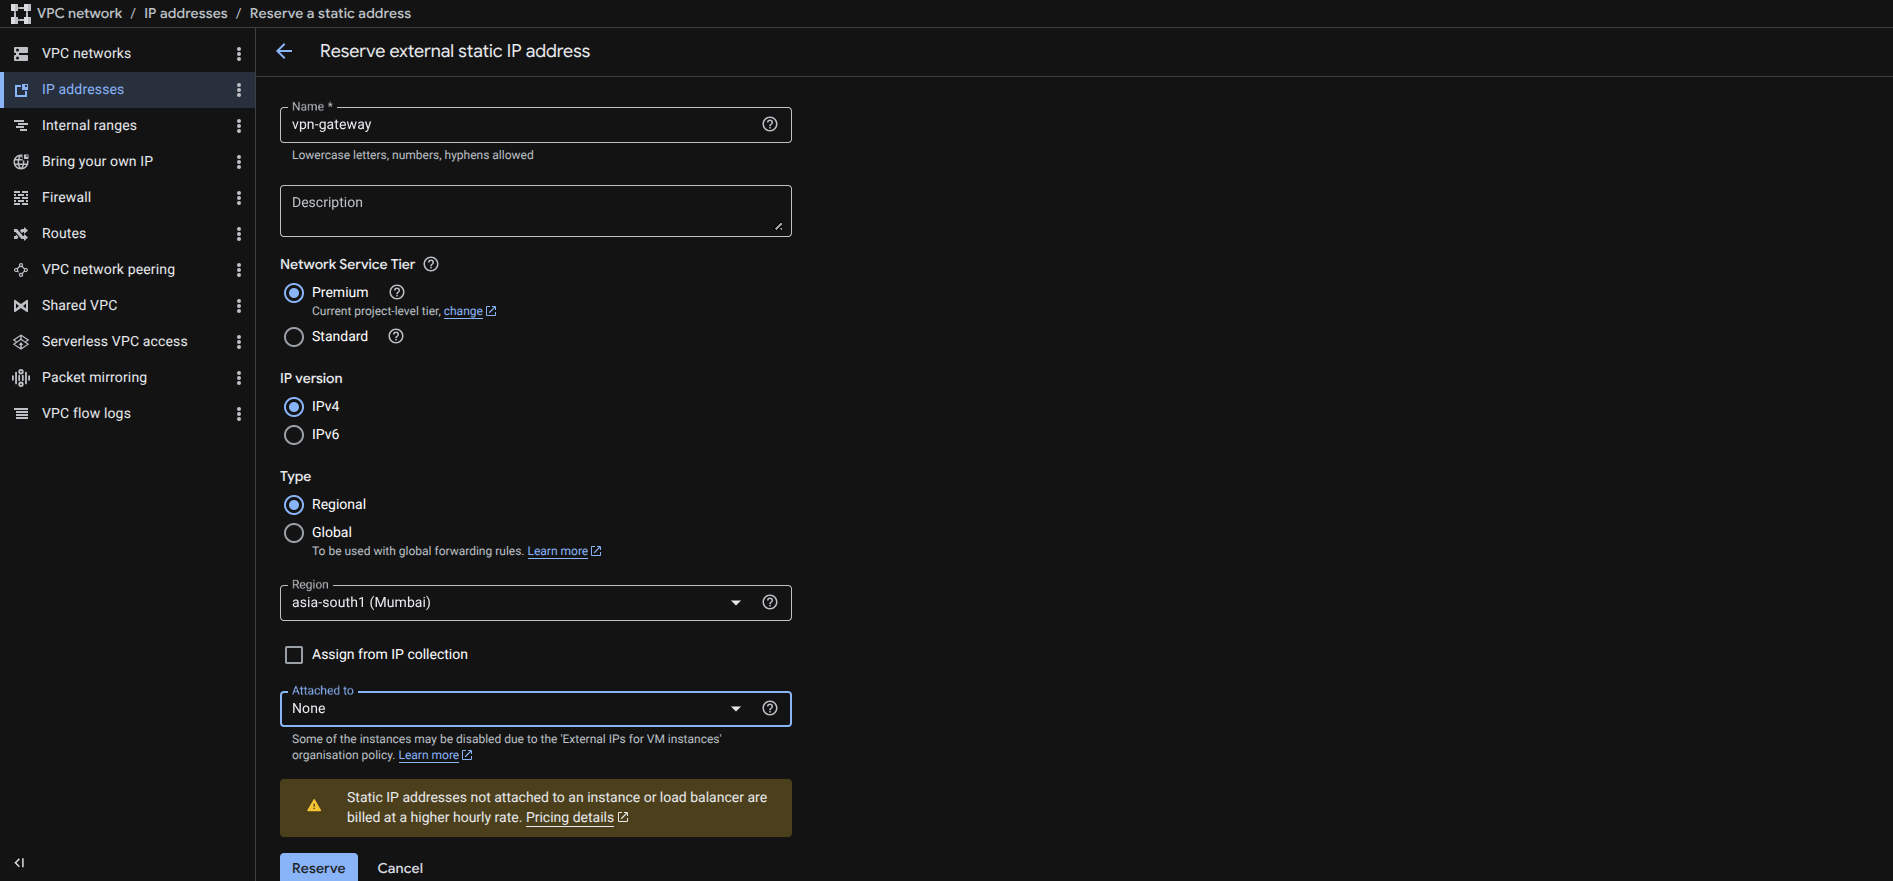
- The reserved IP (e.g.,
34.100.222.133) appears in the IP addresses list. Note this address — it will be assigned to the VPN Gateway.

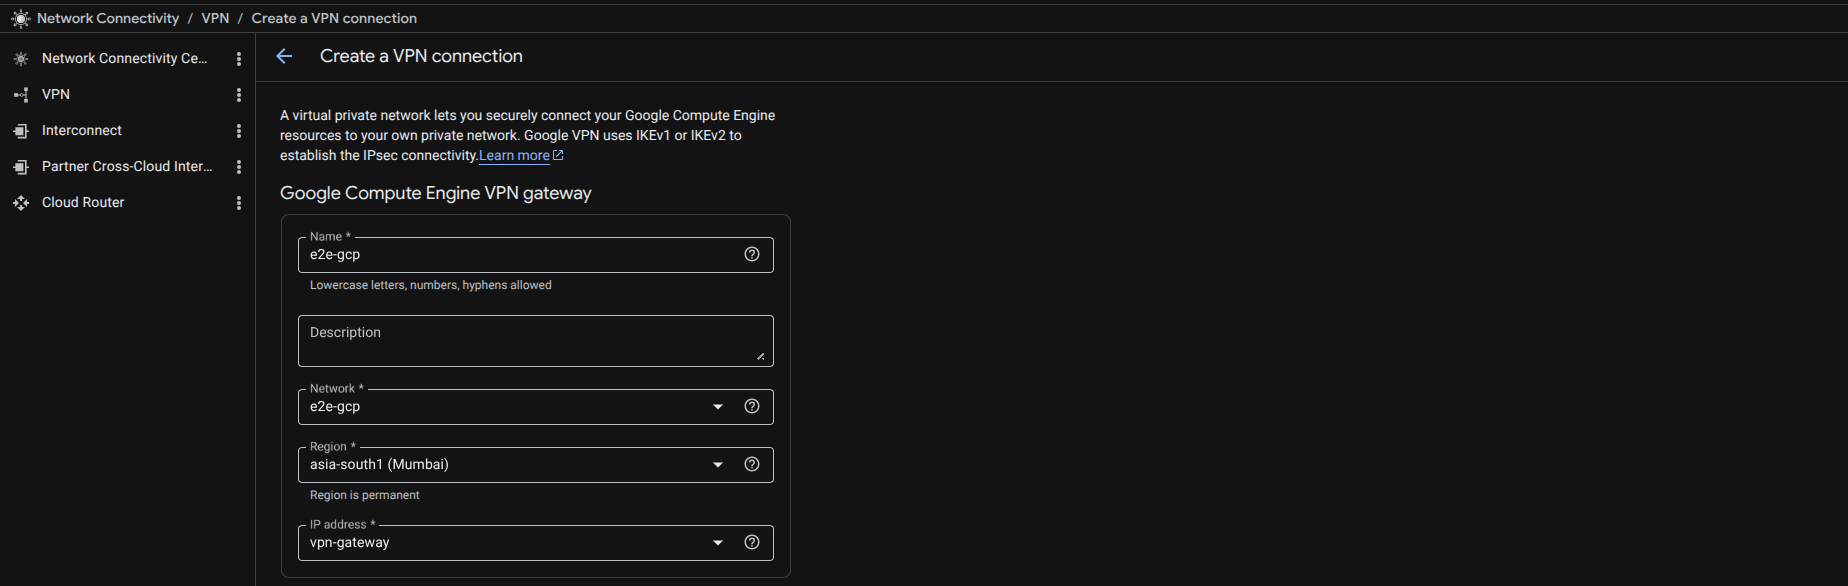
Step 4 — Create a Classic VPN Gateway and Tunnel
- In the search bar, search for VPN and navigate to Network Connectivity → VPN.
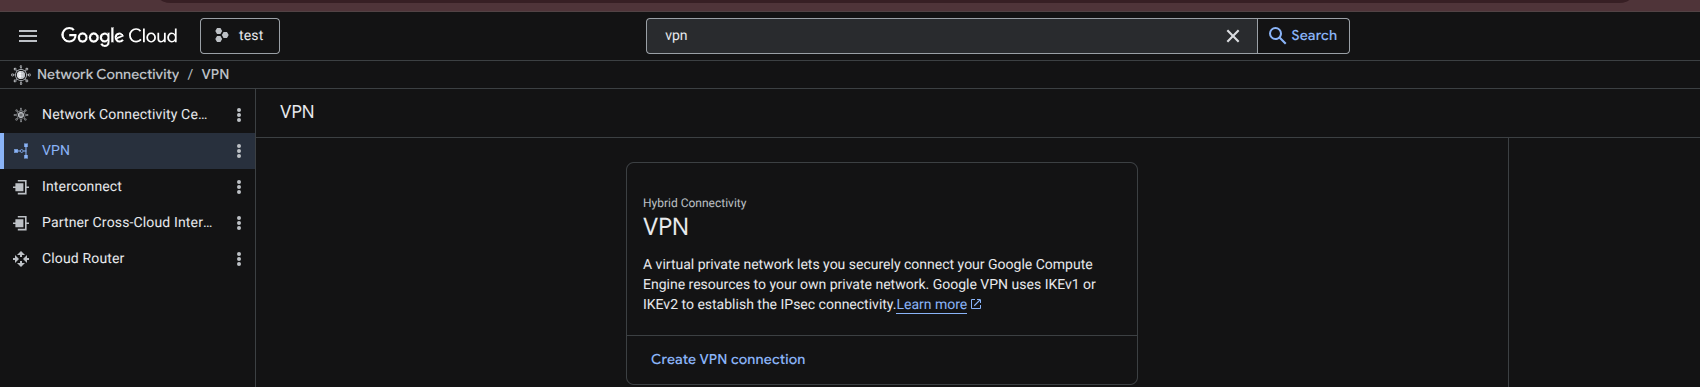
- Click Create VPN connection.
- Select Classic VPN and click Continue.
- Configure the VPN Gateway:
- Name:
e2e-gcp - Network:
e2e-gcp - Region:
asia-south1 (Mumbai) - IP address:
vpn-gateway(the static IP reserved in Step 3)
- Name:
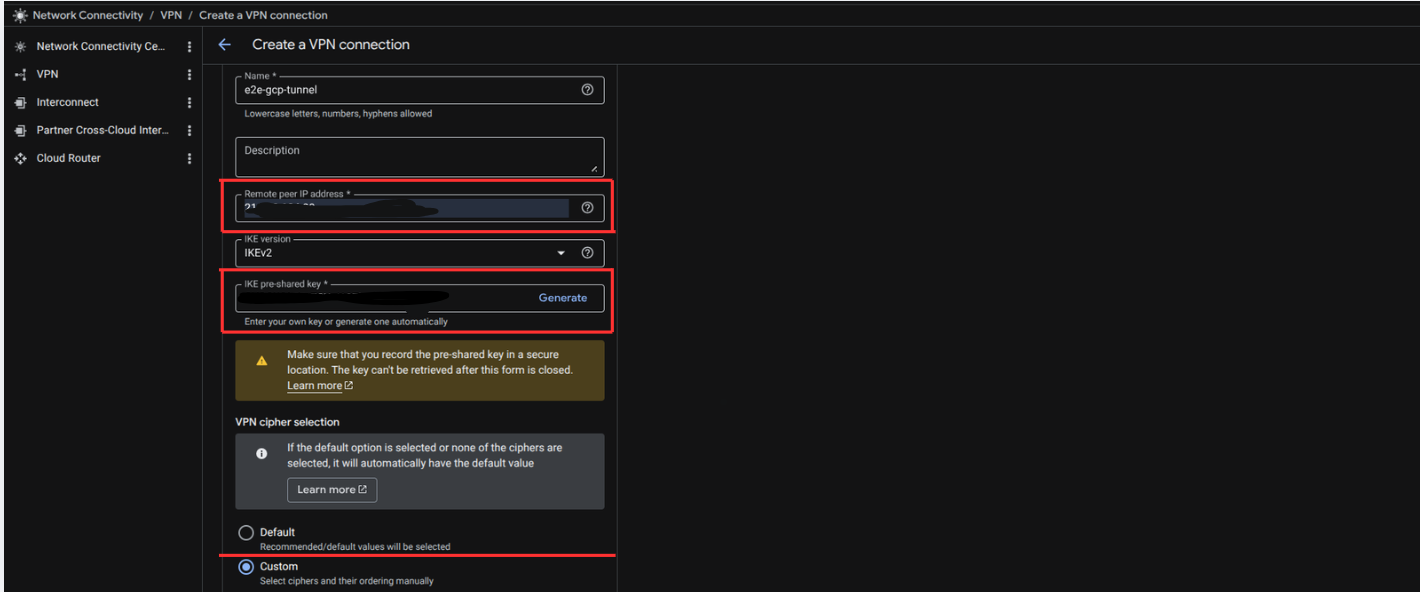
- In the Tunnels section, configure the VPN tunnel:
- Tunnel name:
e2e-gcp-tunnel - Remote peer IP address: Public IP of your E2E FortiGate Firewall
- IKE version: IKEv2
- IKE pre-shared key: Enter a secure key or click Generate. Record this key — you will enter the same key on the FortiGate.
- VPN cipher selection: Select Custom
- Tunnel name:
- Configure the ciphers as follows:
| Phase | Parameter | Value |
|---|---|---|
| IKE Phase 1 | Encryption | AES-GCM-16-256 |
| IKE Phase 1 | PRF | PRF-HMAC-SHA2-256 |
| IKE Phase 1 | Diffie-Hellman Group | modp_2048 (Group 14) |
| IKE Phase 2 | Encryption | AES-GCM-16-256 |
| IKE Phase 2 | PFS | modp_2048 (Group 14) |

The Phase 1 and Phase 2 cipher settings on GCP must match exactly the settings configured on the FortiGate in Part 2. Mismatched ciphers are the most common cause of tunnel failure.
- Configure routing:
- Routing option: Policy-based
- Remote network IP ranges: E2E Cloud VPC CIDR (e.g.,
10.11.14.0/23) - Local subnetworks:
e2e-gcp - Local IP ranges:
10.128.0.0/20
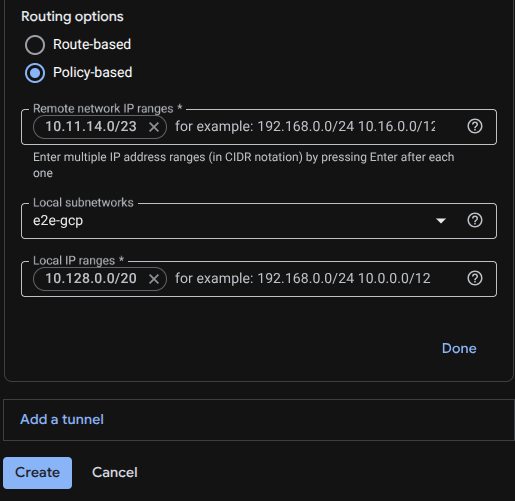
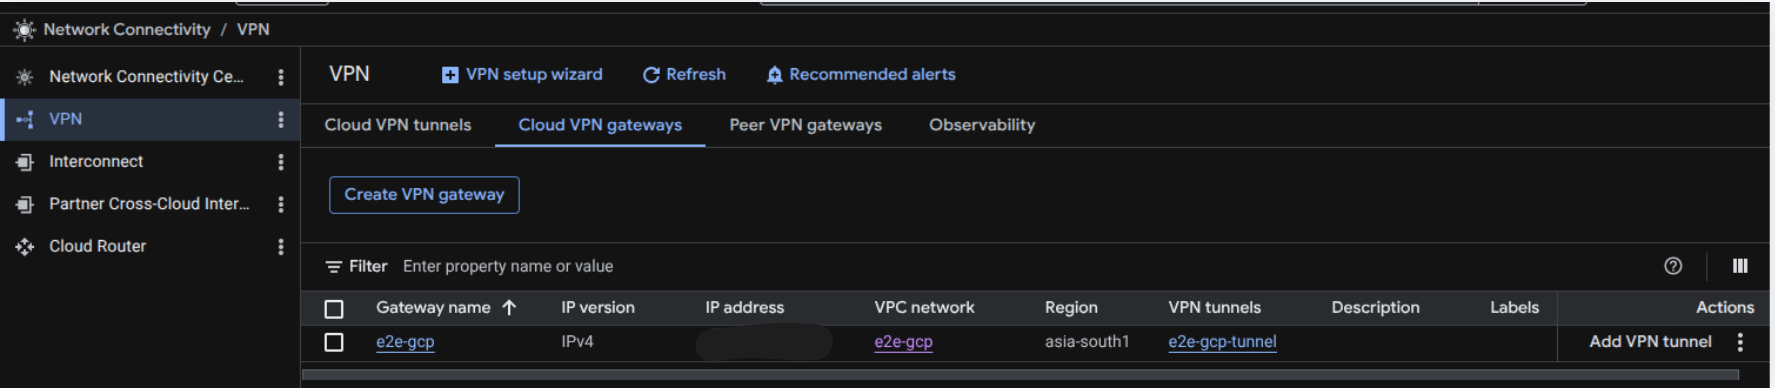
- Click Create. The VPN gateway and tunnel are created.
- GCP VPN Gateway Public IP Address
- Pre-Shared Key (PSK)
- GCP VPC Subnet CIDR (
10.128.0.0/20)
Step 5 — Verify the VPN Route
- Navigate to VPC network → Routes.
- Select network
e2e-gcpand regionasia-south1, then click View. - Verify that a static route for the E2E Cloud CIDR (e.g.,
10.11.14.0/23) exists with Next hop: VPN tunnel (e2e-gcp-tunnel).
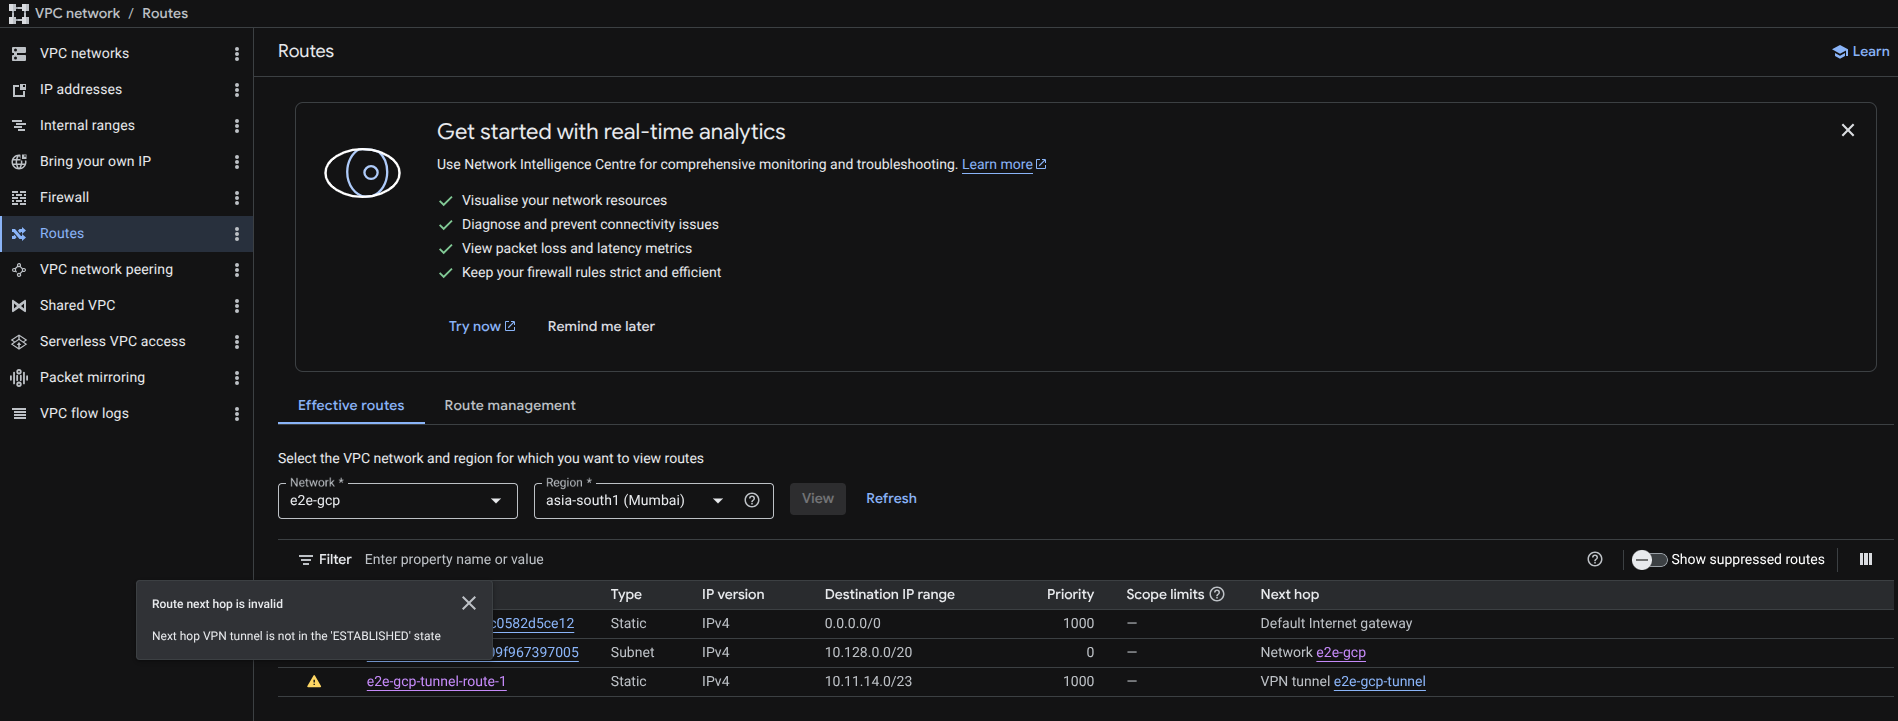
The route may show a warning — "Next hop VPN tunnel is not in the ESTABLISHED state". This is expected at this stage. The warning disappears once the FortiGate tunnel is configured and the connection is established.
Step 6 — Configure Firewall Rules in GCP
This rule allows traffic from the E2E Cloud VPC to reach GCP resources through the VPN tunnel. Without this rule, the tunnel may connect but GCP will silently block all inbound traffic.
- Navigate to VPC network → Firewall (via the left sidebar).

- Click Create firewall rule.

- Configure the rule:
| Field | Value |
|---|---|
| Name | e2e-vpc |
| Network | e2e-gcp |
| Direction of traffic | Ingress |
| Action on match | Allow |
| Targets | All instances in the network |
| Source IPv4 ranges | E2E Cloud VPC CIDR (e.g., 10.11.14.0/23) |
| Protocols and ports | TCP: 22, 80, 443 and ICMP |
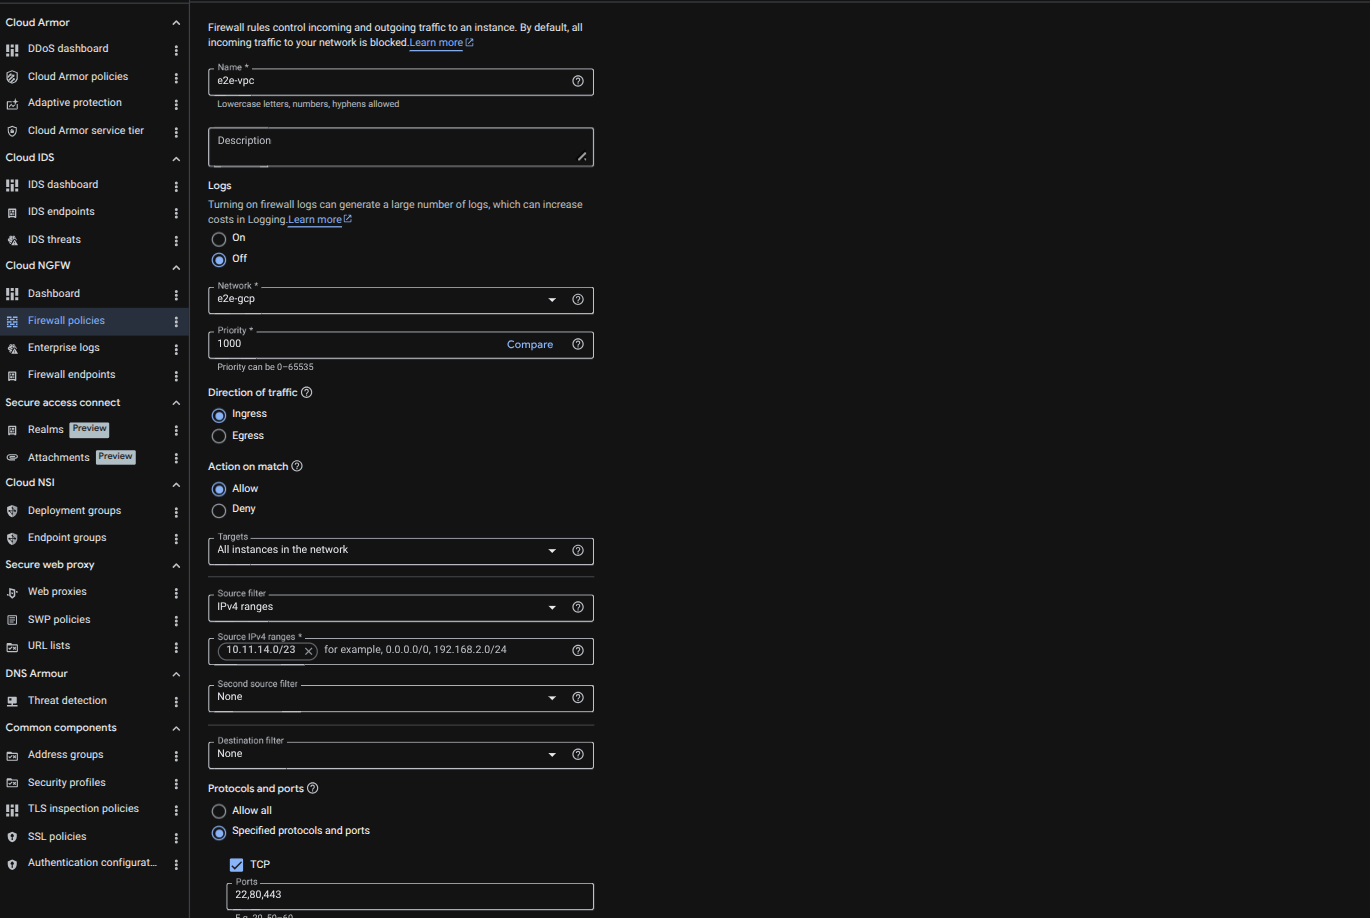
- Click Create.
Add additional ports as required by your application. Port 22 is needed for SSH testing; ports 80 and 443 for web traffic.
GCP configuration is complete. Proceed to configure the FortiGate on the E2E Cloud side.
Part 2 — FortiGate Configuration (E2E Cloud Side)
Step 1 — Access the FortiGate Firewall
- Note the Public IP of your FortiGate from the E2E Cloud Console under Network → Firewall.
- Open a browser and navigate to:
https://<FortiGate-Public-IP> - Log in using:
- Username:
admin - Password: Sent to your E2E Cloud account's registered email address
- Username:
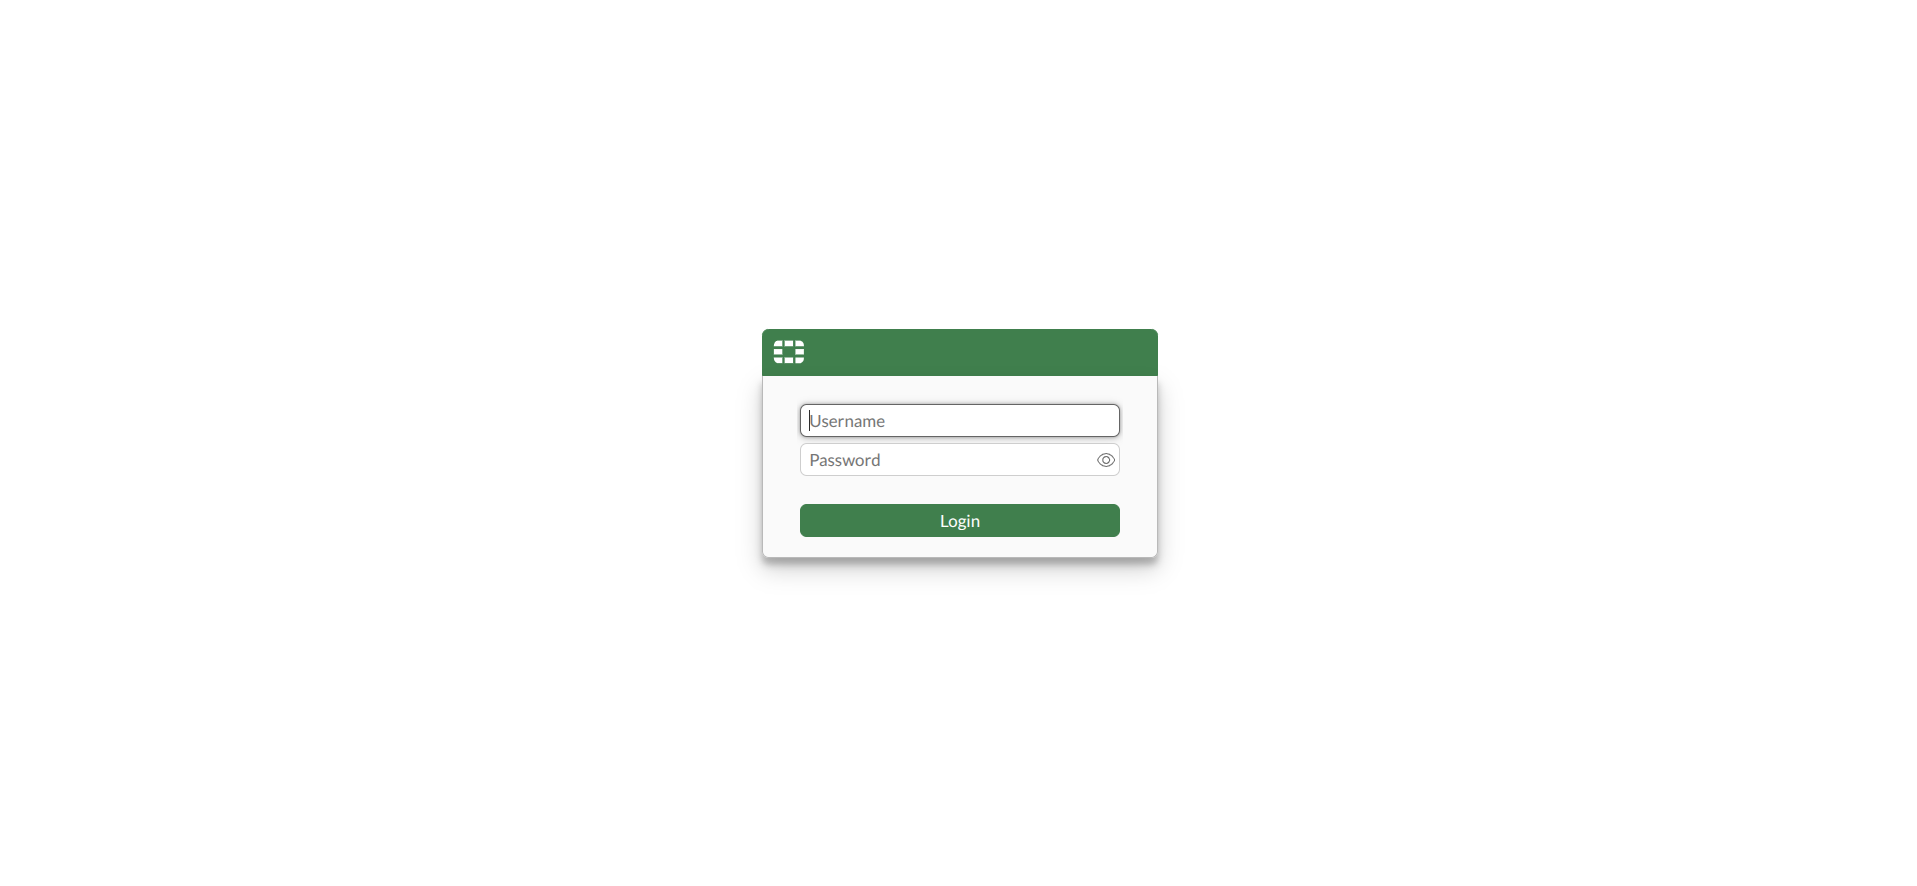
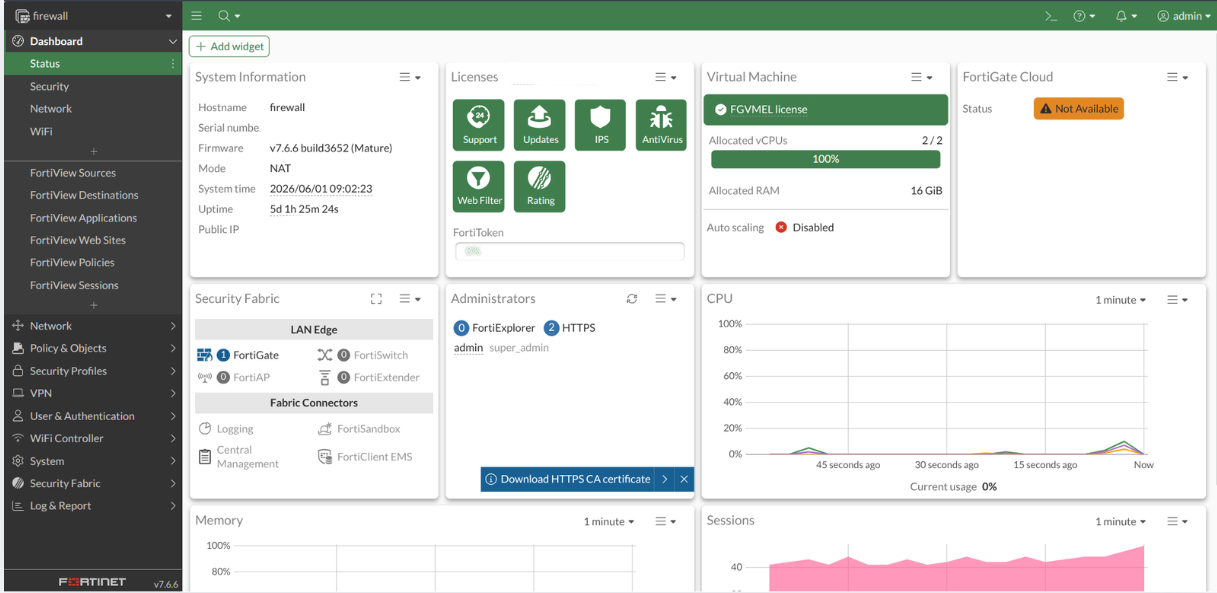
- After login, the FortiGate dashboard is displayed.
Step 2 — Change the HTTPS Management Port
FortiGate uses port 443 for HTTPS management by default. This conflicts with the VPN tunnel. Change it before creating the tunnel.
- Navigate to System → Settings.
- Under Administration Settings, change the HTTPS port from
443to10443. - Click Apply.
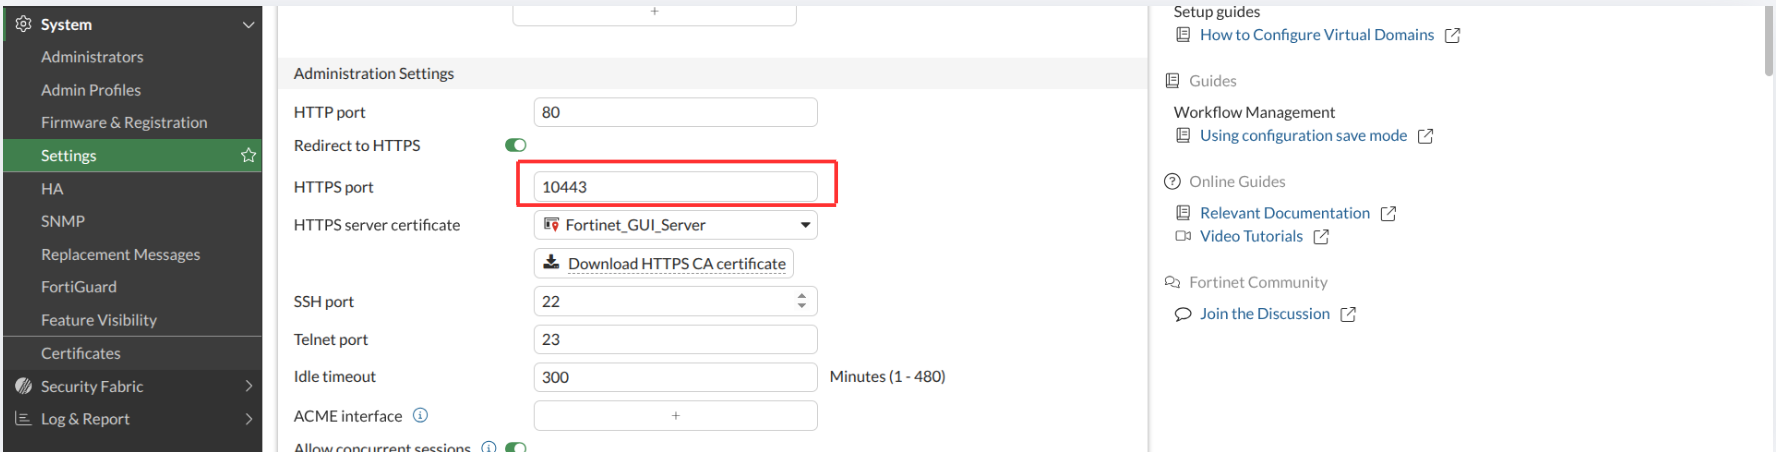
- Log in again using the new port:
https://<FortiGate-Public-IP>:10443
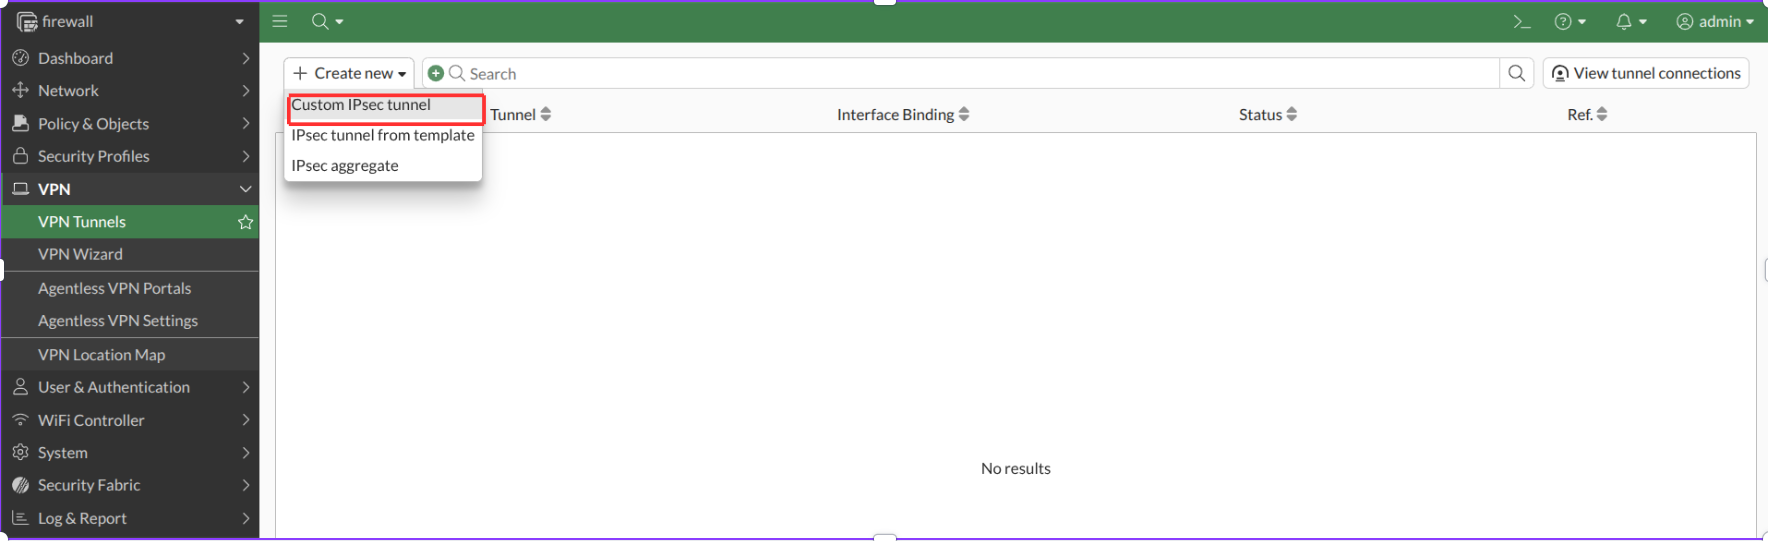
Step 3 — Create a Custom IPsec VPN Tunnel
- Navigate to VPN → VPN Tunnels.
- Click Create New and select Custom IPsec Tunnel.
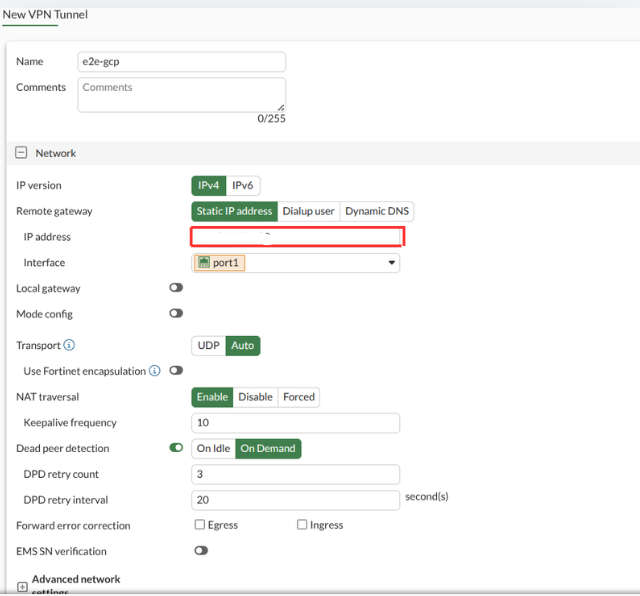
Step 4 — Configure VPN Settings
Configure the following in the Network and Authentication sections:
Network section:
| Parameter | Value |
|---|---|
| Name | e2e-gcp |
| Remote gateway | Static IP Address |
| IP address | GCP VPN Gateway Public IP |
| Interface | port1 |
| NAT traversal | Enable |
| Keepalive frequency | 10 |
| Dead peer detection | Enable |
| DPD retry count | 3 |
| DPD retry interval | 20 seconds |
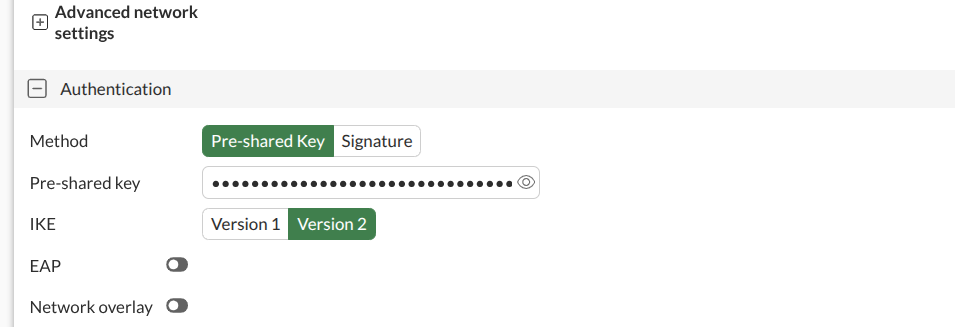
Authentication section:
| Parameter | Value |
|---|---|
| Method | Pre-shared Key |
| Pre-shared key | Same PSK configured in GCP Step 4 |
| IKE version | Version 2 |
Step 5 — Configure Phase 1 Settings
In the Phase 1 proposal section, configure:
| Parameter | Value |
|---|---|
| Encryption | AES256GCM |
| PRF | PRFSHA256 |
| Diffie-Hellman group | 14 |
| Key lifetime | 86400 seconds |
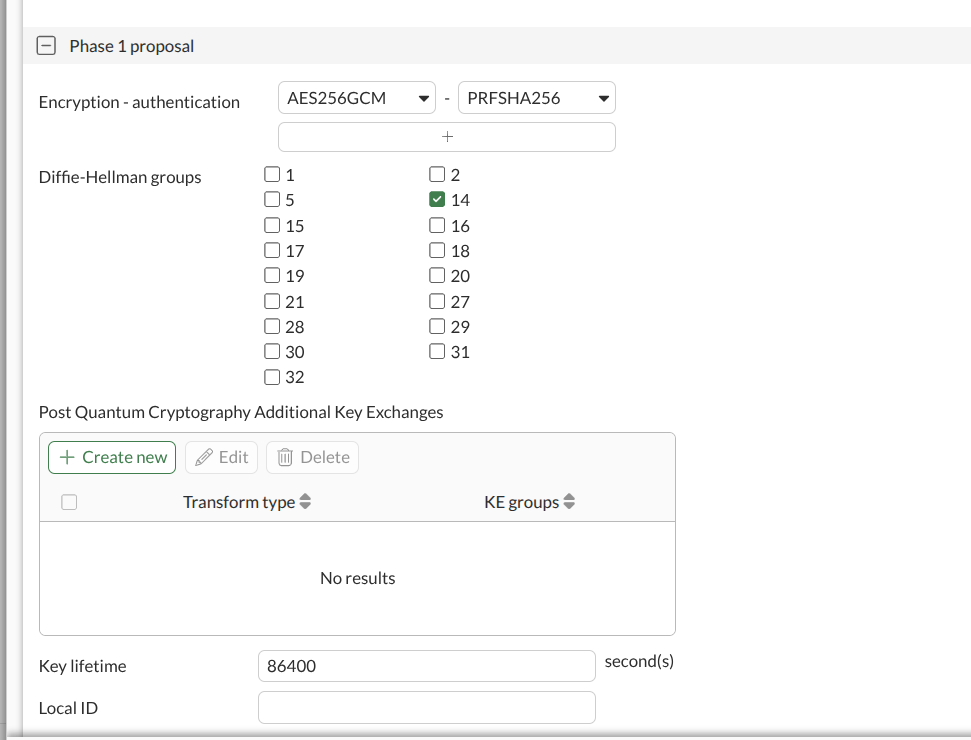
GCP and FortiGate use different names for the same algorithms: GCP's AES-GCM-16-256 = FortiGate's AES256GCM. GCP's PRF-HMAC-SHA2-256 = FortiGate's PRFSHA256. Both DH Group 14 = modp_2048.
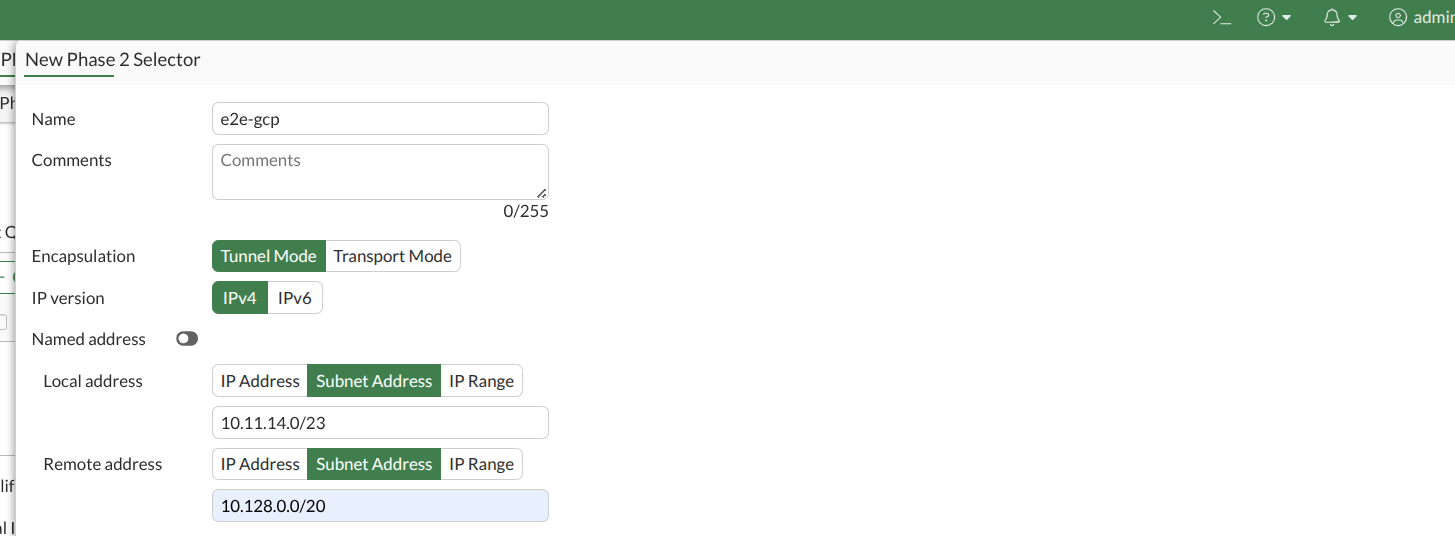
Step 6 — Configure Phase 2 Settings
- In the Phase 2 selectors section, click Create new.
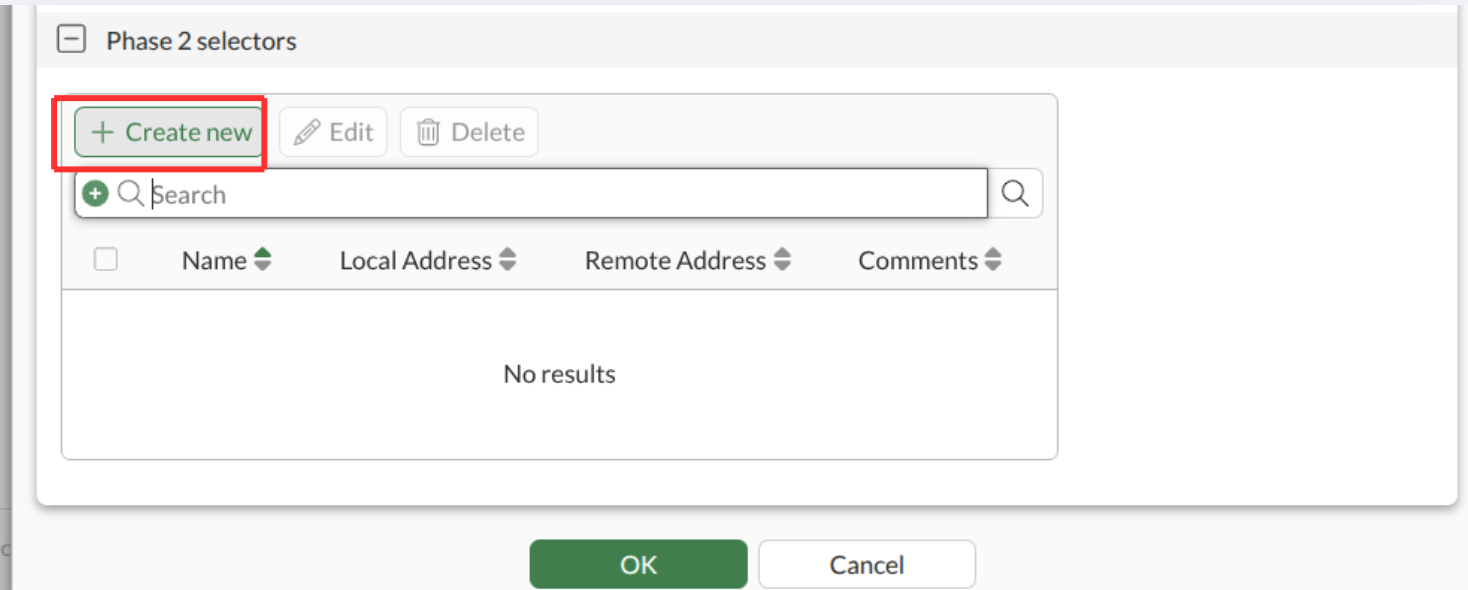
- Configure the selector:
| Parameter | Value |
|---|---|
| Name | e2e-gcp |
| Encapsulation | Tunnel Mode |
| IP version | IPv4 |
| Local address | E2E Cloud VPC CIDR (e.g., 10.11.14.0/23) |
| Remote address | GCP subnet CIDR (e.g., 10.128.0.0/20) |
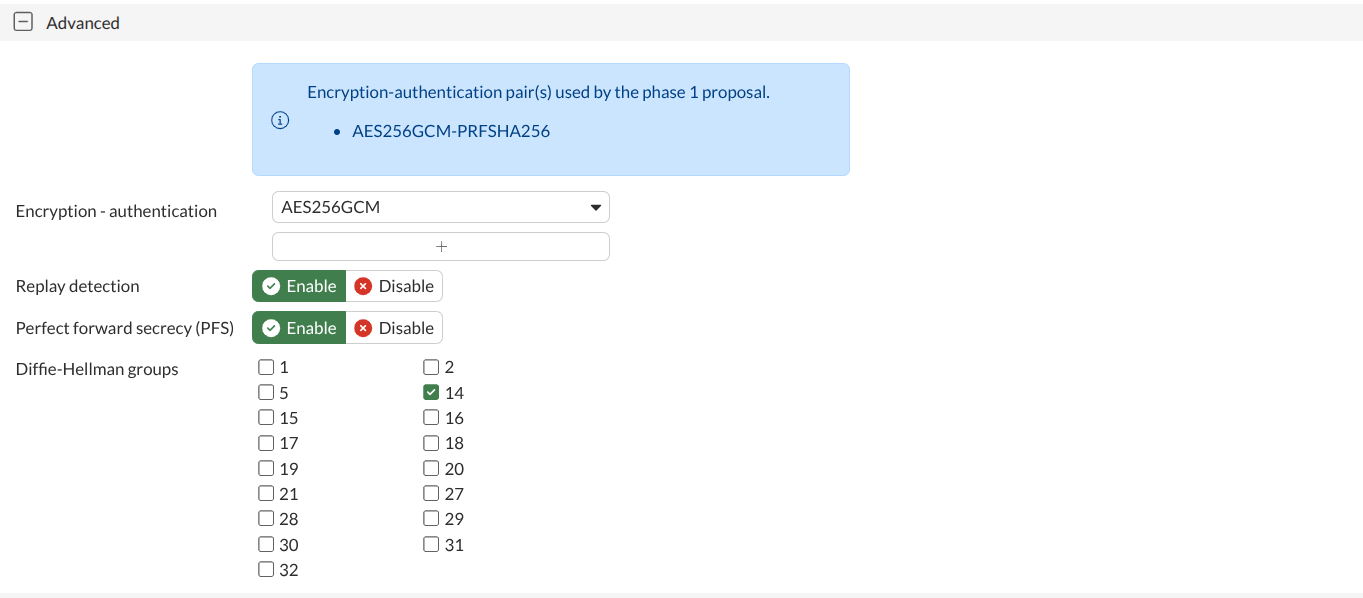
- In the Advanced section, configure:
| Parameter | Value |
|---|---|
| Encryption | AES256GCM |
| Replay detection | Enable |
| Perfect Forward Secrecy (PFS) | Enable |
| Diffie-Hellman group | 14 |
- Configure additional Phase 2 settings:
| Parameter | Value |
|---|---|
| Local port | All |
| Remote port | All |
| Protocol | All |
| Auto-negotiate | Enable |
| Autokey keep alive | Enable |
| Key lifetime | 43200 seconds |
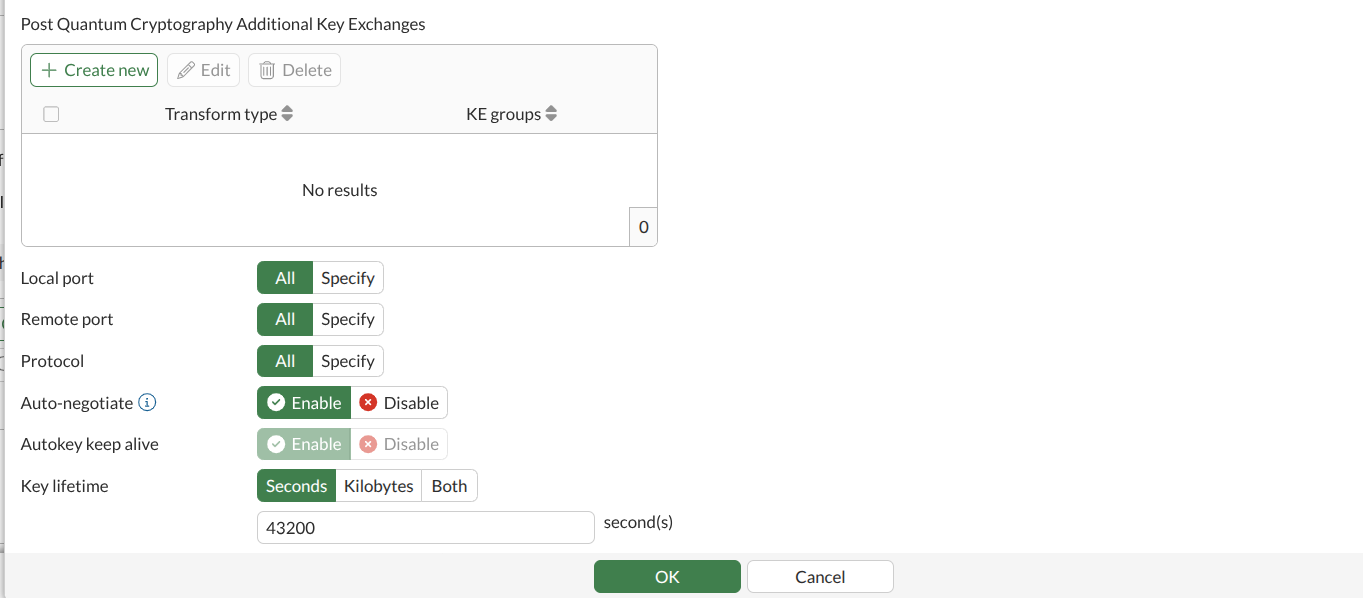
- Click OK to save the Phase 2 selector, then click OK to save the tunnel.
Step 7 — Add a Static Route (E2E → GCP)
- Navigate to Network → Static Routes → Create New.
- Configure:
| Parameter | Value |
|---|---|
| Destination | GCP subnet CIDR (e.g., 10.128.0.0/20) |
| Interface | e2e-gcp (VPN tunnel) |
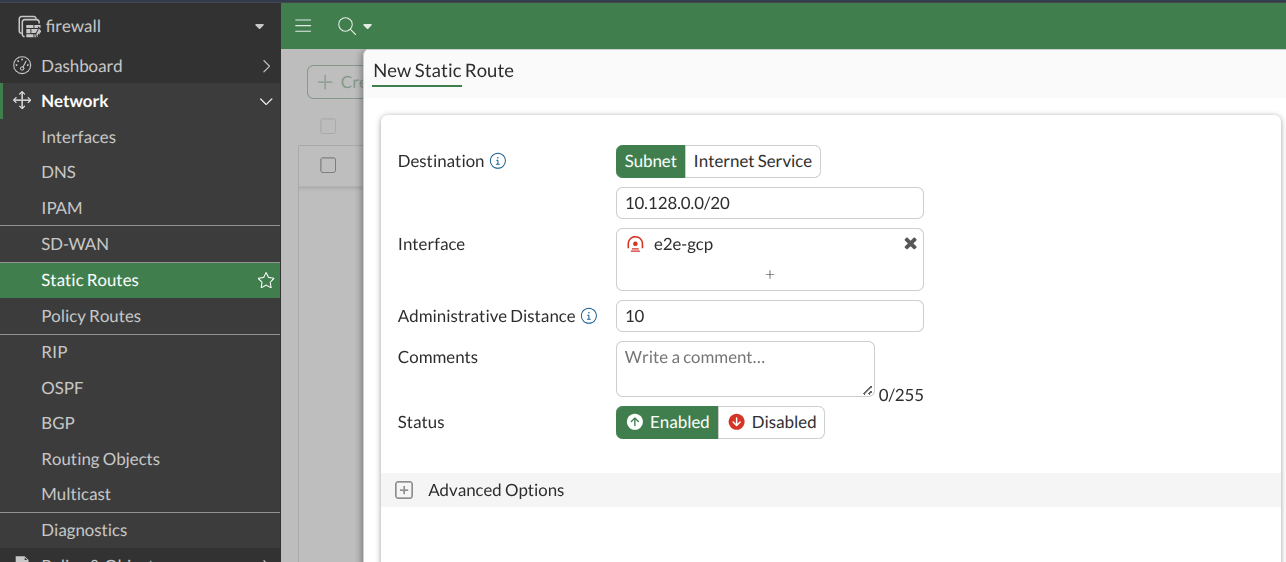
- Click OK. This directs all GCP-bound traffic through the VPN tunnel.
Step 8 — Create Firewall Policy (E2E → GCP)
- Navigate to Policy & Objects → Firewall Policy → Create New.
- Configure:
| Field | Value |
|---|---|
| Name | E2E-to-GCP |
| Incoming interface | port2 (internal/LAN interface) |
| Outgoing interface | e2e-gcp (VPN tunnel) |
| Source | E2E local network address object |
| Destination | GCP subnet address object |
| Service | ALL |
| Action | ACCEPT |
| NAT | Disable |
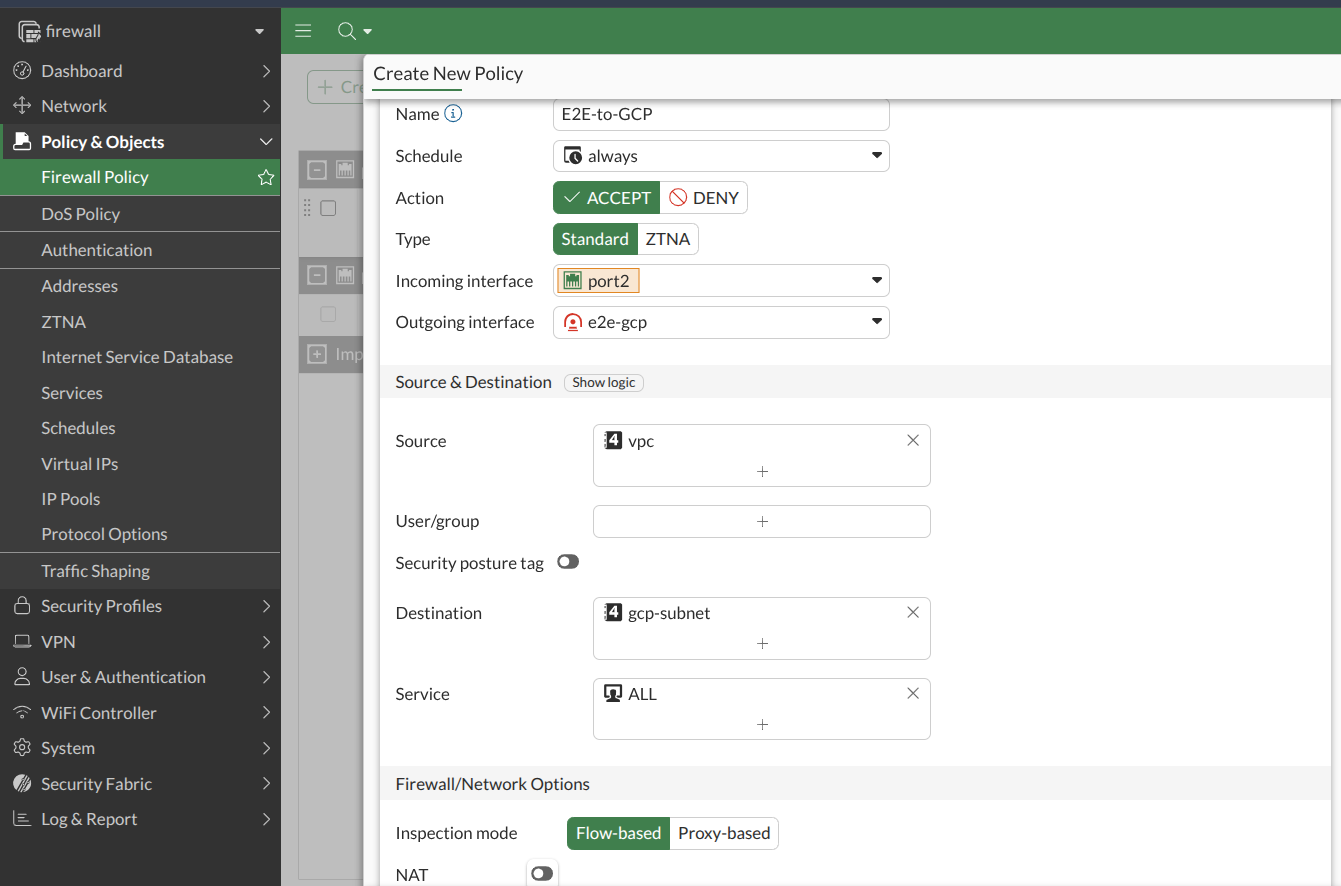
- Click OK.
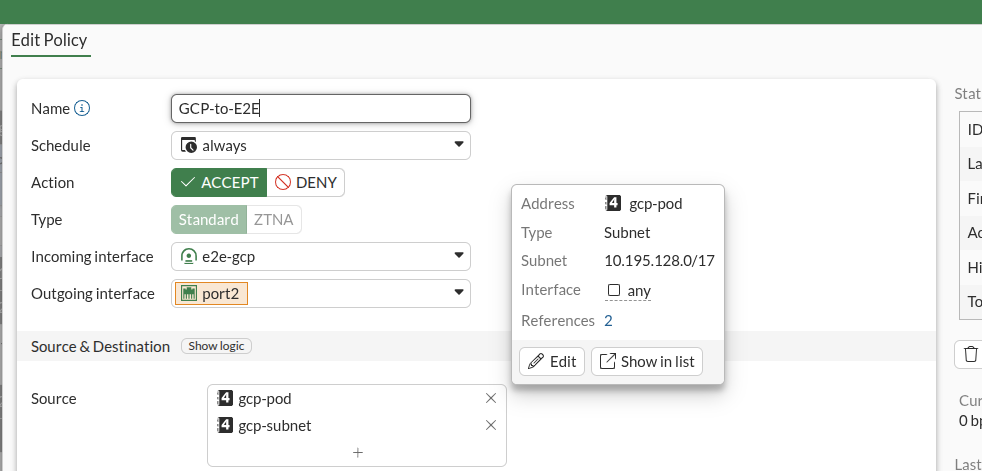
Step 9 — Create Firewall Policy (GCP → E2E)
- Click Create New again to create the reverse policy.
- Configure:
| Field | Value |
|---|---|
| Name | GCP-to-E2E |
| Incoming interface | e2e-gcp (VPN tunnel) |
| Outgoing interface | port2 (internal/LAN interface) |
| Source | GCP subnet address object |
| Destination | E2E local network address object |
| Service | ALL |
| Action | ACCEPT |
| NAT | Disable |
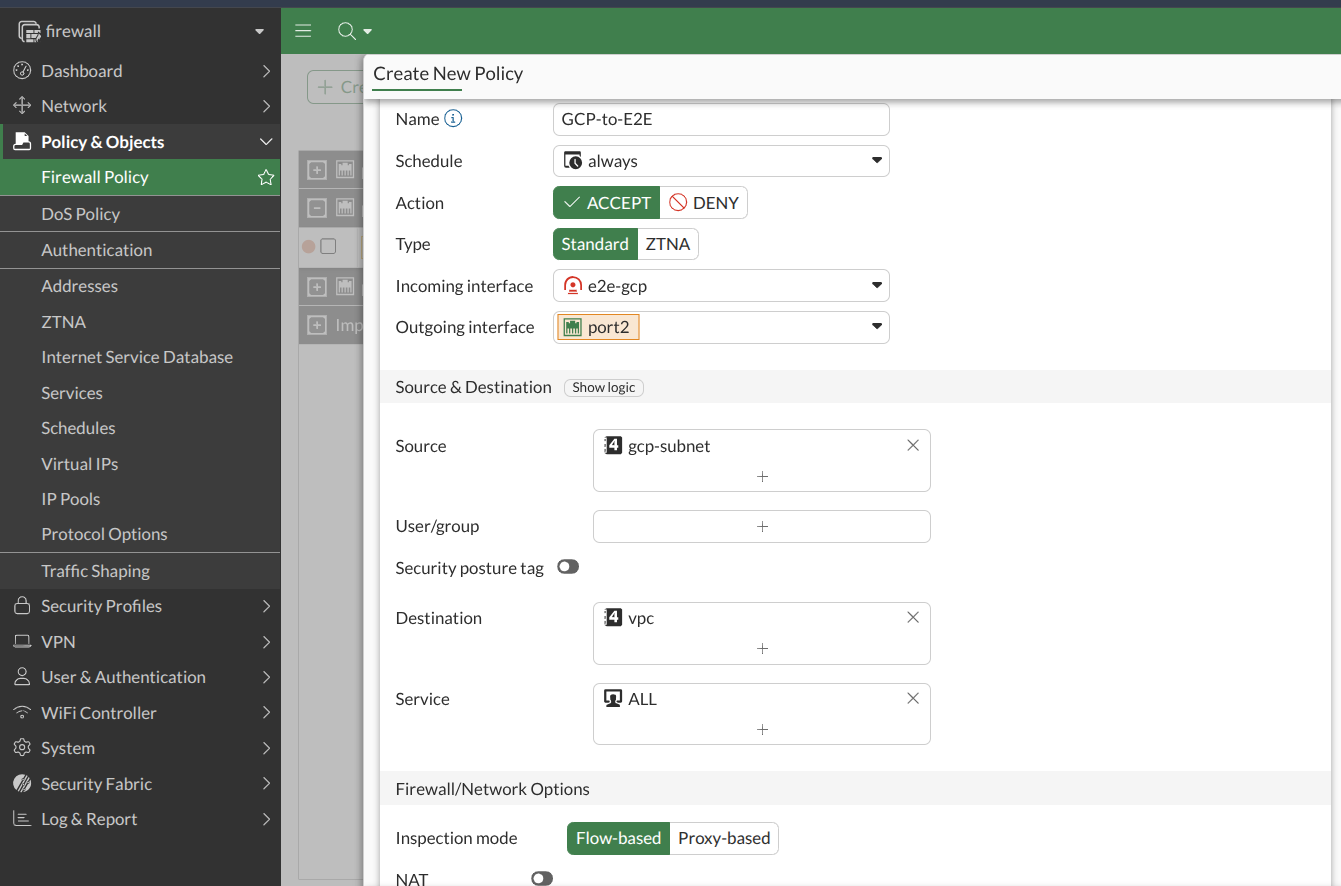
- Click OK.
Both policies are required for bidirectional communication through the VPN tunnel.
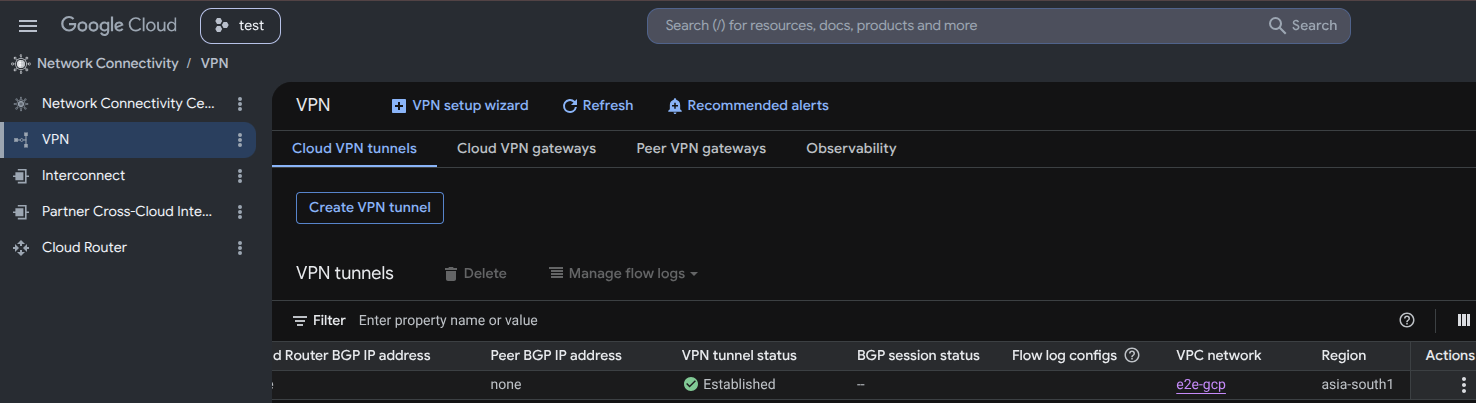
Step 10 — Verify VPN Tunnel Status
GCP side:
- Navigate to Network Connectivity → VPN → Cloud VPN tunnels.
- Verify that the
e2e-gcp-tunnelstatus shows Established.
FortiGate side:
- Navigate to VPN → VPN Tunnels.
- Verify that the
e2e-gcptunnel status shows Up.

The tunnel must show Established on GCP and Up on FortiGate before connectivity testing. If either side shows a different status, verify that the PSK and cipher settings match exactly on both sides.
Part 3 — Connectivity Testing
Step 1 — Note the E2E Cloud VM Details
In the E2E Cloud Console, go to your Nodes list and note the Private IP of your E2E Cloud VM (e.g., 10.11.14.16).

A test VM was already created in GCP in Part 1, Step 2 (private IP: 10.128.0.2).
Step 2 — Add a Route on the E2E Cloud VM
Log in to the E2E Cloud VM via SSH and add a route to the GCP network:
sudo ip route add 10.128.0.0/20 via 10.11.14.6 dev ens9
![]()
10.128.0.0/20— GCP VPC CIDR10.11.14.6— FortiGate private IP on the E2E sideens9— network interface connected to the E2E Cloud VPC
This ensures GCP-bound traffic is forwarded to the FortiGate, which routes it through the VPN tunnel.
Step 3 — Verify Ping Connectivity
E2E Cloud VM → GCP VM
From the E2E Cloud VM, ping the GCP VM's private IP:
ping 10.128.0.2
GCP VM → E2E Cloud VM
From the GCP VM (via browser-based SSH in GCP Console), ping the E2E Cloud VM's private IP:
ping 10.11.14.16
Successful pings in both directions confirm the VPN tunnel is fully active and routing correctly.
Step 4 — Verify SSH Connectivity
Generate an SSH key on the E2E Cloud VM:
ssh-keygen -t ed25519 -C "e2e-gcp-vpn"
Press Enter to accept defaults.
Copy the public key:
cat ~/.ssh/id_ed25519.pub
Add the key to the GCP VM:
- In GCP Console, go to Compute Engine → VM Instances.
- Select the GCP test VM and click Edit.
- Scroll to SSH Keys → Add Item, paste the public key, and click Save.
Connect from E2E Cloud VM to GCP VM:
ssh e2e-gcp-vpn@10.128.0.2

Successful SSH access confirms full end-to-end private connectivity between E2E Cloud and Google Cloud Platform.
Conclusion
The Site-to-Site IPsec VPN between E2E Cloud and Google Cloud Platform is now fully configured and verified. Traffic between the E2E Cloud VPC and the GCP VPC is securely routed through an encrypted IPsec tunnel, enabling private communication between resources in both environments without traversing the public internet.
Part 4 (Optional) — Enable GKE Pod-to-E2E Connectivity
Use this section only if GKE Pods need to communicate with resources hosted in the E2E Cloud VPC through the existing Site-to-Site VPN tunnel.
By default, the VPN tunnel covers only GCP VM traffic (10.128.0.0/20). GKE Pods use a separate Pod CIDR that is not included in the tunnel — without this configuration, pod-to-E2E traffic will fail silently.
Step 1 — Identify the GKE Pod CIDR
Run the following command to retrieve the Pod CIDR assigned to your GKE cluster:
gcloud container clusters describe cluster-1 \
  --location asia-south1 \
  --format="value(ipAllocationPolicy.clusterIpv4CidrBlock)"
The output (e.g., 10.195.128.0/17) is the Pod CIDR used by the GKE cluster. Note this value — it is used in all subsequent steps.

Step 2 — Update the Existing VPN Tunnel (GCP Side)
- Navigate to Network Connectivity → VPN → tunnel-1.
- In the Local IP ranges field, add the GKE Pod CIDR alongside the existing subnet.
| Before | After | |
|---|---|---|
| Remote Network | 10.11.14.0/23 | 10.11.14.0/23 (unchanged) |
| Local Networks | 10.128.0.0/20 | 10.128.0.0/20 (GCP-SUBNET) + 10.195.128.0/17 (GKE-POD-CIDR) |
- Click Save.
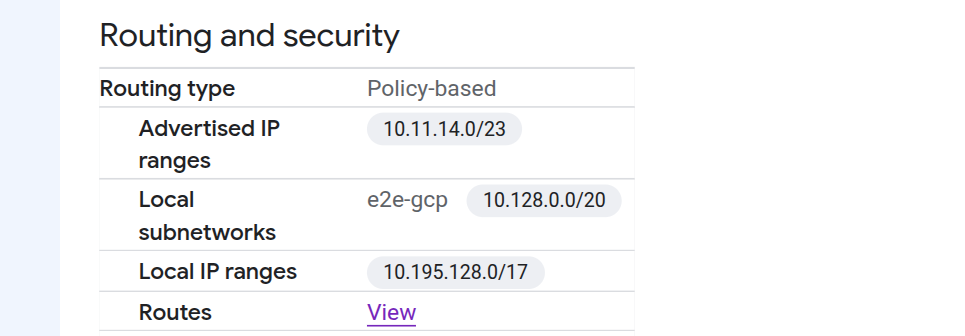
The GKE Pod CIDR value from Step 1 must be used here — replace 10.195.128.0/17 with your actual Pod CIDR if it differs.
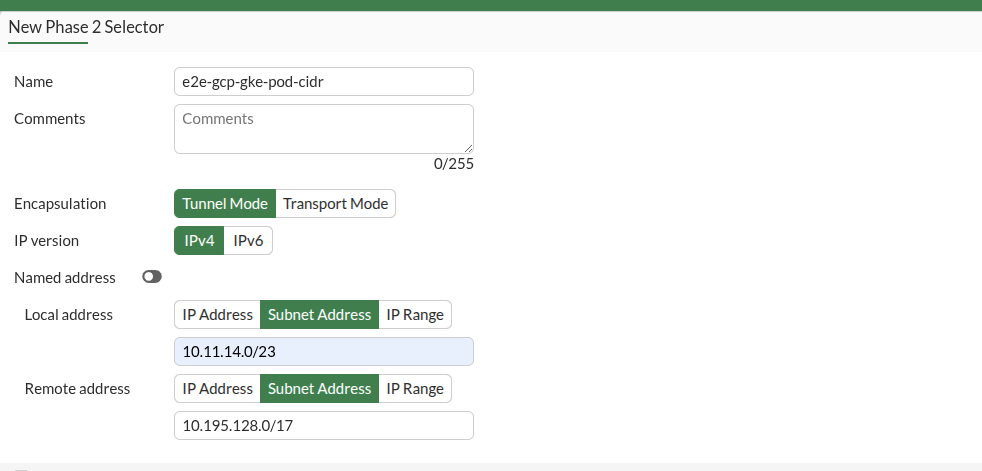
Step 3 — Create an Additional Phase 2 Selector on FortiGate
- Navigate to VPN → IPsec Tunnels → e2e-gcp.
- Click Create New Phase 2 and configure:
| Parameter | Value |
|---|---|
| Name | e2e-gcp-gke-pod-cidr |
| Local Address | 10.11.14.0/23 |
| Remote Address | 10.195.128.0/17 |
| Encryption | AES256GCM |
| PFS | Enable |
| DH Group | 14 |
| Auto-Negotiate | Enable |
| Auto Key Keep Alive | Enable |
- Click OK.
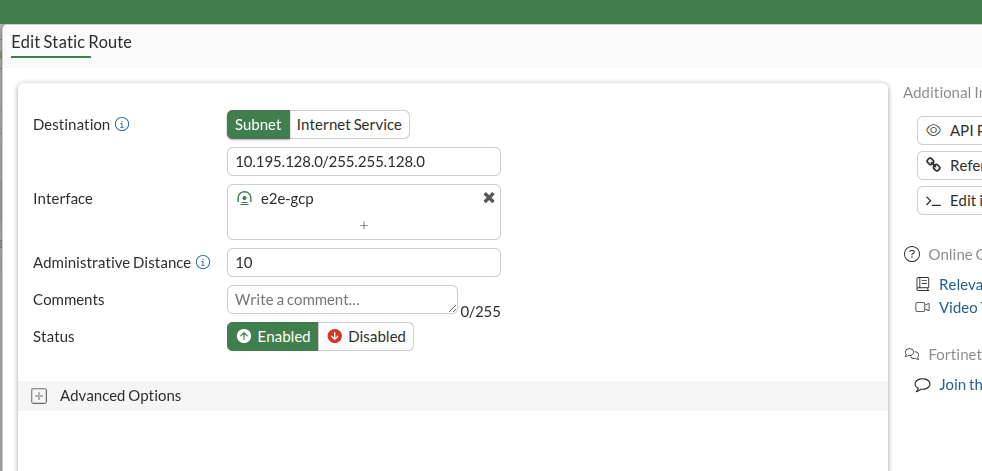
Step 4 — Create a Static Route on FortiGate
- Navigate to Network → Static Routes → Create New.
- Configure:
| Parameter | Value |
|---|---|
| Destination | 10.195.128.0/17 |
| Interface | e2e-gcp (Tunnel) |
- Click OK.
Step 5 — Create a Firewall Address Object on FortiGate
- Navigate to Policy & Objects → Addresses → Create New.
- Configure:
| Parameter | Value |
|---|---|
| Name | gke-pod-cidr |
| Subnet | 10.195.128.0/17 |
- Click OK.
Step 6 — Update Existing Firewall Policies on FortiGate
E2E-to-GCP Policy
- Navigate to Policy & Objects → Firewall Policy.
- Edit the
E2E-to-GCPpolicy. - In the Destination Address list, add
gke-pod-cidr. - Click OK.
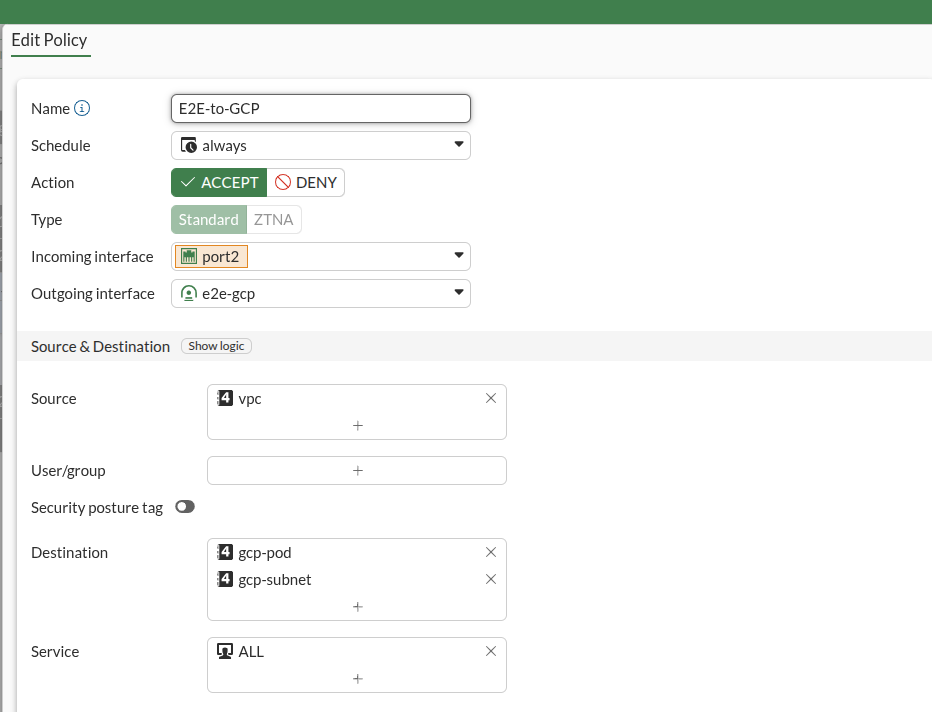
GCP-to-E2E Policy
- Edit the
GCP-to-E2Epolicy. - In the Source Address list, add
gke-pod-cidr. - Click OK.
Step 7 — Add Route to the GKE Pod Network on the E2E VM
Log in to the E2E Cloud VM via SSH and add a route for the GKE Pod CIDR through the FortiGate private IP:
sudo ip route add 10.195.128.0/17 via 10.11.14.6 dev ens9
| Parameter | Description |
|---|---|
10.195.128.0/17 | GKE Pod CIDR |
10.11.14.6 | FortiGate Private IP |
ens9 | E2E VM Private Network Interface |
Step 8 — Test Connectivity from a GKE Pod
- Create a test pod:
kubectl run test --image=busybox:1.36 -it --rm -- sh
- From inside the pod, ping an E2E Cloud VM private IP:
ping 10.11.14.12
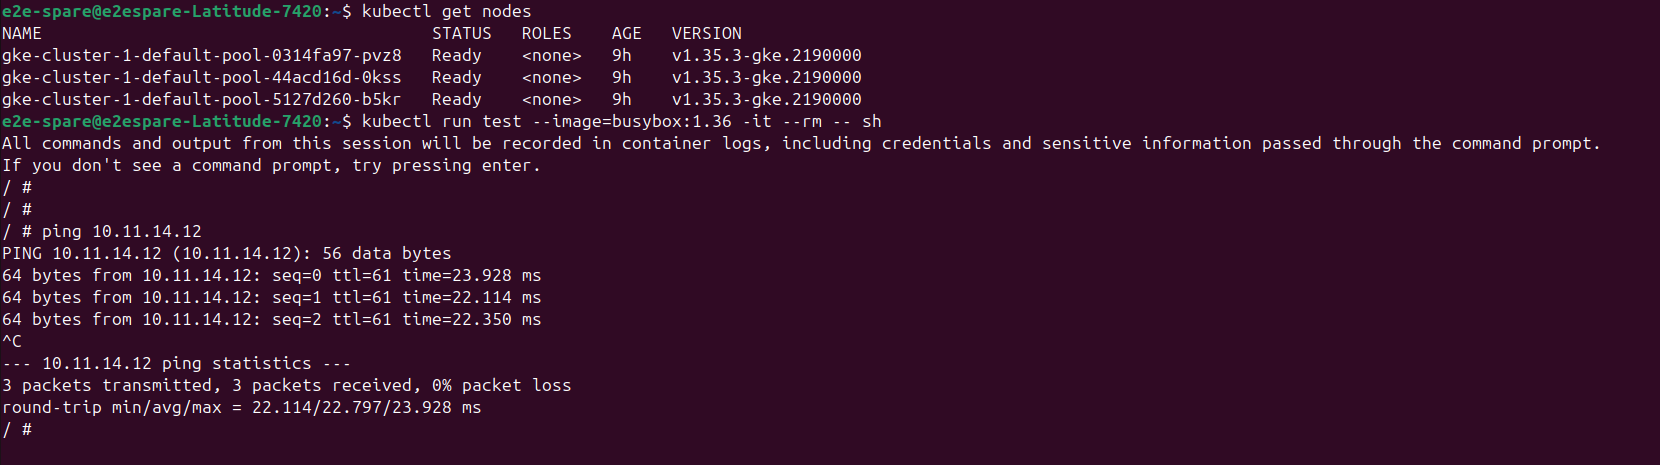
Successful replies confirm that GKE Pods can communicate with resources hosted in the E2E Cloud VPC through the existing Site-to-Site VPN tunnel.