E2E Networks payment options
Important Note: Our Payment Gateway Partner has recently migrated all Virtual accounts to RBL Bank (IFSC Code: RATN0VAAPIS). Please check your updated virtual account details under the Billing Section of your Myaccount (Billing > Billing Profile > Virtual Bank Account Details) and pay accordingly only in RBL Bank Virtual accounts.
E2E Networks accepts payments through the following methods.
Option Name |
Description |
|---|---|
AutoPay |
Automatic charging from your credit or debit card based on the standing instructions given by you. |
PayNow |
One-time payment through the payment gateway using credit card, debit card, net banking, e-wallets and unified payment interface(UPI). |
Virtual Account Bank Transfer |
One-time payment through bank transfer (NEFT, RTGS, IMPS) using your virtual account with E2E Networks Ltd. This option may not work for bank transfer from outside India. |
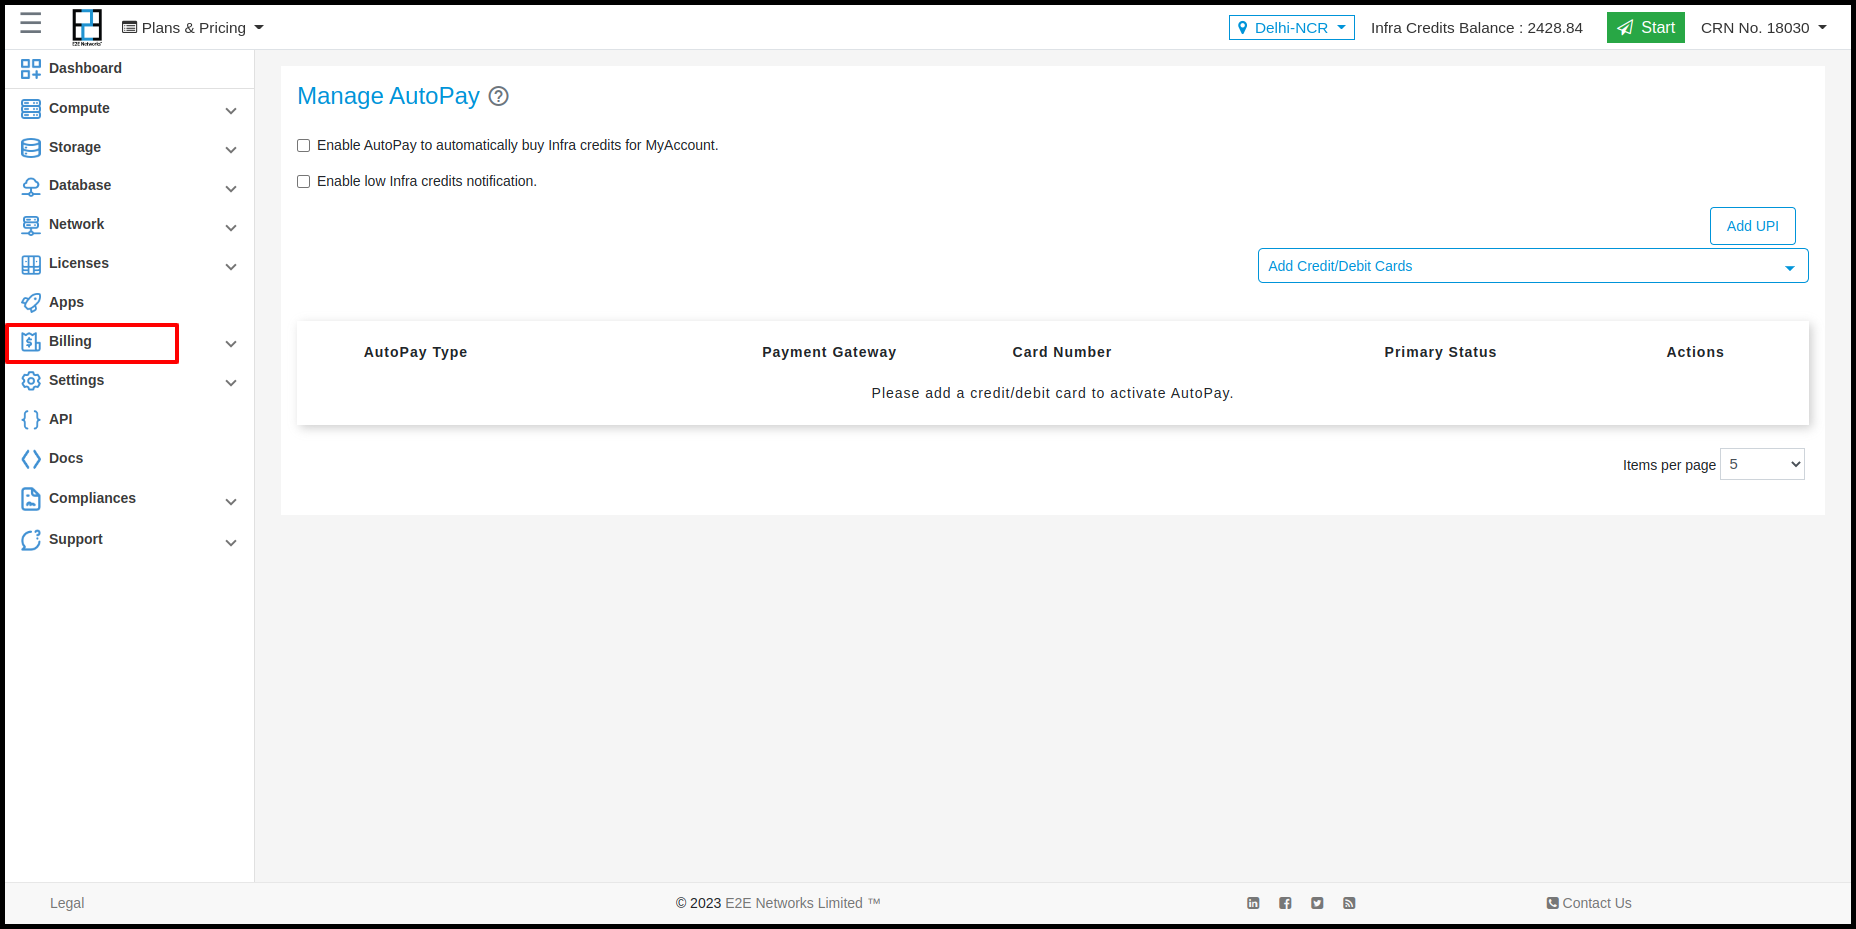
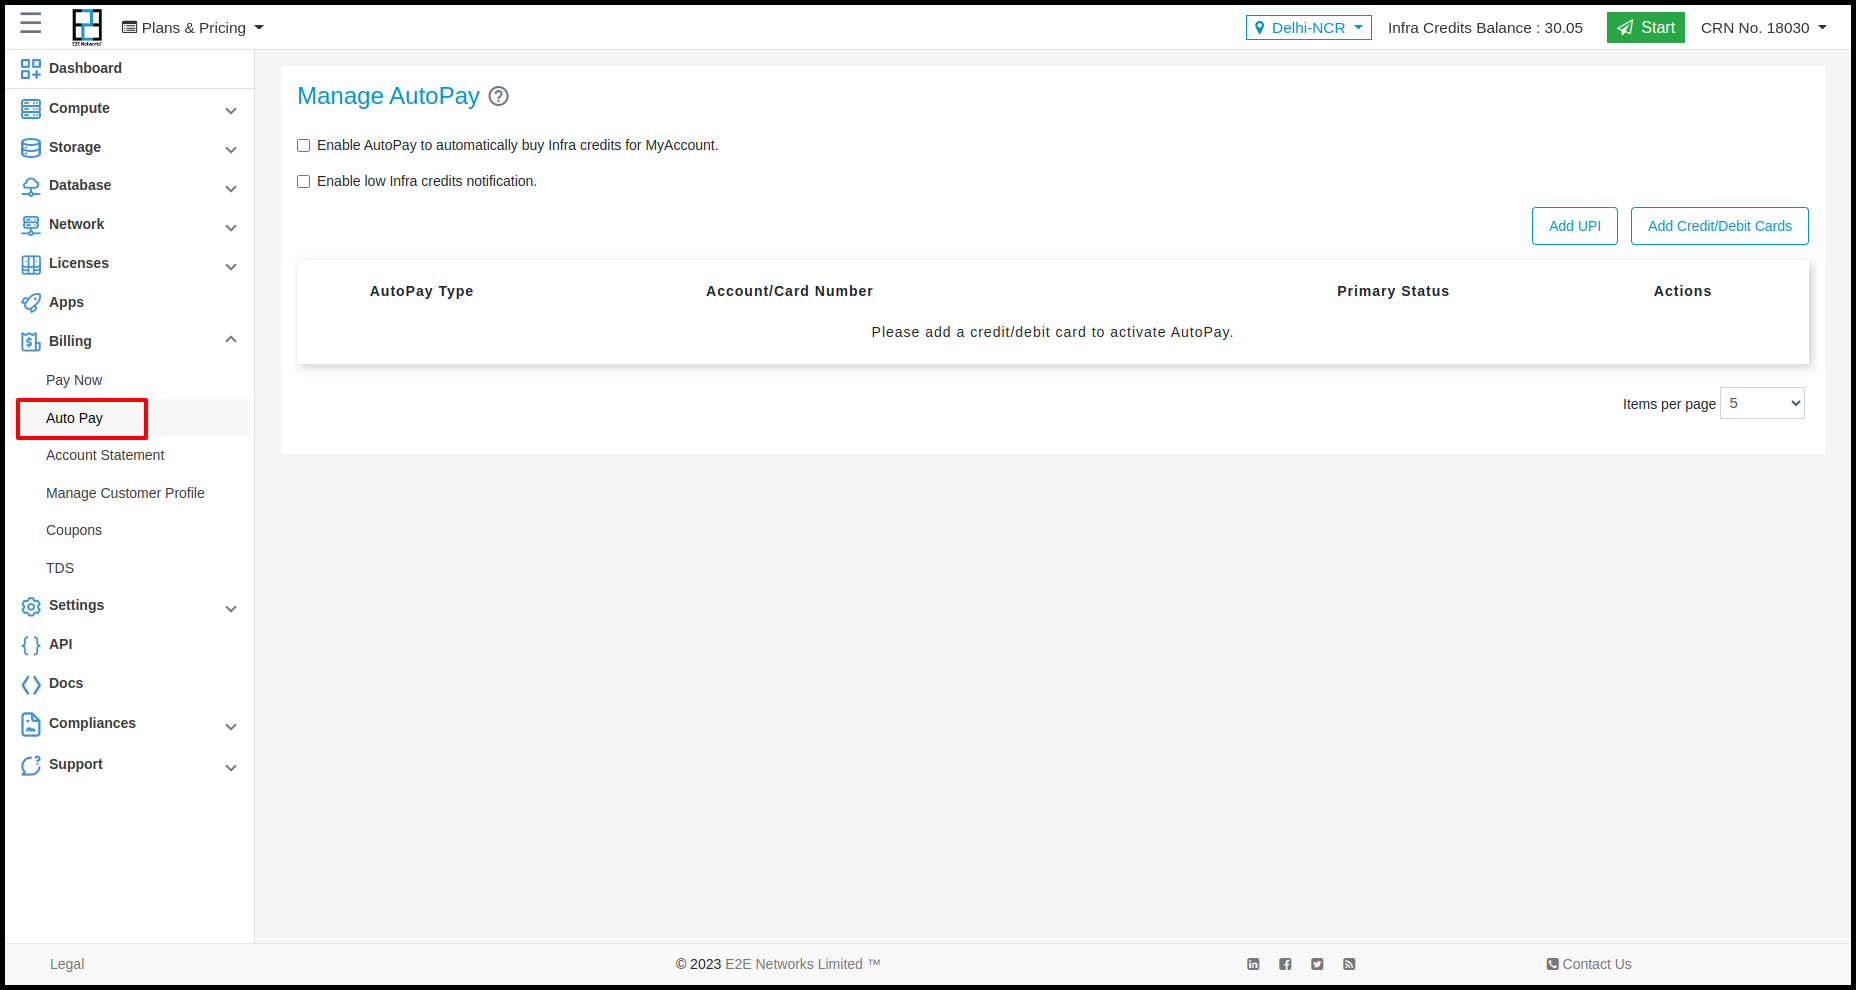
AutoPay
PLEASE NOTE in accordance with RBI guidelines on the processing of recurring payments, existing standing instructions received for Autopay, shall not work post-September 30, 2021 and accordingly we will de-activate these existing instructions for auto pay on September 30, 2021 end of the day. Our payment gateway partner has been able to make live, a few bank’s cards for the processing of recurring payments so far, in accordance with these new guidelines. So, post-October 1, 2021, Customers may add the cards which have been made live by our payment gateway partner. As of now, the following cards are live-
S.No |
Bank |
Debit Card |
Credit Card |
|---|---|---|---|
1 |
HSBC |
N/A |
✓ |
2 |
Equitas Small Finance Bank |
✓ |
N/A |
3 |
City Union Bank |
✓ |
N/A |
4 |
OneCard |
N/A |
✓ |
5 |
Karur Vysya Bank |
✓ |
✓ |
The AutoPay method allows you to set up standing instructions on your credit/debit card to allow E2E Networks Ltd to automatically charge your card. This ensures uninterrupted service by eliminating the risk of suspension due to delayed payments. This also saves you the hassle of regular tracking and making periodic payments on the MyAccount portal.
Payment gateway window
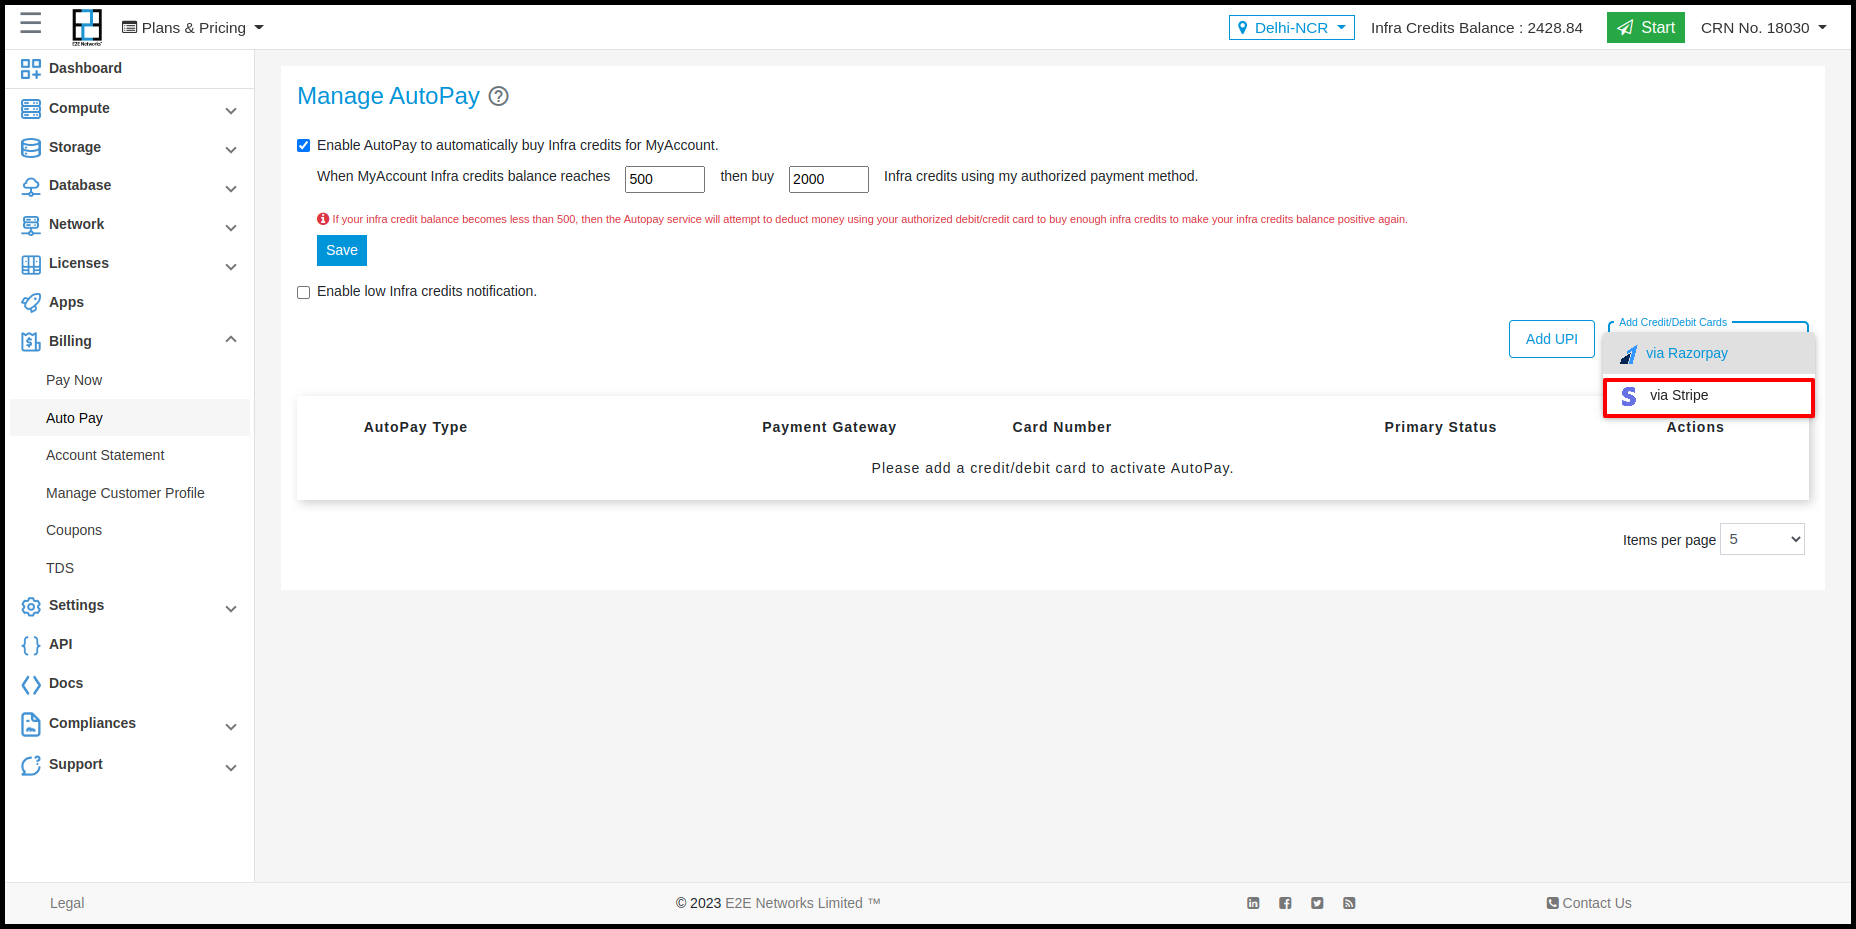
E2E Networks has integrated with the Razorpay payment gateway and Stripe payment gateway for Autopay only.
The behaviour for Prepaid Customers
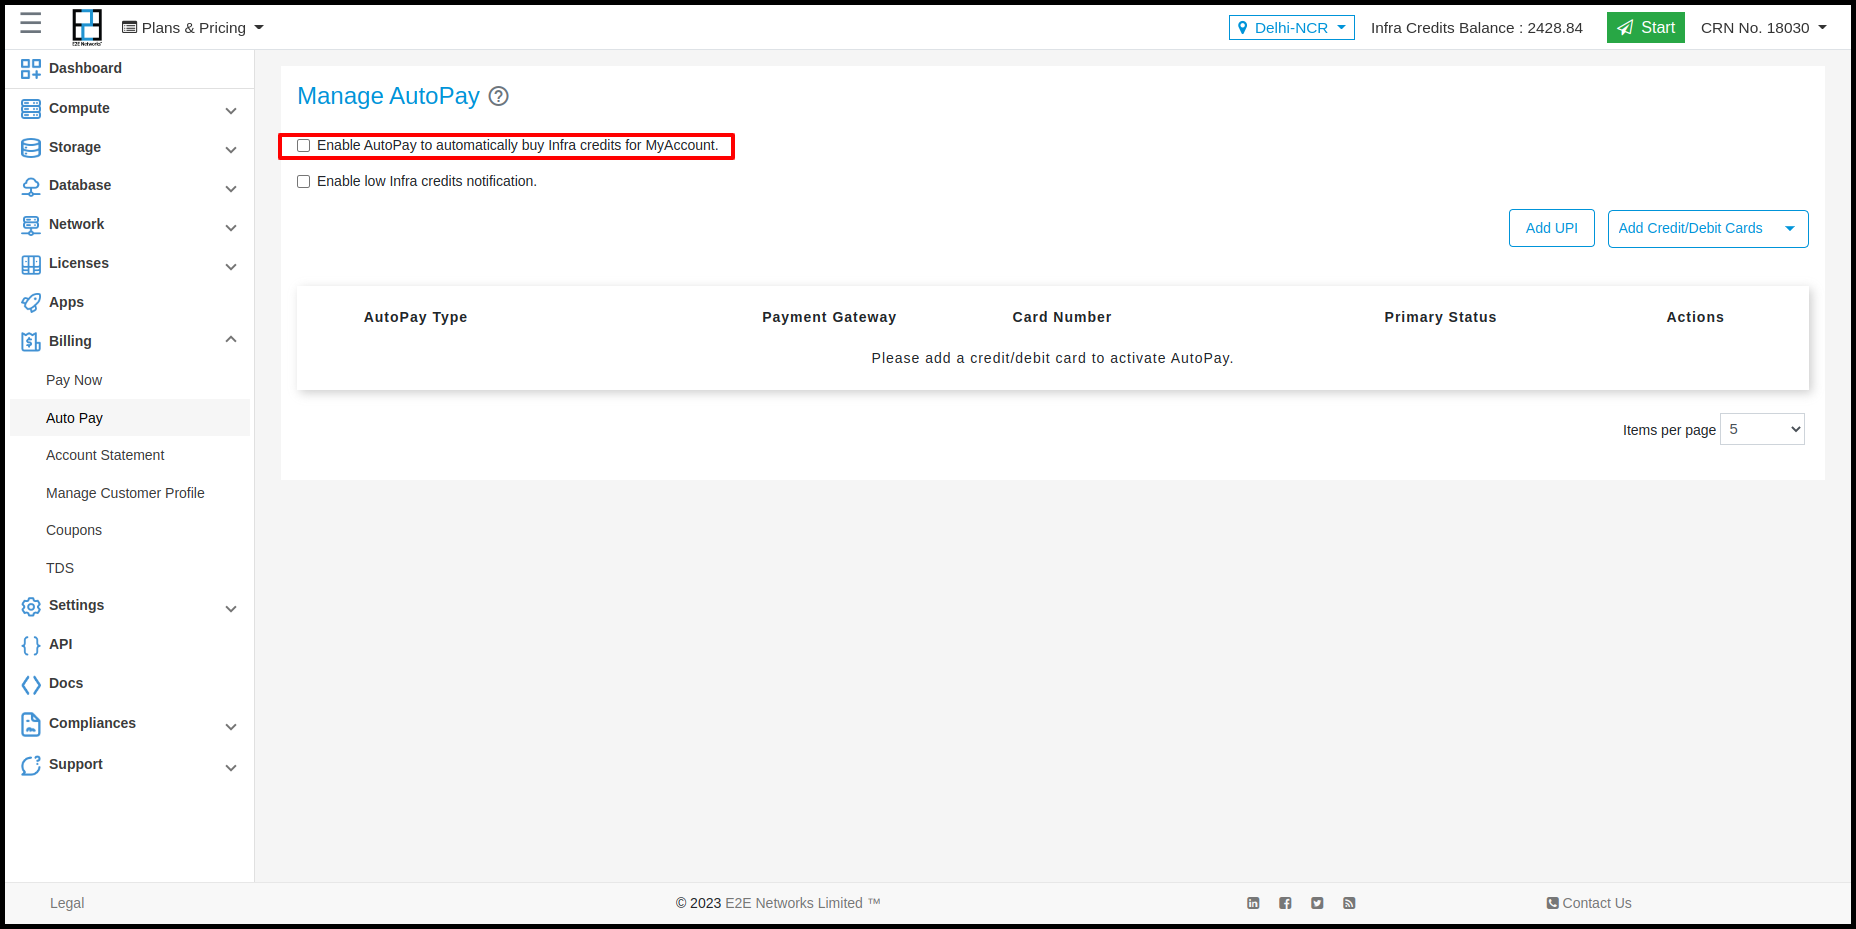
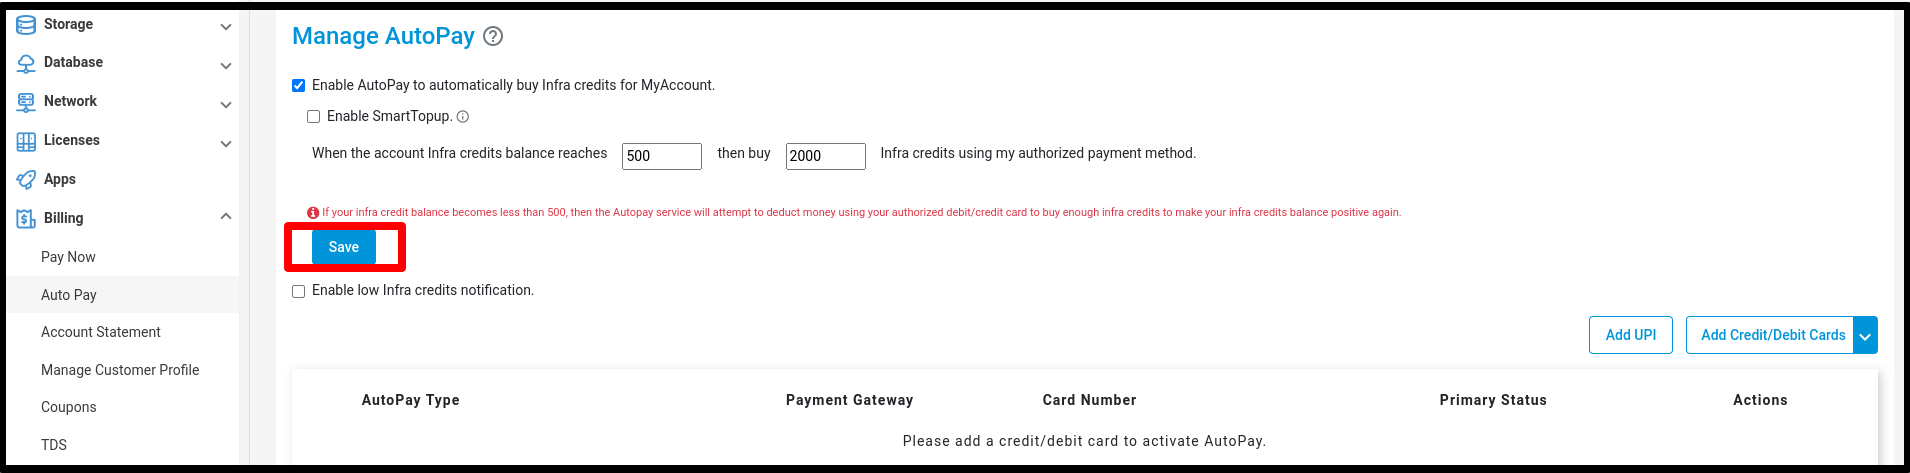
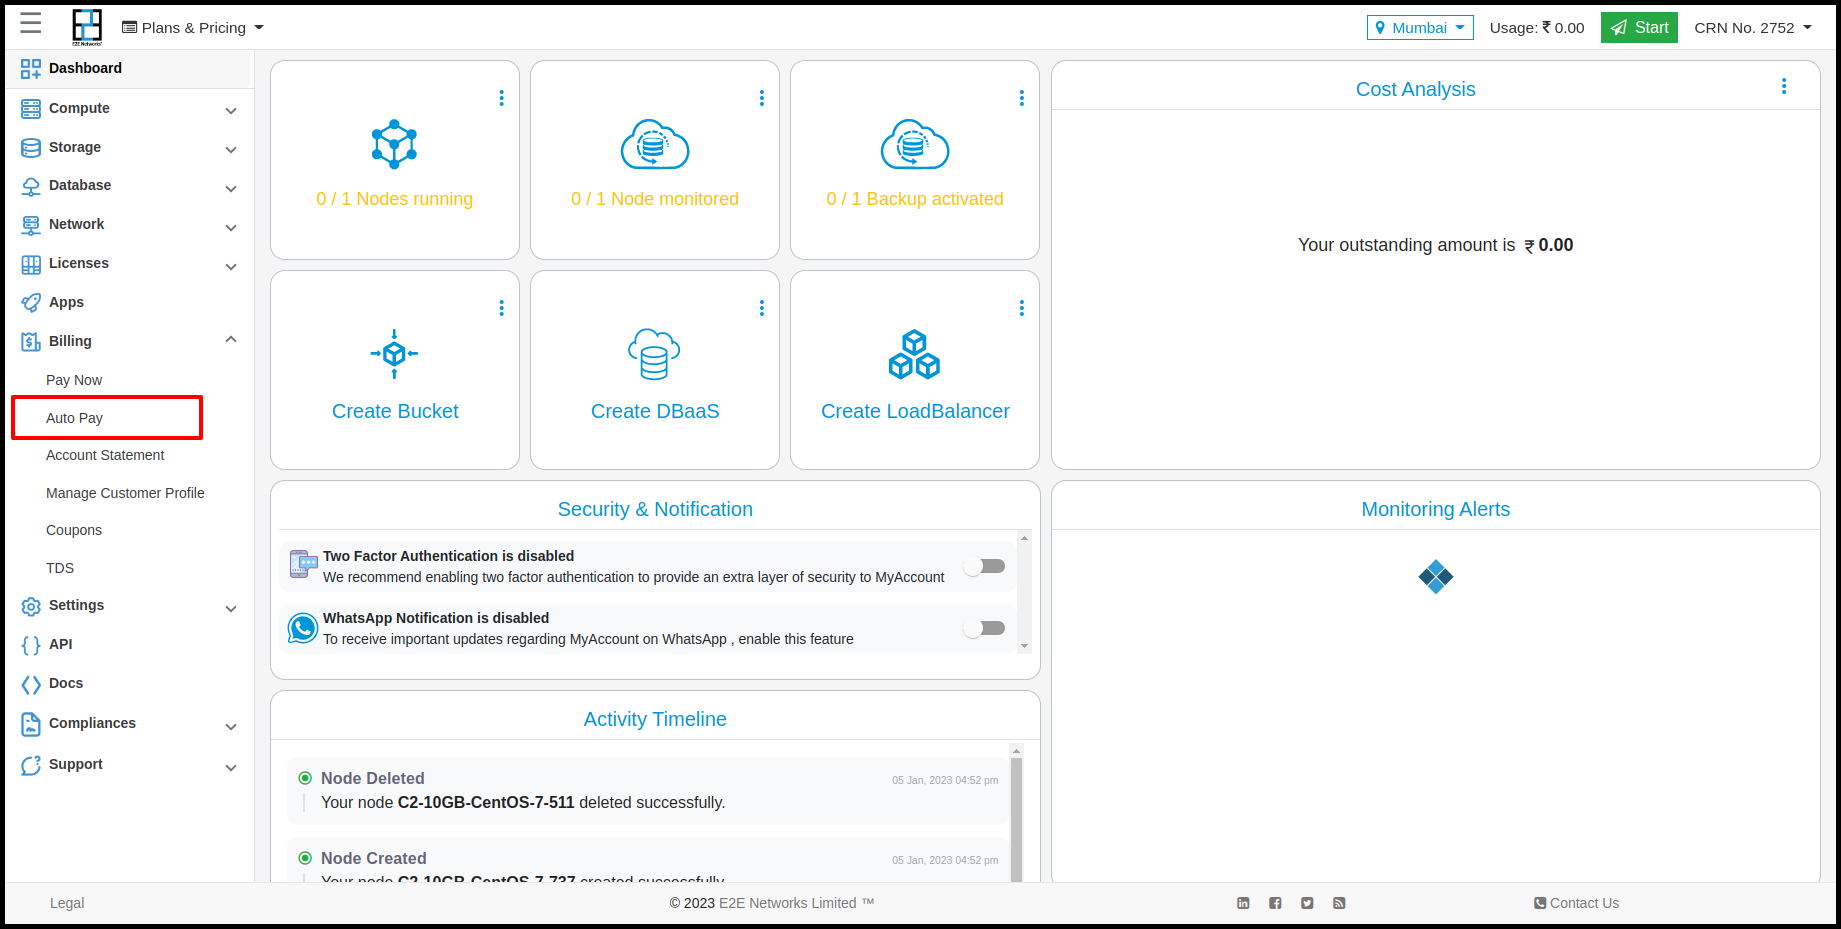
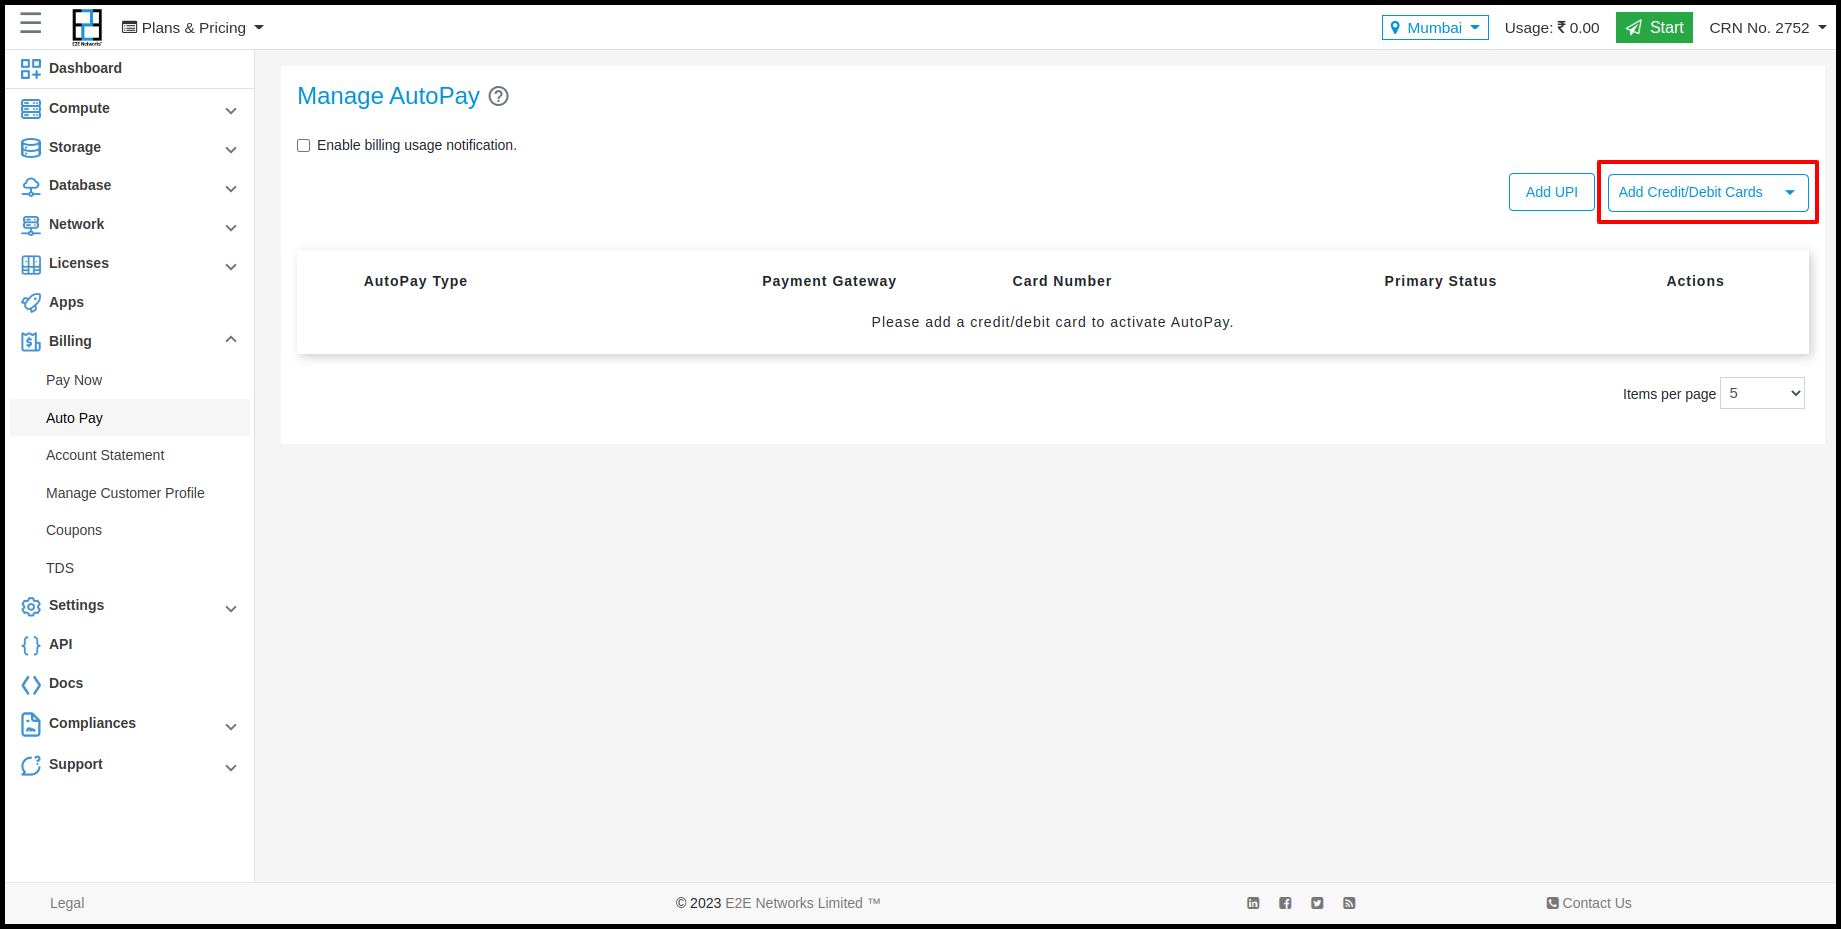
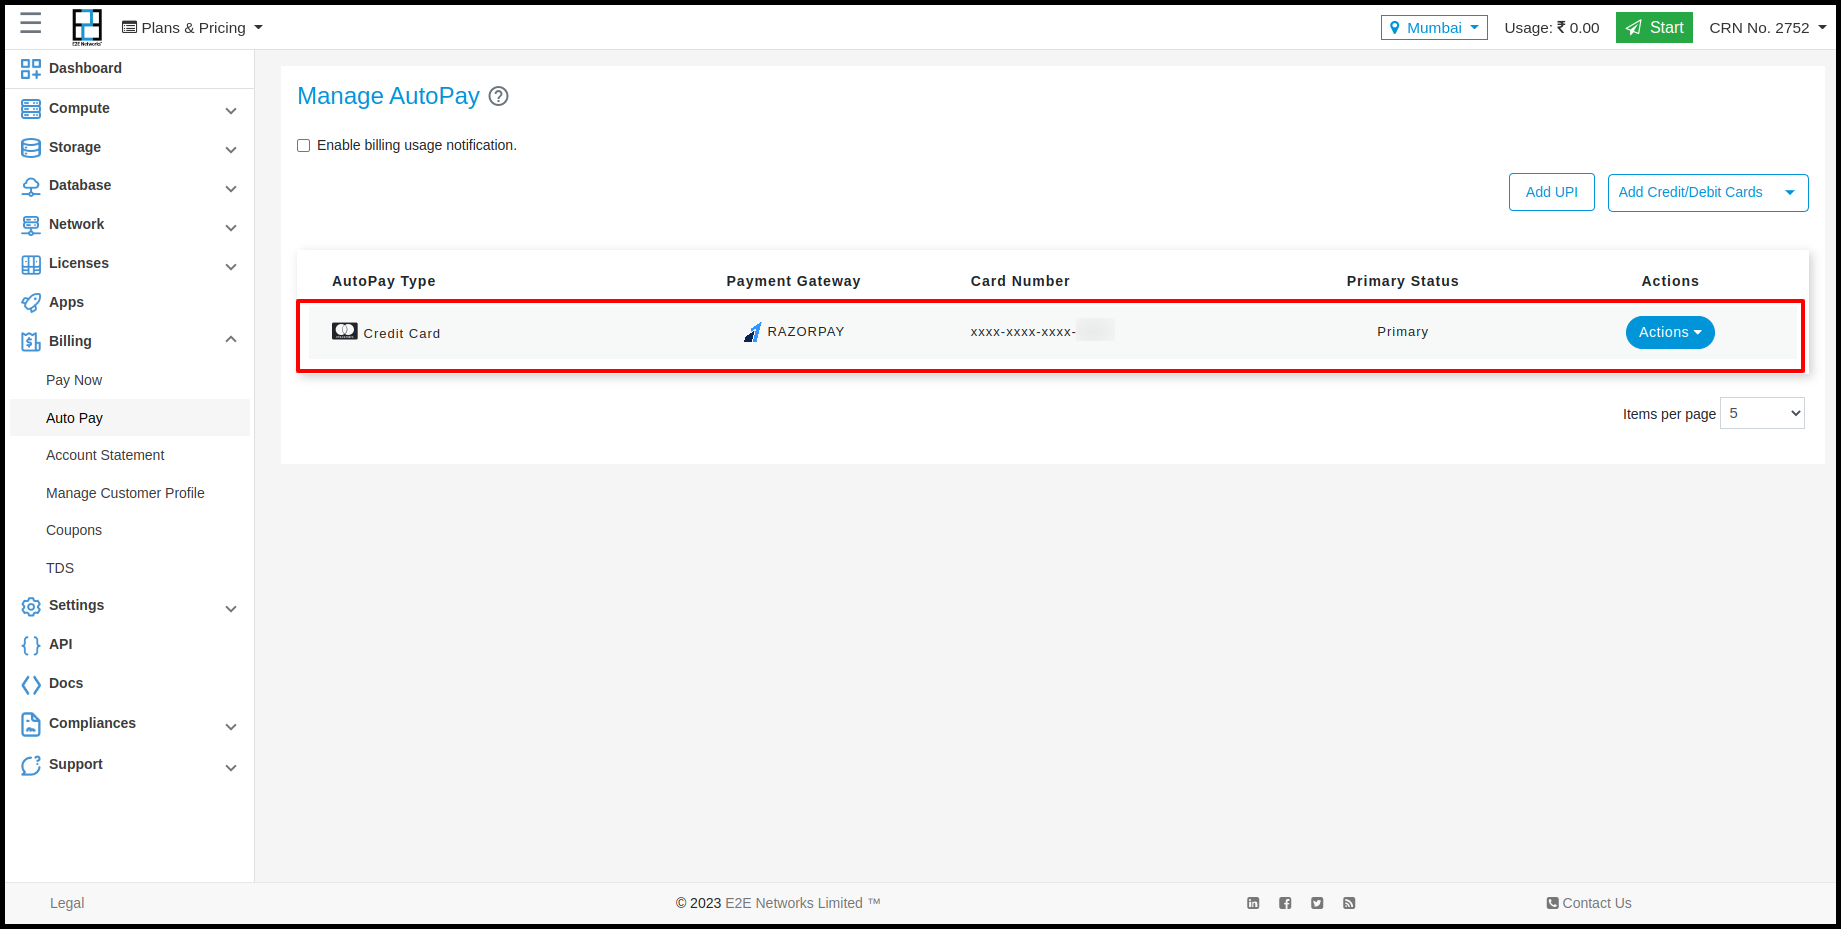
For Enabling Autopay firstly you need to click Billing from side nav bar and click on Autopay.
Smart Top Up
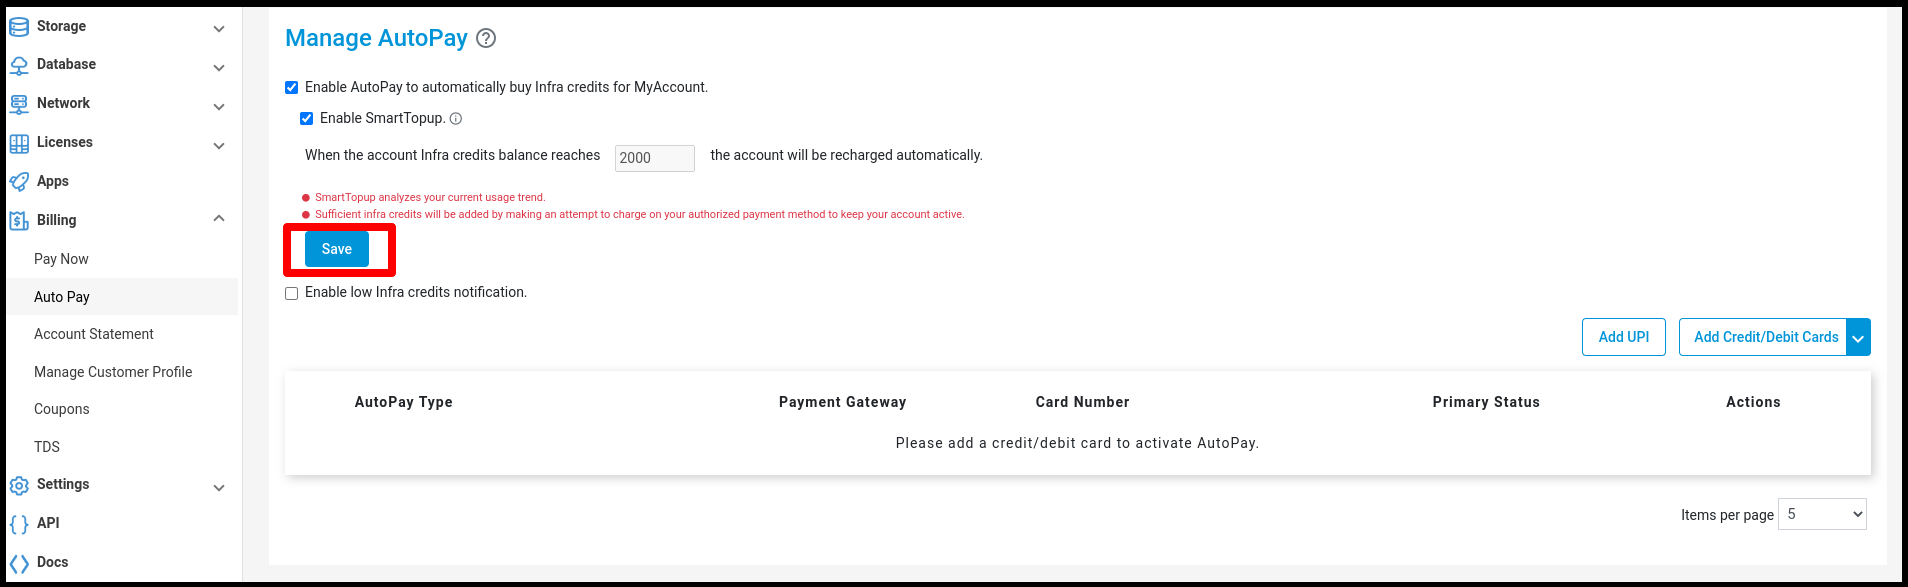
SmartTopup is a convenience feature. It gives you a piece of mind by ensuring that your account infra-credit balance is maintained. When you keep SmartTopup enabled with Autopay service. The account balance quickly gets refilled by making an attempt to charge your saved payment method as soon as the infra-credit balance goes below 2000. As for example if your last 7 days usage 5000 then your account will be auto recharged with the value of 5000, if your infra credit balance goes below 2000.
This is better than setting a fixed refill value as sometimes when you launch new Node instances or other services, the periodic burn rate of the infra-credits also increases. The refill amount value needs to be smartly identified based on current usage trend of your account and upcoming charges like minimum_billing charges, license renewal, committed node renewal, etc.
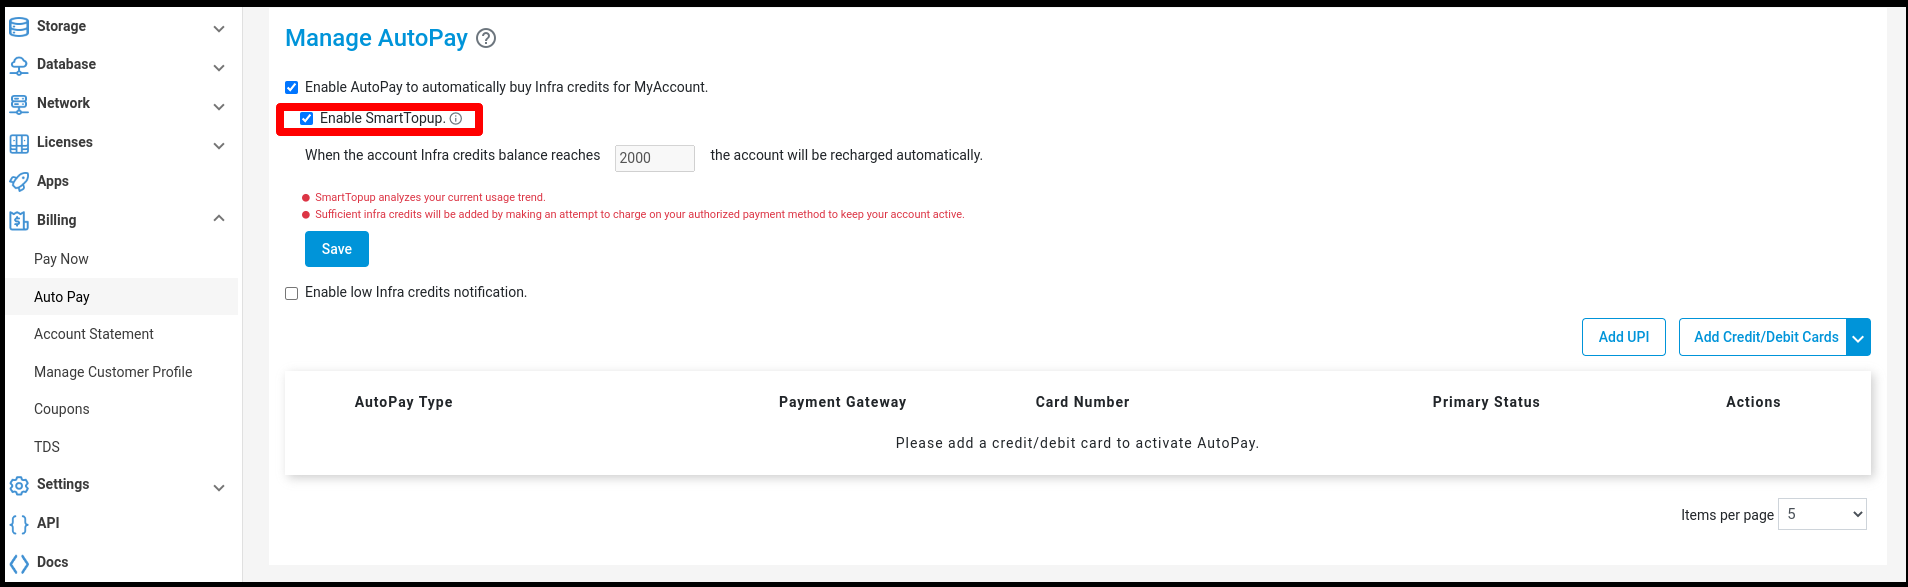
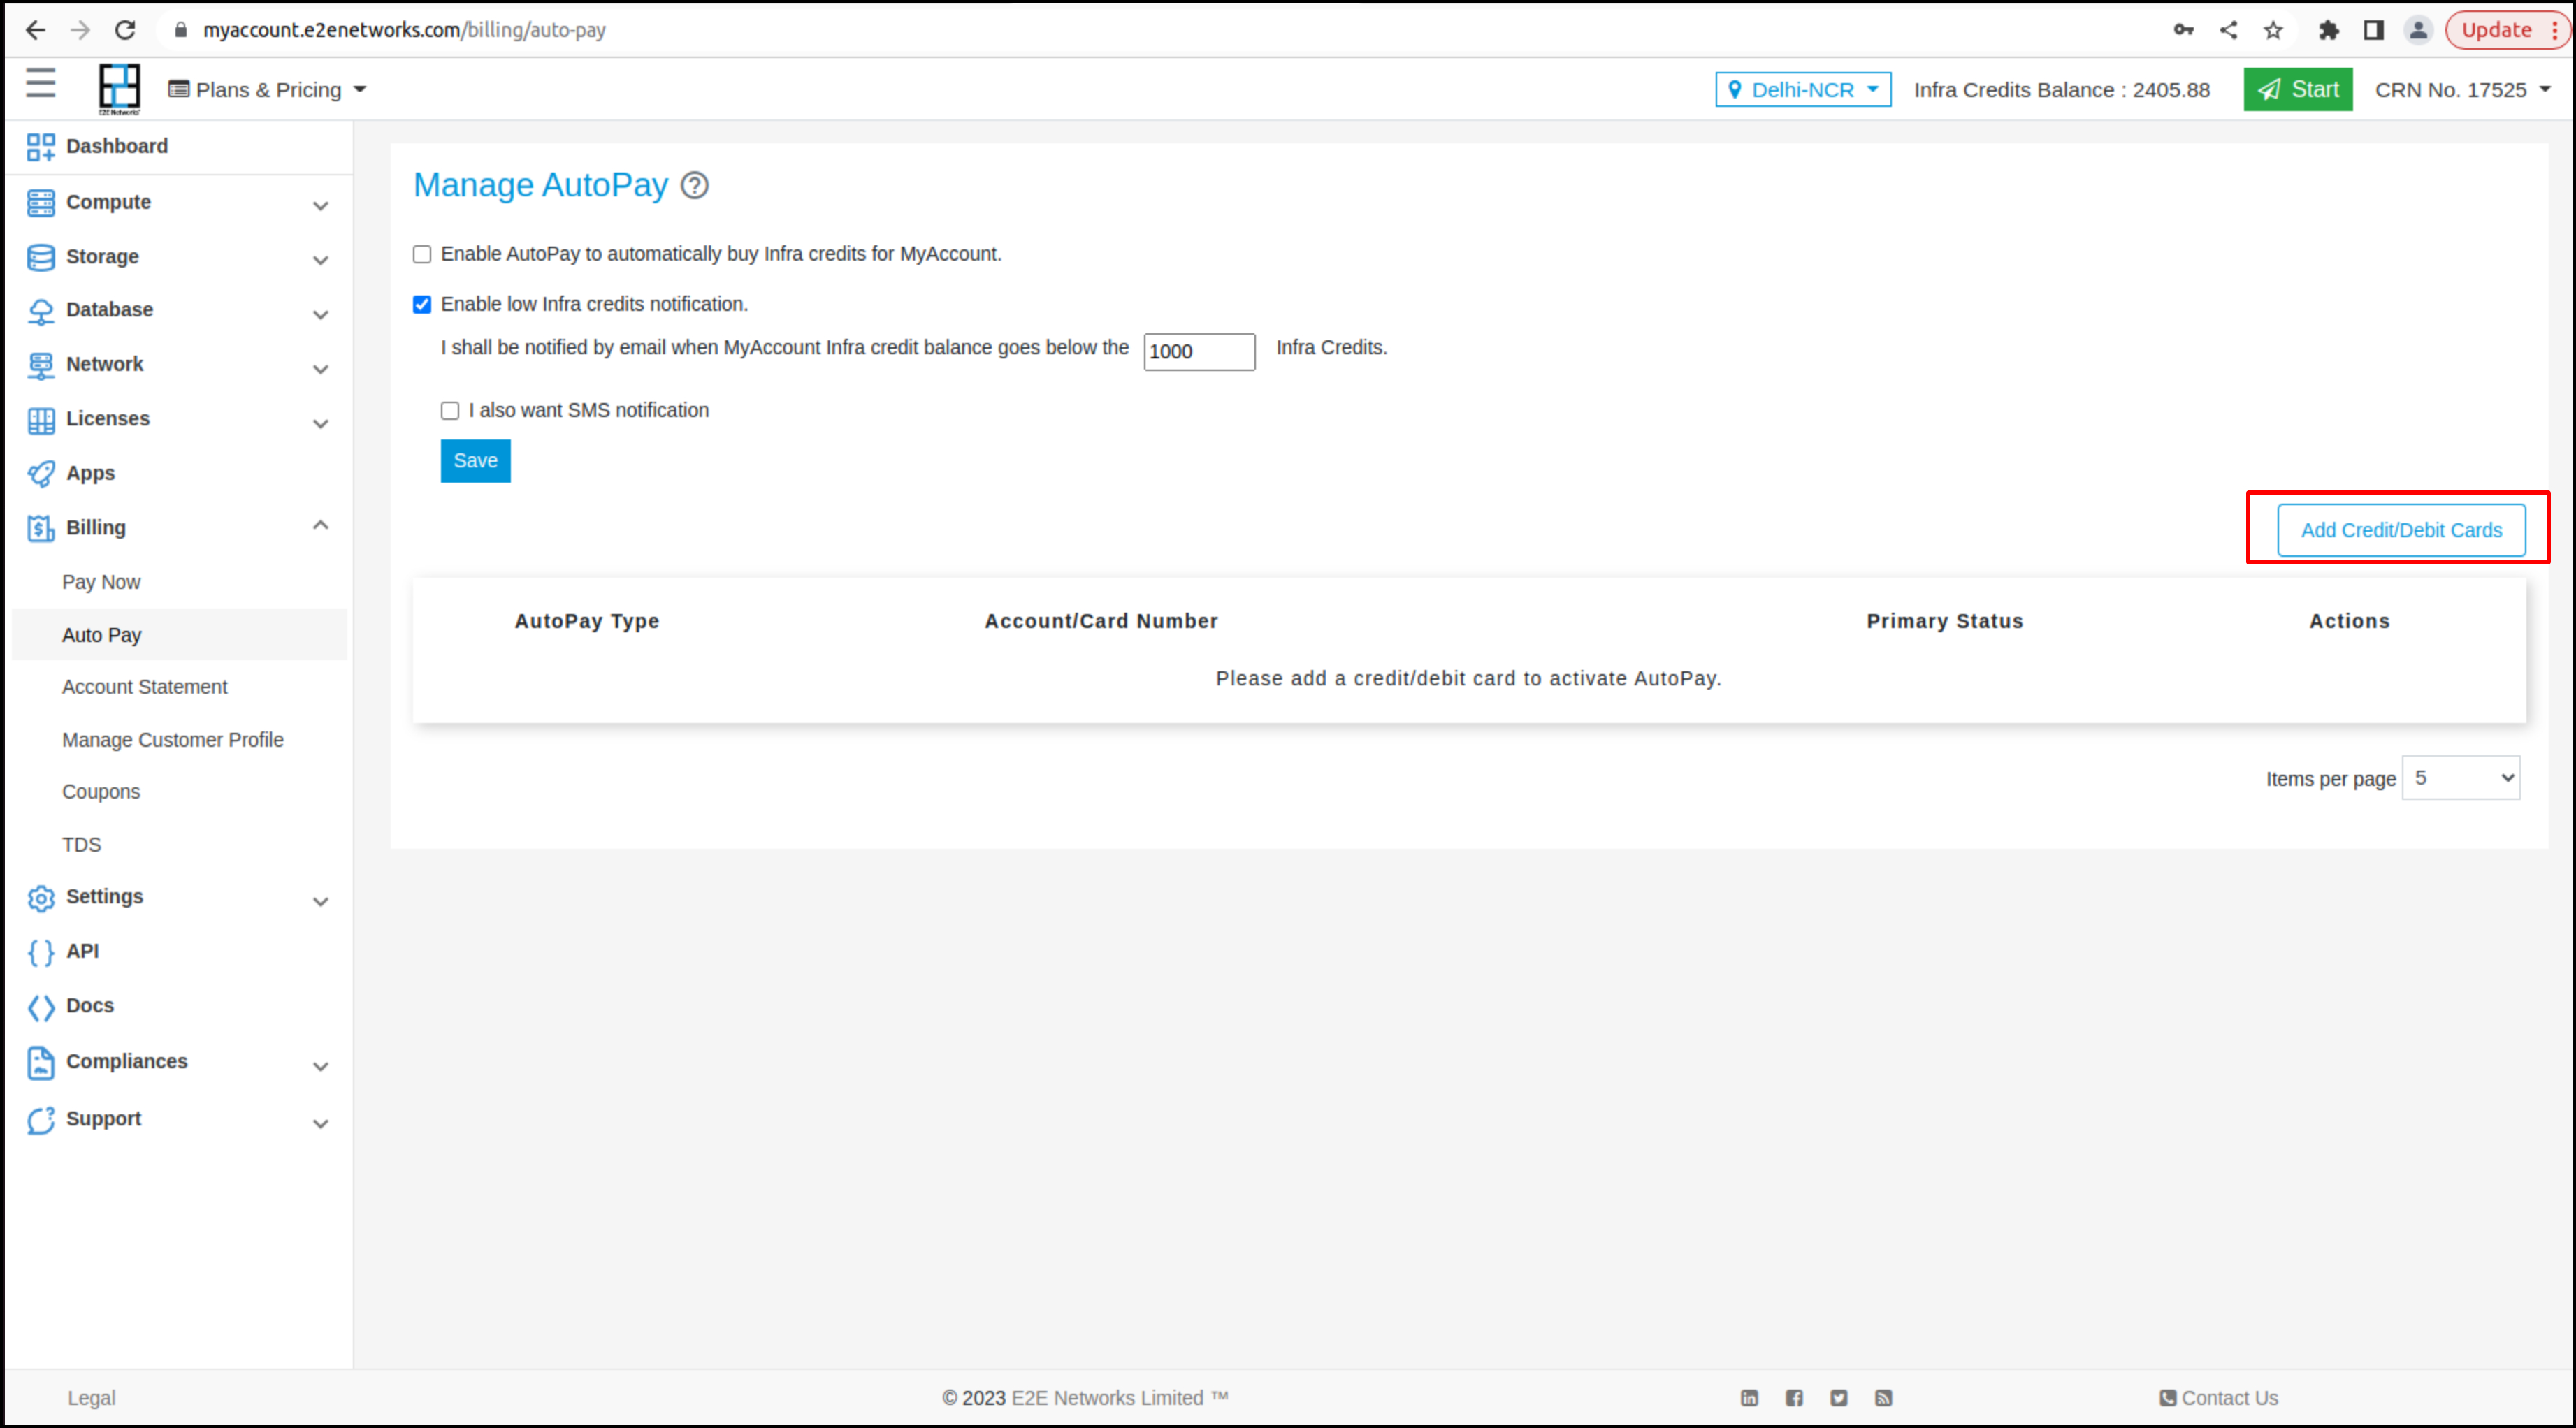
For enabling Autopay & Smart Top Up you have to click on Autopay you need to check on the checkbox of Enable Autopay after clicking enable autopay checkbox then the smart top up will be by default checked and Enabled then you have to click on Save button.
If user wants to disable the SmartTopup then click on enable smart Top Up checkbox and click on Save button to save the changes.
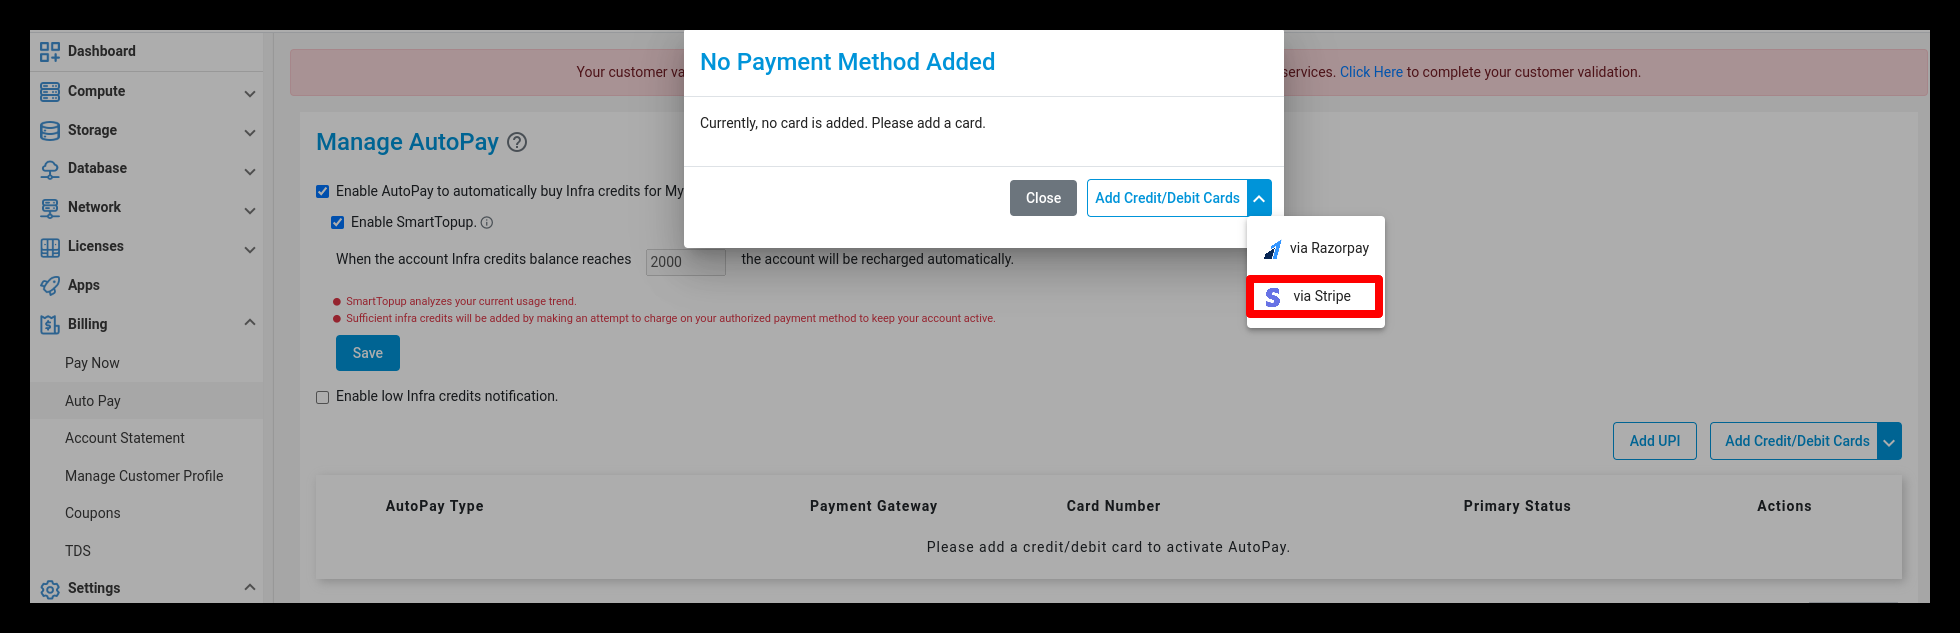
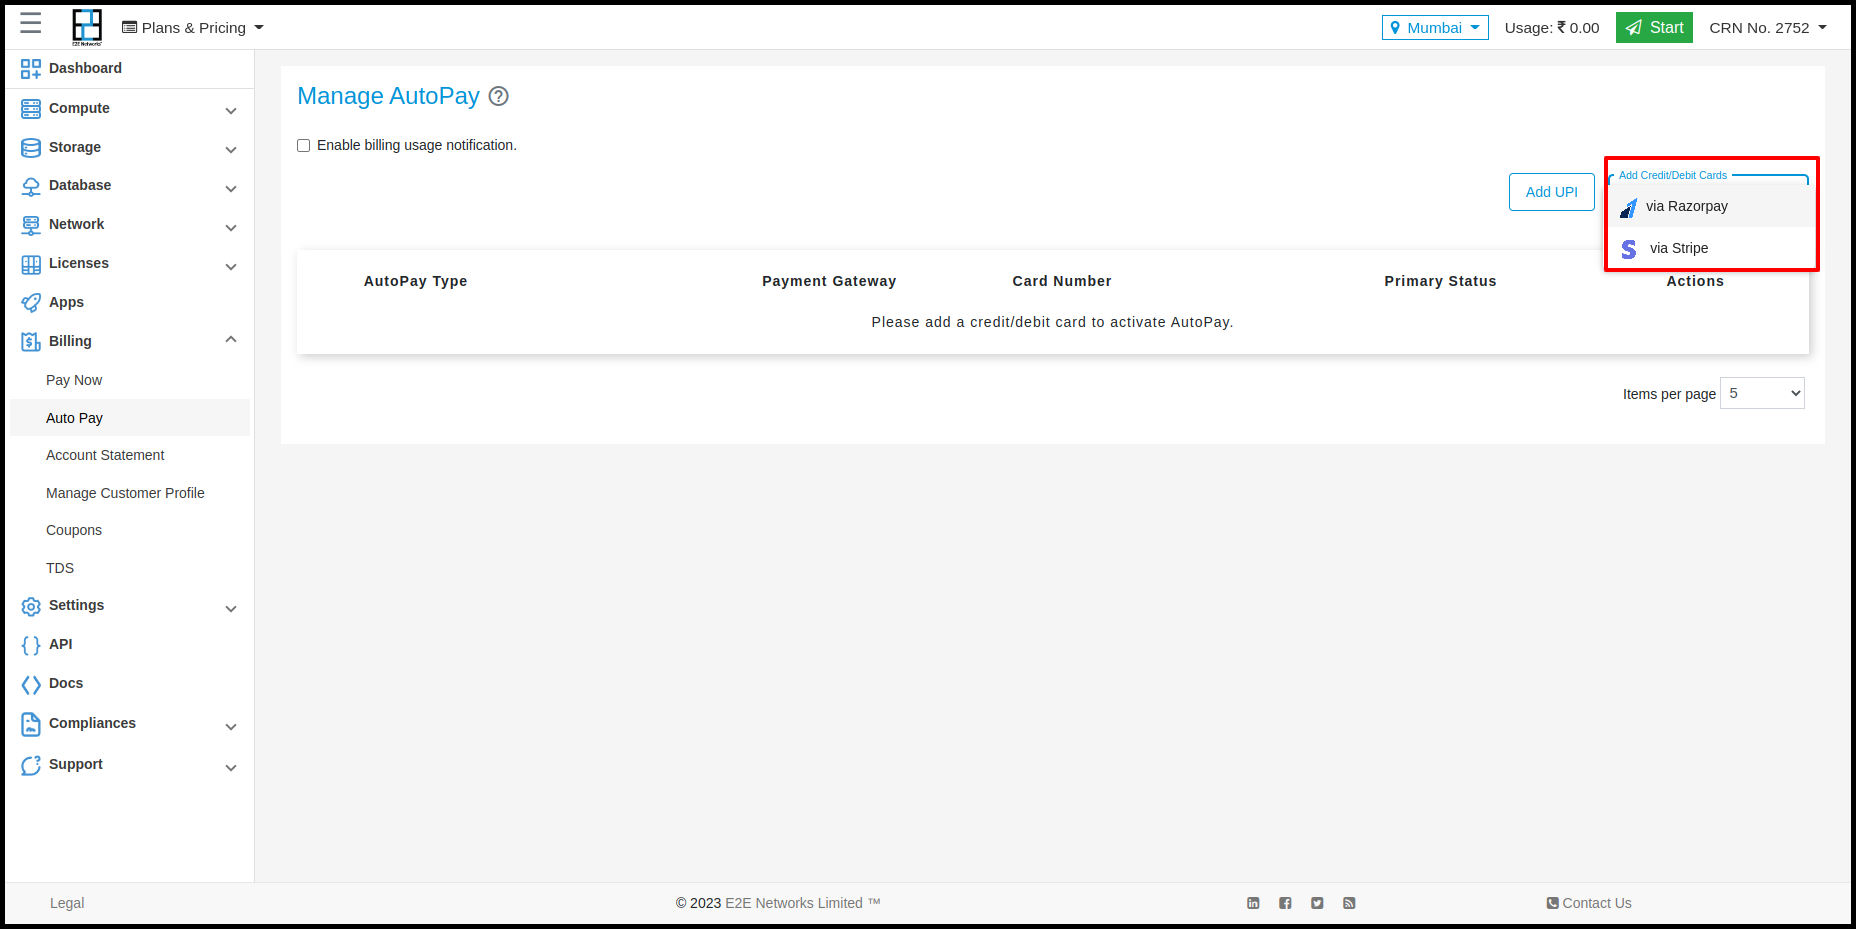
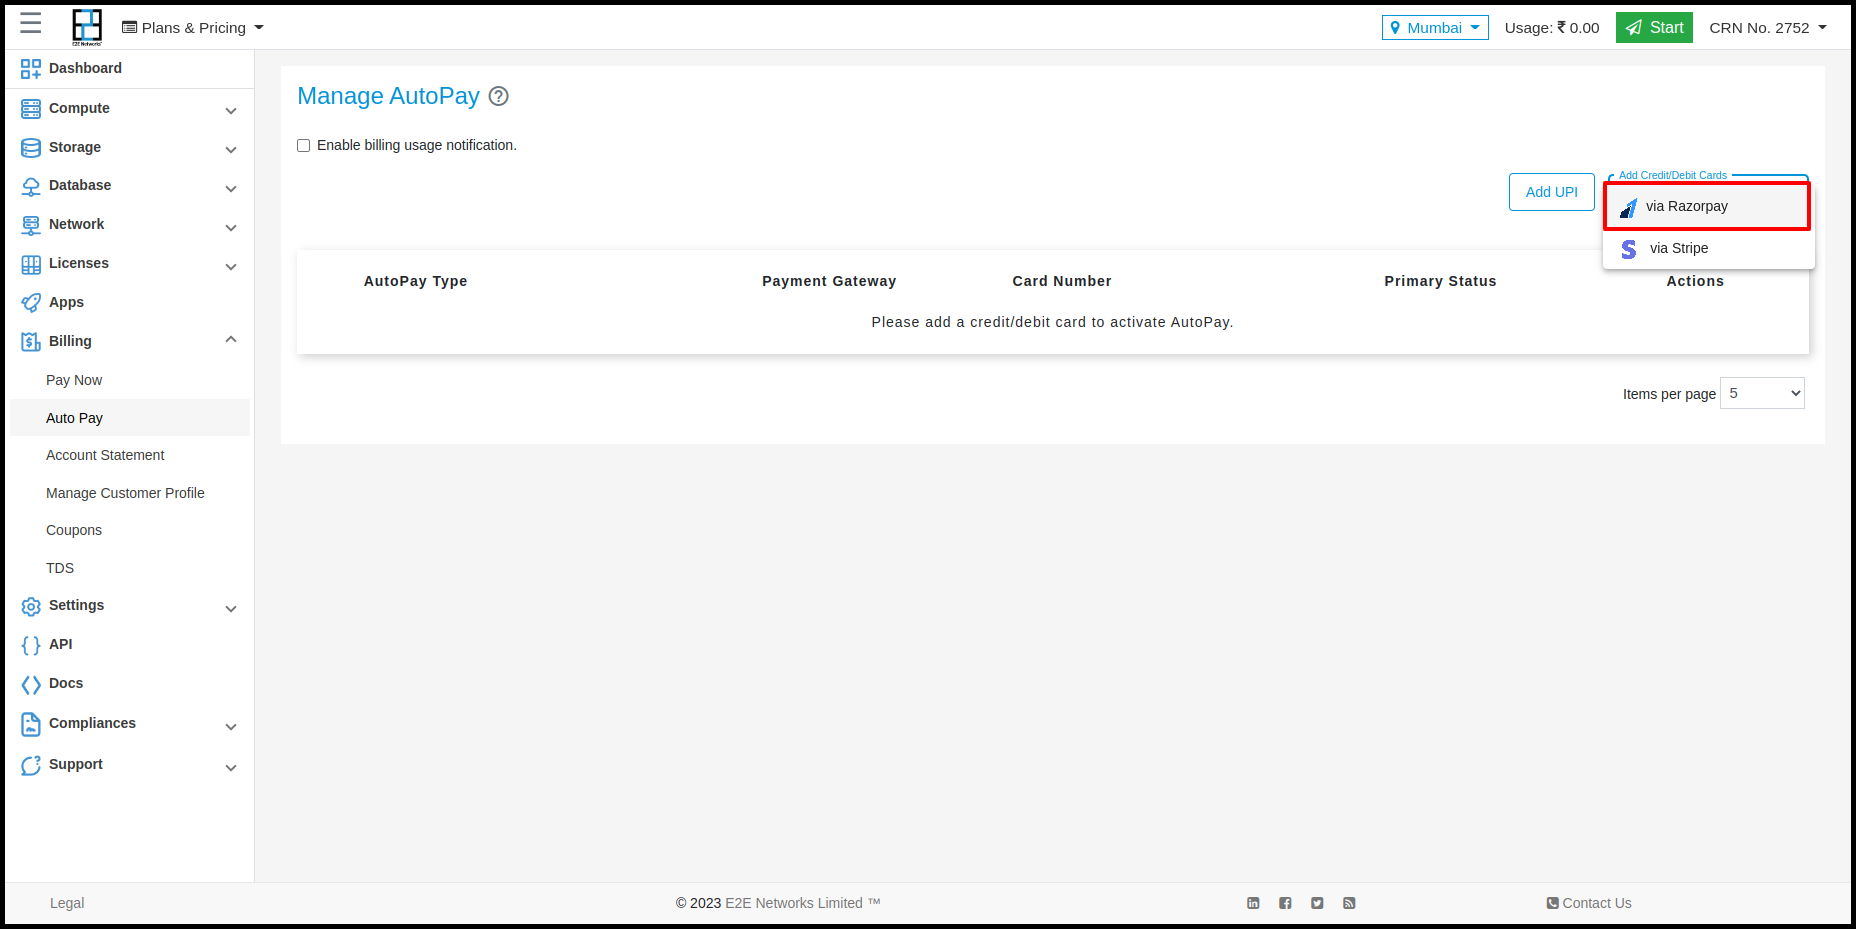
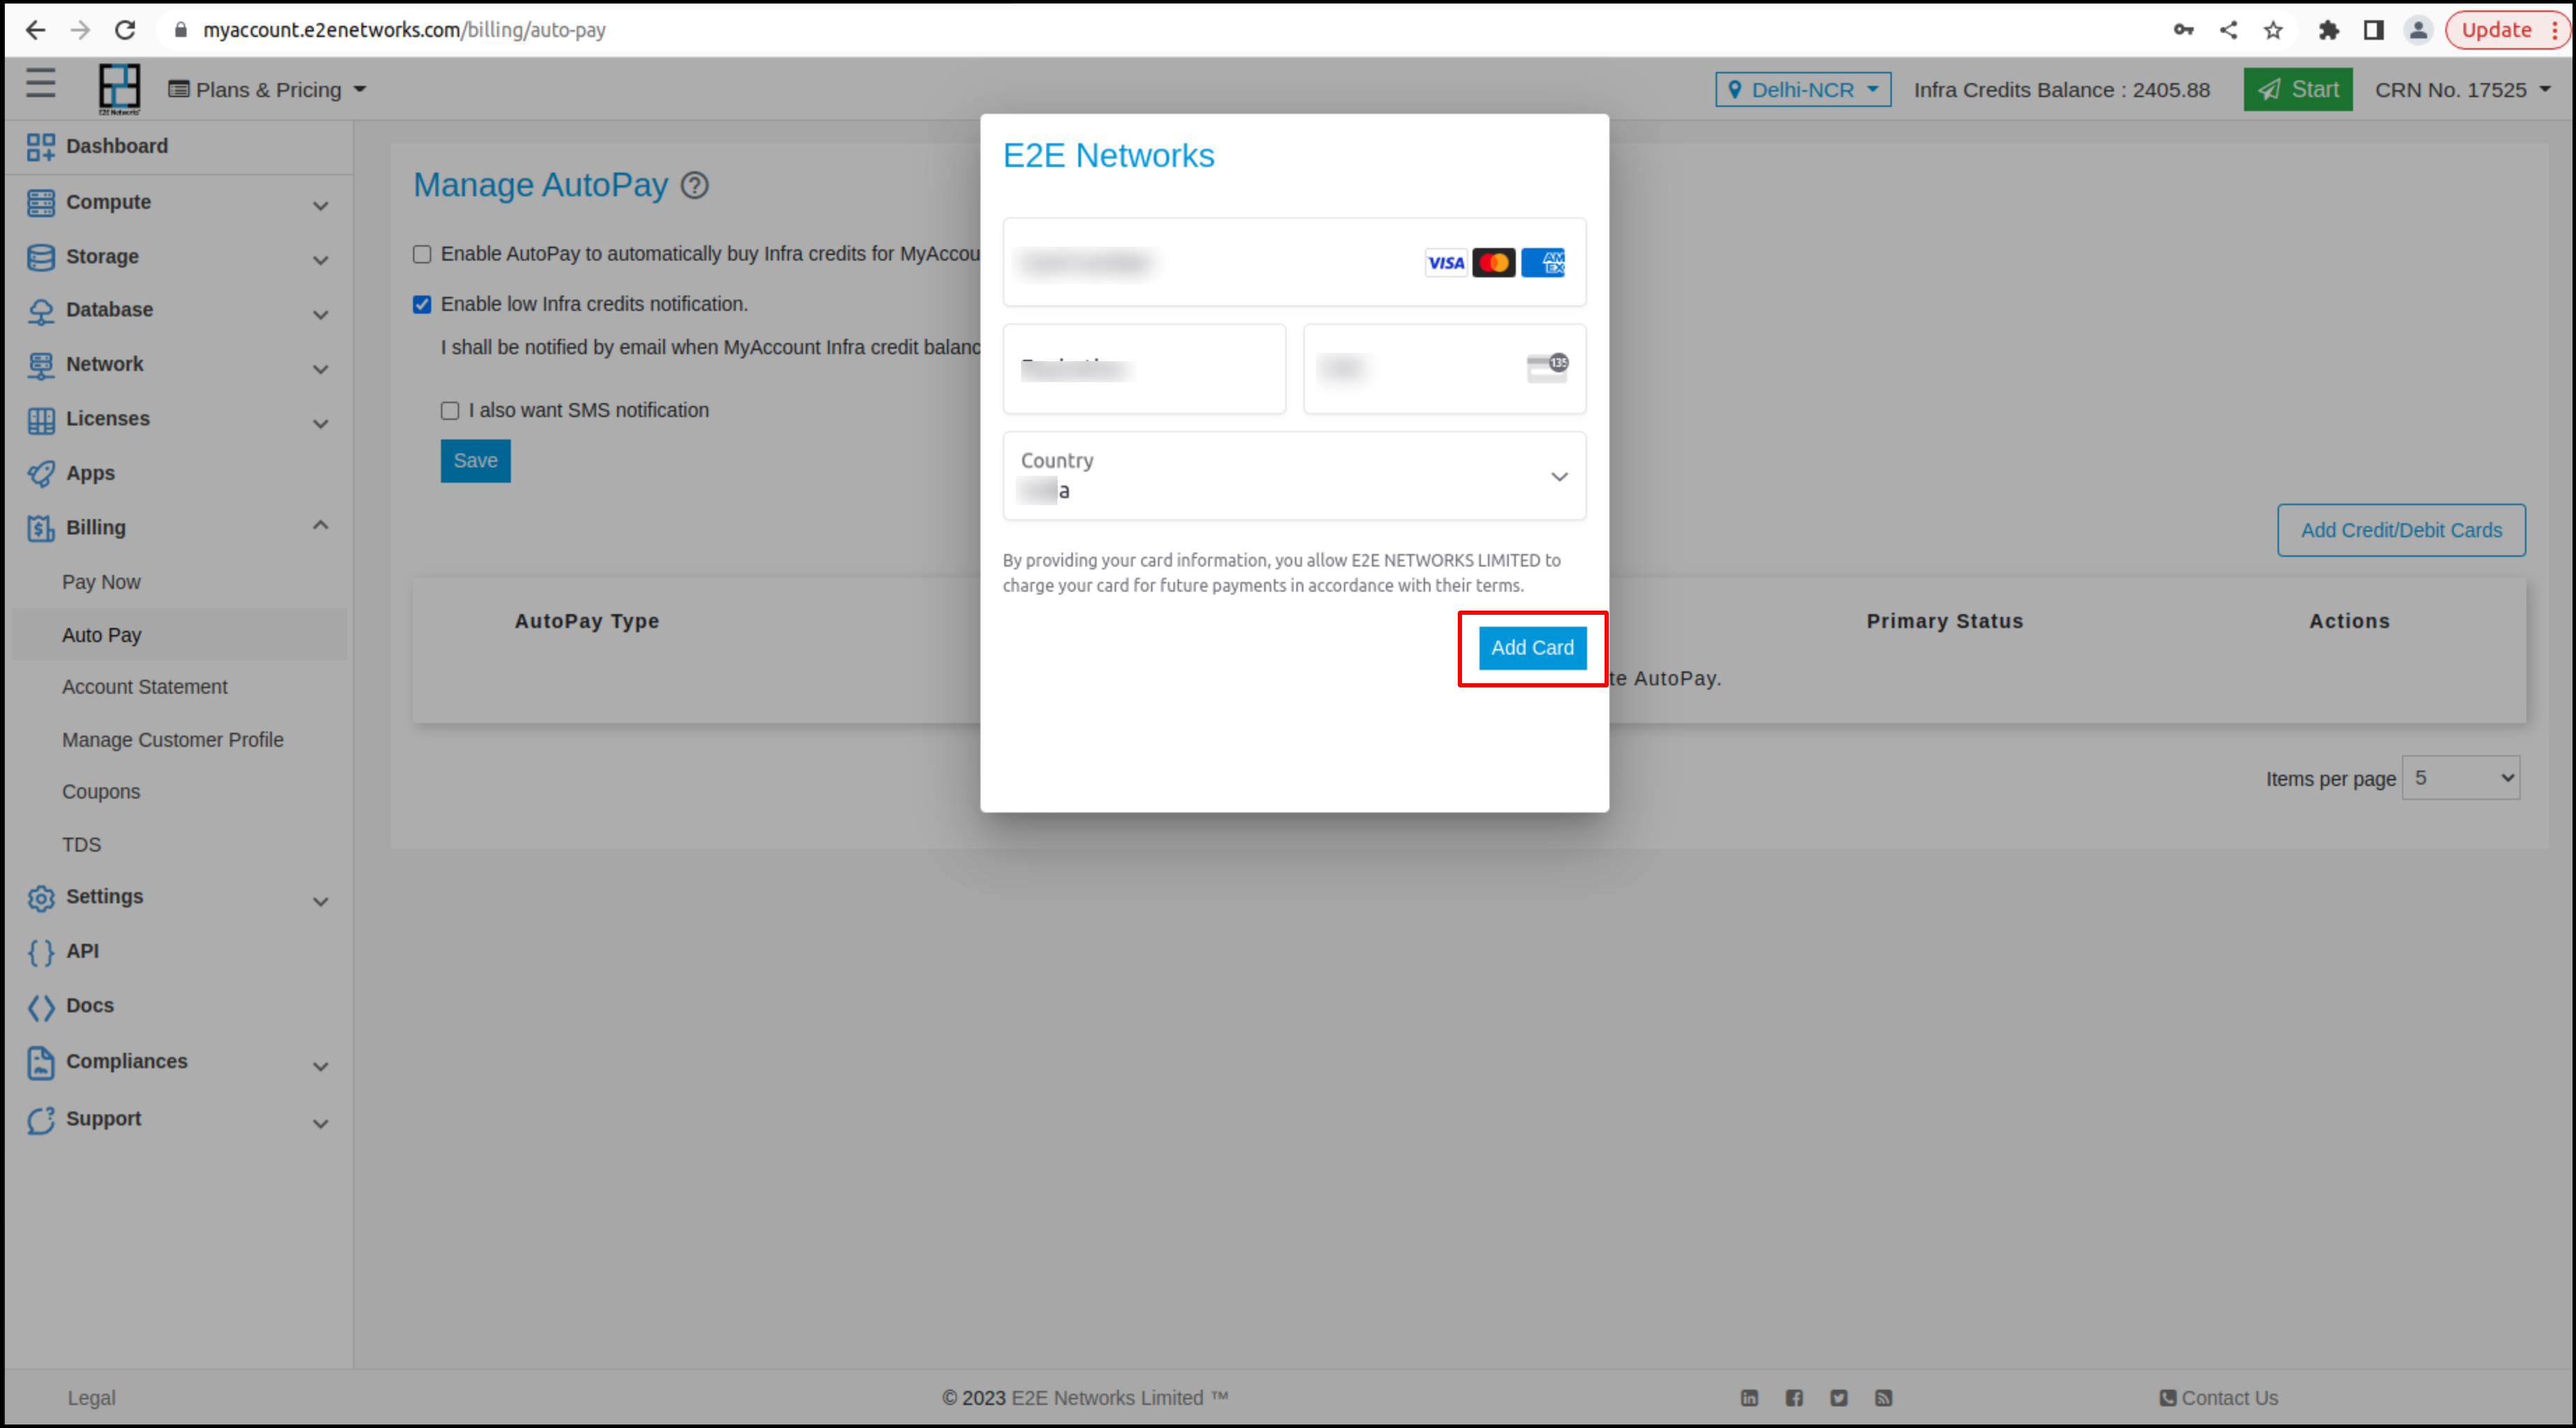
After clicking on save button popup will come on screen for selecting payment gateway as of now E2E providing two payment gateway method azorpay payment gateway and Stripe payment gateway for Autopay. You have to select whatever payment gateway.
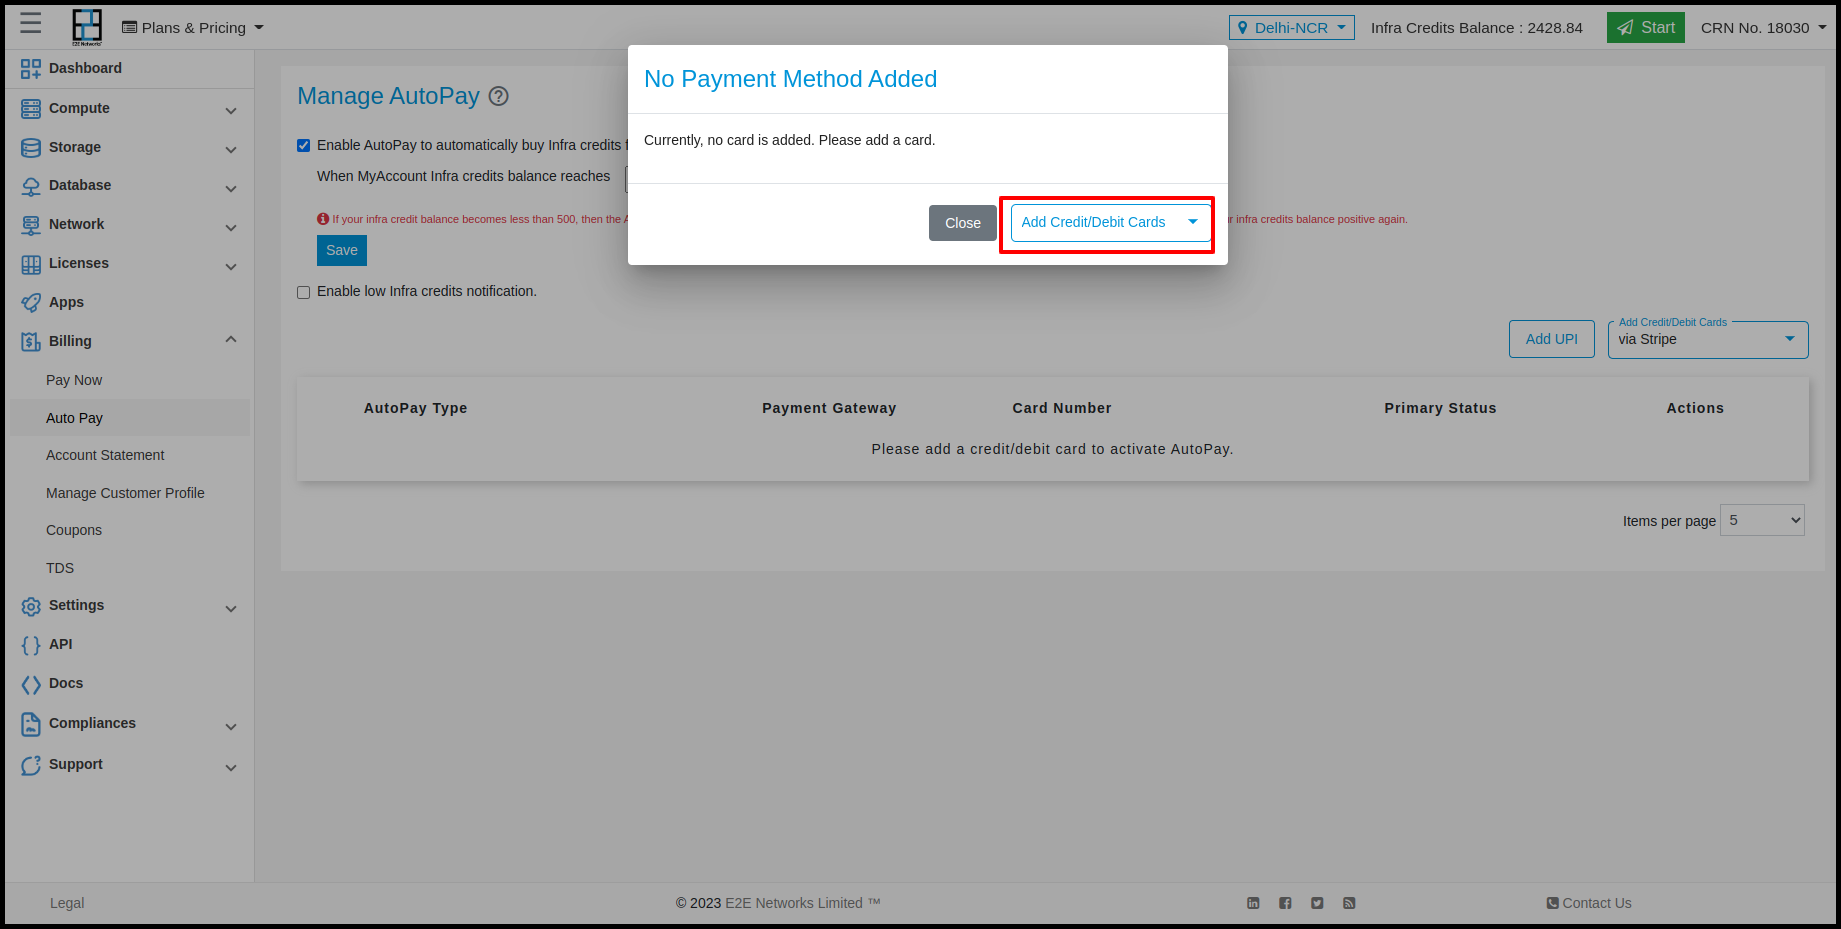
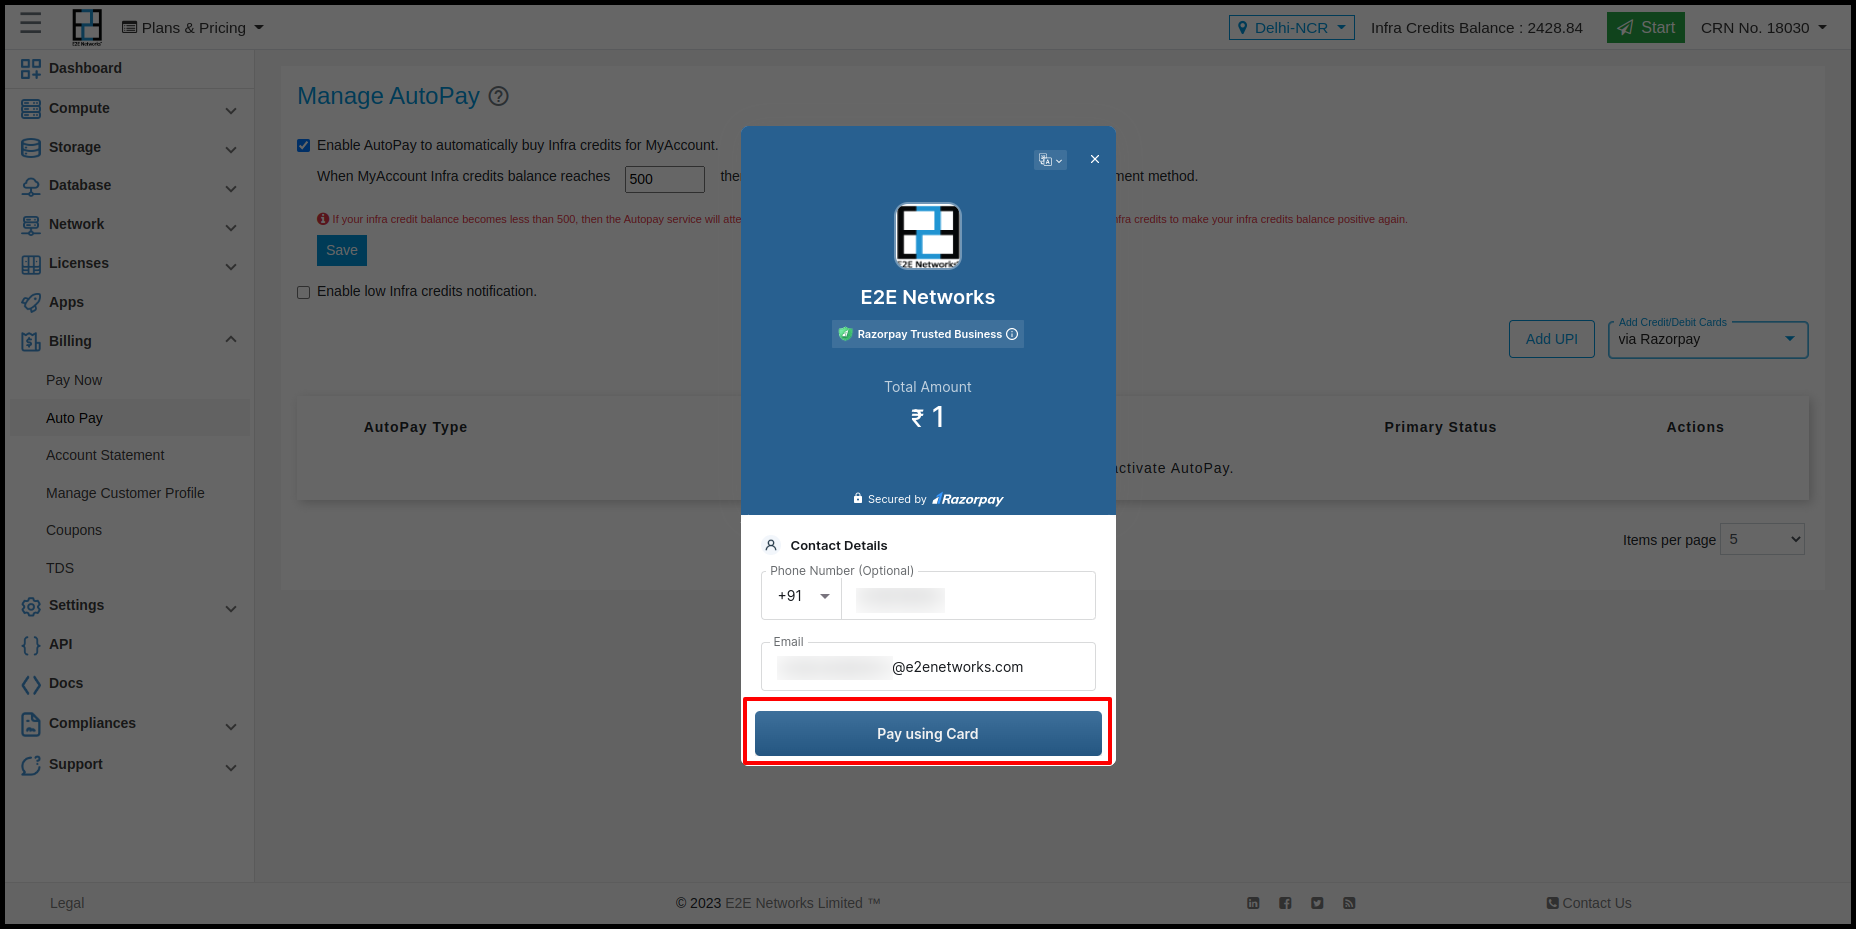
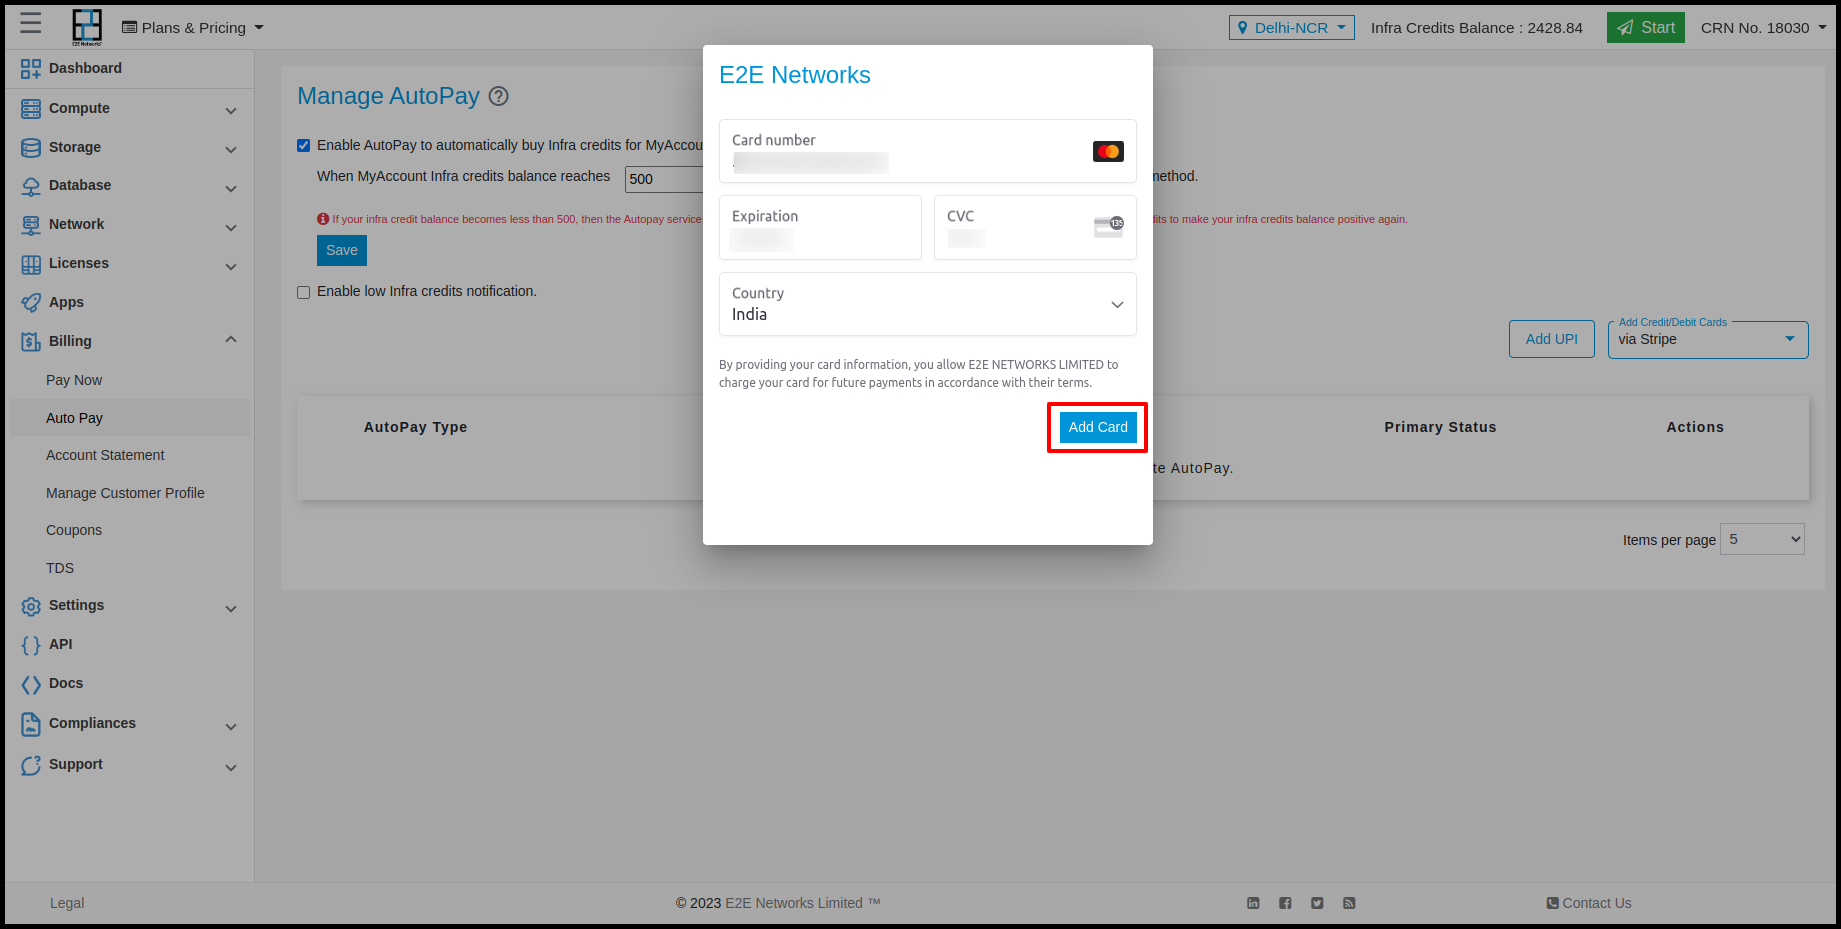
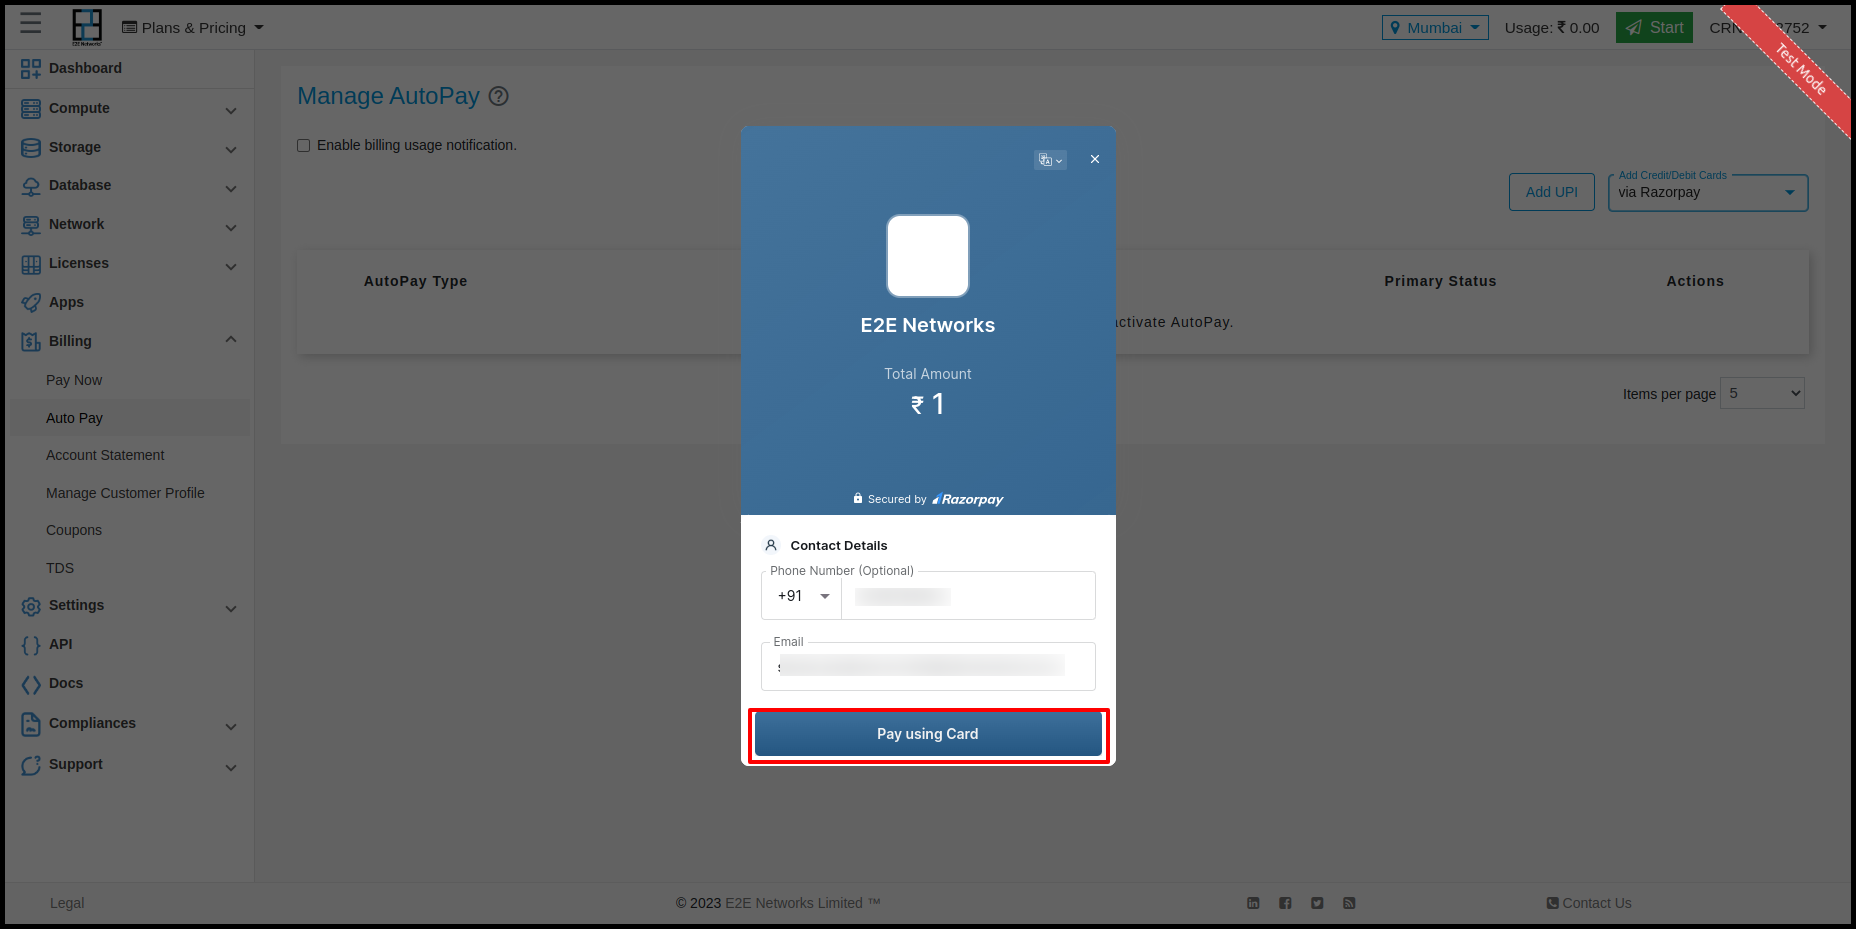
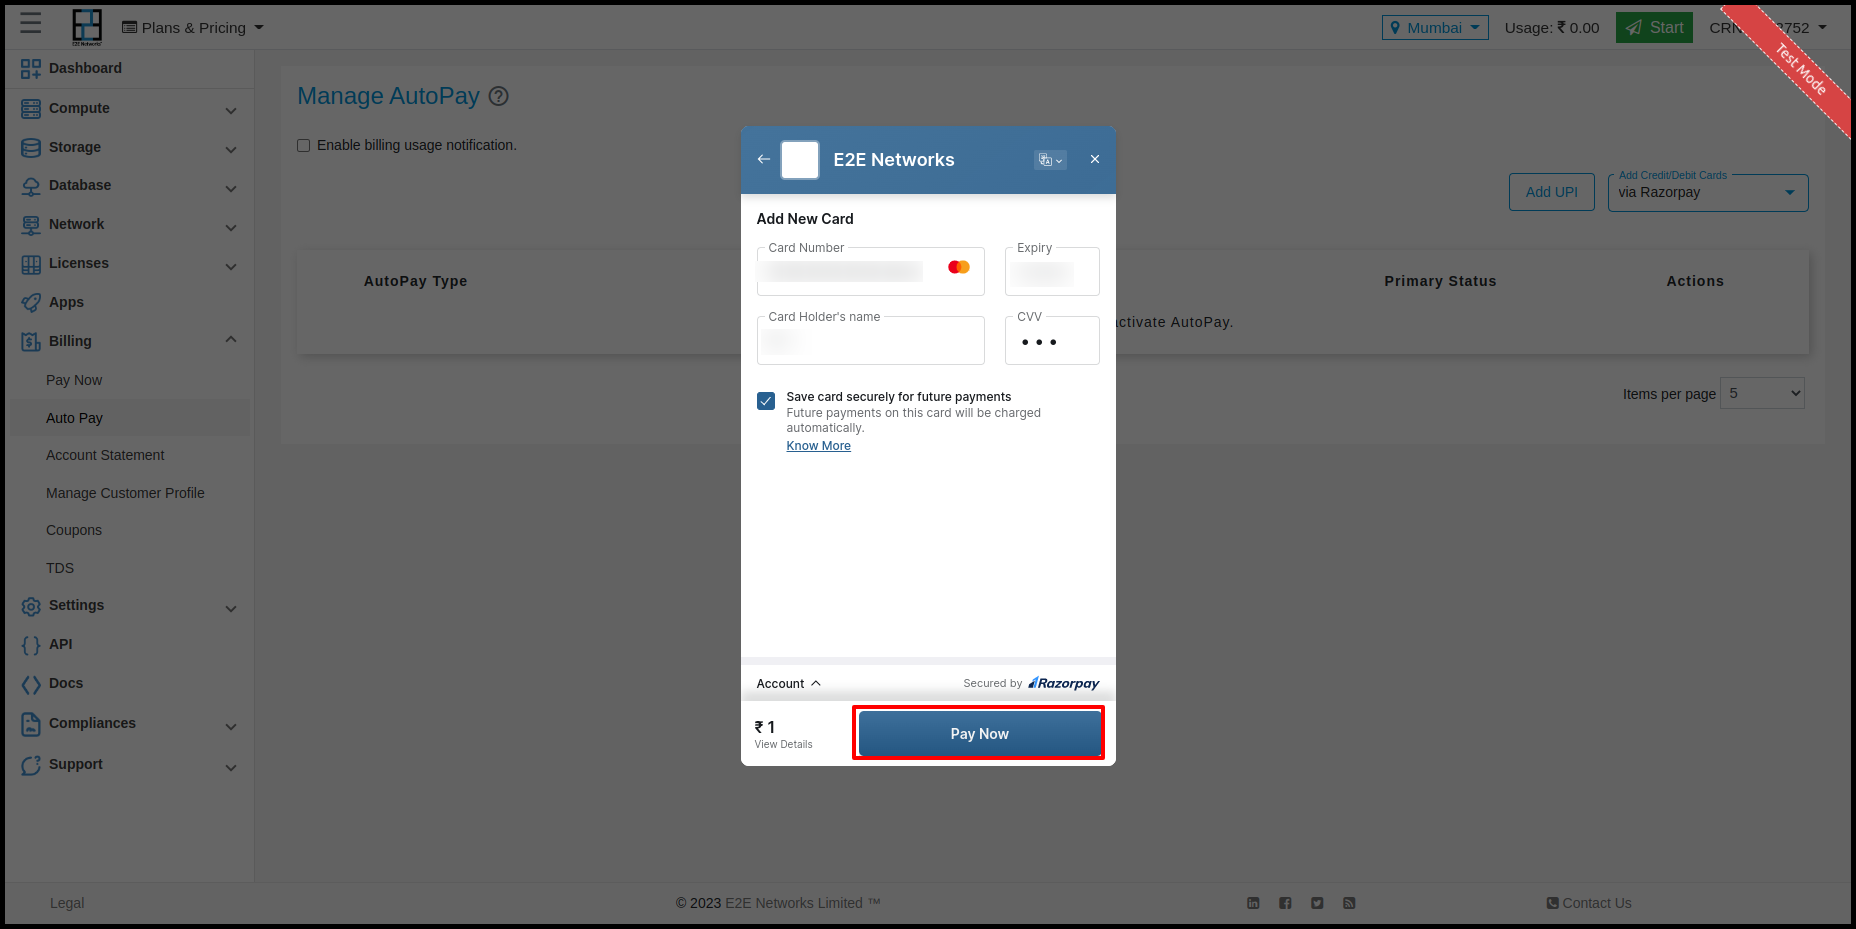
After selecting payment gateway, Payment gateway window will open and you need to enter details of the card and pay ‘₹1’. Then your card will be saved for Autopay.

For Adding more card you need to click on Add Credit/Debit card button and select the payment gateway(Here we have choose Stripe) and enter details and click on save button then your card will be save.
Note
For Indian user’s the auto-pay feature initiates a transaction on the user’s saved card. A pre-debit notification is sent by the bank 24 hours prior to the actual debit. When the amount value is greater than INR 15,000, the customer would have to give an additional approval to the bank to allow the transaction.
Note
Only Mastercard and Visa cards are eligible for processing through the Stripe gateway.
Note
Your Card detail will be saved by the payment gateway partner.
Click on ‘Pay ₹1’ and you will be redirected to the bank page to complete a transaction of ₹1 which will be deducted by the payment gateway to verify the credit card or debit card.
On completing this transaction, The deducted ₹1 will be refunded within 14 working days to the card after the verification.
That’s it! Your Autopay has been set up using the card that will be used for all your payments.
If you’re using the prepaid billing method then you need to follow additional steps:
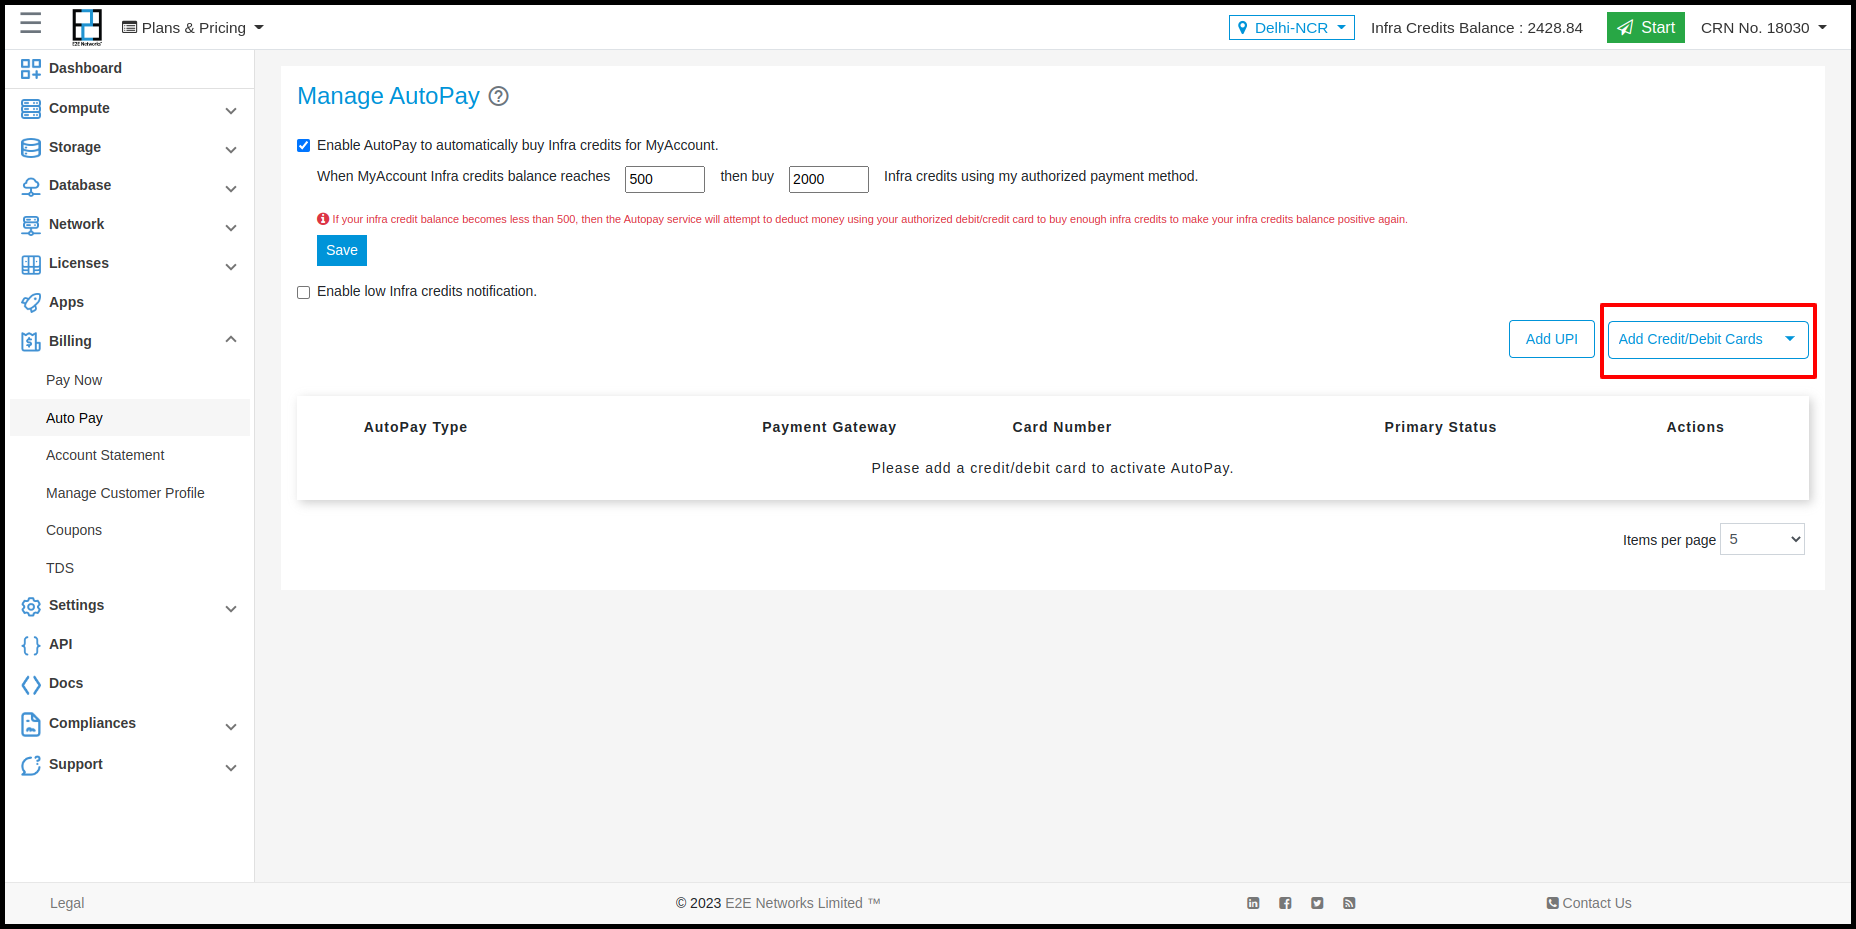
You need to tick the checkbox that says “Enable AutoPay to automatically buy Infra credits for MyAccount”.
In the “When MyAccount Infra credits balance reaches” field, you need to enter the threshold value.
In the “then buy” field, enter the number of infra credits you would like to purchase automatically when the infra credit balance reaches the threshold amount. Then, Click on ‘Save’.
Note
There is a minimum value ₹2000 which you can enter in the “then buy” field.
Whenever your account is topped up automatically, you will receive email alerts from your bank. If the transaction fails on the primary card provided by you, an email notification will be sent to you.
You can add multiple cards by following the above steps.
Note
You need to have at least one active card added under “Manage Cards”. If there is no card added, automatic payment setup cannot be done.
If the transaction fails on the primary card provided by you, an email notification will be sent to you.
The behaviour for Postpaid Customers
For Enabling Autopay firstly you need to click Billing from side nav bar and click on Autopay
After that you have to click on Add Credit/Debit card button.
After clicking on Add Credit/Debit card button you have to select payment gateway.
After selecting payment gateway, Payment gateway window will open and you need to enter details of the card and pay ‘₹1’. Then your card will be saved for Autopay.
Note
Your Card detail will be saved by the payment gateway partner.
Click on ‘Pay ₹1’ and you will be redirected to the bank page to complete a transaction of ₹1 which will be deducted by the payment gateway to verify the credit card or debit card.
On completing this transaction, The deducted ₹1 will be refunded within 14 working days to the card after the verification.
That’s it! Your Autopay has been set up using the card that will be used for all your payments.
PayNow
“PayNow” method is used for making a one-time payment of any amount using a credit card, a debit card, net banking, e-wallets, or a unified payment interface(UPI).
Login to MyAccount at https://myaccount.e2enetworks.com
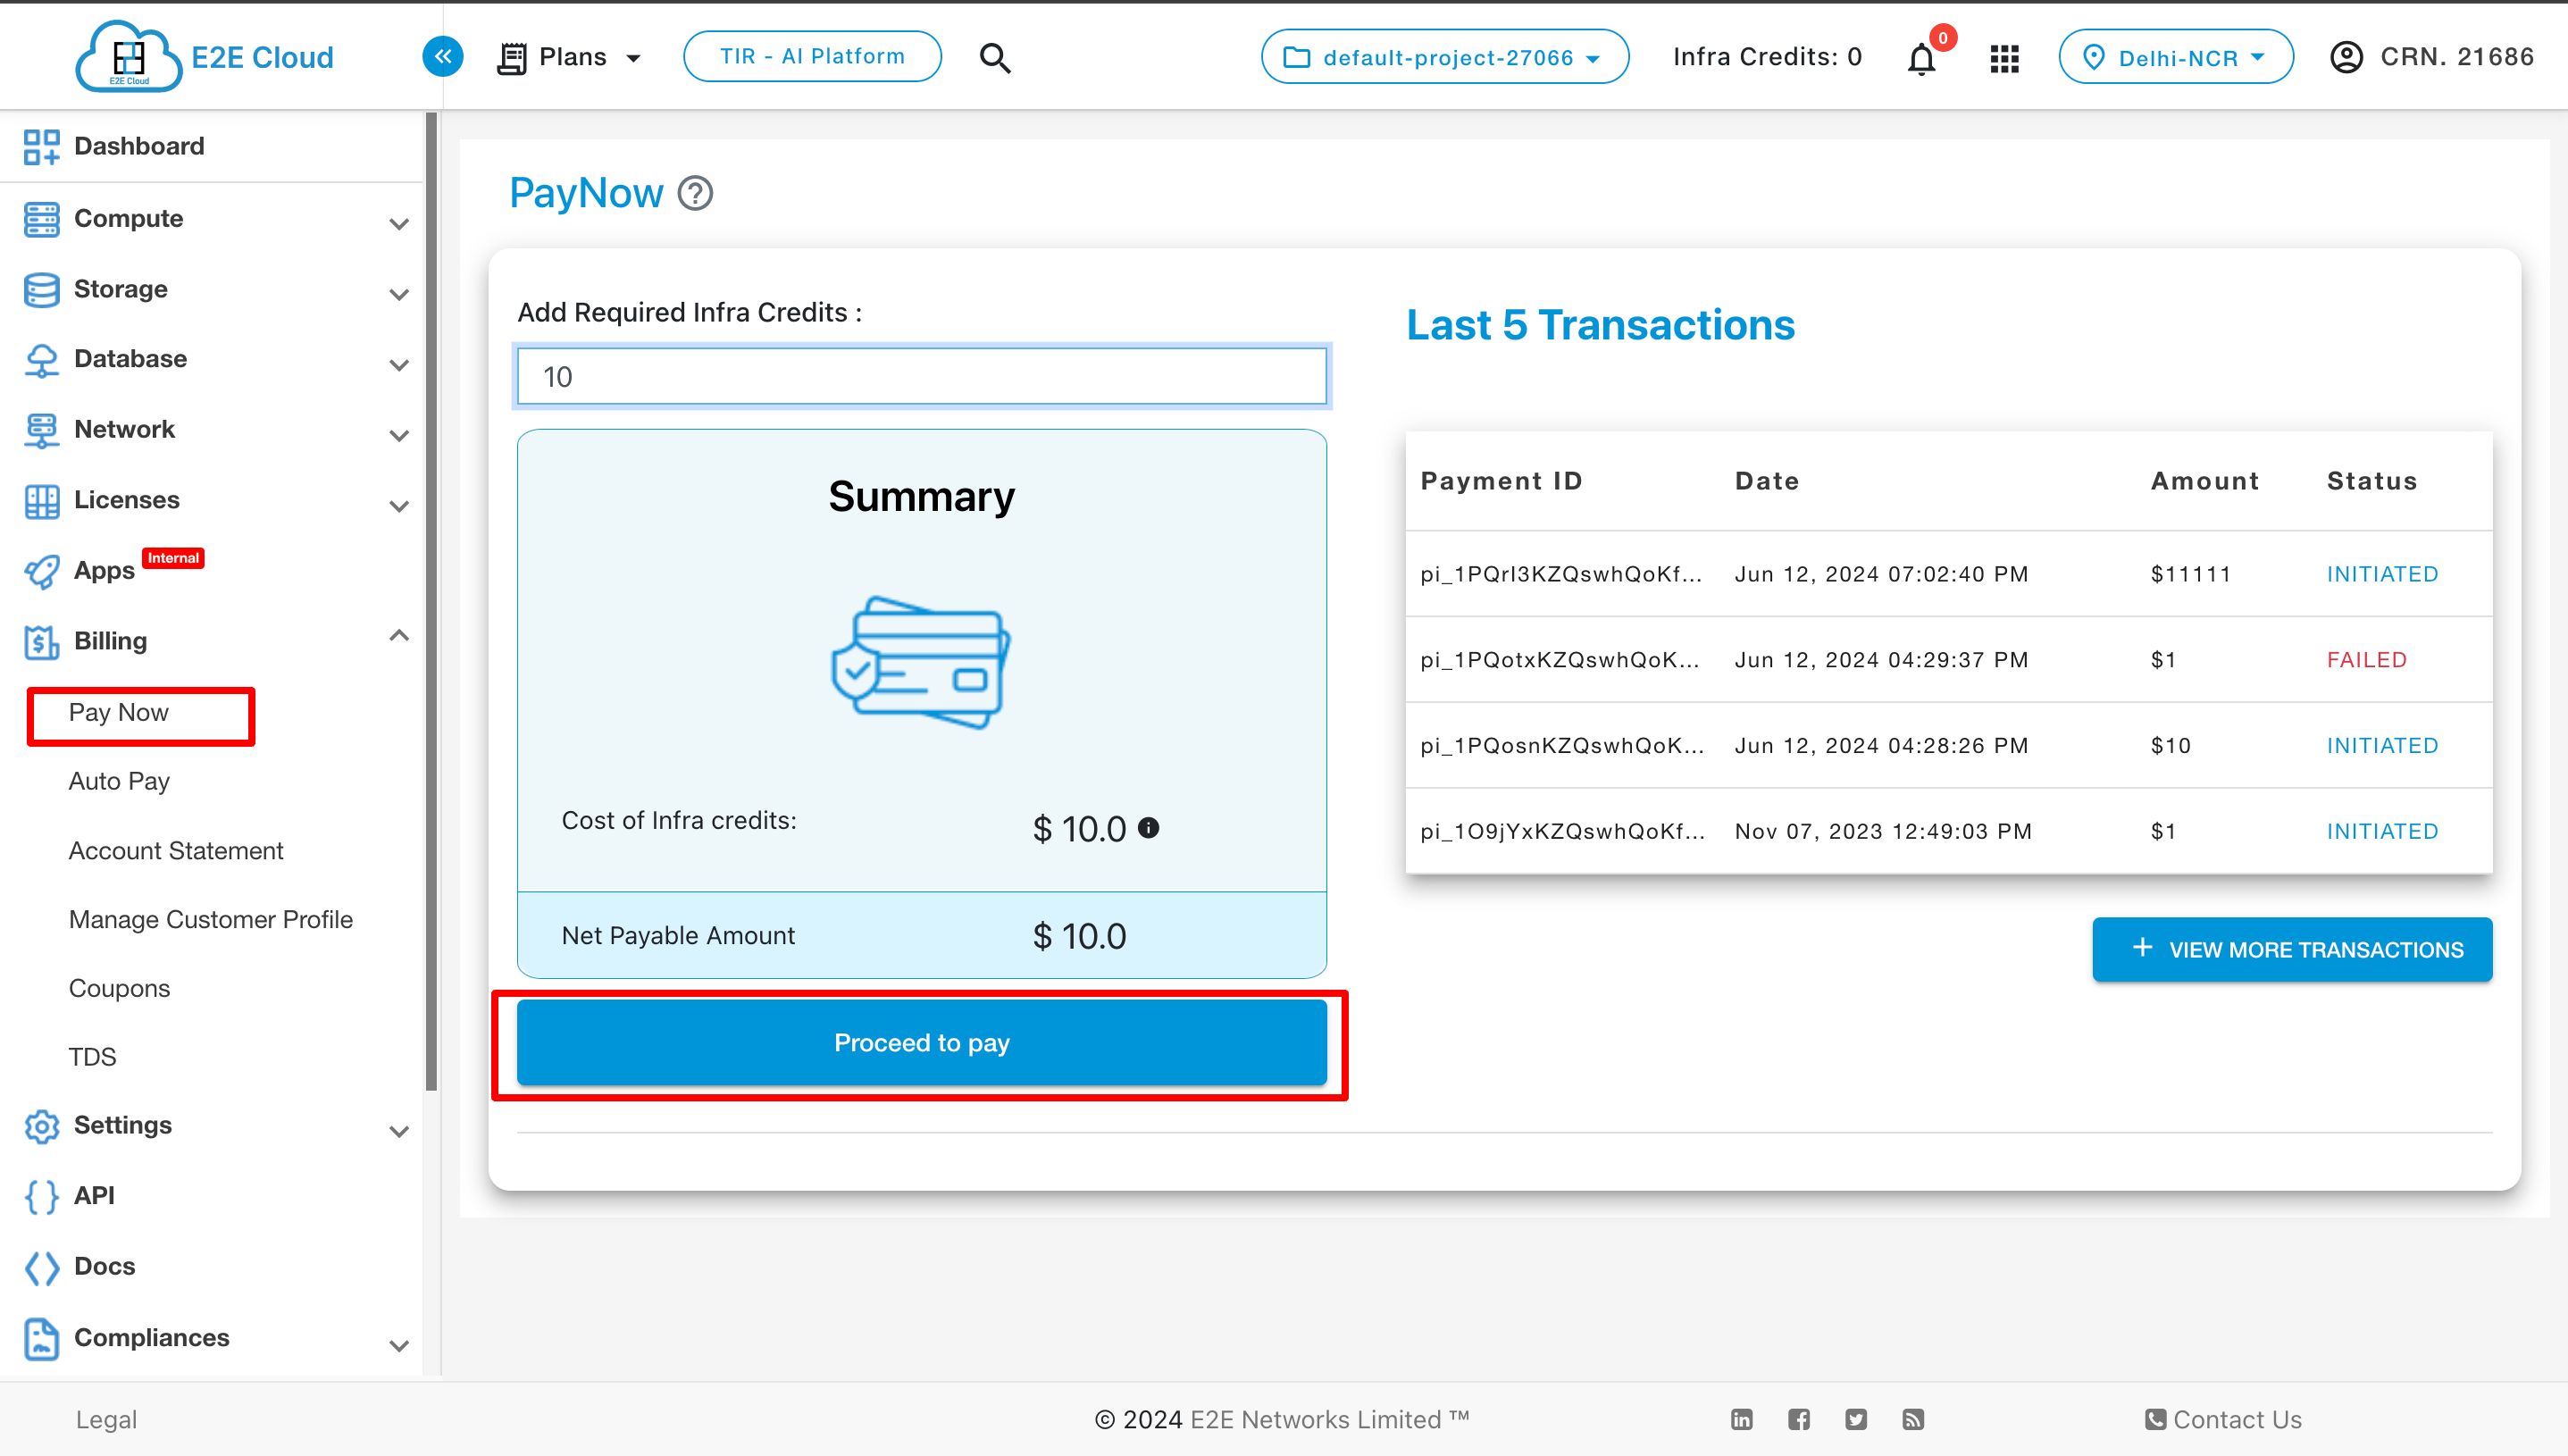
On the left side of the MyAccount dashboard, click on the “PayNow” sub-menu available under the Billing section.
The behavior for Prepaid User
For a prepaid user, the amount paid shall be used to buy infra-credits.
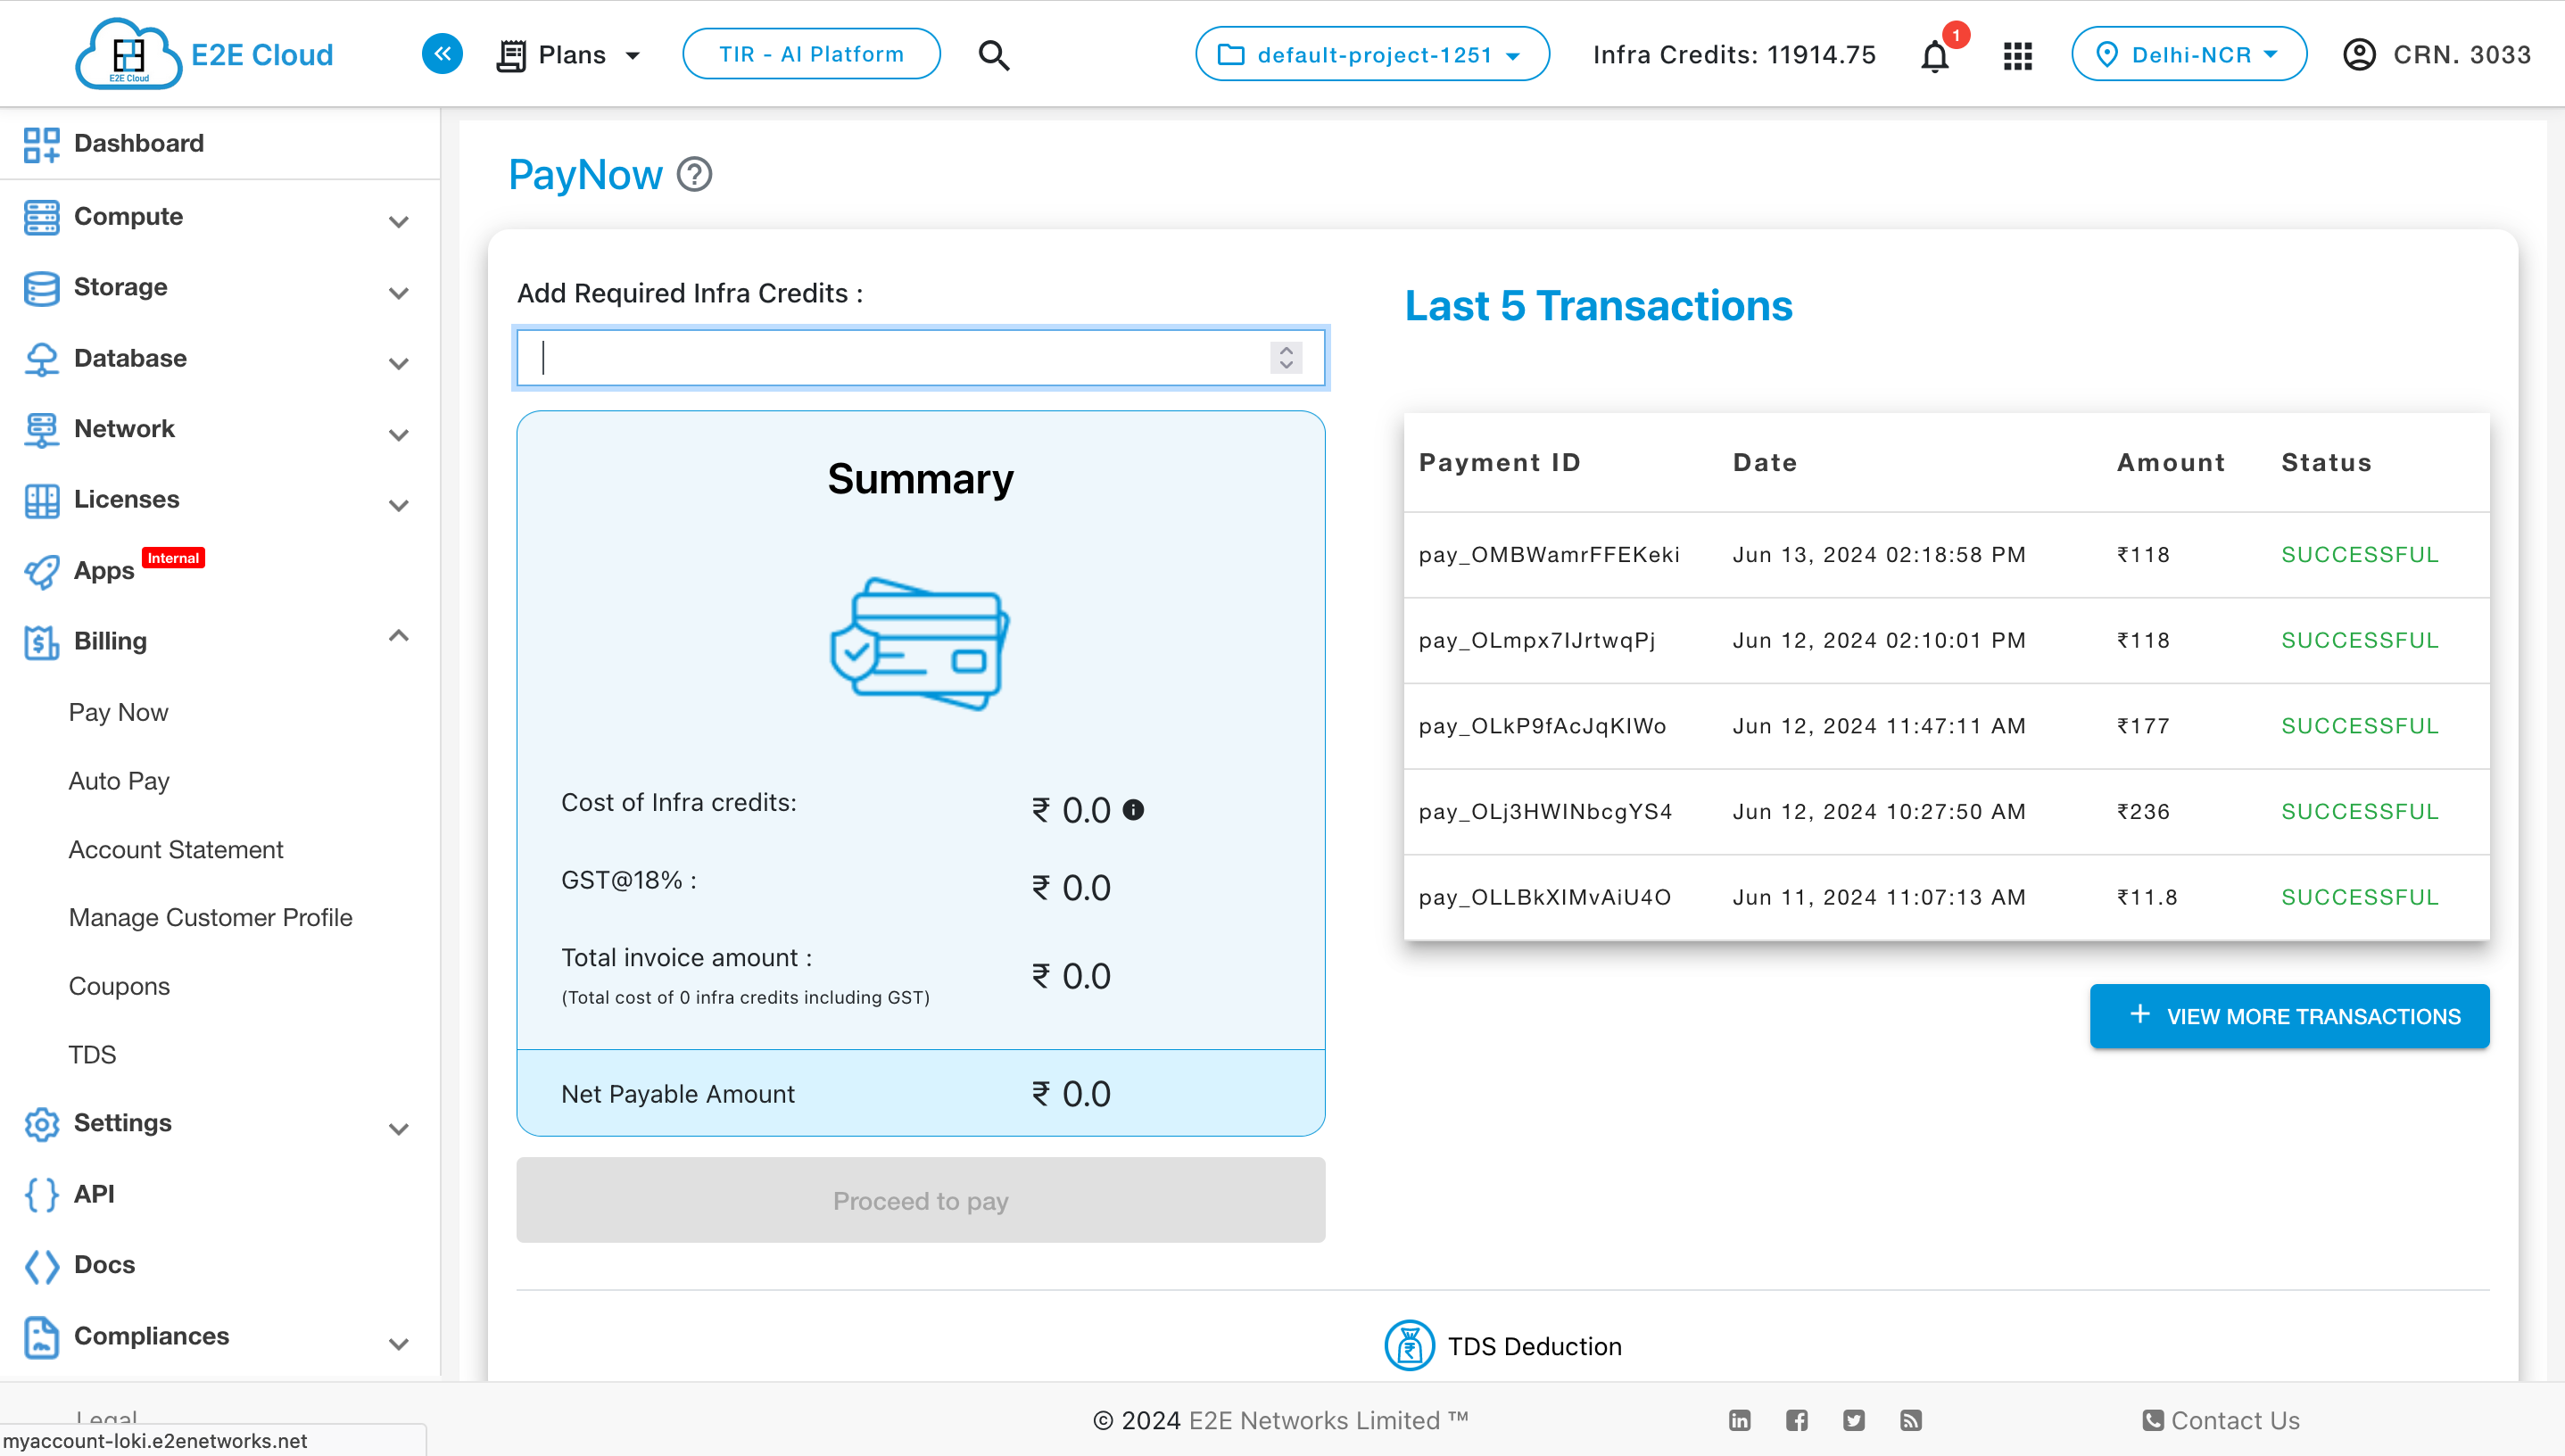
You can view your last 5 transactions on the PayNow page. To see more transactions, click the “View More Transactions” button.
In the ‘Add Required infra credits’ field, you need to enter the number of Infra credits you want to purchase.
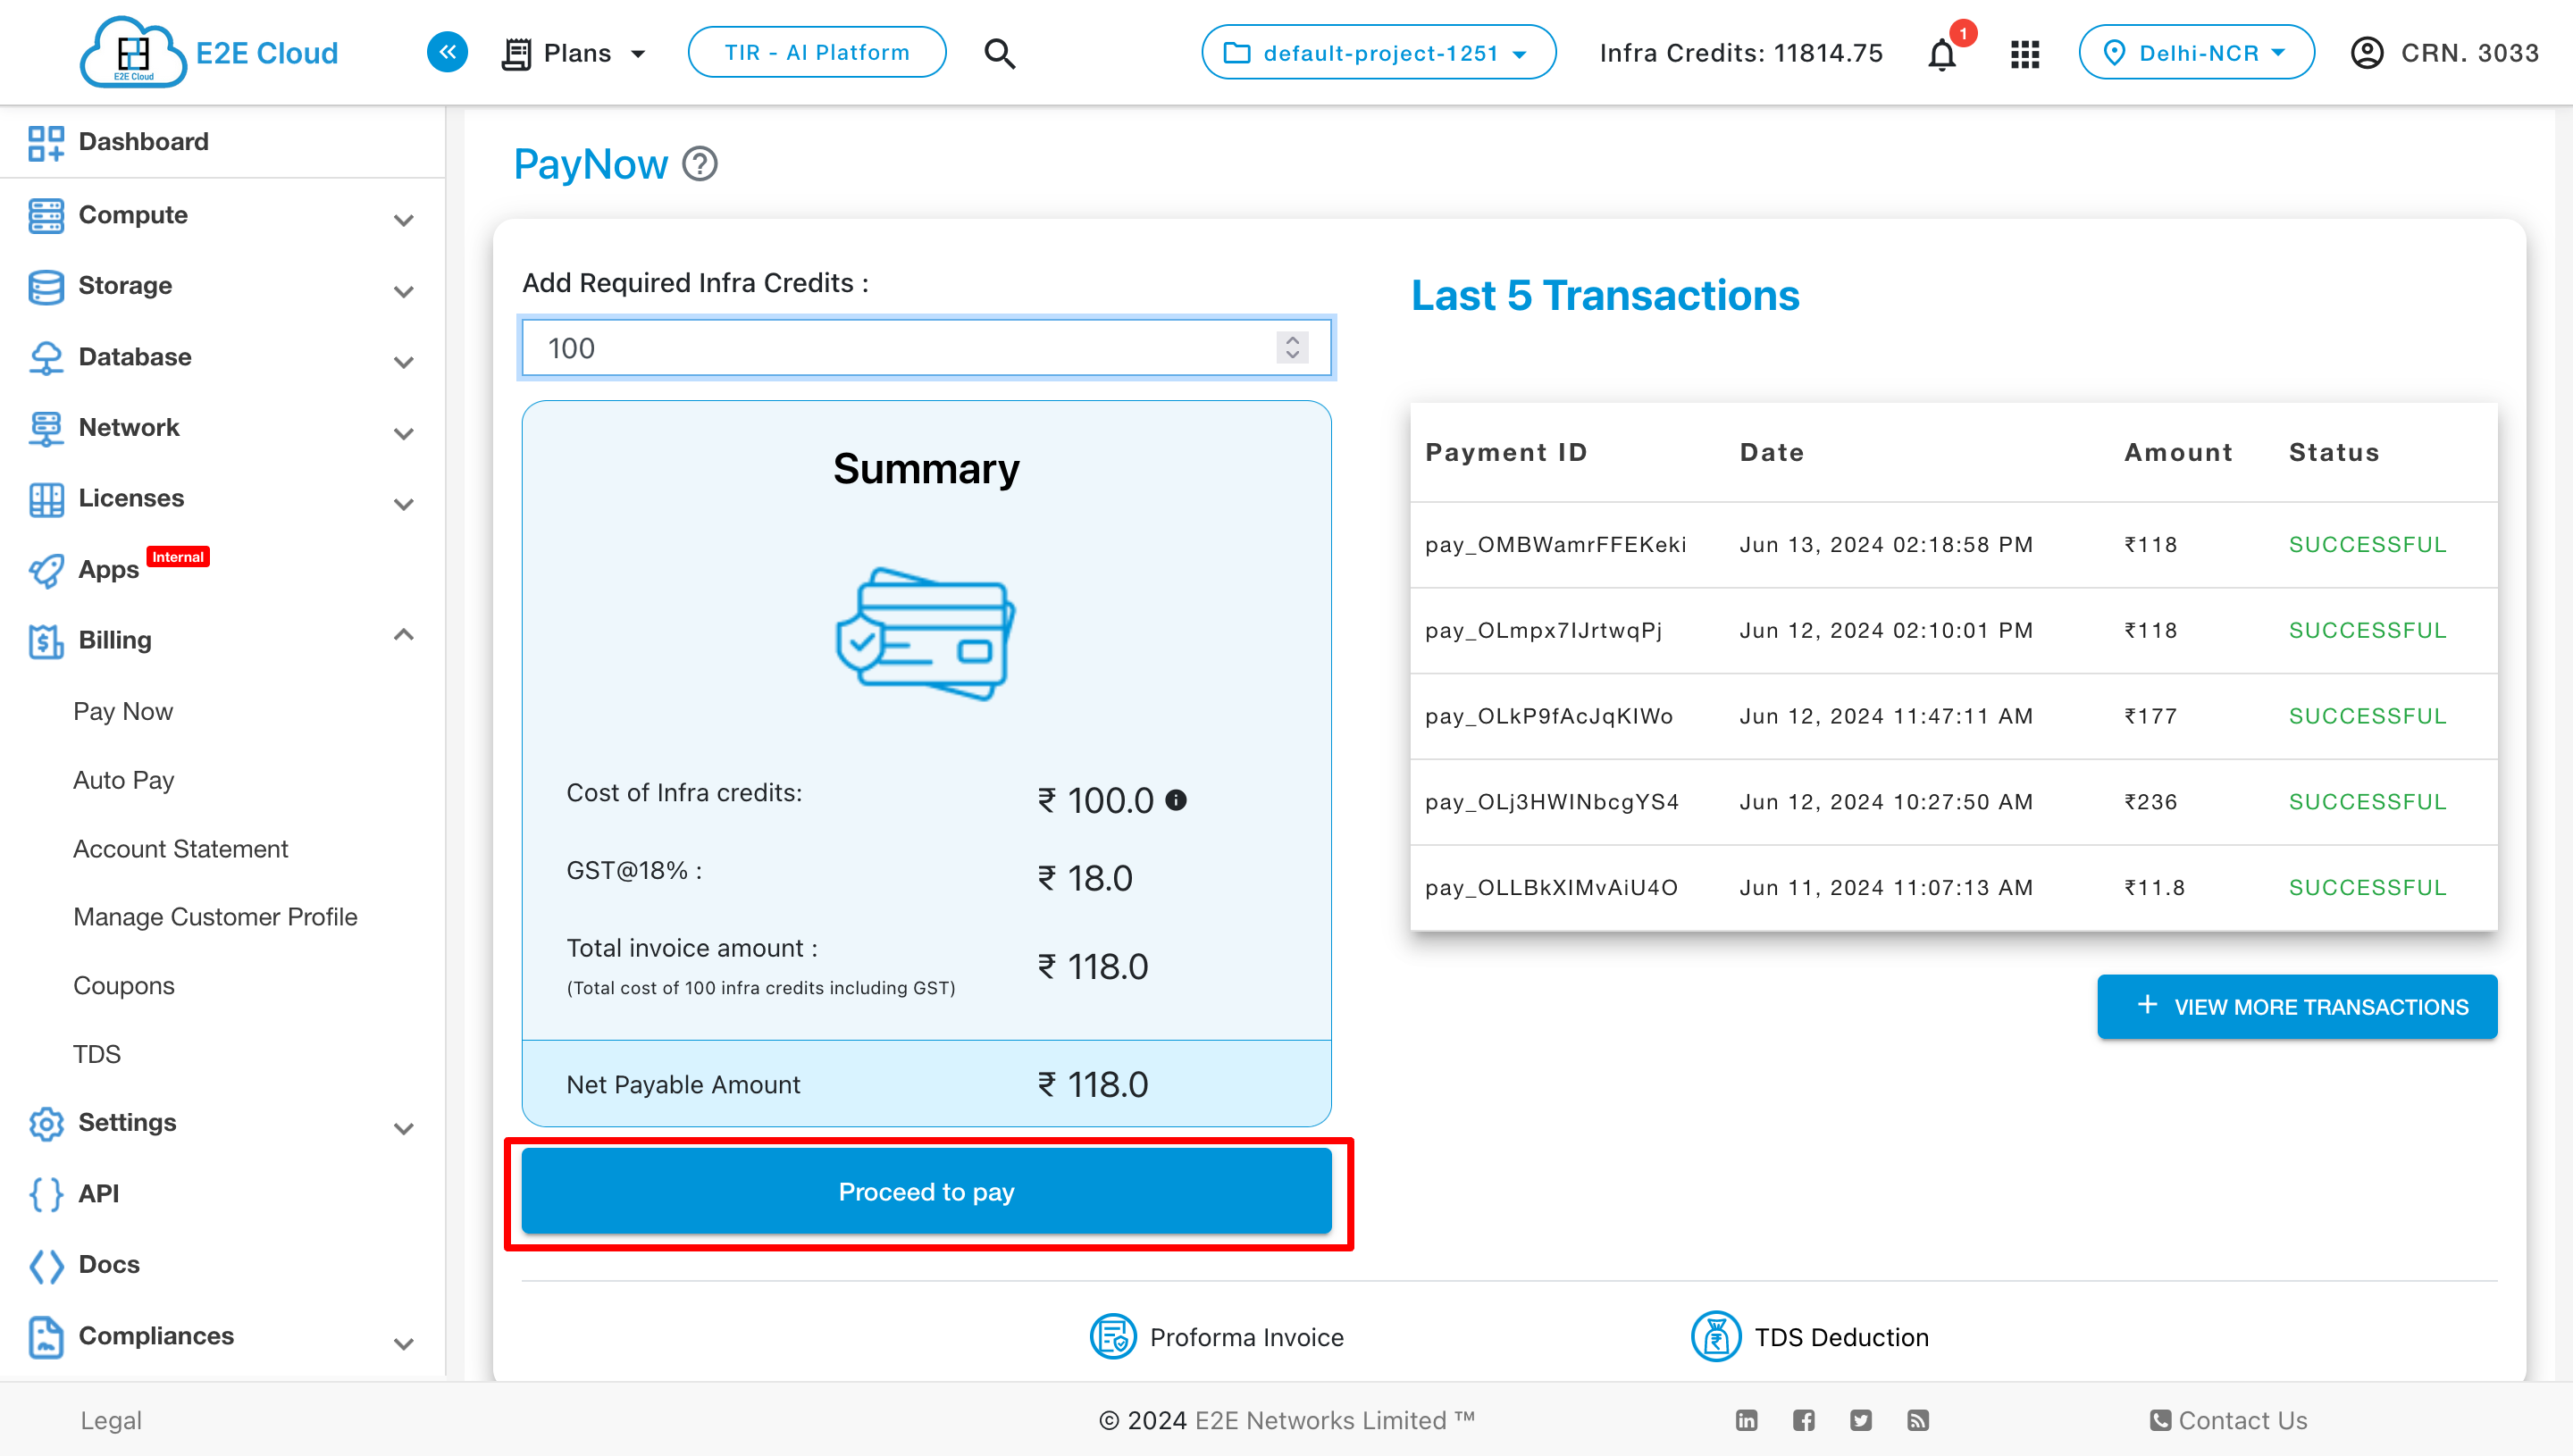
The ‘Net Payable Amount’ shows the amount to be paid including GST. Click on the ‘Proceed to Pay’ button to launch the payment gateway window.
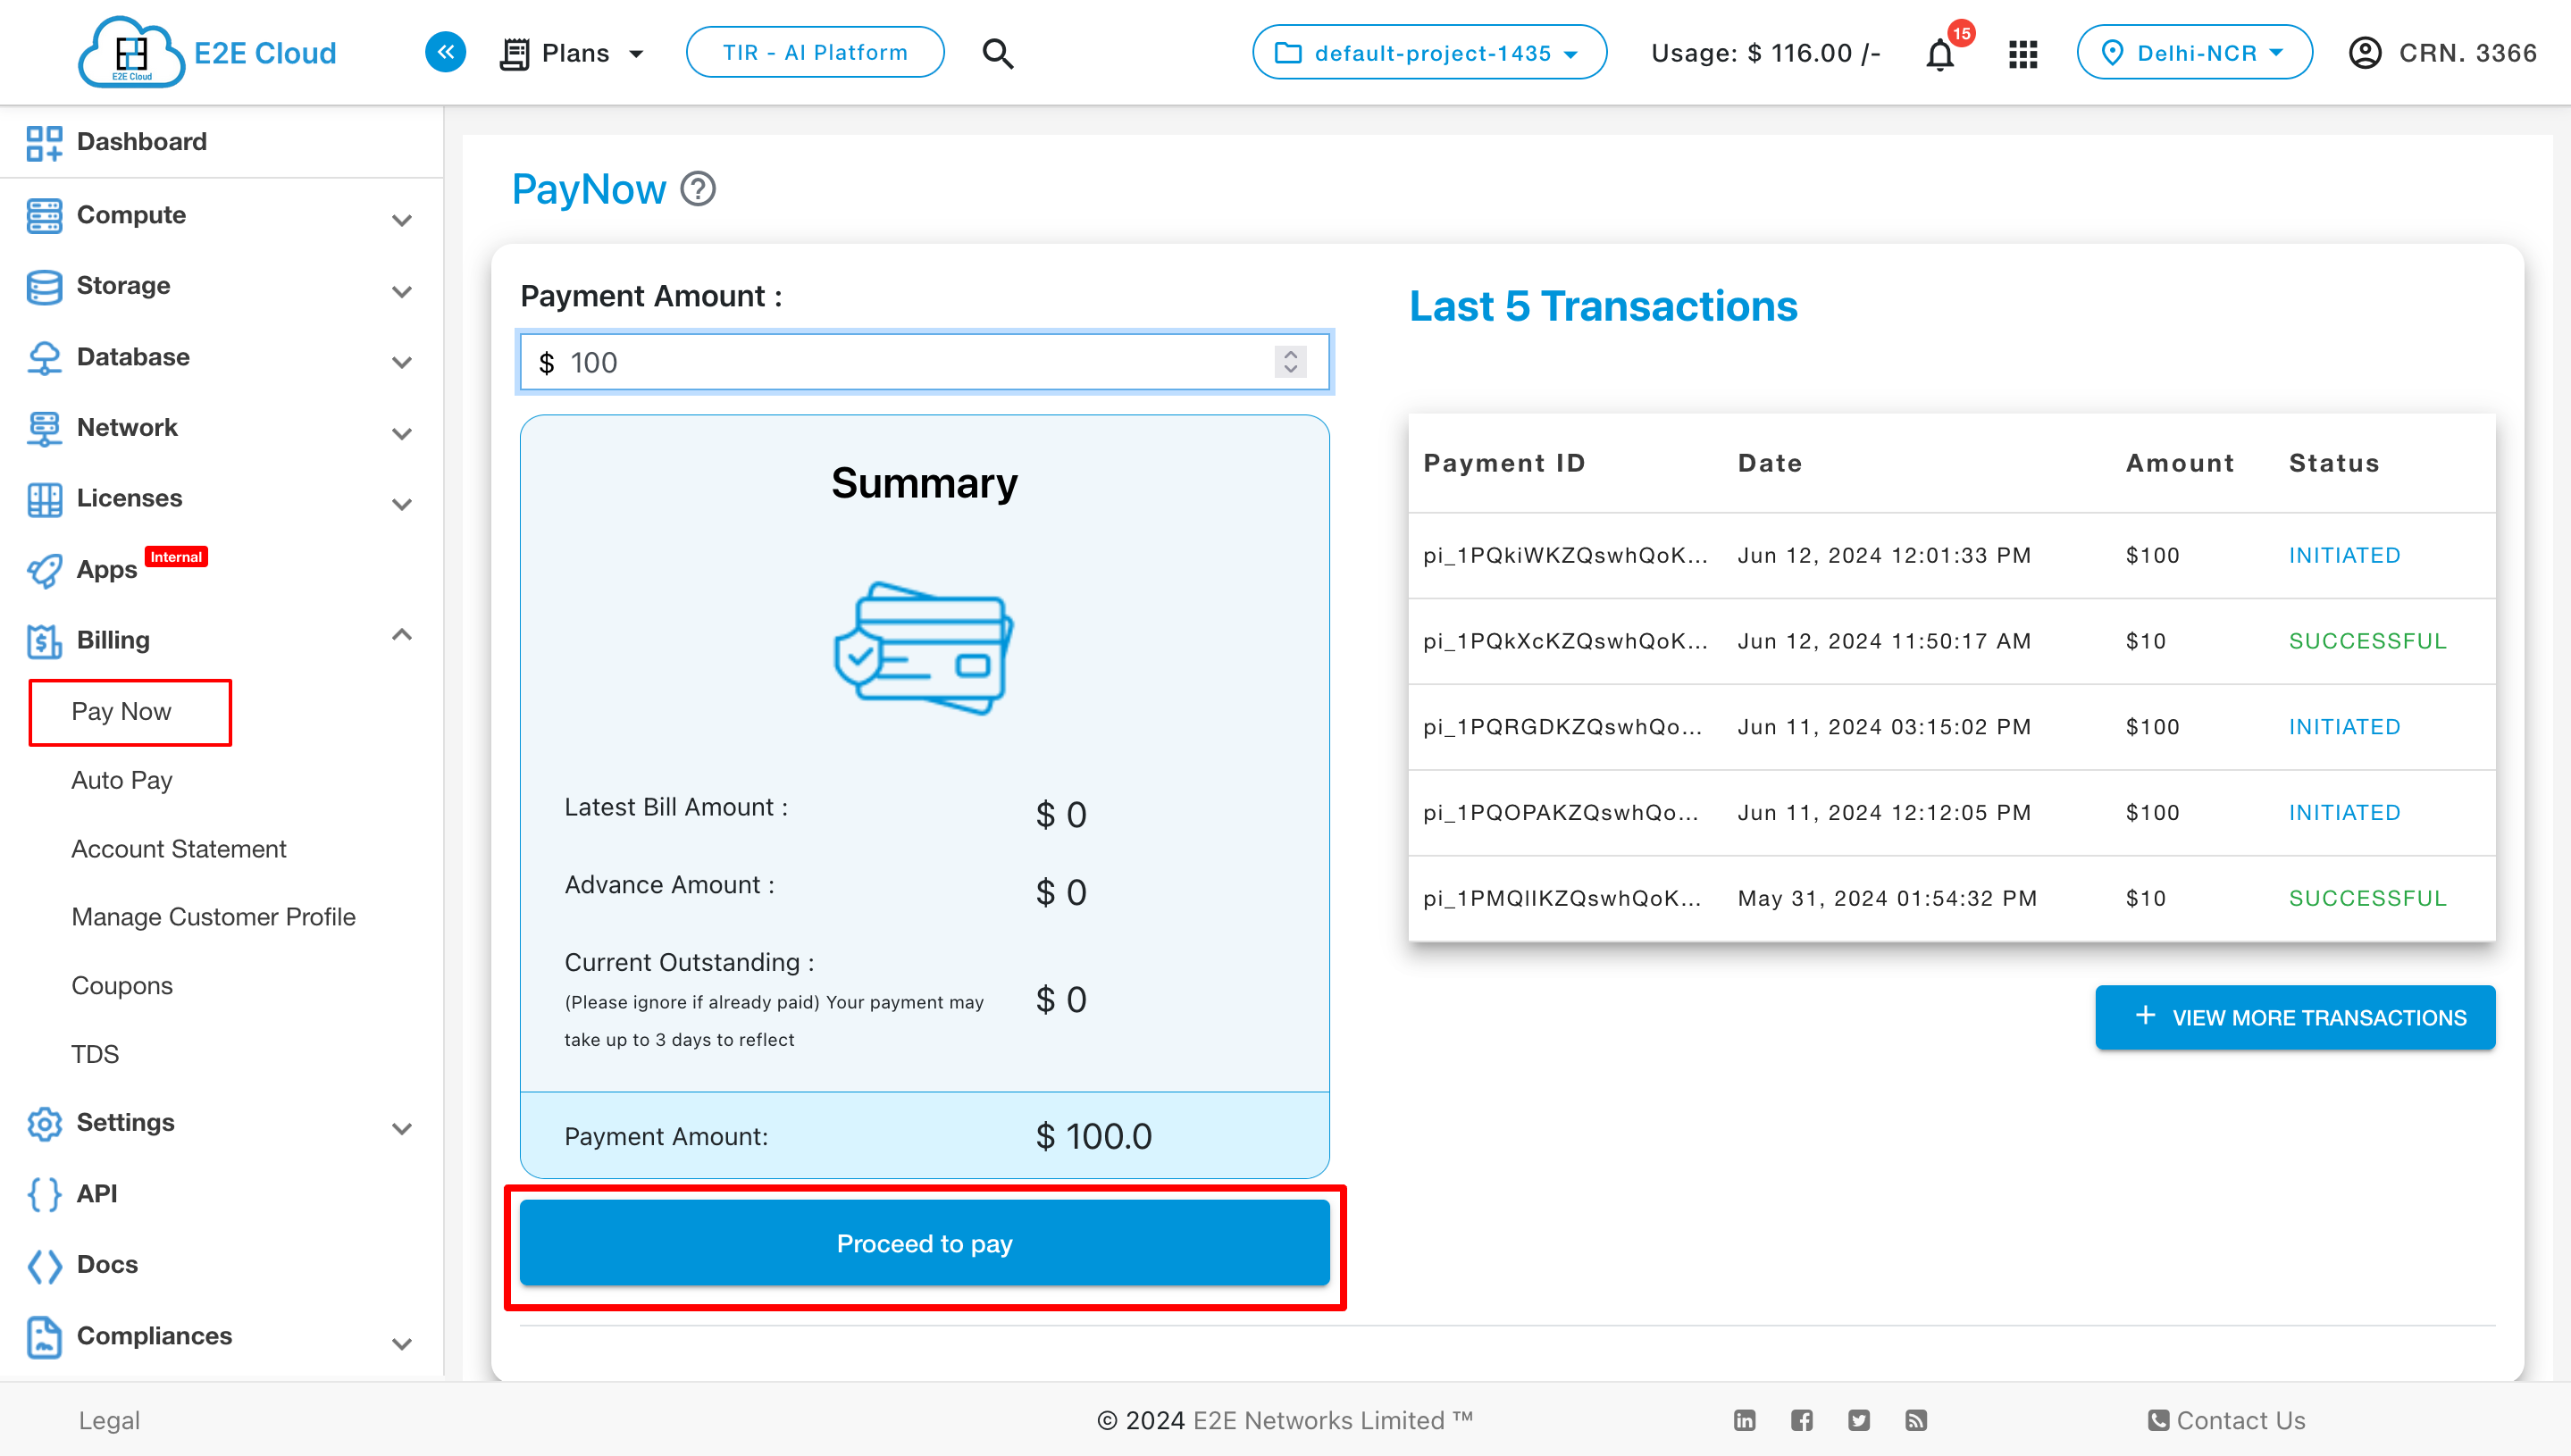
The behavior for postpaid user
For postpaid users, the screen as shown below shall appear where a customer can make any payment. The payment made by a customer is first used to settle any unpaid invoices and the remaining amount is considered as an advance payment in our system.
The screen automatically populates amounts from the last bill, any advance payments are done before, and any outstanding amount related to your account. The Payment Amount field will be auto-populated based on the below calculation.
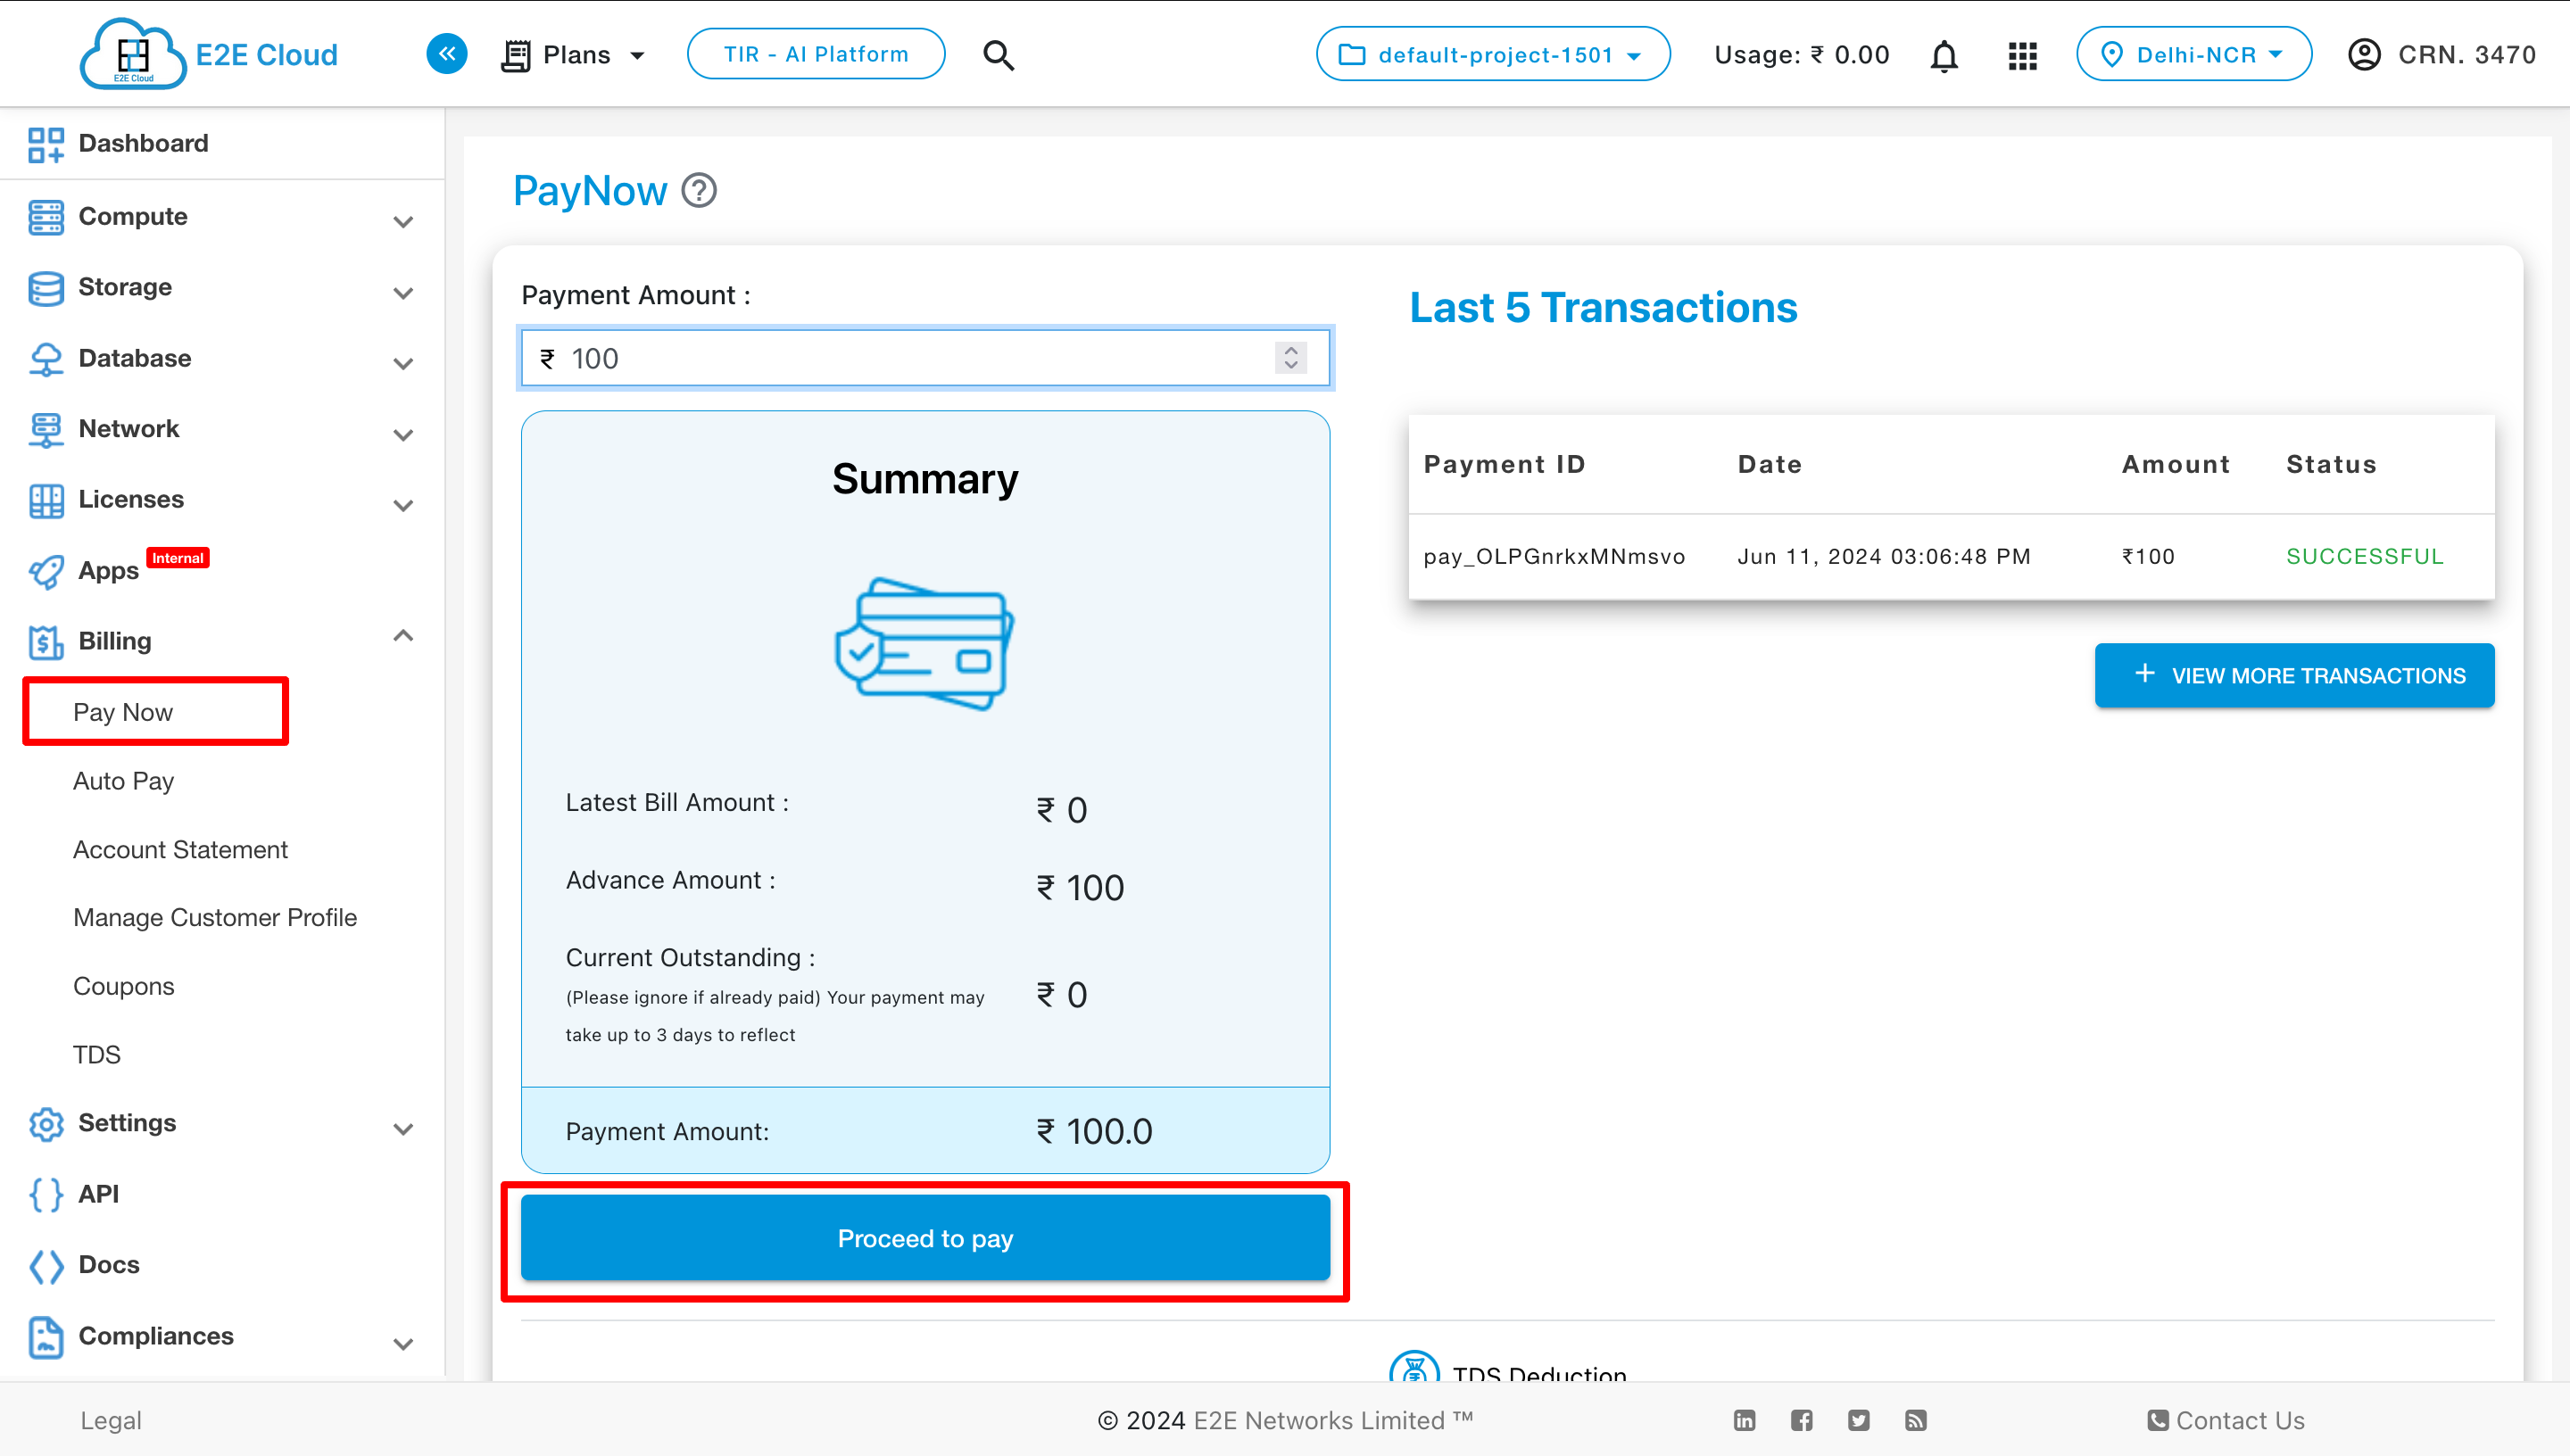
Latest Bill Amount – Advance Amount + Current Outstanding. This calculation excludes the TDS, Click here to know more about the TDS deduction.
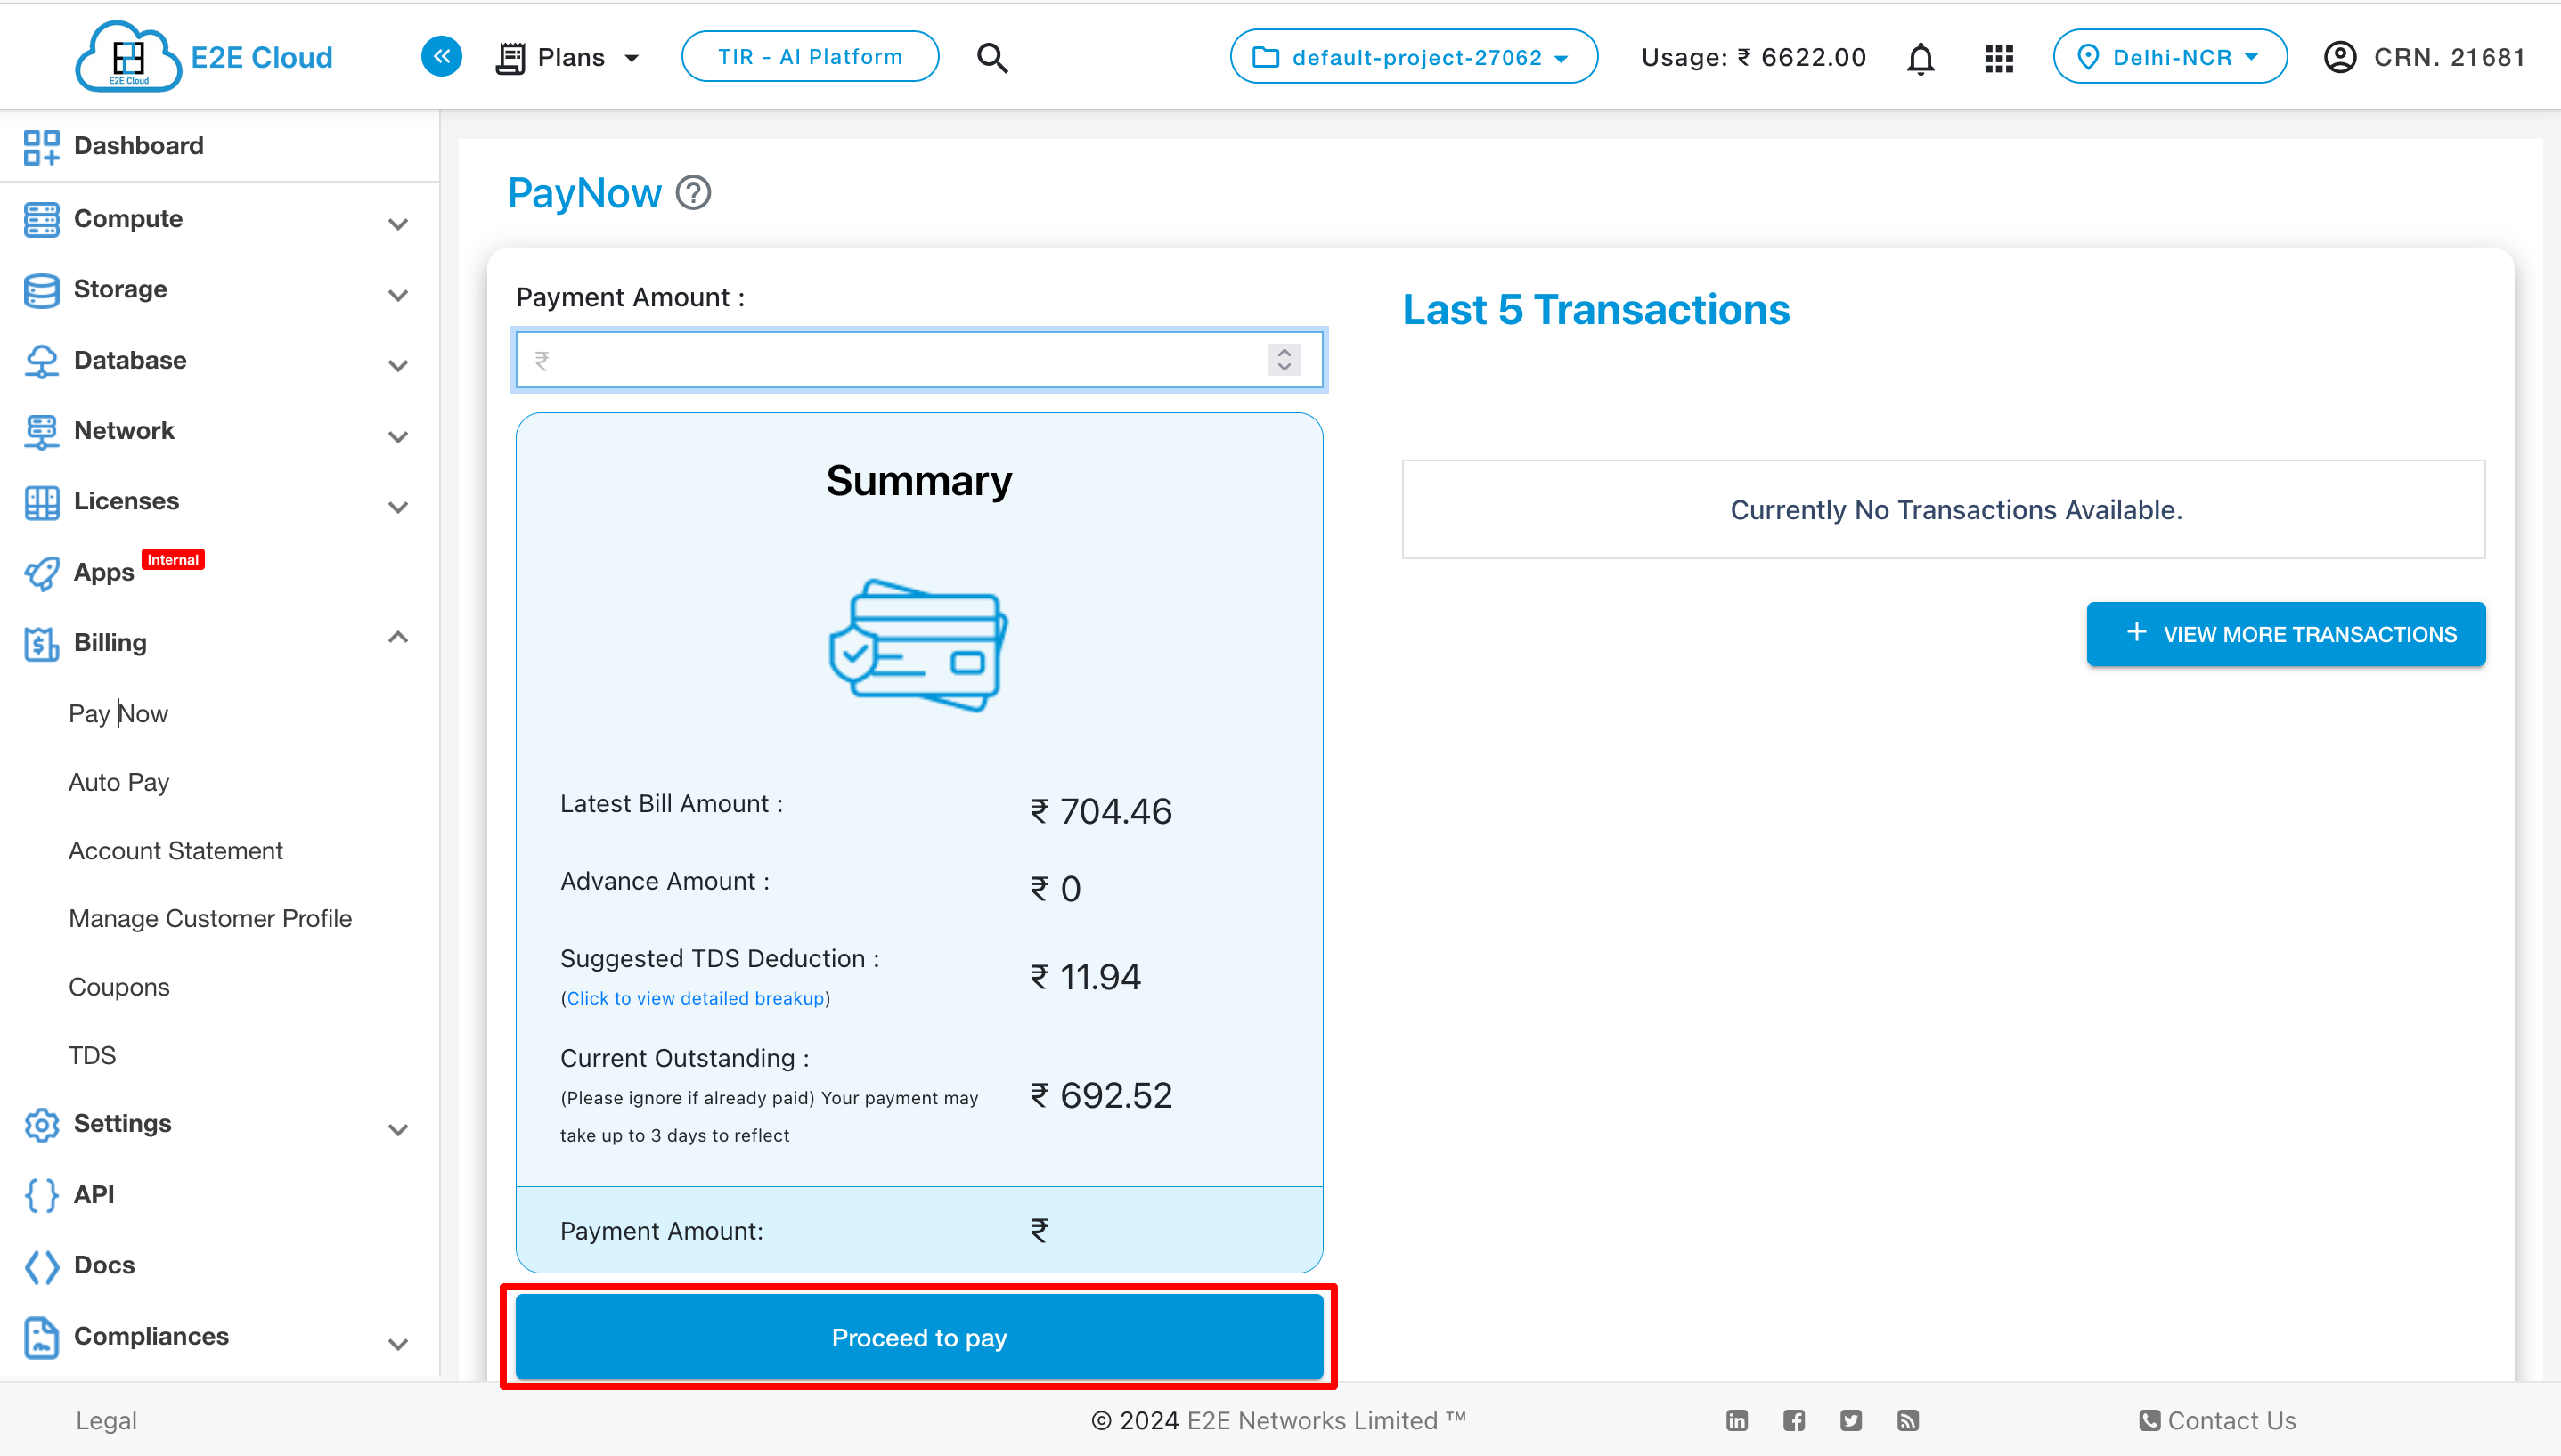
For customers with TDS enabled, the “Suggested TDS Deduction” field is displayed in the Summary section.
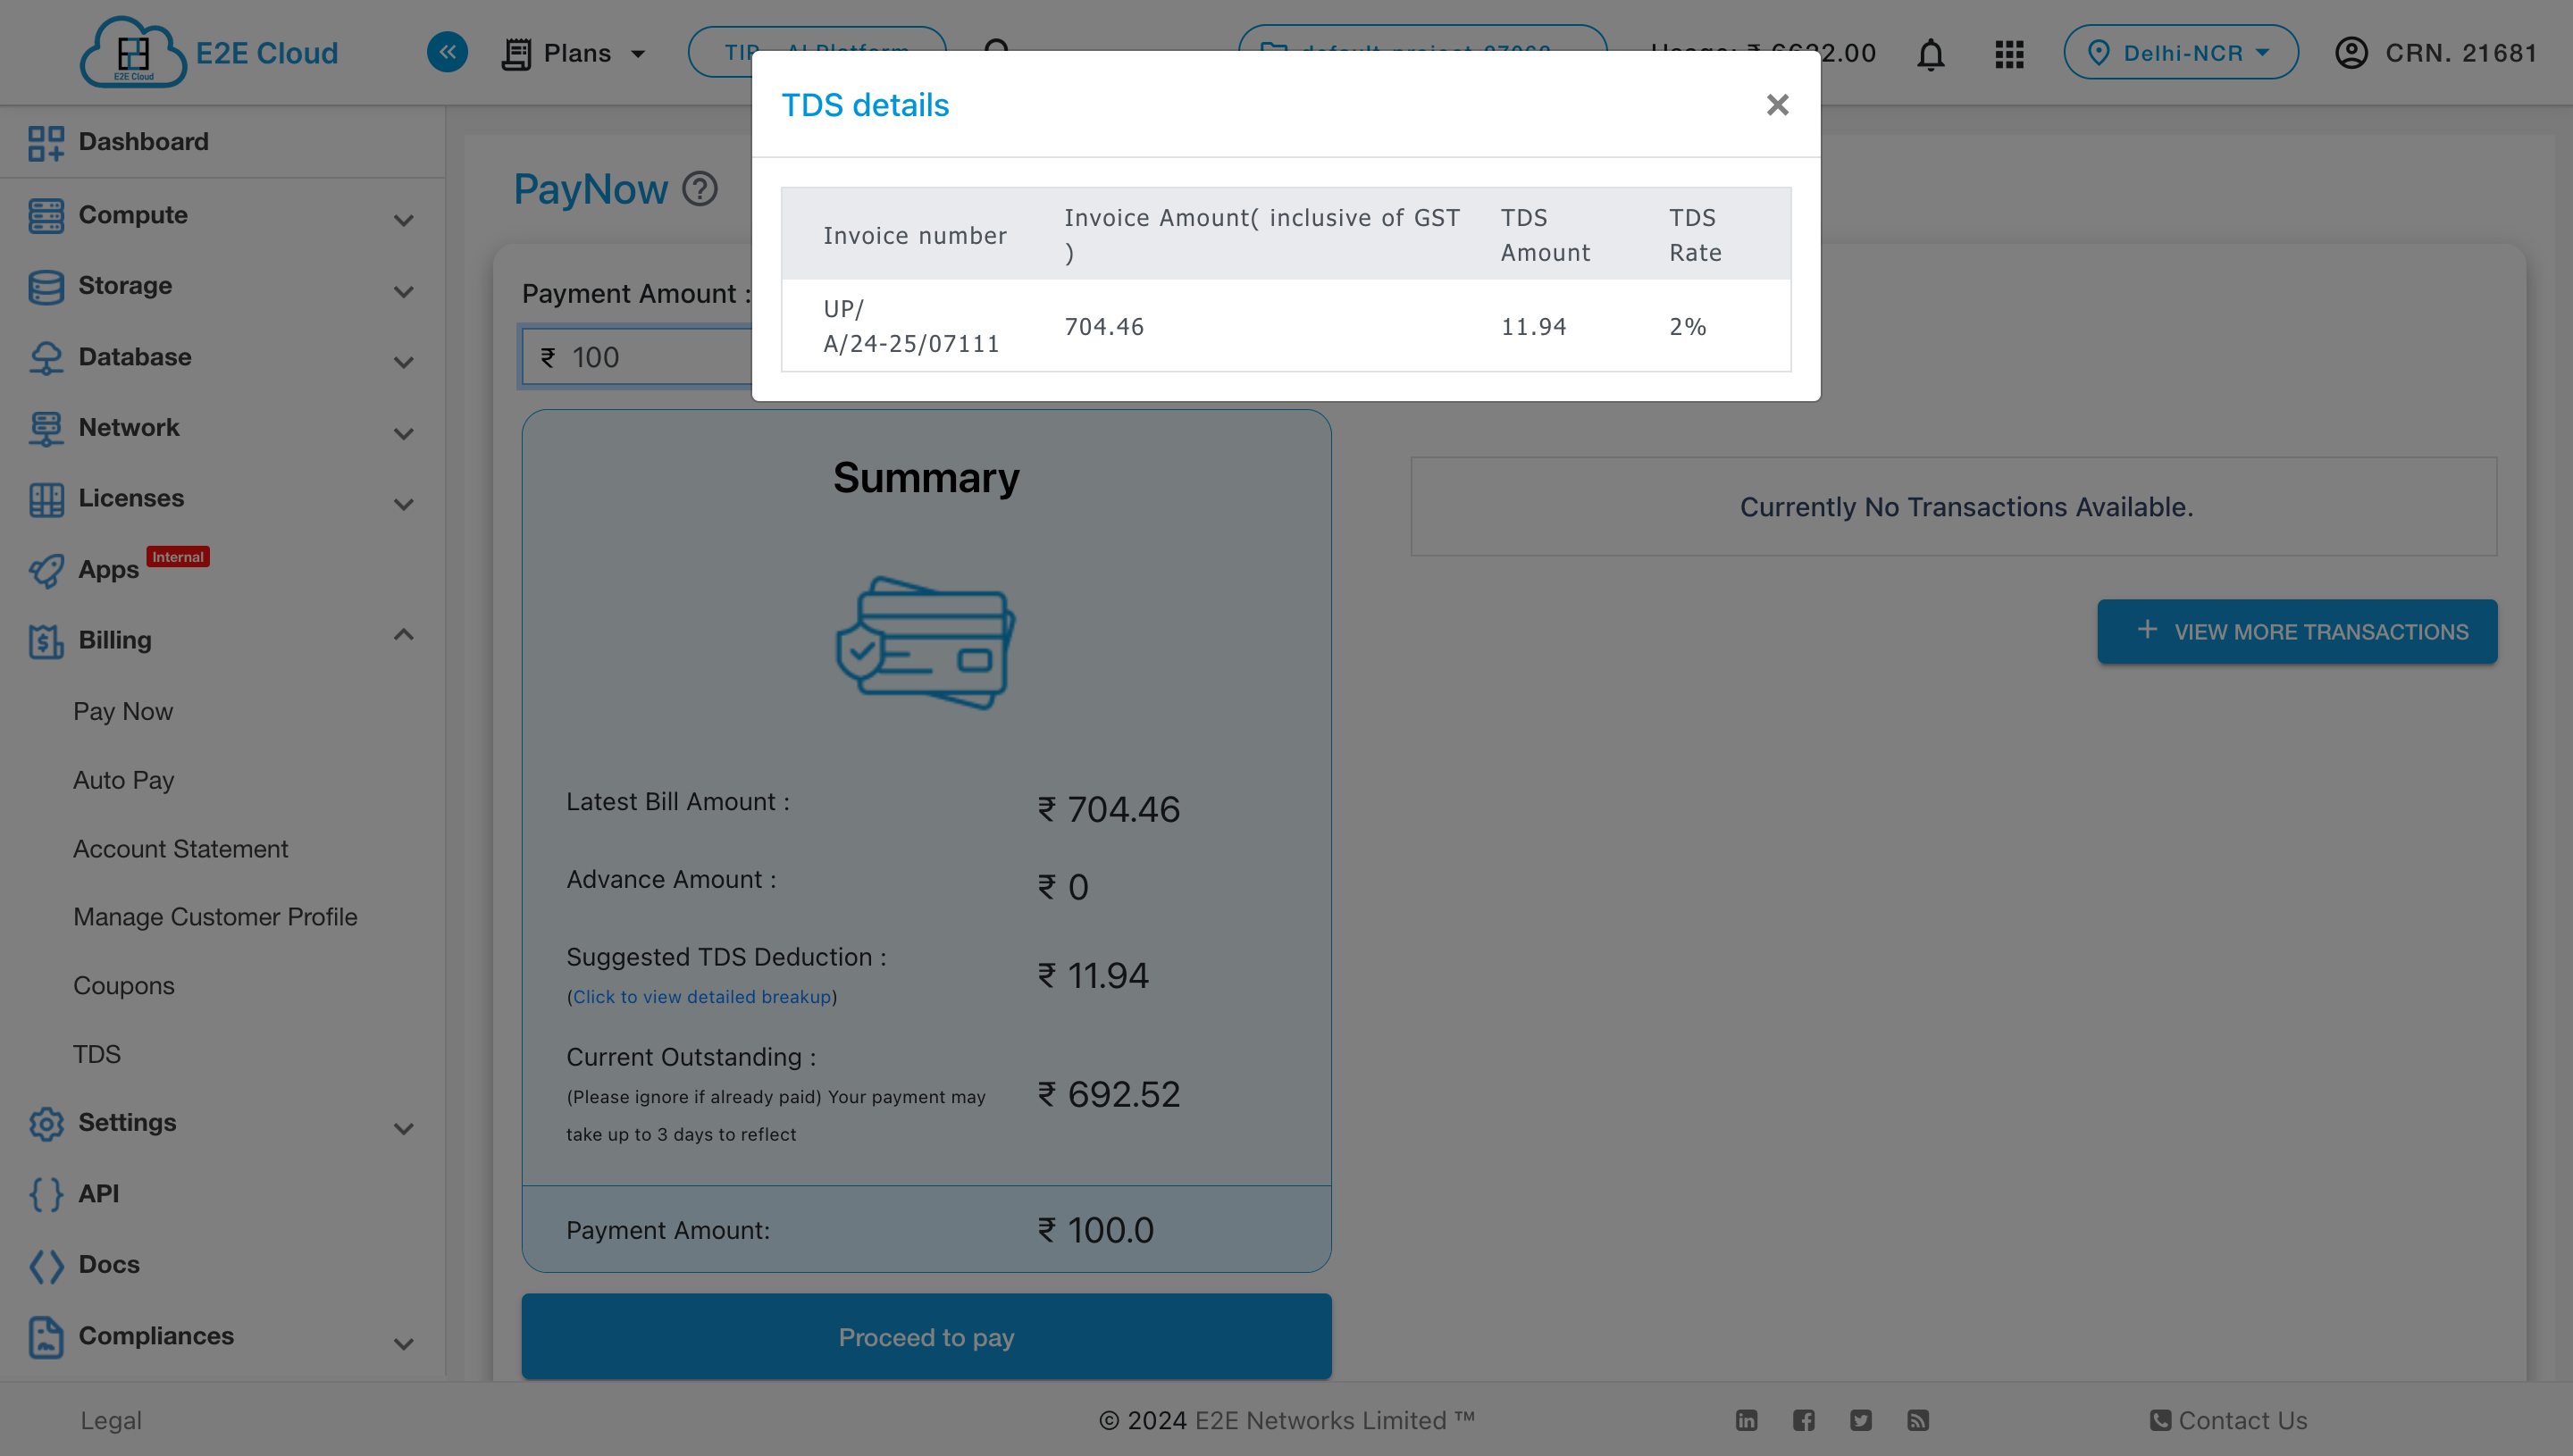
Click the link to view the detailed payment breakdown.
User is allowed to change the amount that is auto-populated in the Payment Amount field. Click on the ‘Proceed to Pay’ button to proceed to the payment gateway window.
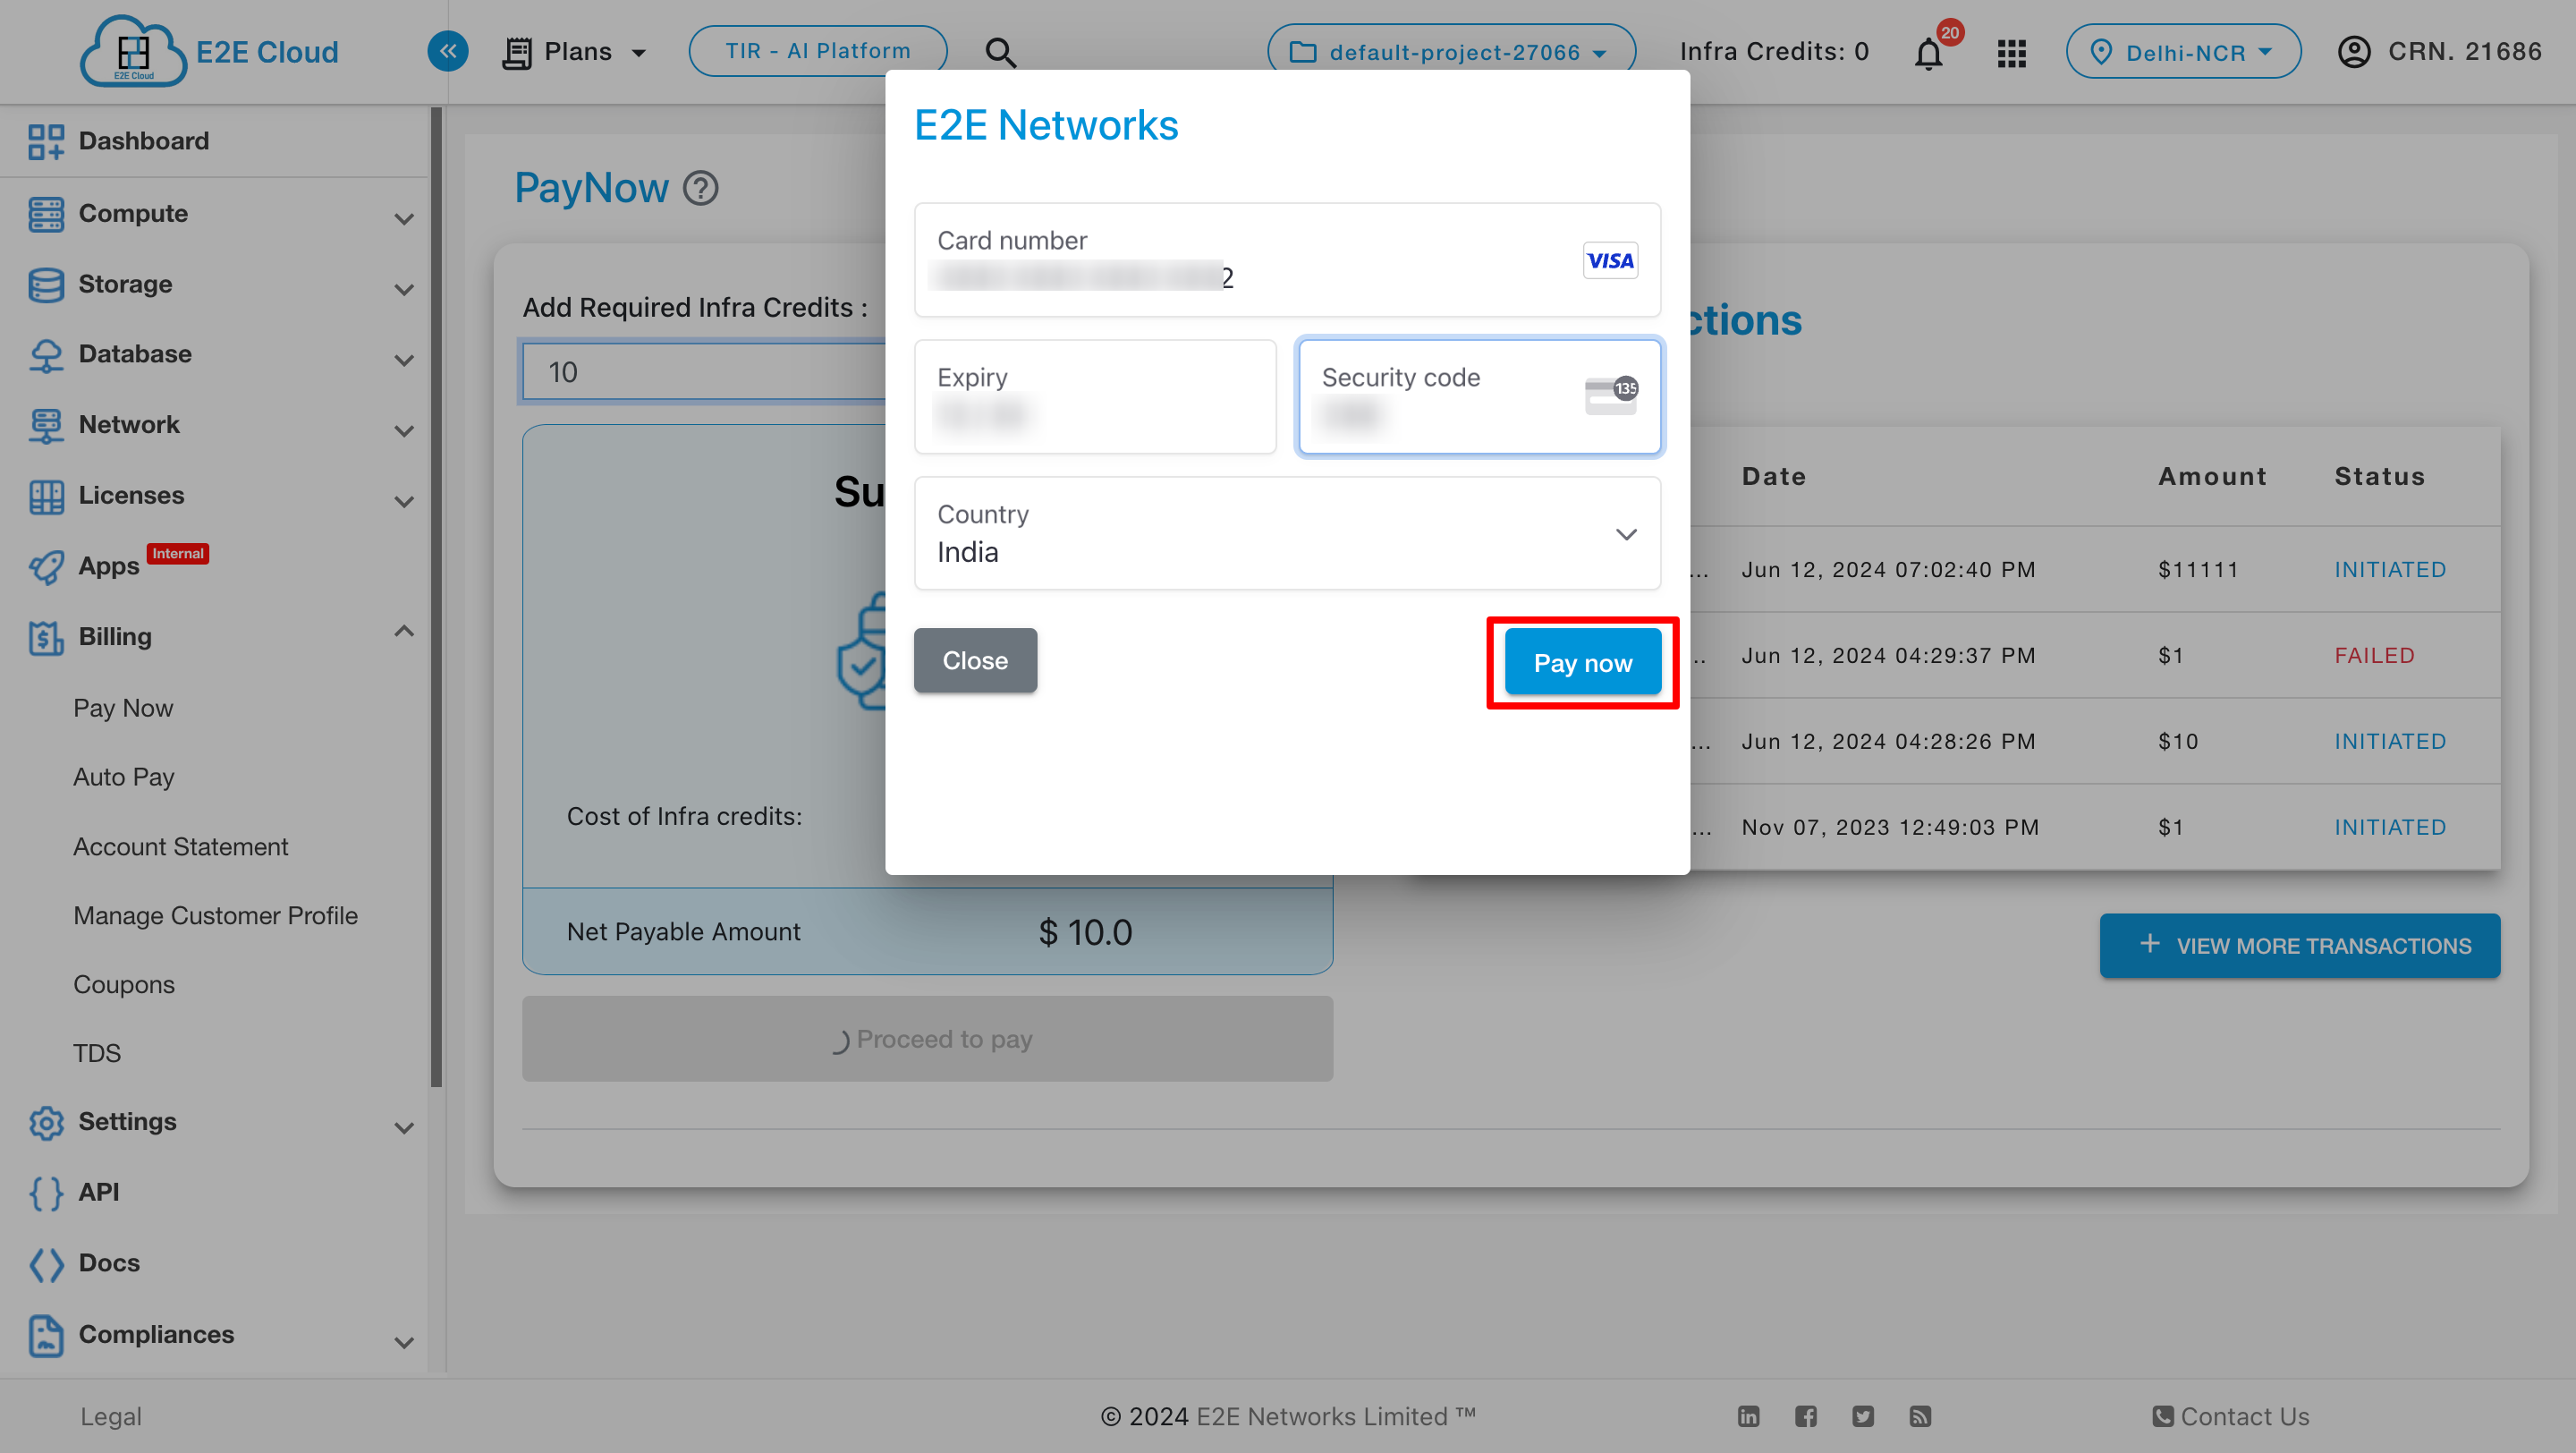
Payment gateway window
E2E Networks has integrated with the Razorpay payment gateway. A payment pop-up box appears where you can choose from any of the following options like credit and debit cards, UPI, net banking, and wallets, etc.
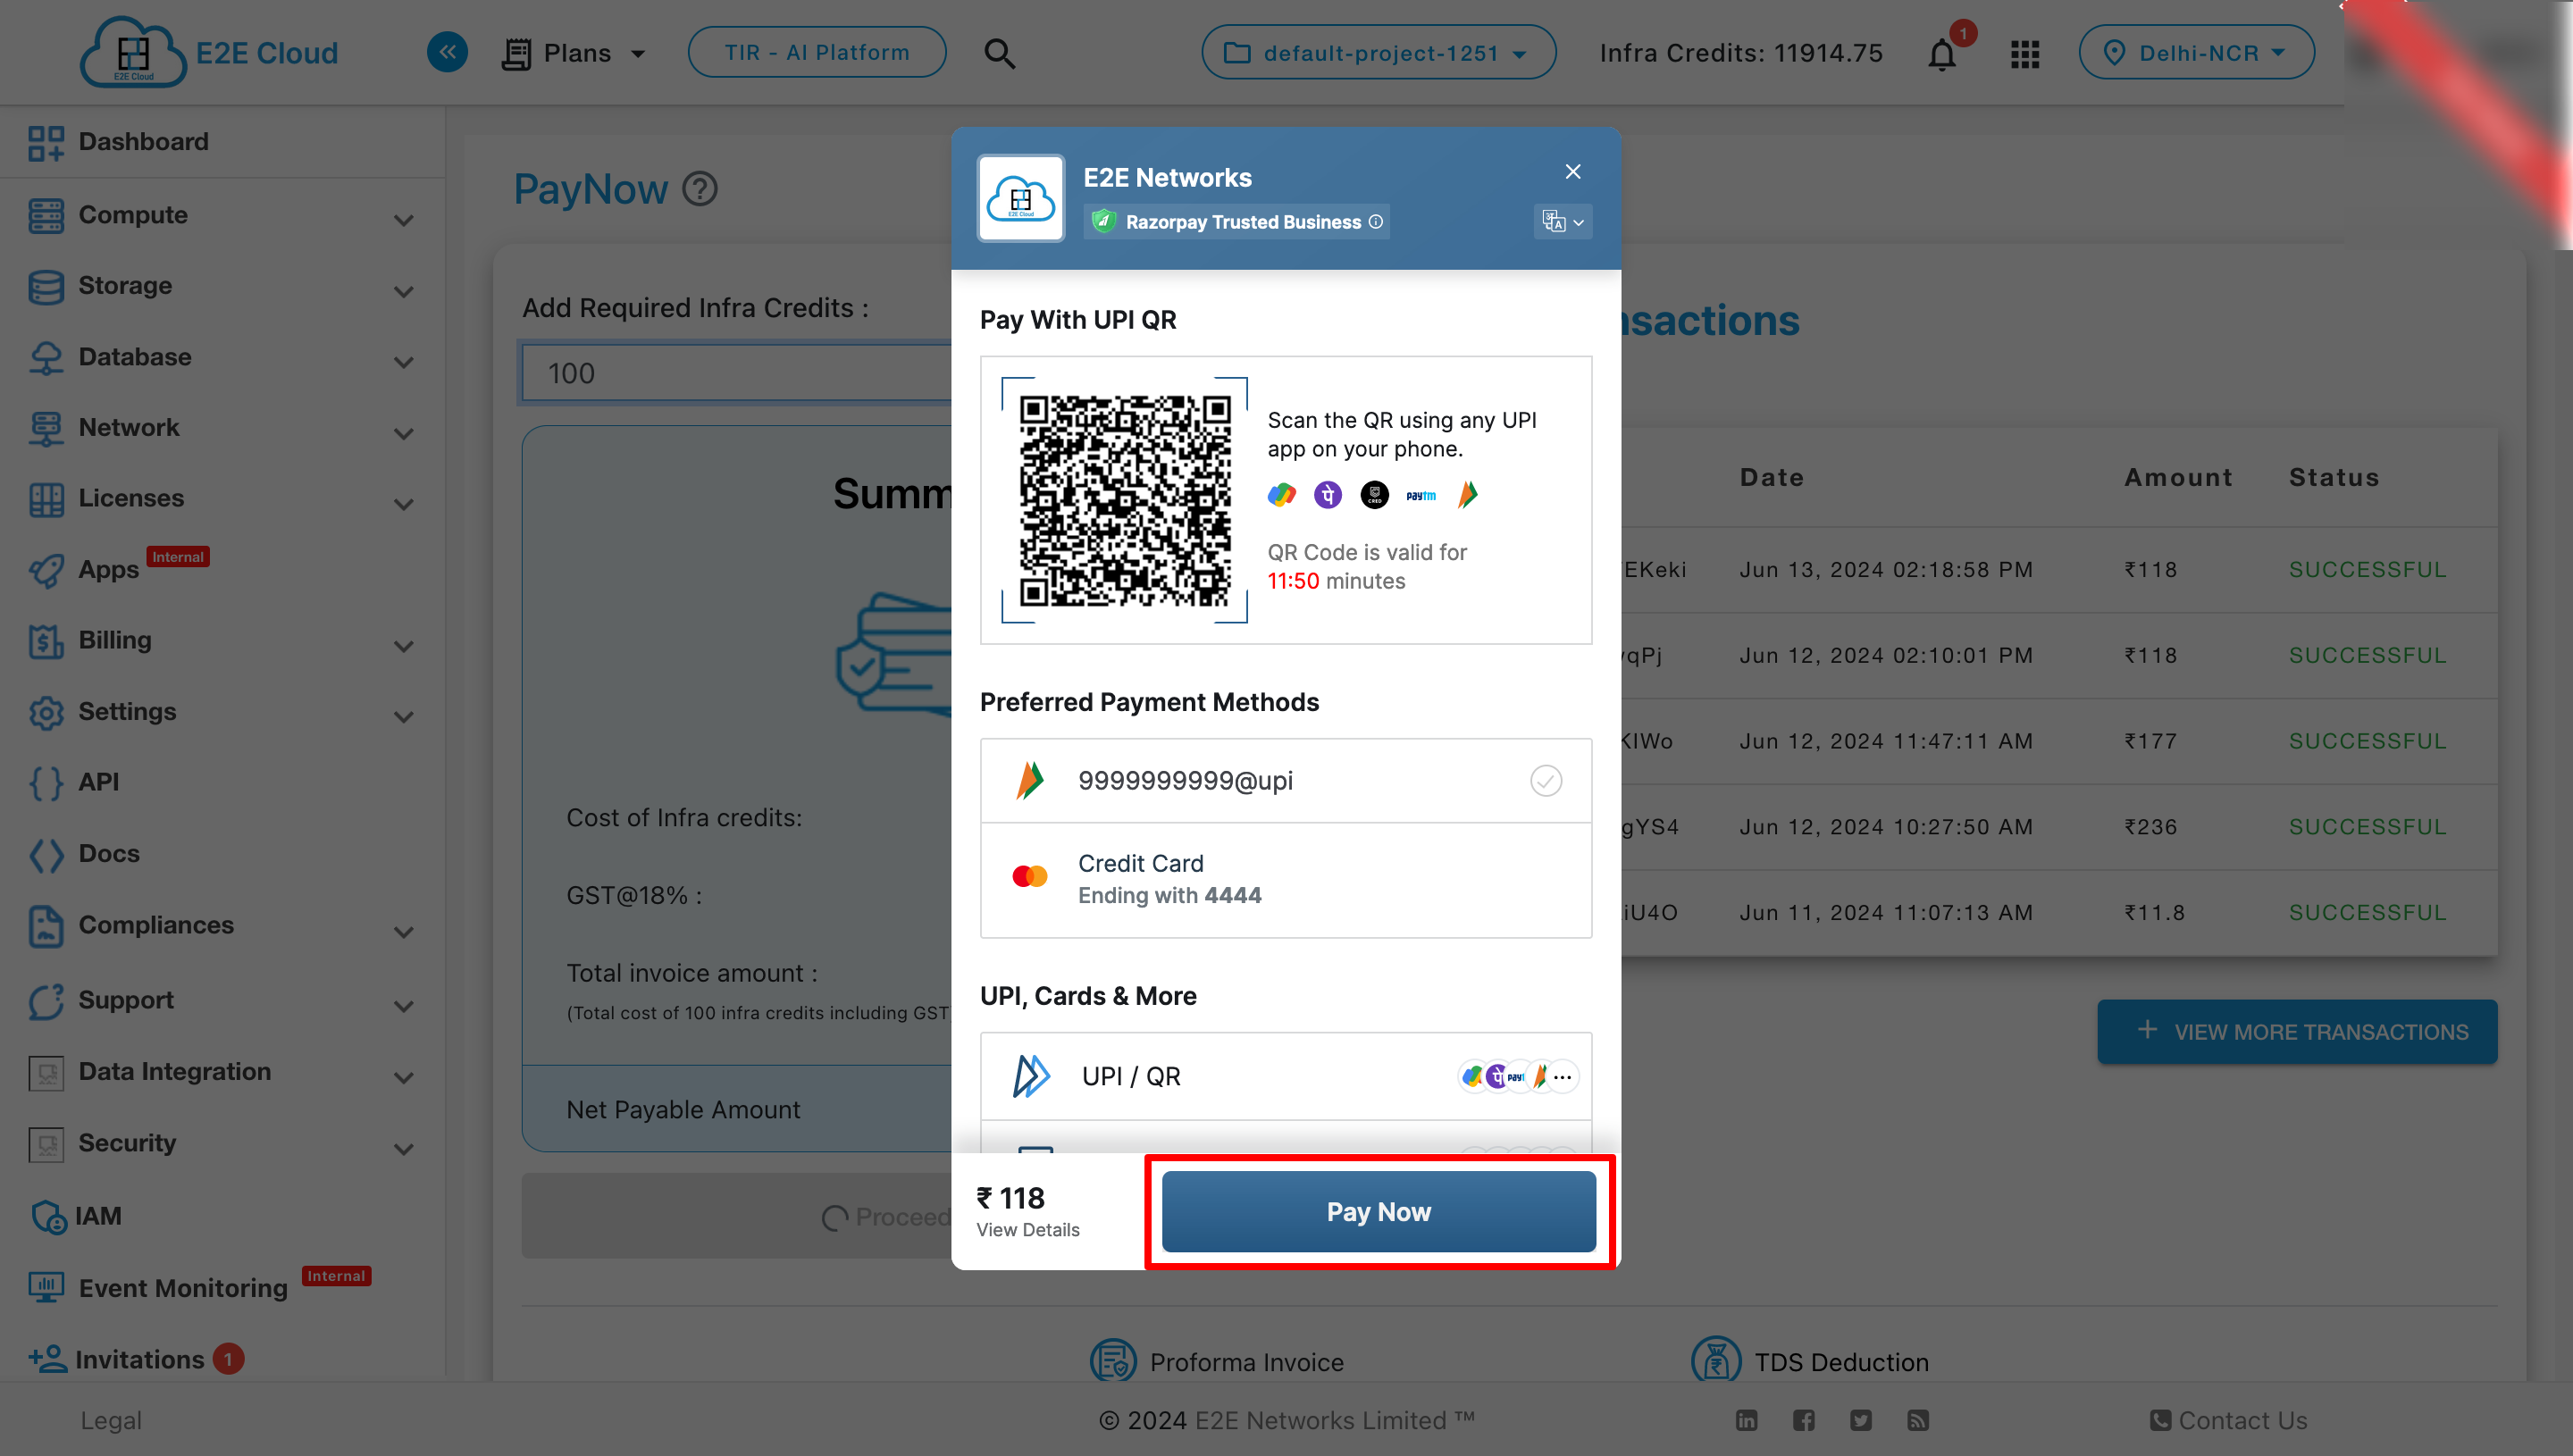
Card
Currently, our payment gateway supports Indian and International credit and debit cards from Visa, Mastercard, and American Express.
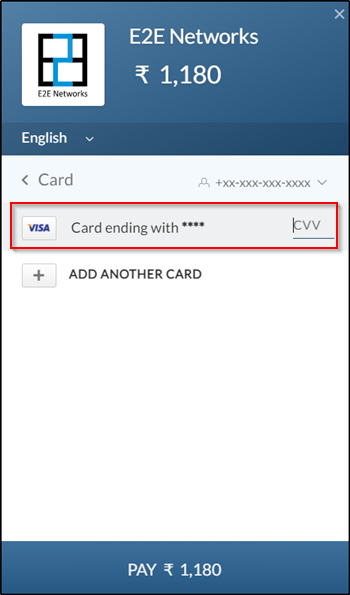
While making payments using a card, you can select the Remember Card’ checkbox to save the card. The card details are not saved by E2E Networks Ltd. The card details are saved by payment gateway Razorpay. The card details can be deleted by logging into the Razorpay website.
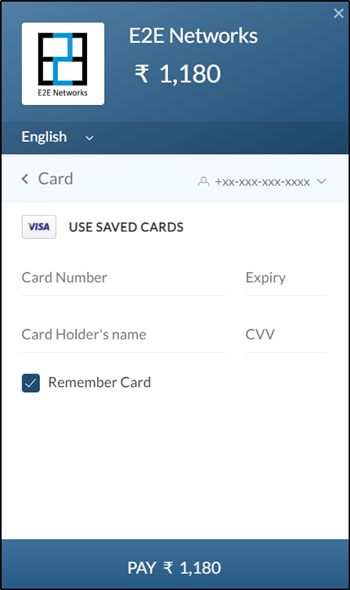
You can access saved cards while you make payments. OTP based authentication shall be performed to access saved cards. The OTP will be sent to your primary contact’s mobile number.
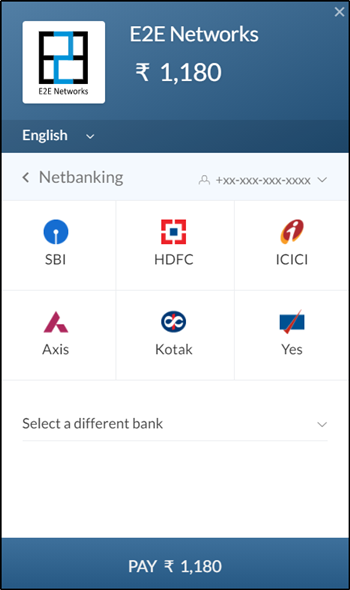
Netbanking
You can pay using the Netbanking interfaces of various banks. After selecting your preferred bank from the list of banks available, you will be taken to the respective bank’s login interface to complete the payment.
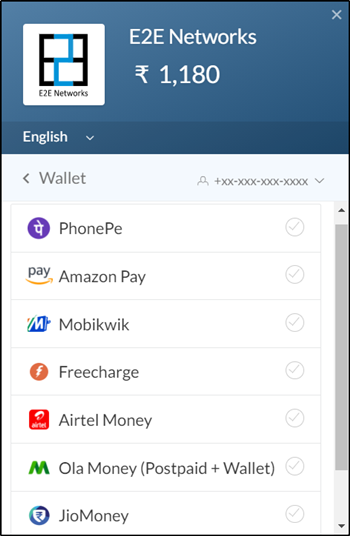
Wallet
You can pay using e-wallets. Currently, Amazon Pay, Freecharge, Ola Money, and PayZapp are supported. After selecting your preferred wallet, you will be taken to the respective wallet’s interface to complete the payment.
Note
While using the PayNow option, Razorpay may show some offers from its partners such as cashback or discounts. Such offers and benefits are governed by the terms and conditions set by the providers of such offers and in no way associated with E2E Networks Ltd.
UPI
You can enter your UPI address to get a payment request directly in your UPI app.
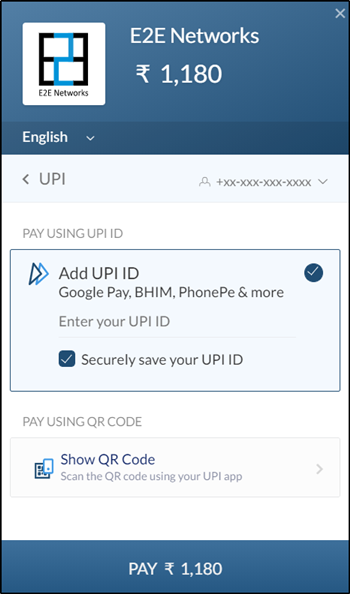
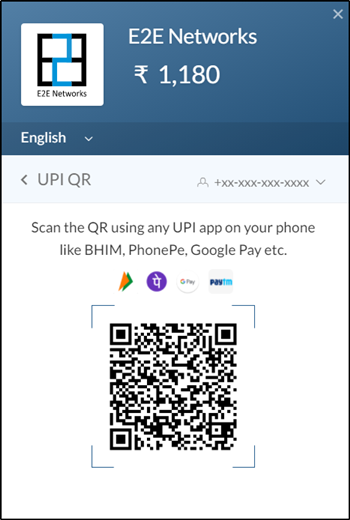
You can pay using UPI apps such as BHIM, Google Pay, WhatsApp, Paytm, PhonePe and others. Alternatively, you can also scan the payment QR code and pay using your UPI address.
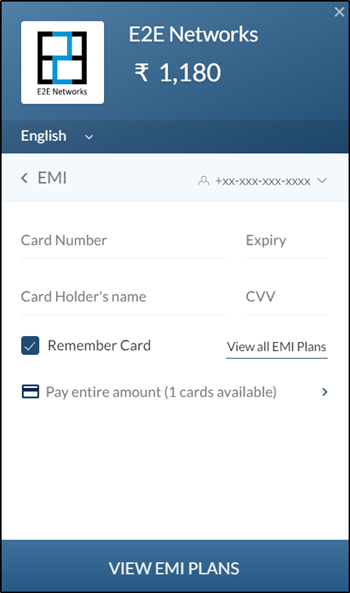
EMI
Debit EMI is an EMI method using which customers can make payments on EMI using their debit cards.
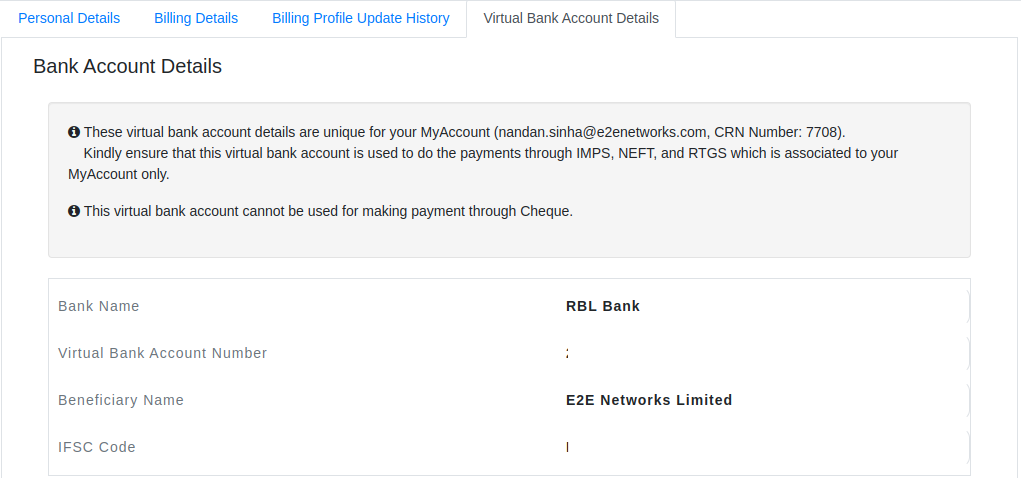
Virtual Account Bank Transfer
To make payments through IMPS, NEFT, and RTGS, the transfer can be made through a virtual bank account associated with your MyAccount. The Virtual Account Bank Transfer feature is available to all E2E’s customers (prepaid as well as postpaid).
One of the advantages of a virtual bank account is that the settlement of the transaction will be processed automatically through the payment gateway.
Kindly note that each of your MyAccount will have unique virtual bank account details and the payment is done using ‘Virtual Account Bank Transfer’ will be processed only for the respective MyAccount.
To check the virtual bank account details for your MyAccount follow the steps
Login to MyAccount at https://myaccount.e2enetworks.com
On the left side of the MyAccount dashboard, and click on the “billing profile” sub-menu available under the Billing section.
Then, click on the ‘Virtual Bank Account Details’ tab.
Note
The virtual bank account detail cannot be used for making payments through Cheque.
E2E Networks payment options for International customers
E2E Networks accepts payments through the following methods.
PayNow
“PayNow” For international users, we use Stripe as the payment method.
Login to MyAccount at https://myaccount.e2enetworks.com
On the left side of the MyAccount dashboard, click on the “PayNow” sub-menu available under the Billing section.
The behavior for Prepaid User
For a prepaid user, the amount paid shall be used to buy infra-credits.
In the ‘Add Required Infra Credits’ field, you need to enter the number of Infra credits you want to purchase.
The ‘Net Payable Amount’ shows the amount to be paid. Click on the ‘Proceed to Pay’ button to launch the payment gateway window.
Payment gateway window
E2E Networks has integrated with the Stripe payment gateway. A payment pop-up box appears. Currently, our payment gateway supports International credit and debit cards from Visa, Mastercard, and American Express.
Card
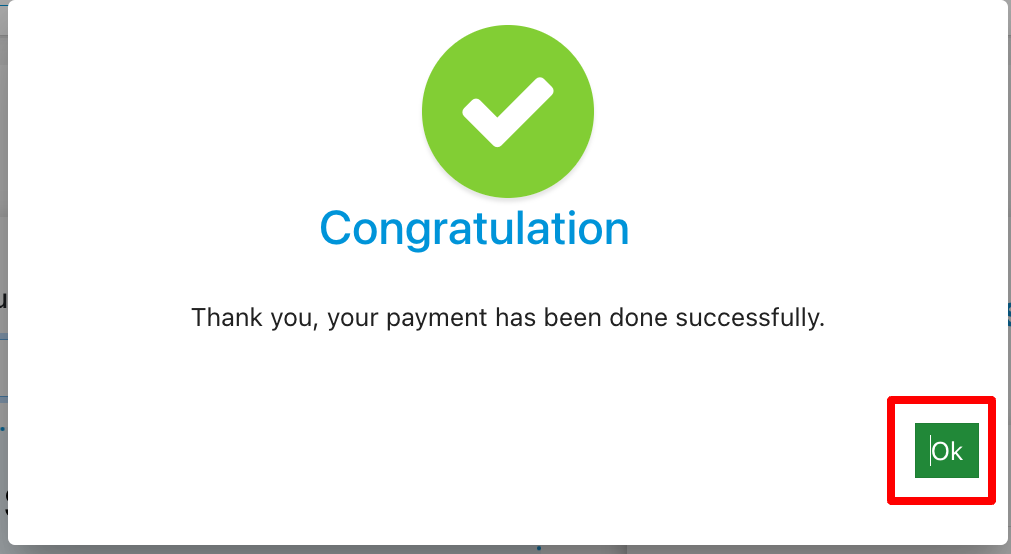
After filling all the details like, Card number, Expiration date,CVV no,Country and Zip Code Then click on the “Pay now” tab then another popup will open and it will show a congratulation message.
The behavior for postpaid user
For postpaid users, the screen as shown below shall appear where a customer can make any payment. The payment made by a customer is first used to settle any unpaid invoices and the remaining amount is considered as an advance payment in our system.
The screen automatically populates amounts from the last bill, any advance payments are done before, and any outstanding amount related to your account. The Payment Amount field will be auto-populated based on the below calculation.
Latest Bill Amount – Advance Amount + Current Outstanding.
User is allowed to change the amount that is auto-populated in the ‘Payment Amount’ field. Click on the ‘Proceed to Pay’ button to proceed to the payment gateway window.
AutoPay
The AutoPay method allows you to set up standing instructions on your credit/debit card to allow E2E Networks Ltd to automatically charge your card. This ensures uninterrupted service by eliminating the risk of suspension due to delayed payments. This also saves you the hassle of regular tracking and making periodic payments on the MyAccount portal.
Login to MyAccount at https://myaccount.e2enetworks.com
On the left side of the MyAccount dashboard, click on the “Auto Pay” sub-menu available under the Billing section.
After clicking on the “Auto Pay” tab in Manage AutoPay we can enable the following options.
Enable AutoPay to automatically buy Infra credits for MyAccount.
Enable low Infra credits notification.
I also want an SMS notification.
After clicking on “Add Credit/Debit Cards” Payment gateway window will appear.
Payment gateway window
E2E Networks has integrated with the Stripe payment gateway. A payment pop-up box appears where you can choose from any of the following options like Visa, Mastercard, and American Express Currently, our payment gateway supports International credit and debit cards from Visa, Mastercard, and American Express.
After filling all the details like,Card number,Expiration date,CVV no,Country and Zip Code Then click on “Pay now” tab then another popup will open and it will show a “Setting Saved” pop up will appear then read the instructions and click on”Okay”Button.
Note
Your Card detail will be saved by the payment gateway partner.
Click on ‘Pay $1’ and you will be redirected to the bank page to complete a transaction of ₹1 which will be deducted by the payment gateway to verify the credit card or debit card.
On completing this transaction, The deducted $1 will be refunded within 14 working days to the card after the verification.
That’s it! Your Autopay has been set up using the card that will be used for all your payments.
Note
There is a minimum value ₹2000 which you can enter in the “then buy” field.
Whenever your account is topped up automatically, you will receive email alerts from your bank. If the transaction fails on the primary card provided by you, an email notification will be sent to you.
You can add multiple cards by following the above steps.
Note
You need to have at least one active card added under “Manage Cards”. If there is no card added, automatic payment setup cannot be done.
If the transaction fails on the primary card provided by you, an email notification will be sent to you.