Cert-Manager
How to set up an Nginx Ingress with Cert-Manager on E2E Kubernetes
Introduction
Kubernetes Ingress is an API object that provides routing rules to manage access to the services within a Kubernetes cluster. This typically uses HTTPS and HTTP protocols to facilitate the routing.
Popular Ingress Controllers include Nginx , Contour , HAProxy , and Traefik . Ingresses provide a more efficient and flexible alternative to creating multiple LoadBalancer services, each with its own dedicated load balancer.
This guide will walk you through setting up the Kubernetes-maintained Nginx Ingress Controller. We’ll then create Ingress resources to route traffic to backend services efficiently. Finally, to secure communication, we’ll install cert-manager for managing and provisioning TLS certificates for the Ingress
For assistance on rolling out the Nginx Ingress Controller using Helm, refer to the docs How to set up an Nginx Ingress on E2E Kubernetes and demonstrate host-based routing protocol.
Prerequisites
Before you begin with this guide, you should have the following available to you:
Before you begin with this guide, you should have the following available to you:
Provision E2E Kubernetes cluster with any available versions this will serve as the platform for deploying your service workloads. Once the cluster is up and running, download the cluster configuration file (kubeconfig.yaml) from the E2E Kubernetes dashboard section and place it in the standard location: ~/.kube/config on your local machine.
Ensure that kubectl command-line tool is Installed on your local machine and configured to connect to your cluster. You can read more about installing kubectl in the Official documentation .
Need to reserve and attach an LB IP through the k8s LB IP section to expose a service externally via an ingress.
Please find the detailed steps over here to provision LB IP.
A domain name and DNS A records which you can point to the E2E K8s LB IP used by the Ingress. If you are using E2E to manage your domain’s DNS records, consult the following article to for more information.
Step 1: Creating a sample Backend Services
echo "---
apiVersion: apps/v1
kind: Deployment
metadata:
 name: nginxhello-blue
 labels:
   app.kubernetes.io/name: nginxhello-blue
   app.kubernetes.io/part-of: nginxhello-blue
spec:
 replicas: 1
 selector:
   matchLabels:
     app.kubernetes.io/name: nginxhello-blue
     app.kubernetes.io/part-of: nginxhello-blue
 template:
   metadata:
     labels:
       app.kubernetes.io/name: nginxhello-blue
       app.kubernetes.io/part-of: nginxhello-blue
   spec:
     containers:
     - name: nginxhello-blue
       image: suryaprakash116/blue-container
       ports:
       - containerPort: 80
       env:
       - name: NODE_NAME
         valueFrom:
           fieldRef:
             fieldPath: spec.nodeName
       - name: COLOR
         value: blue
---
apiVersion: v1
kind: Service
metadata:
 name: nginxhello-blue
 labels:
   app.kubernetes.io/name: nginxhello-blue
   app.kubernetes.io/part-of: nginxhello-blue
spec:
 ports:
 - port: 80
   protocol: TCP
   targetPort: 80
 selector:
   app.kubernetes.io/name: nginxhello-blue
   app.kubernetes.io/part-of: nginxhello-blue
" | kubectl apply -f -
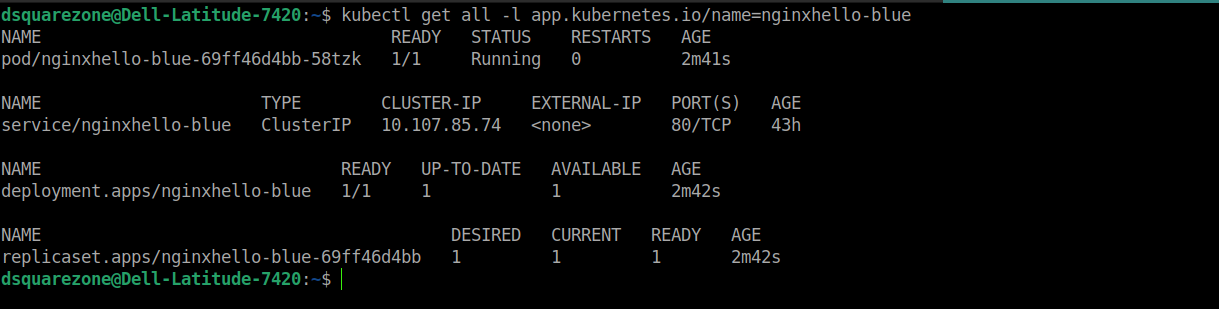
After deploying the sample backend deployments and service, you’ll see the following output.
Step 2: Setting up the Nginx Ingress Controller
To set up and install the nginx ingress controller kindly refer to the following docs step 1. Once the installation has been completed you’ll see the following output.

After a few minutes, the Ingress controller service (ingress-nginx-controller) should acquire an external IP address. This IP will match the Load Balancer IP you previously provisioned from the E2E Kubernetes Dashboard LB IP section.

Step 3: Implementing TLS for a Backend Service using Cert-Manager.
Managing X.509 Certificates: A Pain in the Neck
Manually defining, requesting, applying, renewing, and removing TLS certificates can be a tedious and error-prone process, especially when dealing with a large number of certificates.
Introducing Cert-Manager: Your Kubernetes Certificate Hero
The Kubernetes ecosystem offers a powerful open-source and community-driven solution called Cert-Manager (developed by Jetstack). Cert-Manager automates the entire lifecycle of TLS certificates within your Kubernetes cluster, significantly reducing manual work and associated errors.
Benefits of Automated X.509 Certificate Management:
Enhanced Automation: Cert-Manager automates certificate management tasks, freeing you to focus on other critical development activities.
Reduced Risk: By eliminating the human element from certificate management, you minimize the risk of errors and security vulnerabilities.
Reliable Outcomes: Automation ensures consistency and predictability in the certificate management process, leading to more reliable results.
adds the Jetstack repository, which contains the official Cert-Manager Helm chart, to your local Helm repository list.
helm repo add jetstack https://charts.jetstack.io
Updates the Jetstack repository information in your local Helm cache. This ensures you have access to the latest version of the Cert-Manager chart.
helm repo update jetstack
Actual installation of Cert-Manager
helm install cert-manager jetstack/cert-manager --namespace cert-manager --create-namespace --set installCRDs=true
To verify our installation, check the cert-manager Namespace for running pods:

This indicates that the cert-manager installation succeeded.
Before issuing certificates for our domain (e.g., example.com) used throughout this guide, we need to create an Issuer. An Issuer specifies the certificate authority from which signed X.509 certificates can be obtained. In this guide, we’ll leverage Let’s Encrypt, a popular certificate authority that provides free, trusted TLS certificates. Let’s Encrypt offers both a staging environment for testing your certificate configuration before deploying them to production and a production server for issuing verifiable TLS certificates.
Note: During the creation of the ingress rule in the tls ingress object add annotation cert-manager.io/issuer: acme-lets-encrypt to automate the creation of cert-manager and secrets
echo "apiVersion: networking.k8s.io/v1
kind: Ingress
metadata:
 name: host-rule-ingress
 annotations:
   cert-manager.io/issuer: acme-lets-encrypt
spec:
 ingressClassName: nginx
 rules:
 - host: dsquarezone.online
   http:
     paths:
     - backend:
         service:
           name: nginxhello-blue
           port:
             number: 80
       pathType: ImplementationSpecific
 tls:
 - hosts:
   - dsquarezone.online
   secretName: dsquarezone-online-tls
" | kubectl apply -f -
To verify our certificate provisioning process is working flawlessly, let’s create a test ClusterIssuer. Unlike regular Issuers which are confined to a single namespace, a ClusterIssuer has cluster-wide visibility. This allows any Certificate .resource in any namespace to leverage this ClusterIssuer for obtaining certificates.
echo "apiVersion: cert-manager.io/v1
kind: Issuer
metadata:
 name: acme-lets-encrypt
spec:
 acme:
   server: https://acme-v02.api.letsencrypt.org/directory
   privateKeySecretRef:
     name: acme-lets-encrypt
   email: example@gmail.com
   solvers:
   - http01:
       ingress:
         class: nginx" | kubectl apply -f -
This step defines and submits a Kubernetes resource called a Certificate. This resource instructs Cert-Manager to request and manage a TLS certificate for your specified domain name.
echo "apiVersion: cert-manager.io/v1
kind: Certificate
metadata:
 name: dsquarezone-online
spec:
 dnsNames:
 - dsquarezone.online ## Replace your domain name
 issuerRef:
   name: acme-lets-encrypt
 secretName: dsquarezone-online-tls" | kubectl apply -f -
Once the certificate has been successfully created, you can run a describe on it to further confirm its successful creation:
kubectl describe certificate
You should see the following output in the Events section:

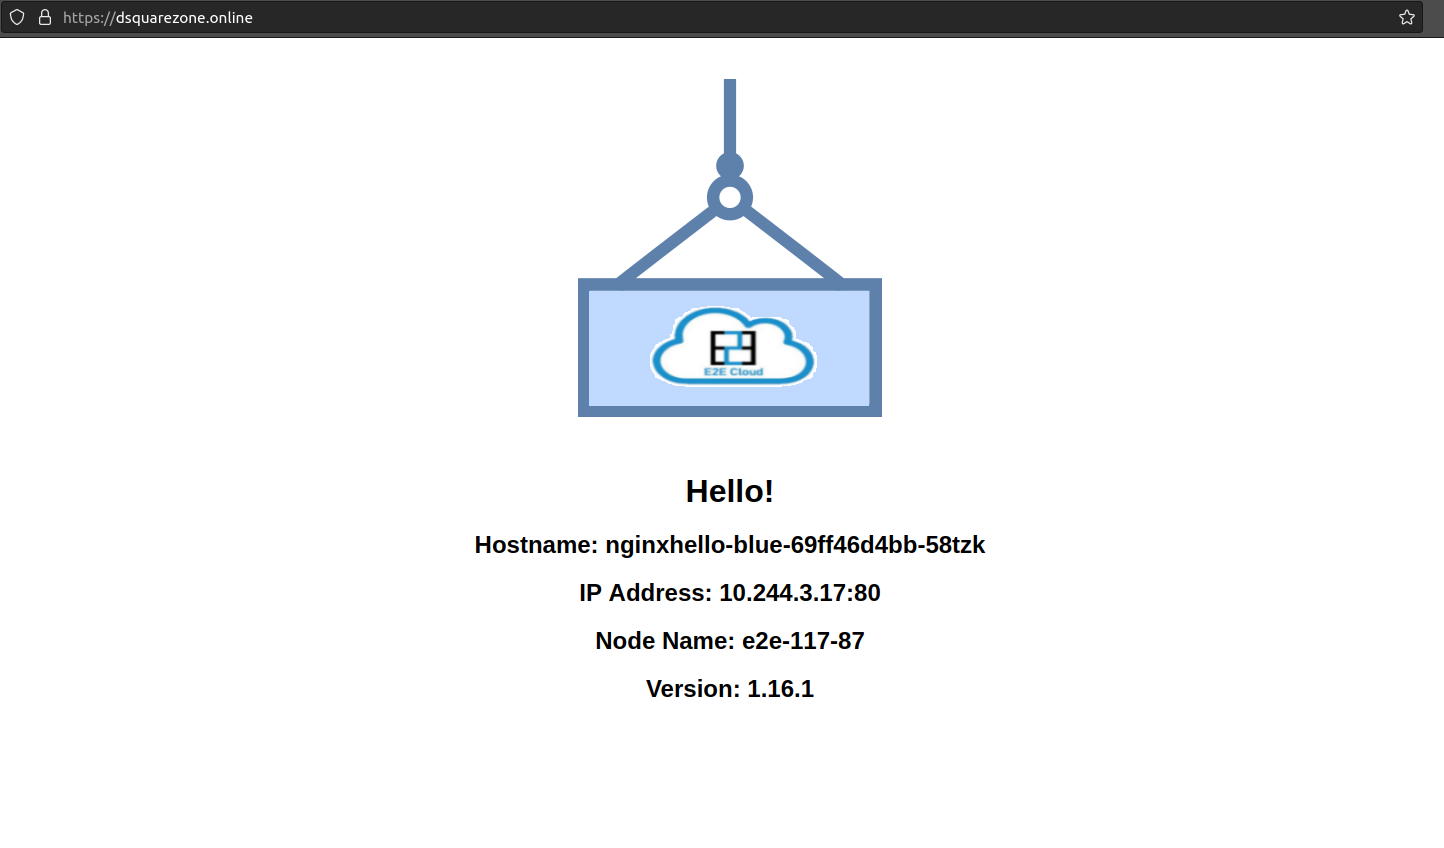
We’ll now try to access our site in a browser e.g. https://example.com using https protocol to ensure it is working properly.