Kubernetes
Kubernetes is an open-source container-orchestration system for automating deployment, scaling, and management of containerized applications. It has a large, rapidly growing ecosystem and the services, support, and tools are widely available. Kubernetes provides you with a framework to run distributed systems resiliently.
With the E2E Myaccount portal, You can quickly launch the Kubernetes master, worker nodes and get started working with your Kubernetes cluster in a minute.
Getting Started
How to Launch Kubernetes Service from Myaccount portal
Login into MyAccount
Please go to ‘MyAccount’ and log in using your credentials set up at the time of creating and activating the E2E Networks ‘MyAccount’.
Navigate to Kubernetes Service create page
After you log in to the E2E Networks ‘MyAccount’, you can click on the following options.
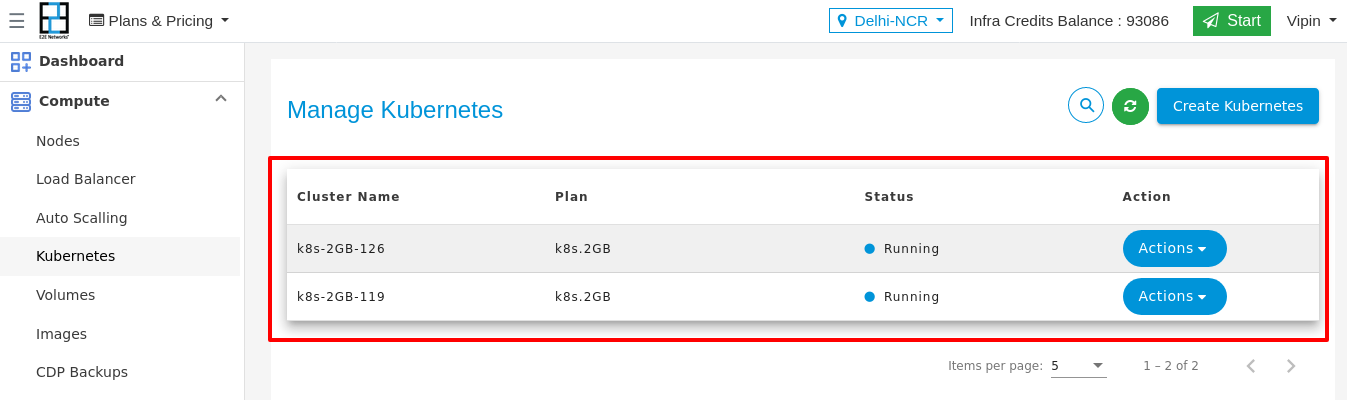
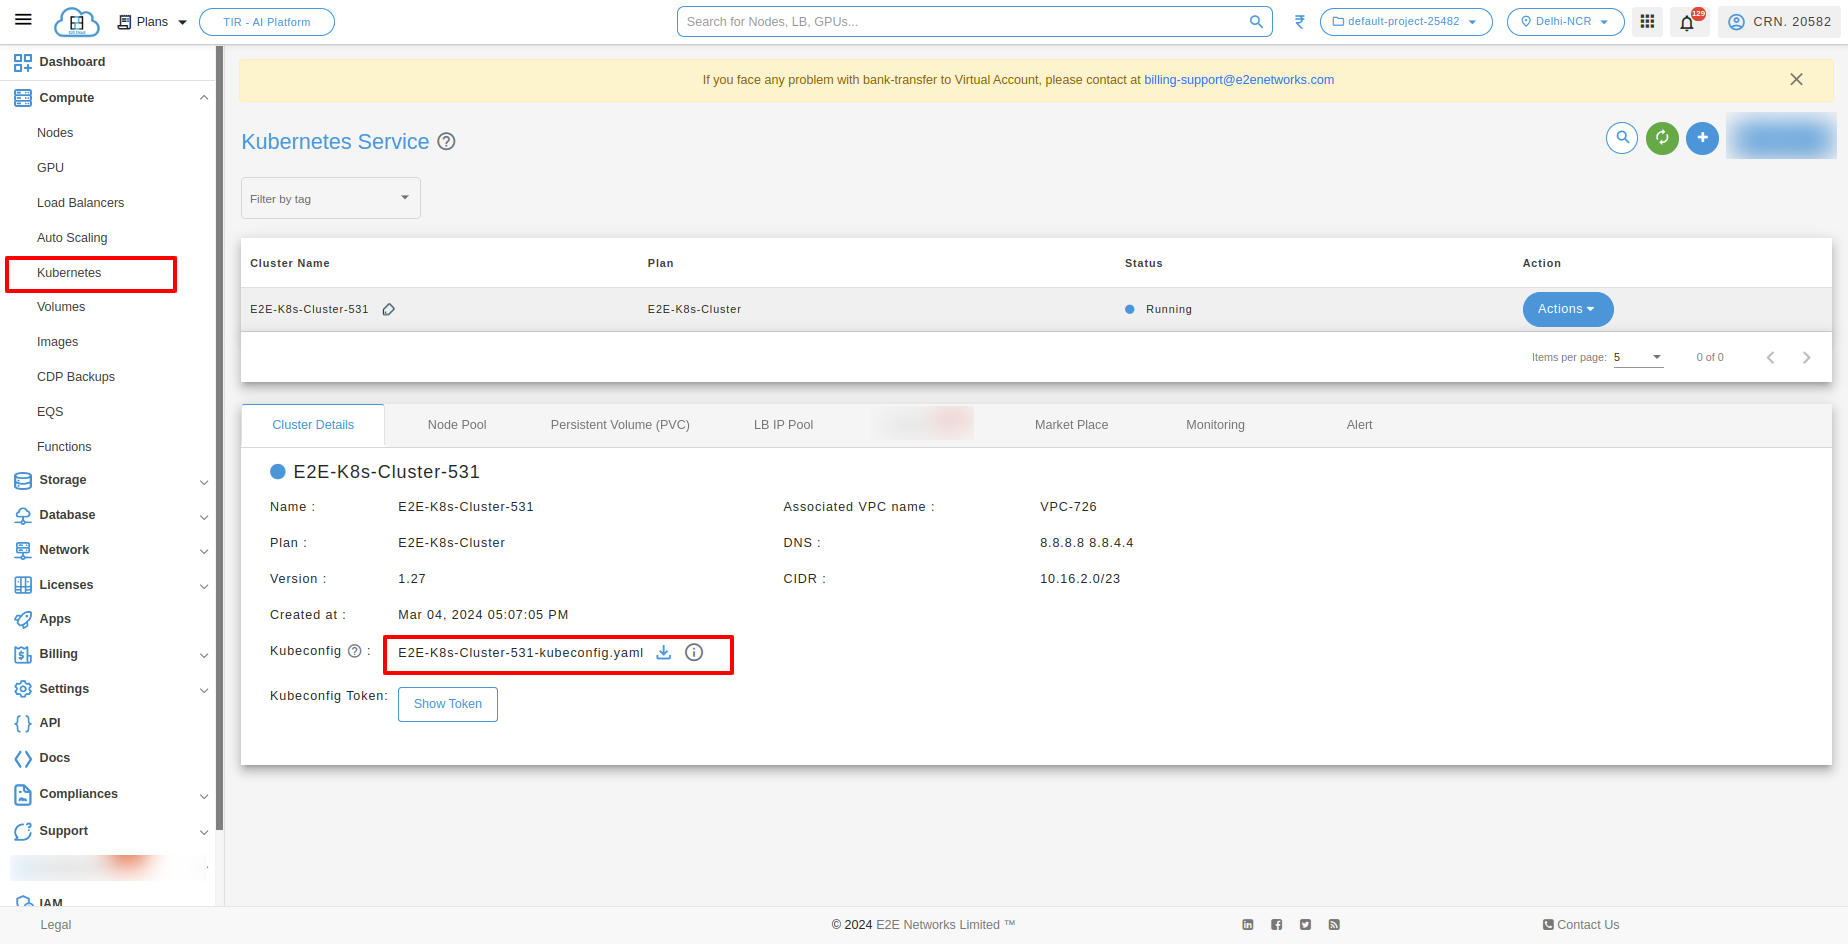
On the left side of the MyAccount dashboard, click on the “Kubernetes” sub-menu available under the Compute section.

Create Kubernetes Service
On the top right section of the kubernetes service dashboard, You need to click on the Create kubernetes icon which will prompt you to the cluster page where you will be selecting the configuration and entering the details of your database.

Kubernetes Configuration and Settings
After click on Create Kubernetes, you have to click on Add Plan and You need to select the required configuration and setting for your kubernetes which are mentioned below.

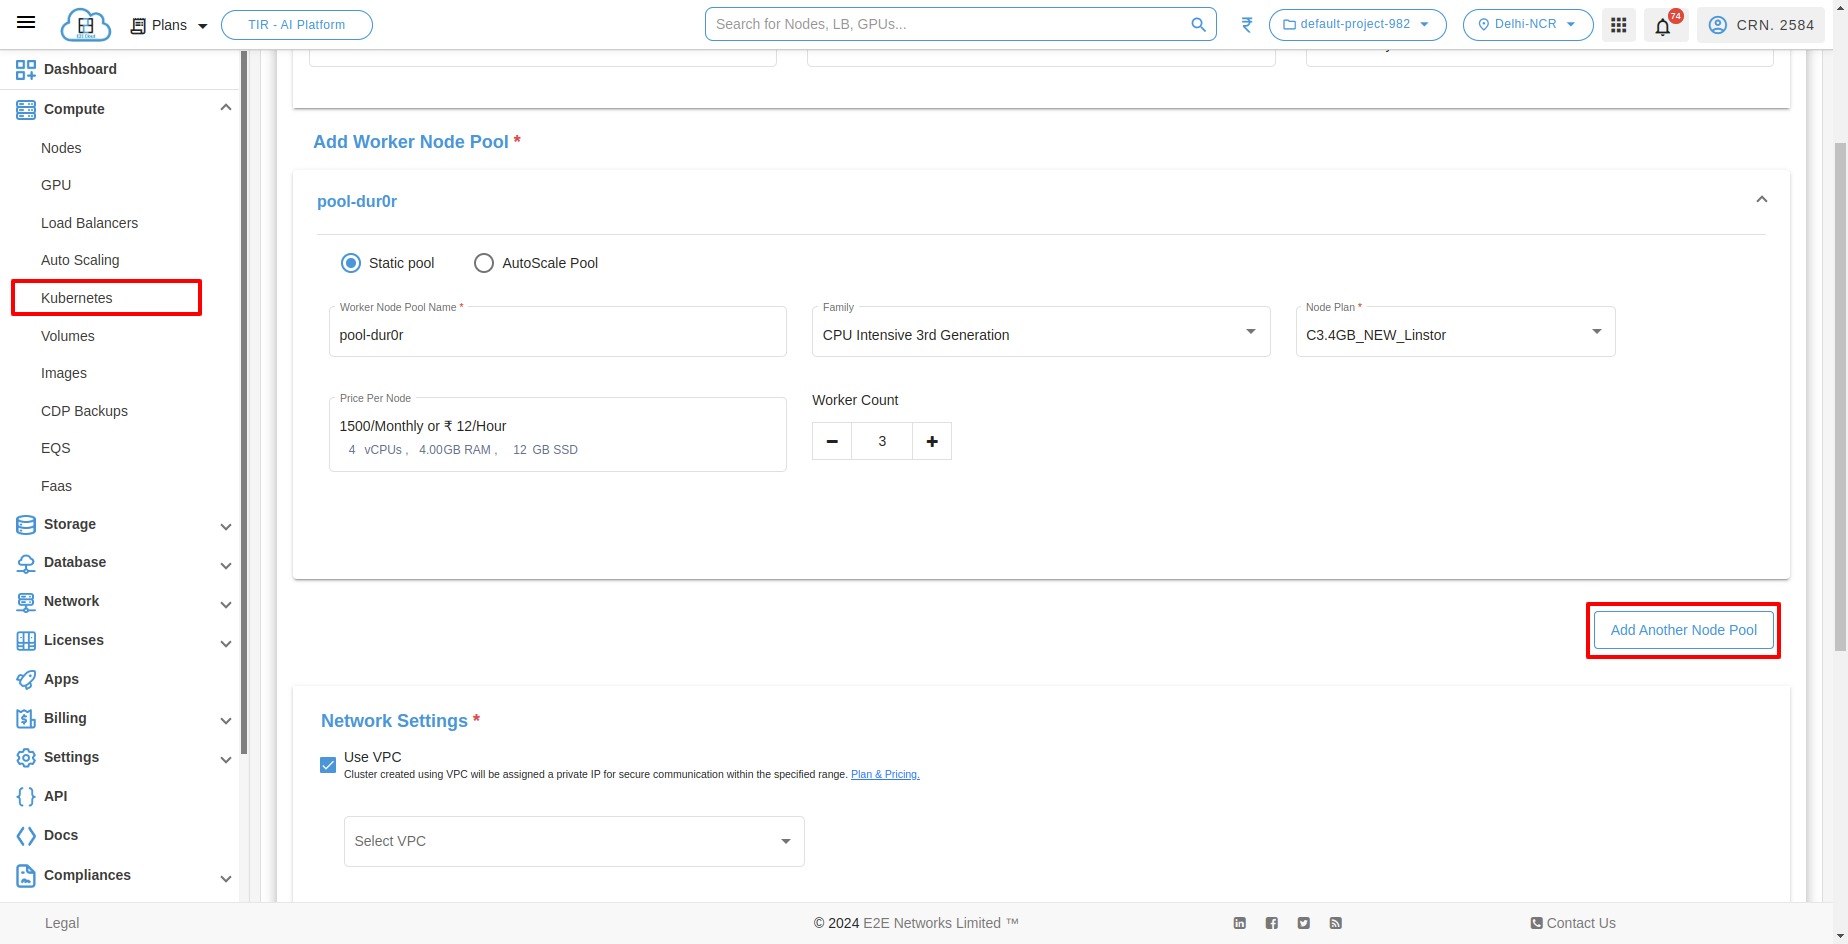
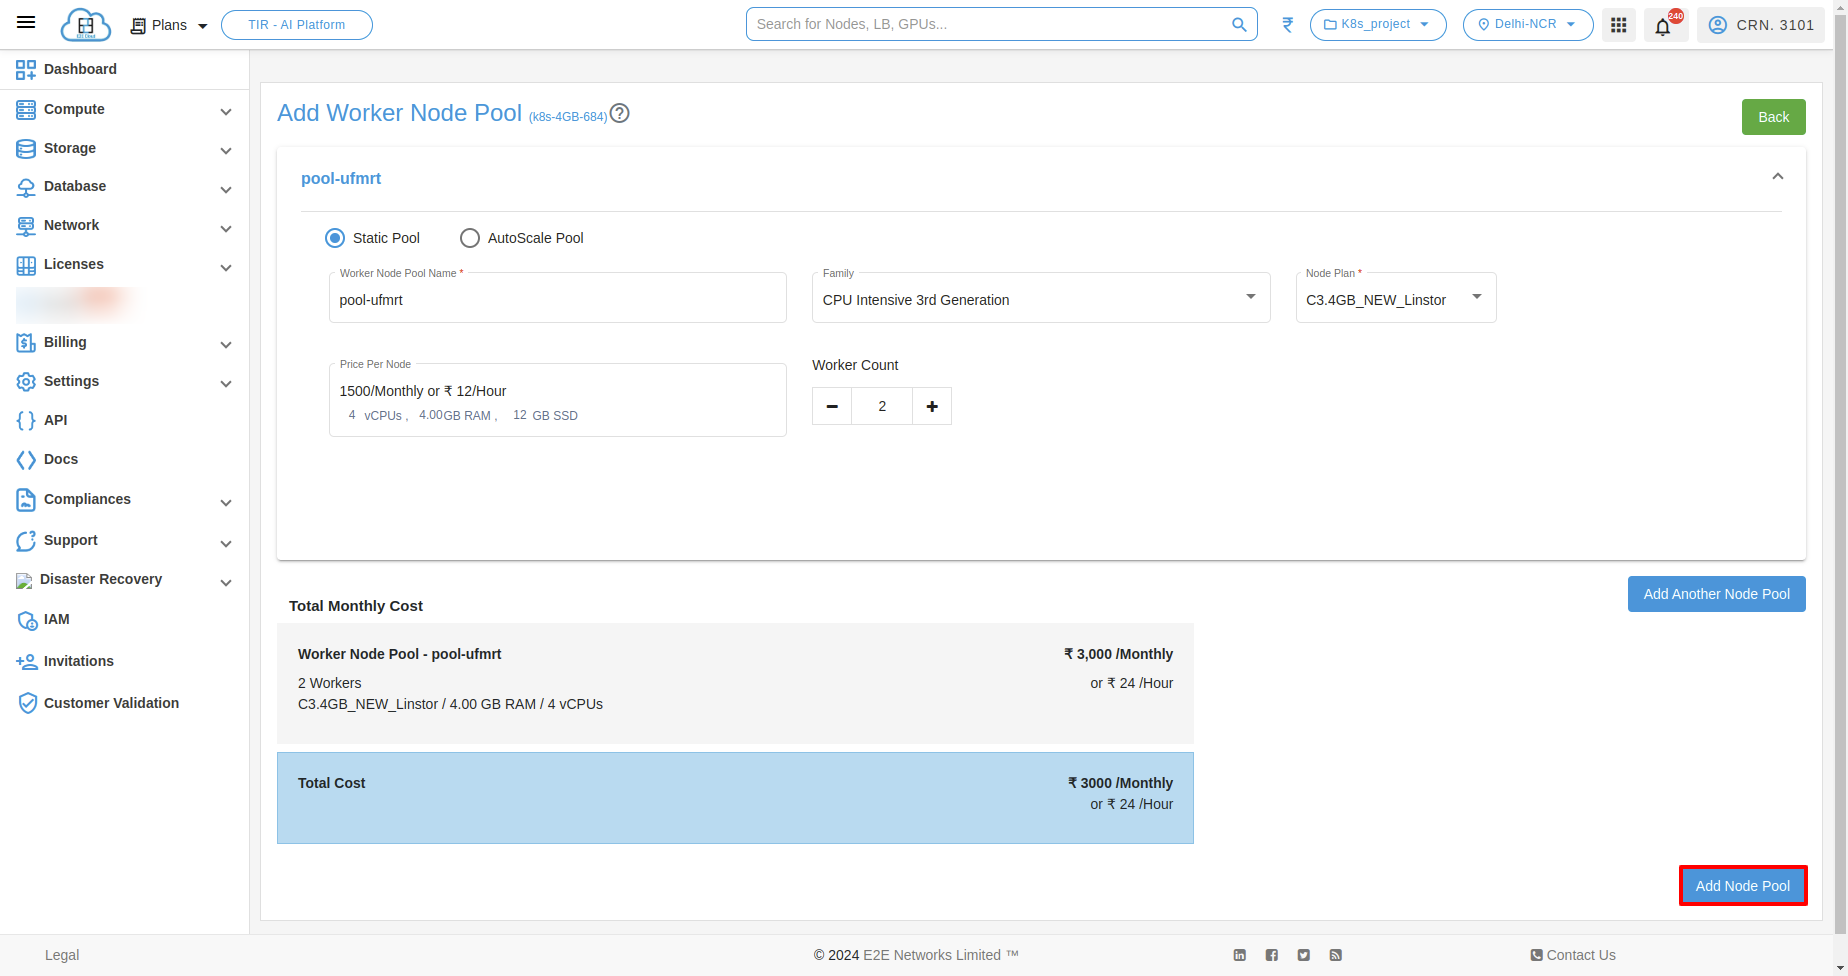
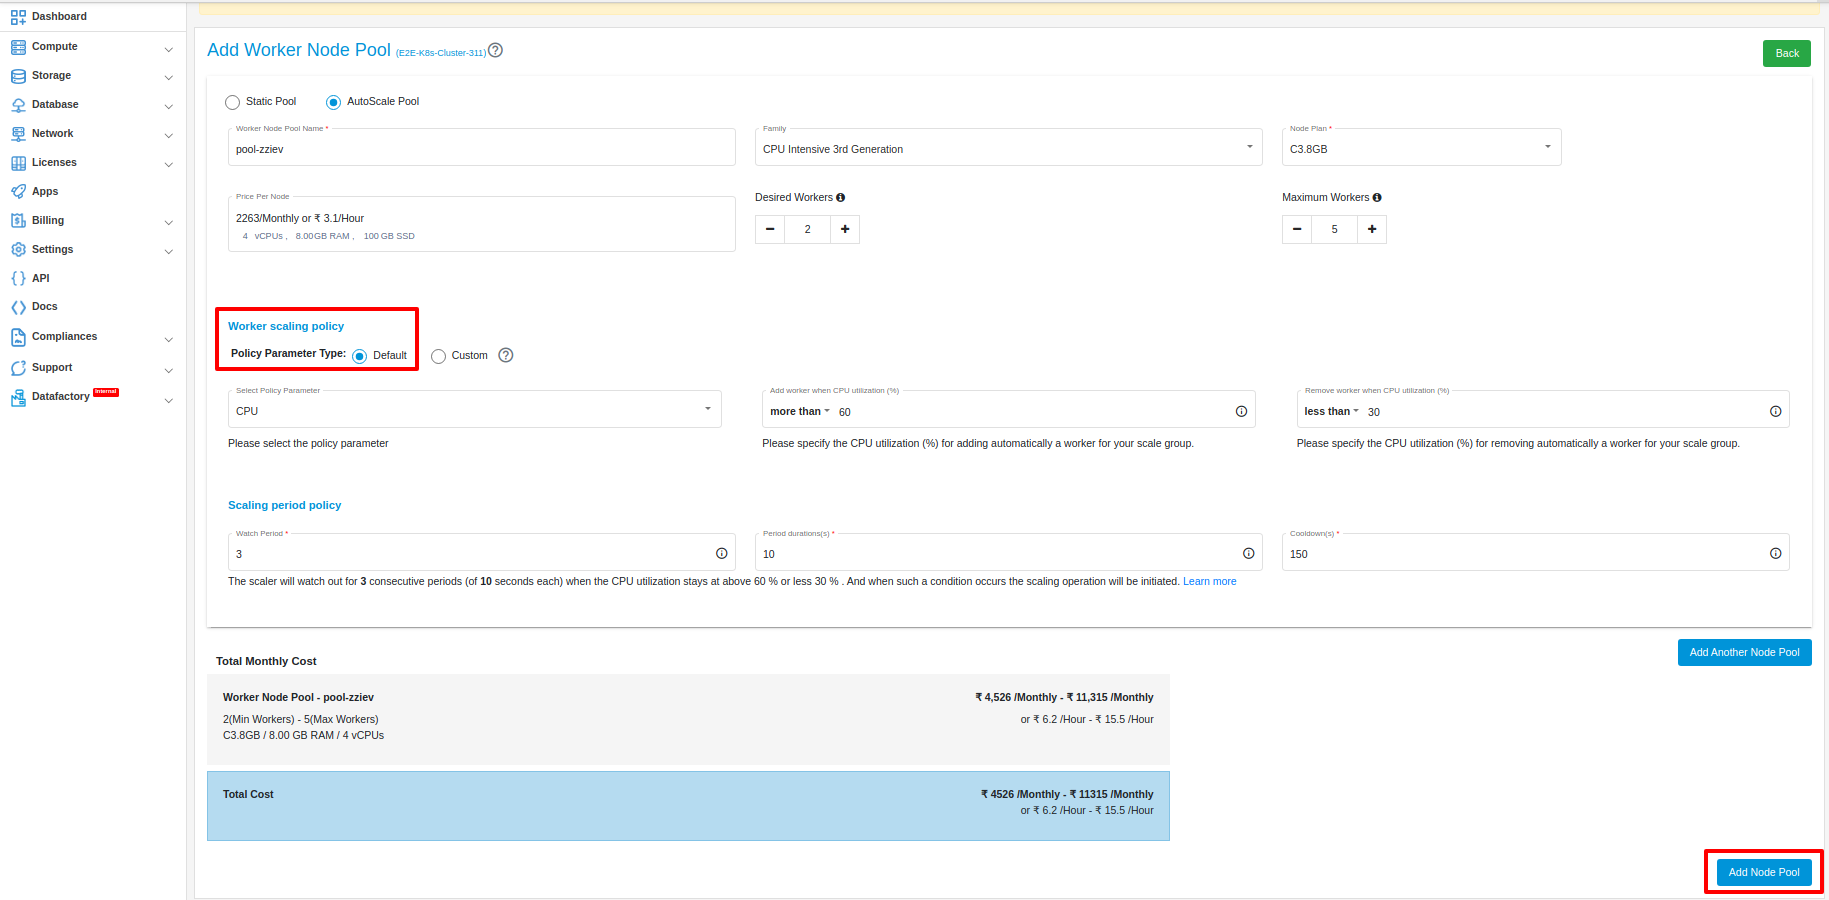
Add Worker Node Pool
You can select Static Pool or AutoScale Pool.
Static Pool

Add another Node Pool
if you want to add another node pool just click on “Add Another Node Pool” button.
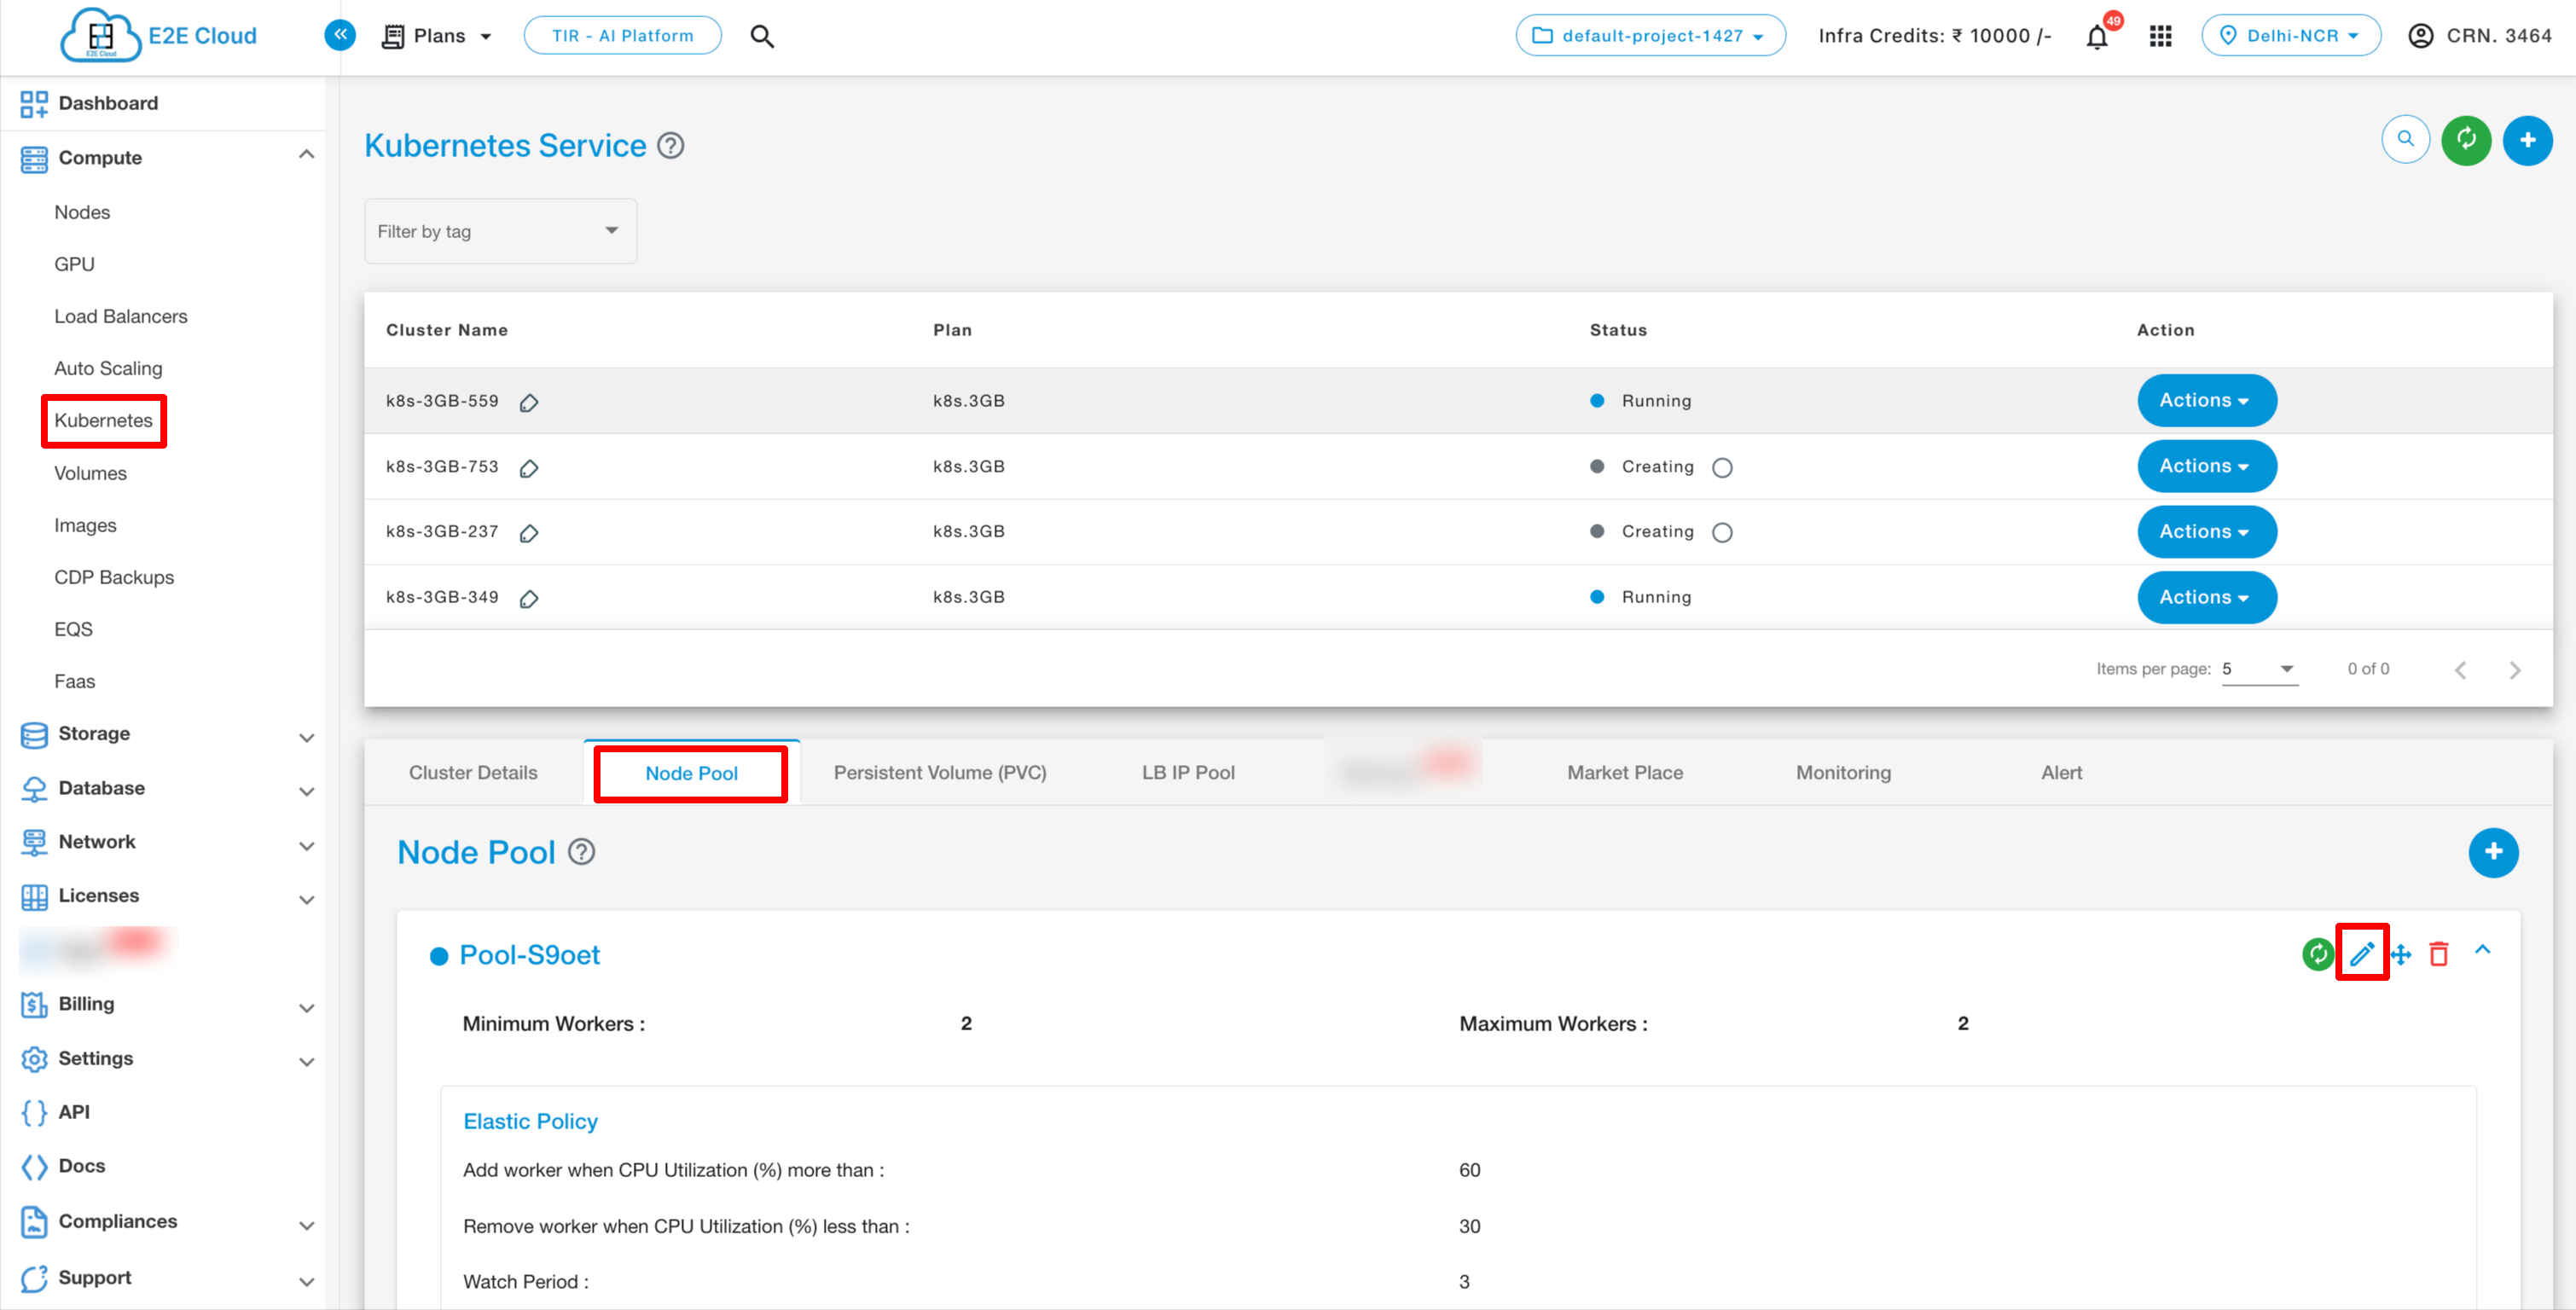
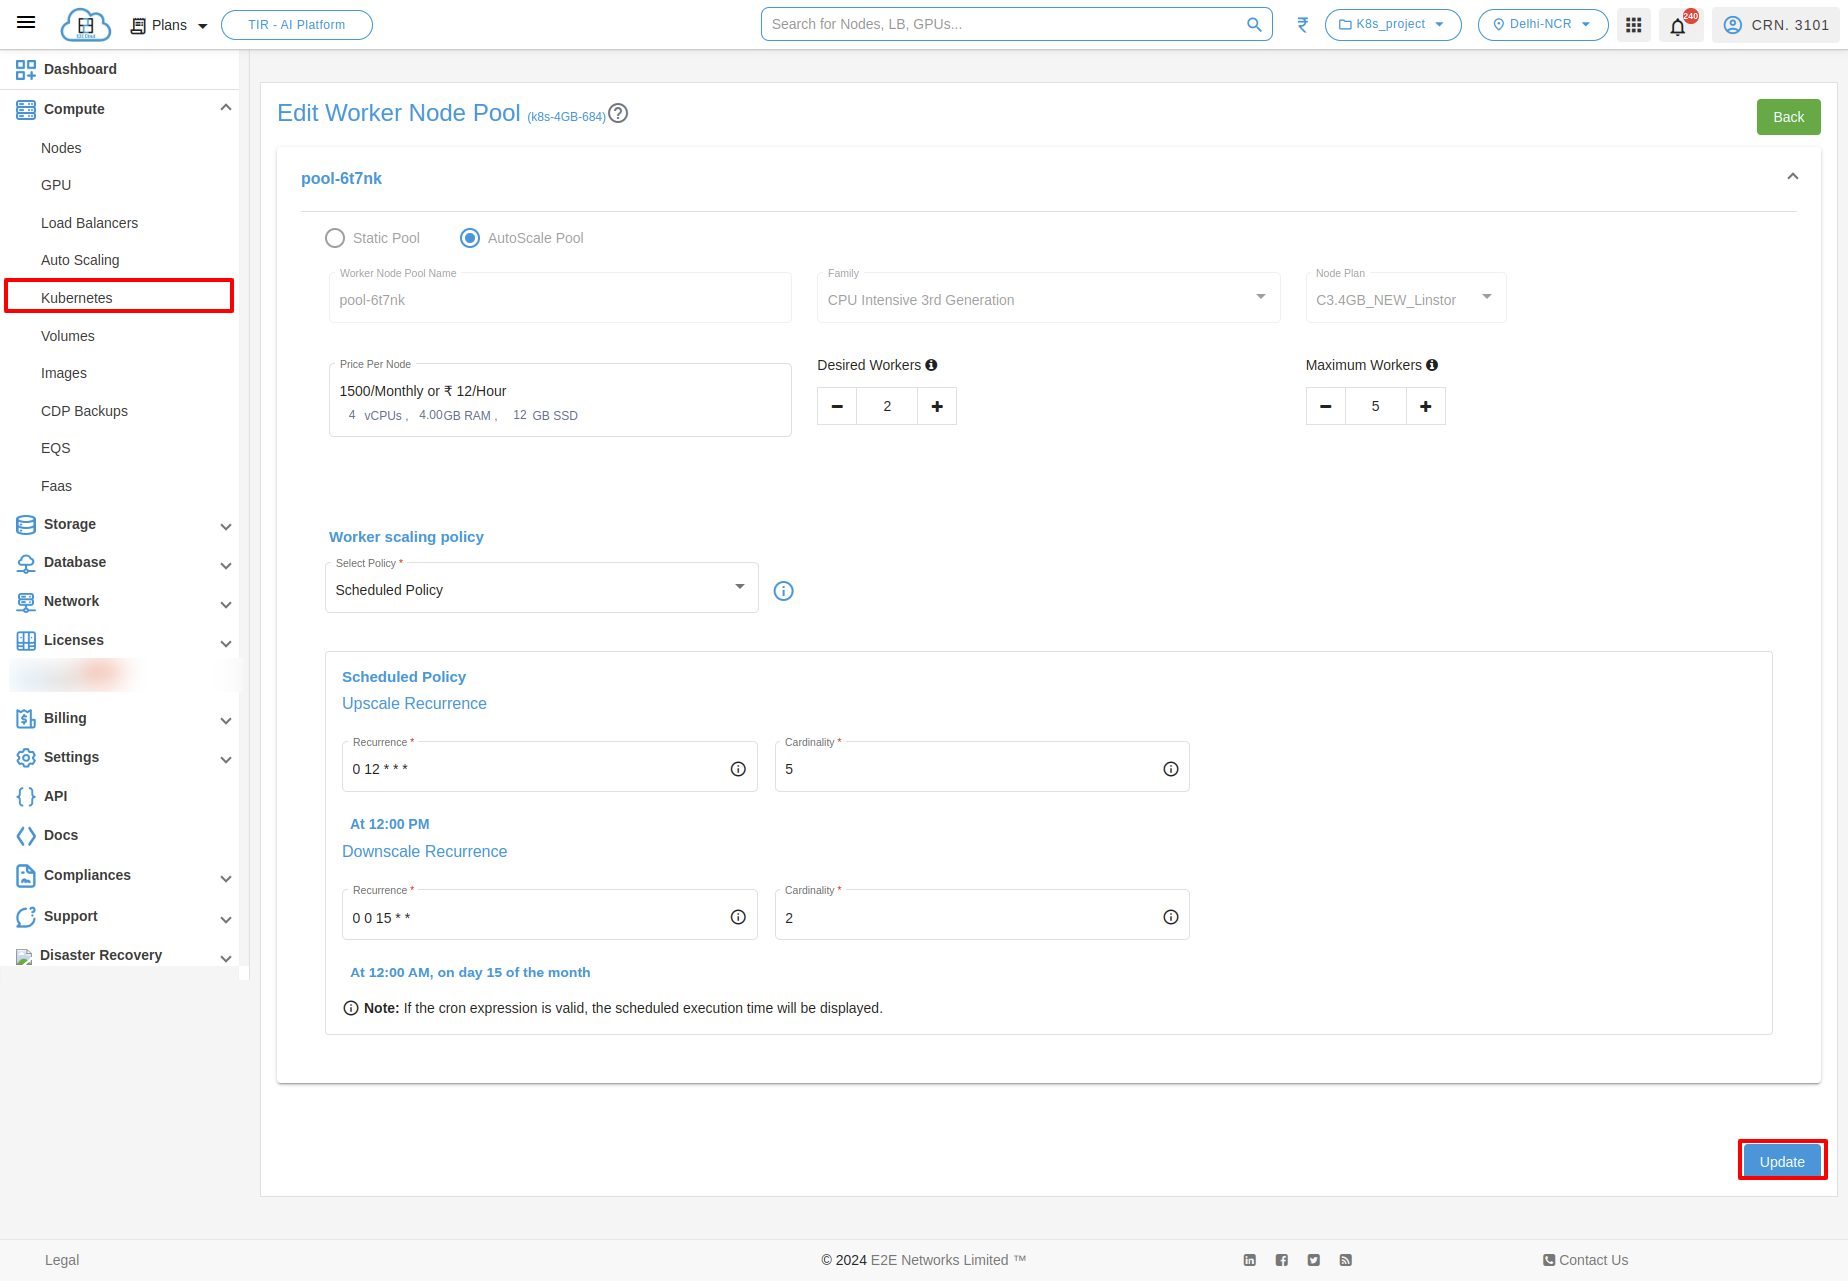
AutoScale Pool
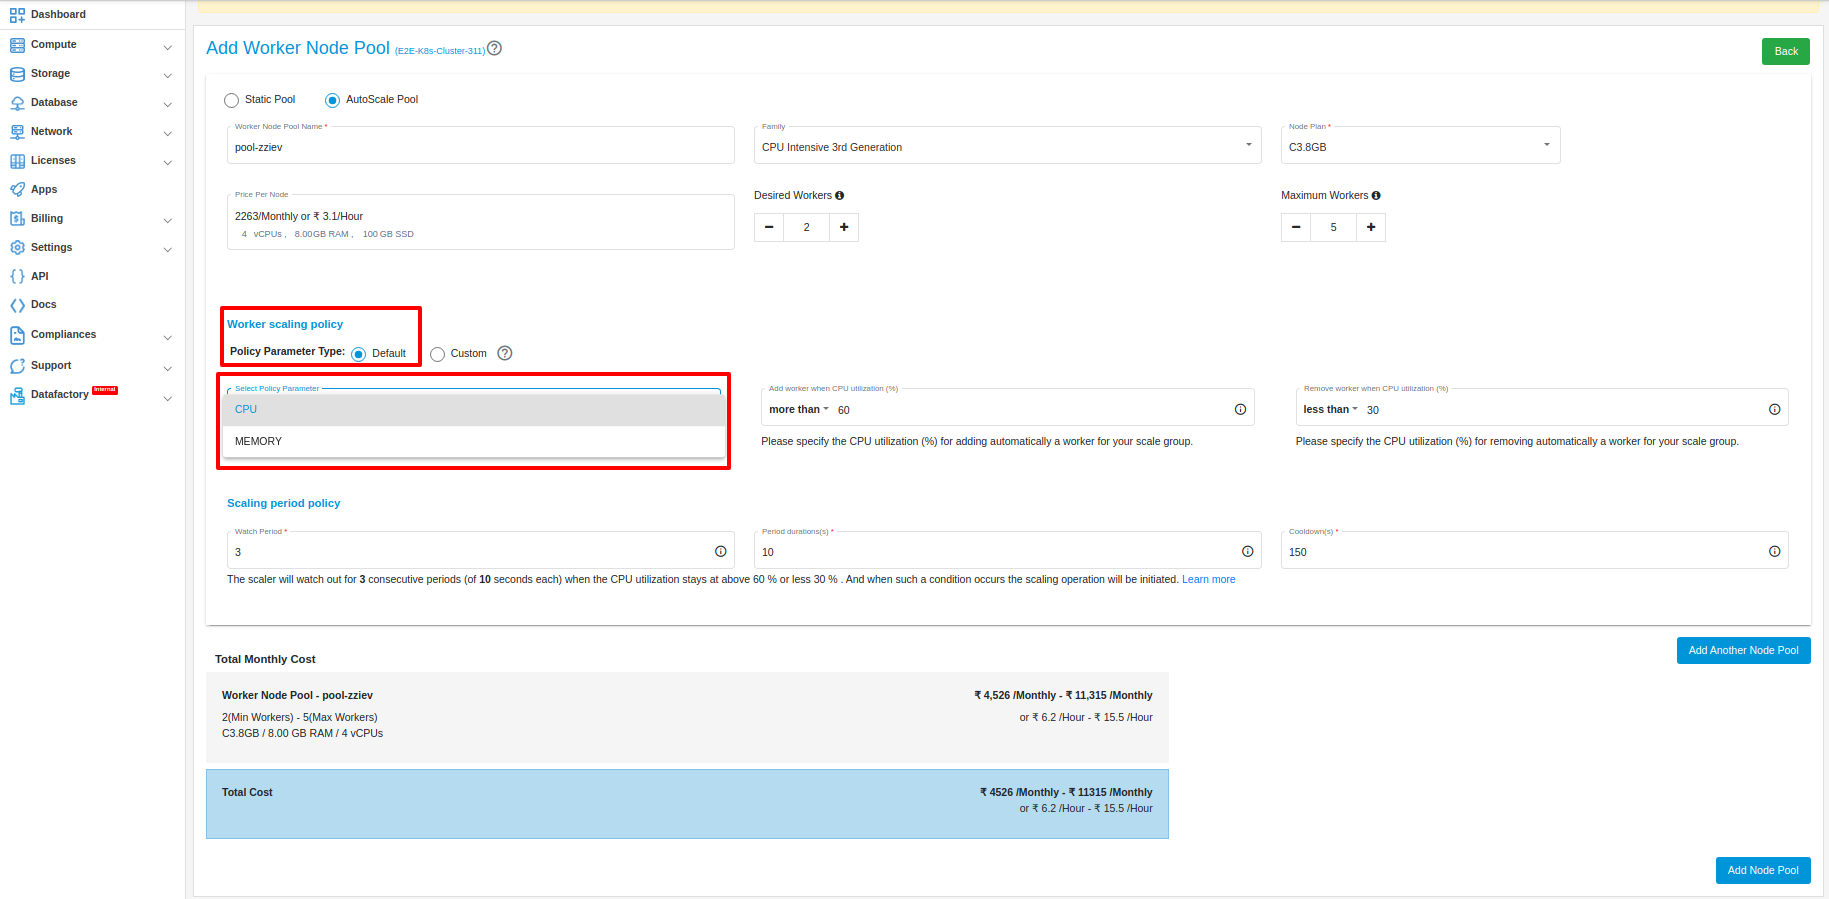
In AutoScale Pool, You have to select worker scaling policy.
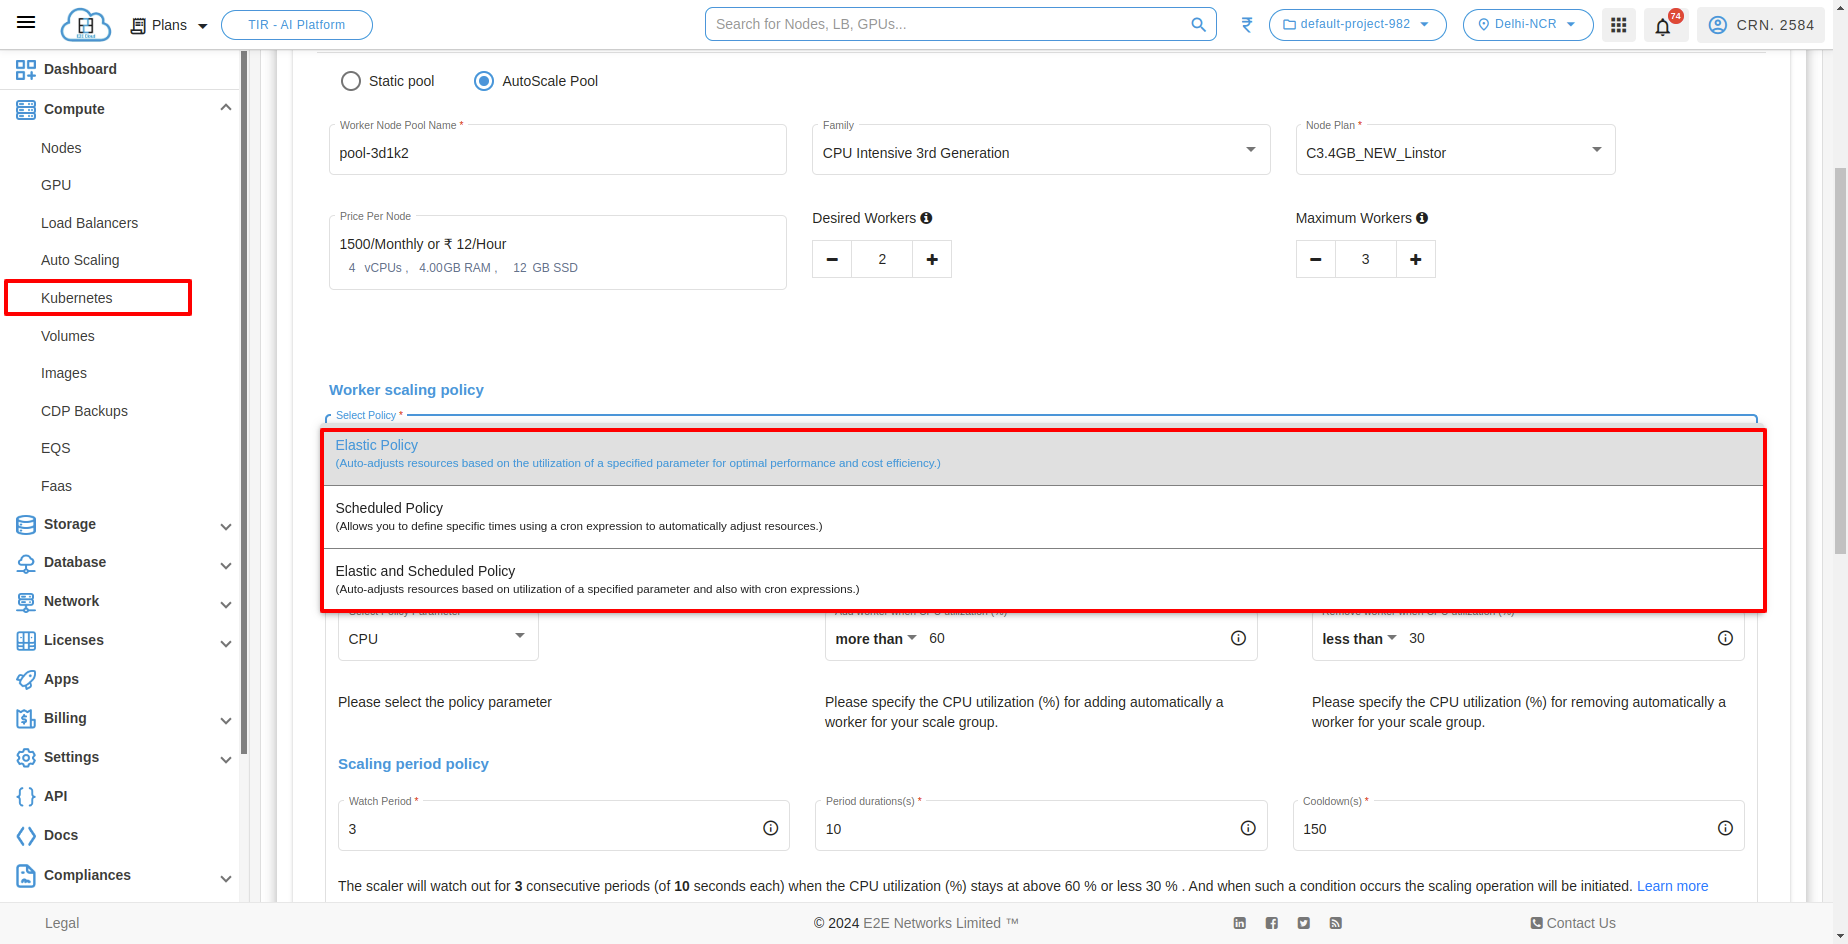
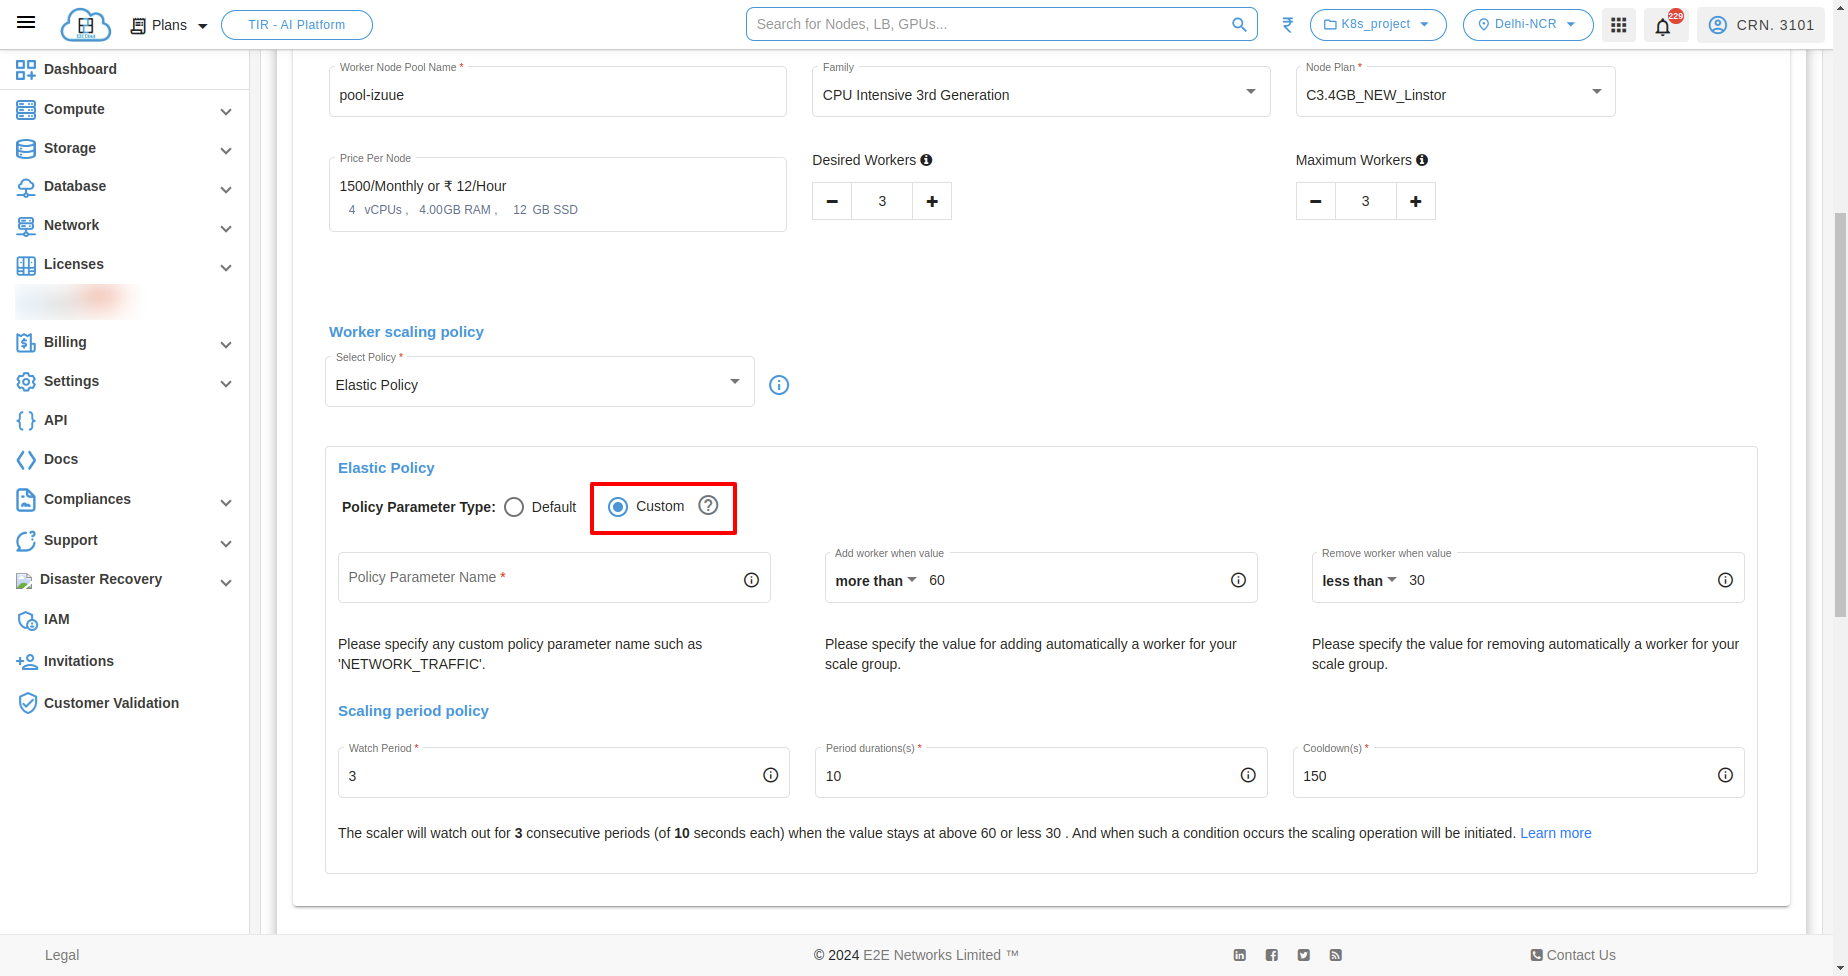
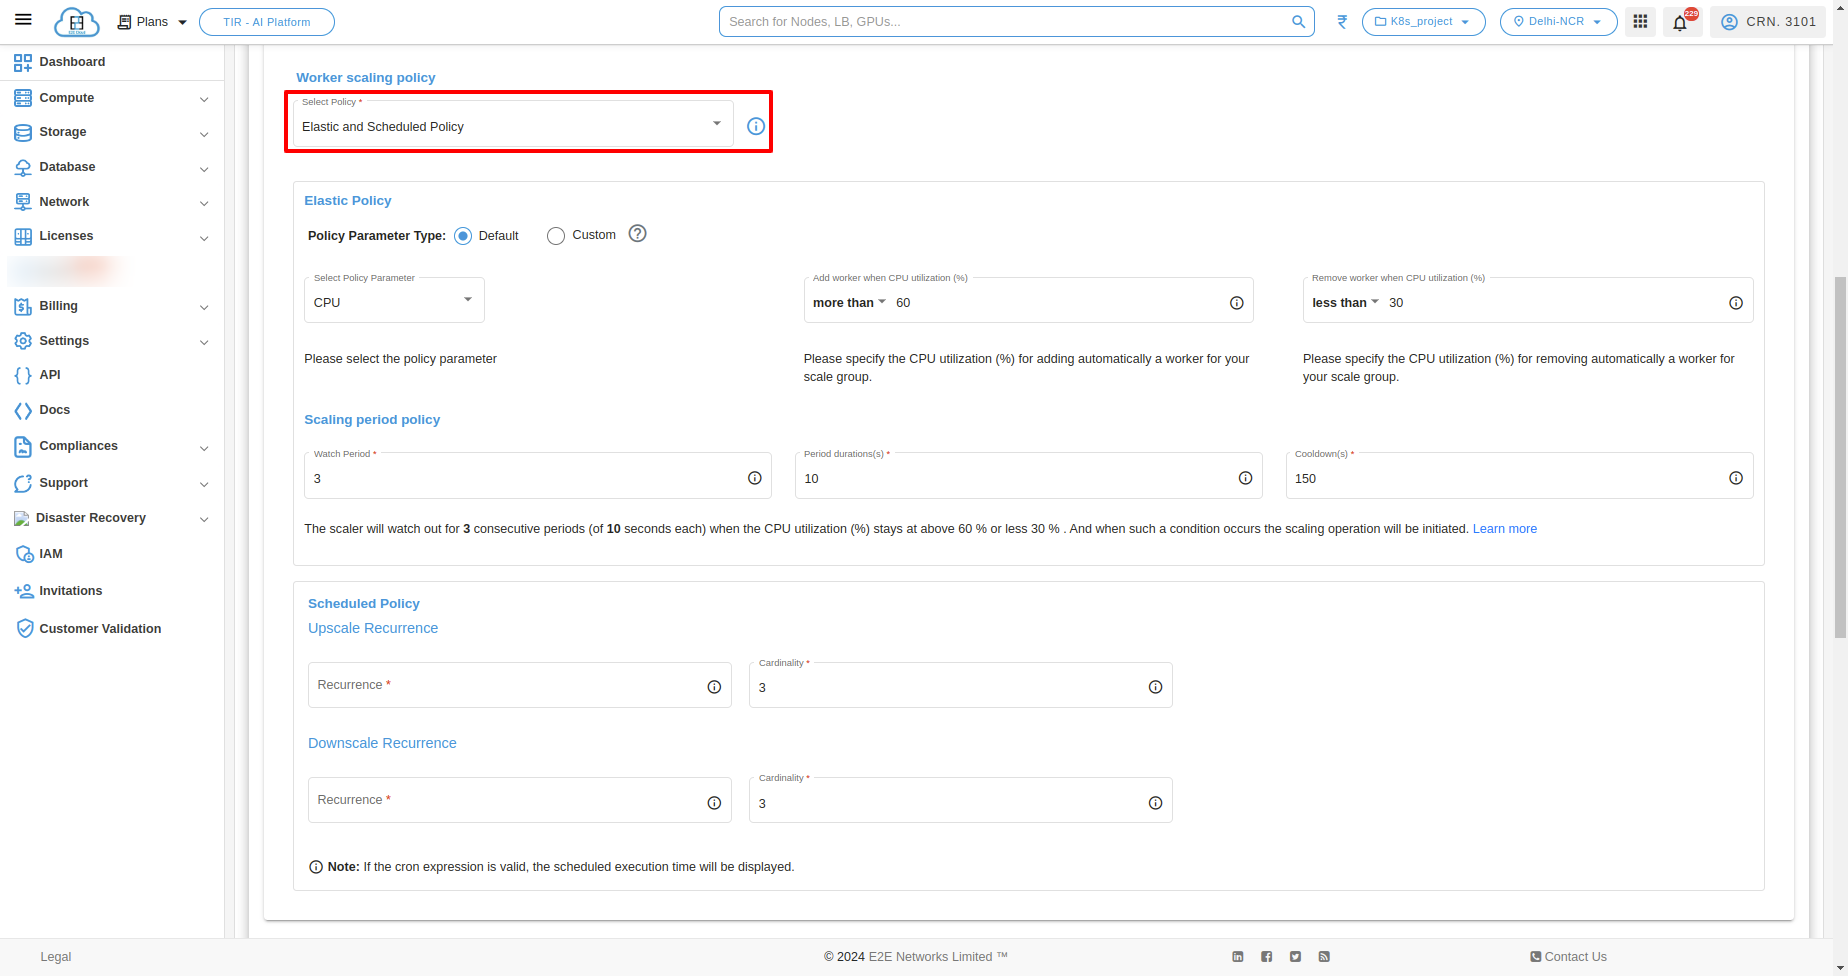
Elastic Policy
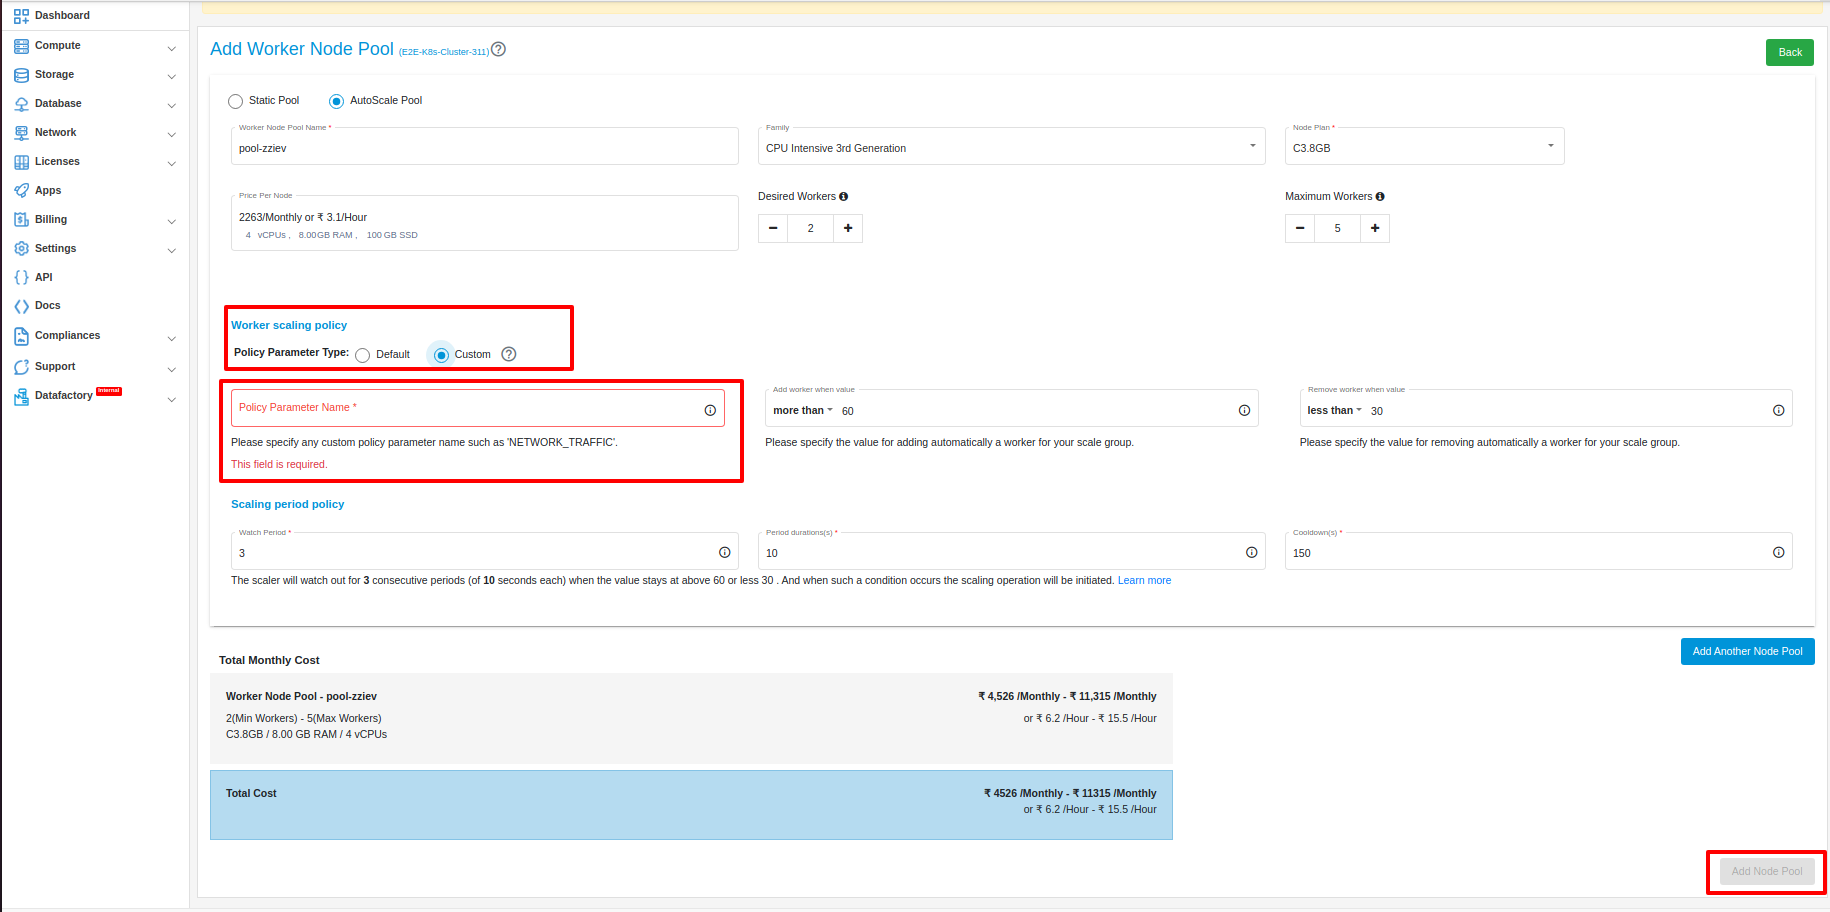
The Elastic Policy allows you to choose between two scaling policies: Default or Custom. If you choose Default, the scaling will be based on CPU or Memory utilization. If you choose Custom, you can specify a custom attribute that will be used to determine the scaling.
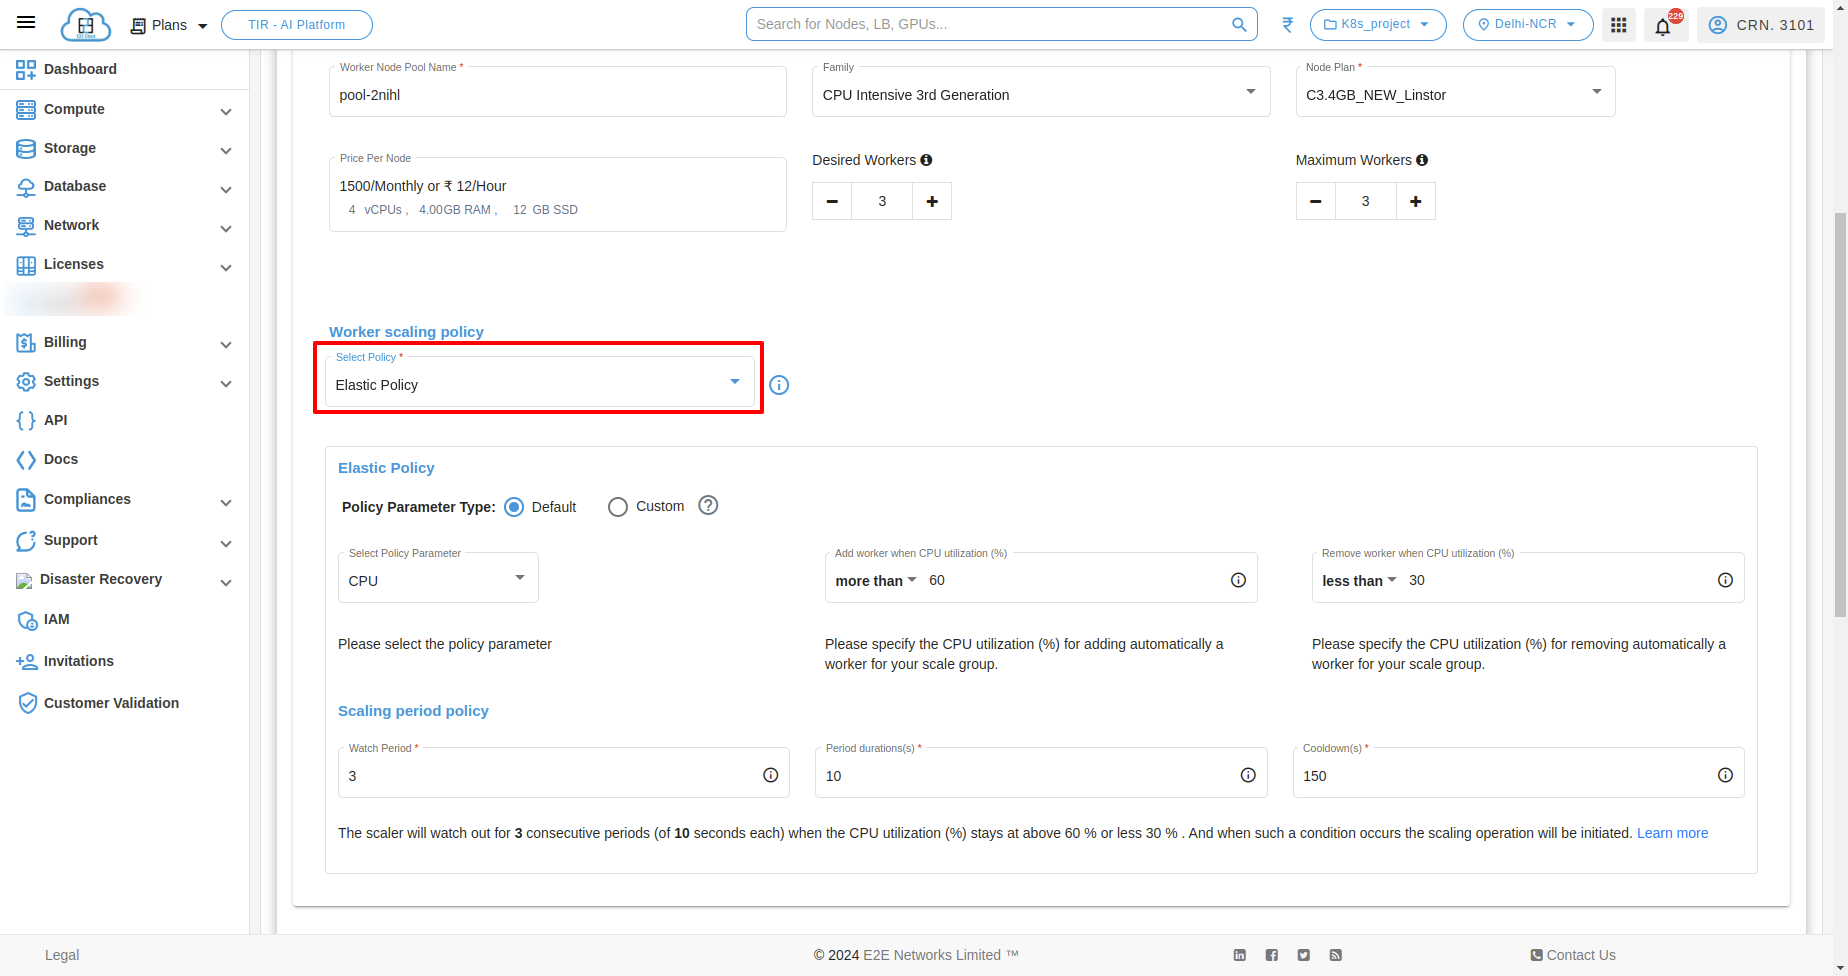
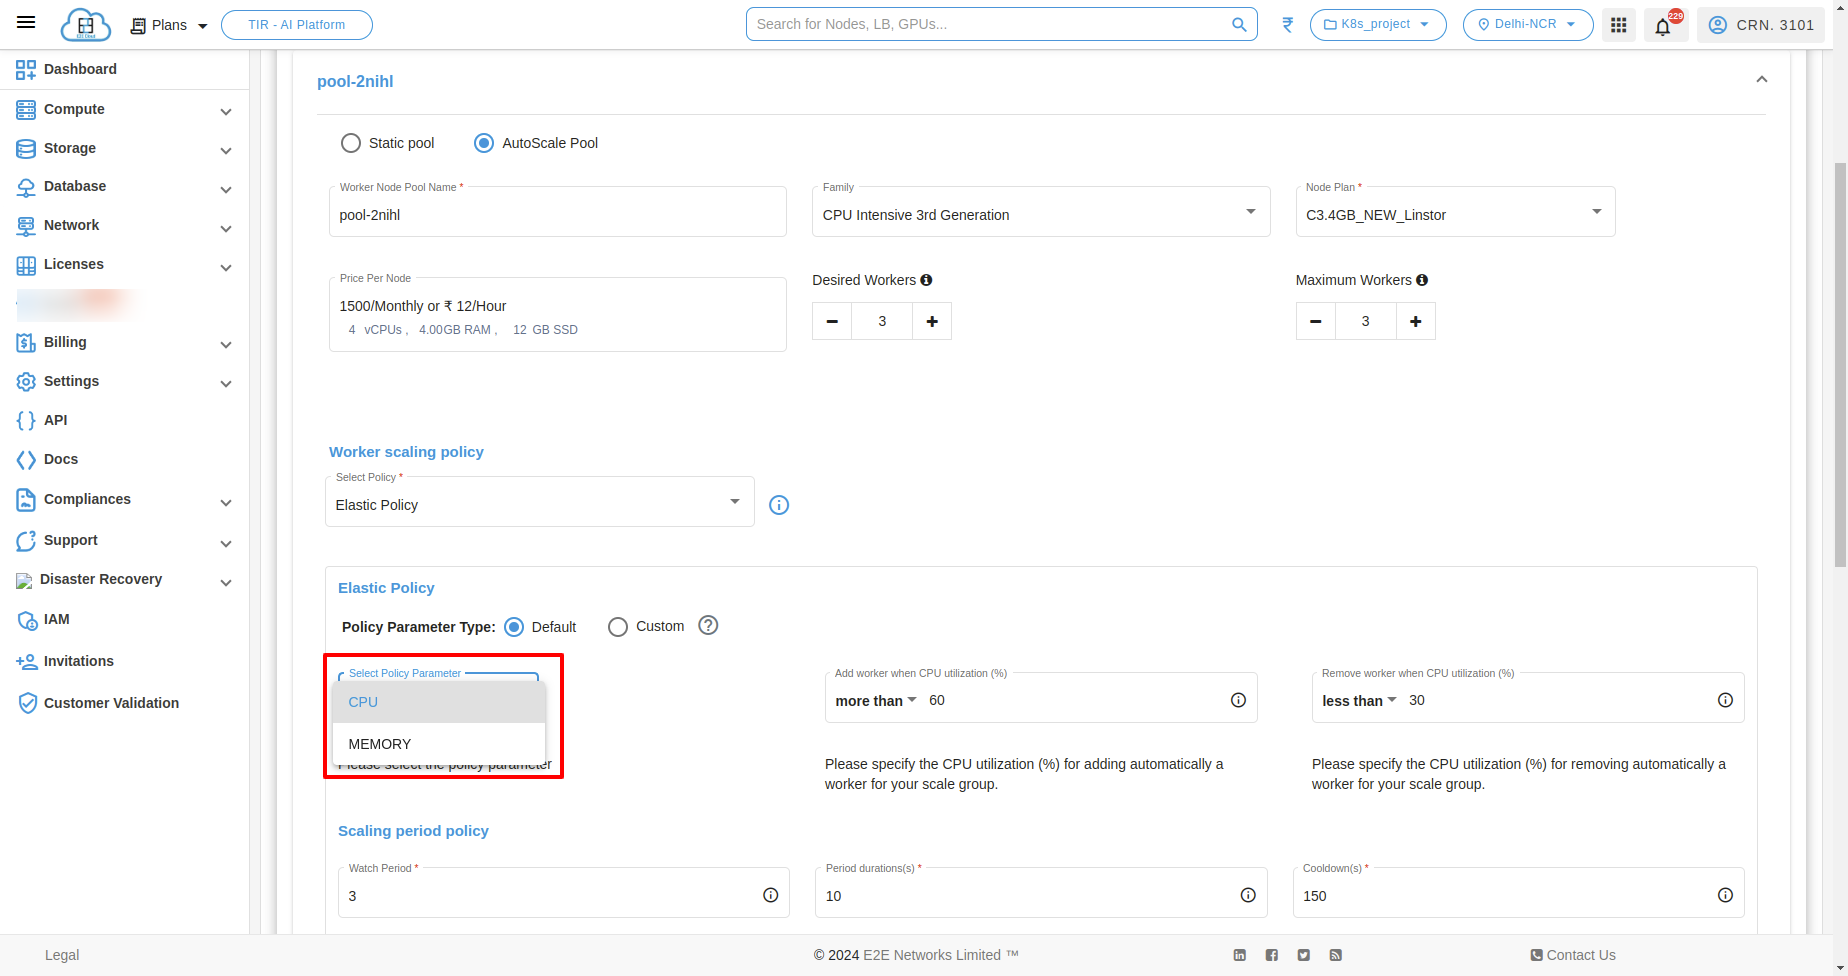
Default In Default policy parameter type, you can select two types of policy parameter.
CPU This policy scales the number of resources based on the CPU utilization. When the CPU utilization reaches a certain threshold, the number of resources will be increased according to the policy which you have set. When the CPU utilization decreases, the number of resources will be decreased.
MEMORY This policy scales the number of resources based on the MEMORY utilization. When the MEMORY utilization reaches a certain threshold, the number of resources will be increased according to the policy which you have set. When the MEMORY utilization decreases, the number of resources will be decreased.
Custom Once an auto-scaling configuration is created with custom parameters, you’ll receive a CURL command for updating the custom parameter value. This command can be used within scripts, hooks, cron jobs, and similar actions. When the value of this custom parameter reaches a specific threshold, the number of resources will increase. Conversely, when the value decreases, the number of resources will decrease.
Note: Please note that the default value of the custom parameter is set to 0.
Manage Custom policy
The custom policy feature in Kubernetes Autoscale Pool enables you to define your custom attribute. The auto-scaling service utilizes this attribute to make scaling decisions. After setting this custom attribute you can scale/downscale your node pool nodes. Once the Kubernetes cluster is launched you will be given curl from where you can update this custom attribute according to your use case.
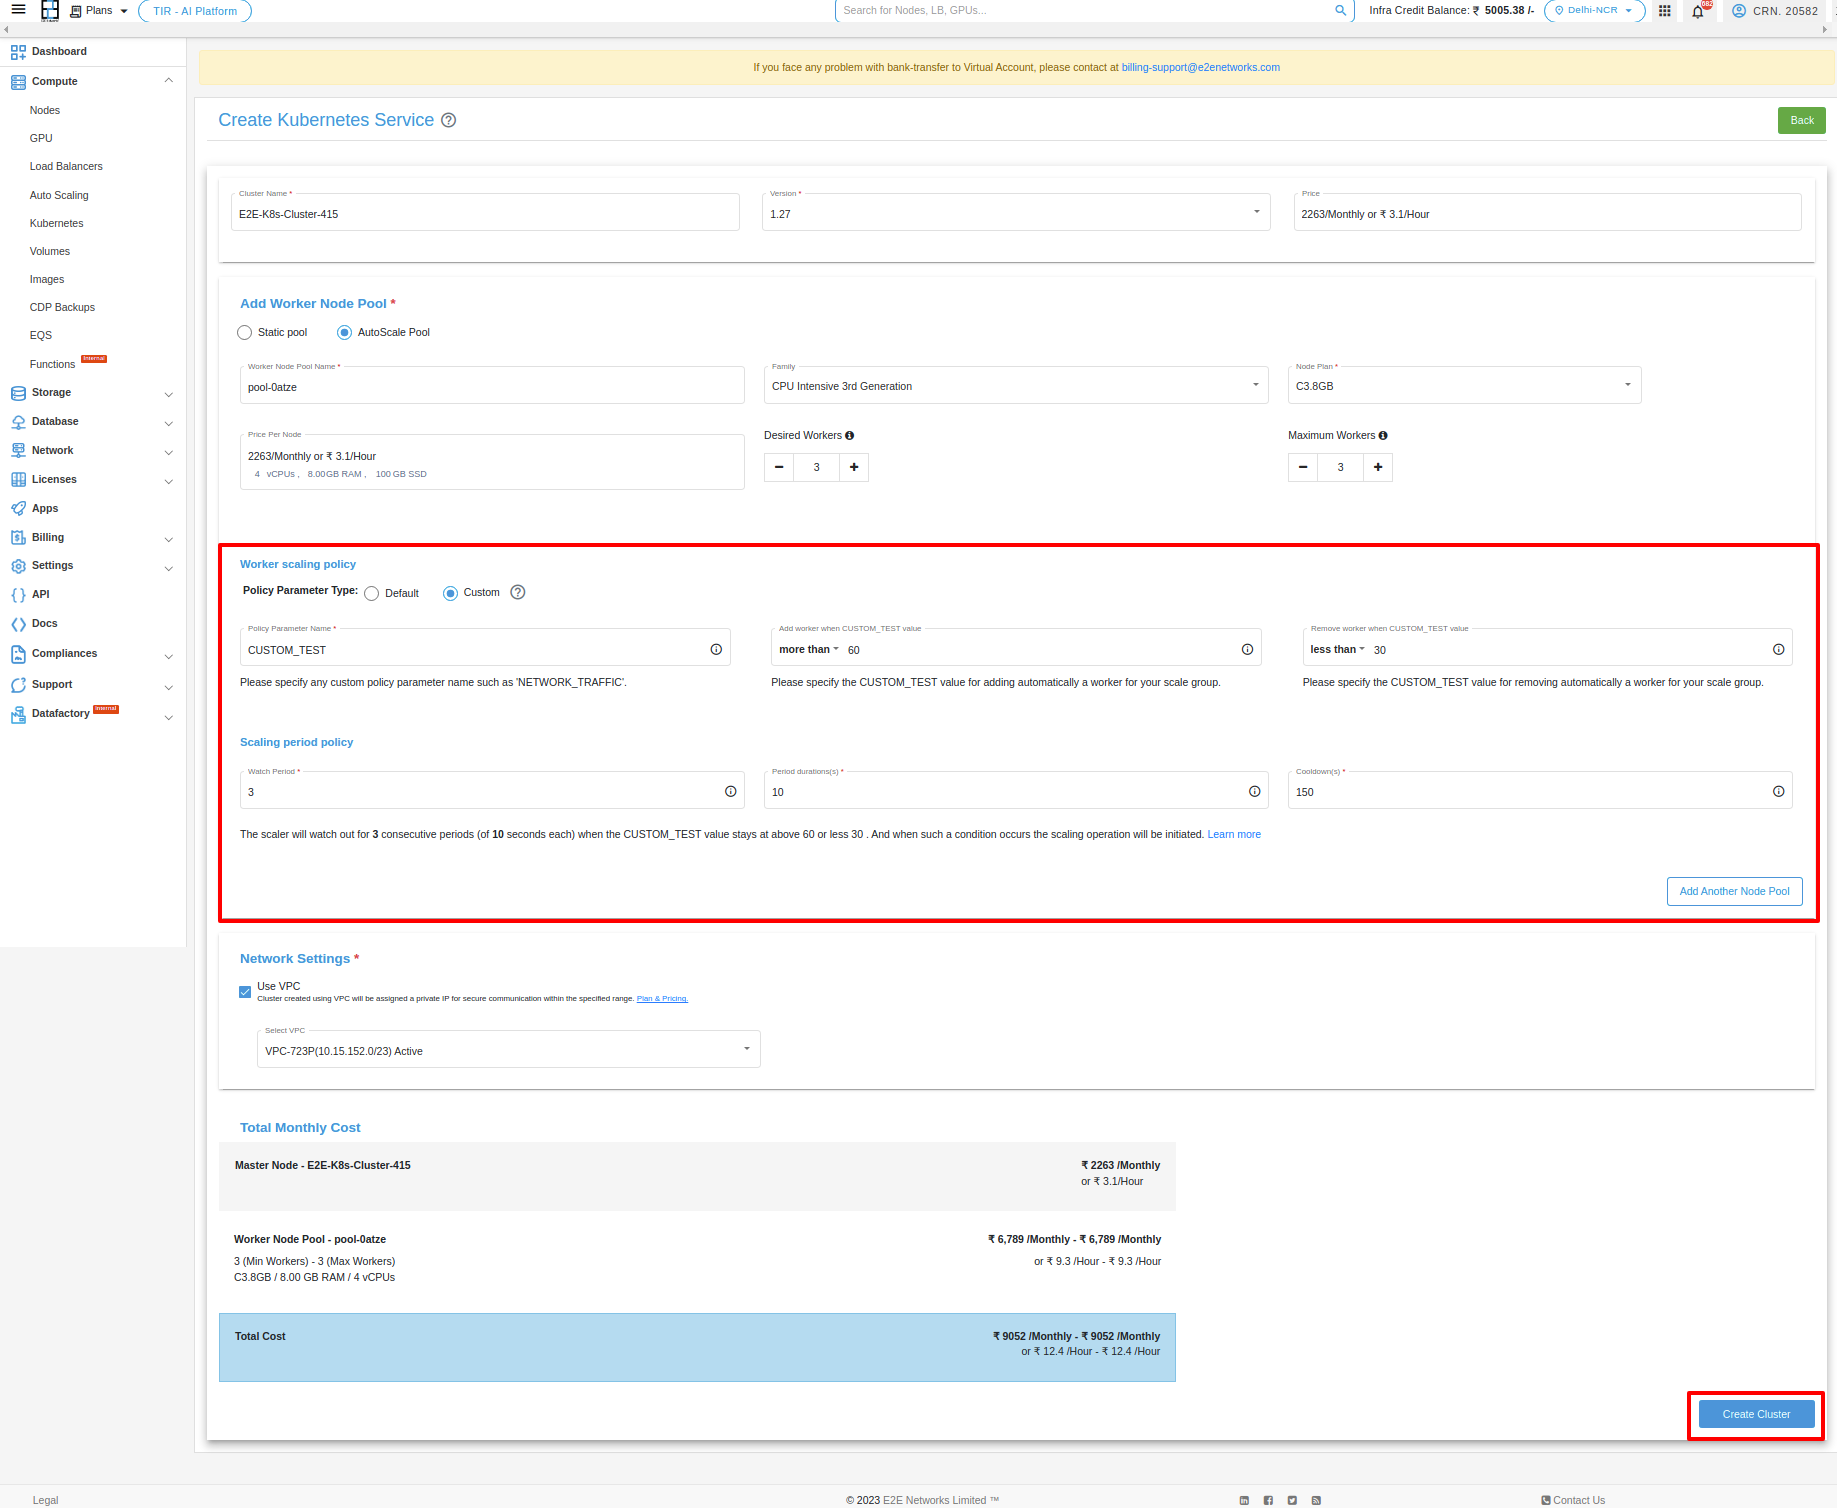
Policy Parameter Name:
The Policy Parameter Name field is where you enter the name of the custom attribute you want to use to monitor your service. This attribute can be any name that you choose, but it is helpful to use names that are descriptive of the aspect of your service that you are monitoring. For example, you could use “NETTX” for Network traffic, “DISKWRIOPS” for disk write operations, etc.
Node utilization section:
Specify the values that will trigger a scale-up (increase in cardinality) or scale-down (decrease in cardinality) operation based on your preferences.
Scaling Period Policy:
You need to define the watch period, duration of each period, and cooldown period.
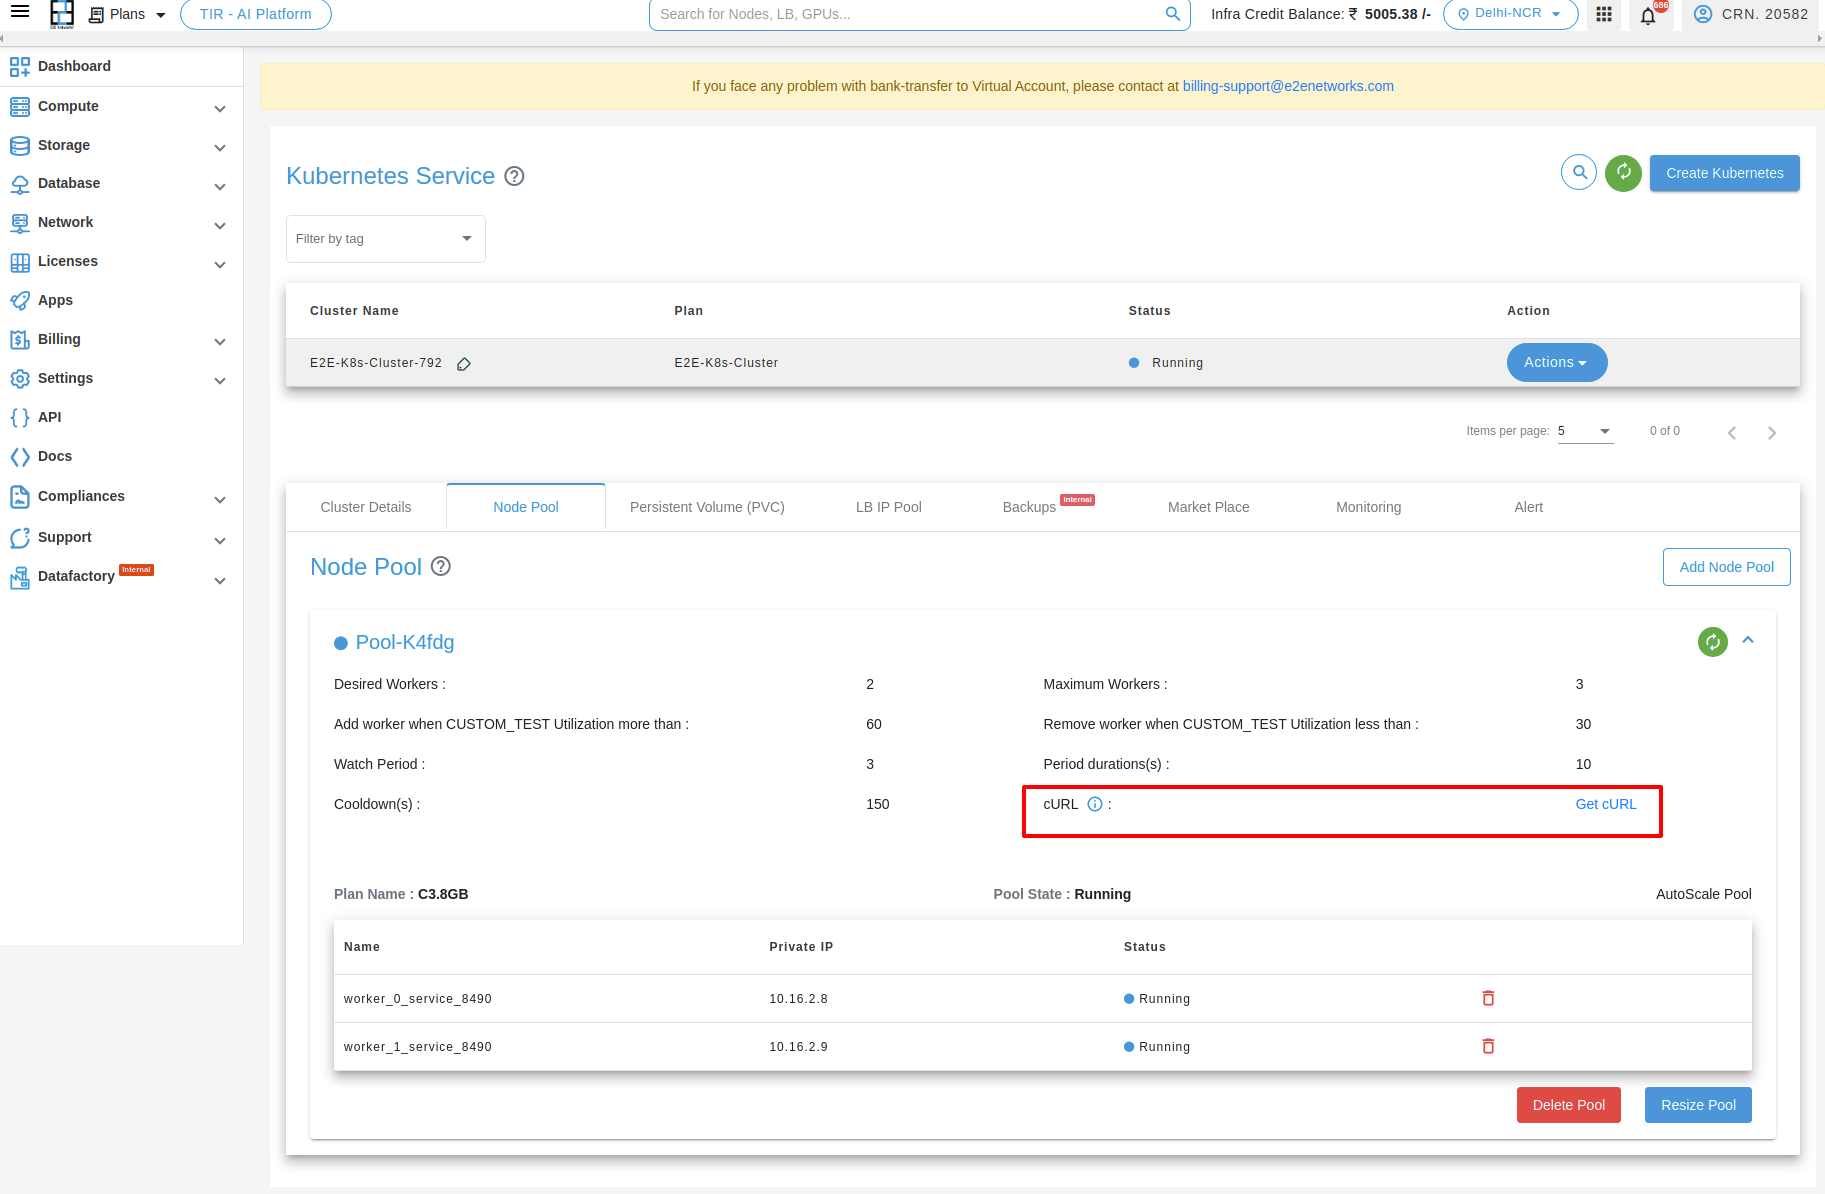
How to get a CURL:
You can obtain a curl command by clicking on ‘Get Curl’.
Note
After you complete filling the fields, click the ‘create cluster’ button. When the cluster is up and running, you’ll get a curl command. Use this command in Postman, inputting your API Key and token. Then, in the Postman’s body section, modify the value of the custom parameter.
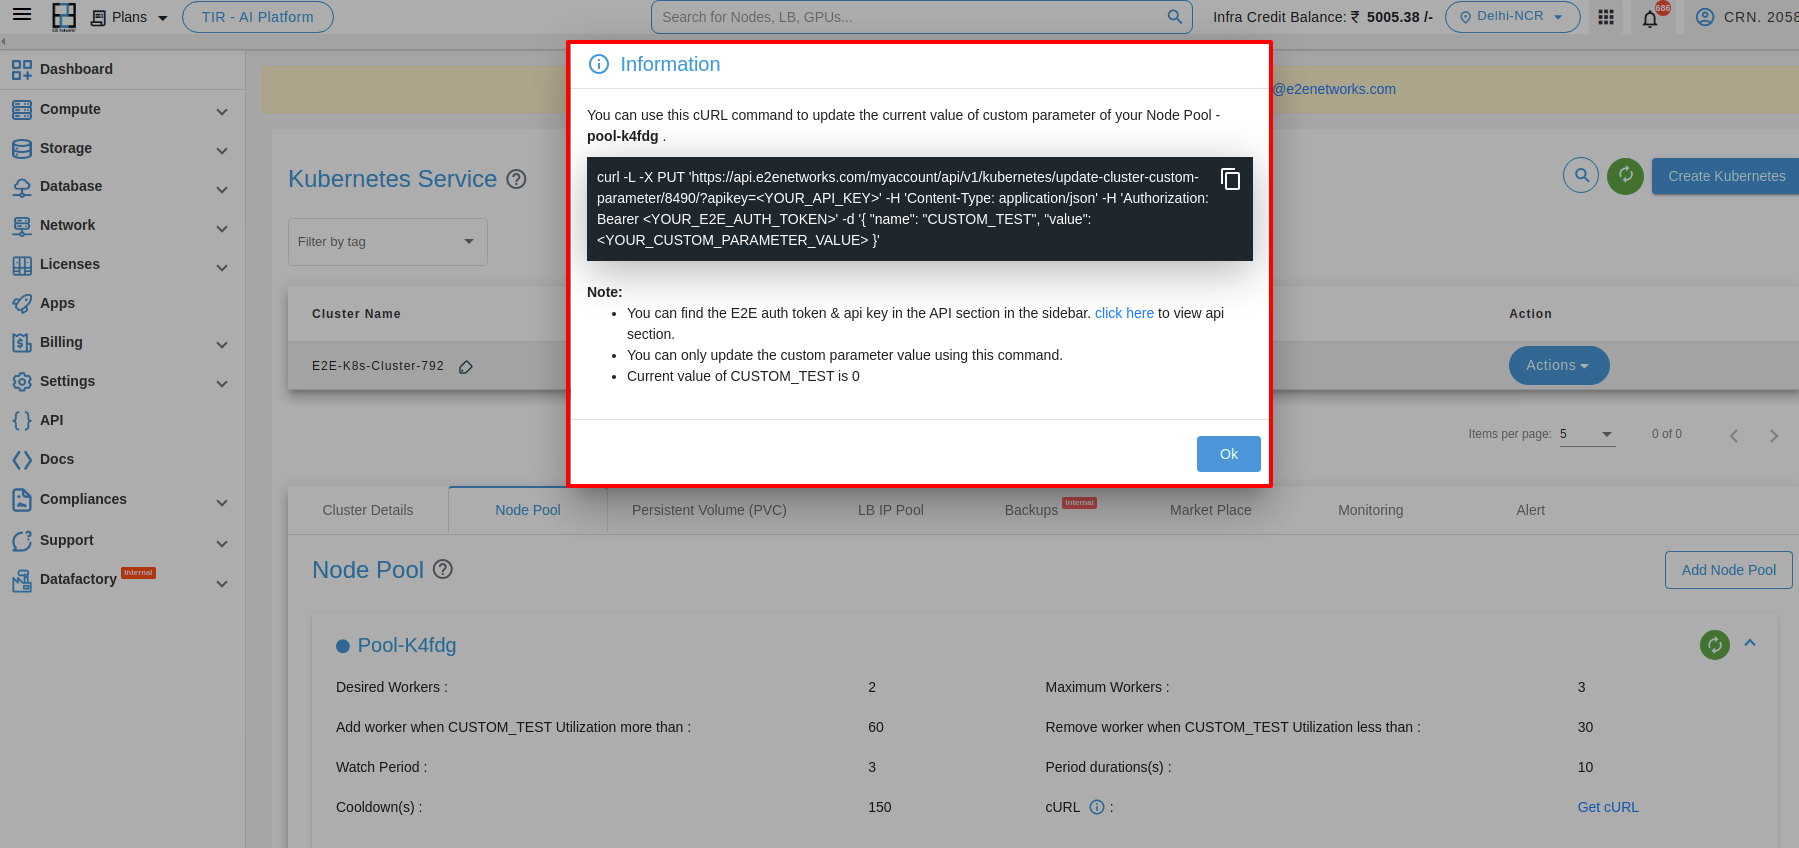
How to change custom parameter value in a CURL through CLI:
When you receive a curl command, paste it into the terminal along with your API Key, Bearer token, and set the value of the custom parameter as you prefer.


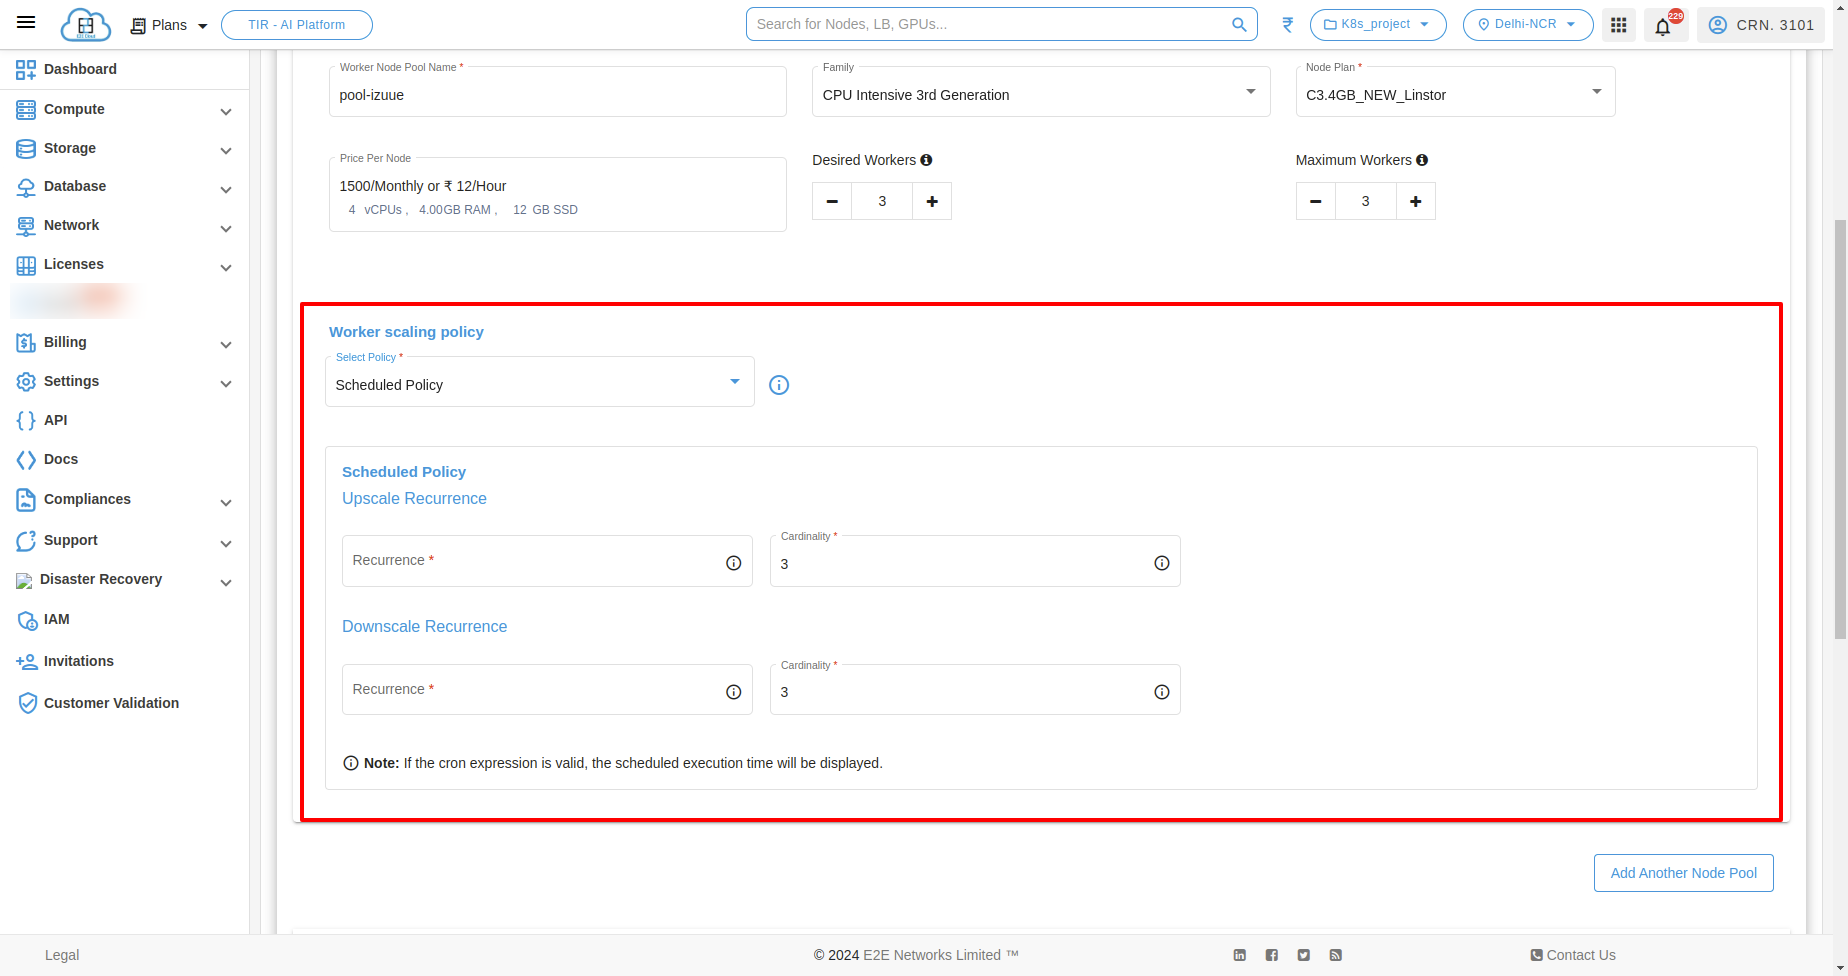
Scheduled Policy
Auto scale pool schedule policy is a feature that allows you to define a predetermined schedule for automatically adjusting the capacity of your resources. A scheduled autoscaling policy is a type of scaling policy that allows you to scale your resources based on a defined schedule. For example, you may use a scheduled autoscaling policy to increase the number of instances in your service during peak traffic hours and then decrease the number of instances during off-peak hours.
Recurrence - Recurrence refers to the ability to schedule scaling actions to occur on a recurring basis. This can be useful for applications that experience predictable traffic patterns, such as a website that receives more traffic on weekends or a web application that receives more traffic during peak business hours.
Upscale and downscale recurrence in auto scale pool refers to the process of increasing and decreasing the number of resources in a kubernetes, respectively. This can be done on a recurring basis, such as every day, week, or month.
Upscale recurrence: You can specify the cardinality of nodes at a specific time by adjusting the field in the cron settings. Ensure that the value is lower than the maximum number of nodes you had previously set.
Downscale recurrence: You can specify the cardinality of nodes at a specific time by adjusting the field in the cron settings. Ensure that the value is greater than the maximum number of nodes you had previously set.
Now if you want to choose scheduled policy as your choice of option then select Schedule Policy in place of Elastic Policy and then set the upscale and downscale recurrence and click on Create Scale button
Elastic and Scheduled Policy
If the user desires to create a kubernetes service using both options, they can choose the Elastic and Scheduled Policy option, configure the parameters, and proceed with creating the cluster service.
Add another node pool
To add another node pool, click on “Add Another Node Pool” button.
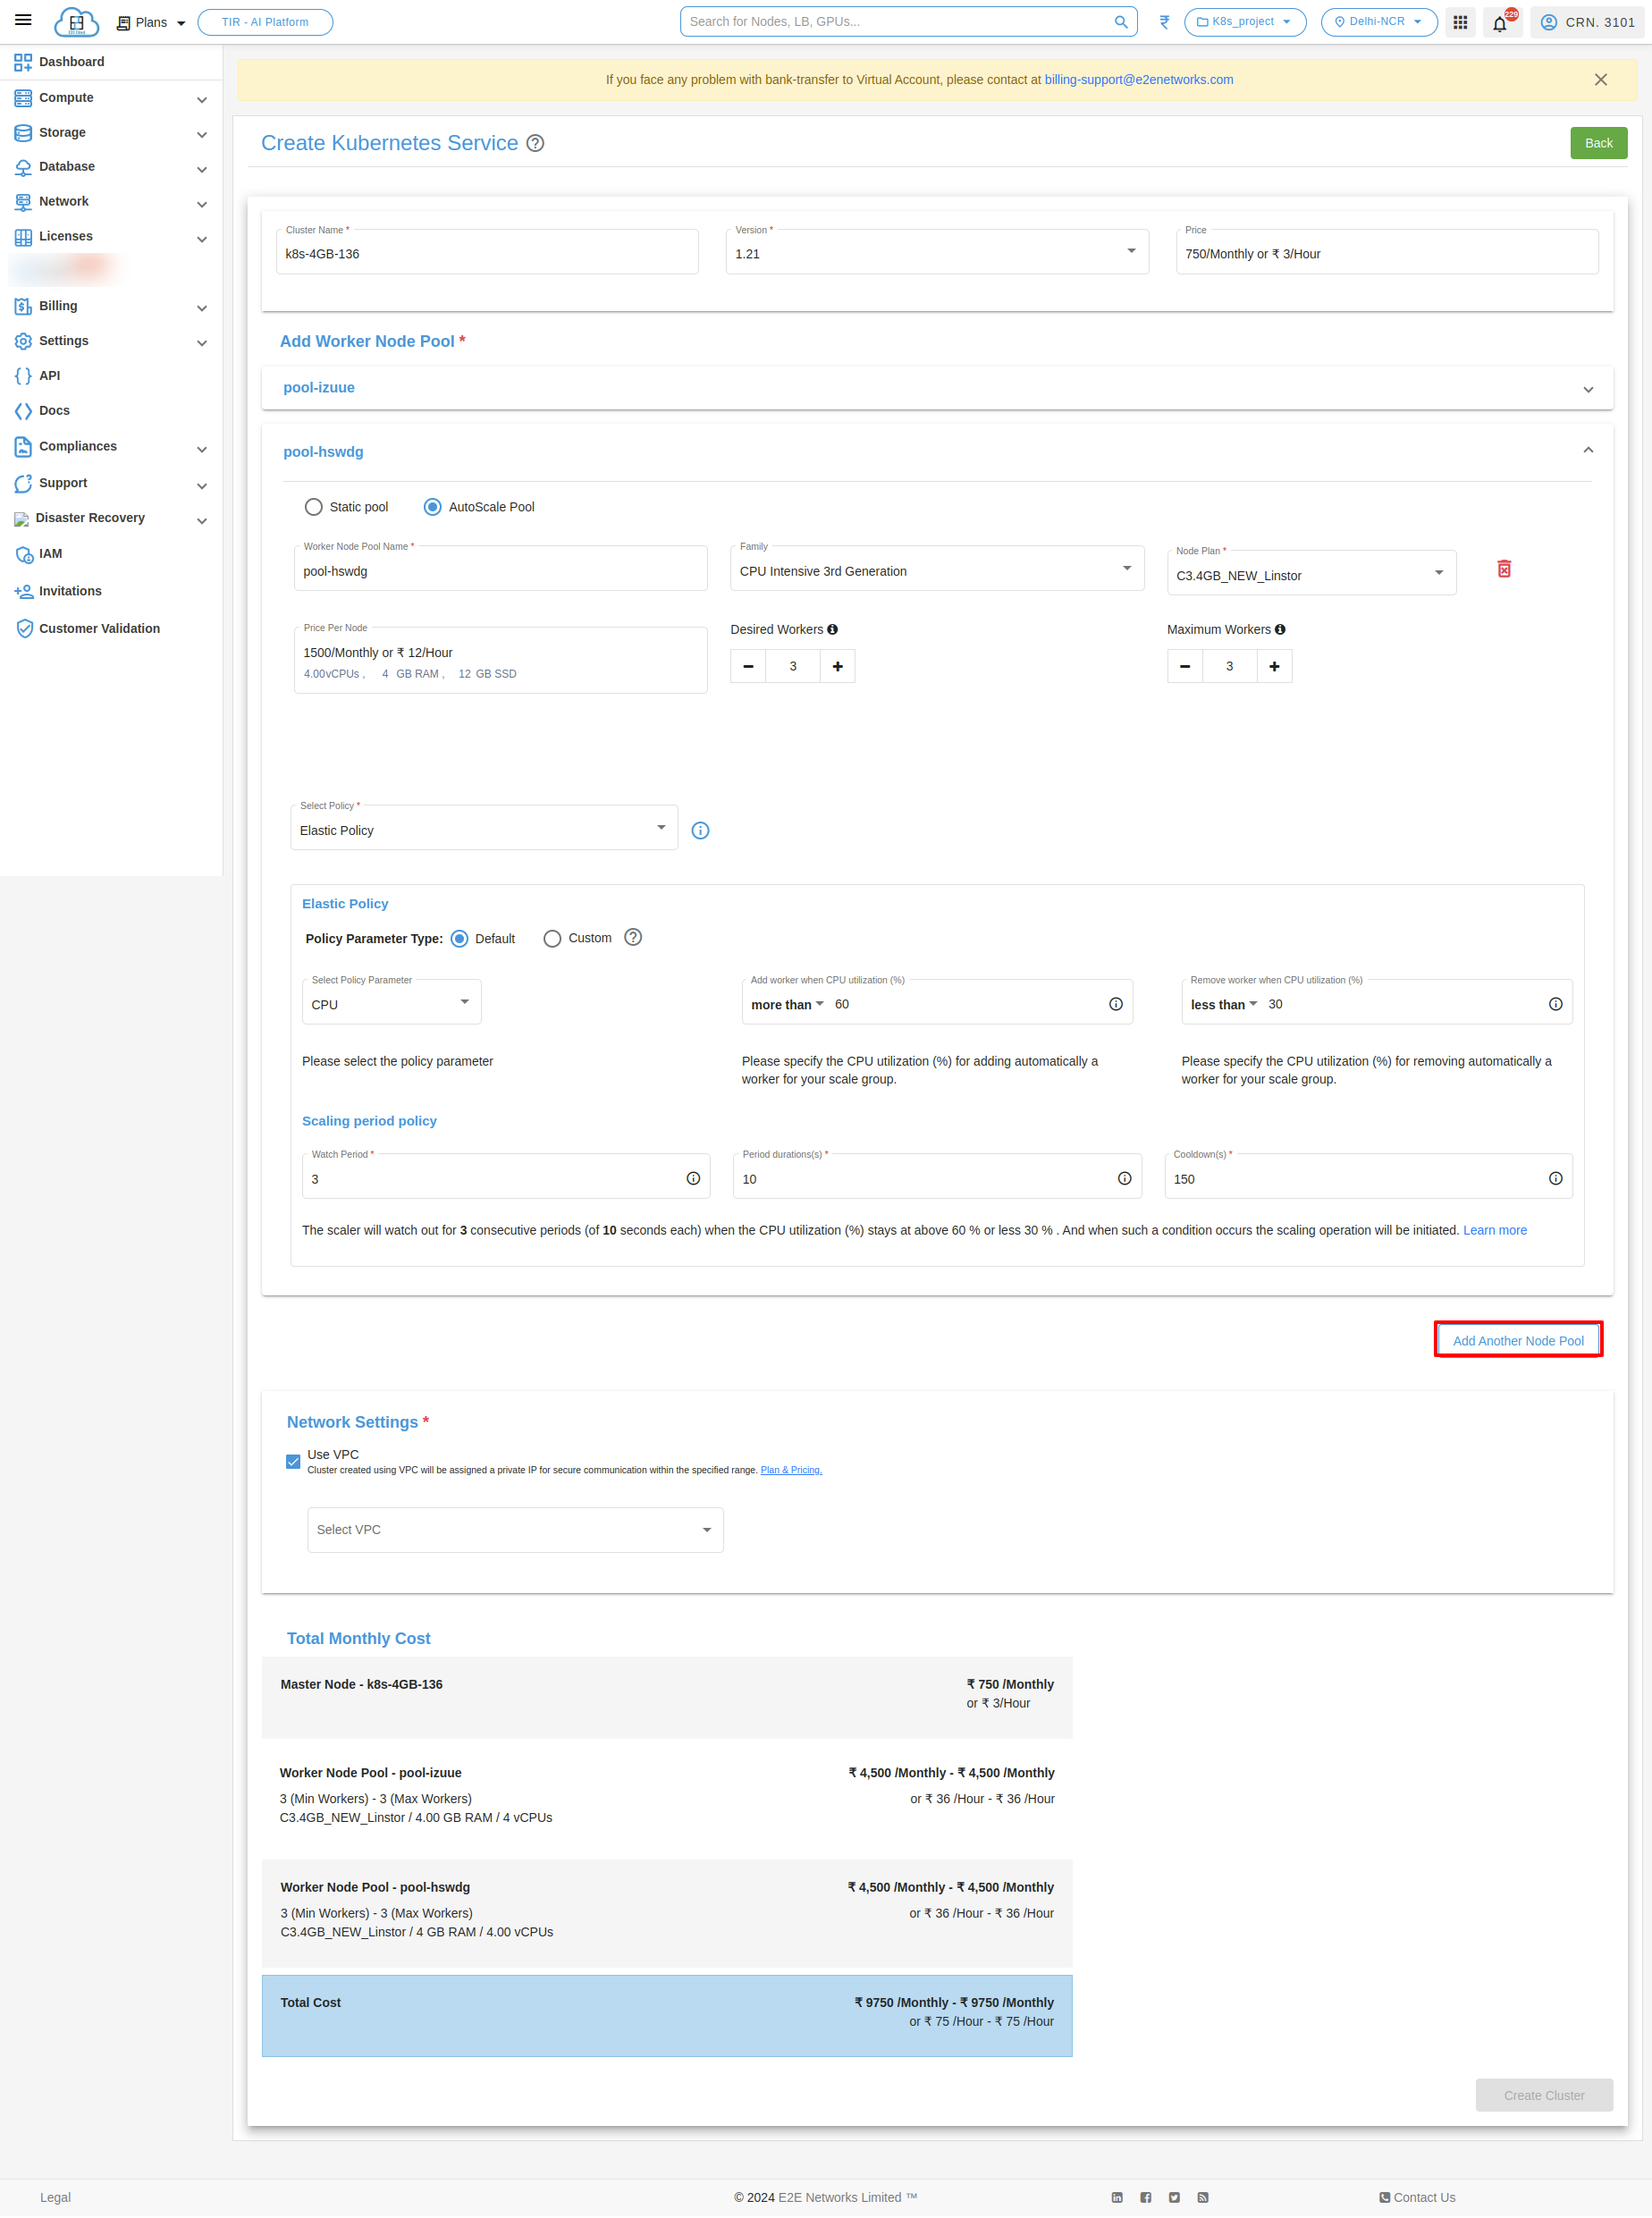
Network
Use VPC - In the List Type, you can select the VPC.

Deploy Kubernetes
After filling all the details successfully, click on the Create Cluster button. It will take a few minutes to set up the scale group and you will take to the ‘Kubernetes Service’ page.
Kubernetes Service
Cluster Details
You will be able to check all the basic details of your kubernetes. You can Check the kubernetes name and kubernetes version details.

How To Download Kubeconfig.yaml File
After Downloading the Kube config
Please make sure kubectl is installed on your system
To install kubectl follow this doc: https://kubernetes.io/docs/tasks/tools/
Run
kubectl --kubeconfig="download_file_name" proxy

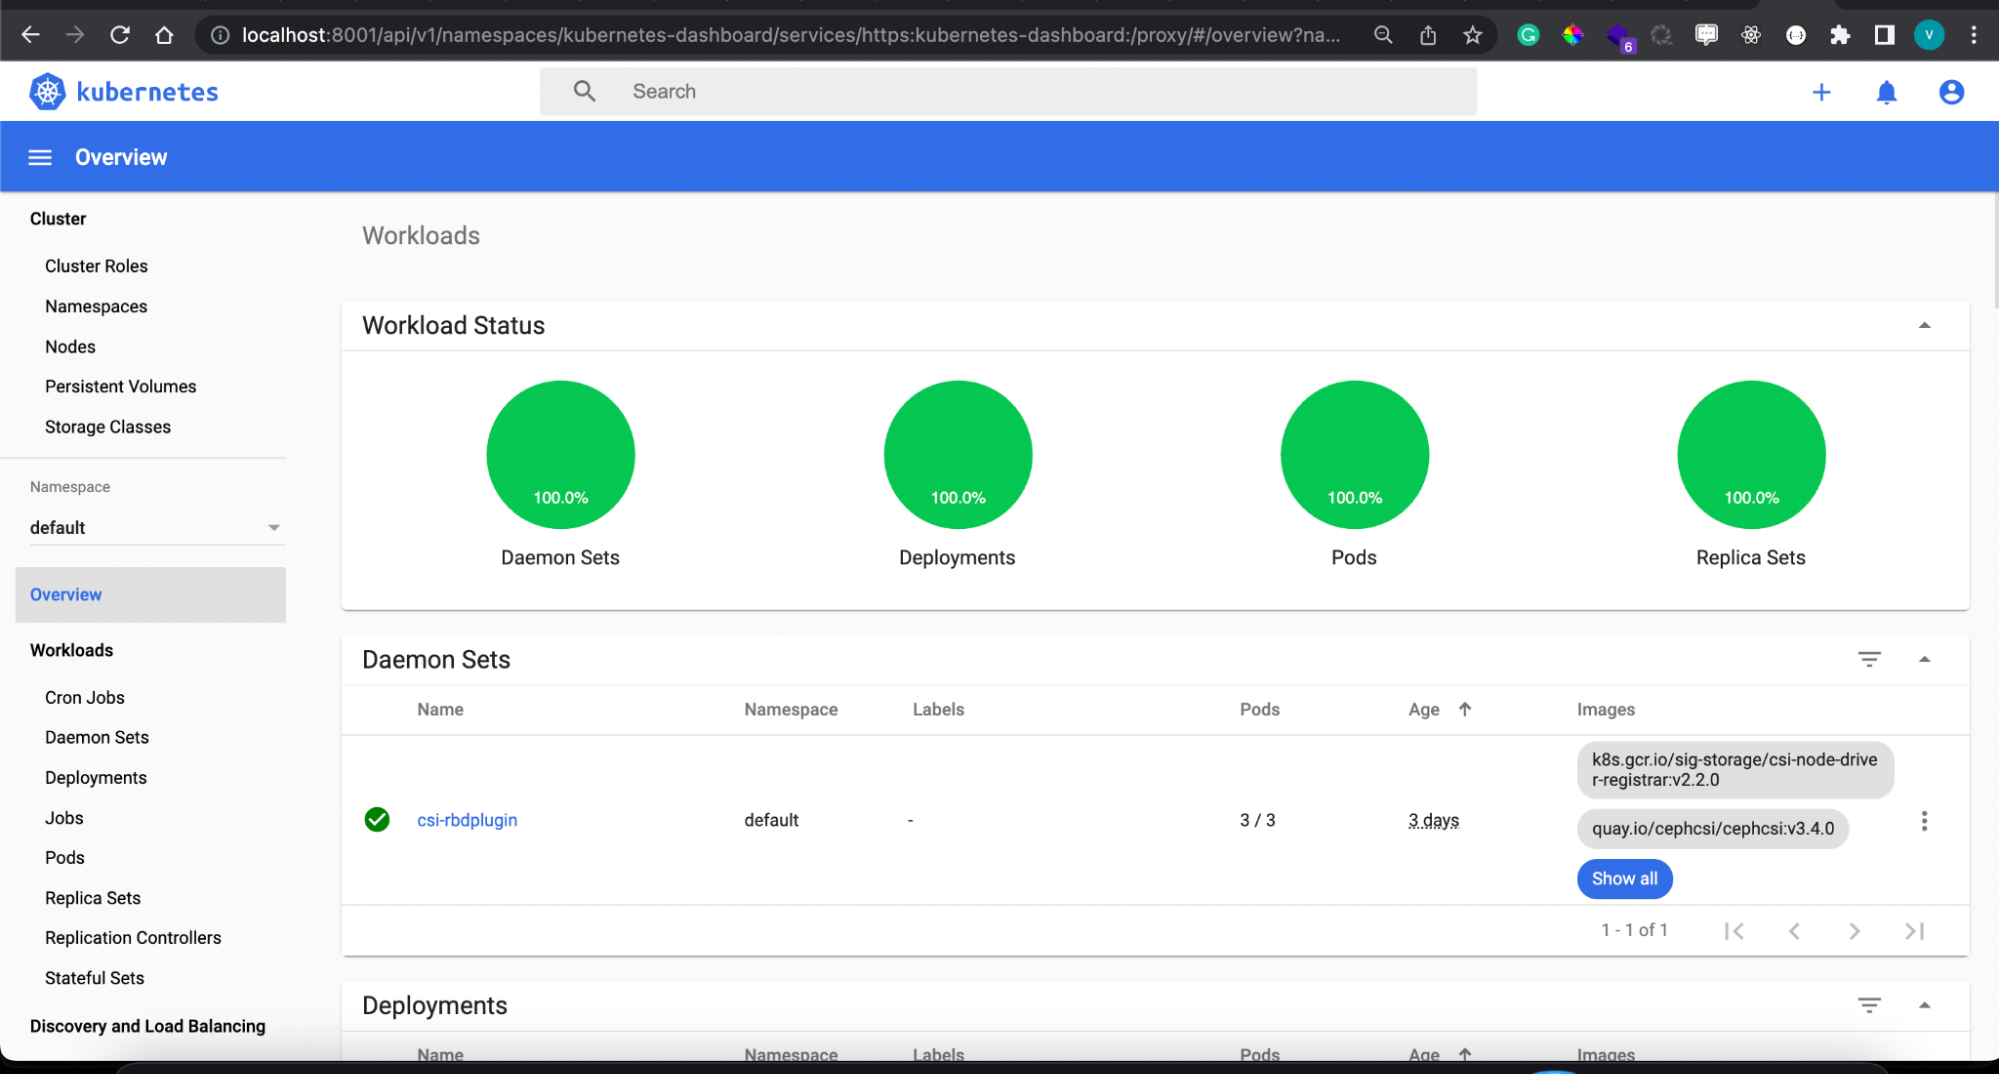
Open the below URL in the browser
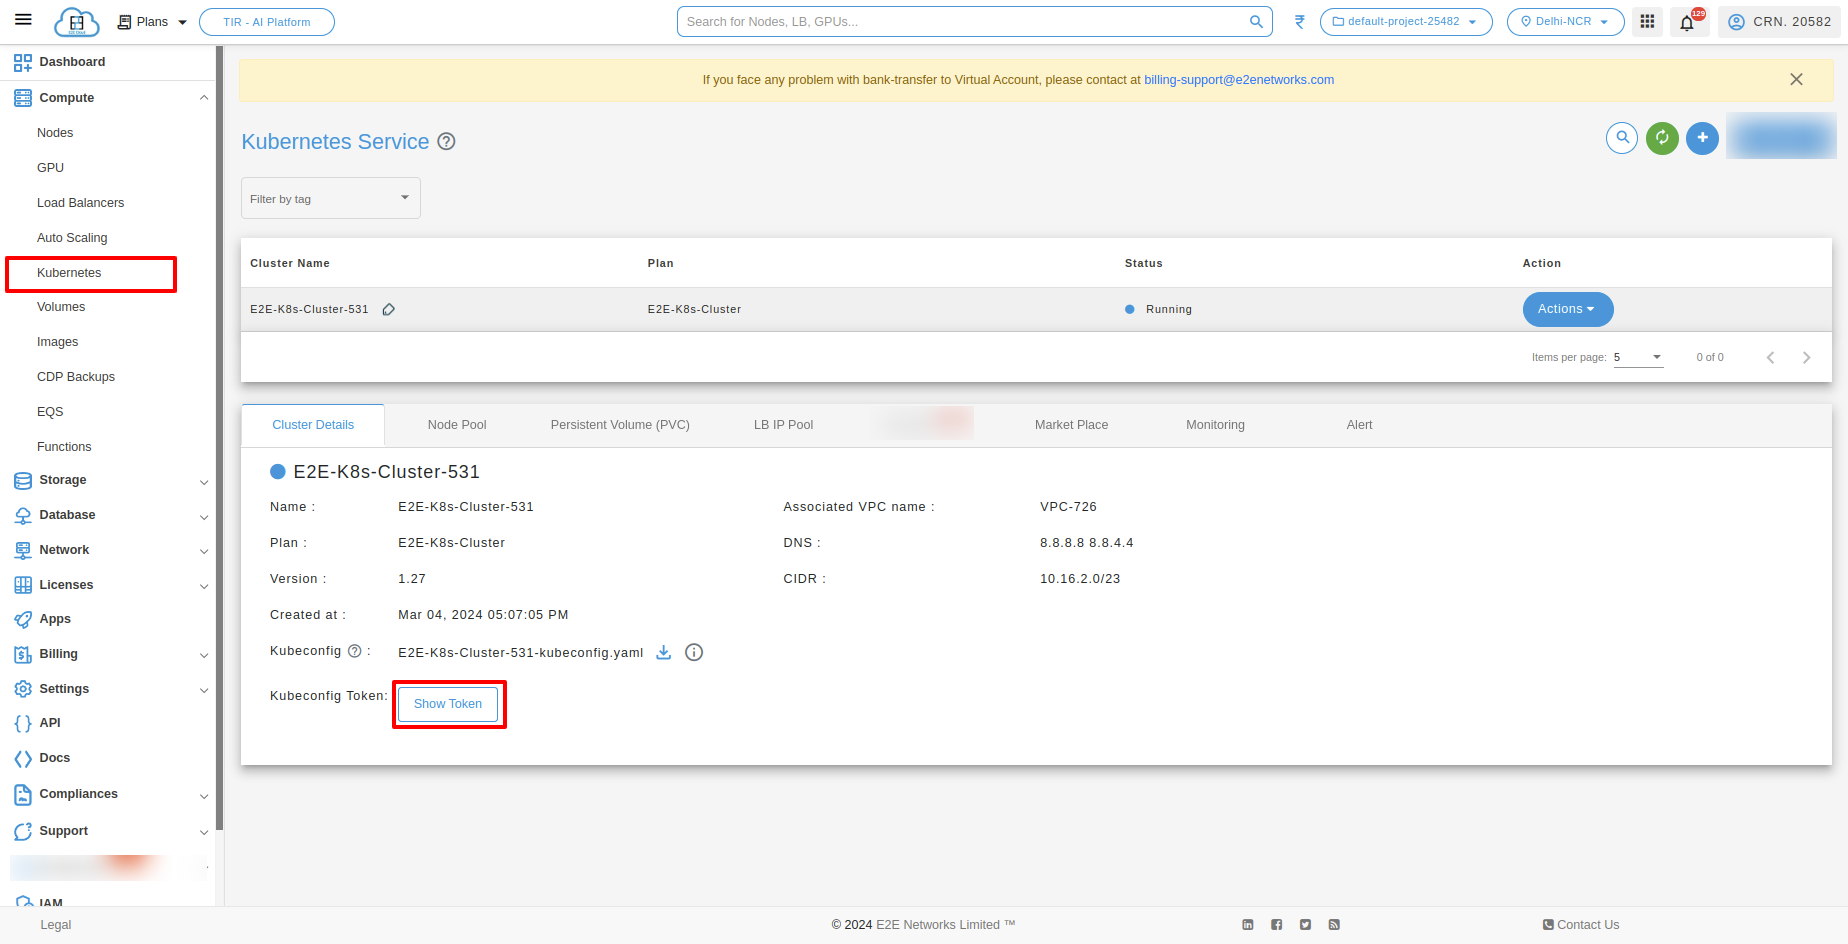
Copy the kubeconfig token in below option
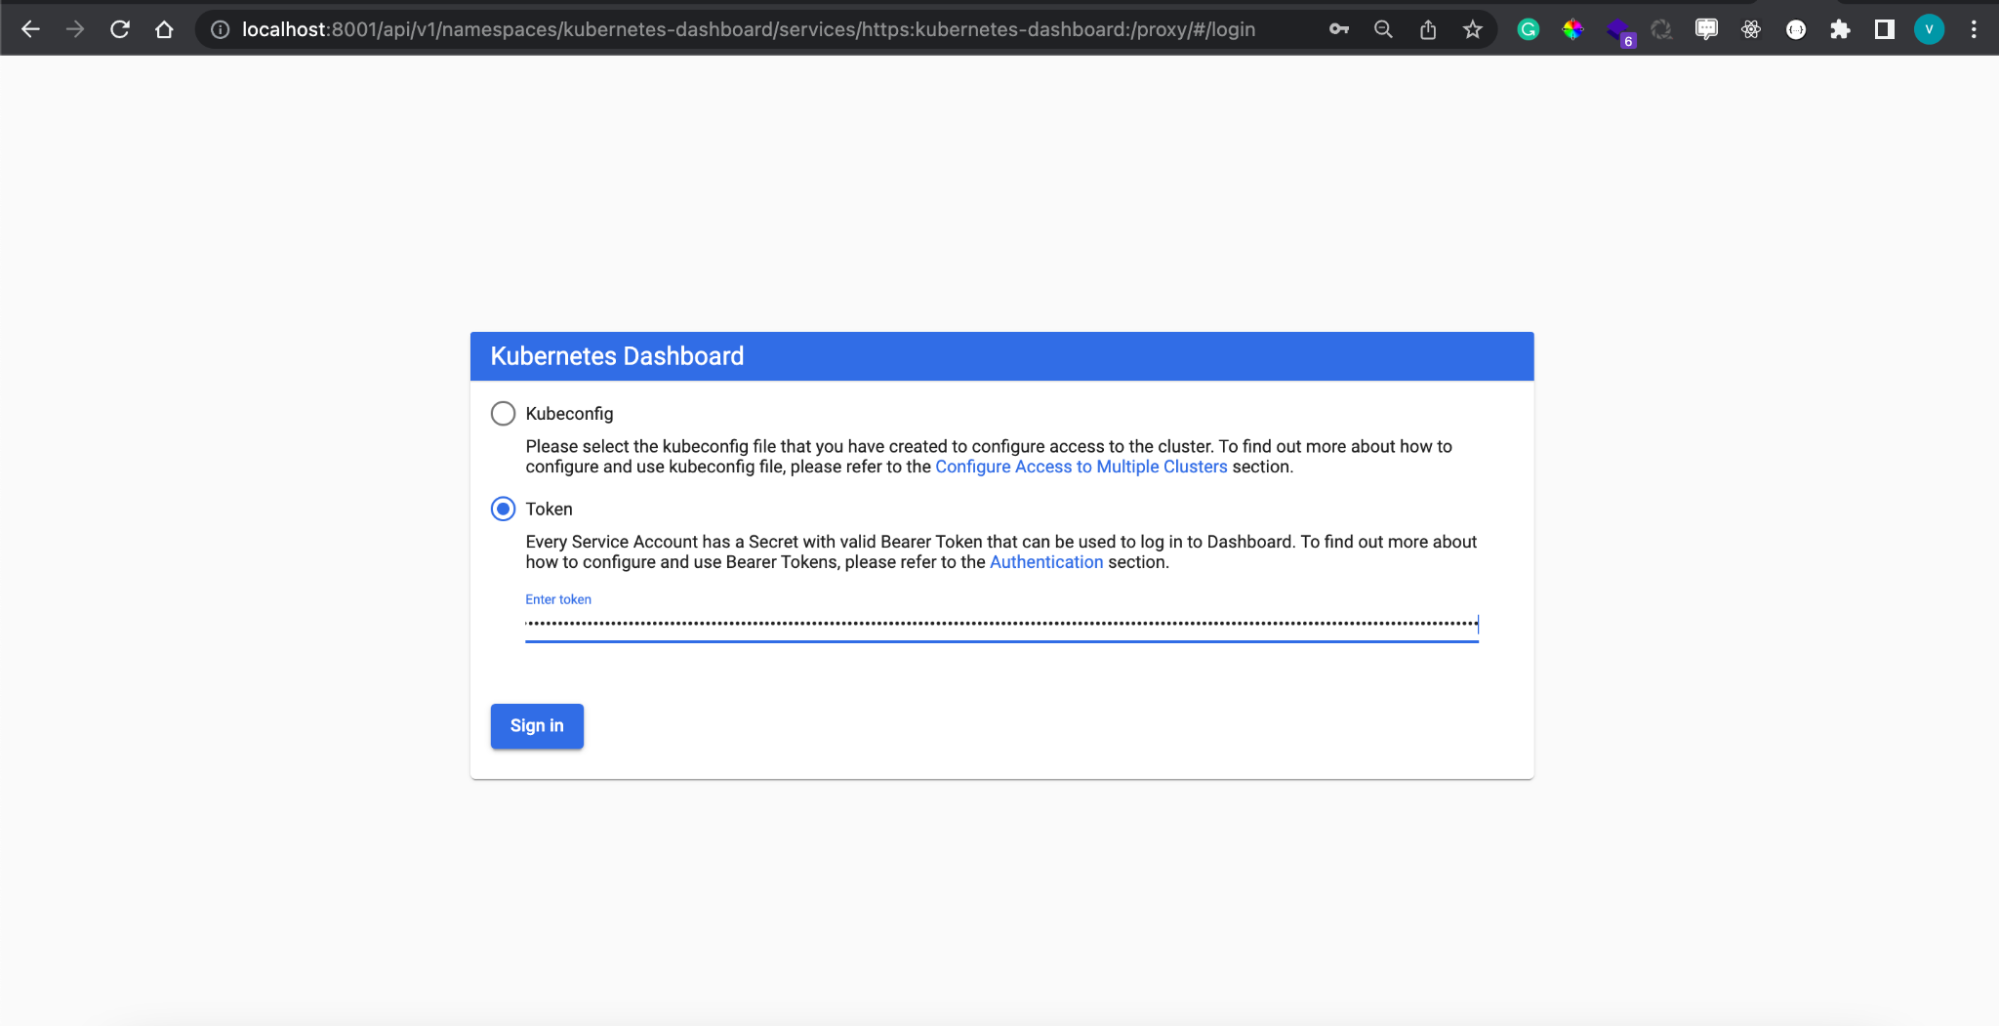
And paste Kubeconfig Token to access Kubernetes dashboard
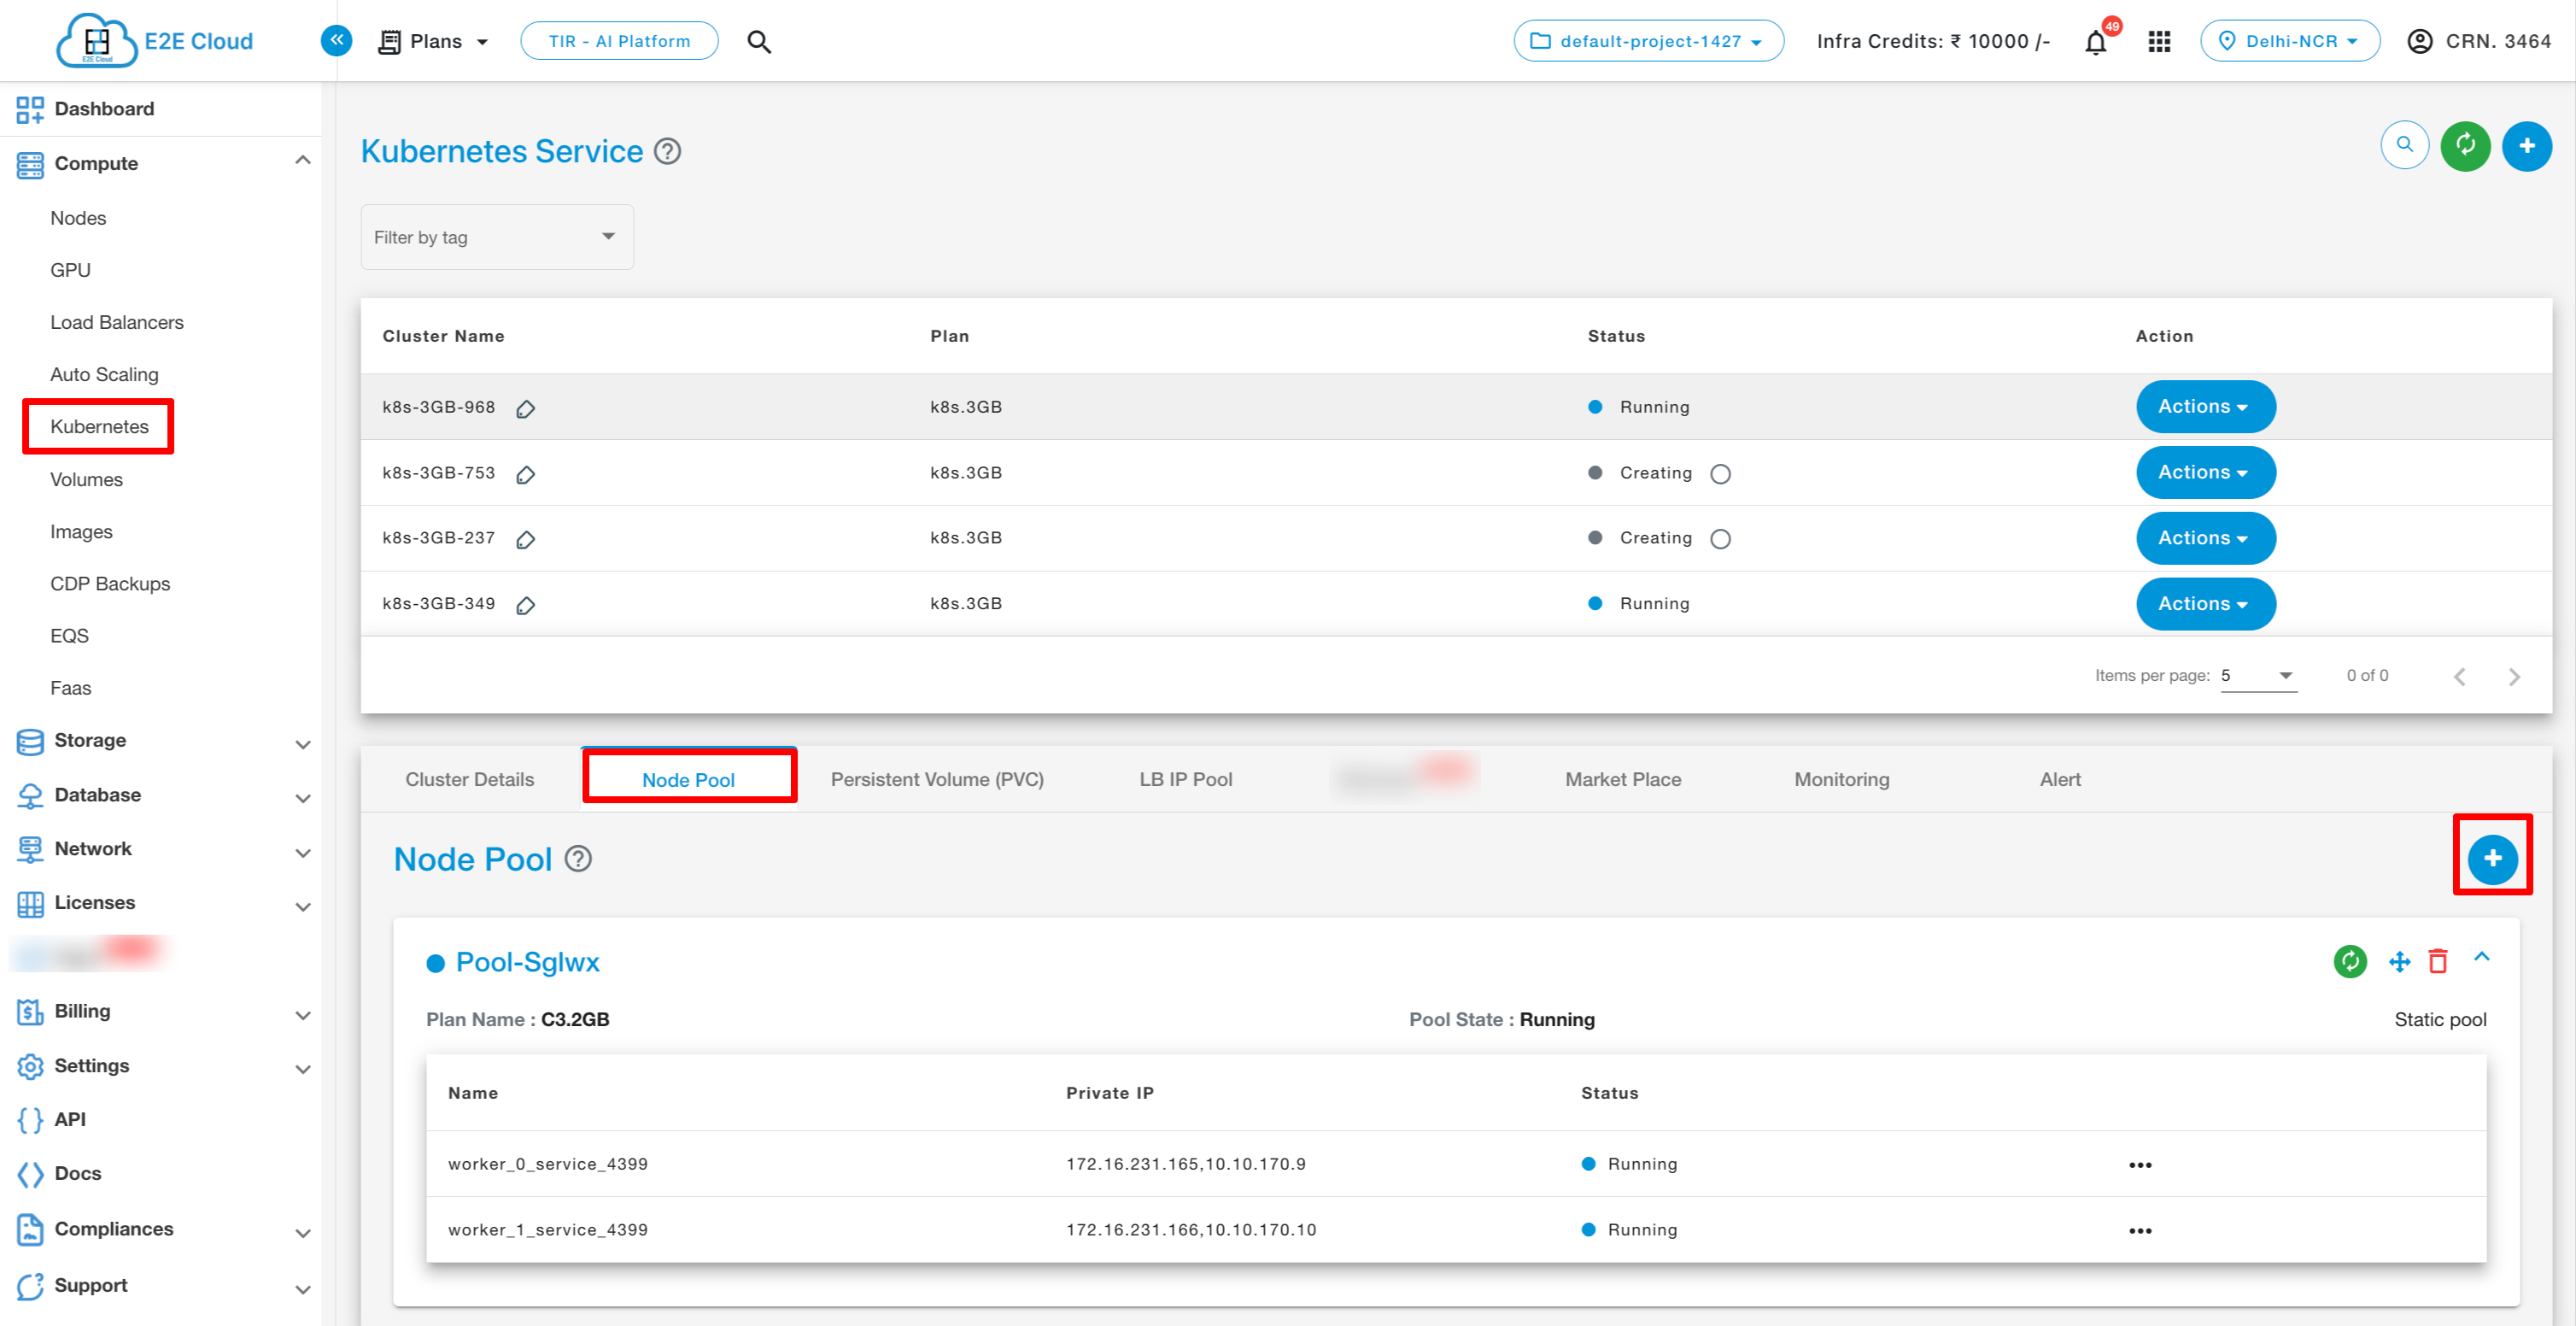
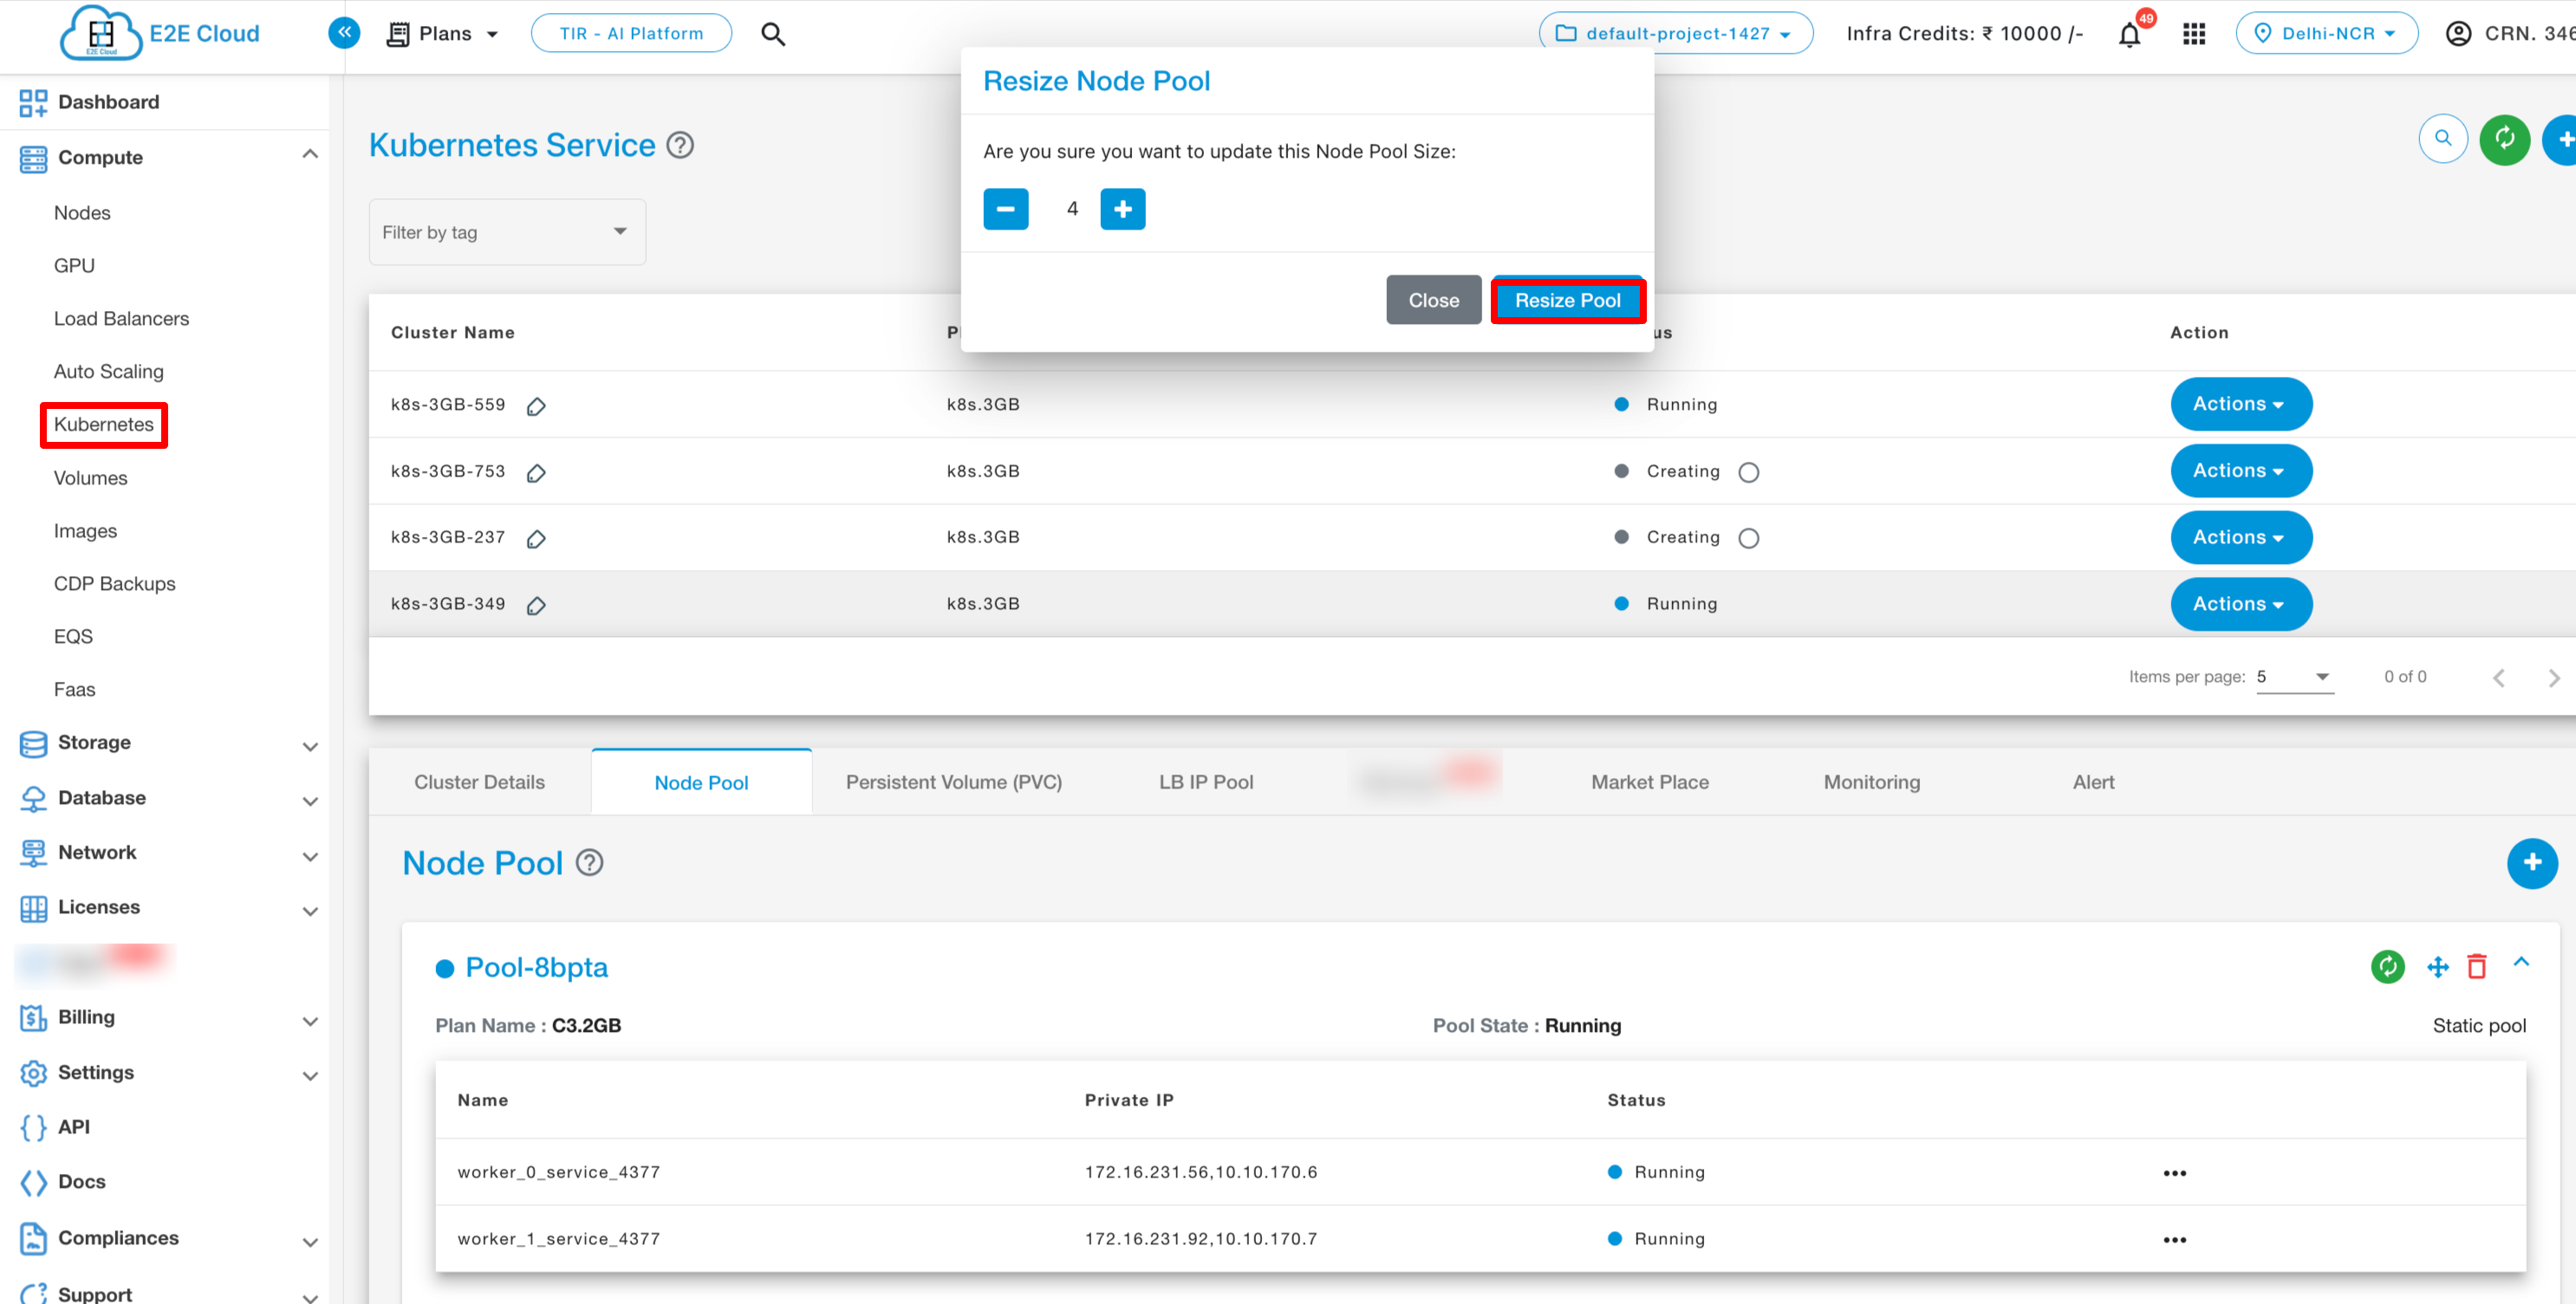
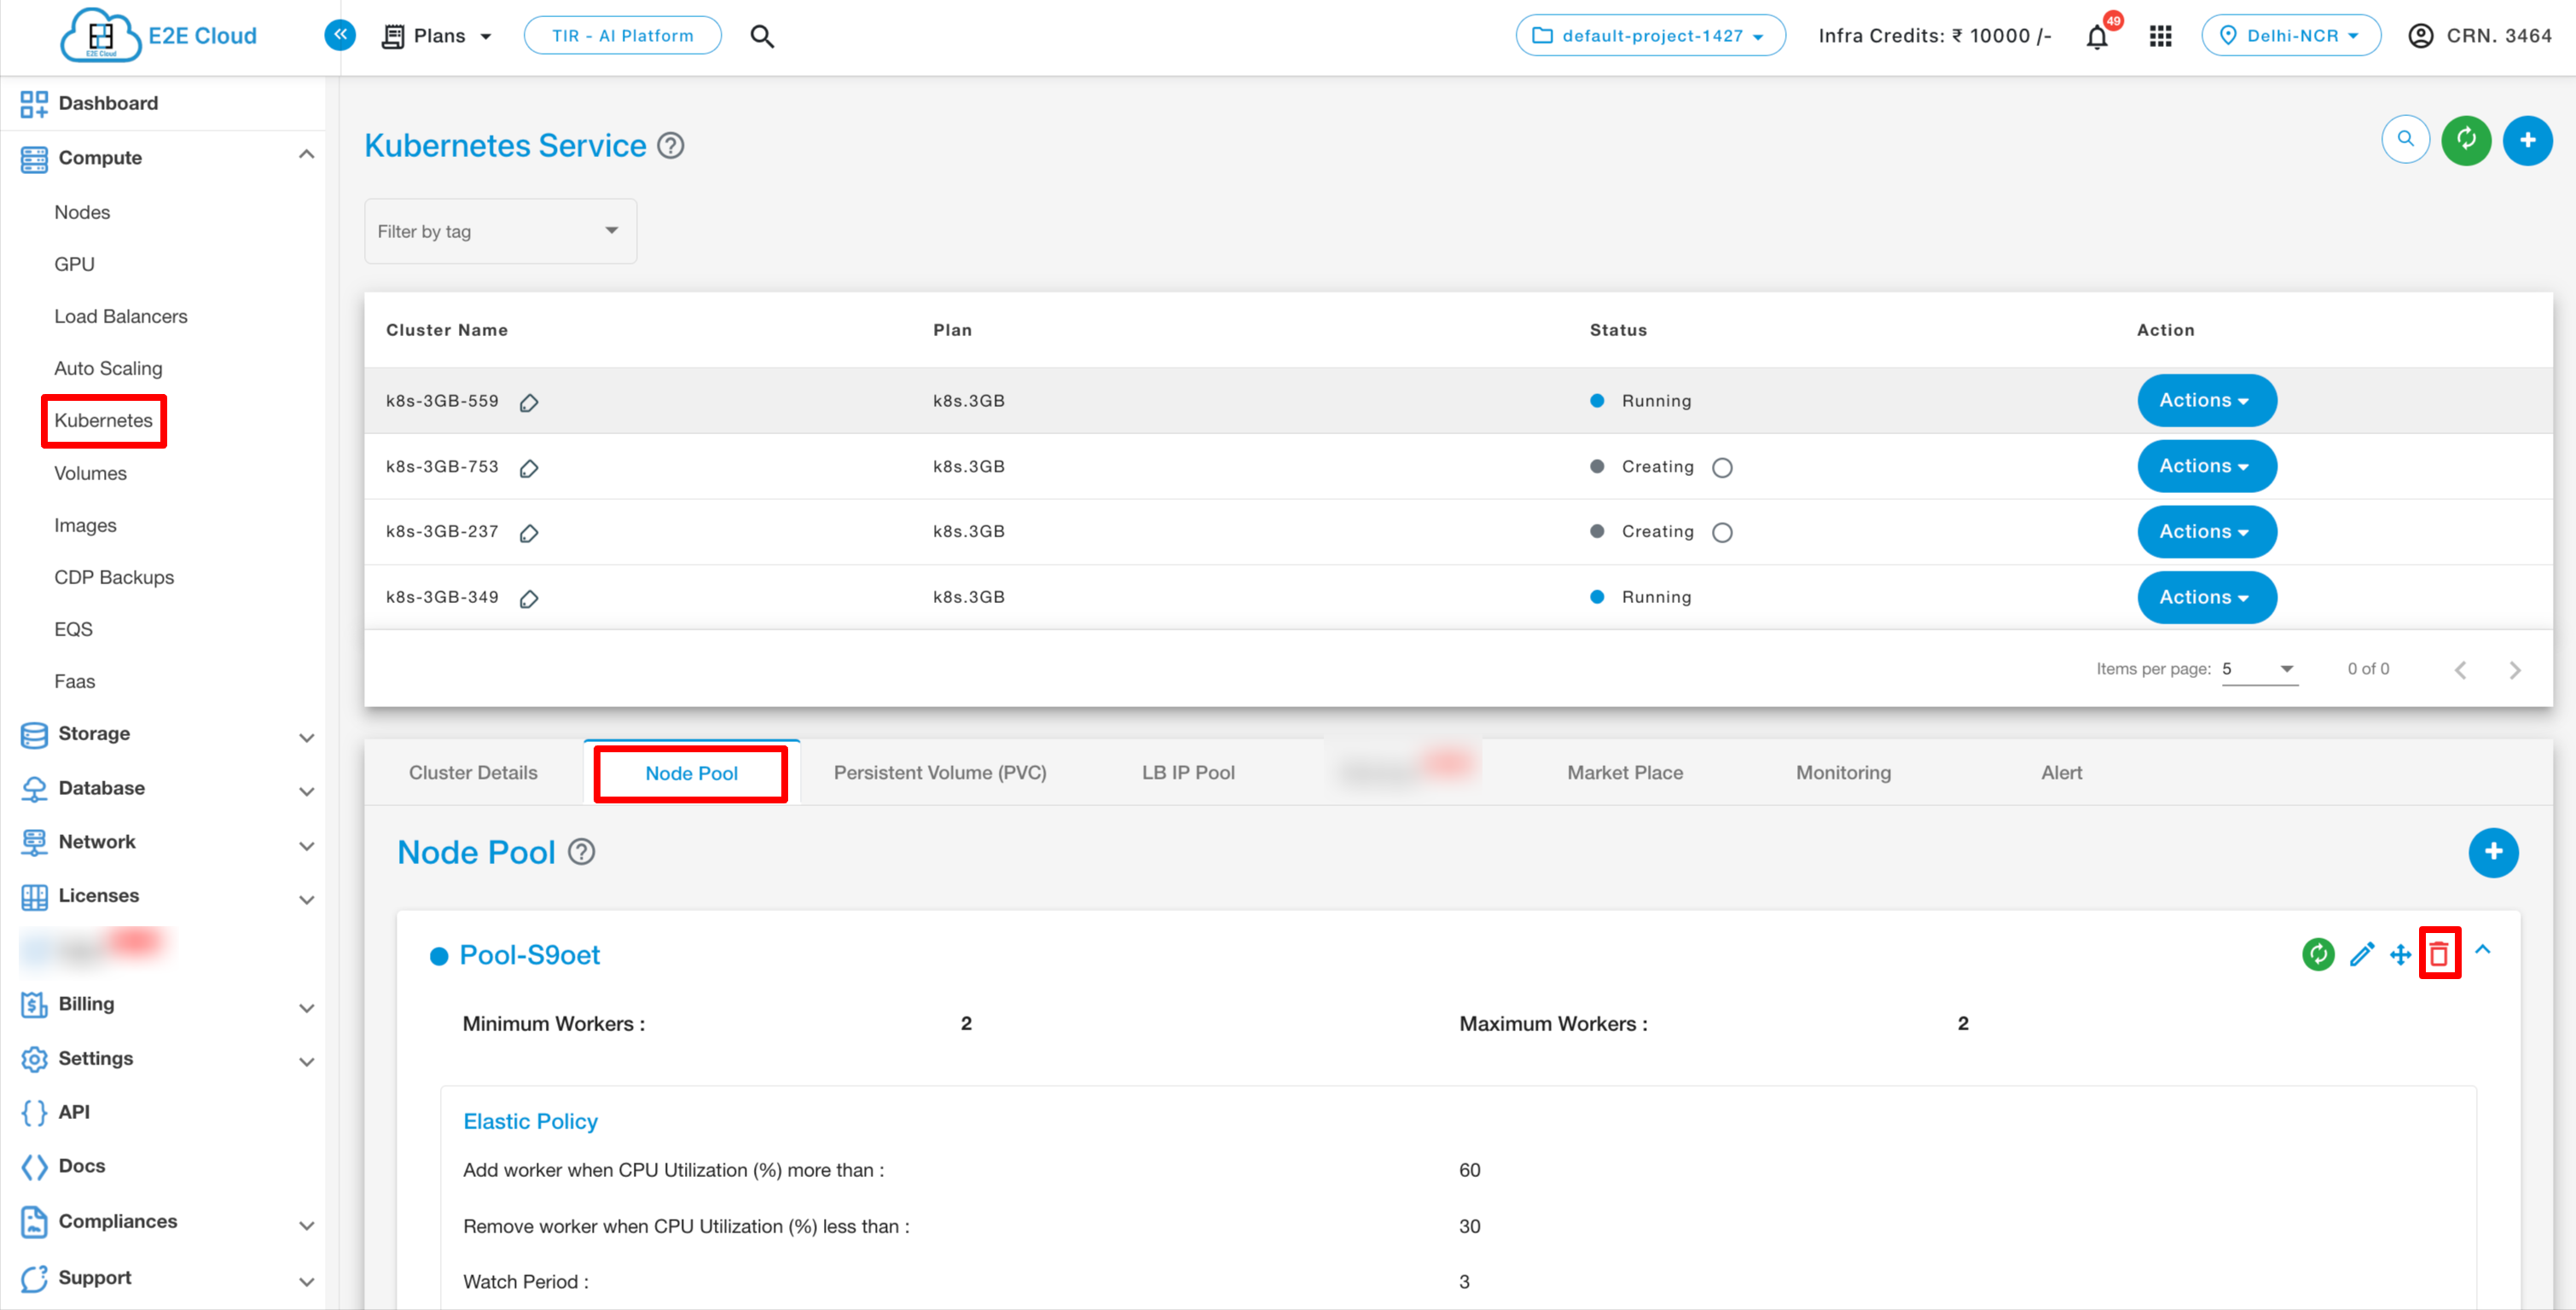
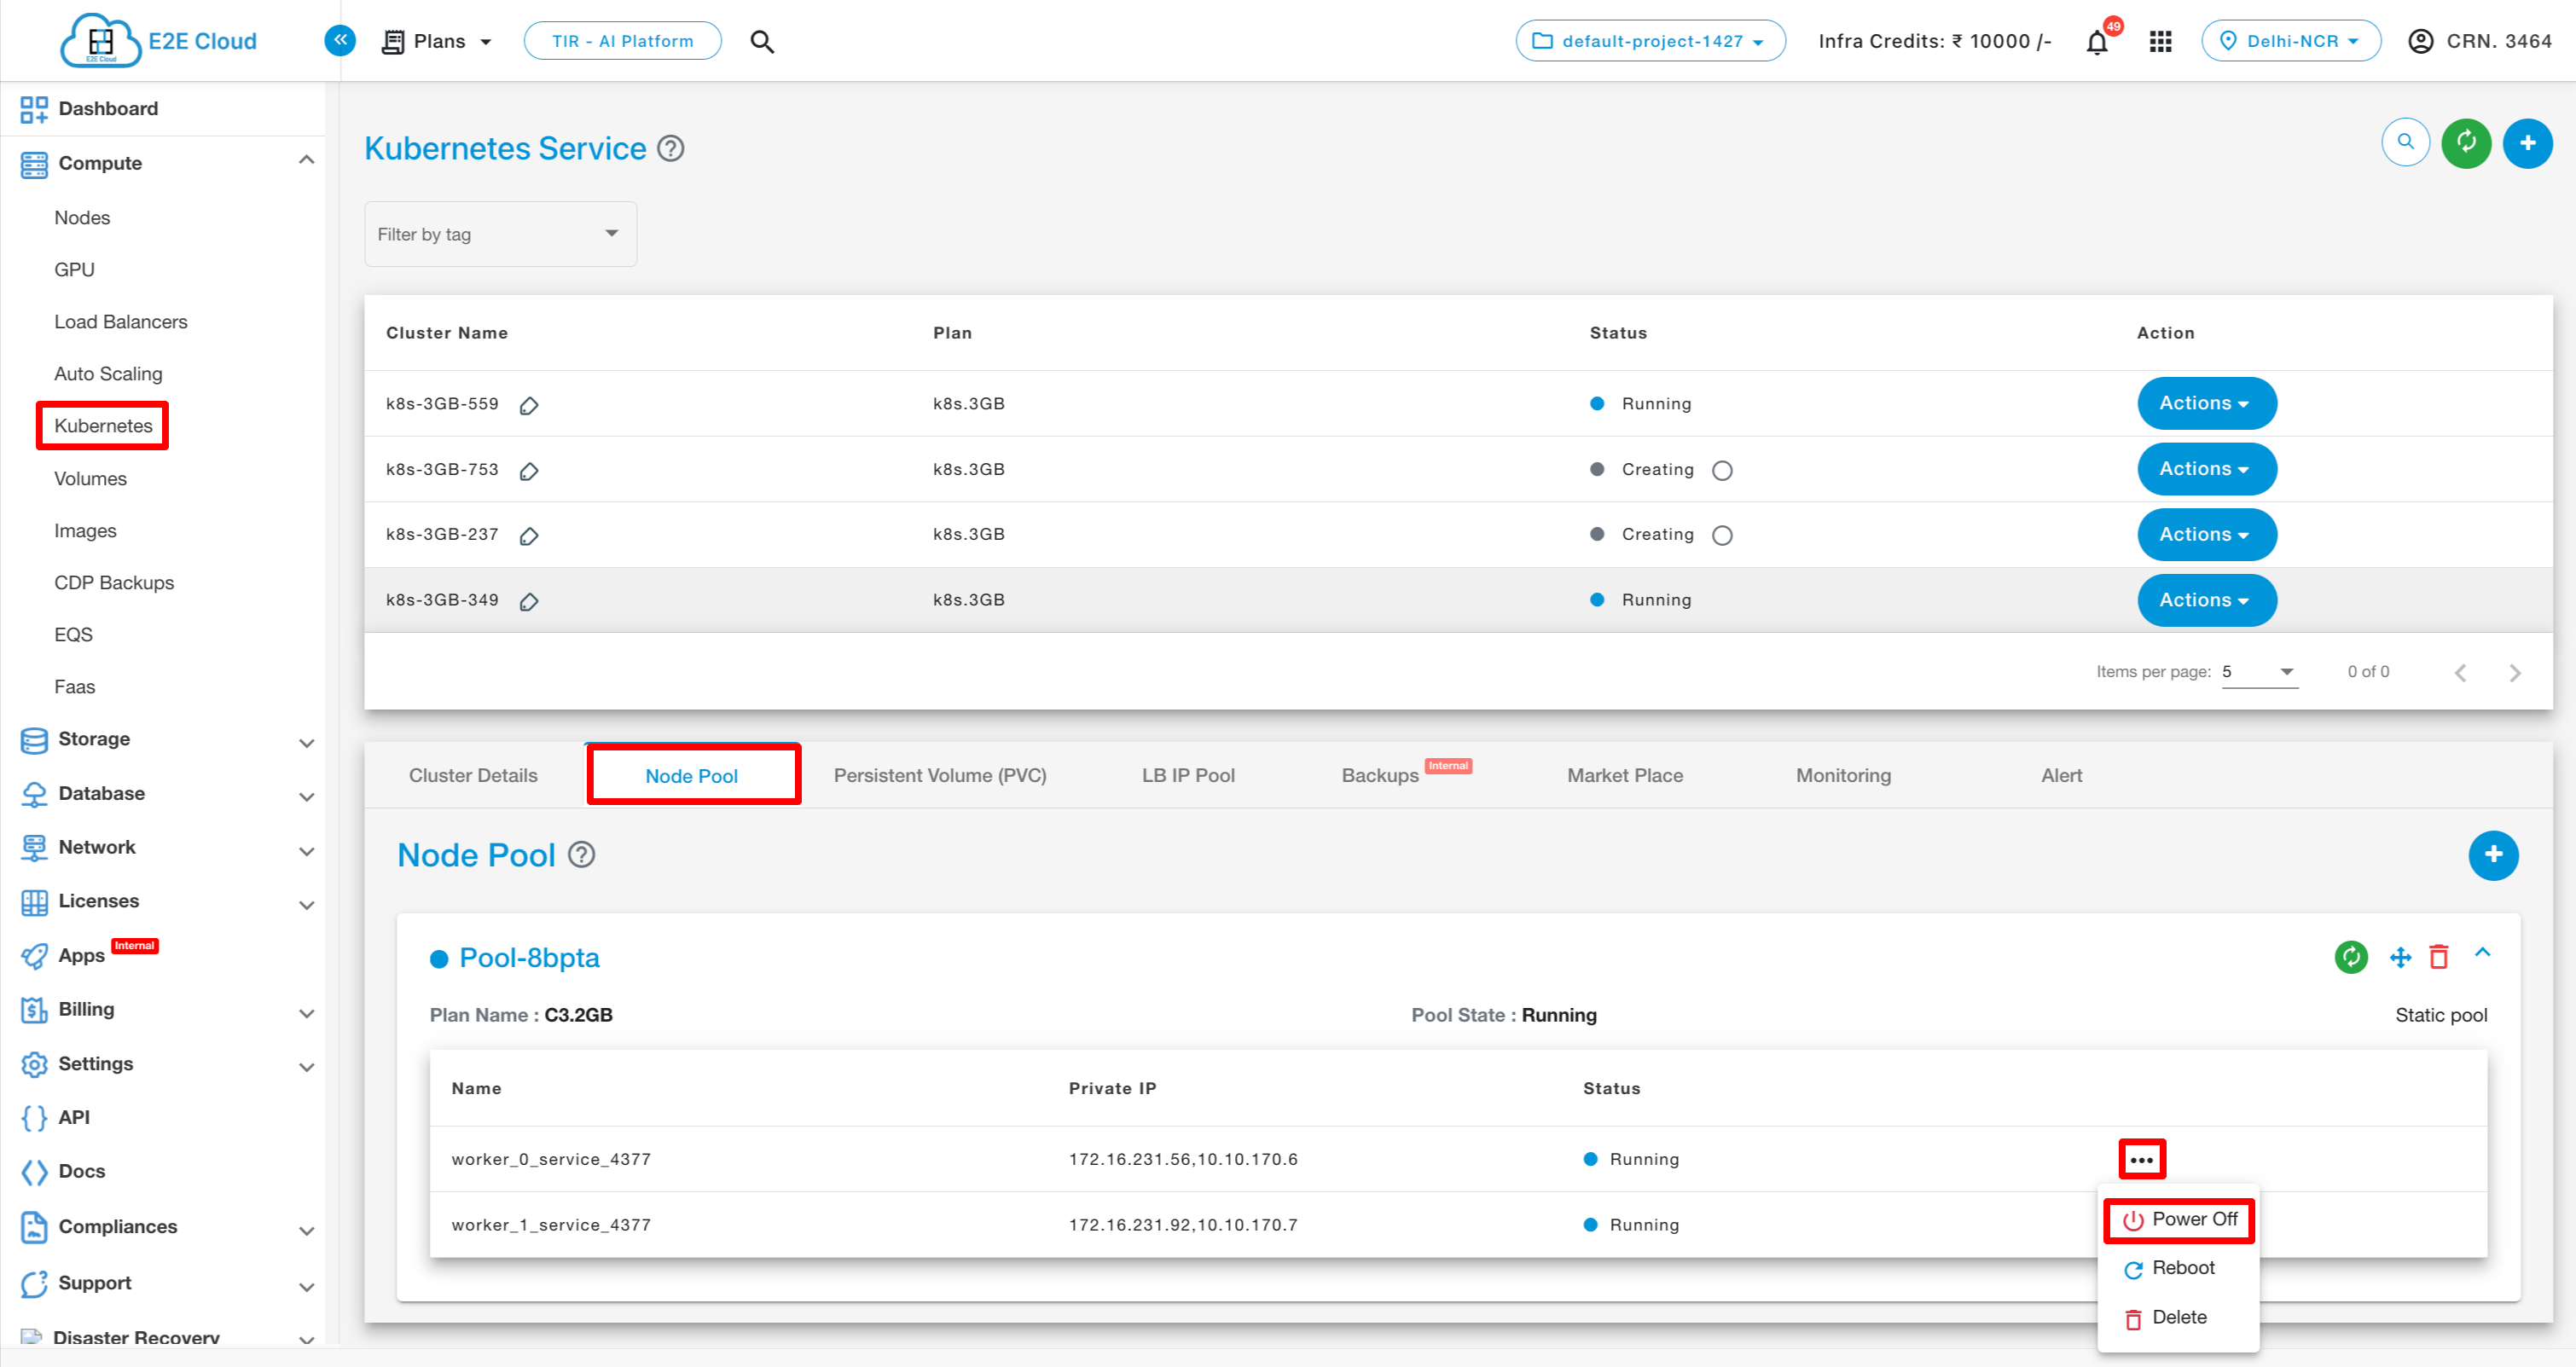
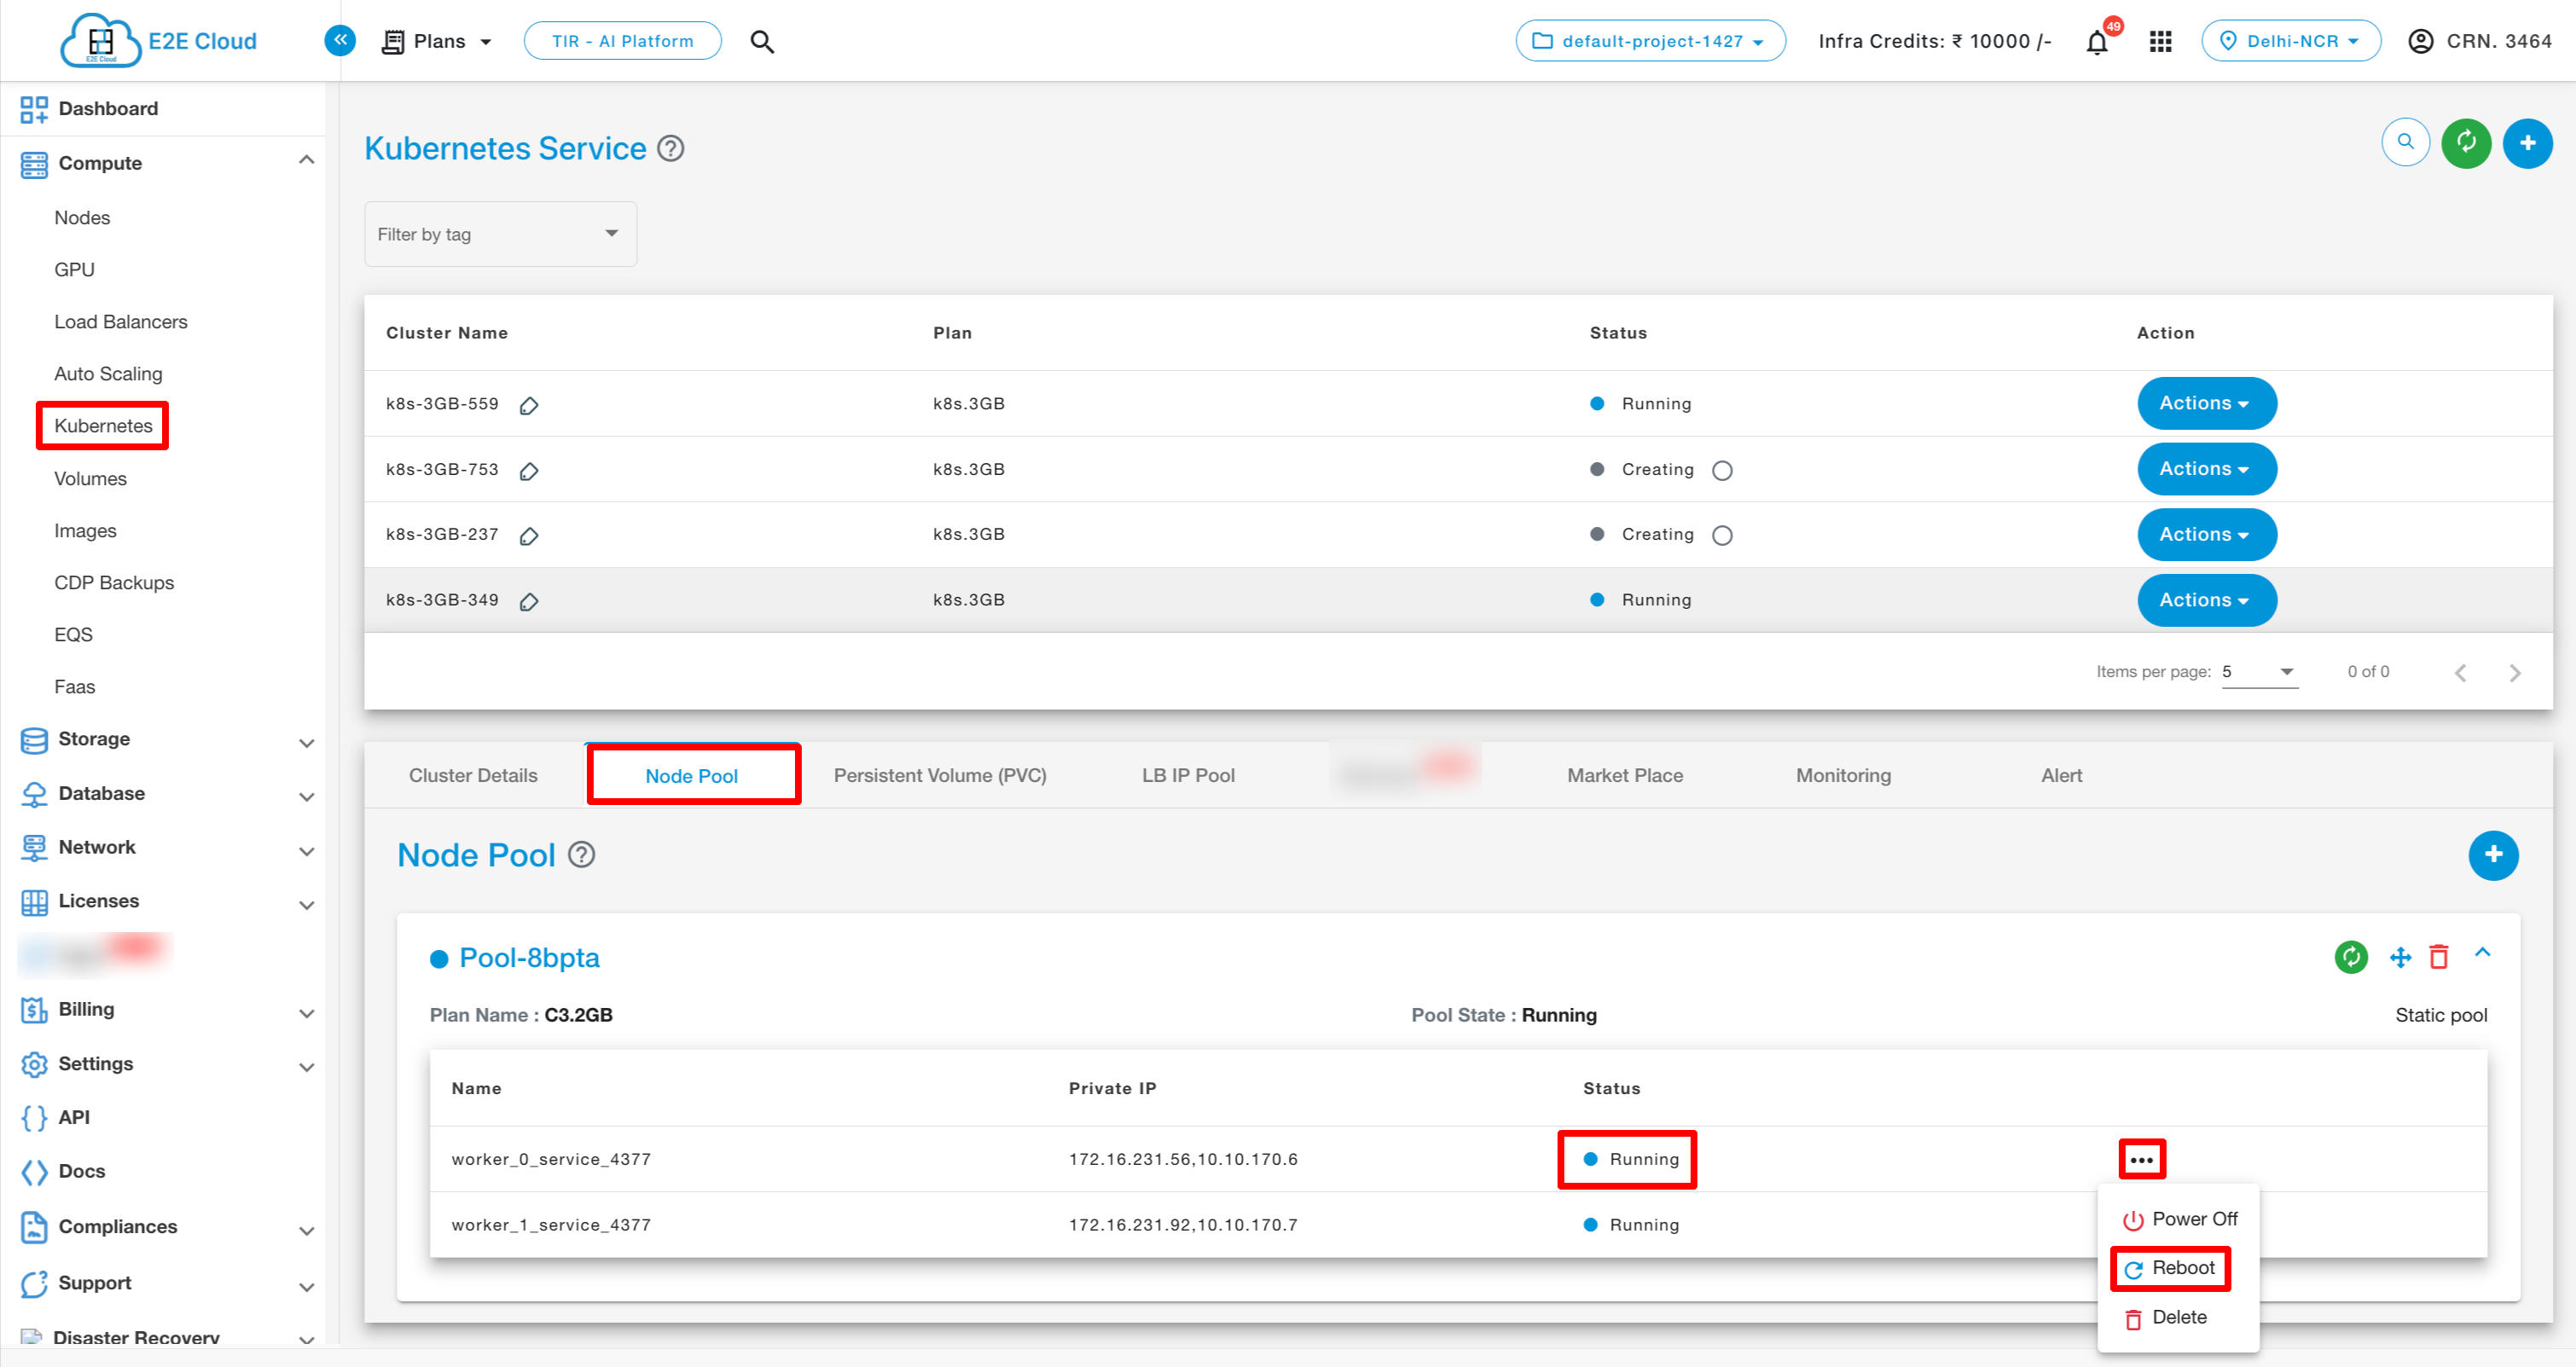
Node Pool
The Node Pool Details tab provides information about the Worker nodes. Users also Add, Edit, Resize, power on/off, reboot and delete the worker node.
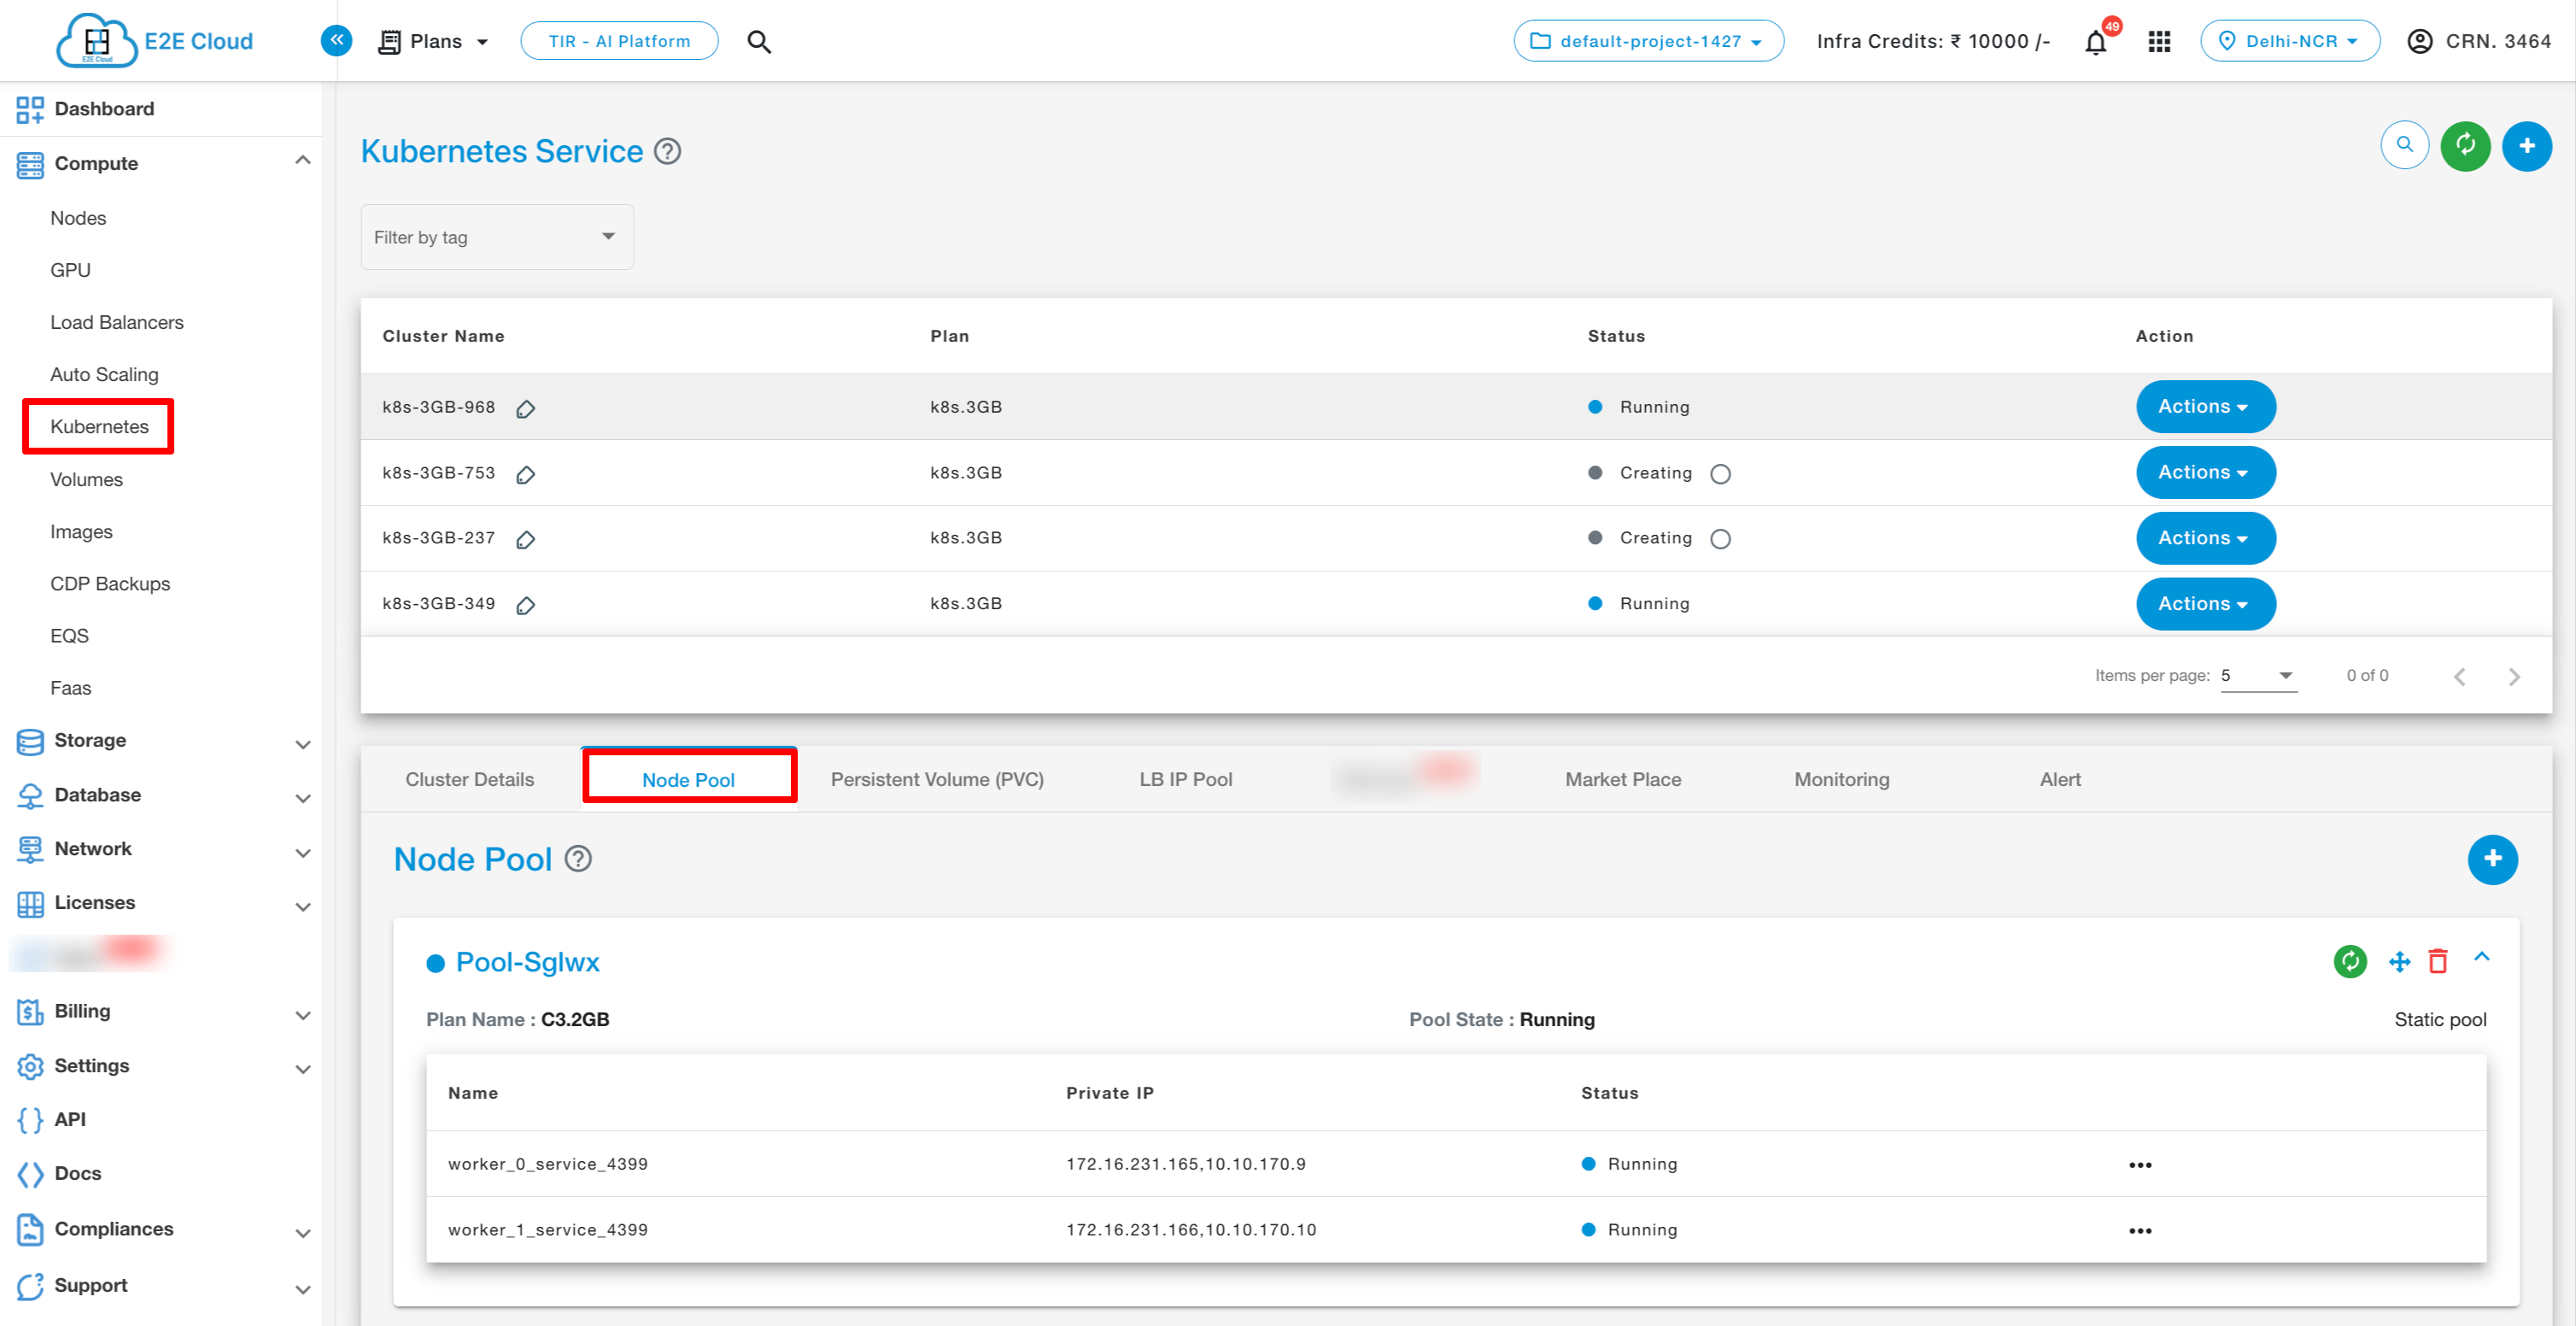
To Add node pool
To add node pool click on Add node icon.
After clicking on the icon, you can add node pool by clicking “Add node pool” btton.
To Edit node pool
To Resize node pool
Users can also resize the worker nodes pool. Click on resize button.

To Delete node pool
To Power Off a worker node
When a user clicks the three dots icon associated with a worker node, they will find a list of available actions. Simply select the ‘Power Off’ option from this list to power off the node.
To Power On a worker node
To bring the powered-off node back online, locate the three dots icon associated with it. You’ll notice that only the “start” action is available, while the “reboot” and “delete” actions are unavailable. Simply select “start” to bring the node to a running state.

To Reboot a worker node
To reboot a running node, locate the three dots icon associated with the node. Then, select the “Reboot” option from the menu that appears. This will initiate the reboot process for the node.
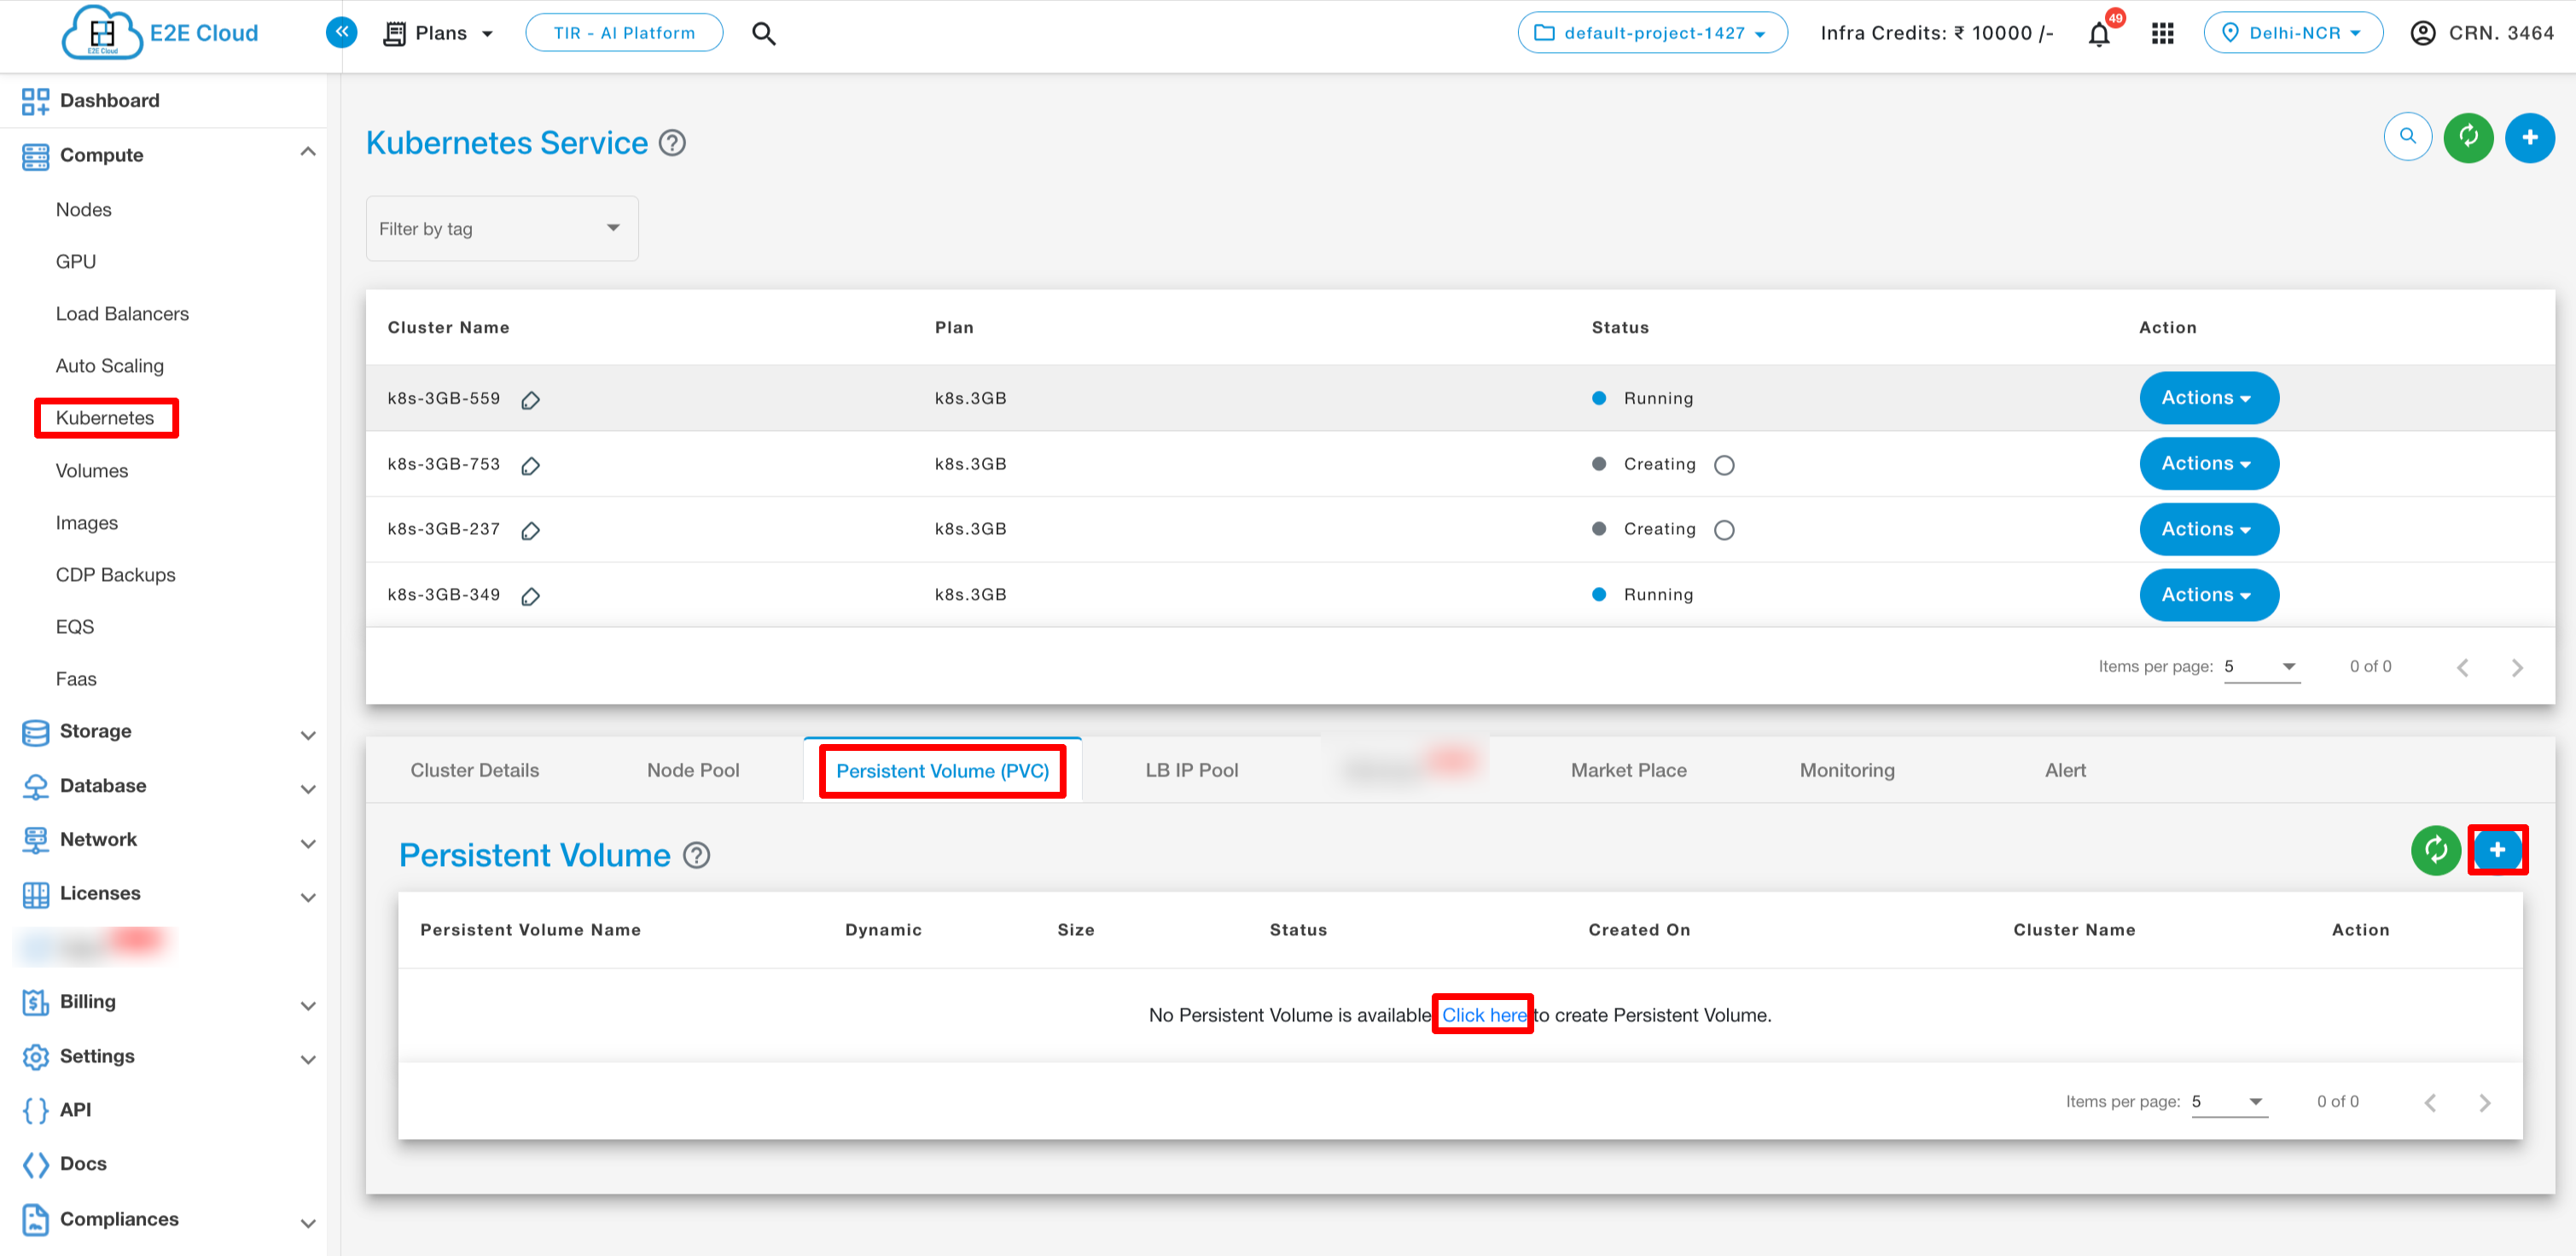
Persistent Volume(PVC)
To check PVC run below command

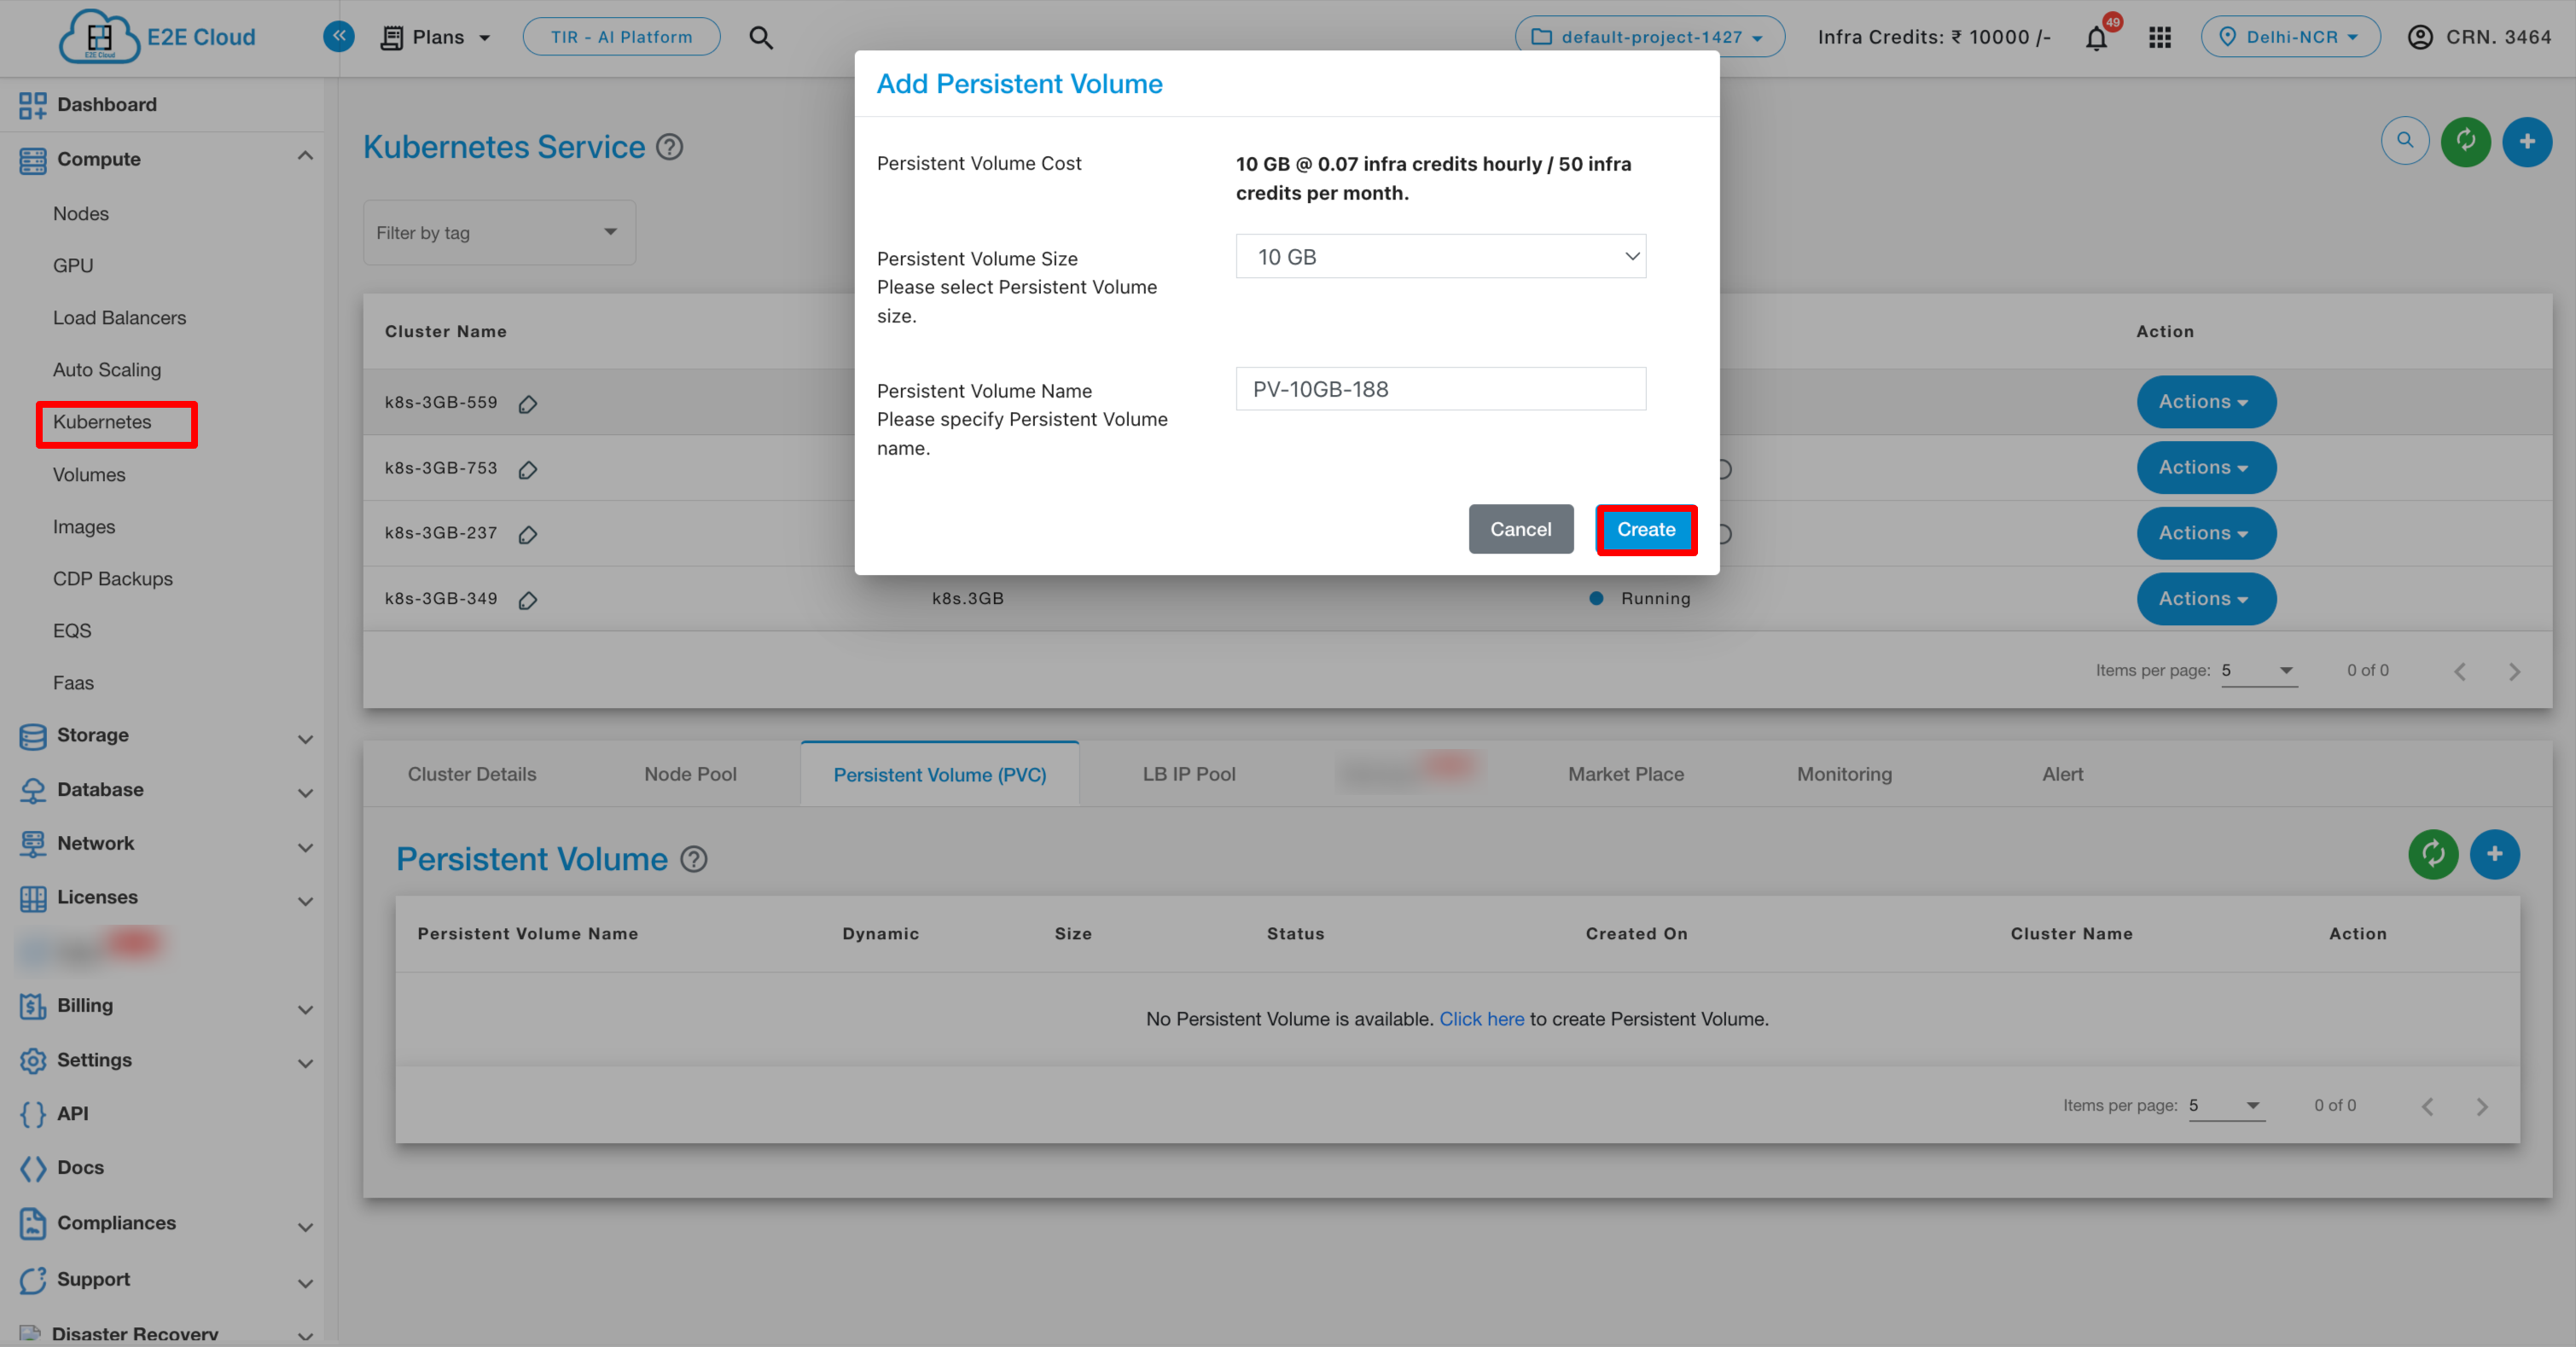
Create Persistent Volume :- On the top right section of the manage persistent volume, You need to click on the “Add persistent volume” Button which will prompt you to the Add persistent volume page where you will click the create button.
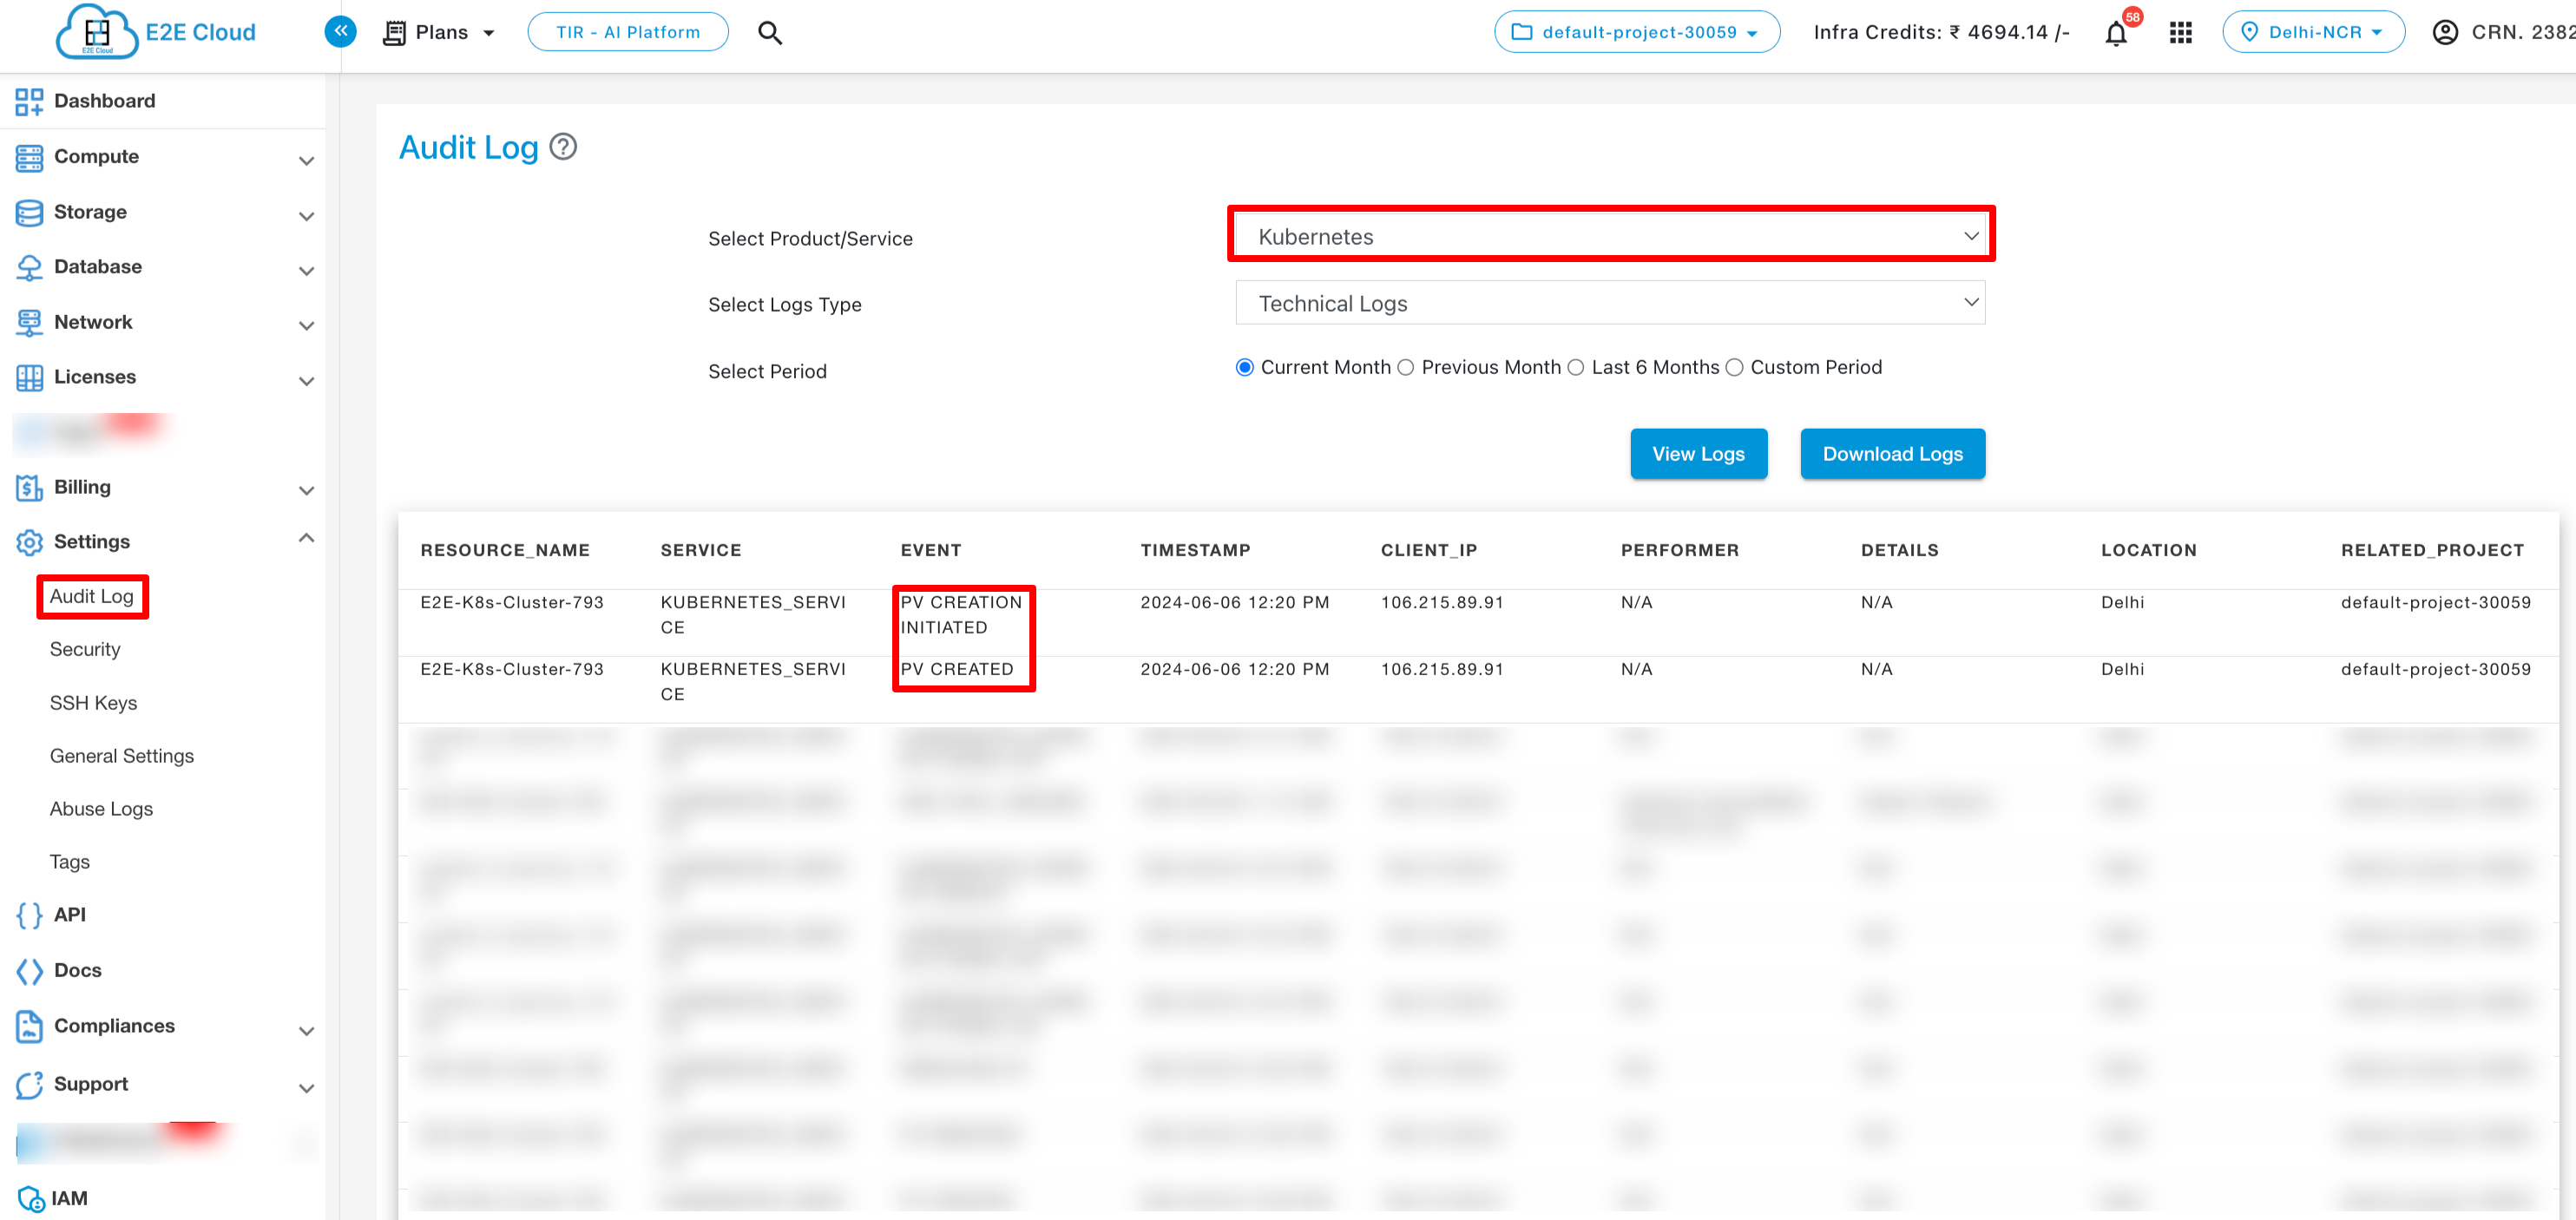
You can check the audit logs for details about the creation of the persistent volume.
Delete Persistent Volume:- To delete your persistent volume, click on delete option. Please note that once you have deleted your persistent volume you will not be able to recover your data.

You can check the audit logs for details about the deletion of the persistent volume.

Dynamic Persistent Volume(PVC)
Note
The sizes we show over UI and also the bill are calculated in GB, however, in creation the size used by K8s is in GiB.Decreasing the size of an existing volume is not possible. The Kubernetes-API doesn’t even allow it.
Dynamic volume provisioning allows storage volumes to be created on-demand.
Note
To create dynamic PersistentVolumeClaim alteast one PersistentVolume should be create in your kubernetes cluster from myaccout kubernetes PersistentVolumne section.
CREATE A STORAGE CLASS
To enable dynamic provisioning, a cluster administrator needs to pre-create one or more StorageClass objects for users. StorageClass objects define which provisioner should be used and what parameters should be passed to that provisioner when dynamic provisioning is invoked.
The following manifest creates a storage class “csi-rbd-sc” which provisions standard disk-like persistent disks.
cat <<EOF > csi-rbd-sc.yaml
---
apiVersion: storage.k8s.io/v1
kind: StorageClass
metadata:
   name: csi-rbd-sc
provisioner: rbd.csi.ceph.com
parameters:
   clusterID: 4335747c-13e4-11ed-a27e-b49691c56840
   pool: k8spv
   imageFeatures: layering
   csi.storage.k8s.io/provisioner-secret-name: csi-rbd-secret
   csi.storage.k8s.io/provisioner-secret-namespace: default
   csi.storage.k8s.io/controller-expand-secret-name: csi-rbd-secret
   csi.storage.k8s.io/controller-expand-secret-namespace: default
   csi.storage.k8s.io/node-stage-secret-name: csi-rbd-secret
   csi.storage.k8s.io/node-stage-secret-namespace: default
reclaimPolicy: Delete
allowVolumeExpansion: true
mountOptions:
   - discard
EOF
kubectl apply -f csi-rbd-sc.yaml
CREATE A PERSISTENT VOLUME CLAIM
Users request dynamically provisioned storage by including a storage class in their PersistentVolumeClaim. To select the “csi-rbd-sc” storage class, for example, a user would create the following PersistentVolumeClaim
cat << EOF > pvc.yaml
apiVersion: v1
kind: PersistentVolumeClaim
metadata:
  name: rbd-pvc
spec:
  accessModes:
  - ReadWriteOnce
  volumeMode: Filesystem
  resources:
    requests:
      storage: 4Gi
  storageClassName: csi-rbd-sc
EOF
kubectl apply -f pvc.yaml

This claim results in an SSD-like Persistent Disk being automatically provisioned. When the claim is deleted, the volume is destroyed.
Public IPv4 Address
A public IP address is an IPv4 address that’s reachable from the Internet. You can use public addresses for communication between your Kubernetes and the Internet. You can reserve the default assigned public IP for your account until you do not release it. If you want to allocate public IP addresses for your Kubernets, this can be used by using type load-balancer.
Private IPv4 Address
A private IPv4 address is an IP address that’s not reachable over the Internet. You can use private IPv4 addresses for communication between instances in the same VPC. When you launch an E2E Kubernetes, we allocate a private IPv4 address for your Kubernetes.
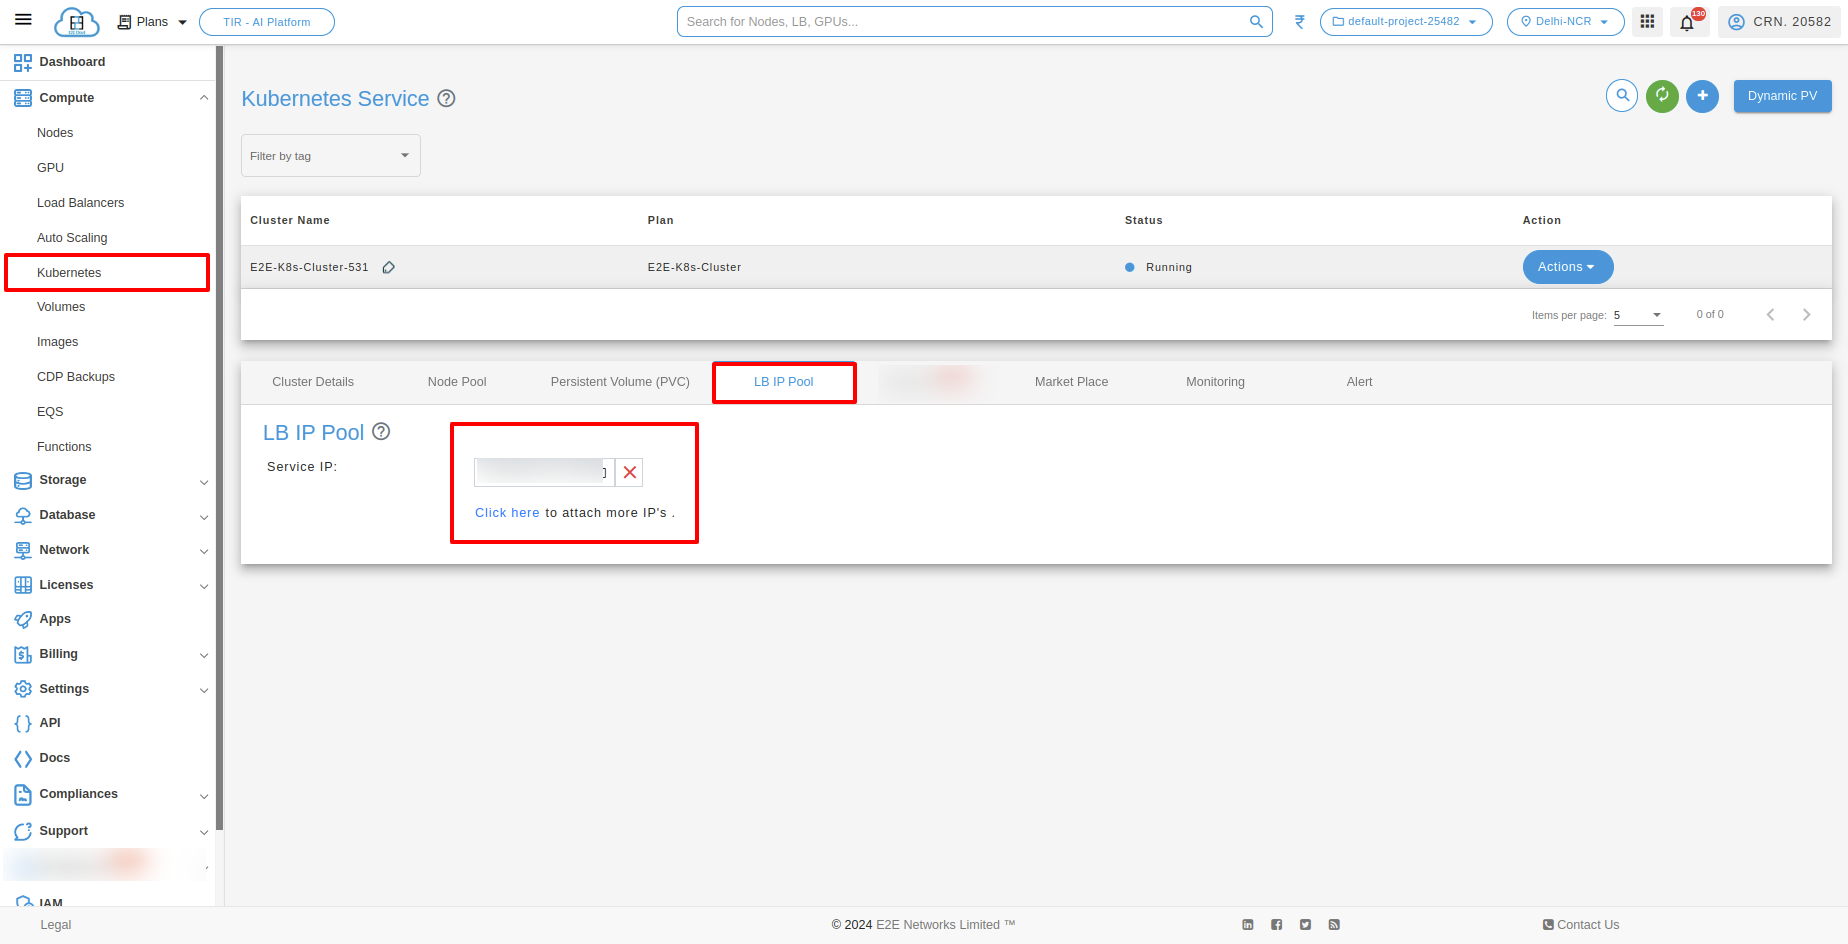
LoadBalancer
We have a native integration of the bare-metal Load Balancer MetalLB in our Kubernetes Appliance.
MetalLB hooks into our Kubernetes cluster and provides a network load-balancer implementation. It has two features that work together to provide this service: address allocation, and external announcement.
With Metallb you can expose the service on a load-balanced IP (External/Service IP) which will float across the Kubernetes nodes in case some node fails and this is where it differs from a simple External IP assignment.
As long as you ensure that the network traffic is routed to one of the Kubernetes nodes on this load-balanced IP, your service should be accessible from the outside.
We have to provide pools of IP addresses that MetalLB will use for allocation and for that part, we allow users the option of Service IP.

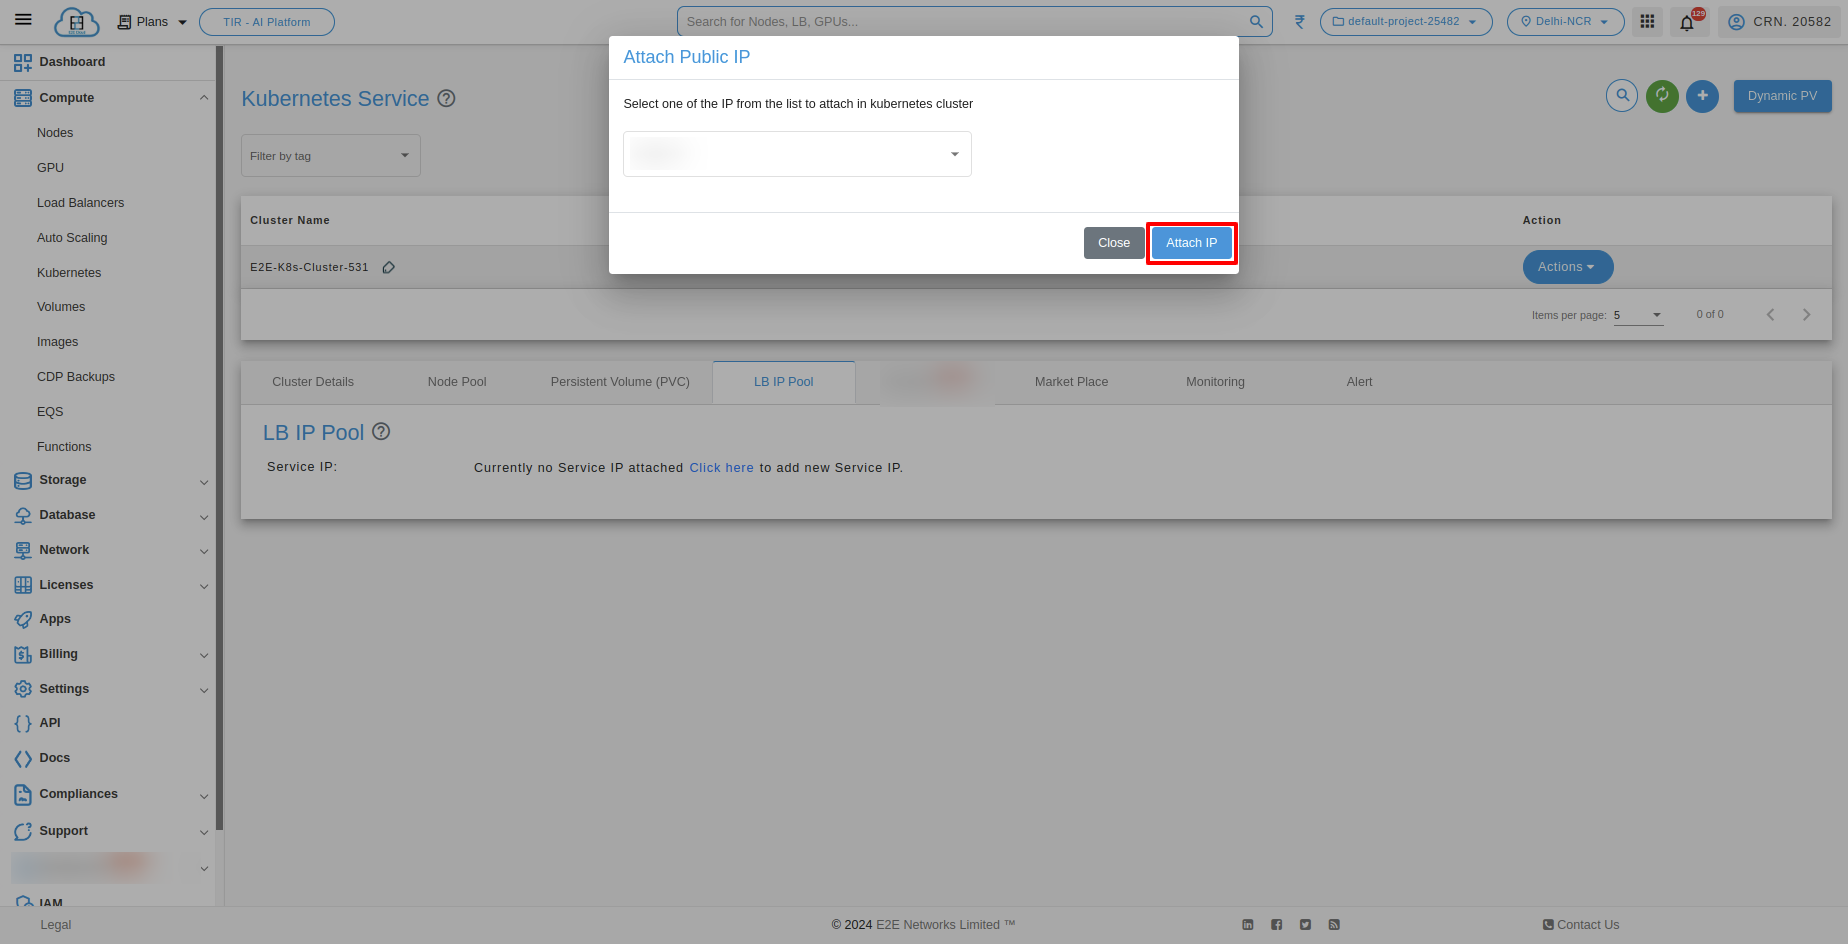
With Service IP, customers can reserve IPs which will be used to configure pools of IP addresses automatically in the Kubernetes cluster. MetalLB will take care of assigning and unassigning individual addresses as services come and go, but it will only ever hand out IPs that are part of its configured pools.

Monitoring Graphs
Monitoring of server health is a free service that provides insights into resource usage across your infrastructure. There are several different display metrics to help you track the operational health of your infrastructure. Select the worker node for which you want to check the metrics.
Click on the ‘Monitoring’ tab to check the CPU Performance, Disk Read/ Write operation, and Network Traffic Statistics.


Alerts
Setup Monitoring Alert for Worker Node
Go to the ‘Alerts’ tab and click on Create Alert button and if you want configure email then you have to click on Configure Email button.


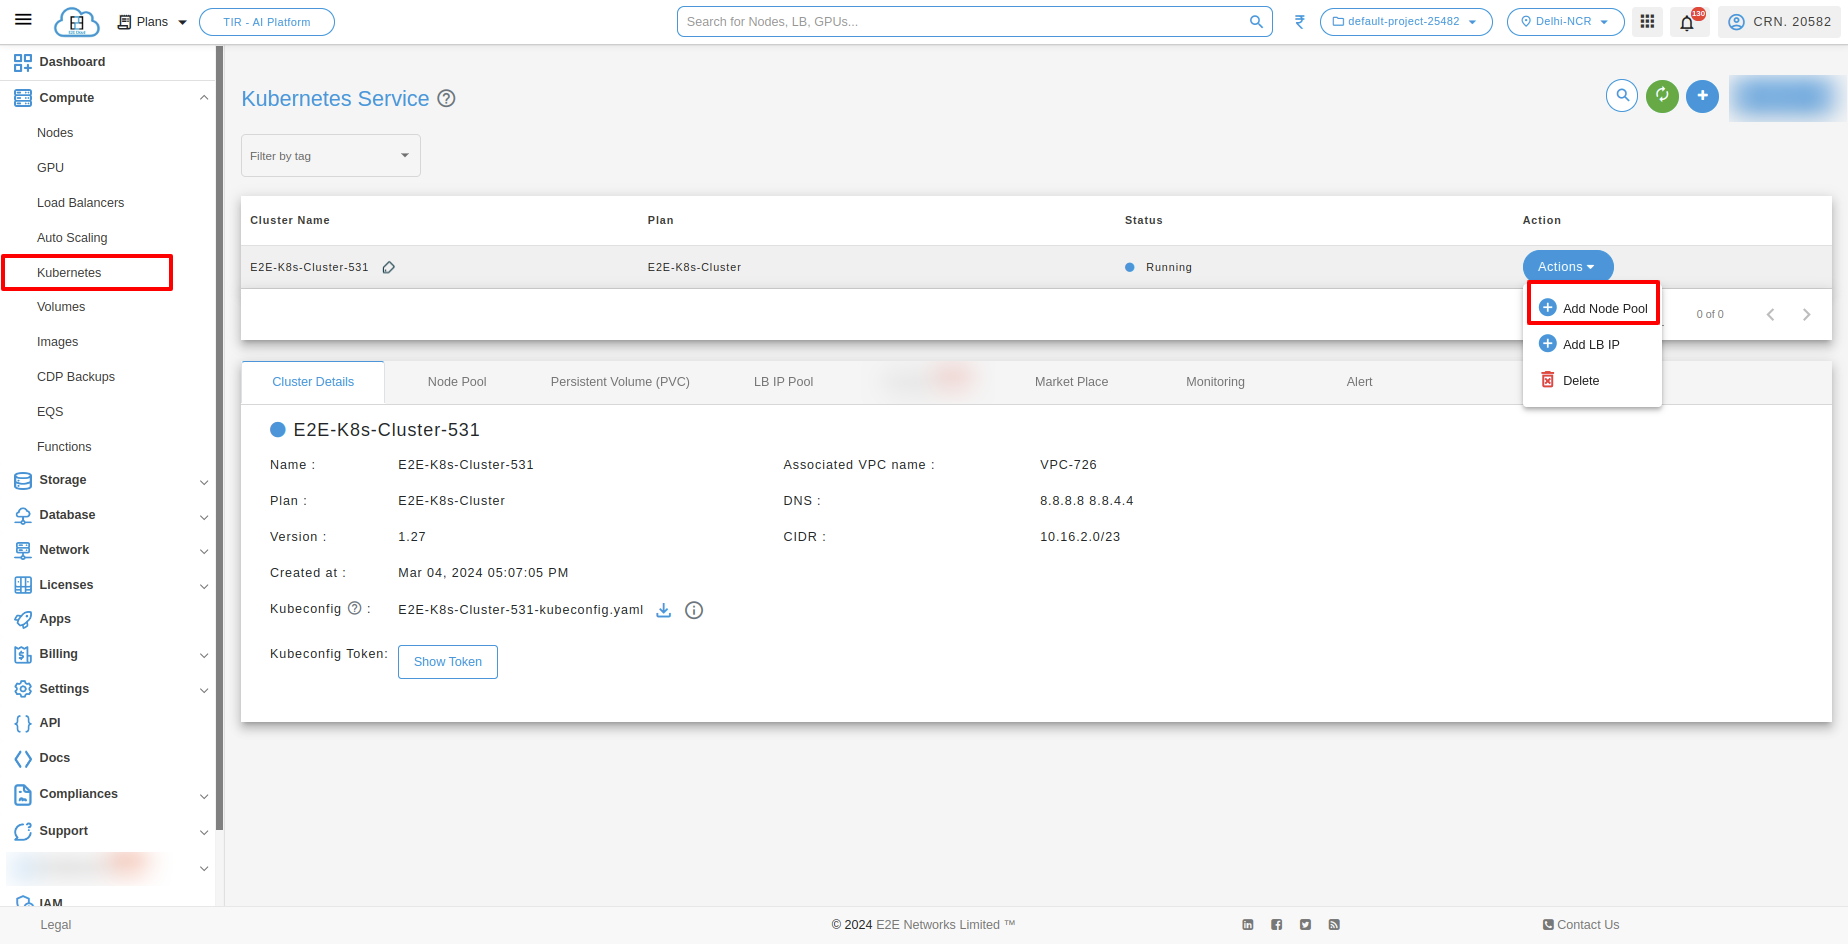
Actions
You can perform the following actions available for the respective cluster
Add Node Pool
You can add your Kubernetes current plan to a higher plan, for this, you need to click on the Add node pool button.

Default
CUSTOM
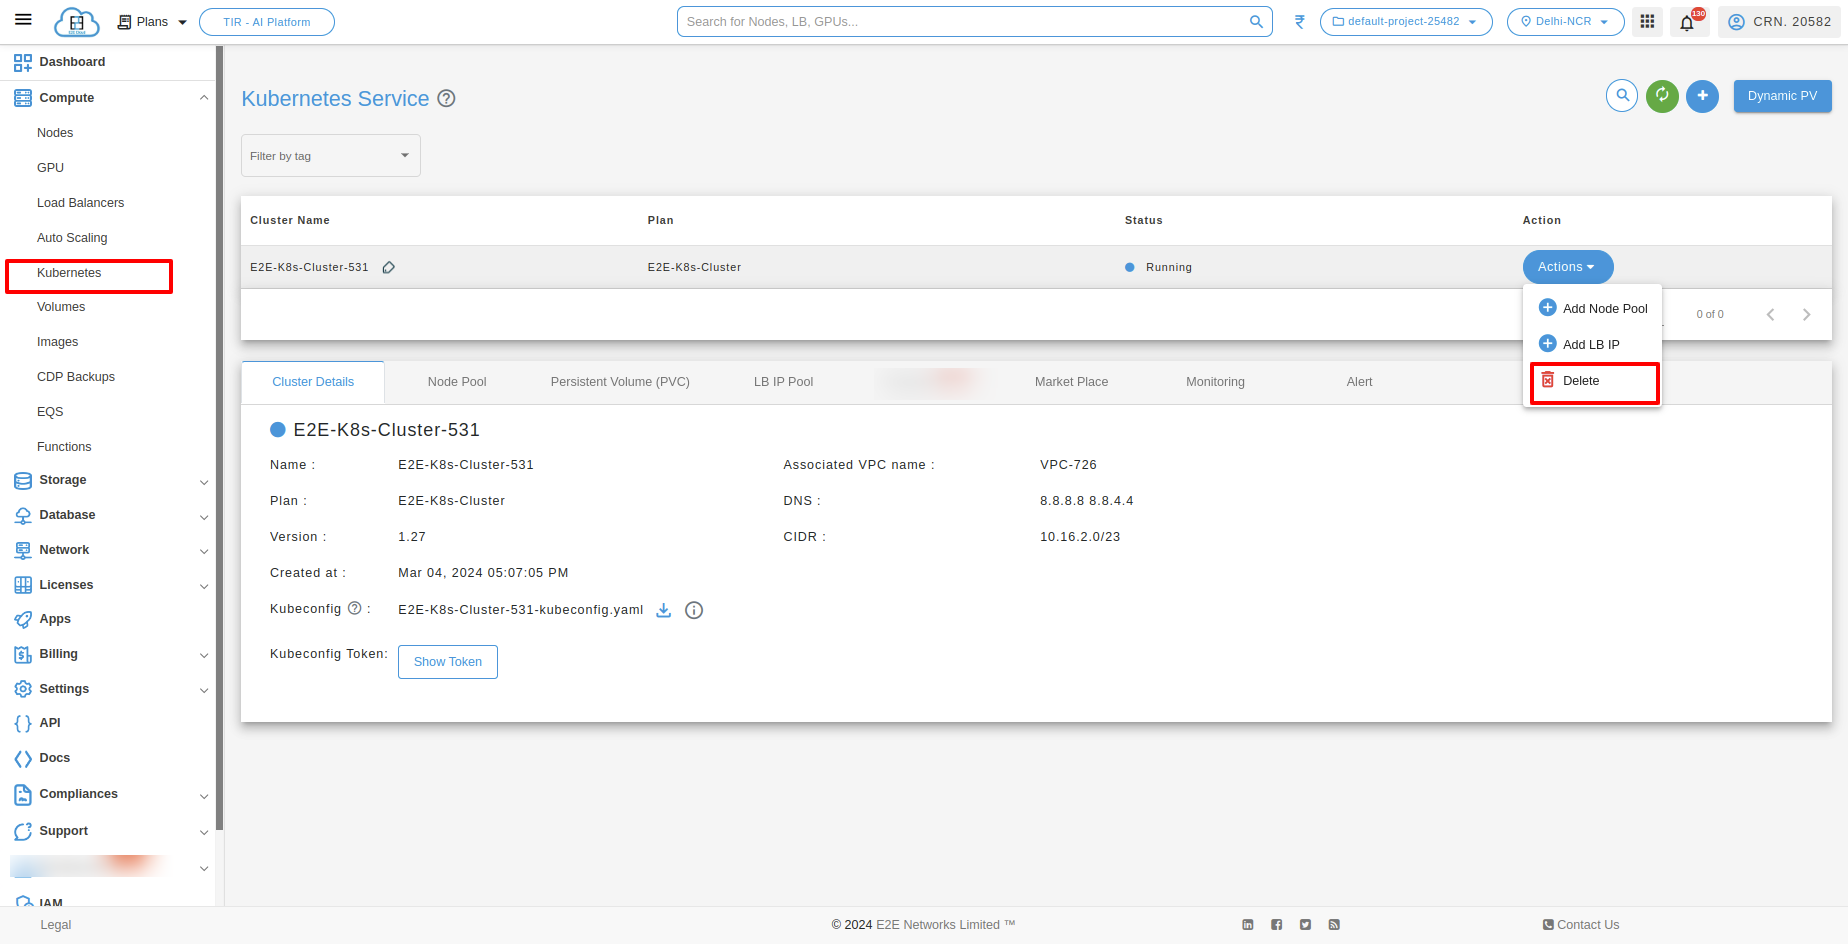
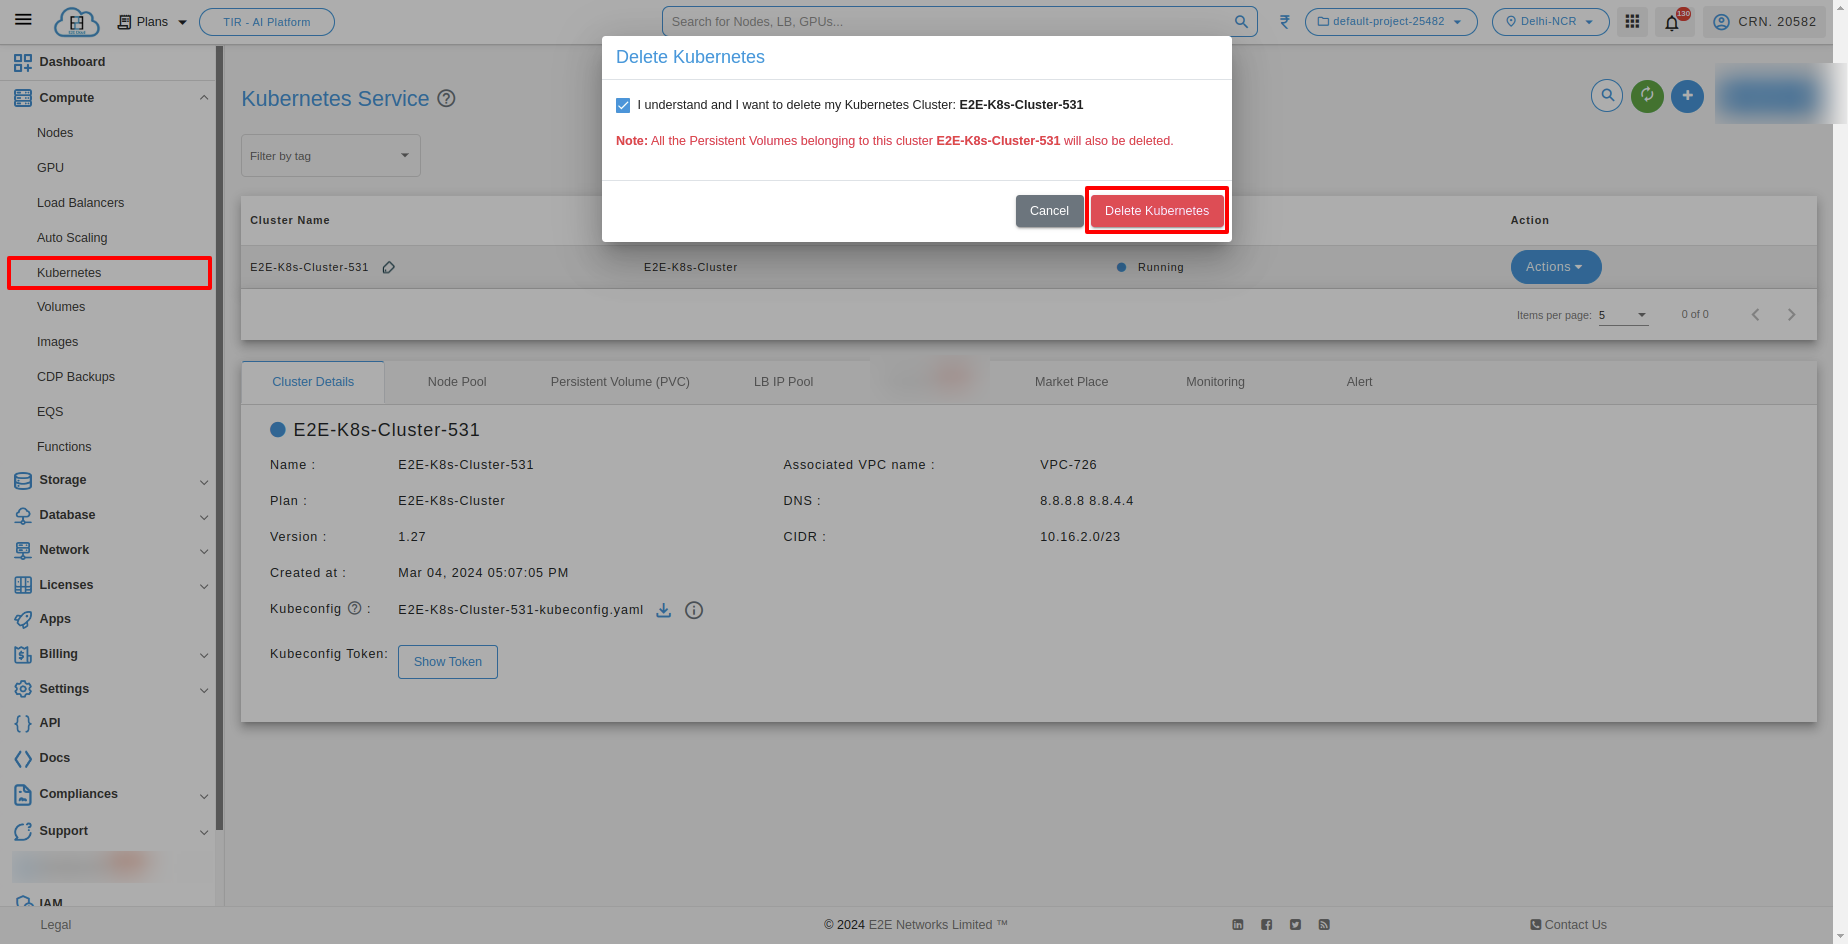
Delete Kubernetes
Click on the Delete button to delete your kubernetes. Termination of a kubernetes will delete all the data on it.
Create a Secret For Container Registery
Secrets
A Secret is an object that contains a small amount of sensitive data such as a password, a token, or a key. Such information might otherwise be put in a Pod specification or in a container image. Using a Secret means that you don’t need to include confidential data in your application code.
Create Secrets
kubectl create secret docker-registry name-secrets \
--docker-username=username \
--docker-password=pass1234 \
--docker-server=registry.e2enetworks.net
Create a Pod that uses container registry Secret
cat > private-reg-pod-example.yaml << EOF
apiVersion: v1
kind: Pod
metadata:
  name: node-hello
spec:
  containers:
  - name: node-hello-container
    image: registry.e2enetworks.net/vipin-repo/node-hello@sha256:bd333665069e66b11dbb76444ac114a1e0a65ace459684a5616c0429aa4bf519
  imagePullSecrets:
  - name:  name-secrets
EOF