Tutorial : How to Export AWS Image and Import it to E2E Networks
Introduction
E2E Networks Myaccount Portal allow users to import their customized images. User can bring in their golden images from the on-premises environment or from other cloud providers to the E2E’s Myaccount portal and use them to create virtual machines with their choice of Plans. This option saves time and effort required to set up and configure your node right from the scratch again to get your required golden stack in place.
In this guide,We will demonstrate how to create an Image from aws instance and convert it to required format which then can be imported to E2E’s Myaccount portal.
Step 1 : Download and Install the Contextualization Packages and Dependencies
Before Proceeding with saving image of your Instance, You need to Download and Install the Contextualization Packages and Dependencies on your aws instance to make sure once the image is imported in Myaccount, the virtual machine initialization process works correctly.
VM initialization method
There are different methods to pass information to a newly created Virtual Machine. This information can be the network configuration of the VM, user credentials, init scripts, and free form data.
In our cloud platform, we use the OpenNebula context package for virtual machine initialization, which configures the network, sets the user credentials, sets hostname, adds provided SSH keys, etc.
Download and Installation of Contextualization Packages and Dependencies to your VM
CentOS/RHEL 6.x
# wget https://github.com/OpenNebula/addon-context-linux/releases/download/v5.8.0/one-context-5.8.0-1.el6.noarch.rpm
# yum install -y epel-release
# yum install -y one-context-[0-9]*el6*rpm
CentOS/Fedora/RHEL 7.x
# wget https://github.com/OpenNebula/addon-context-linux/releases/download/v5.8.0/one-context-5.8.0-1.el7.noarch.rpm
# yum install -y epel-release
# yum install -y one-context-[0-9]*el7*rpm
Debian/Ubuntu
# wget https://github.com/OpenNebula/addon-context-linux/releases/download/v5.8.0/one-context_5.8.0-1.deb
# apt-get purge -y cloud-init
# dpkg -i one-context_*deb || apt-get install -fy
OpenSUSE 42,15
# wget https://github.com/OpenNebula/addon-context-linux/releases/download/v5.8.0/one-context-5.8.0-1.suse.noarch.rpm
# zypper --no-gpg-check install -y one-context-[0-9]*suse*rpm
Alpine Linux
# wget https://github.com/OpenNebula/addon-context-linux/releases/download/v5.8.0/one-context-5.8.0-r1.apk
# apk add --allow-untrusted one-context-[0-9]*apk
FreeBSD 11,12
# wget https://github.com/OpenNebula/addon-context-linux/releases/download/v5.8.0/one-context-5.8.0_1.txz
# pkg install -y curl bash sudo base64 ruby open-vm-tools-nox11
# pkg install -y one-context-[0-9]*.txz
Windows
Download the MSI package into C:\:
Or execute this command in powershell:
(New-Object Net.WebClient).DownloadFile("https://github.com/OpenNebula/addon-context-windows/releases/download/v5.8.0/one-context-5.8.0.msi", "C:\one-context-5.8.0.msi")
Double-click on the downloaded MSI package icon in the same way you open other documents to install it.
Note
If you have cloud-init present in your virtual machine for initialization, please make sure that the respective cloud-init service is disabled on boot before taking the image. The cloud-init will conflict with the OpenNebula context package which may result in failure of virtual machine initialization process.
Supported image formats
E2E cloud-platform supports images in qcow2, qed, raw, vdi, and vhd formats for import.
Tip
To save space and reduce import time you can also compress the file using gzip and tar compression formats.
Disk requirements
The image should contain single disk partition. The primary partition on the disk can be in any format that you like as long as it boots properly from the MBR bootloader. The disk should not be larger than 2048 GB (2 TB).
Step 2 : Create an Image of your aws instance
Once contextualization packages and dependencies are installed, You can power off your aws instance and Proceed with creating image.
For this tutorial purpose we are going to use centos7 instance of aws
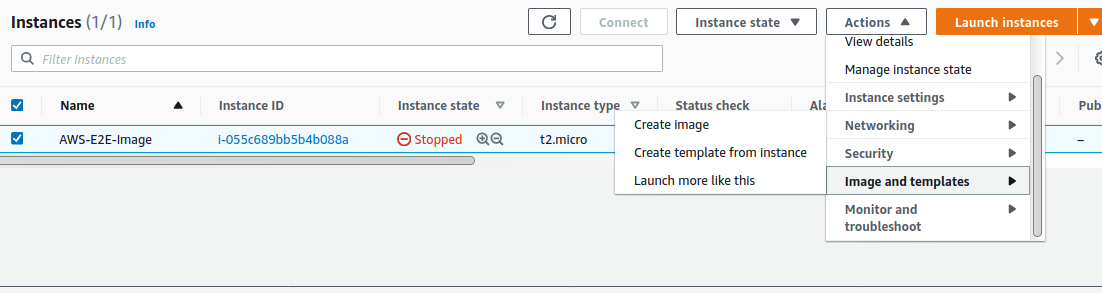
You will be Prompt to enter the Image name and other details, after entering these details, The status of image creation will be shown at ami section

Step 3 : Export your Image to aws s3 bucket
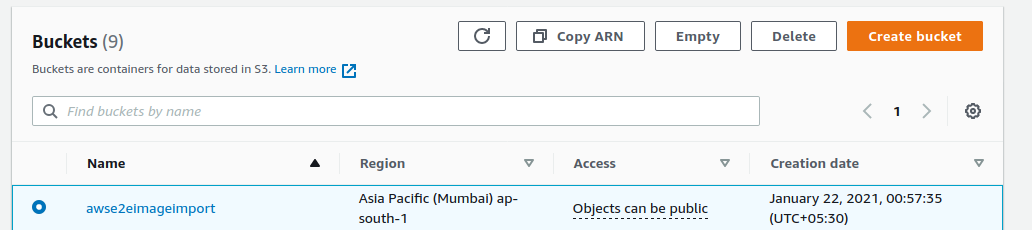
Create an Amazon S3 Bucket for Storing exported Image
After creating an image of your instance, You need to Create an Amazon S3 bucket for storing the exported images or choose an existing bucket. The bucket must be in the Region where you want to export your VMs.
Here for this tutorial purpose, we have created a bucket name “awse2eimageimport”
Install aws cli
We will be using aws cli to convert and export the image in to required format and copying it to s3 bucket. If you have already installed and configured aws cli on your server or local desktop, You can ignore this steps and proceed further.
To install aws cli on your server, Please follow below steps
curl "https://awscli.amazonaws.com/awscli-exe-linux-x86_64.zip" -o "awscliv2.zip"
unzip awscliv2.zip
sudo ./aws/install
Create an IAM role named vmimport to your S3 bucket
VM Import/Export requires a role to perform certain operations on your behalf. You must create a service role named vmimport with a trust relationship policy document that allows VM Import/Export to assume the role, and you must attach an IAM policy to the role
Create a file named trust-policy.json on your server or local desktop where aws cli is configured. Add the following policy to the file:
{
   "Version": "2012-10-17",
   "Statement": [
      {
         "Effect": "Allow",
         "Principal": { "Service": "vmie.amazonaws.com" },
         "Action": "sts:AssumeRole",
         "Condition": {
            "StringEquals":{
               "sts:Externalid": "vmimport"
            }
         }
      }
   ]
}
Use the create-role command to create a role named vmimport and grant VM Import/Export access to it. Ensure that you specify the full path to the location of the trust-policy.json file that you created in the previous step, and that you include the file:// prefix as shown the following example:
aws iam create-role --role-name vmimport --assume-role-policy-document "file:///root/trust-policy.json"
Create a file named role-policy.json with the following policy,where “awse2eimageimport” is the bucket name for exported images:
{
   "Version":"2012-10-17",
   "Statement":[
      {
         "Effect": "Allow",
         "Action": [
            "s3:GetBucketLocation",
            "s3:GetObject",
            "s3:ListBucket"
         ],
         "Resource": [
            "arn:aws:s3:::awse2eimageimport",
            "arn:aws:s3:::awse2eimageimport/*"
         ]
      },
      {
         "Effect": "Allow",
         "Action": [
            "s3:GetBucketLocation",
            "s3:GetObject",
            "s3:ListBucket",
            "s3:PutObject",
            "s3:GetBucketAcl"
         ],
         "Resource": [
            "arn:aws:s3:::awse2eimageimport",
            "arn:aws:s3:::awse2eimageimport/*"
         ]
      },
      {
         "Effect": "Allow",
         "Action": [
            "ec2:ModifySnapshotAttribute",
            "ec2:CopySnapshot",
            "ec2:RegisterImage",
            "ec2:Describe*"
         ],
         "Resource": "*"
      }
   ]
}
..Note :: In the above policy, Replace the bucket name with your actual bucket name
Start an Export Image Task
To export your image, use the export-image command, Here we are exporting the disk image in vhd format which is supportable in e2e’s myaccount portal. You can also export the image in raw format.
aws ec2 export-image --image-id ami-033e50757697c4d75 --disk-image-format VMDK --s3-export-location S3Bucket=awse2eimageimport,S3Prefix=exports/
Note: Kindly make sure to replace your image ami id and bucket name in the above command
Monitor an Export Image Task
To monitor your image export task, Use below command
aws ec2 describe-export-image-tasks --export-image-task-ids export-ami-1234567890abcdef0
Note: Kindly make sure to replace your export ami id in the above command
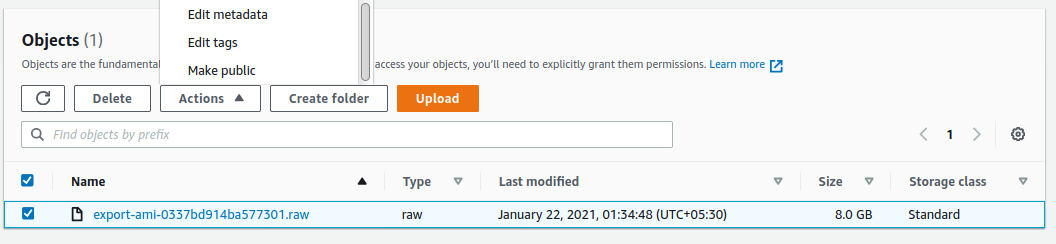
Providing Public access to your bucket
Once the image has been converted and exported to s3 bucket, you need provide public access to the object in order to import it to myaccount portal.
Select the object and go to actions and make it public.
Step 4 : Importing an Image to Myaccount Portal
Once the bucket has been created, Select the object and go to properties and copy the object URl, We will use this url to import the image in myaccount portal.
You can Import an image to Myaccount Portal using below steps
Go to MyAccount and log in using your credentials set up at the time of creating and activating the My Account.
On the left Navigation bar, Select Node available under the product section.
You will redirect to the Manage Node page.
Click on the ‘Saved Image’.
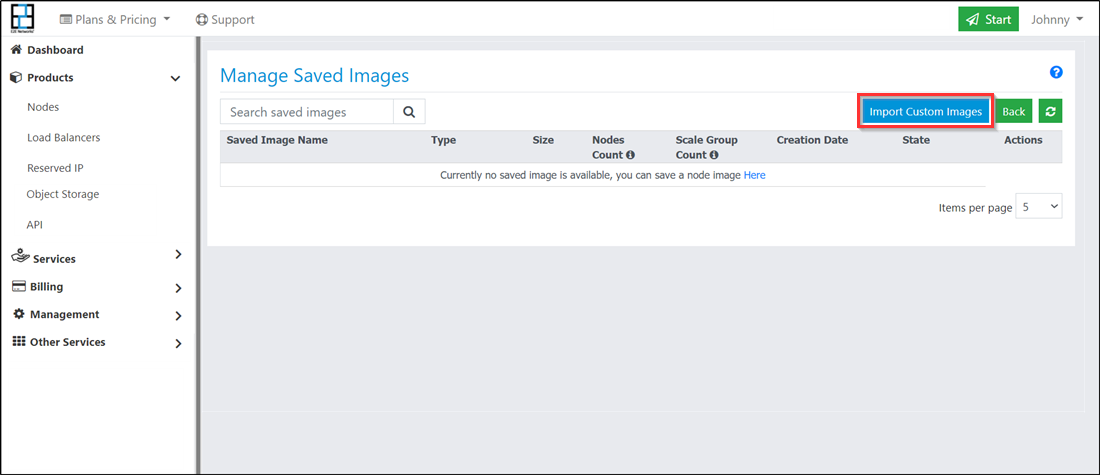
You will redirect to the ‘Manage Saved Image’ page.
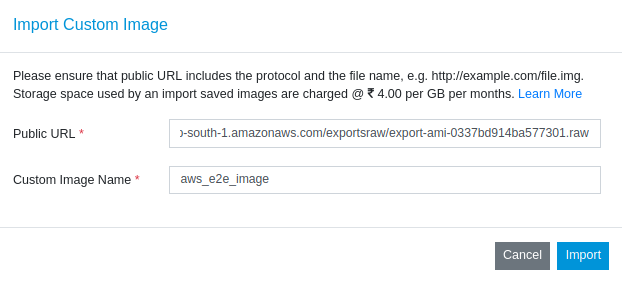
Click on the ‘Import Custom Image’.
The import custom image window will be opened. Please provide the following details.
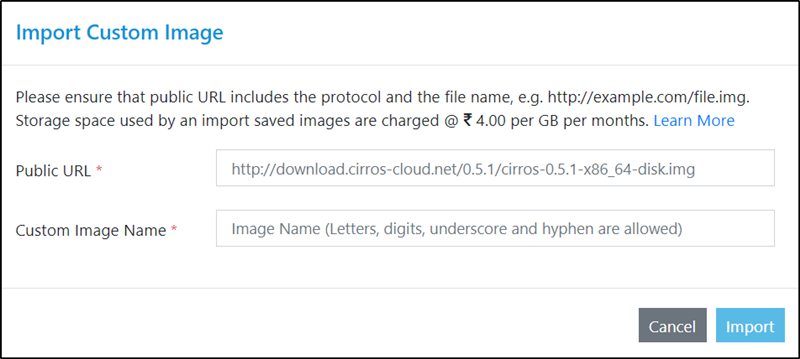
Enter the URL (downloadable link) of the image you want to use in this text field. Here,We will be pasting the link of object url which we just copied it from aws s3 panel and click on import.
After you’ve entered the required details, click Import.
Note
Importing virtual images will take some time. It’s depending upon the size of an image. You will be notified once an image is imported.
The status of your Image will turn to “Ready” state when your image is sucessfully imported.
Once your custom image is added to your account, you can create a node or create a scale group from your custom image.