Reserve IP address
You can reserve IP addresses from MyAccount . A Reserved IP address is a public IPv4 address. Reserving an IP address ensures that an IP address will be reserved for your MyAccount. This can be used for dynamic cloud computing and it is reachable from the internet.
You can use reserve IPs to create cloud server infrastructures without any single points of failure. With a reserved IP address, you can mask the failure of a resource due to increased system load or website by rapidly remapping the address to another instance in your MyAccount. Or, you can dynamically update the backend resources of your applications and websites by re-assigning the Reserve IP address with an insignificant downtime if at all.
For example, since DNS propagation takes time when A records of a domain name are changed, reserving an IP address allows you to re-assign the IP address to a new resource without updating your domain name A records; this is useful especially when you are moving to a different Node series — for example, C2 series to Smart Dedicated series.
The following are the basic characteristics of a Reserve IP address: To use a Reserve IP address for your MyAccount, you need to first reserve one IP either from an IP address pool or reserve your resource’s default public IPv4 address. Only after that, you can use it as an Add-On IP or Primary Public IP address. You can attach a reserve IP address as add-on IP with a resource, which is going to associate with the resource’s primary network interface and work as an additional IP address. Kindly note that resource’s primary public IPv4 static address will not be released back into E2E Networks’s pool of public IPv4 addresses after attaching additional addon Reserve IP.
You can also use a reserved IP address as the primary public IP address of a resource while creating a new Node/ Load Balancer.
Note
You will get a random static primary public IP for the newly created resource if you have not assigned a reserved IP as a primary public IP while creating a resource (node or load balancer).
There is an option available to change the default primary public IPv4 static address, which will work as the resource’s primary network interface. Kindly note that resource’s default primary public IPv4 address will be released back into E2E Networks’s pool of public IPv4 addresses when detached without reserving it.
You have the flexibility of detaching a Reserve IP address from a resource which is either used as add-on IP or primary public IP address of a resource and you can re-attach it to a different resource. The detached reserve IP address will remain reserved for your MyAccount until you explicitly release it.
Whenever you Reserve an IP address it will be billed at ₹199 (excluding GST) per calendar month whether it’s in use or not. If you are a prepaid customer, infra credits will be deducted as soon as an IP address is reserved. If you are a postpaid customer, the relevant charges will be added to your monthly invoice
To ensure efficient use of Reserve IP addresses, there is a default limit of reserve IP for your MyAccount. If your use case requires more IP, you may request for Increase IP Limit.
Navigate to Manage Reserve IP page
Please go to ‘My Account’ and log in using your credentials set up at the time of creating and activating the E2E Networks ‘My Account’.
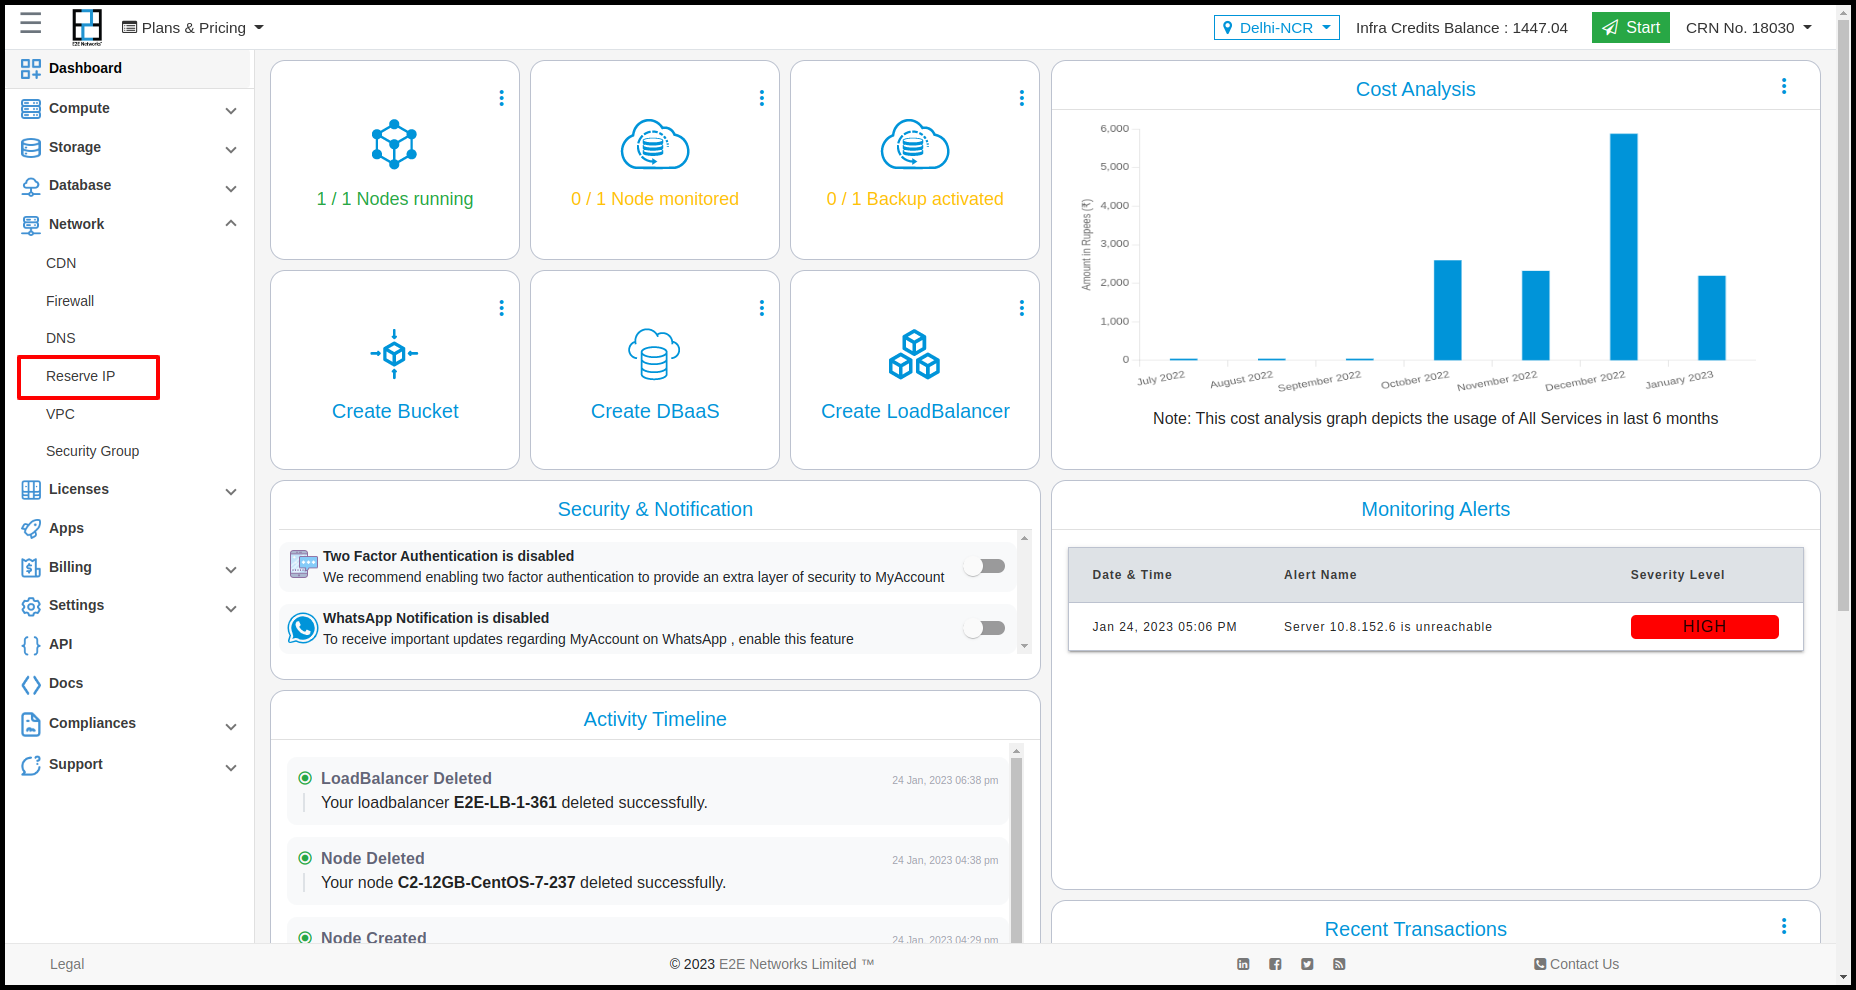
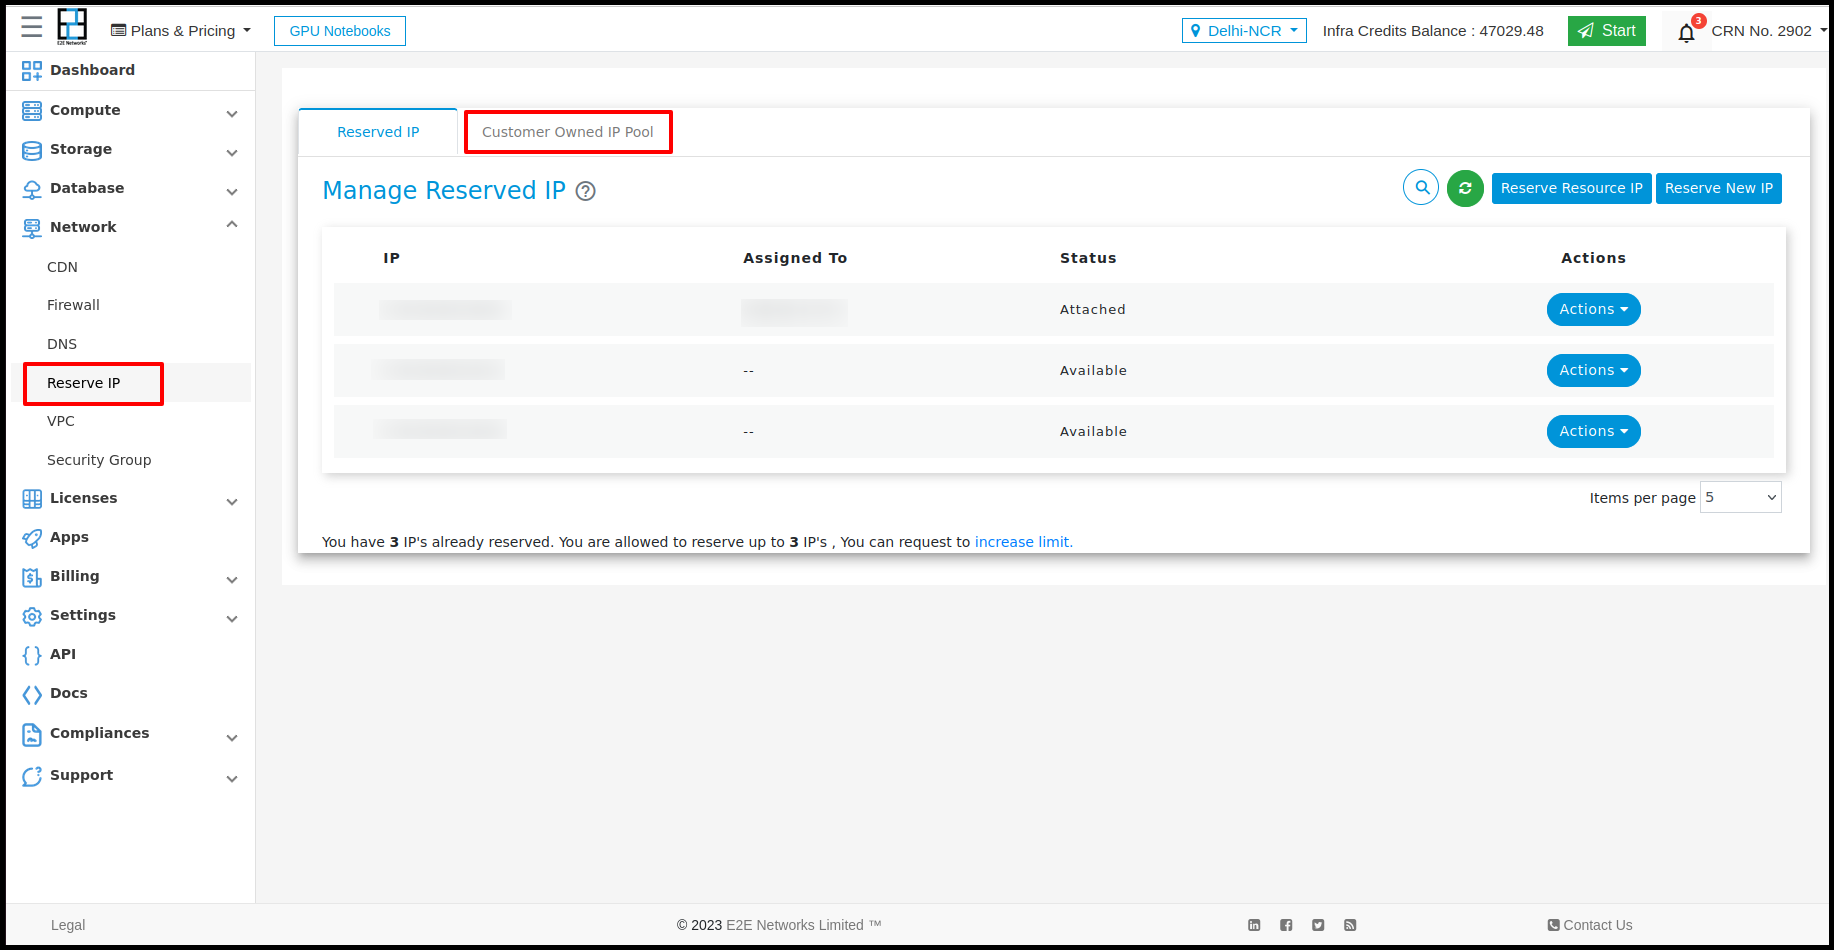
After you log in to the E2E Networks ‘My Account’, On the left side of the MyAccount dashboard, click on the “Reserved IP” sub-menu available under the Networking section.
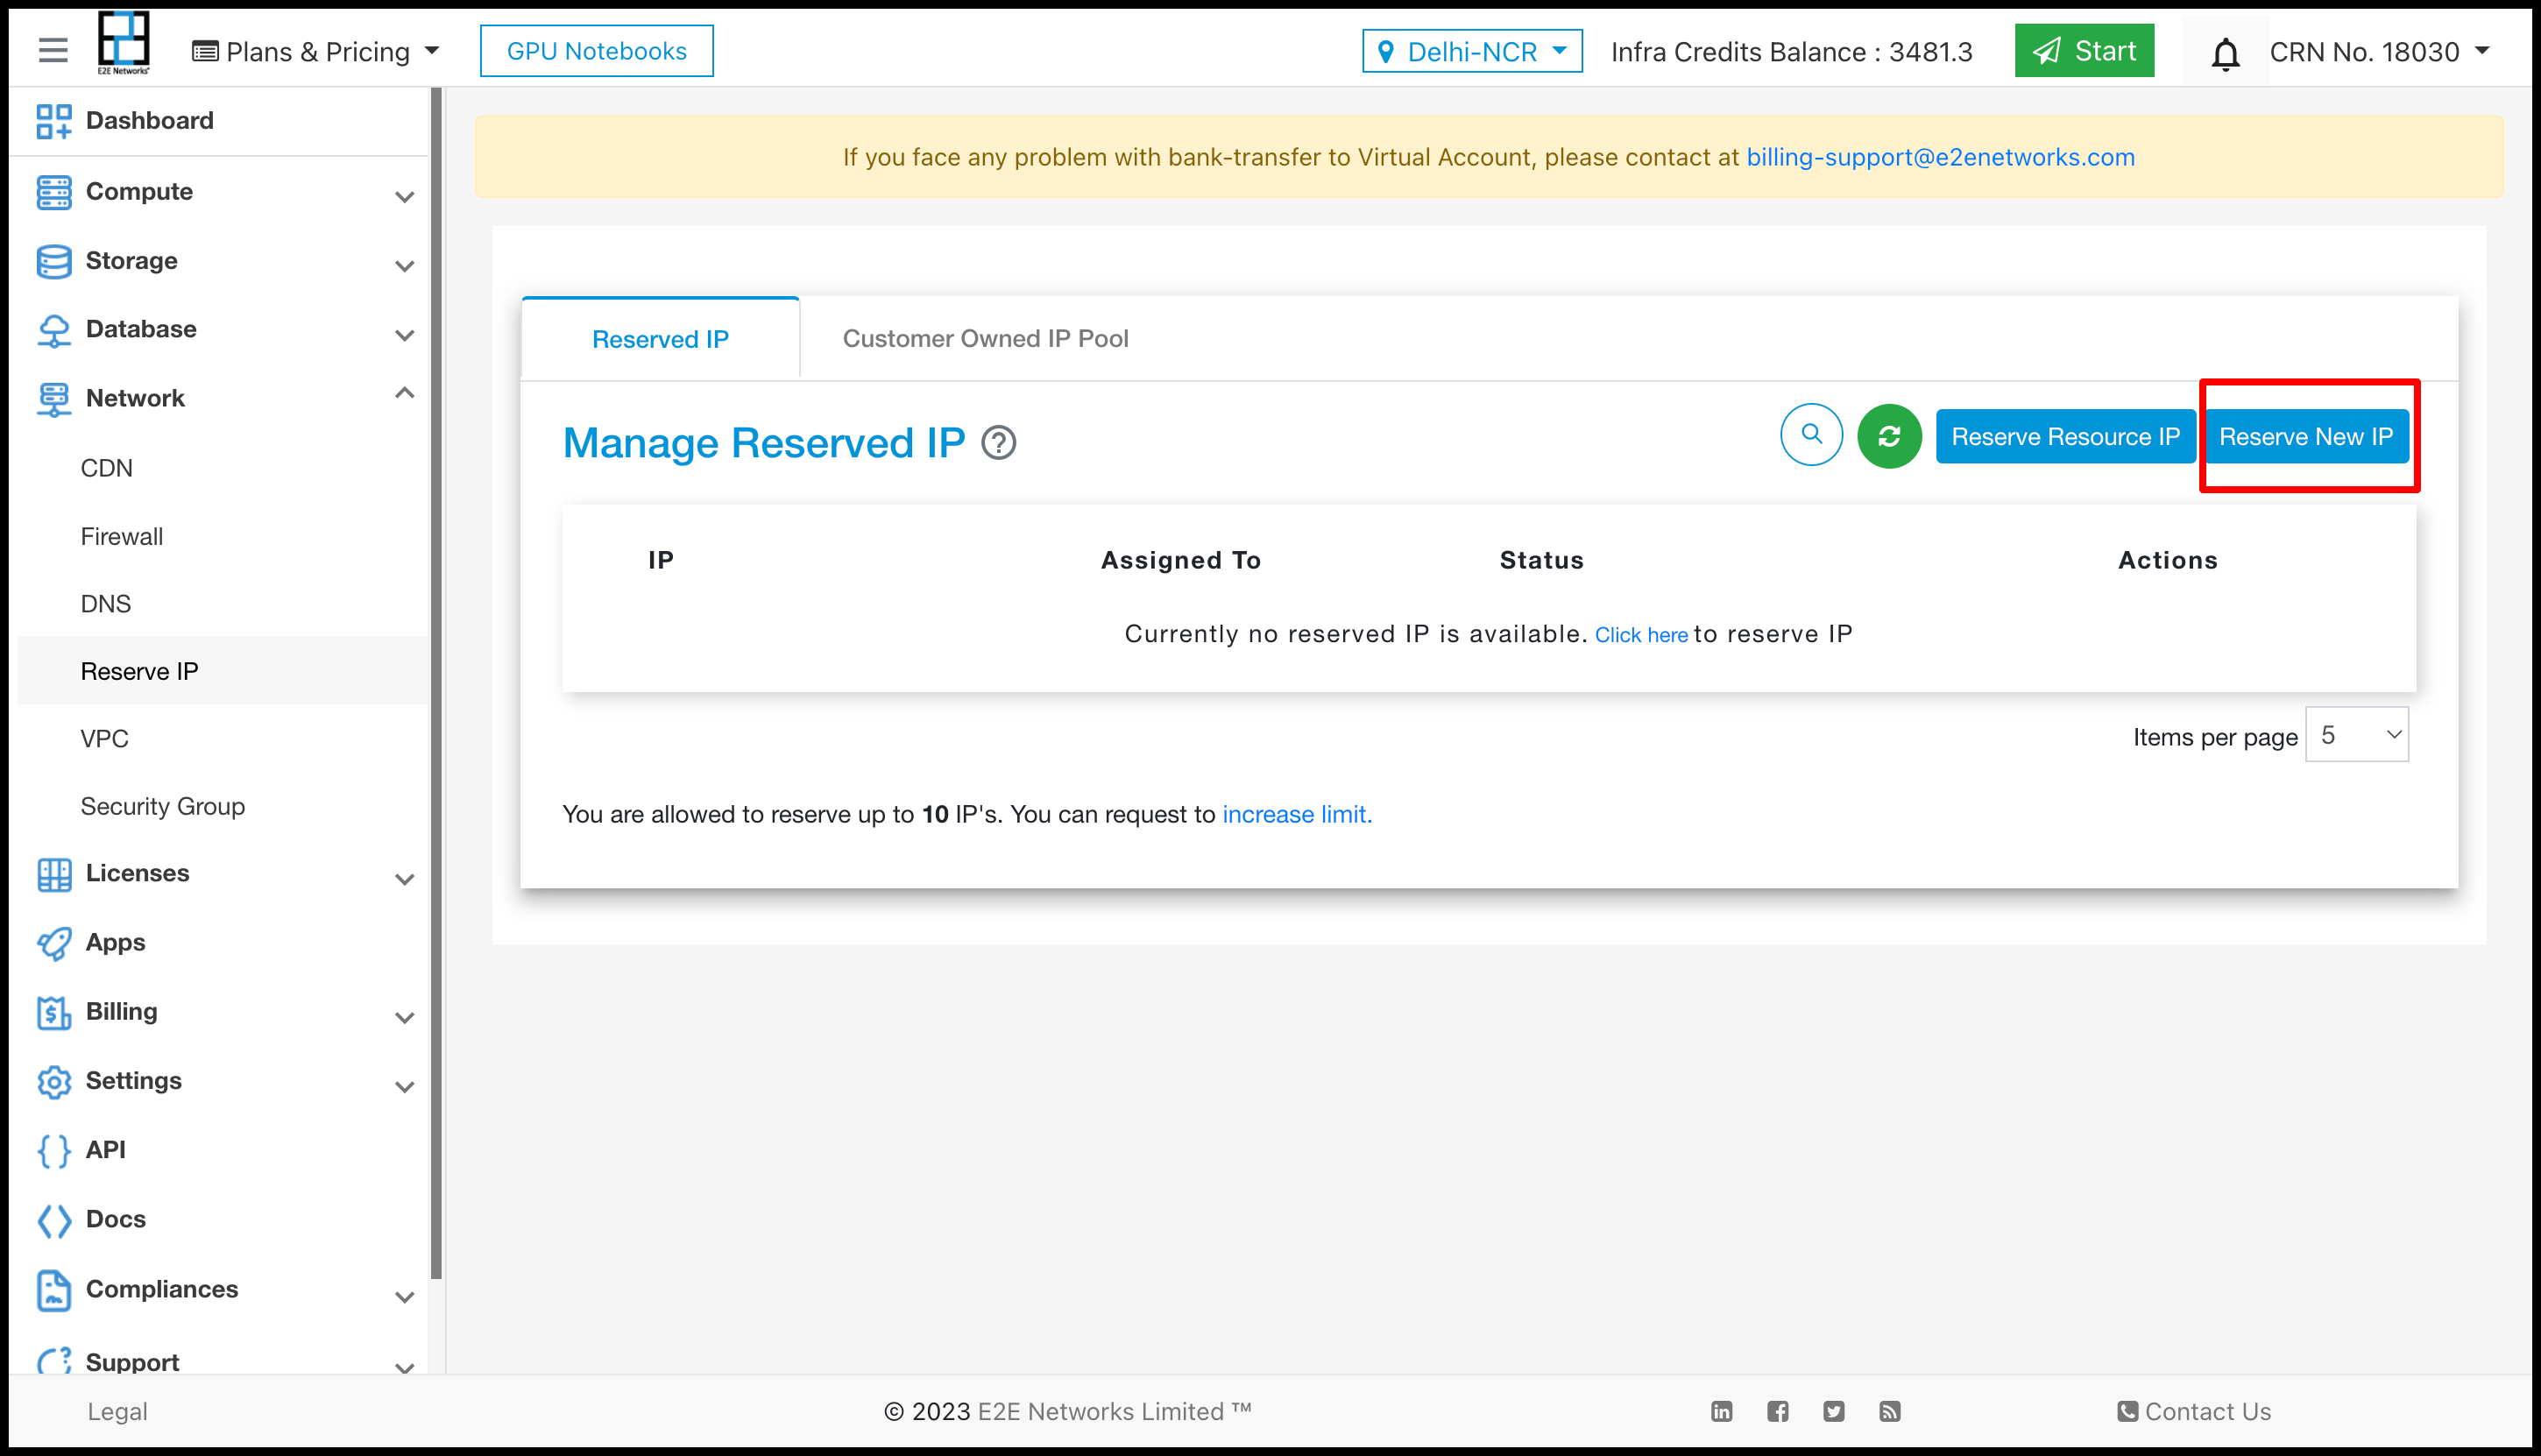
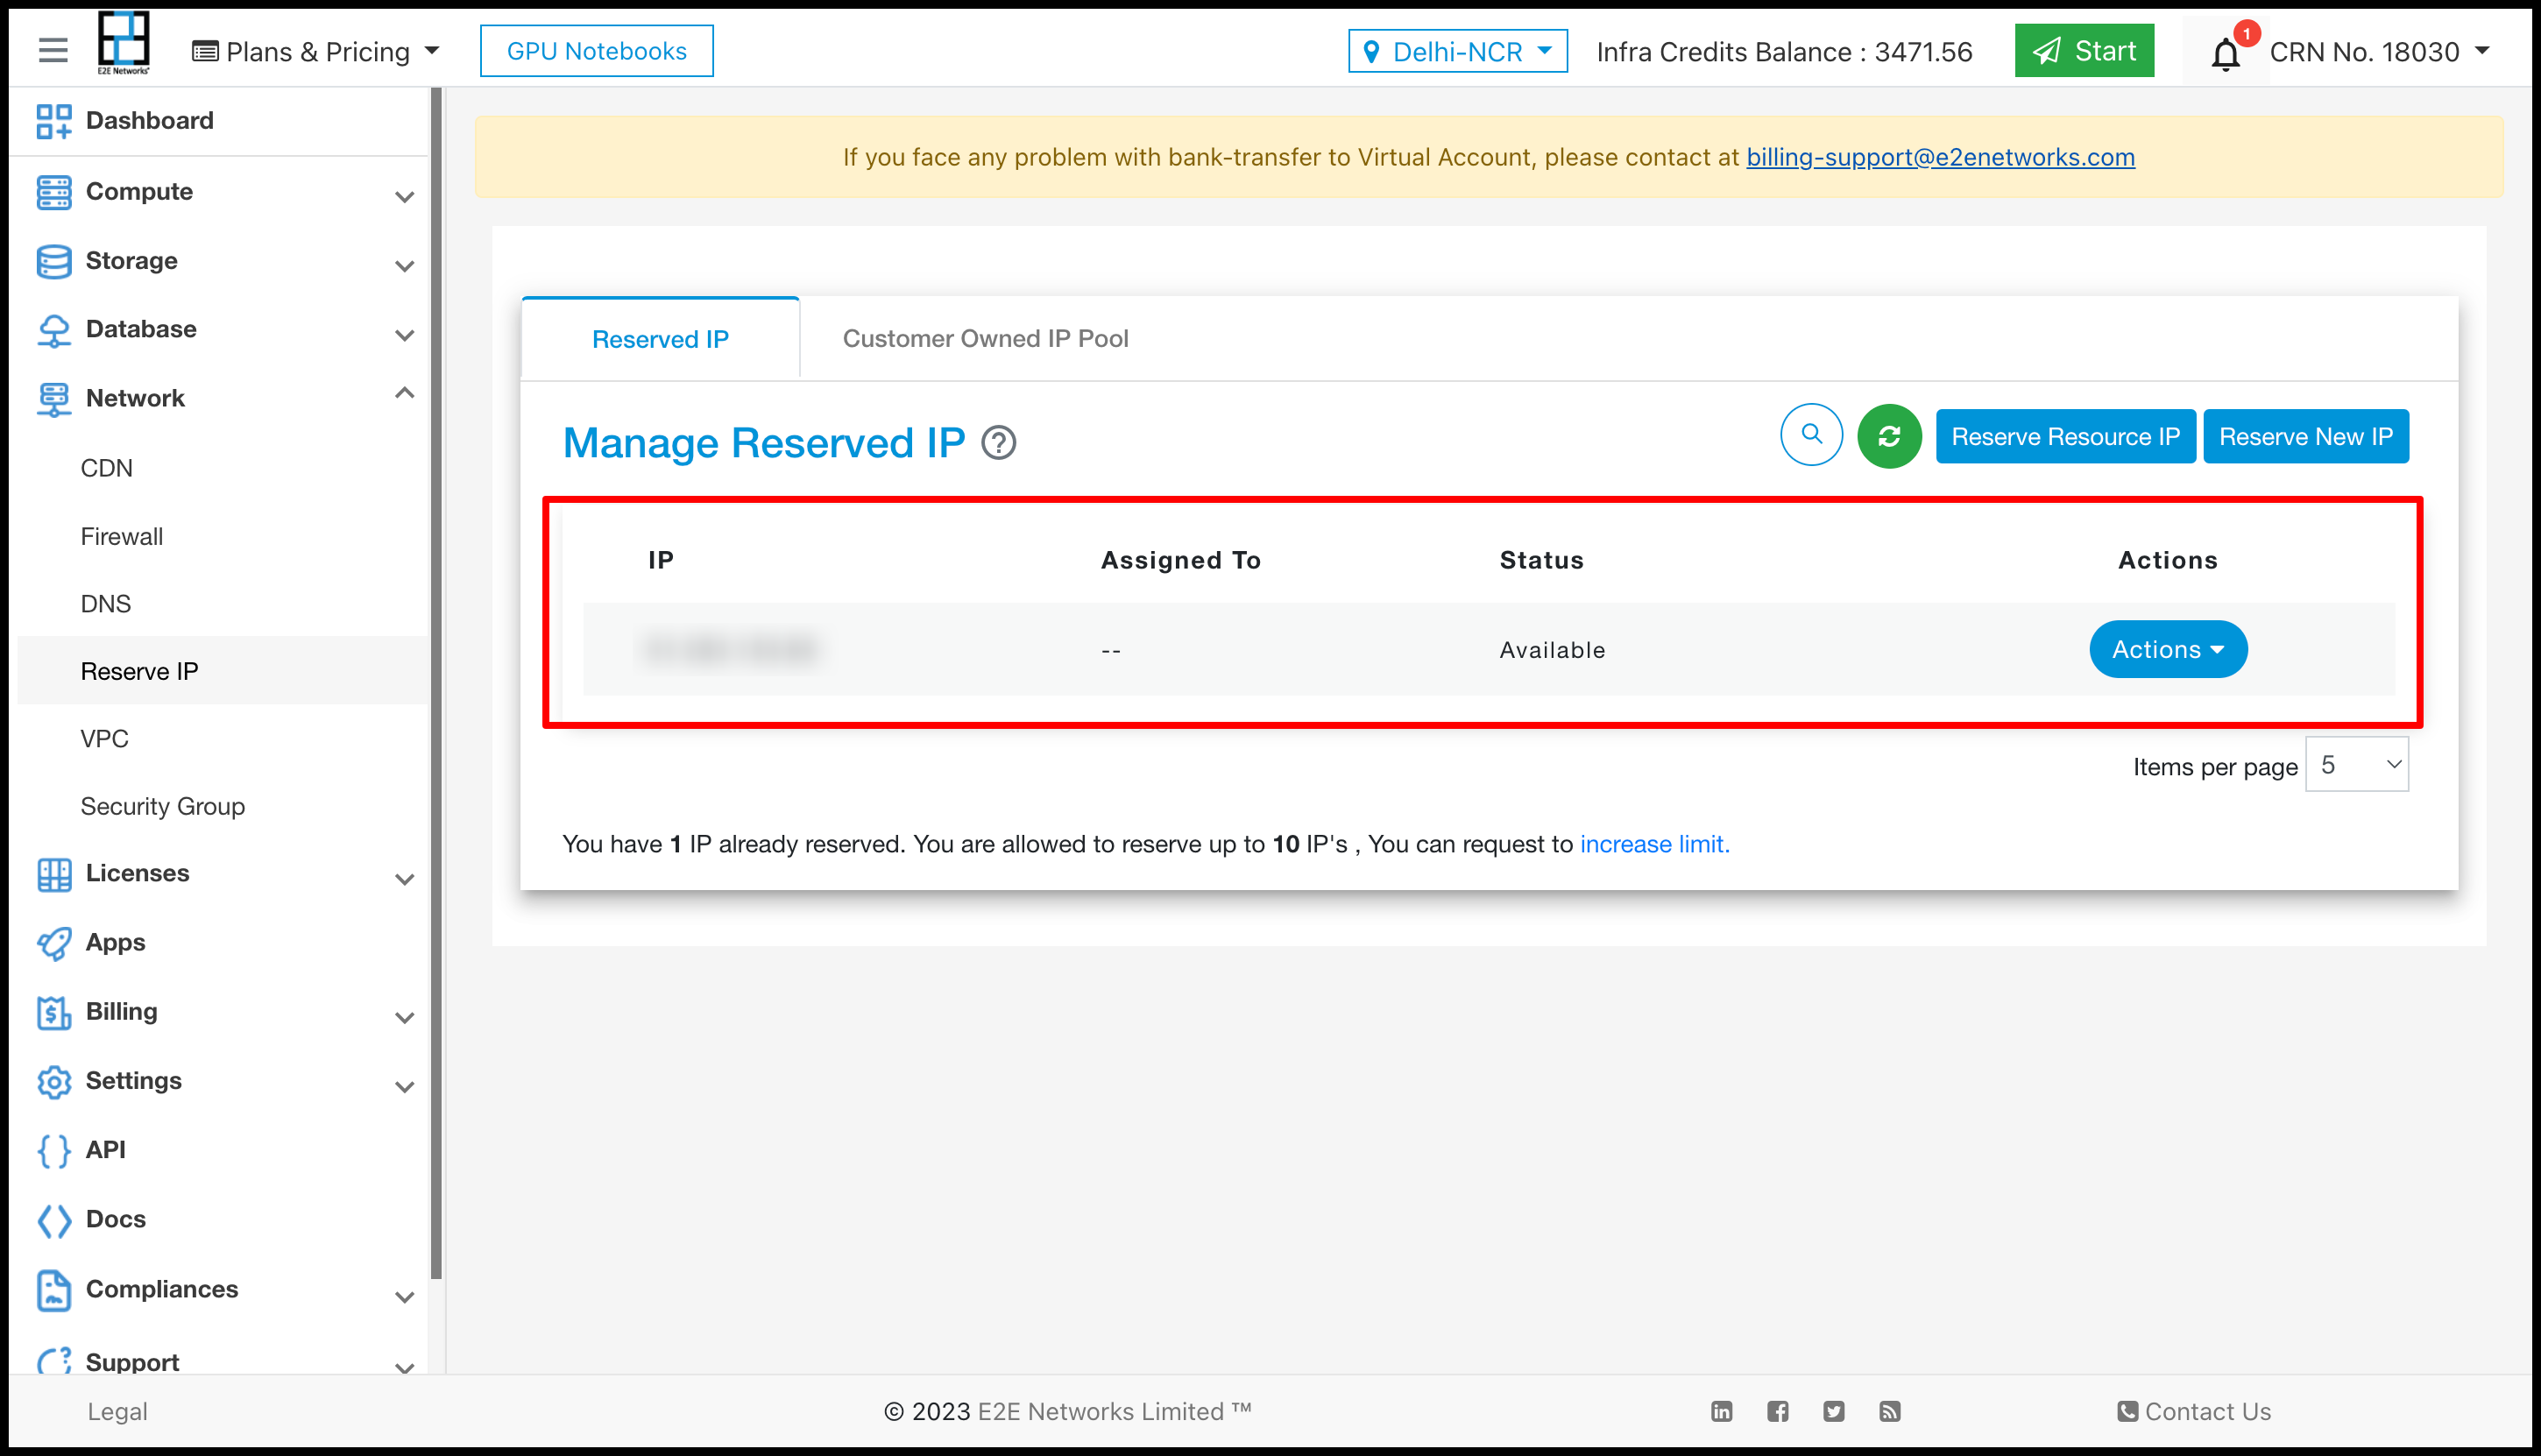
You will be directed to the ‘Manage Reserved IP’ page.
Working with Reserve IP addresses
The following sections describe how you can use Reserve IP addresses.
Reserve a New IP address - Click on the ‘+ Reserve New IP’ button to reserve a new public IP from the IP address pool for your MyAccount. The ‘Reserve New IP’ pop-up window will appear.
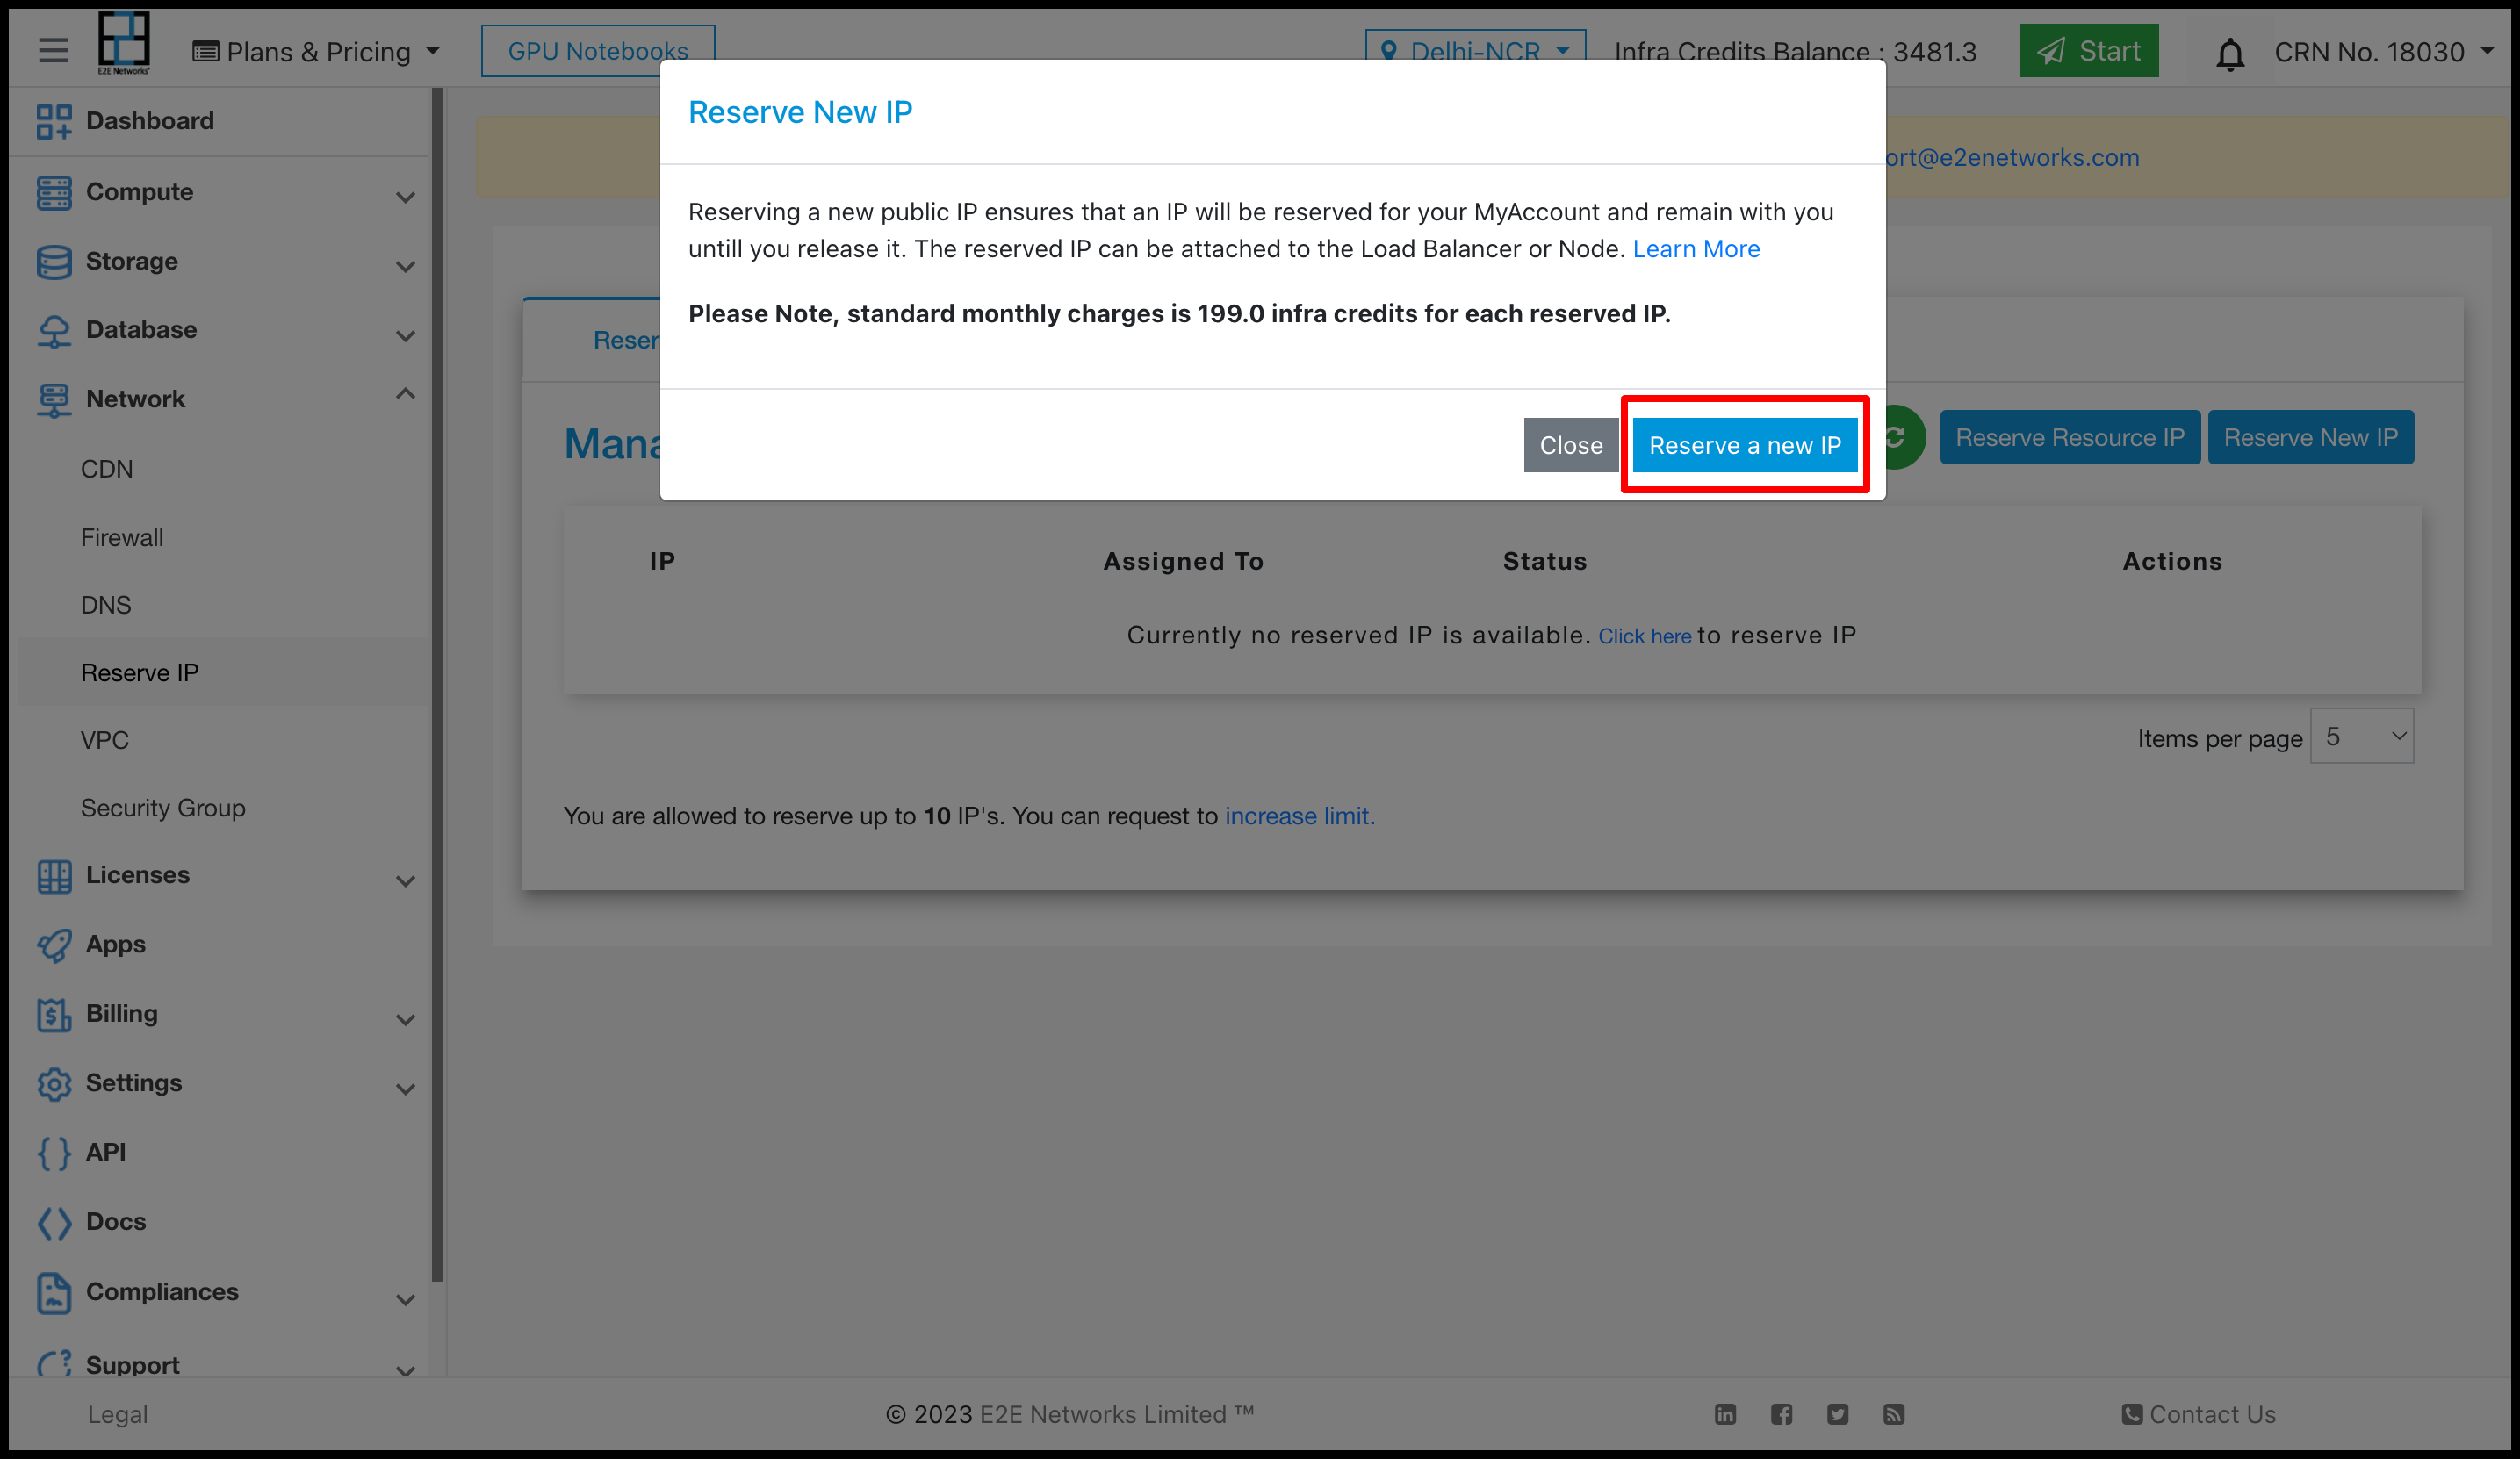
Again, click-on “Reserve a new IP” button after reading the information on the pop-up box.
The new Reserve IP will be listed in the table of the Manage Reserved IP page. This new Reserve IP status will be ‘Available’ because it’s not attached to any resource.
Reserve Resource’s Public IP
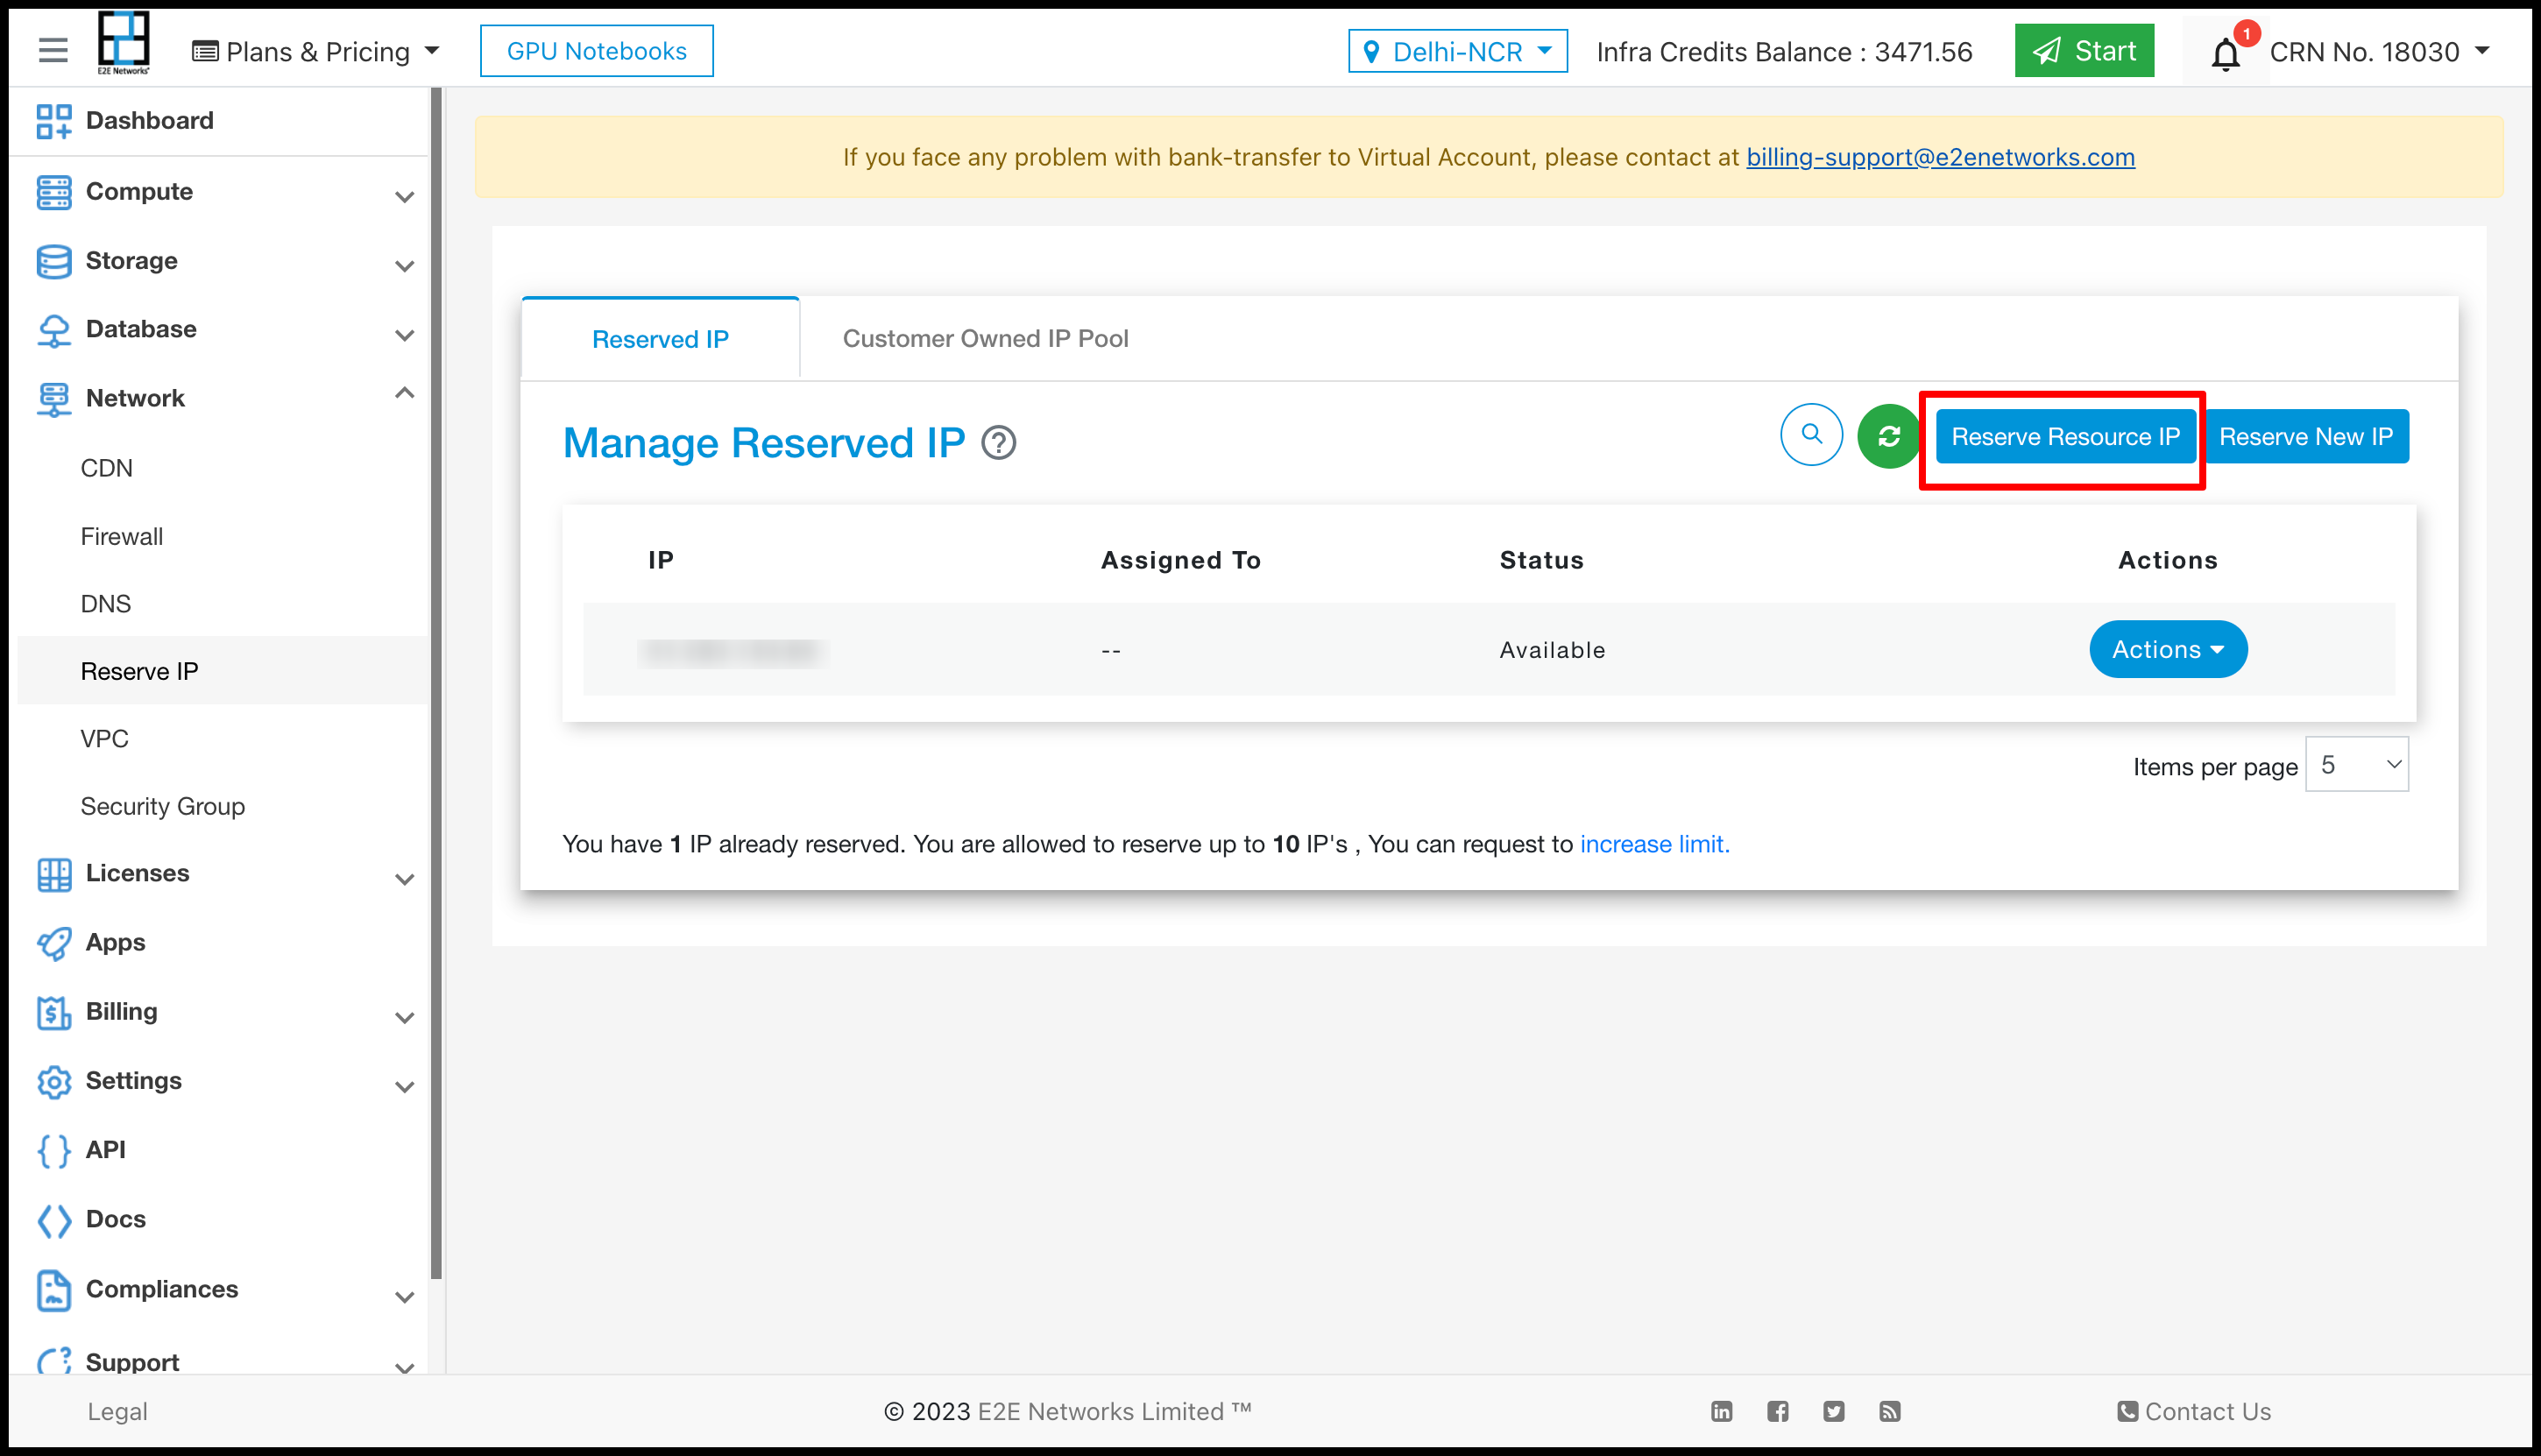
Click on the ‘Reserve Resource IP’ button to reserve the primary public IP address of your resources (any nodes or load balancer instance). The ‘Reserve Resource IP’ pop-up window will appear.
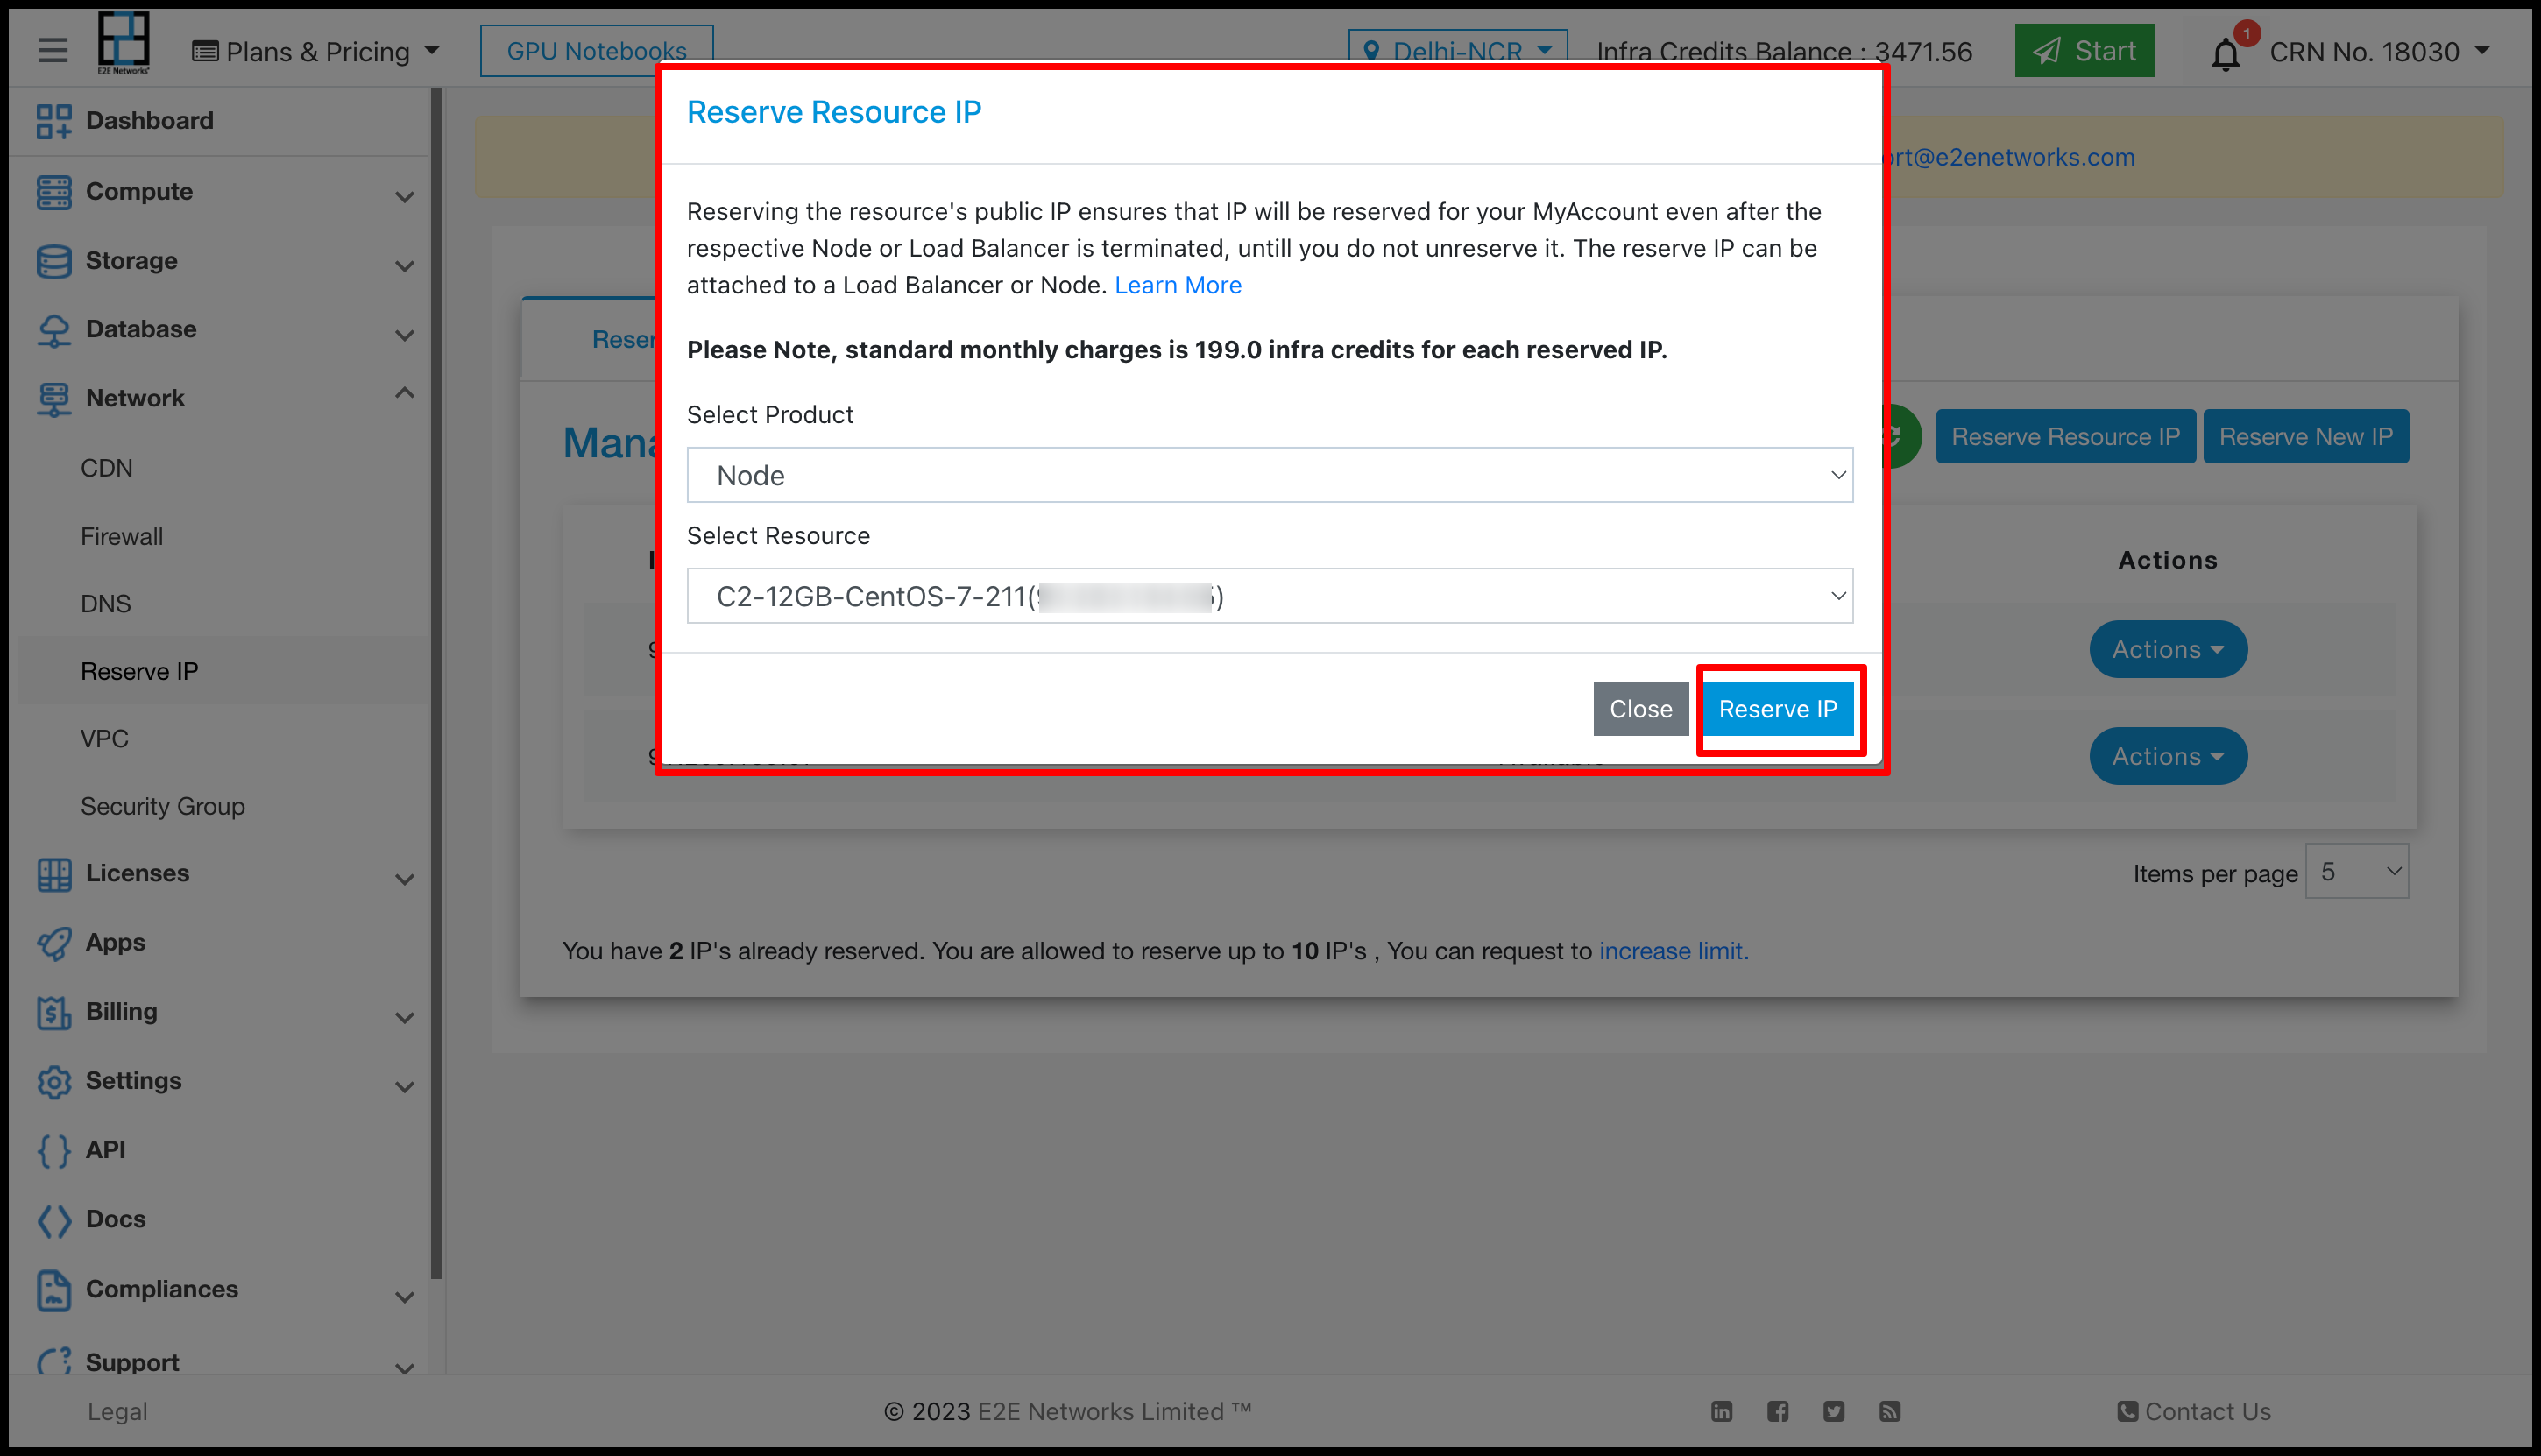
In the ‘Select Product’ fields drop-down list please select the product type. Currently node and load balancer IPs can be reserved.
After selecting the product, please select the resource from the ‘Select Resource’ drop-down list.
Then, click on the “Reserve IP” button after reading the information on the pop-up window.
The public IP of the resource will be reserved now and it will be listed in the table along with Reserve IP’s ‘Status’ & ‘Assigned to’ information.
The status will be ‘Unavailable’ which means that IP is already attached to an existing resource. When the status is ‘Unavailable’ you cannot attach this Reserve IP to another resource unless it is detached from the resource or the resource to which the Reserve IP originally belongs is terminated.

Attach Reserve IP as an Addon IP
You can attach a Reserve IP as an addon IP to either a load balancer or a node. For this, click on the Actions button and select the ‘Attach IP’.
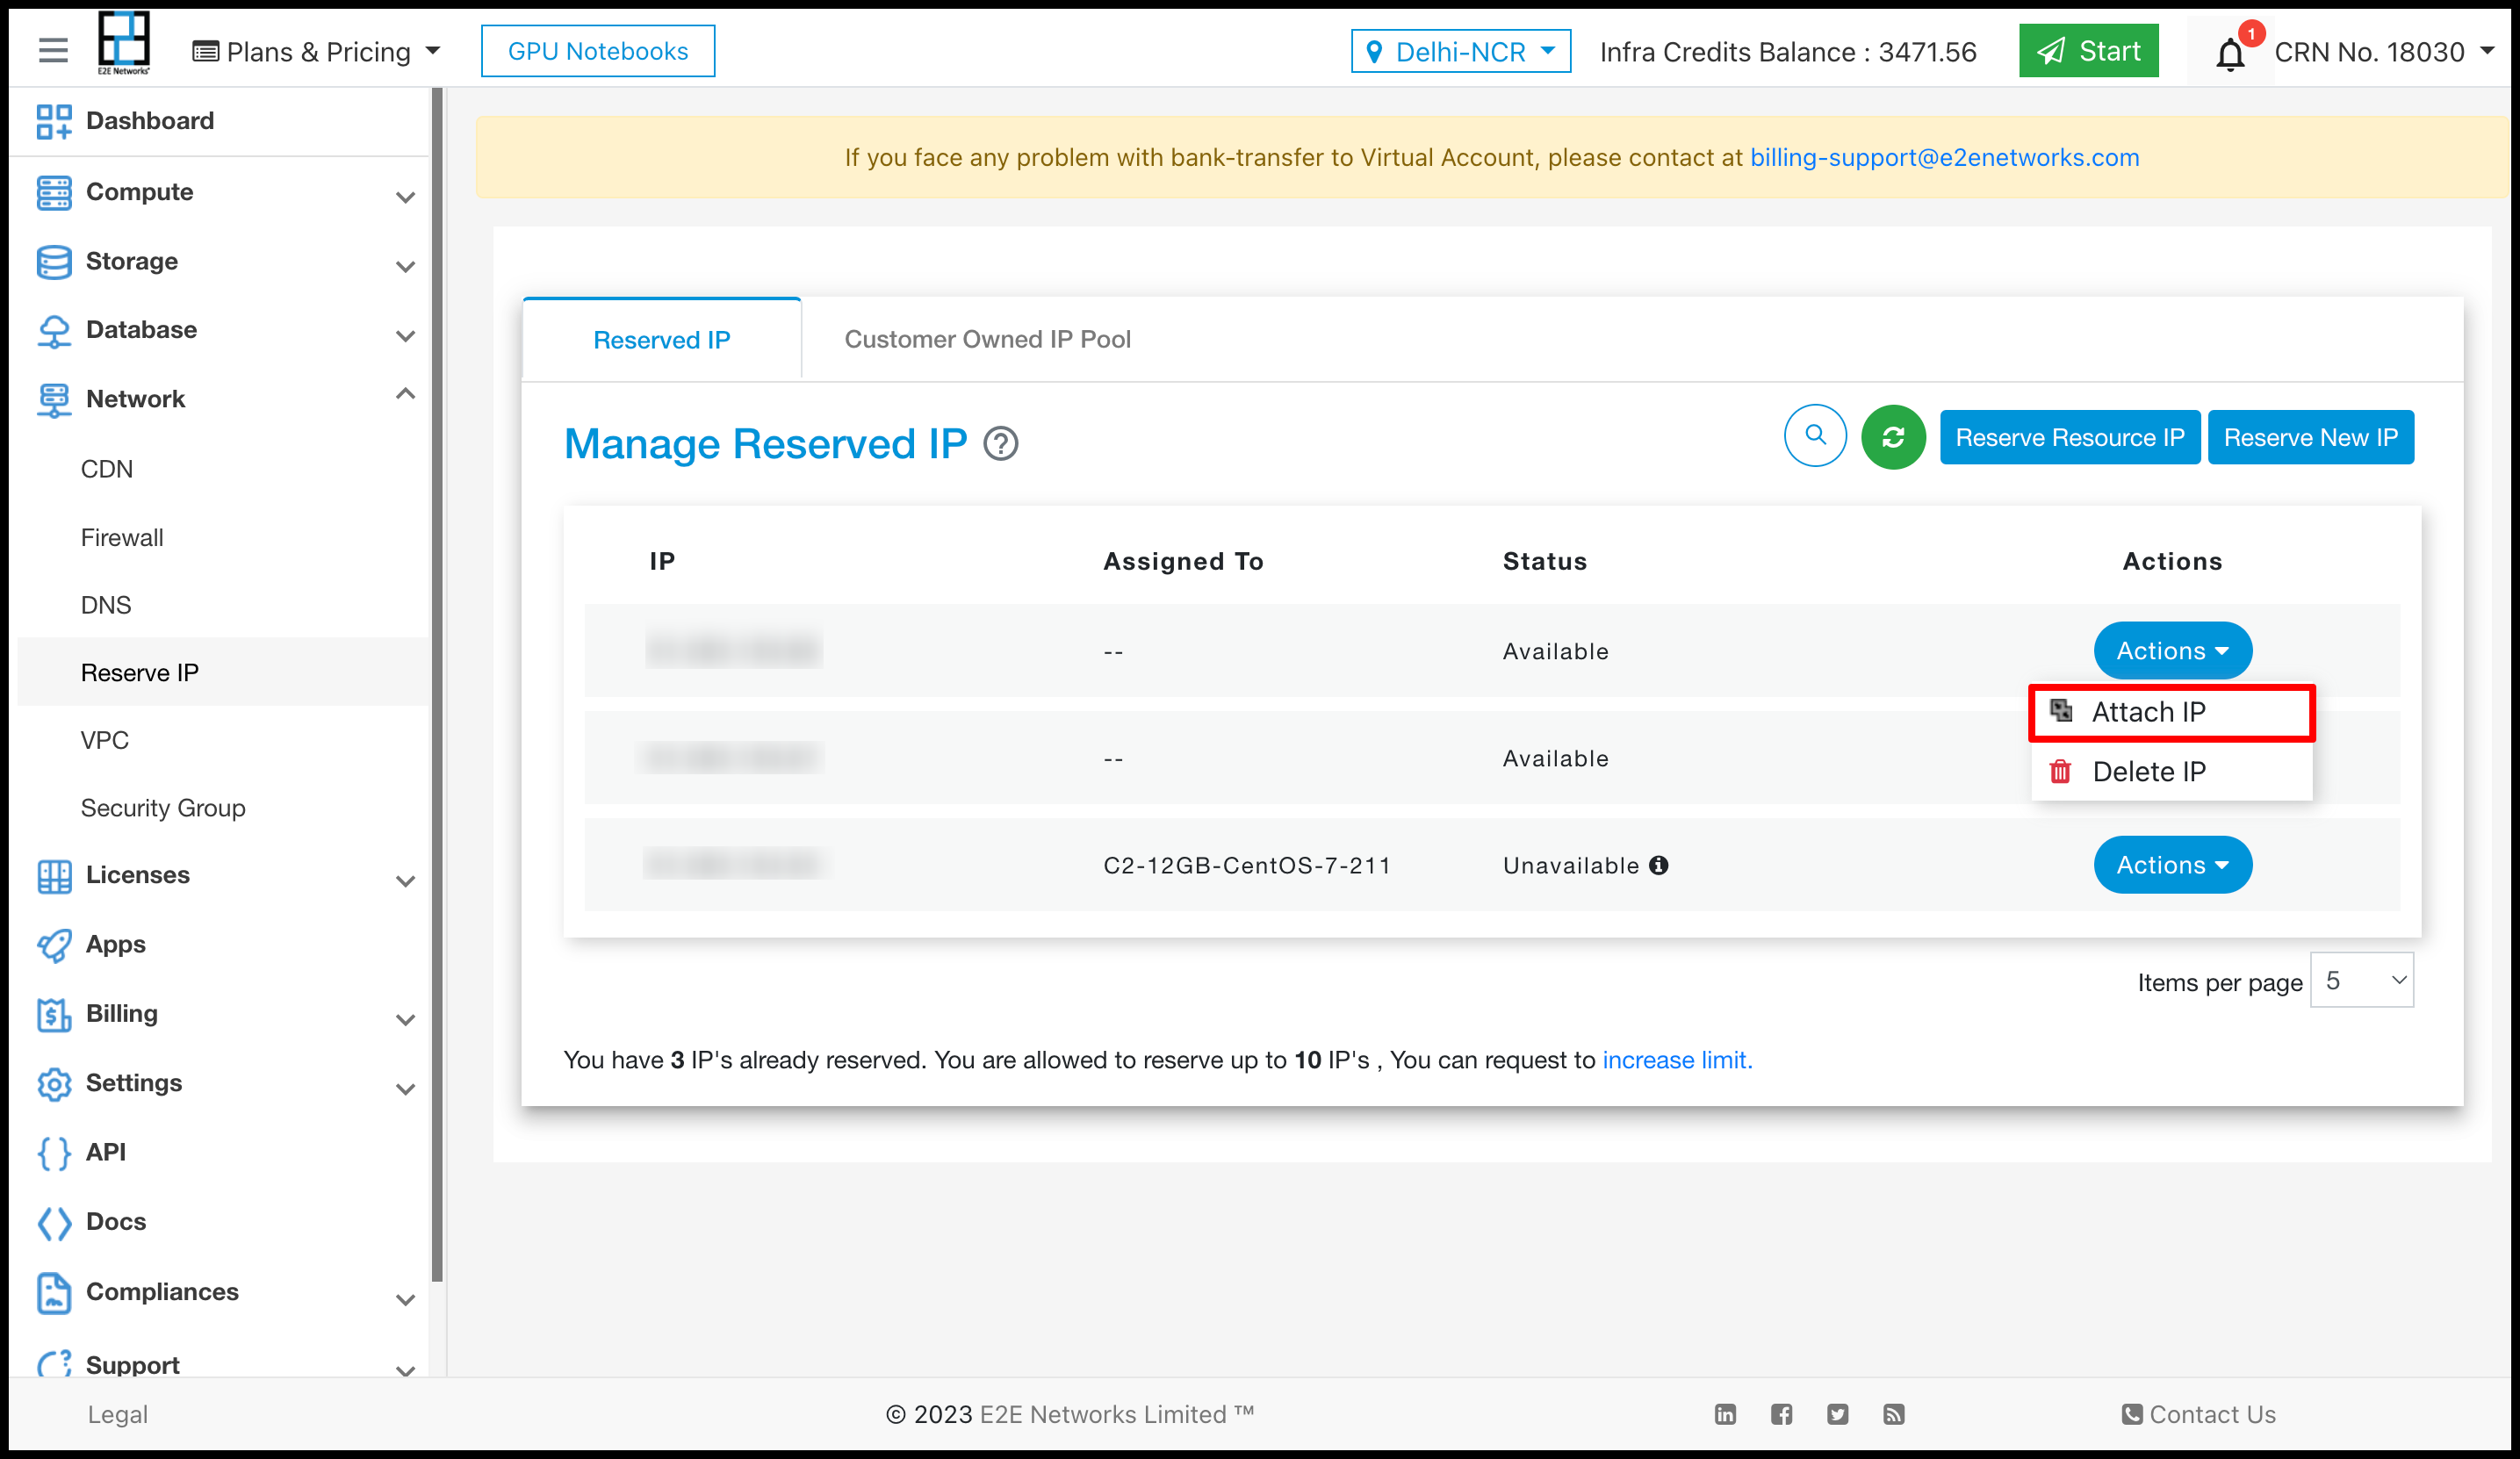
Note
You are not allowed to perform an ‘Attach IP’ action when the Reserve IP status is ‘Unavailable’ or ‘Attached’ because it’s already associated with another resource.
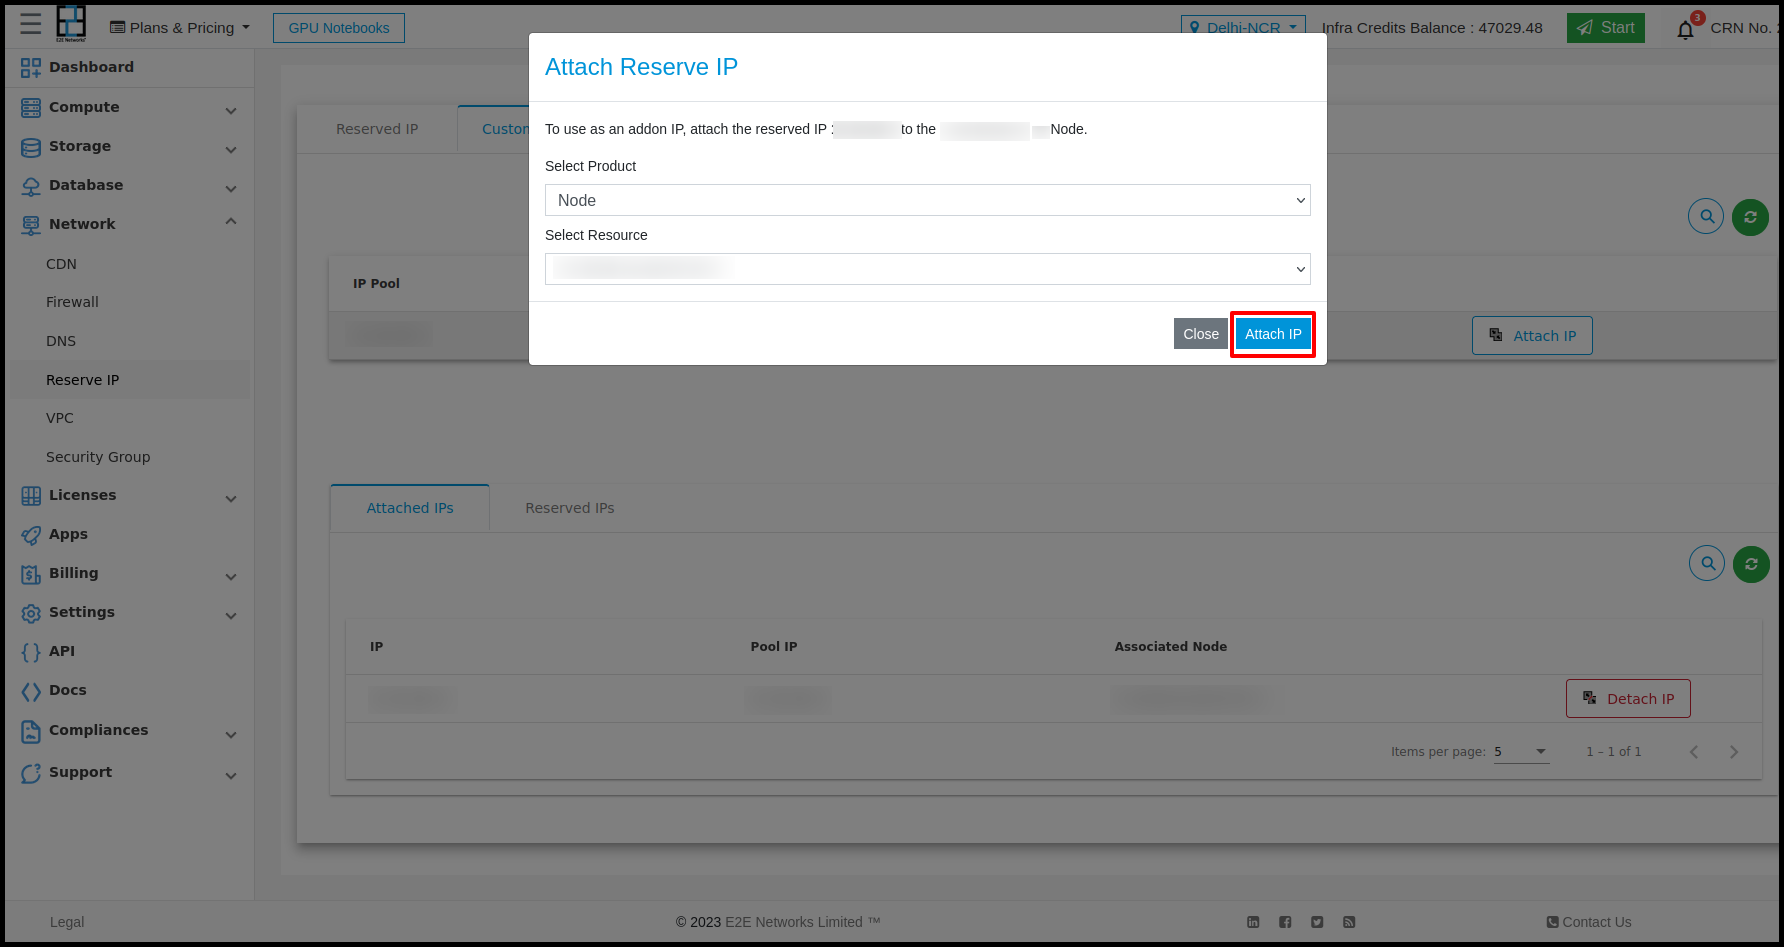
The ‘Attach Resource IP’ pop-up window will appear.
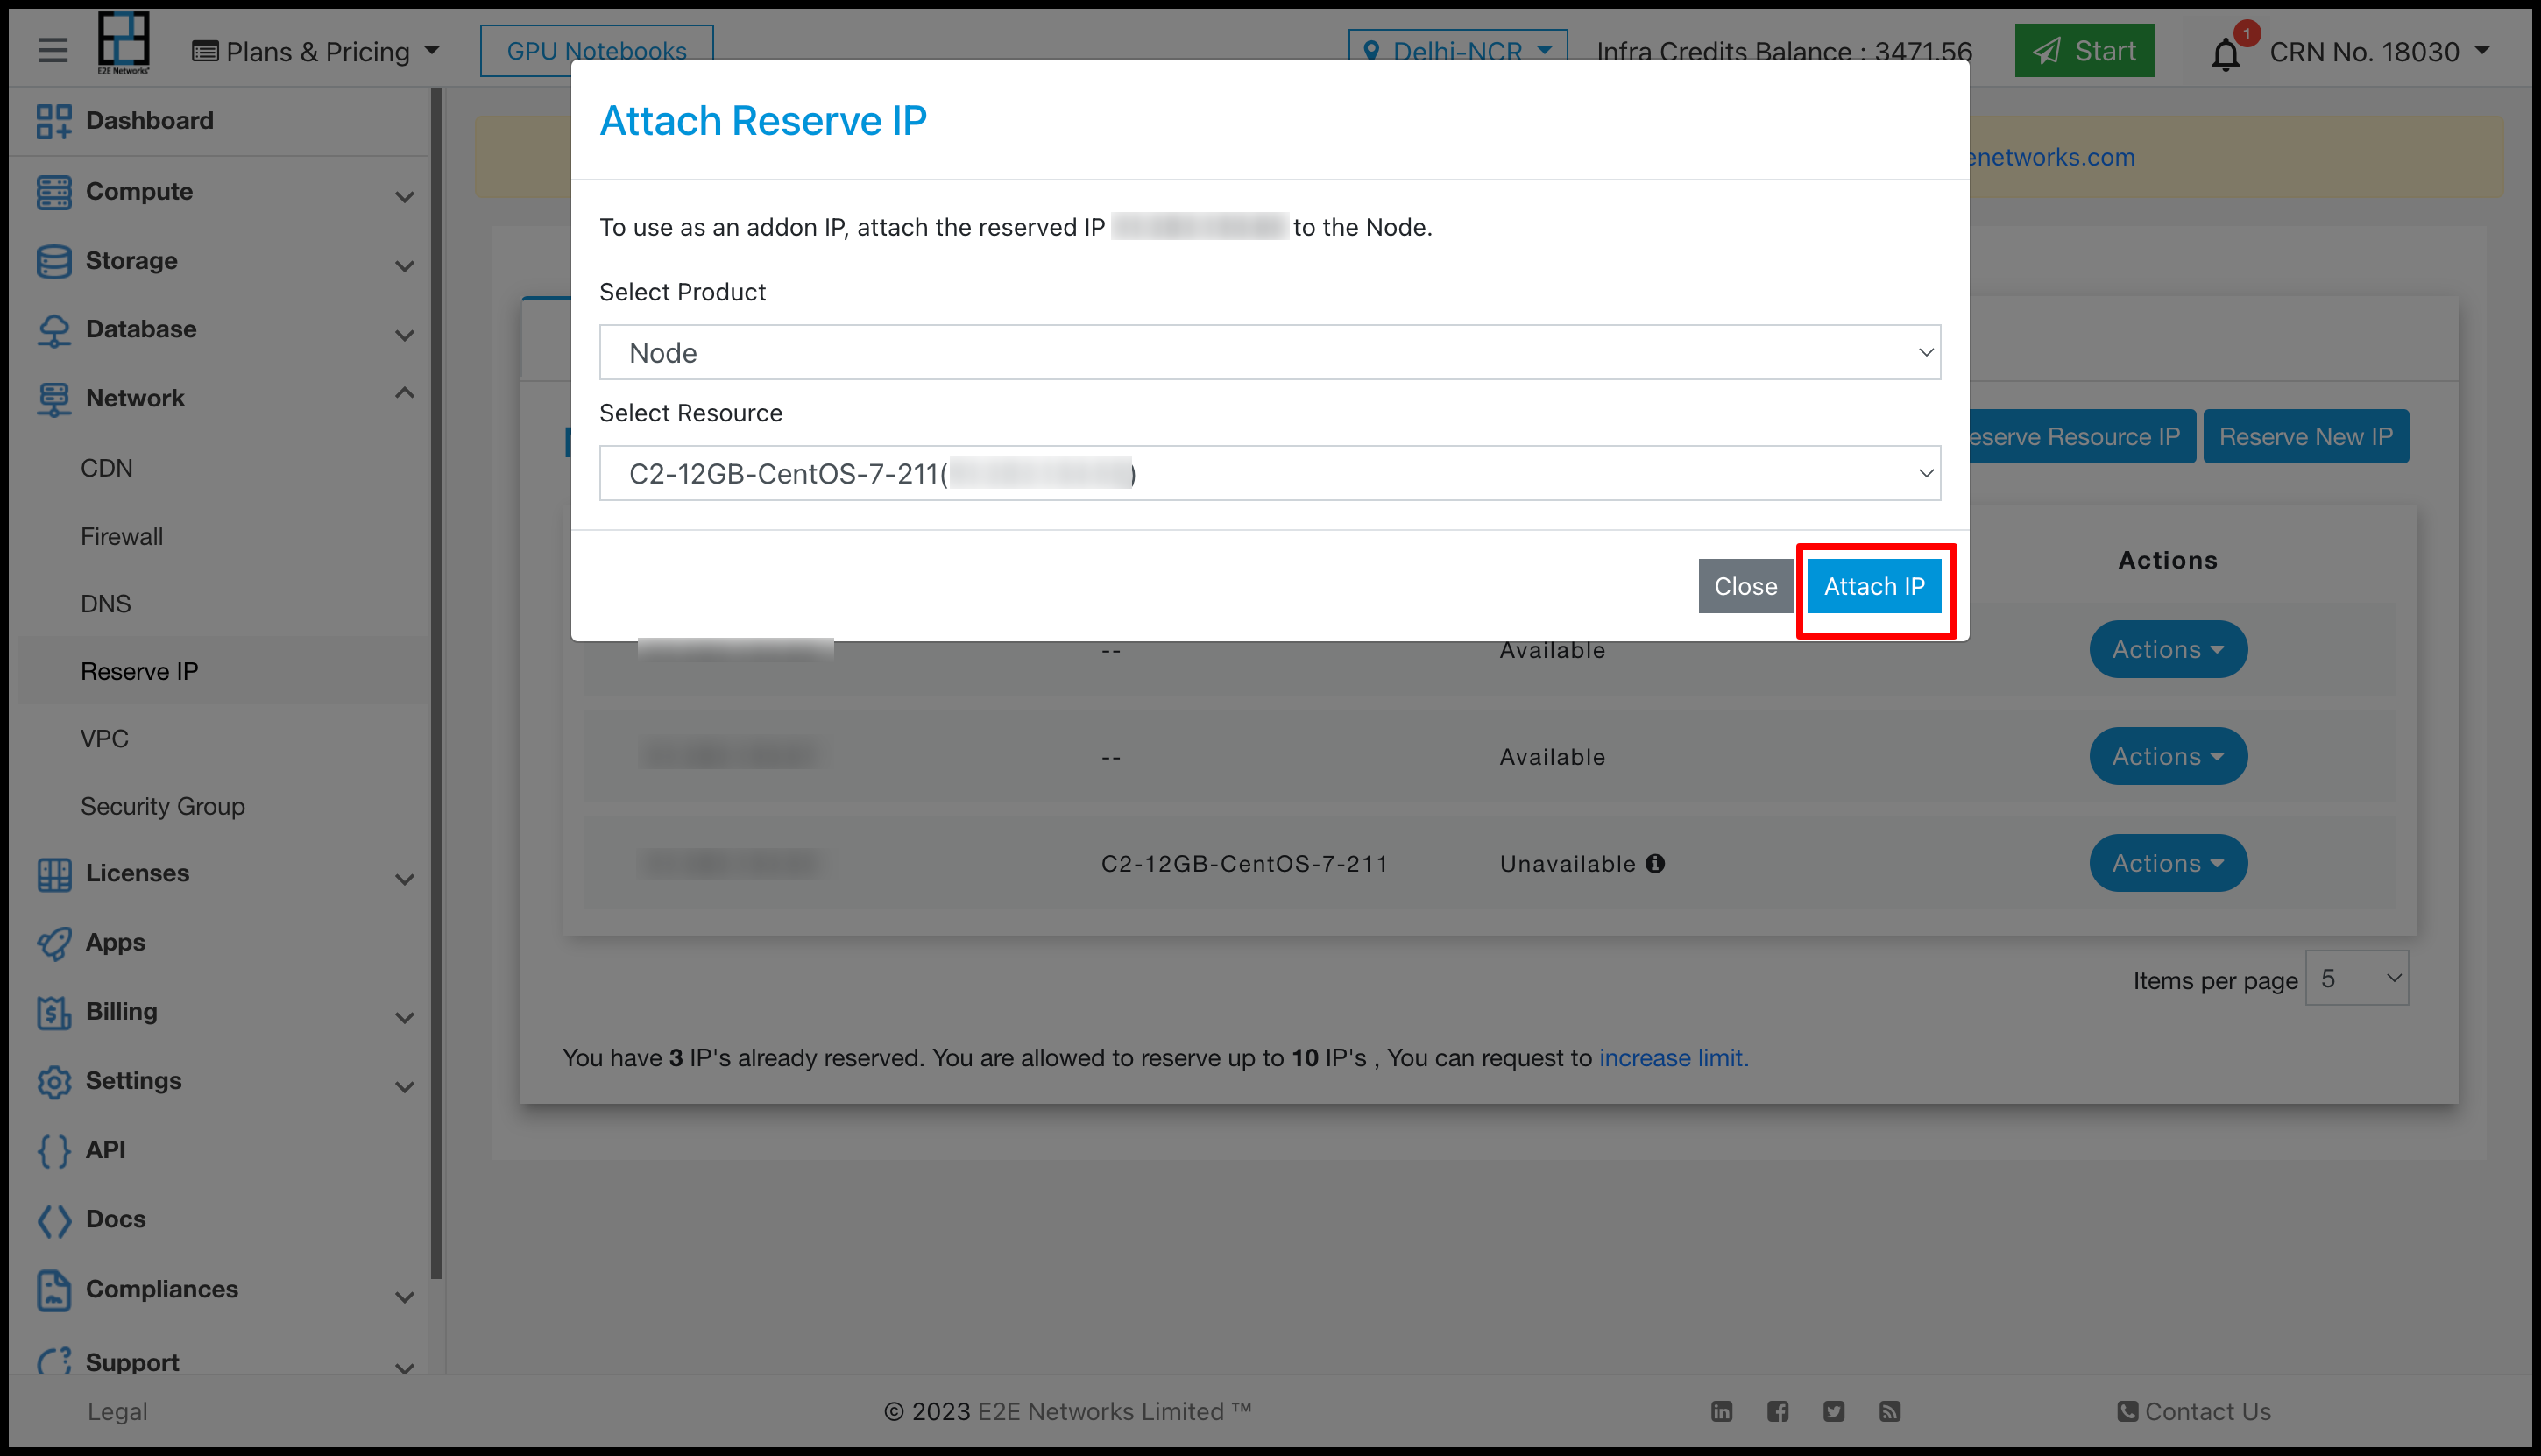
From the ‘Select Product’ drop-down list please select the product type to attach the reserved IP.
After selecting the product, from the ‘Select Resource’ drop-down list, please select the resource.
Then, click on the “Attach IP” button after reading the information on the pop-up window.
After successfully assigning the Reserve IP to the respective resource, the reserved IP’s ‘Status’ & ‘Assigned to’ information will be updated in the table.
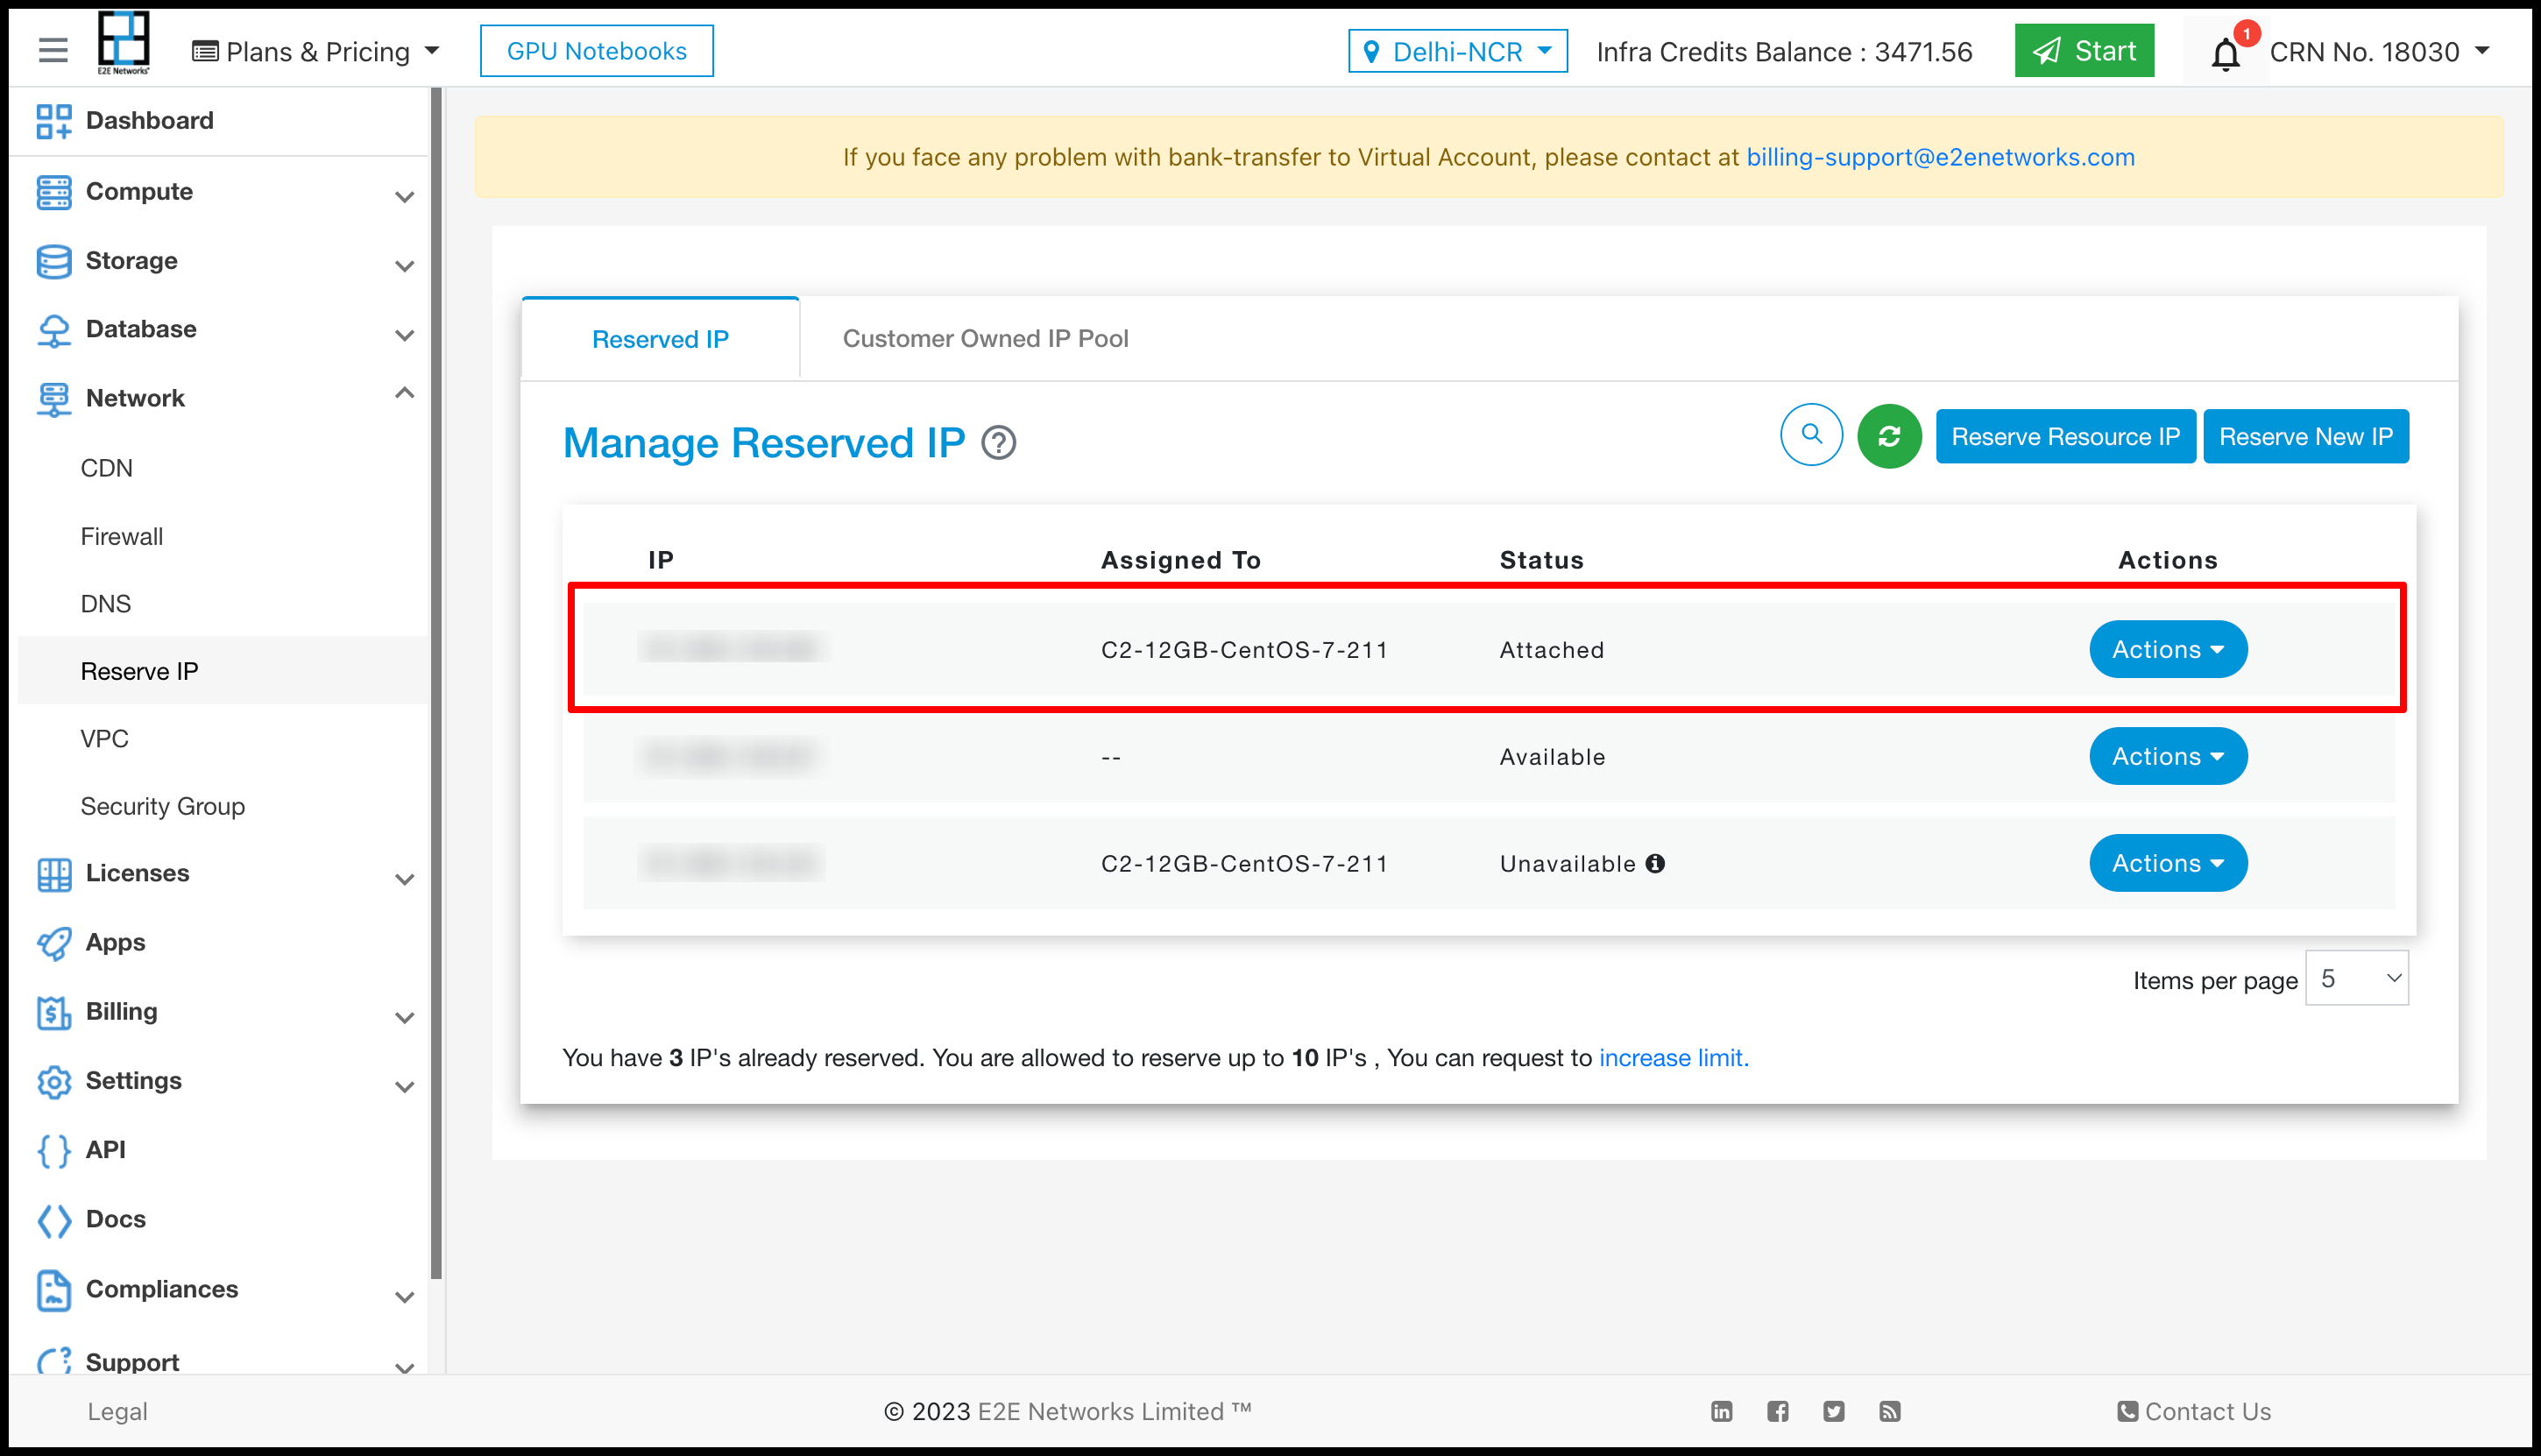
You can also check an addon IP information in the ‘Node details’ or ‘Load Balancer Details’ tabs.
Tip
You can attach multiple reserve IP’s to a resource as an addon IP. You can perform this action directly on the network tab of the node, or the load balancer detail tab.
Detach Addon Reserve IP
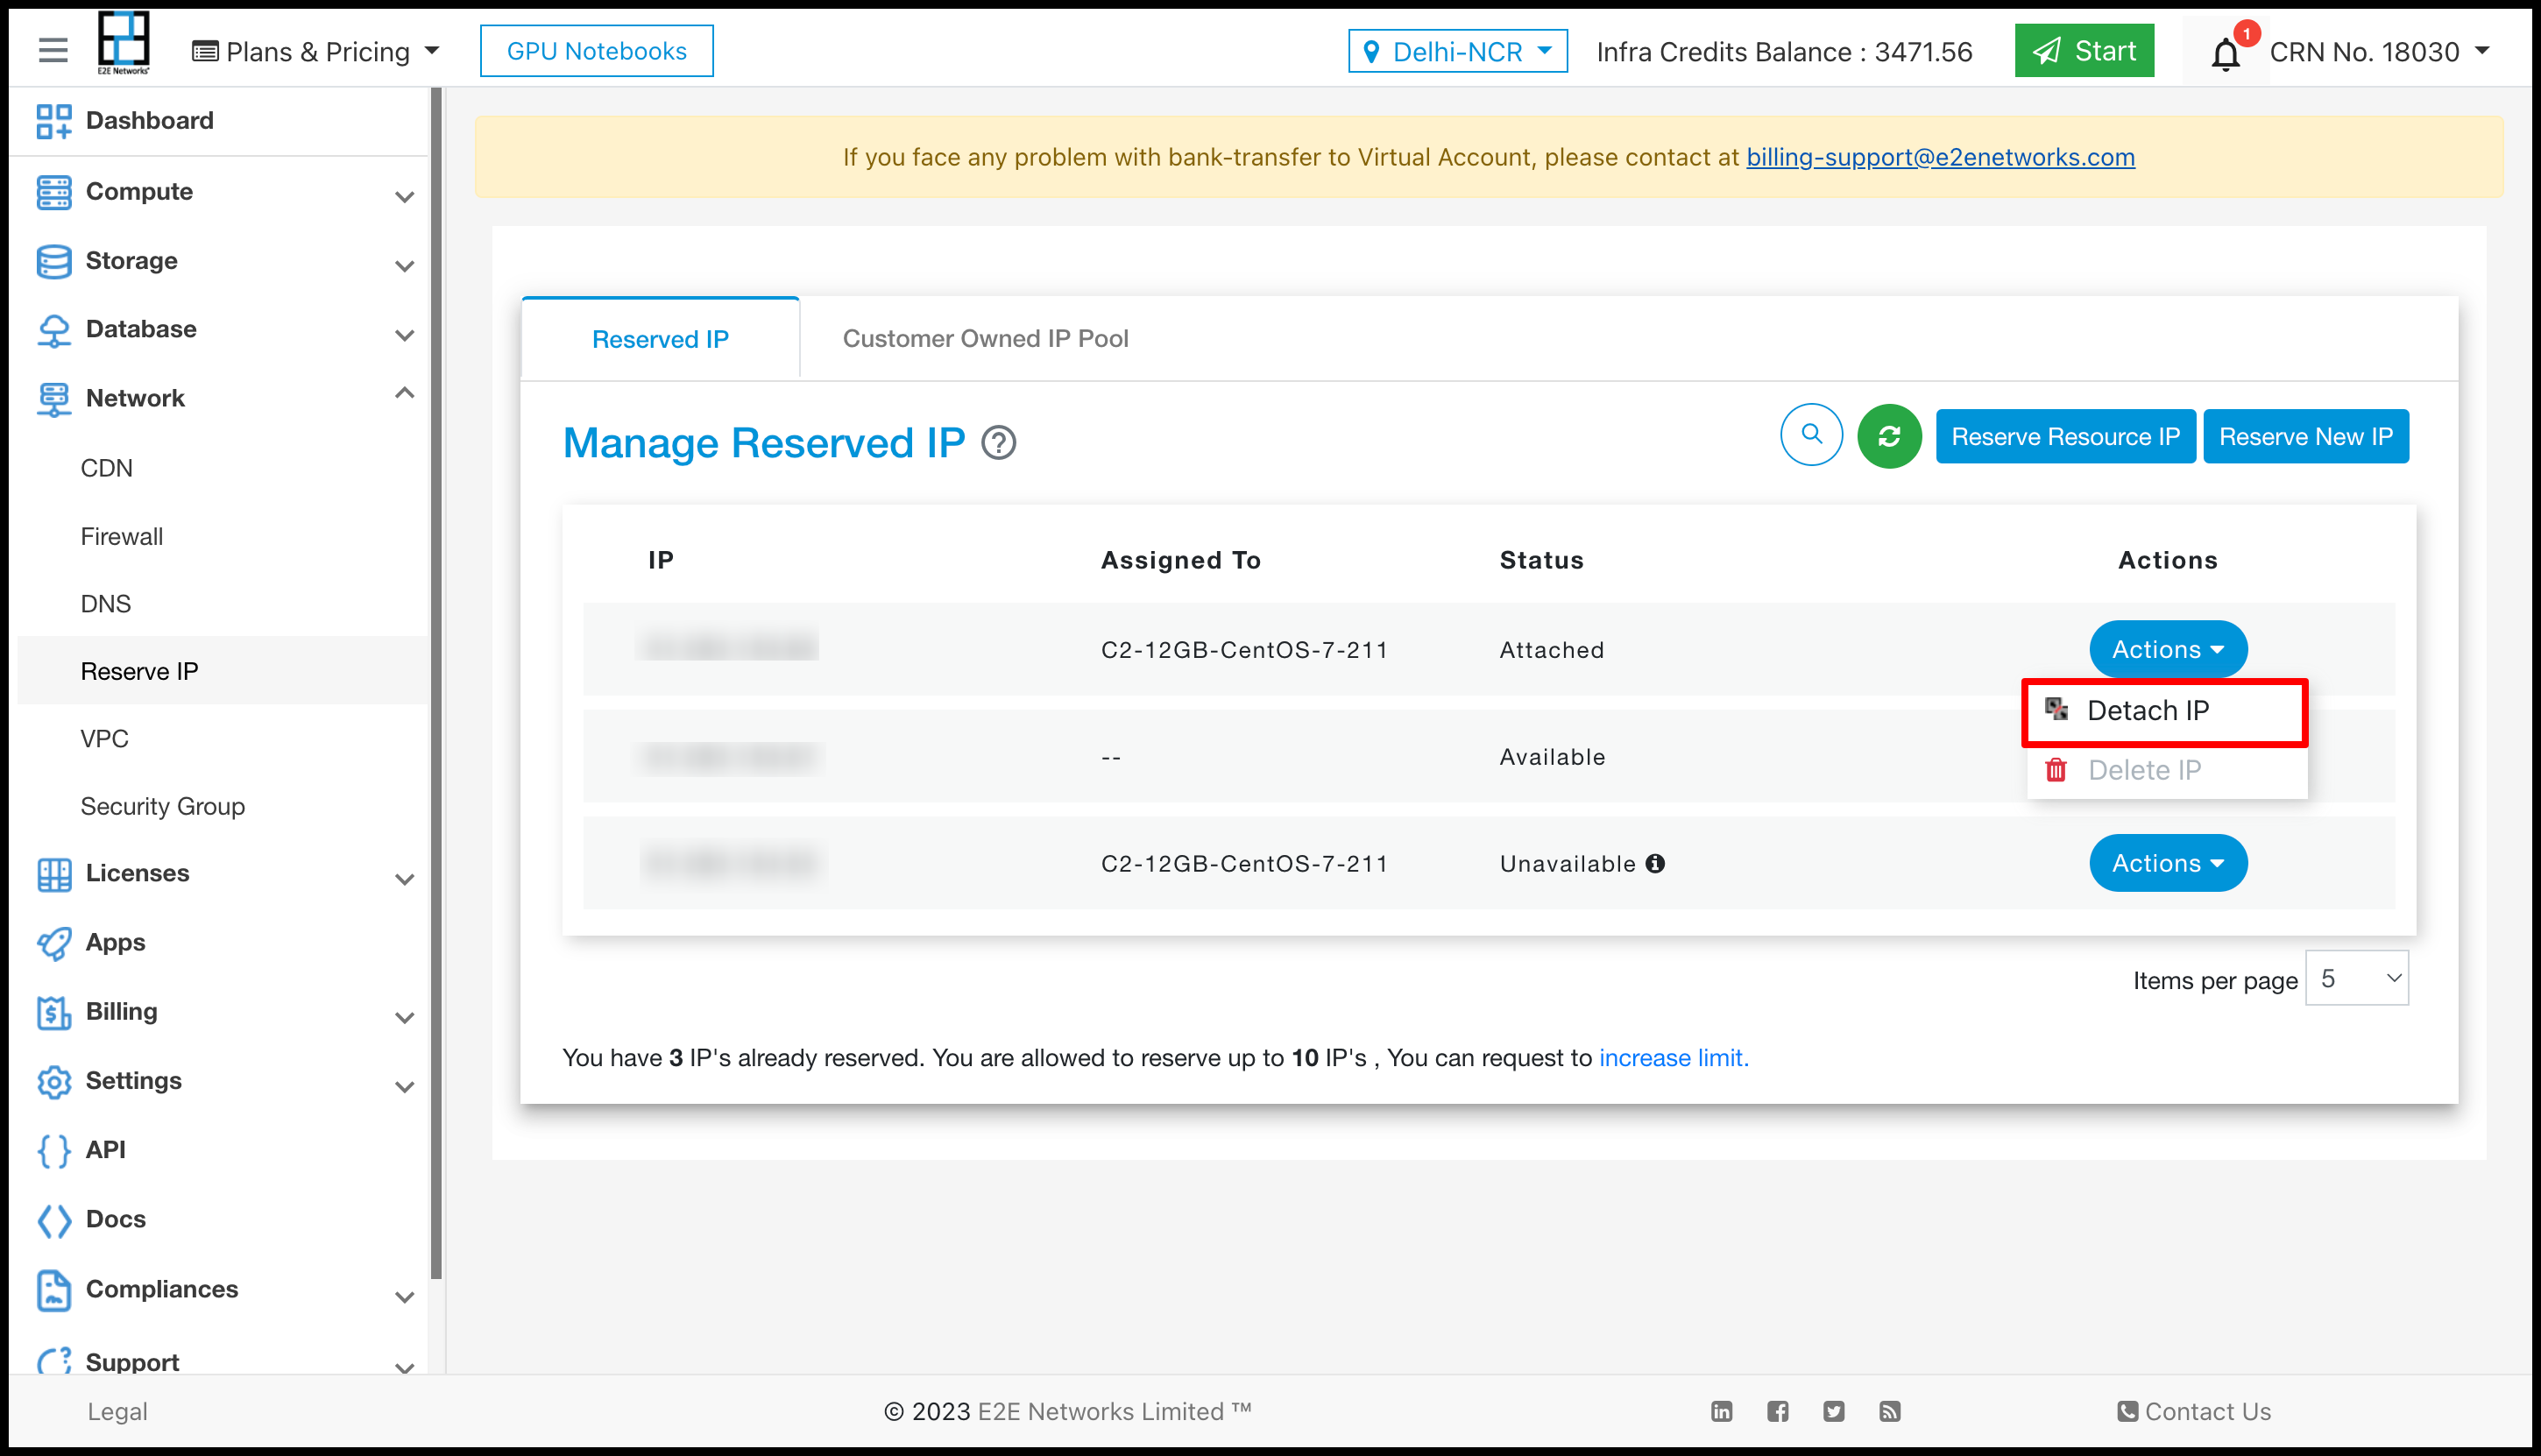
To detach Reserve IP from the resource which is attached as an addon IP. click on the ‘Actions’ button and select the Detach IP.
The ‘Detach Reserve IP’ pop-up window will appear.
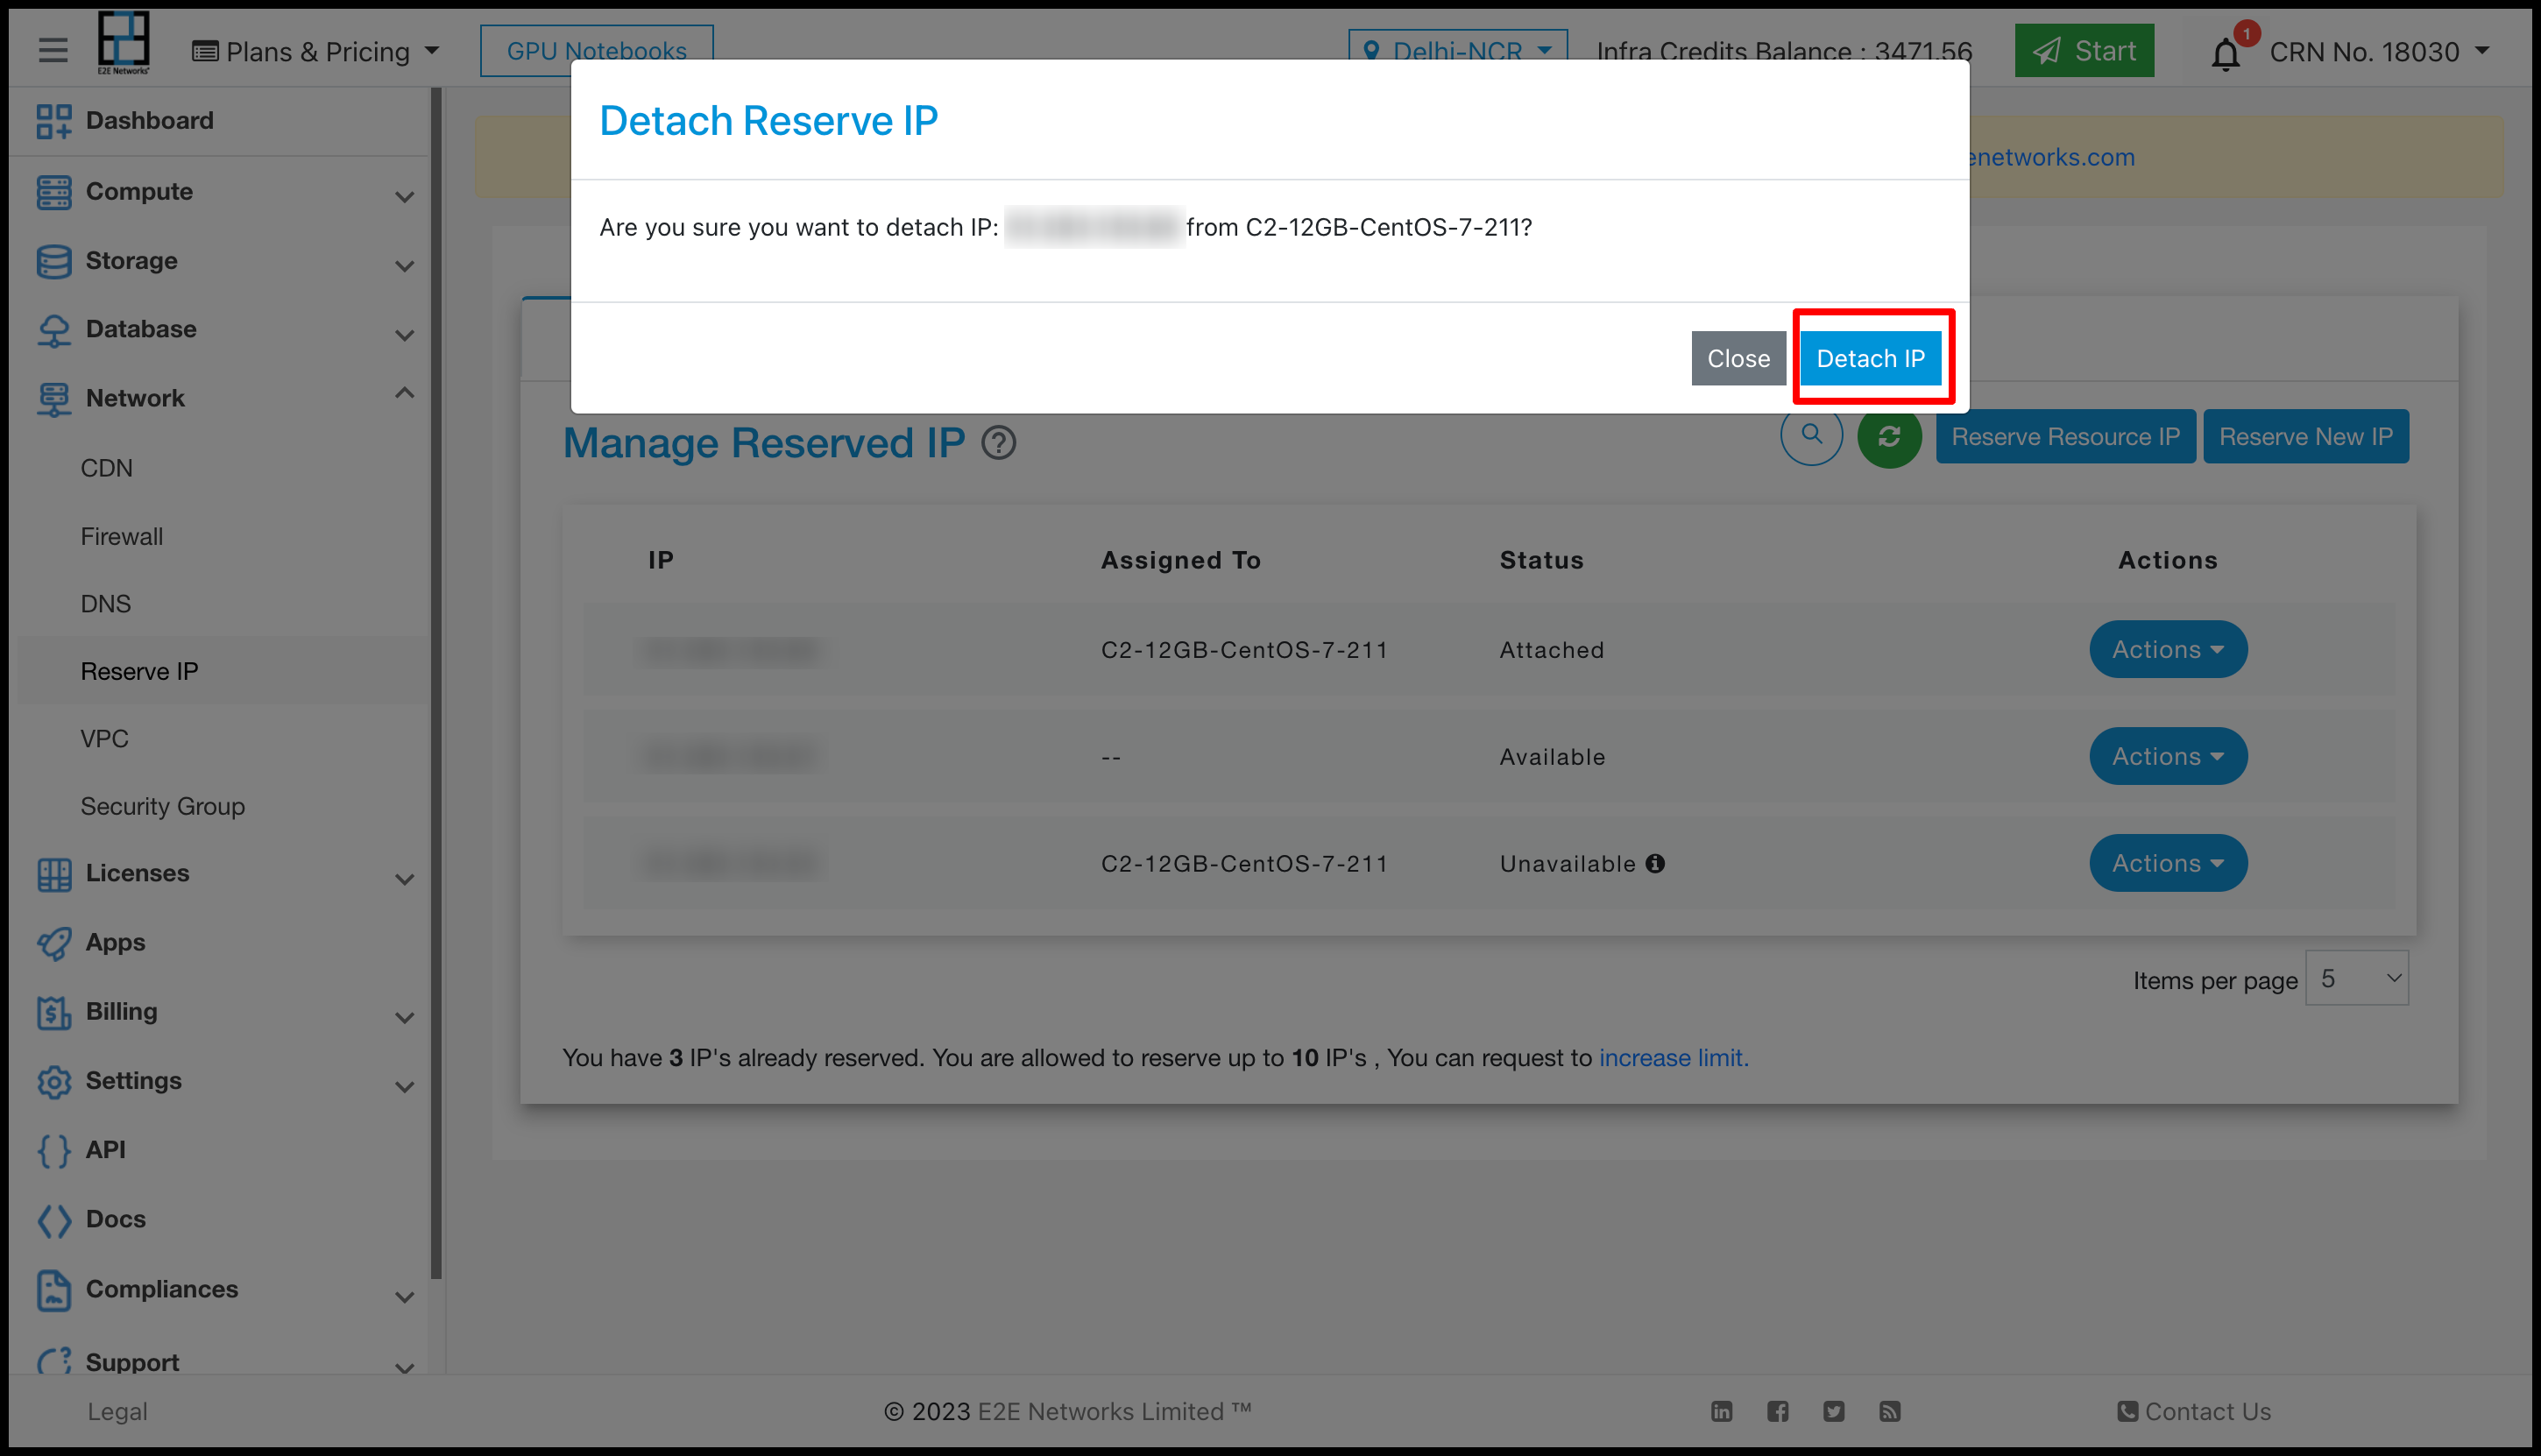
Click on the “Detach IP” button after reading the information on the pop-up window.
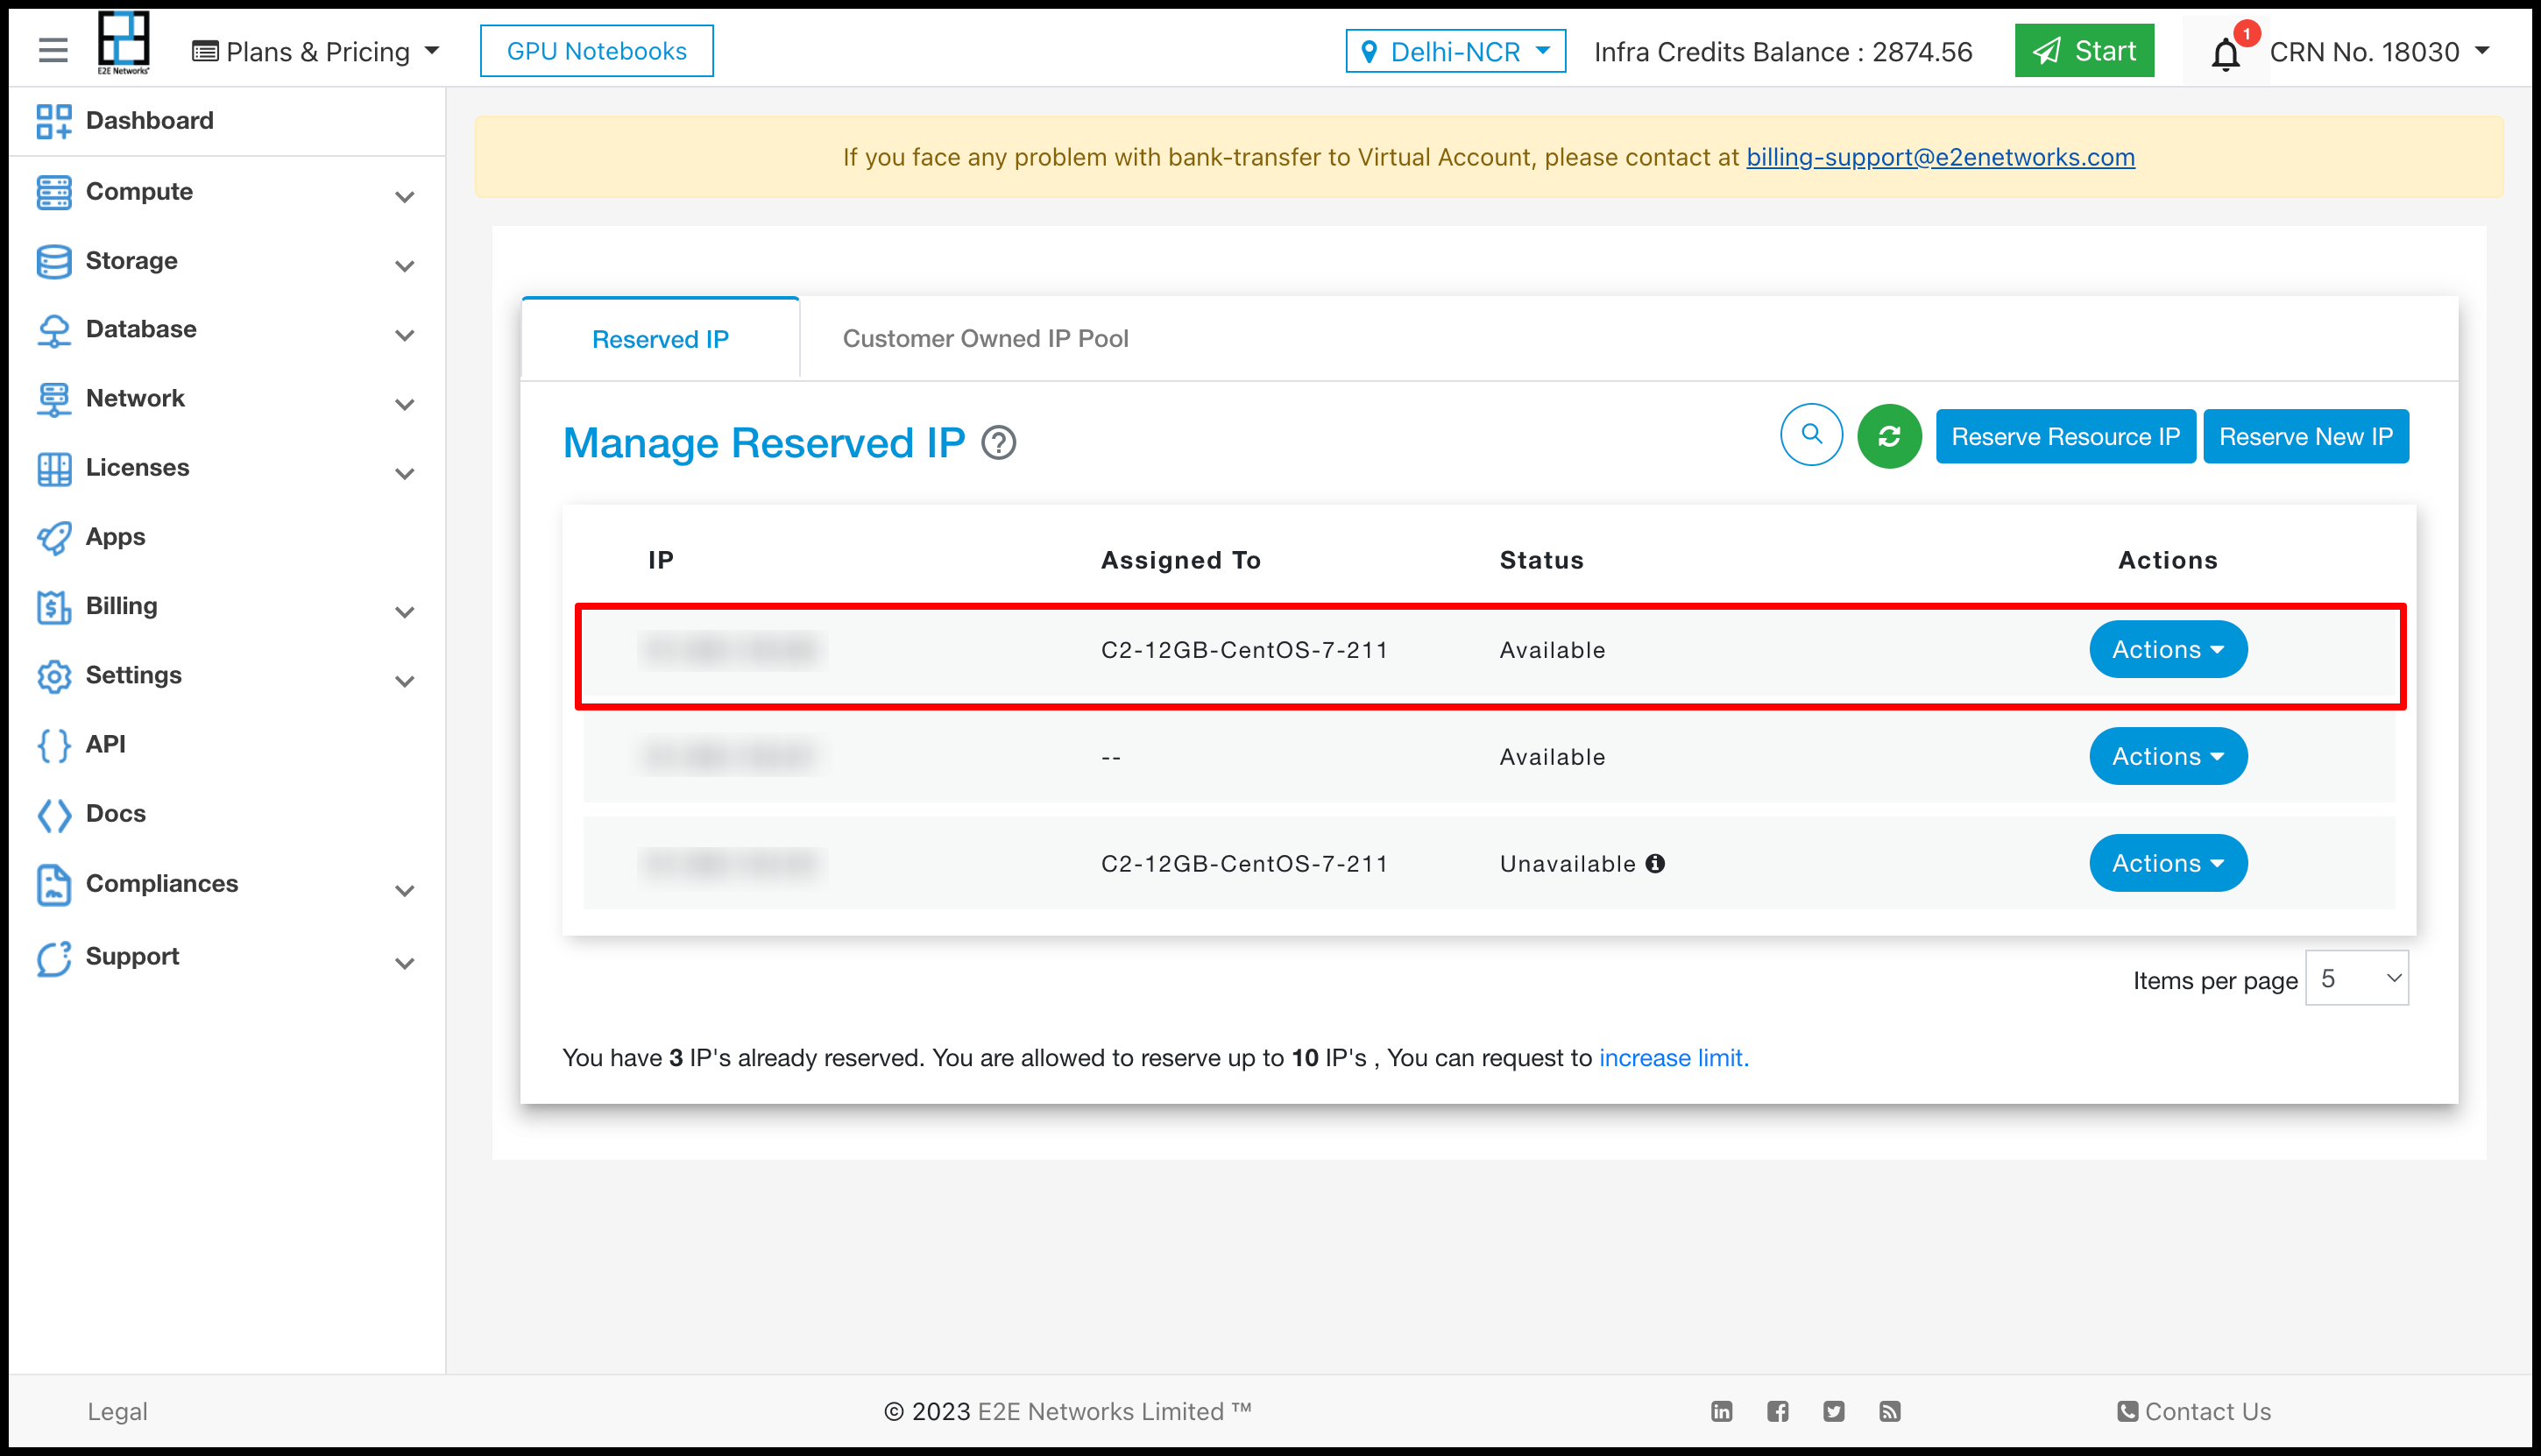
After successfully detaching the reserved IP from the respective resource, the reserved IP’s ‘Status’ & ‘Assigned to’ information will be updated in the table.
Tip
You can detach addon IP from the resource directly on the network tab of the node, or the load balancer detail tab.
Move Reserve IP To Another Project
Using this action you can transfer your reserve ip from its current project to another project within the same CRN.
Note
To transfer the reserve ip -
Ensure the reserve ip is not in Attached or Unavailable state.
The reserve ip must not have any Tags attached.
To transfer the reserve ip click on Move To Another Project button in actions.
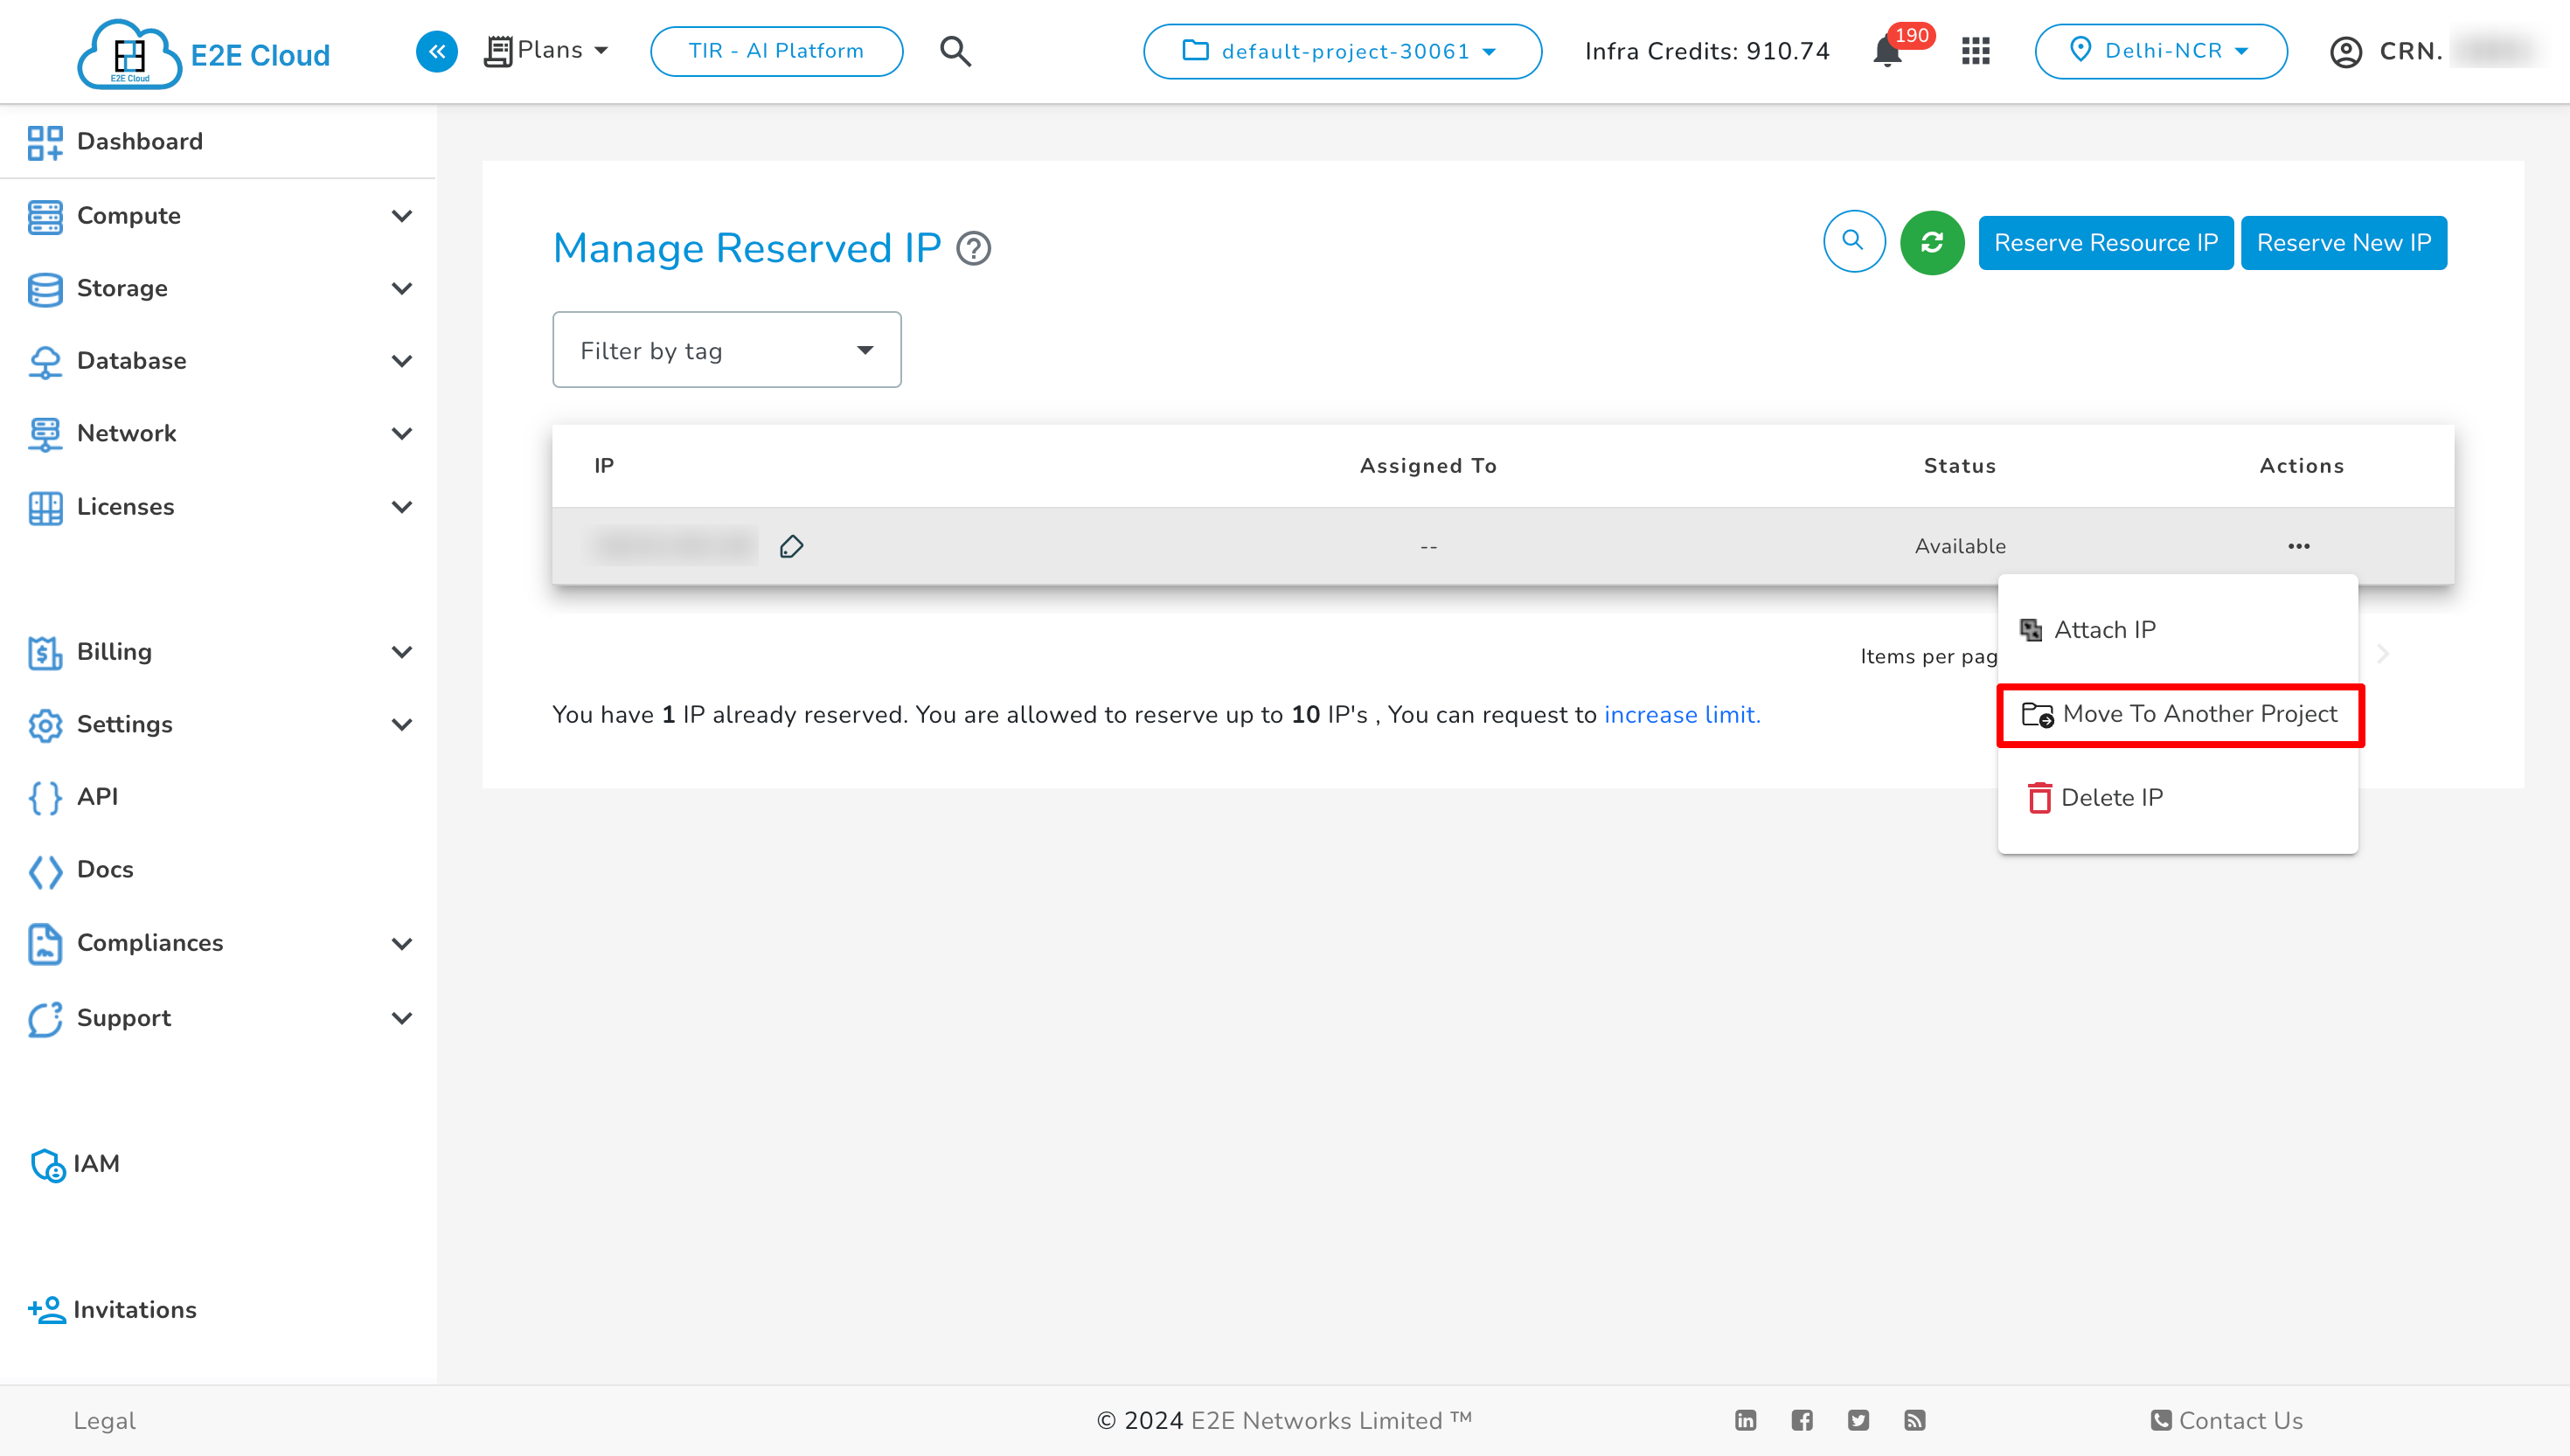
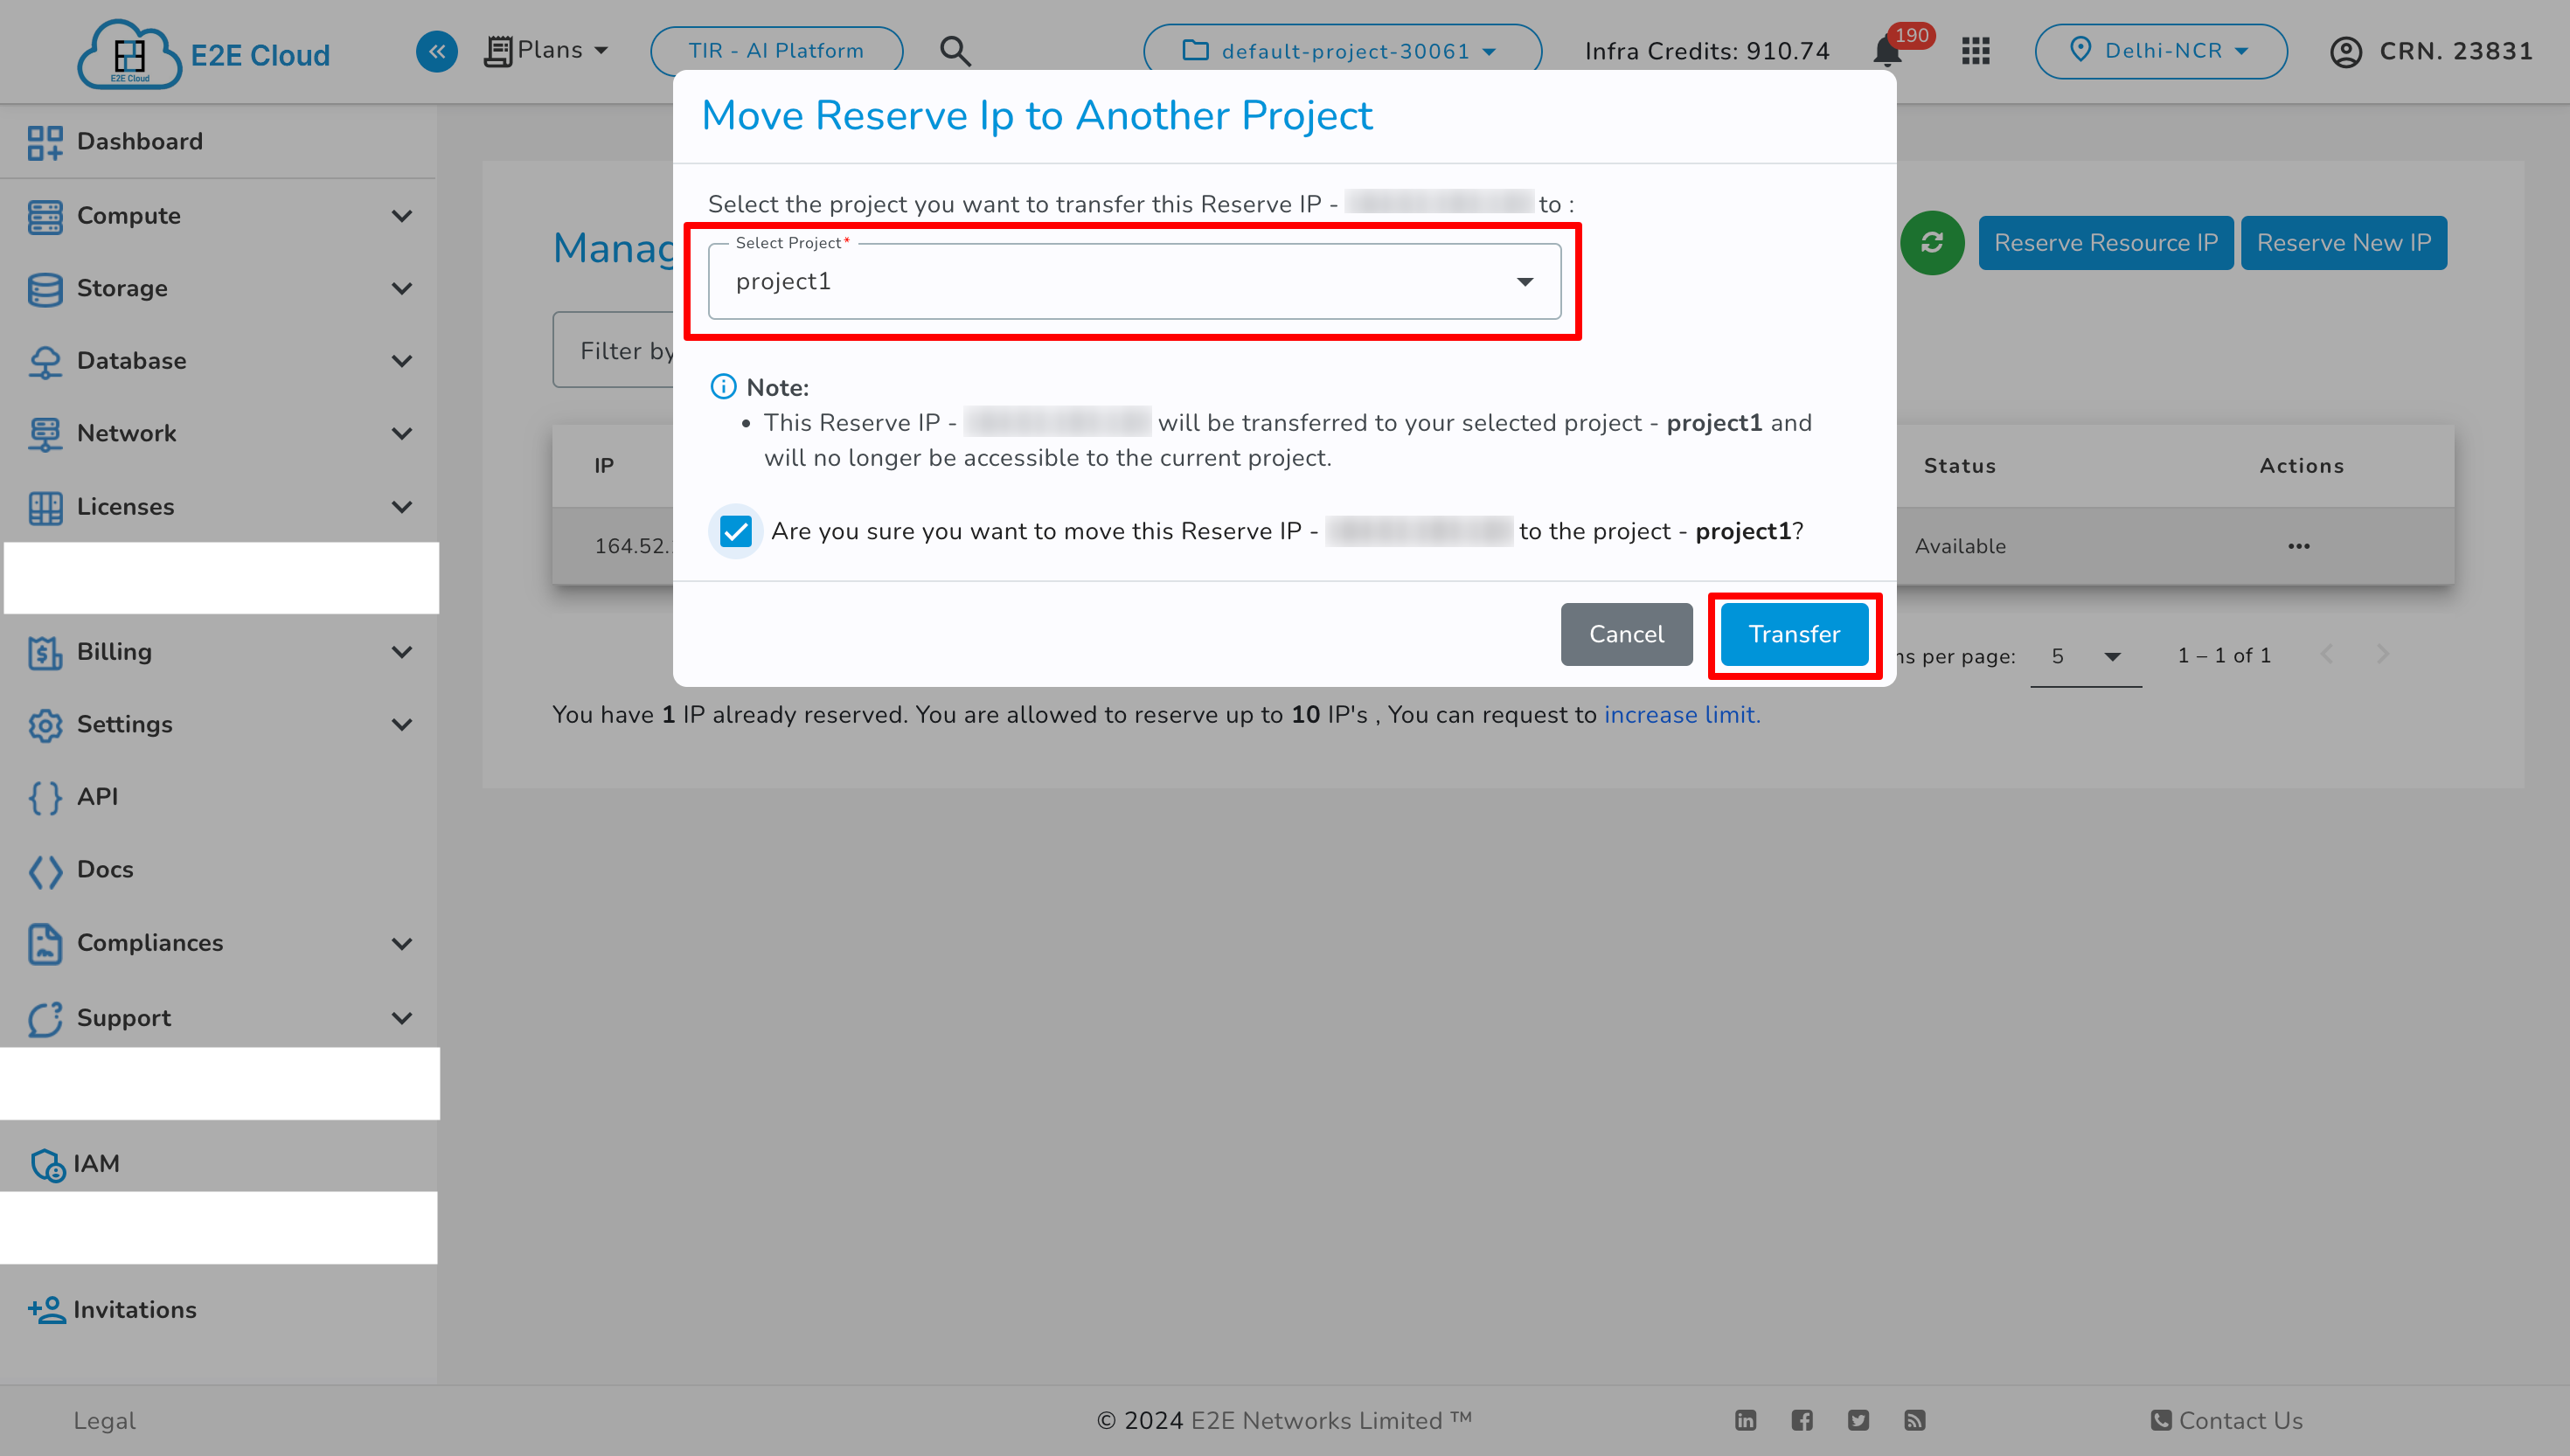
Then click on Move To Another Project from Actions, select the target project, check the checkbox, and click Transfer.
Note
An audit log will be created for the transfer in both the current and target projects during the transfer.
Delete Reserve IP
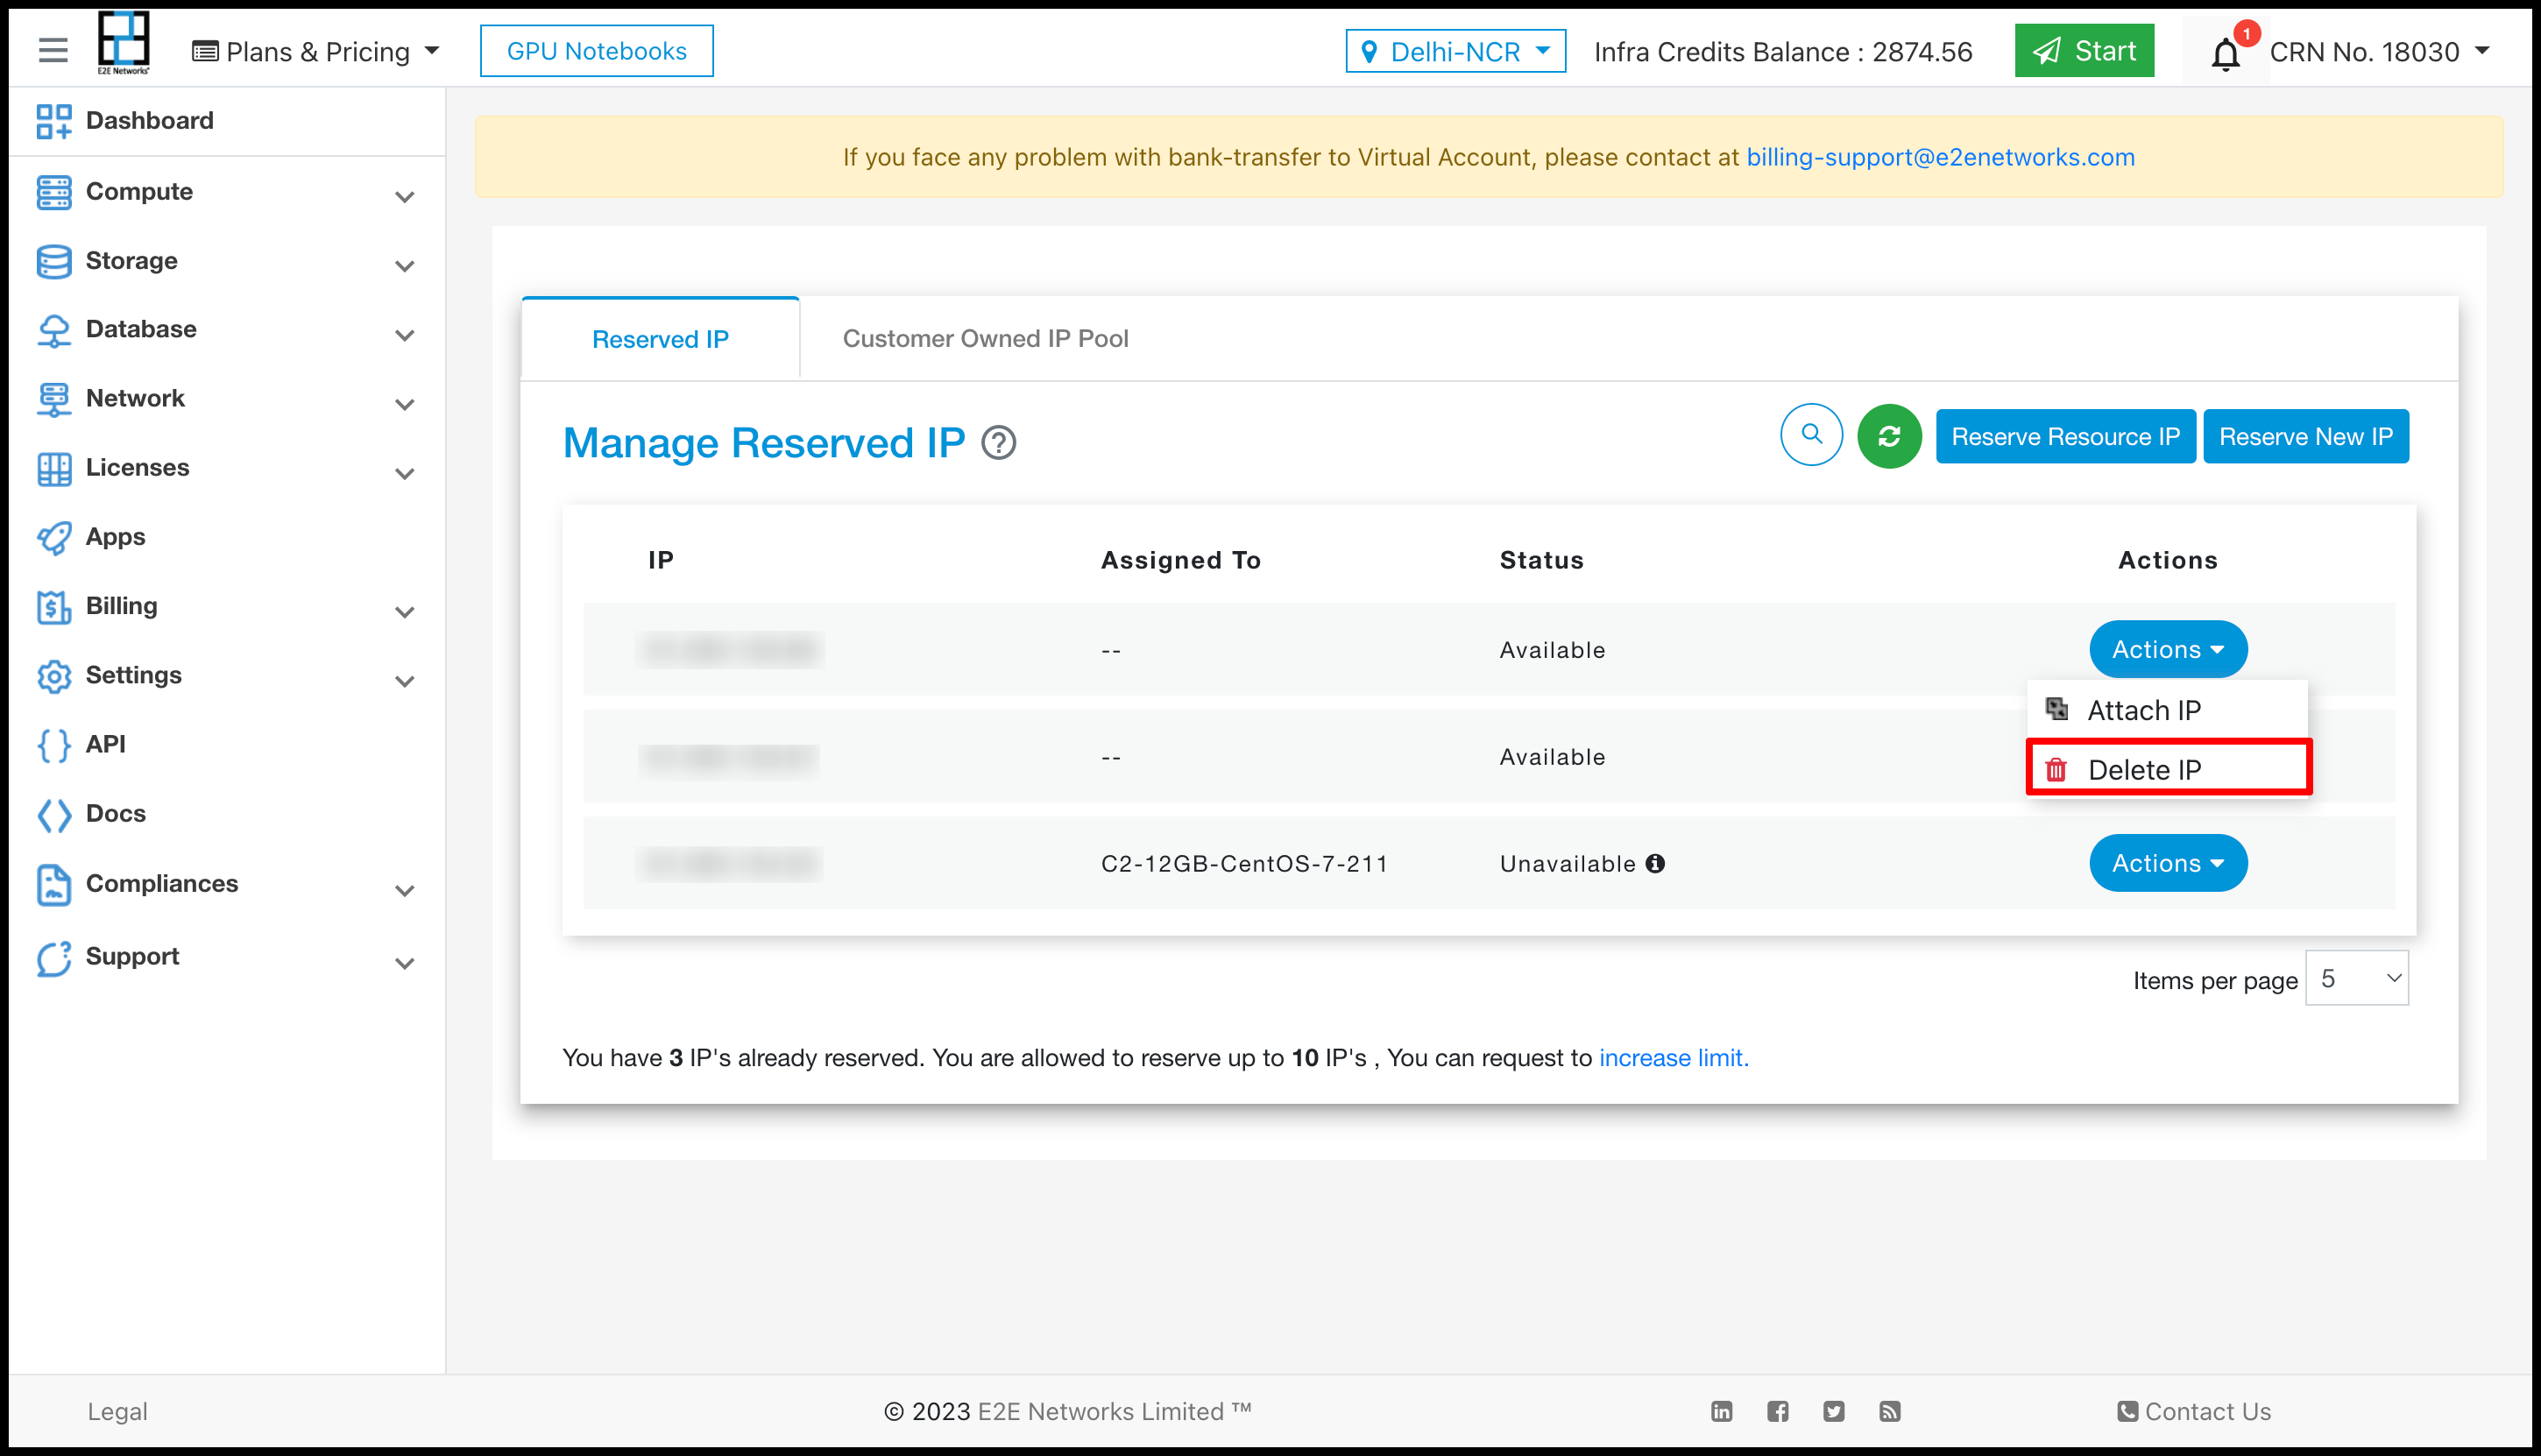
Click on the ‘Actions’ button and select the Delete IP to delete reserved IP whose status is either ‘Available’ or “Unavailable’.
Note
You cannot delete a reserved IP when its status is attached. First Detach the Reserve IP from the respective resource, only then you will be able to delete a reserved IP.
The ‘Delete Reserve IP’ confirmation pop-up window will appear.
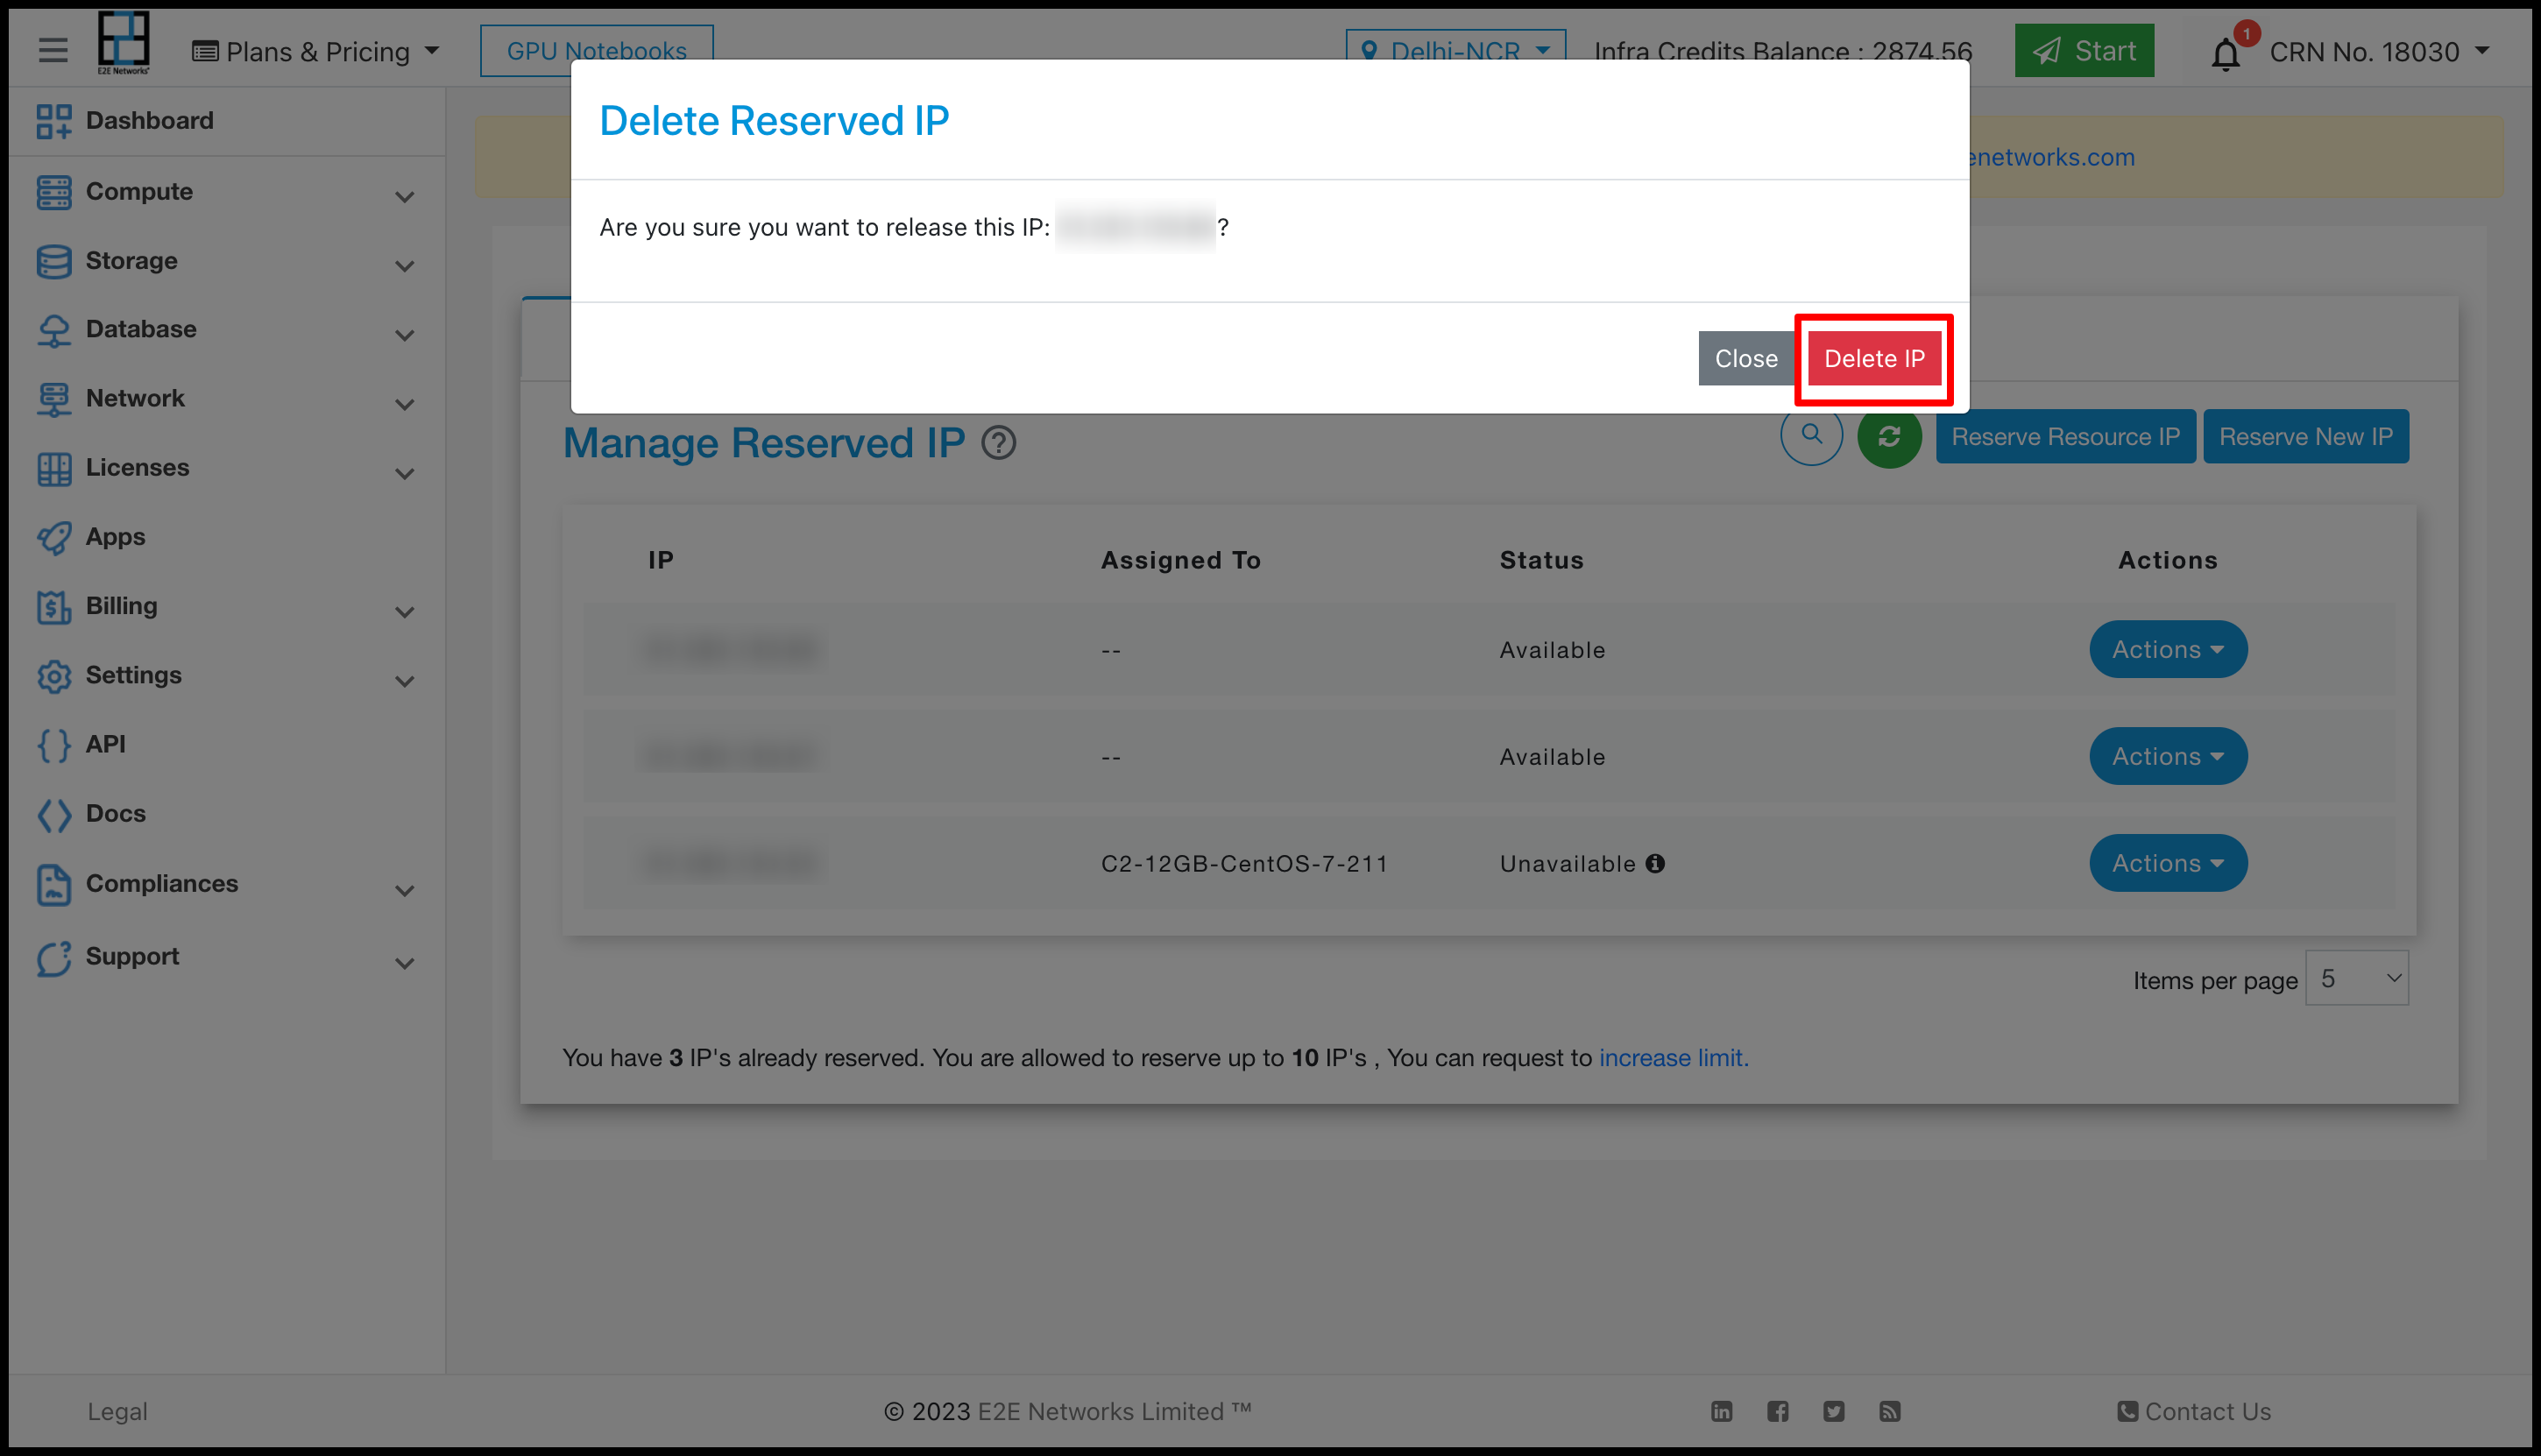
Click on the “Delete IP” button after reading the information on the pop-up box.
Reserved IP will be released back to the E2E Networks IP address available pool.
Note
We request your discretion before deleting the reserved IP because you will not get the same IP once it is released.
Request for Reserve IP Limit Increase
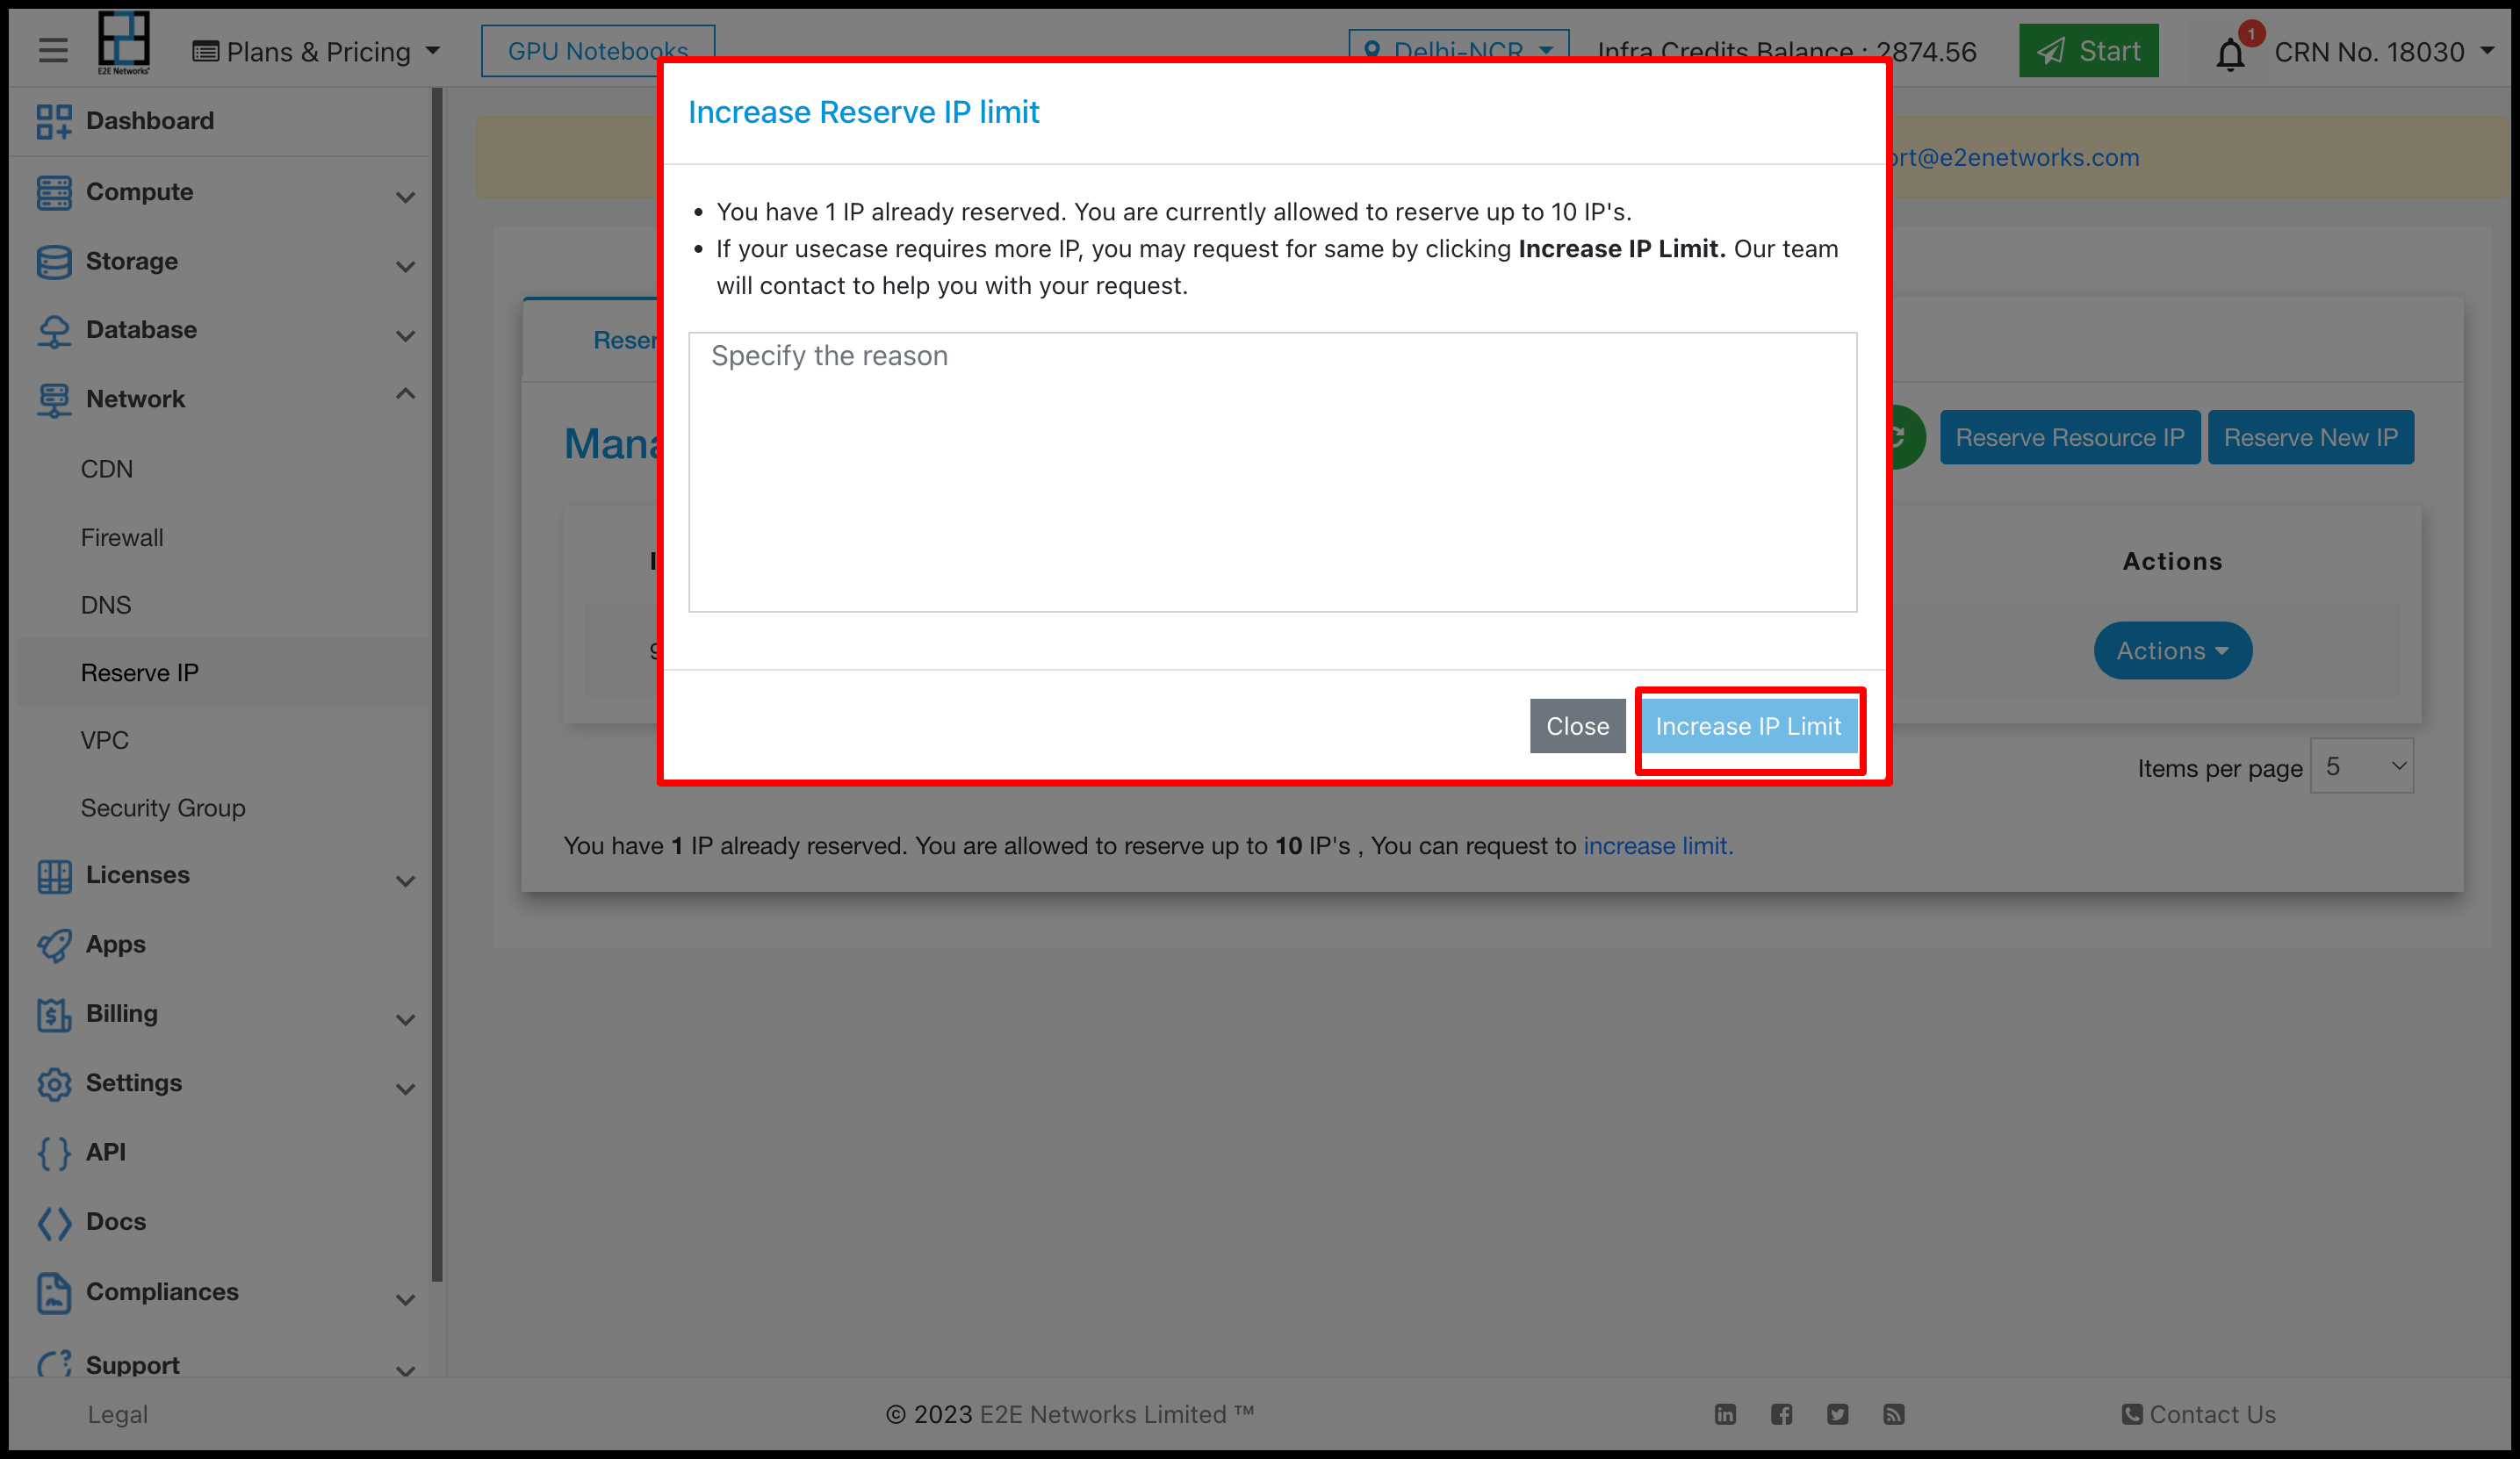
There is a default limit for the Reserve IP that can be reserved by a user. If your use case requires more public IP, you may request the same by clicking “Increase IP Limit”.
If you have exceeded the maximum number of Reserve IP, then ‘Reserve IP Limit Exceeded’ pop-up window will be opened when you click on the ‘Reserve New IP’ or ‘Reserve Resource IP’ buttons.
In the text box, please specify your usecase which needs more reserved IP addresses.
After specifying the usecase details, click on ‘Increase IP Limit’.
Your request will be reviewed by the E2E Networks Customer Communications Team. You will be notified about the request approval by an email.
If required, our team will contact you, to help you with your request.
Once your request is approved, You can either reserve a New IP address or you can reserve the IP address of a resource in your MyAccount.
New Node launch using Reserve IP
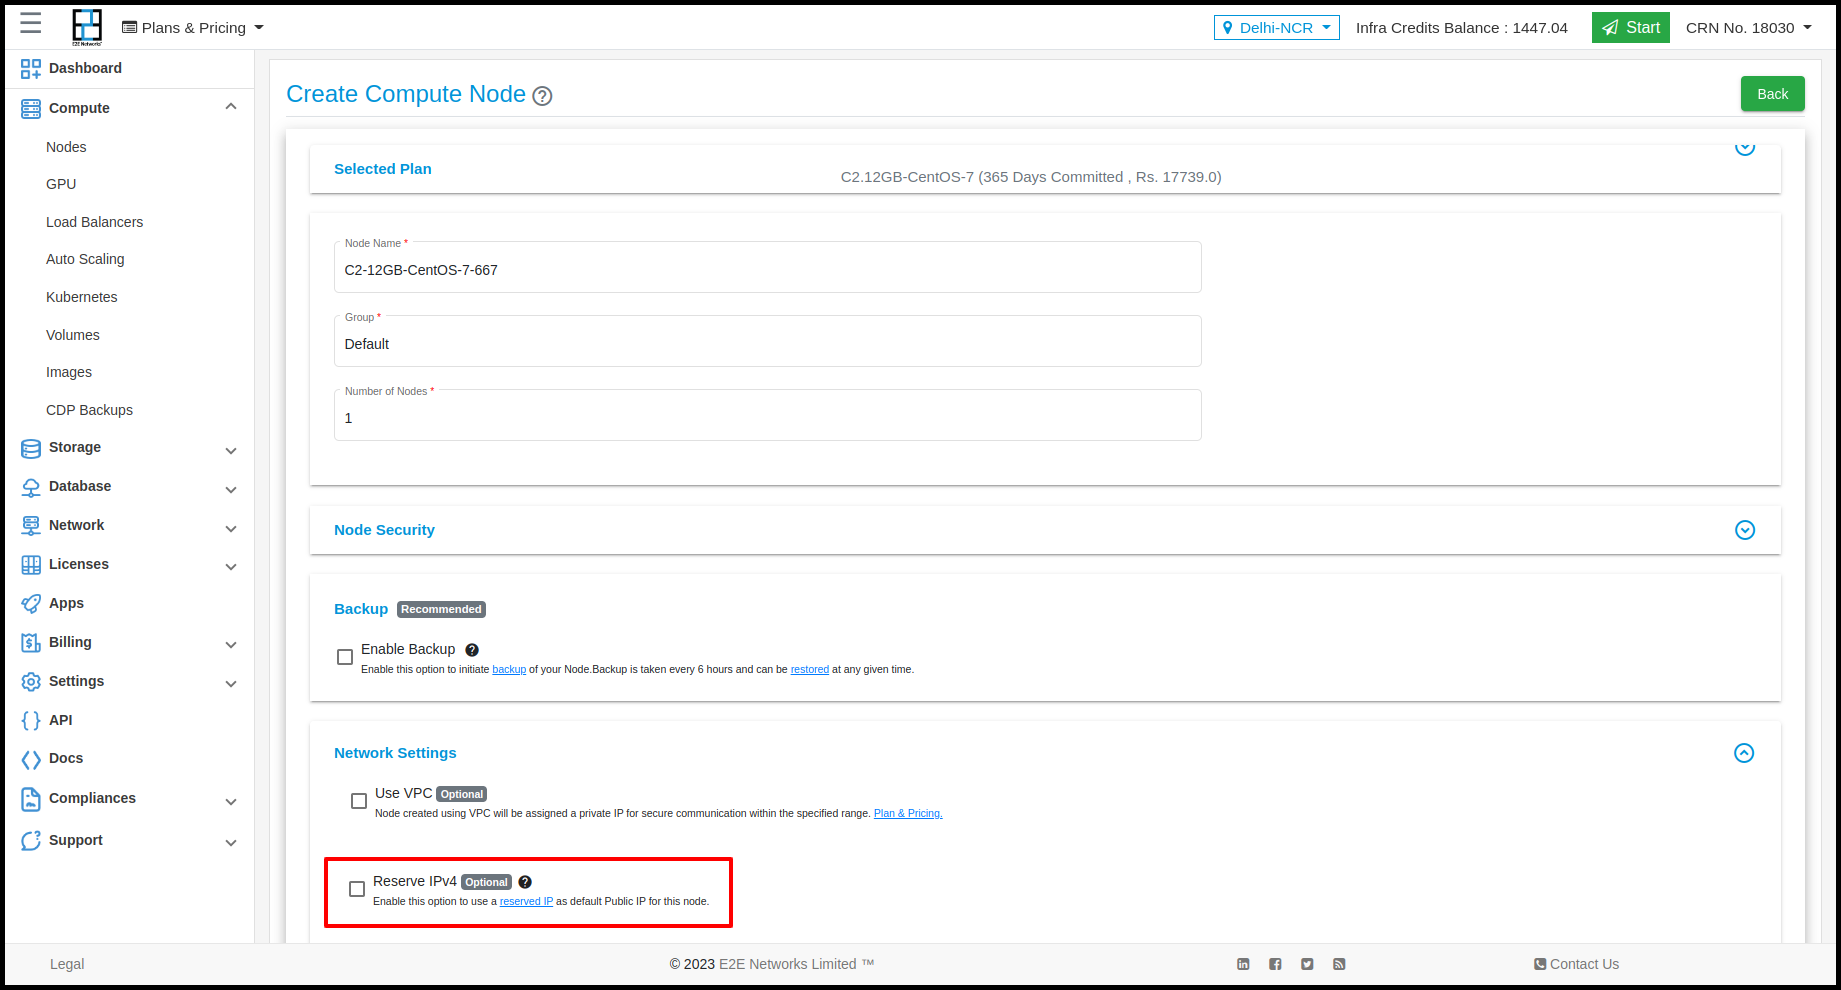
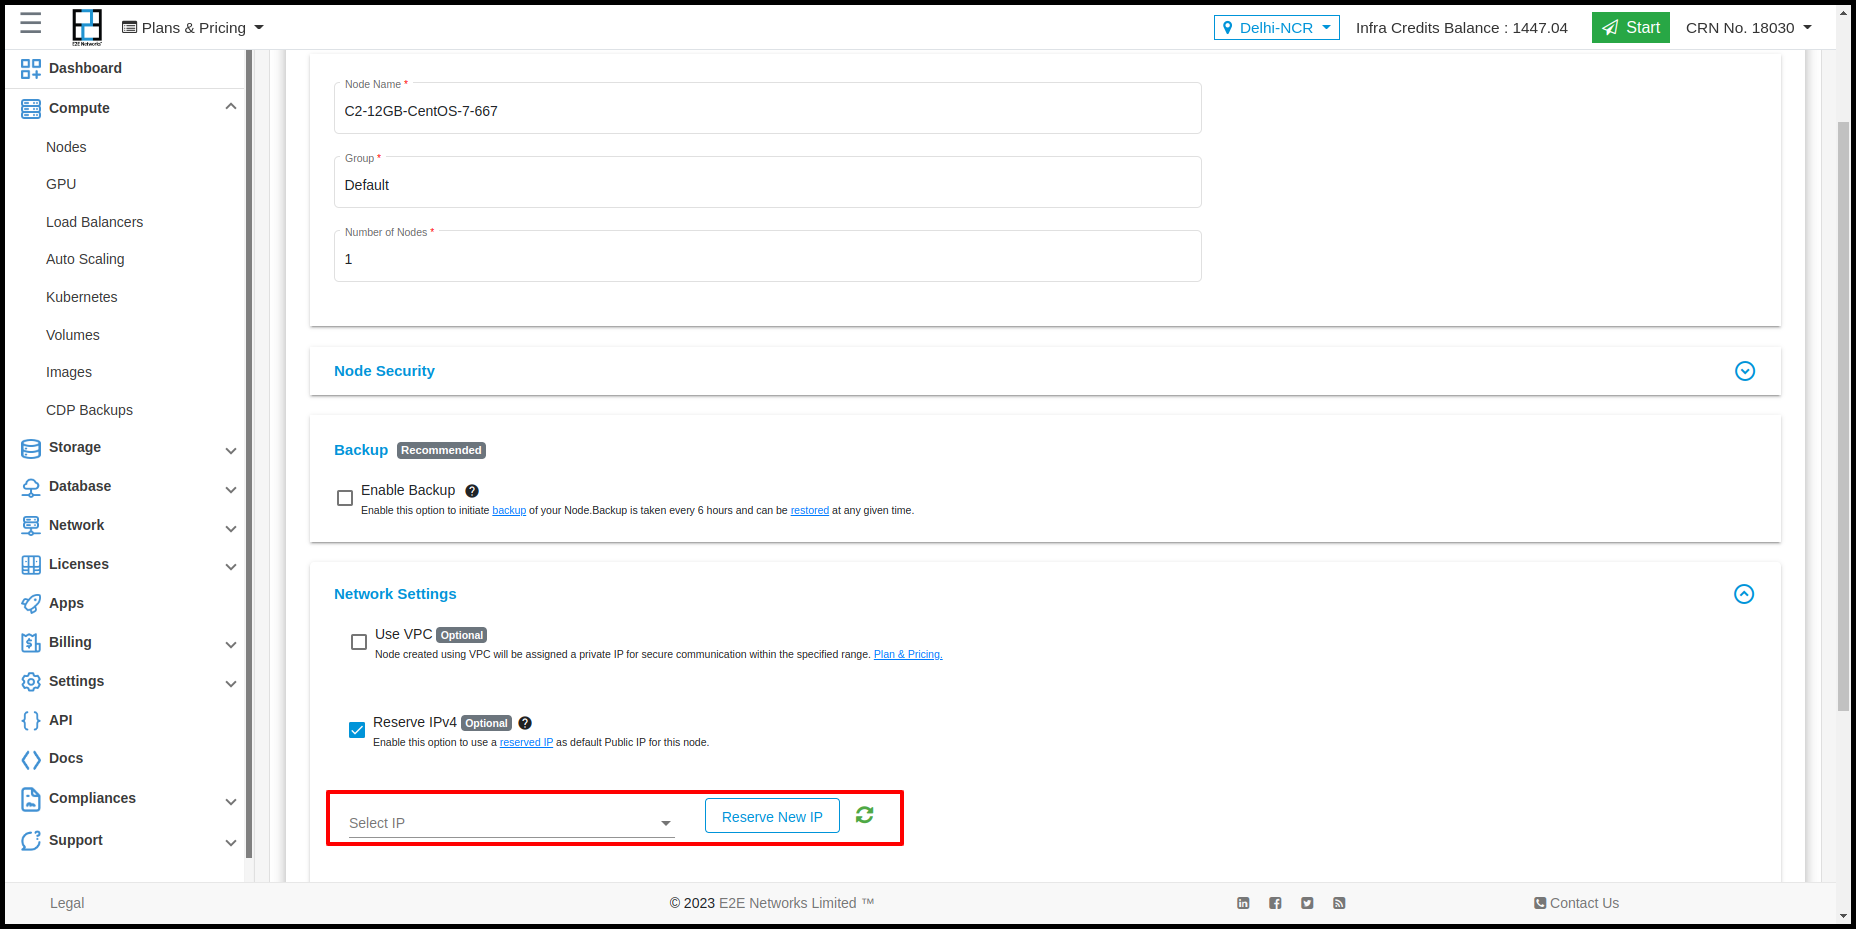
To use a reserved IP as the primary public IP of you node you need to tick the ‘Reserve IPv4’ checkbox while creating creating a new Node.
From the ‘Select IP’ drop-down list please select the reserved IP that you wish to assign as primary public IP.
In case, you don’t have a Reserve IP or wish to Reserve New IP then click on the ‘Reserve New IP’ button to get a new public IP from the IP address pool. The ‘Reserve New IP’ pop-up window will appear.
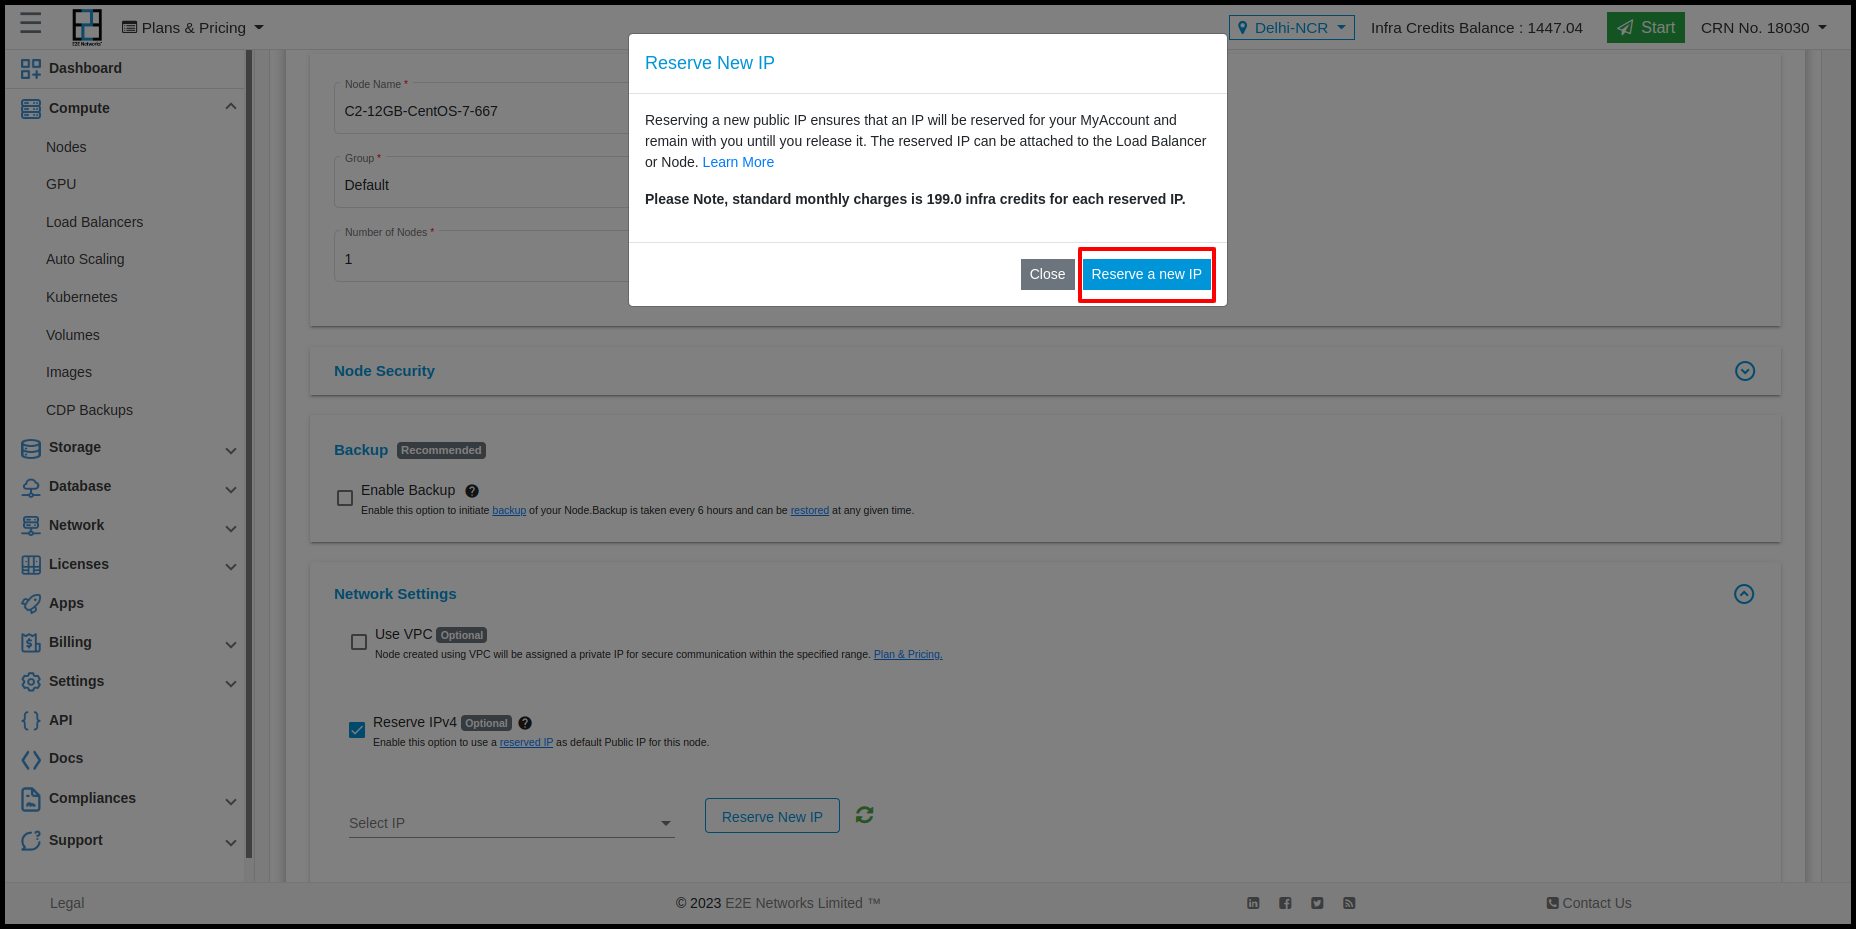
Click on the “Reserve a new IP” after reading the information on the pop-up window. A new public IP address will be reserved and it’s listed in the dropdown list of the ‘Select IP’ drop-down list.
After selecting the reserved IP and specifying the node name and additional options for the new Node you’re creating. Click on the ‘Create’ button.
It will take a few minutes to set up the Node and you will be taken to the ‘Manage Node’ page.
Reserve Node’s Default Public IP Address
You can also reserve a Node’s default public IP while terminating the Node. For this, click on the “Compute” sub-menu available under the Products section and you will be Navigate to the ‘Manage Nodes’ page.
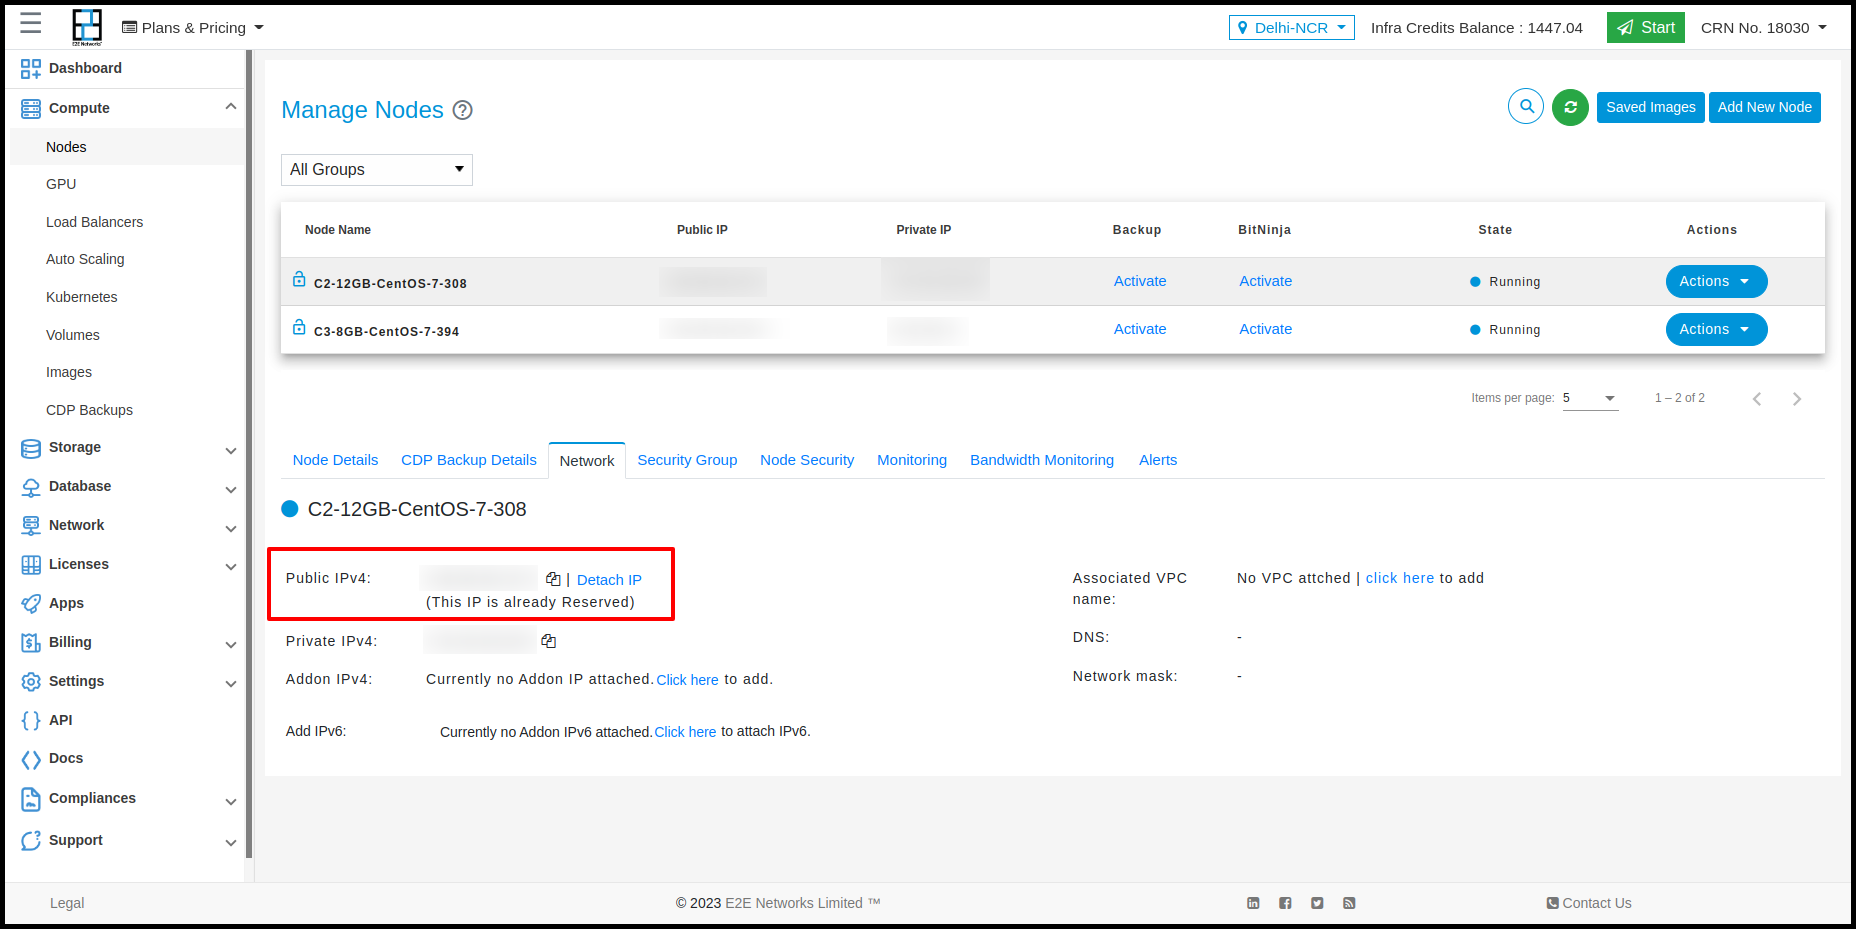
Select the node and go to the ‘Network’ tab.
Click on the ‘Want to reserve this Public IP Click Here’ button available below the public IPv4 address.
The ‘Reserve IP Address’ pop-up window will appear.
Click on the ‘Reserve IP’ button after reading the information on the pop-up window.
You will get a confirmation message and public IP will be reserved for your MyAccount.
Else

When you are going to terminate a node by clicking on the ‘Delete Node’ button available in the node details tab.
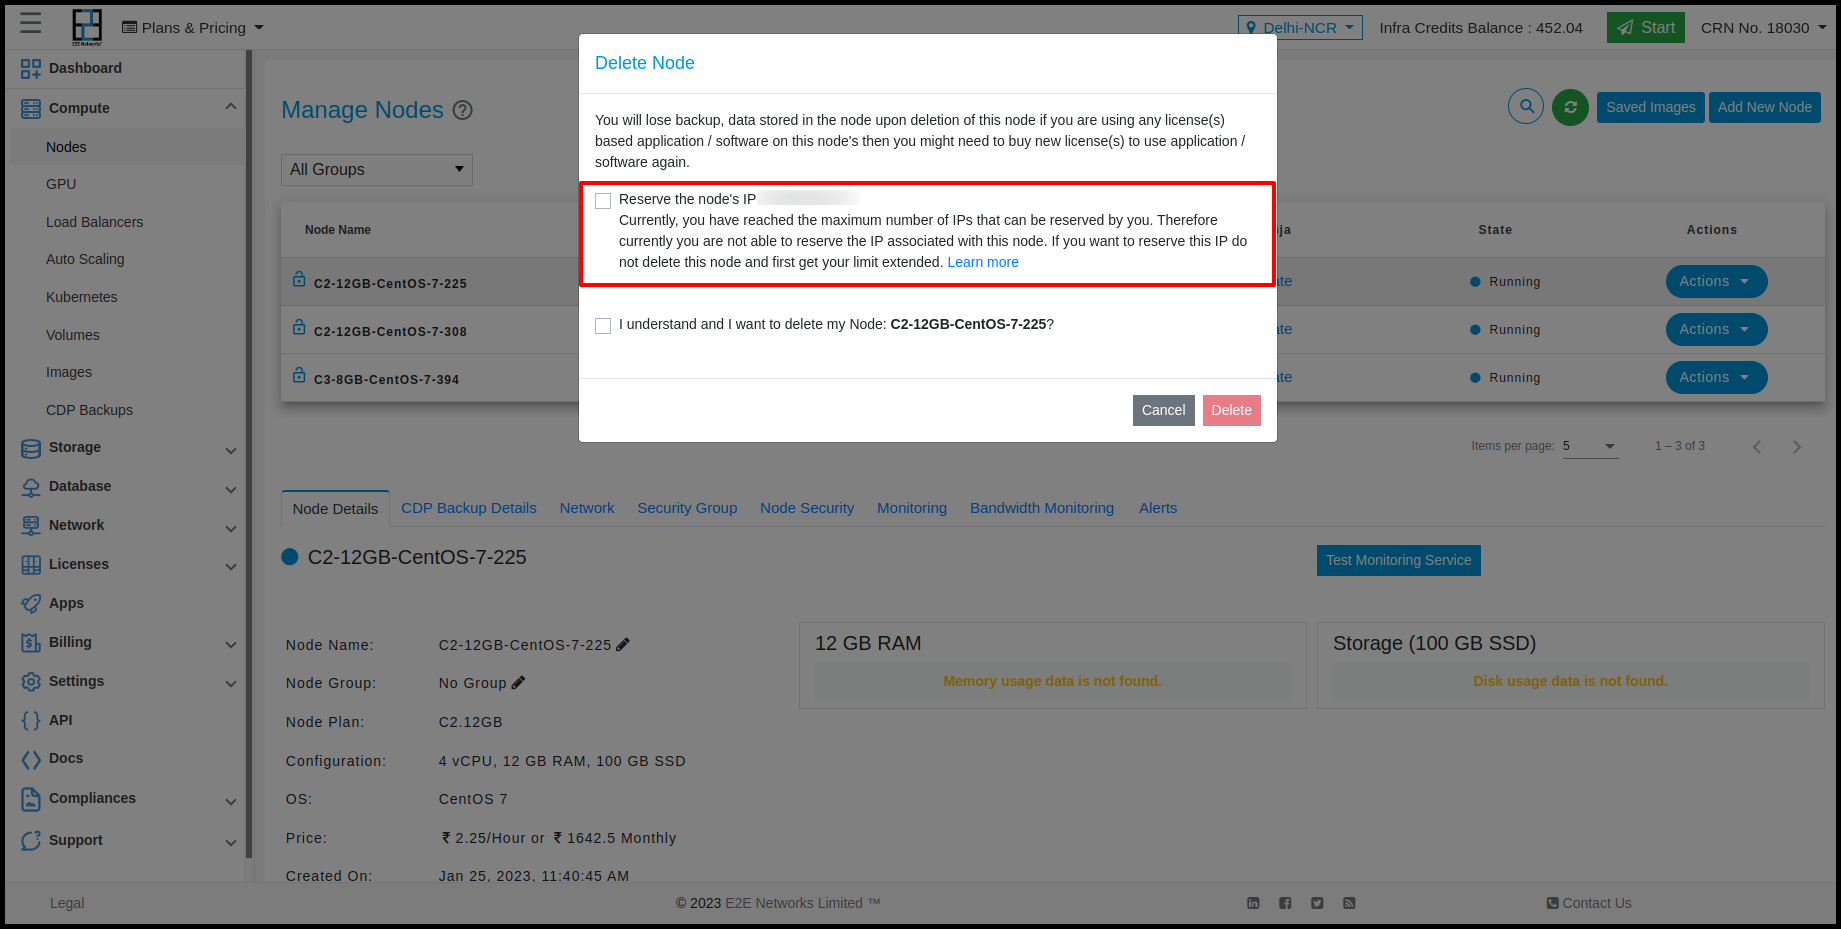
The ‘Delete Node’ pop-up window will appear. Here, you have an option to Reserve public IP by tick the ‘Reserve the Node’s IP’ checkbox after reading the information on the pop-up window and click on the ‘Delete’ button.
The Node’s IP address will be reserved for your MyAccount.
This reserved IP will be listed in the table of the Manage Reserved IP page. This reserved IP status will be ‘Available’ because it’s not attached to any resource.
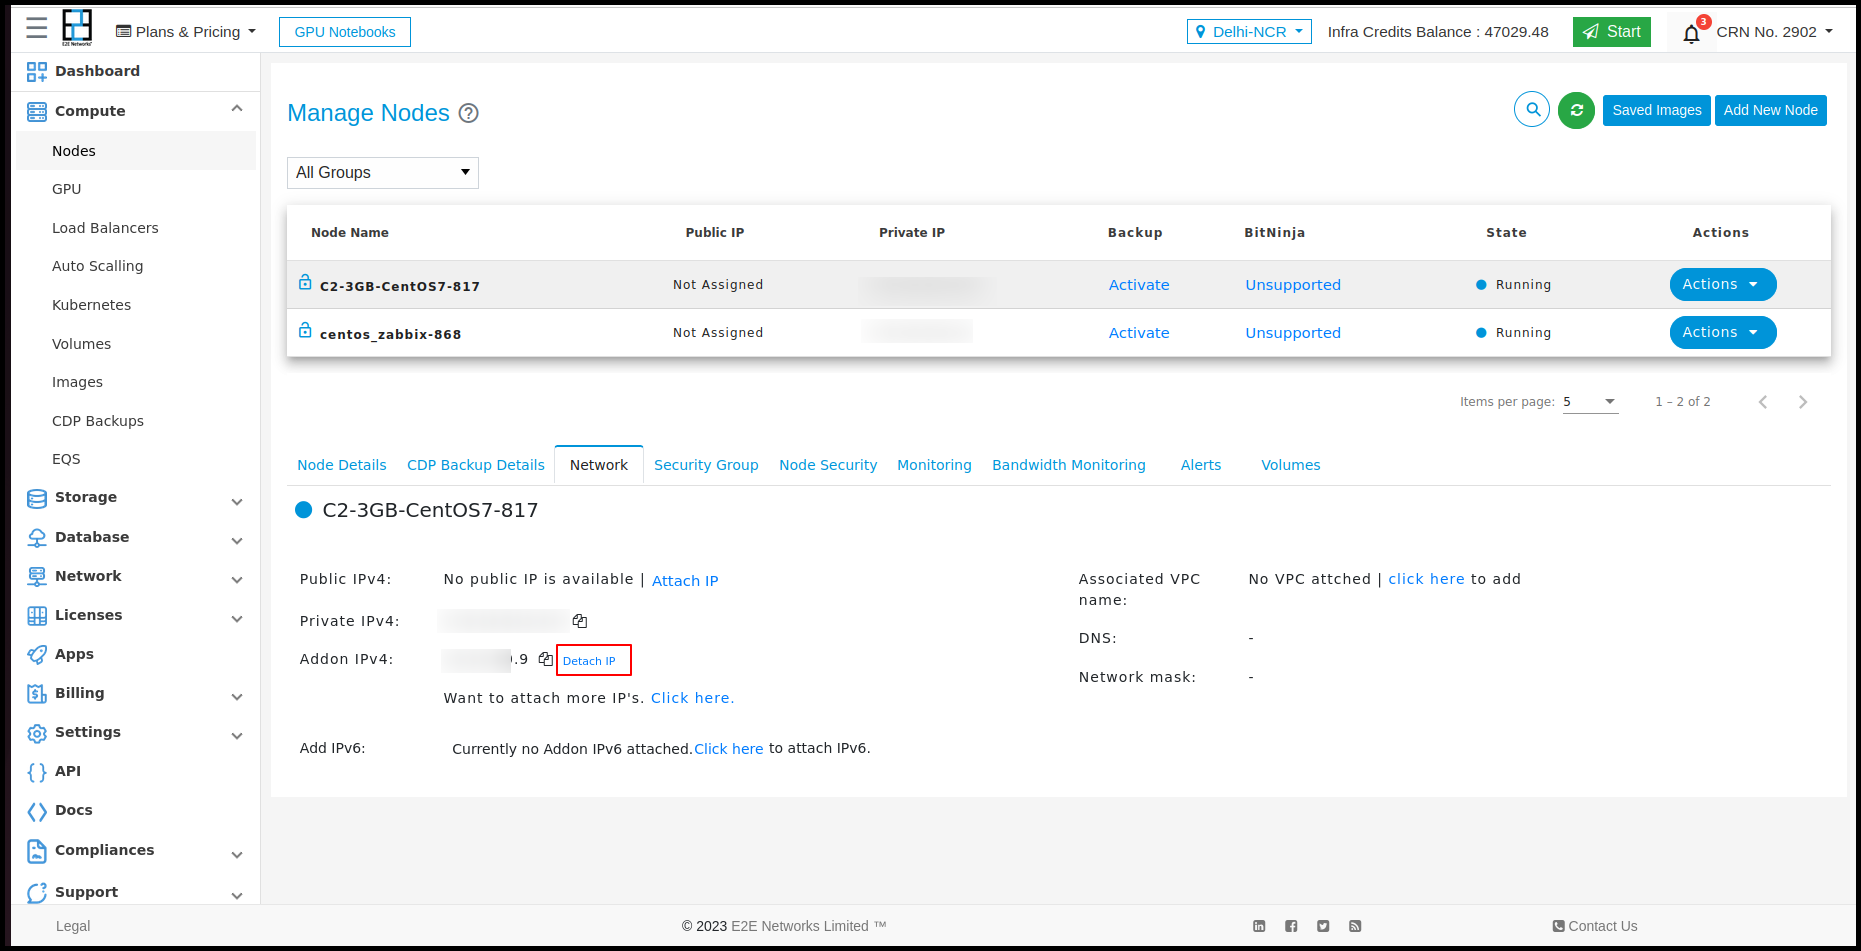
Detach Node’s Primary Public IP
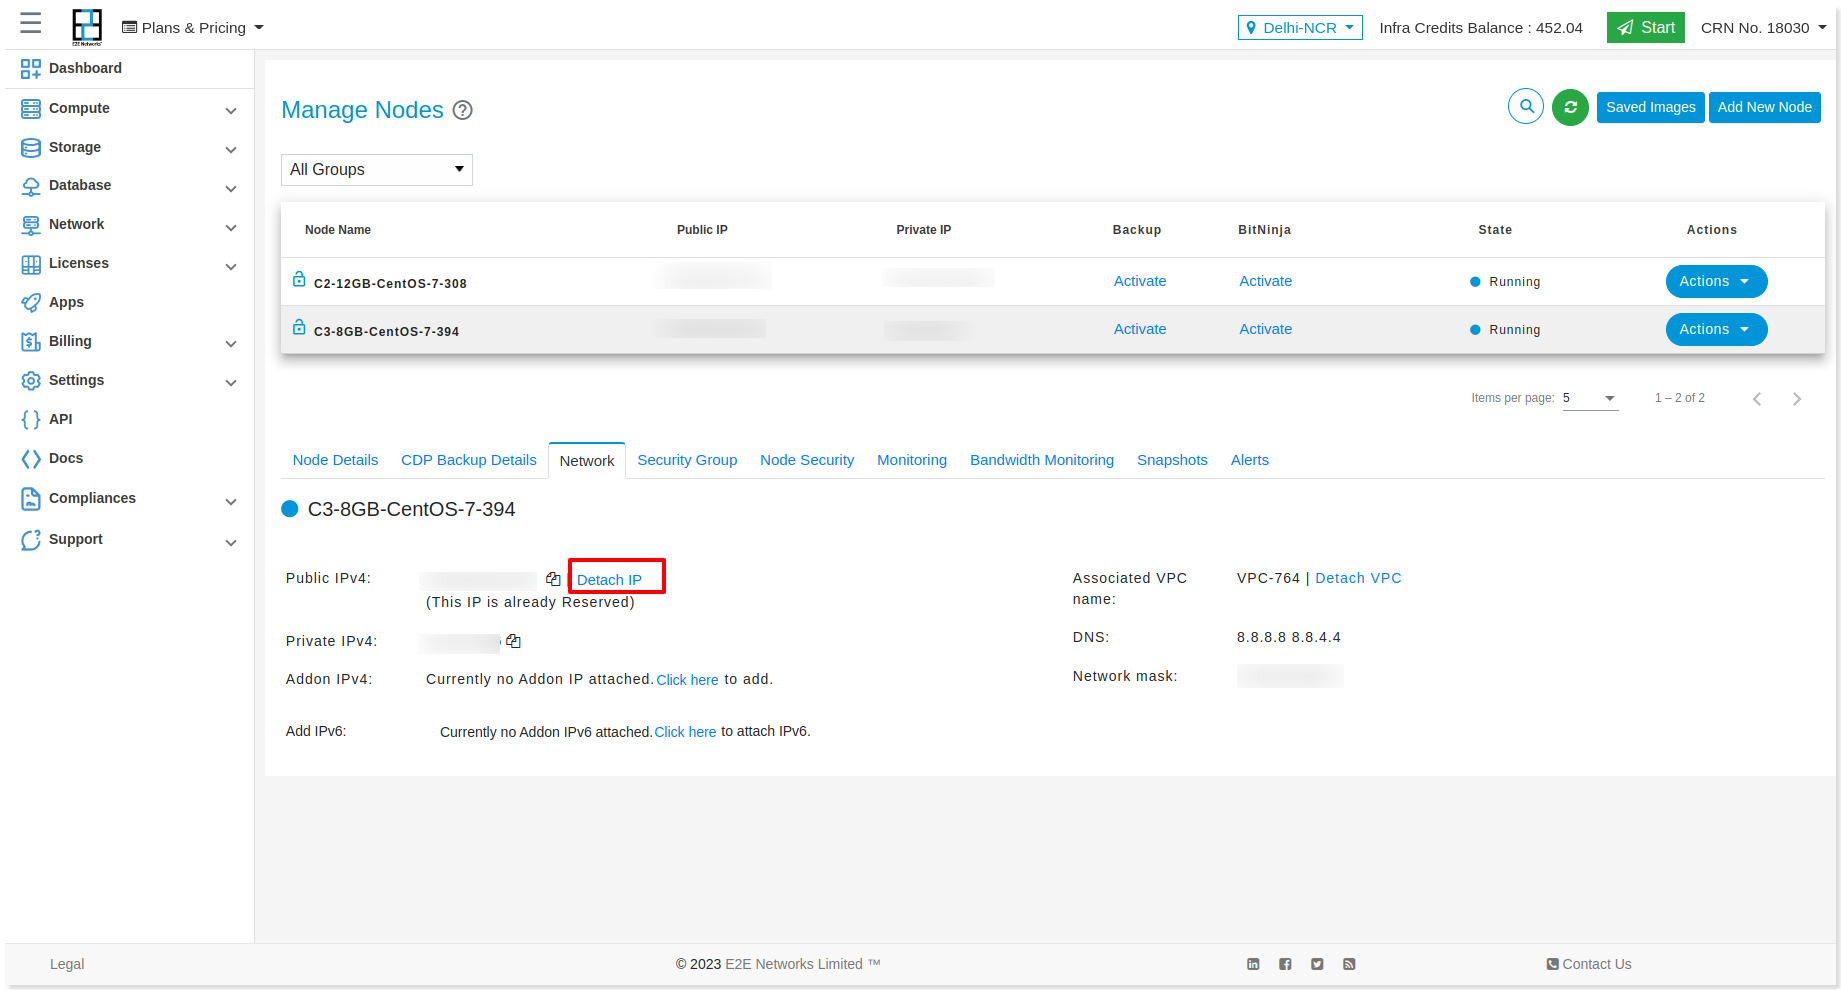
To detach primary public IP from the resource, click on the “Compute” sub-menu available under the Products section and you will navigate to the ‘Manage Nodes’ page.
Select the node from which you want to detach the primary public IP and go to the Network tab.
Click on the ‘Detach IP’ button available next to the public IPv4 address.
Note
The Primary public IP of the node will be released back into E2E Networks’s pool of public IPv4 addresses if you have not reserved it before detaching from the node.
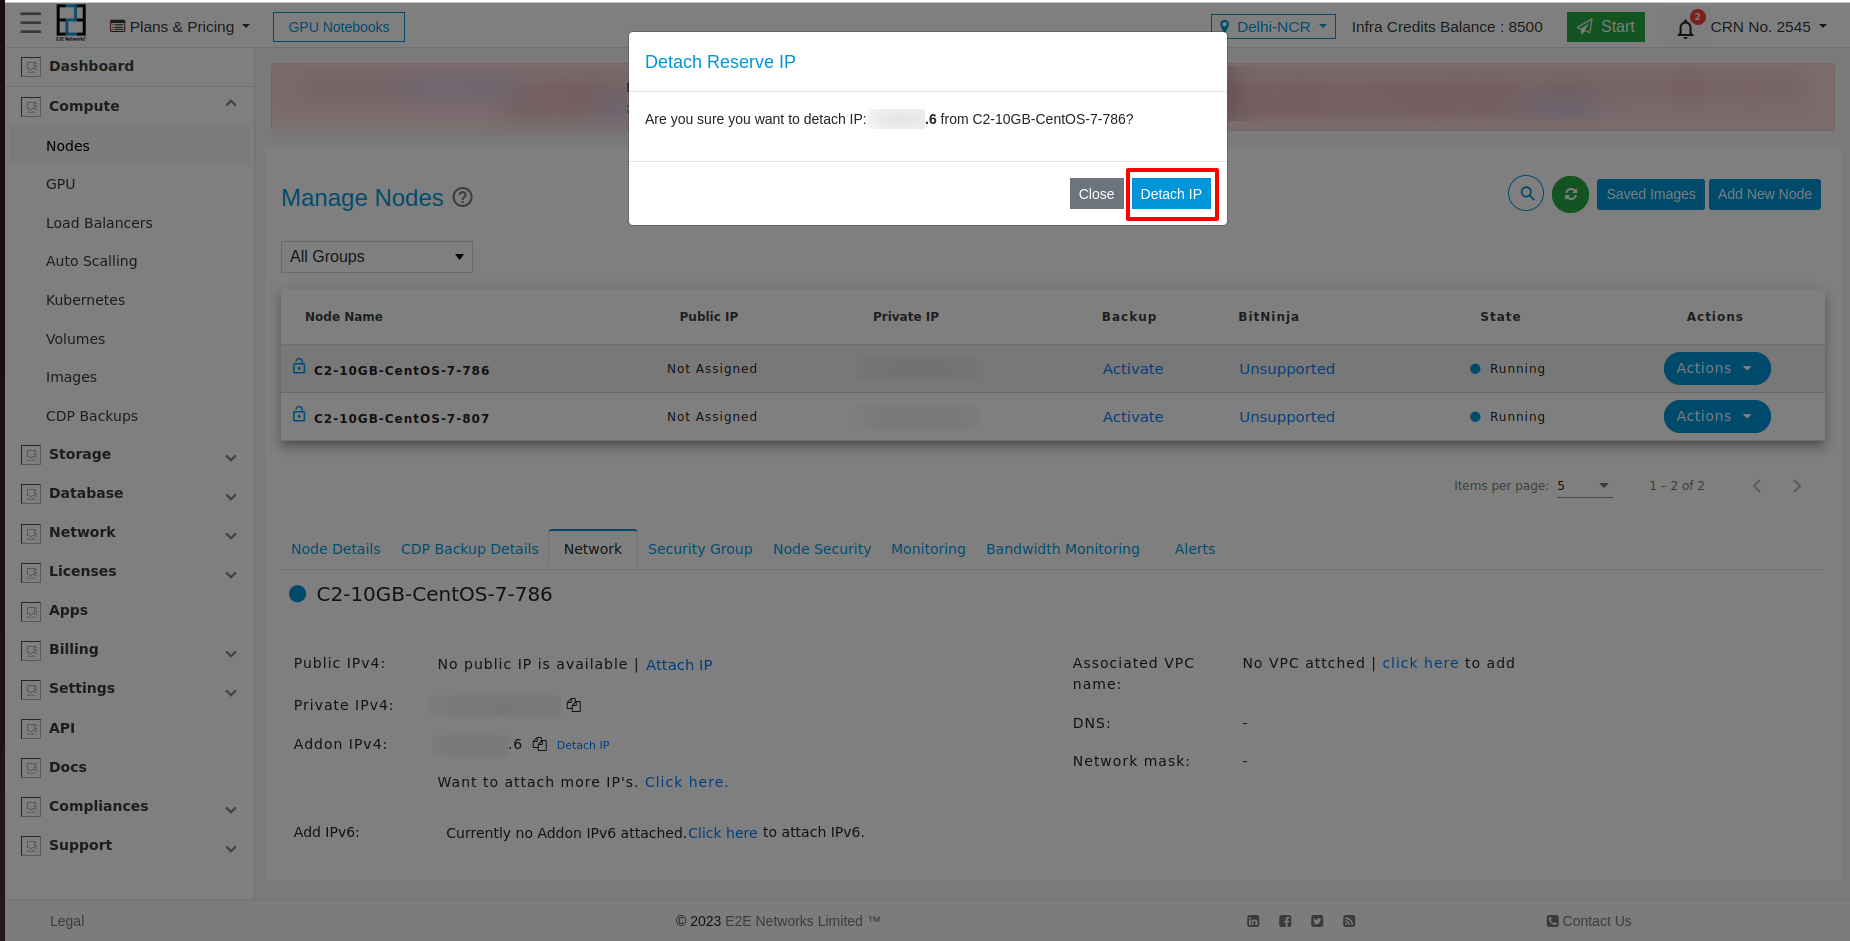
The ‘Detach Reserve IP’ pop-up window will appear.
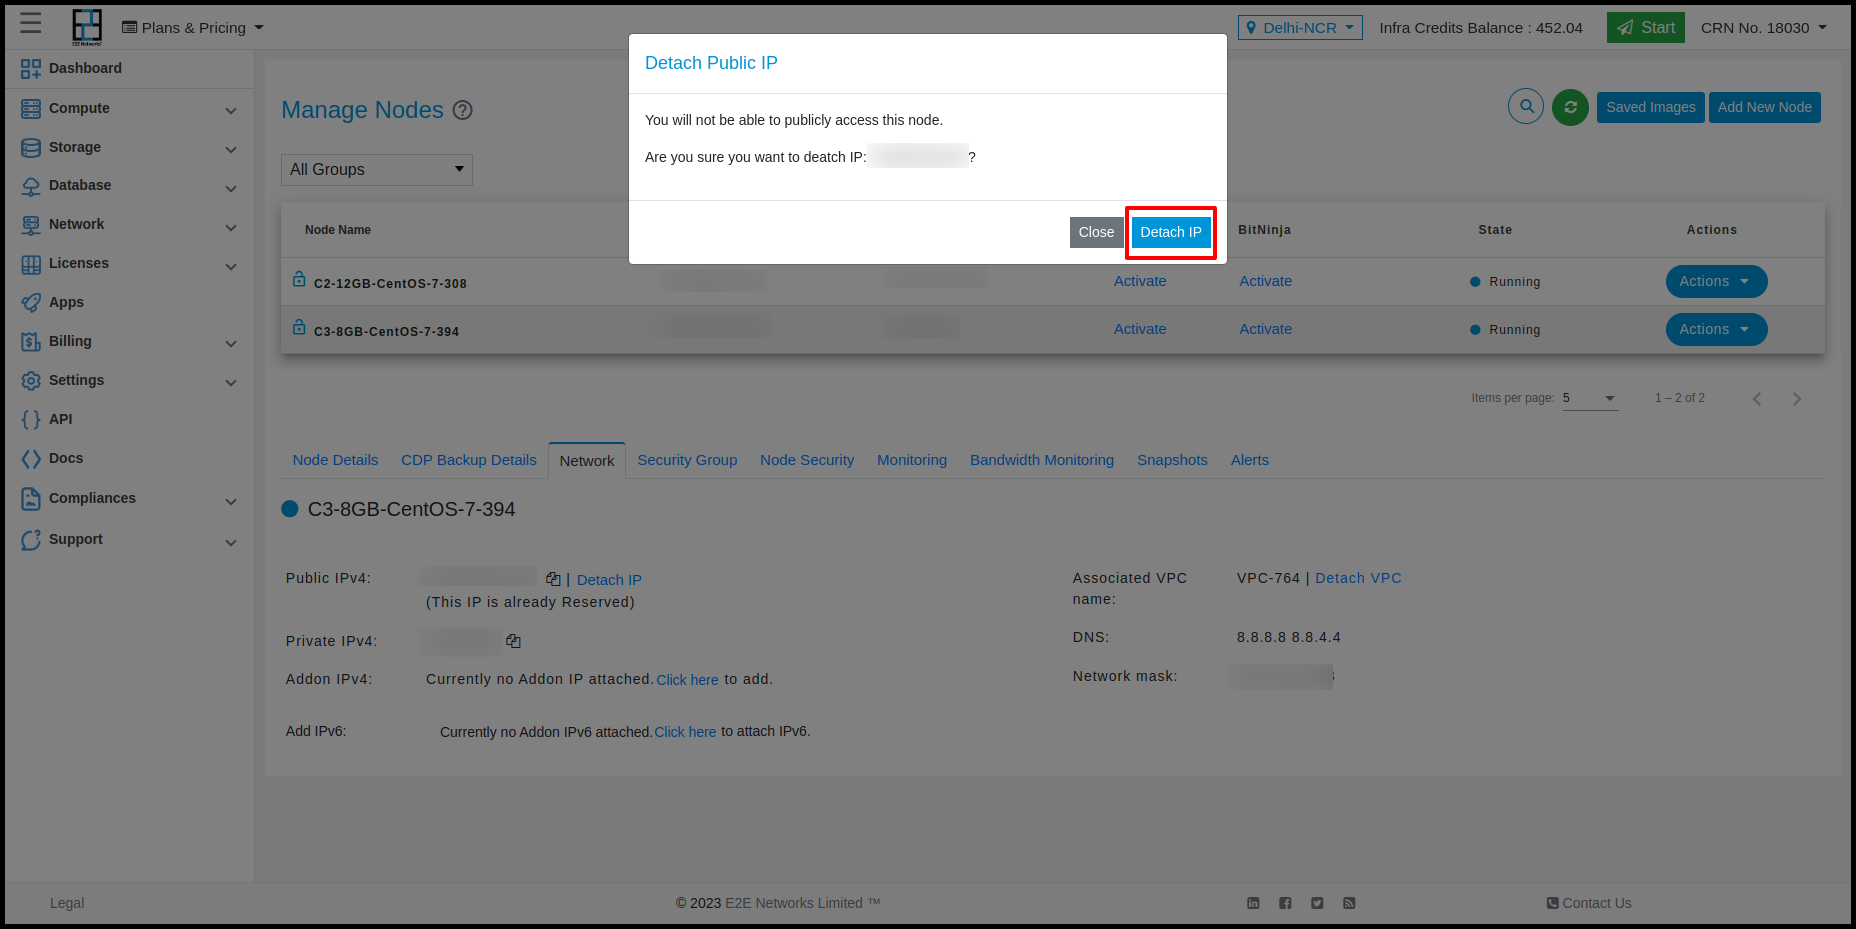
Then, click on the “Detach IP” button after reading the information on the pop-up box.
There will be no public IP available for the respective node after successfully detaching this IP.

New Load Balancer launch using Reserve IP
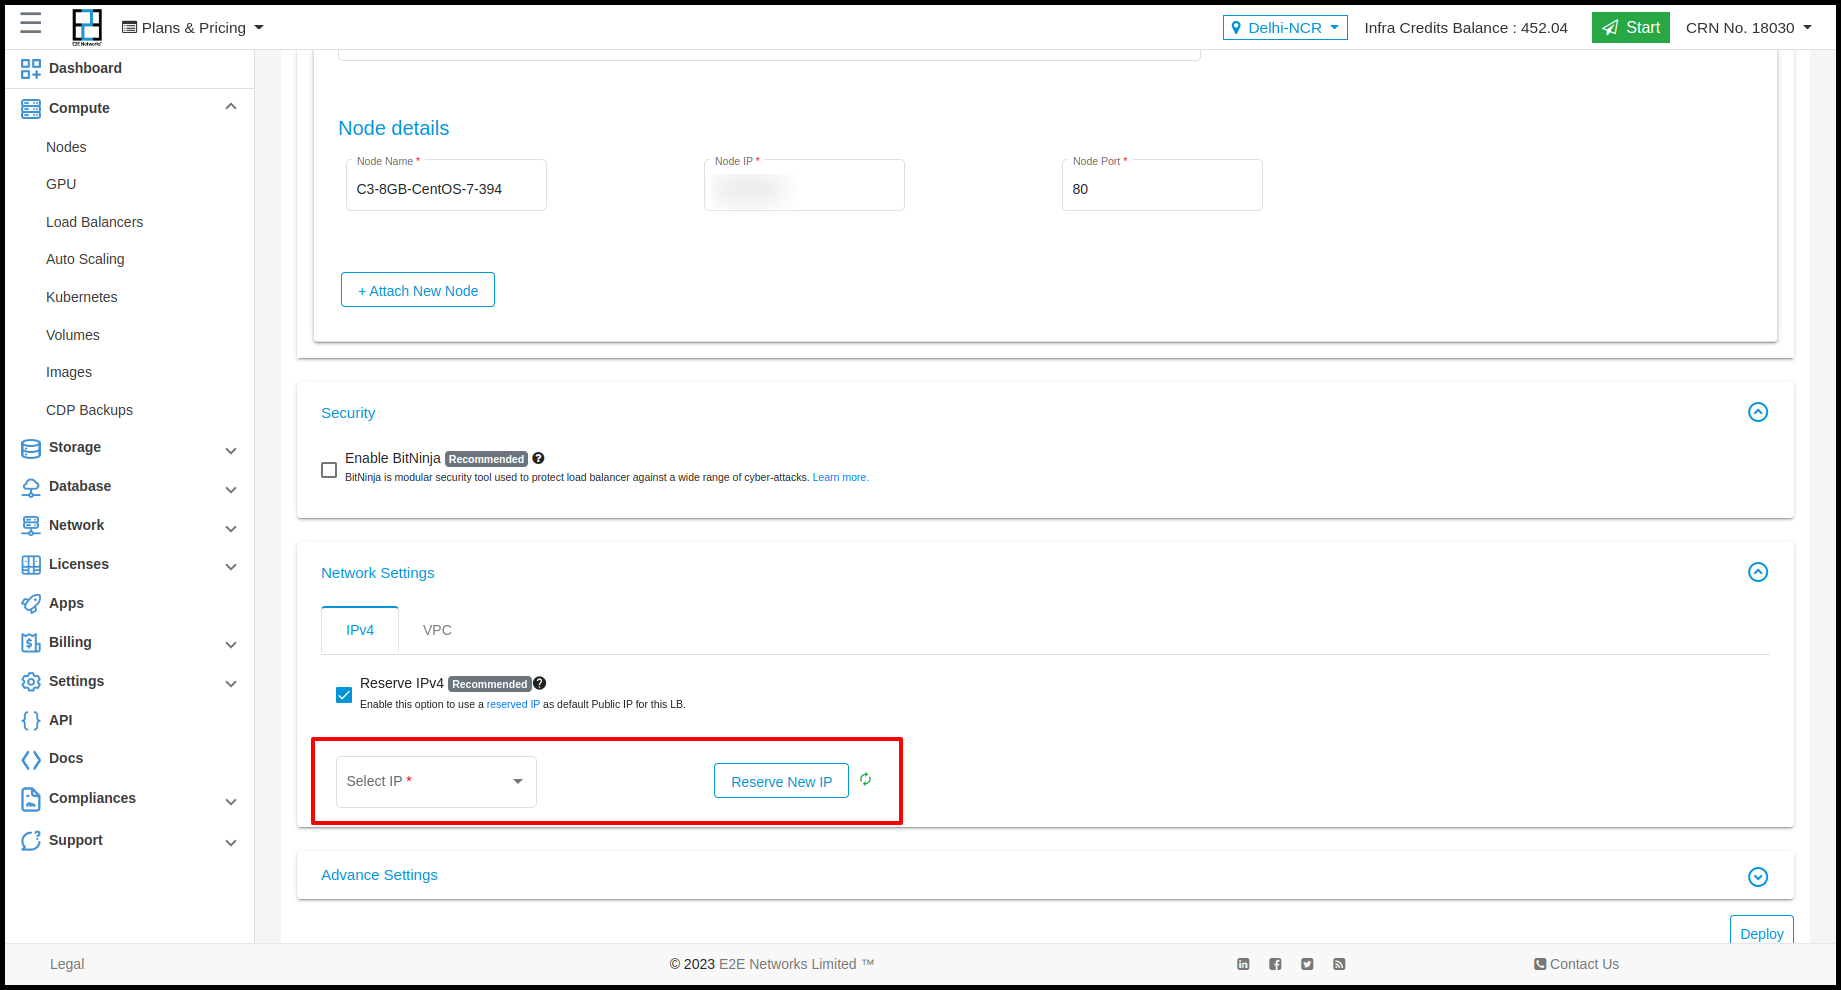
To use a reserved IP as the primary public IP of your load balancer instance you need to tick the ‘Use Reserve IP’ checkbox available under the network section while creating a new load balancer.
From the ‘Select IP’ drop-down list please select the reserved IP that you wish to assign as primary public IP.
In case, you don’t have a Reserve IP or wish to Reserve New IP then click on the ‘Reserve New IP’ button to get a new public IP from the IP address pool. The ‘Reserve New IP’ pop-up window will appear.
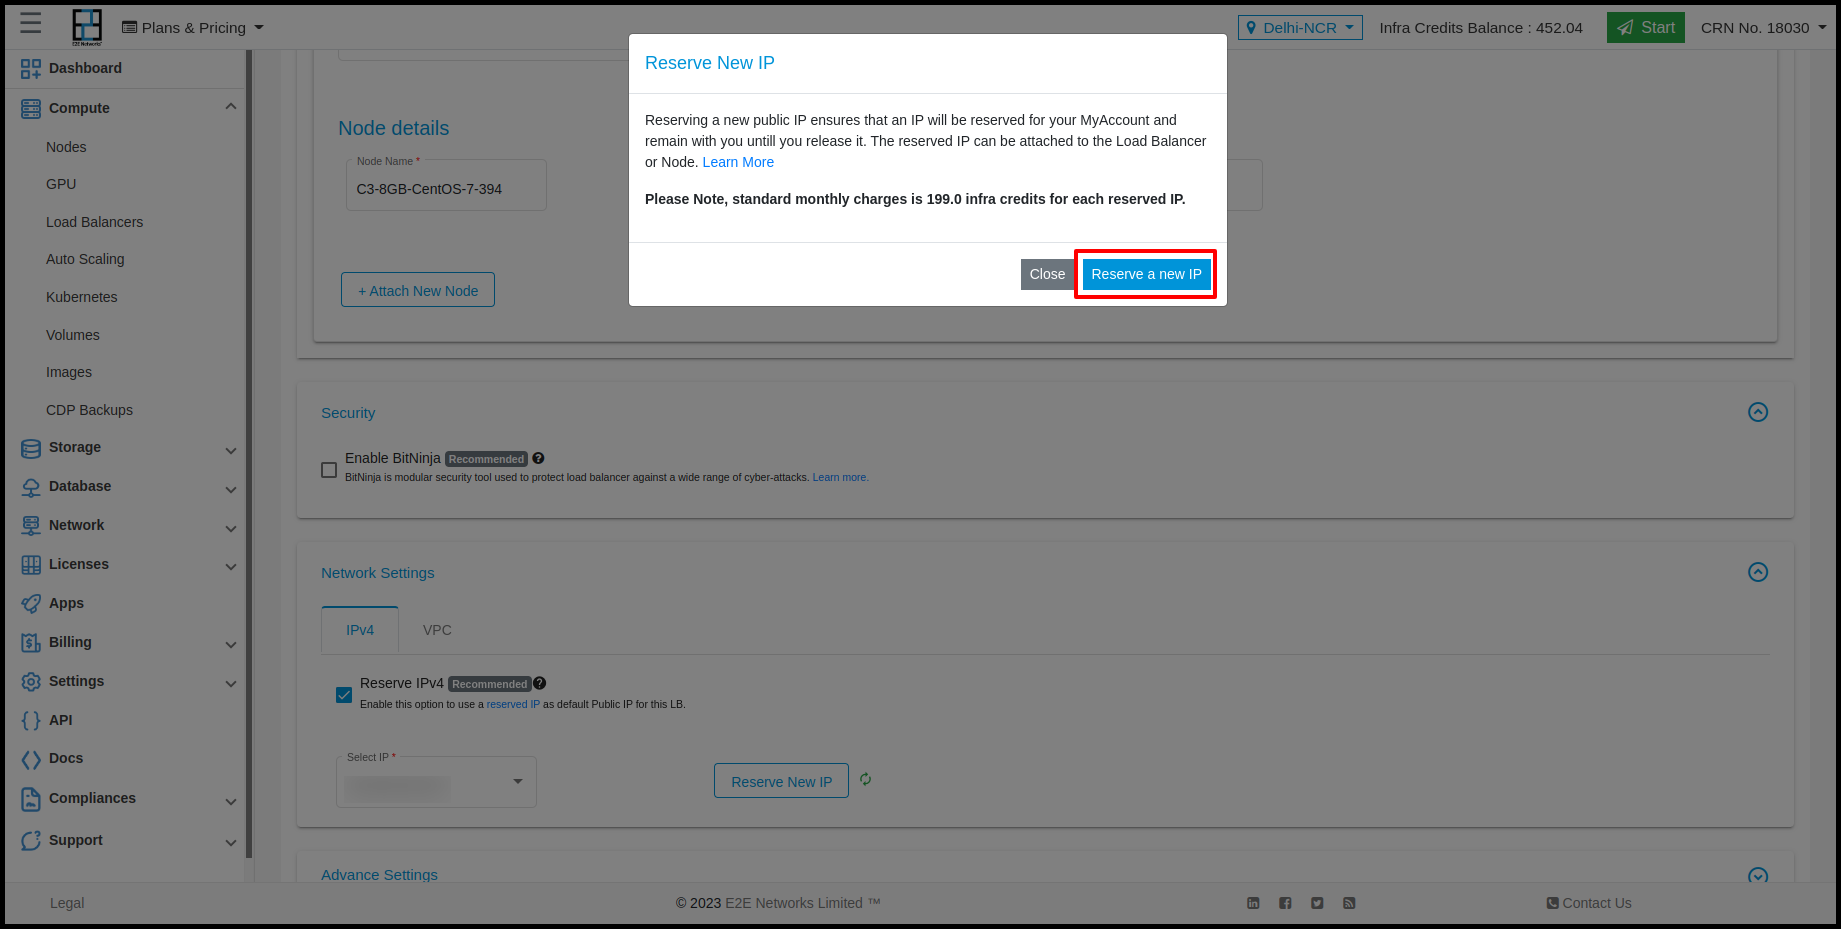
Click on the “Reserve a new IP” after reading the information on the pop-up window. A new public IP address will be reserved and it’s listed in the dropdown list of the ‘Select IP’ drop-down list.
After selecting the reserved IP and specifying the backend and frontend configurations for the new load balancer you’re creating. Click on the ‘Deploy’ button.
It will take a few minutes to set up the load balancer and you will be taken to the ‘Manage Load Balancer’ page.
Reserve Load Balancer’s Default Public IP Address
You can also reserve a Load Balancer’s default public IP while terminating the load balancer. For this, click on the “Load Balancer” sub-menu available under the Products section and you will be Navigate to ‘Manage Load Balancer’ page.
Select the load balancer and go to the load balancer details tab.
Click on the ‘Want to reserve this Public IP Click Here’ button available below the public IPv4 address in the load balancer details tab.
The ‘Reserve IP Address’ pop-up window will appear.
Click on the ‘Reserve IP’ button after reading the information on the pop-up window.
You will get a confirmation message and public IP will be reserved for your MyAccount.
Else
Also, When you are going to terminate a node by clicking on Actions button and selecting the ‘Delete’.
The ‘Delete Load Balancer’ pop-up window will appear. Here, you have an option to Reserve public IP by tick the ‘Reserve the LoadBalancer’s IP’ checkbox after reading the information on the pop-up window and click on the ‘Delete’ button.
The Load Balancer’s IP address will be reserved for your MyAccount.
This reserved IP will be listed in the table of the Manage Reserved IP page. This reserved IP status will be ‘Available’ because it’s not attached to any resource.
Detach Load Balancer’s Primary Public IP
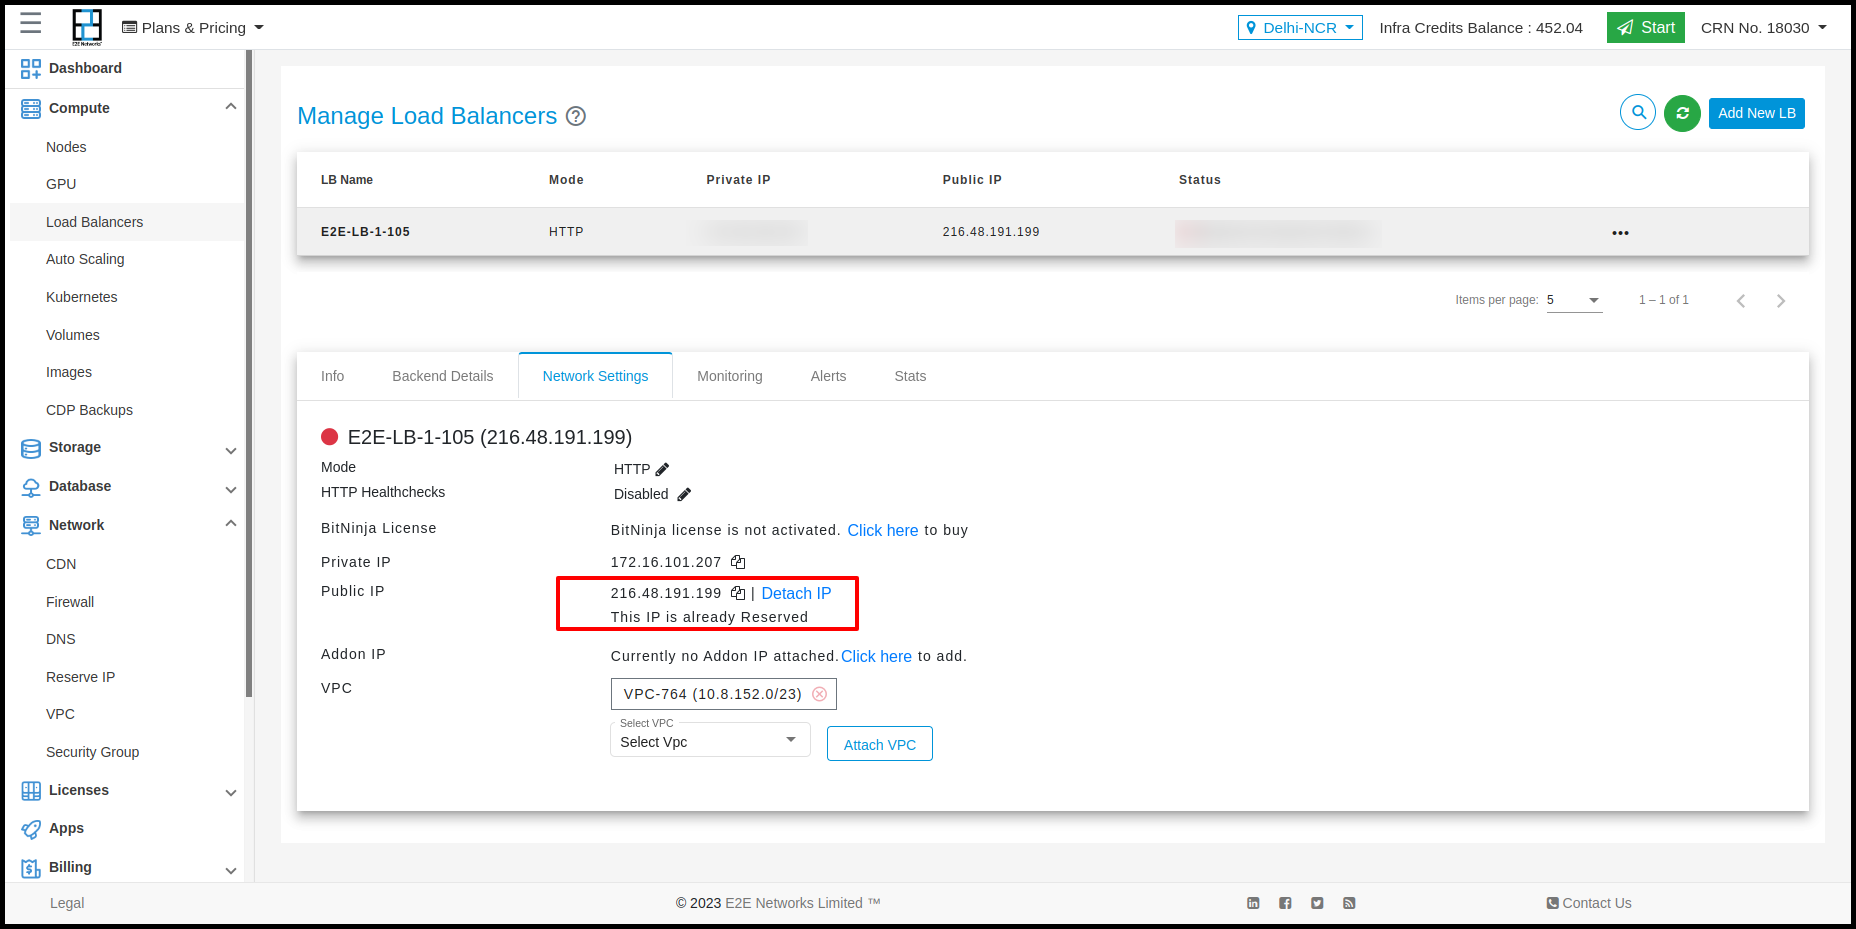
To detach primary public IP from the resource, click on the “Load Balancer” sub-menu available under the Products section and you will navigate to the ‘Manage Load Balancer’ page.
Select the load balancer from which you want to detach the primary public IP and click on the ‘Detach IP’ button available in the load balancer details tab.
Note - The Primary public IP of the node will be released back into E2E Networks’s pool of public IPv4 addresses if you have not reserved it before detaching from the load balancer. - The ‘Detach Reserve IP’ pop-up window will appear.

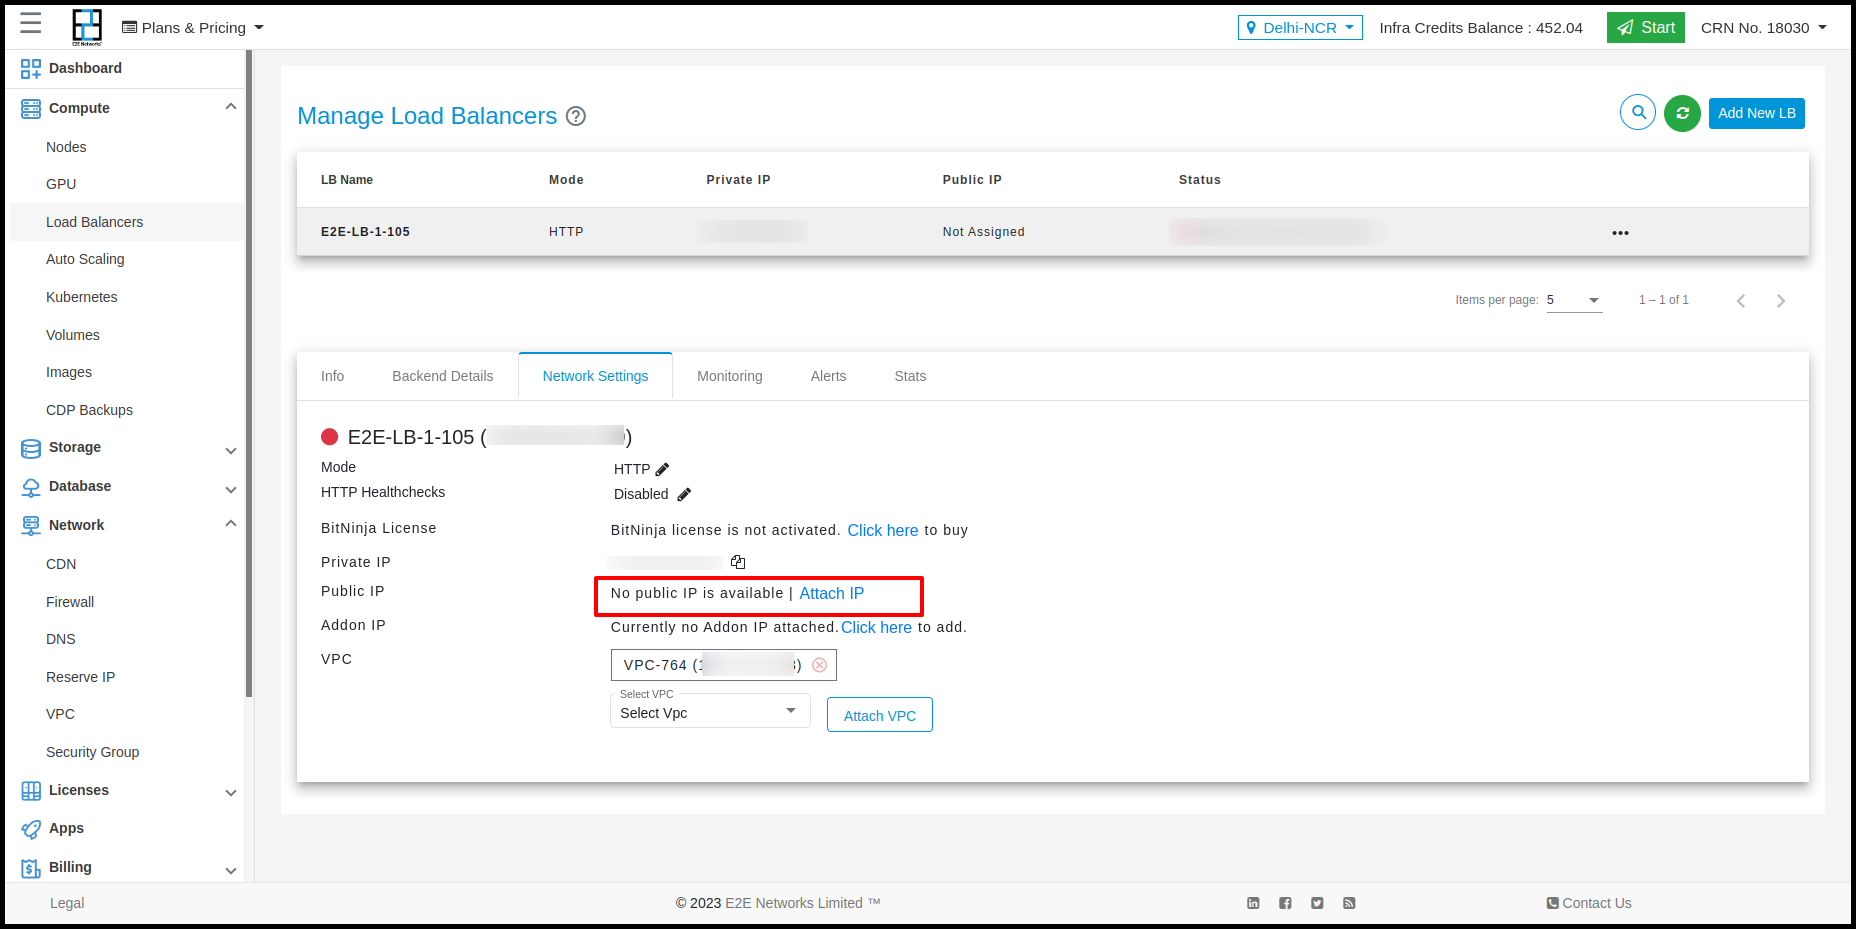
Then, click on the “Detach IP” button after reading the information on the pop-up box.
There will be no public IP available for the respective load balancer after successfully detaching this IP.
Reserve IP Pool
Introduction
Reserve IP pool, also called customer-owned IP address pool, is a reserved range of IP addresses that customers can use to connect their on-premises network to resources in their Outpost subnets, either locally or externally.
For adding customer owned IP pool, Customer needs to mail on sales@e2enetworks.com
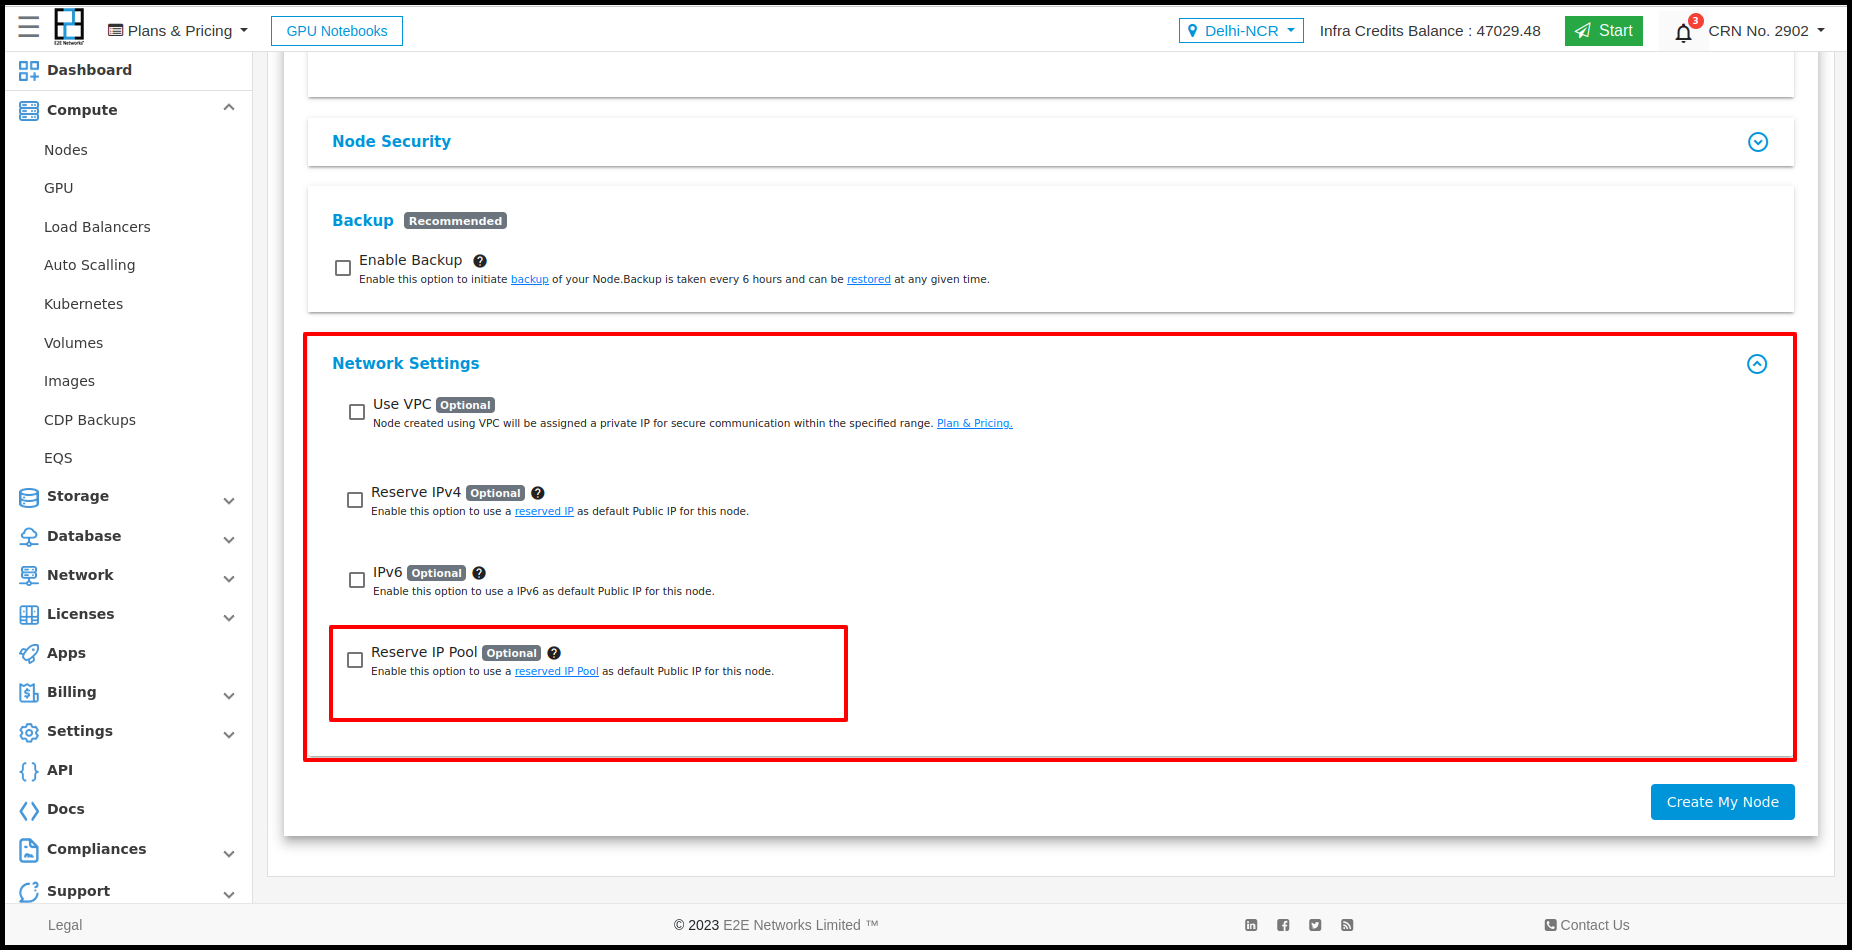
New Node launch using Reserve IP Pool
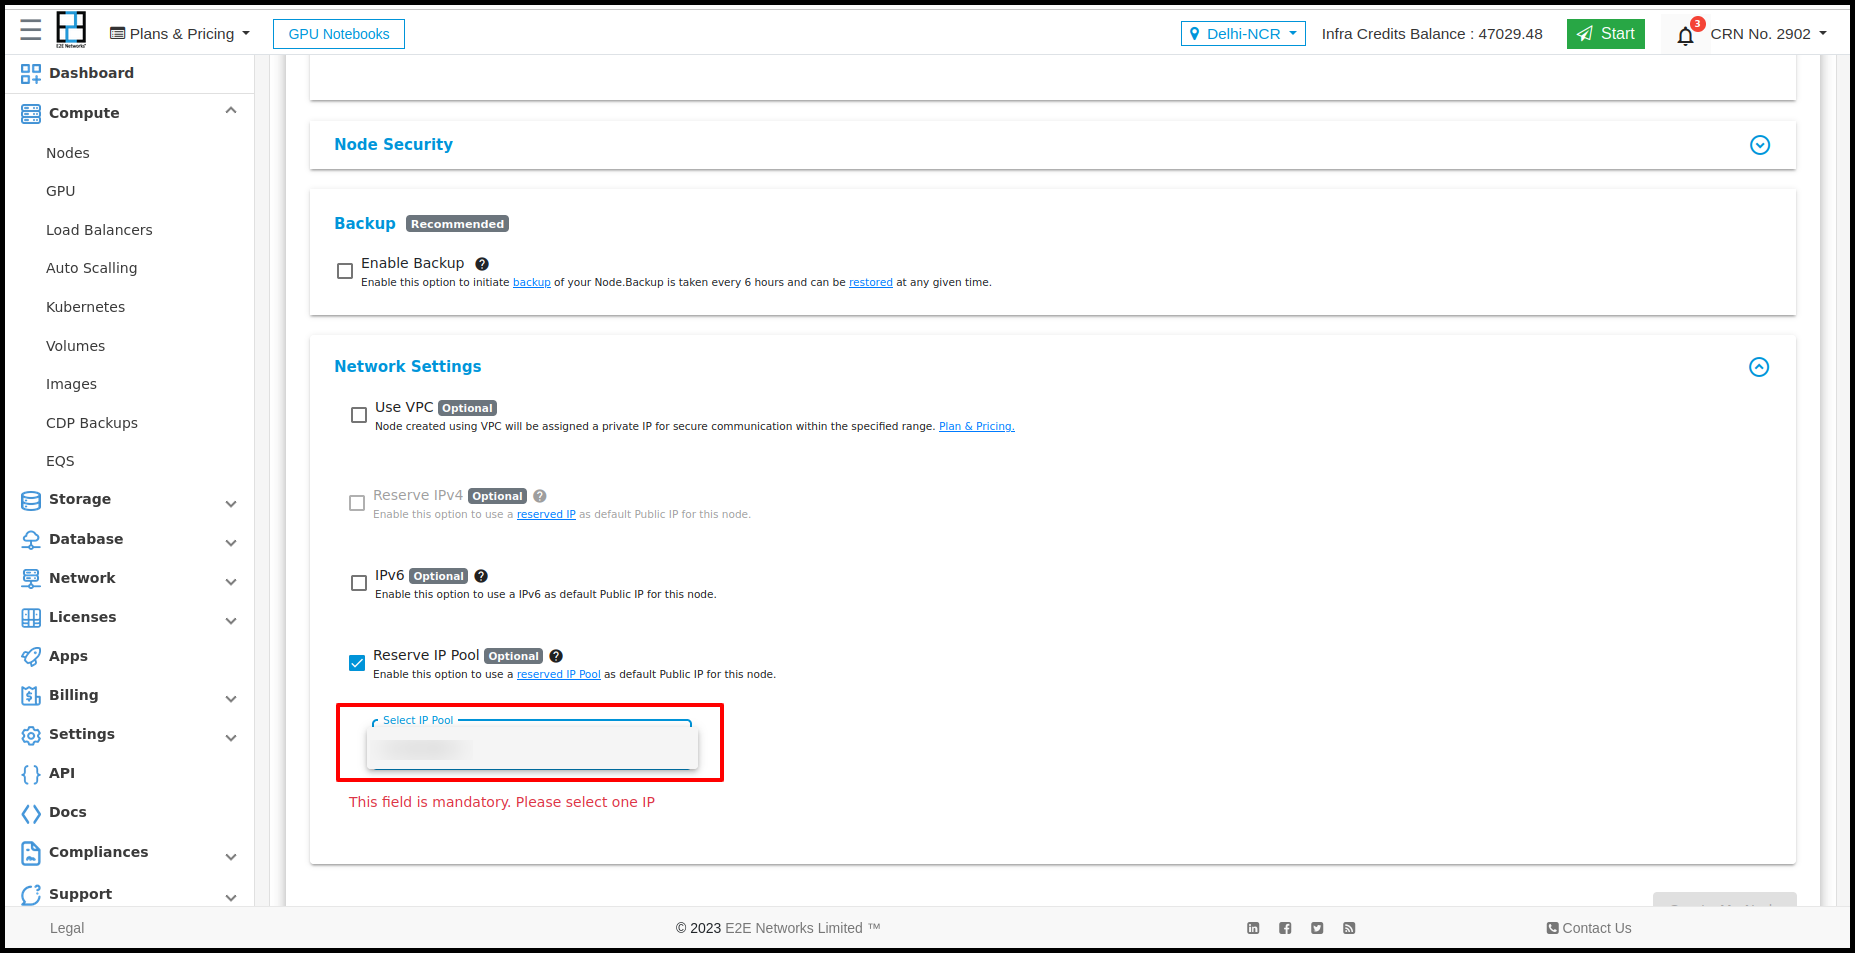
To use a reserved IP Pool as the IP for your node you need to tick the ‘Reserve IP Pool’ checkbox in the networks section while creating a new Node.
From the ‘Select IP Pool’ drop-down list please select the reserved IP Pool that you wish to assign as the Private IP.
The attached reserve IP Pool IP is shown in the AddOn IPV4.
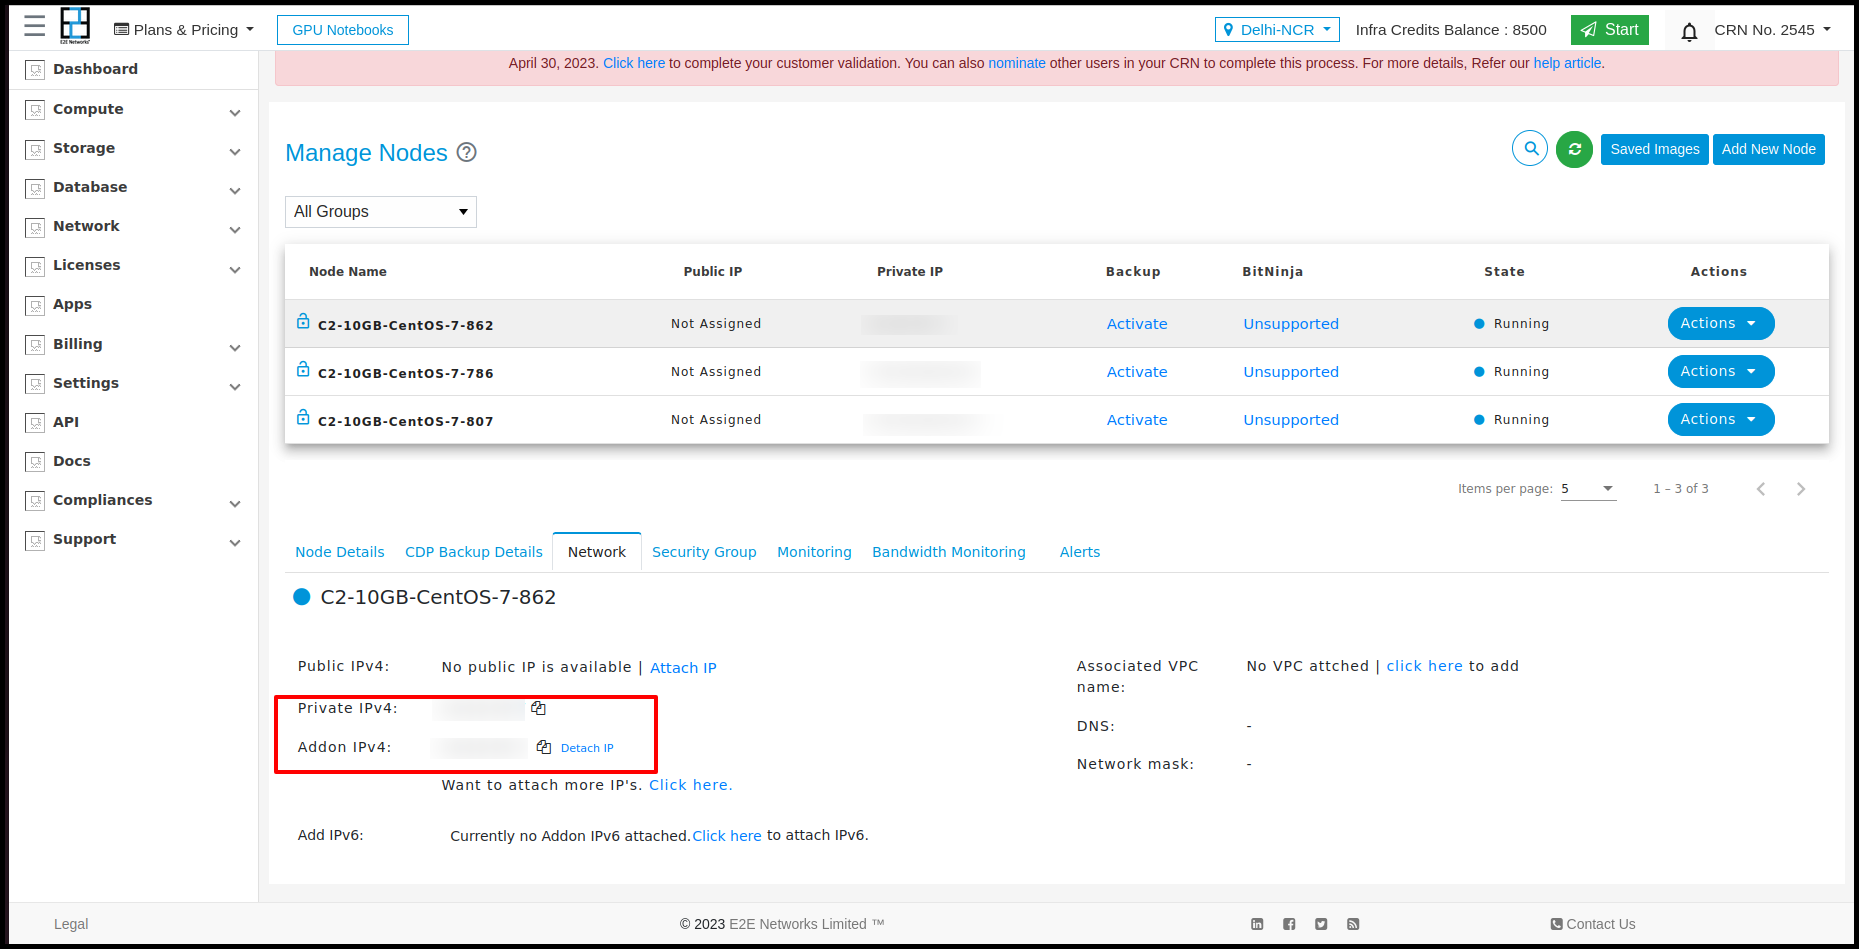
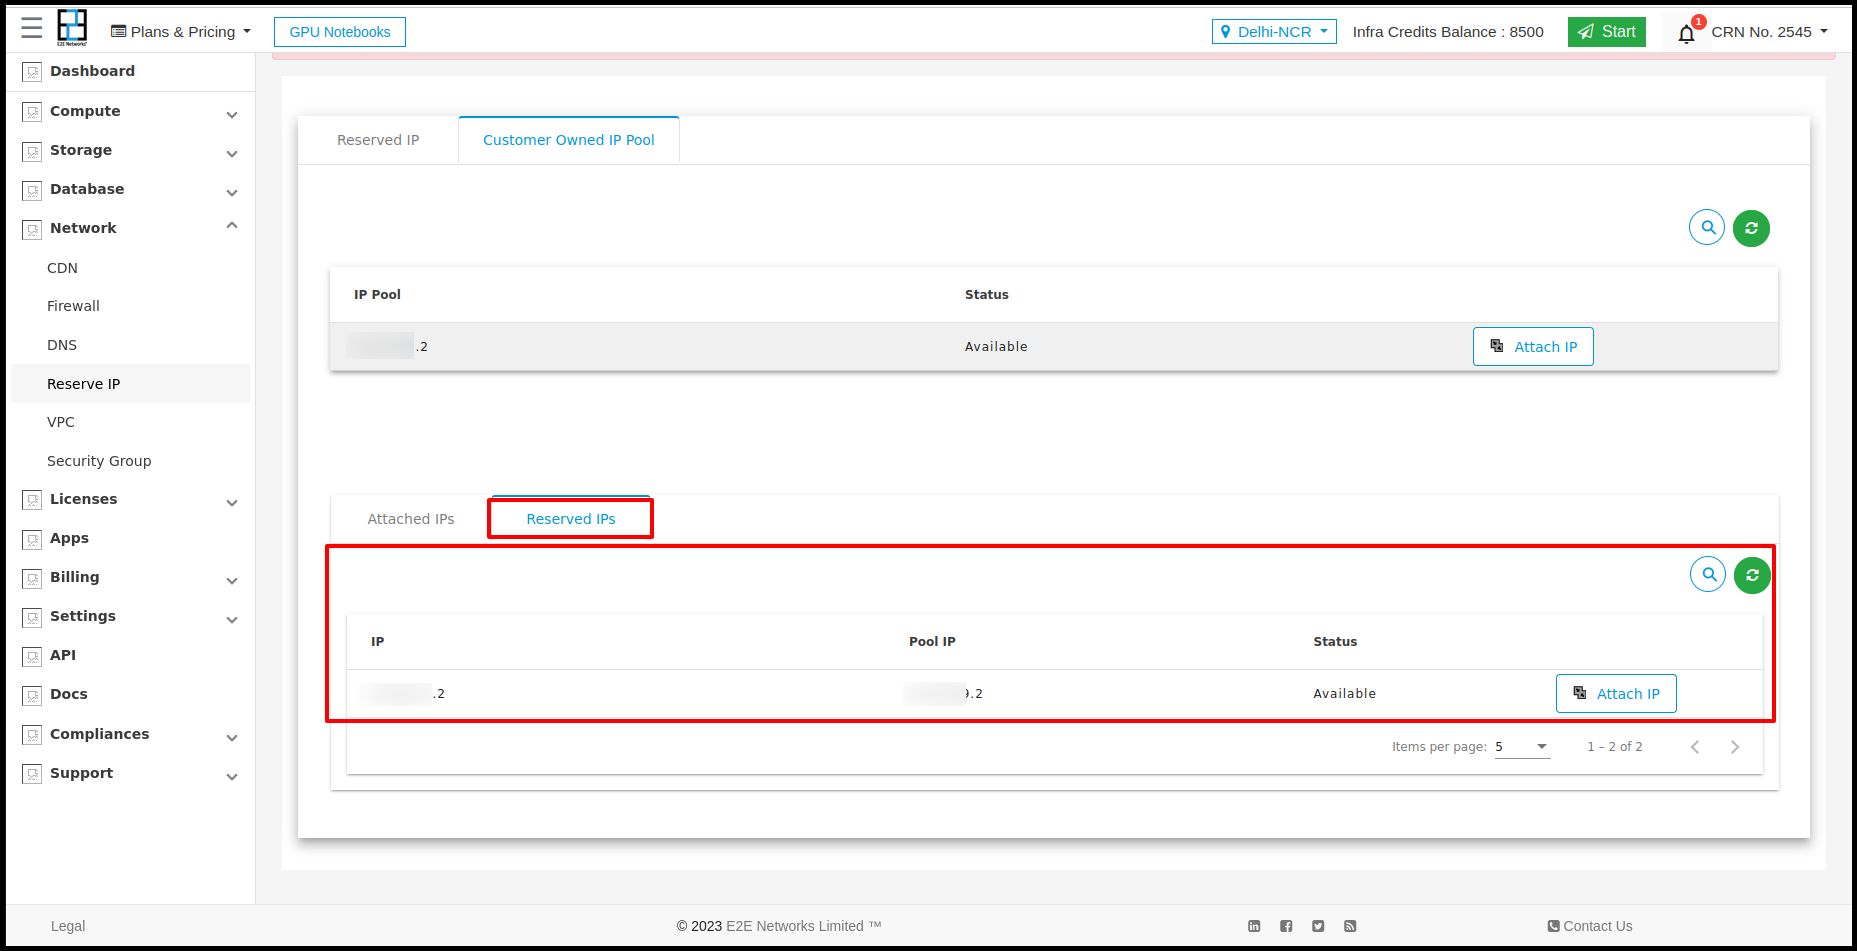
Customers can see the Reserve IP Pool from the Networks section>Reserve IP> Customer Owned IP Pool section.
From the Customer Owned IP Pool section customers can attach Reserve IP Pool to the Node.
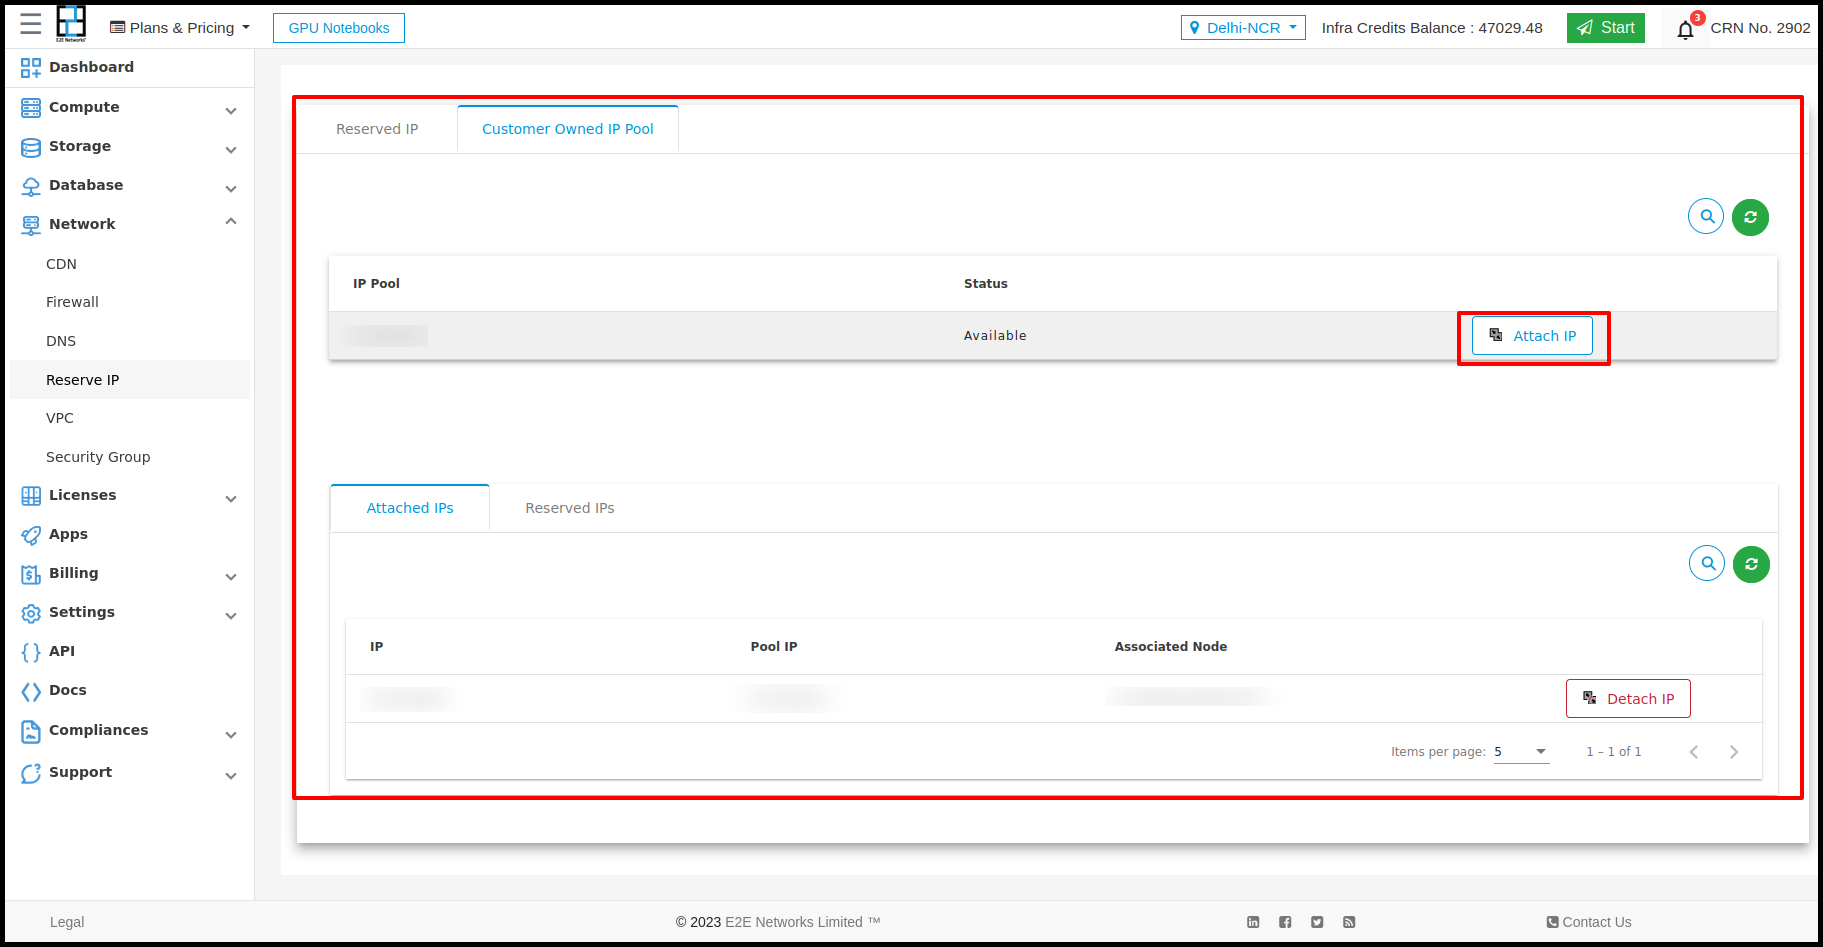
The attached IPs will be shown in the list.
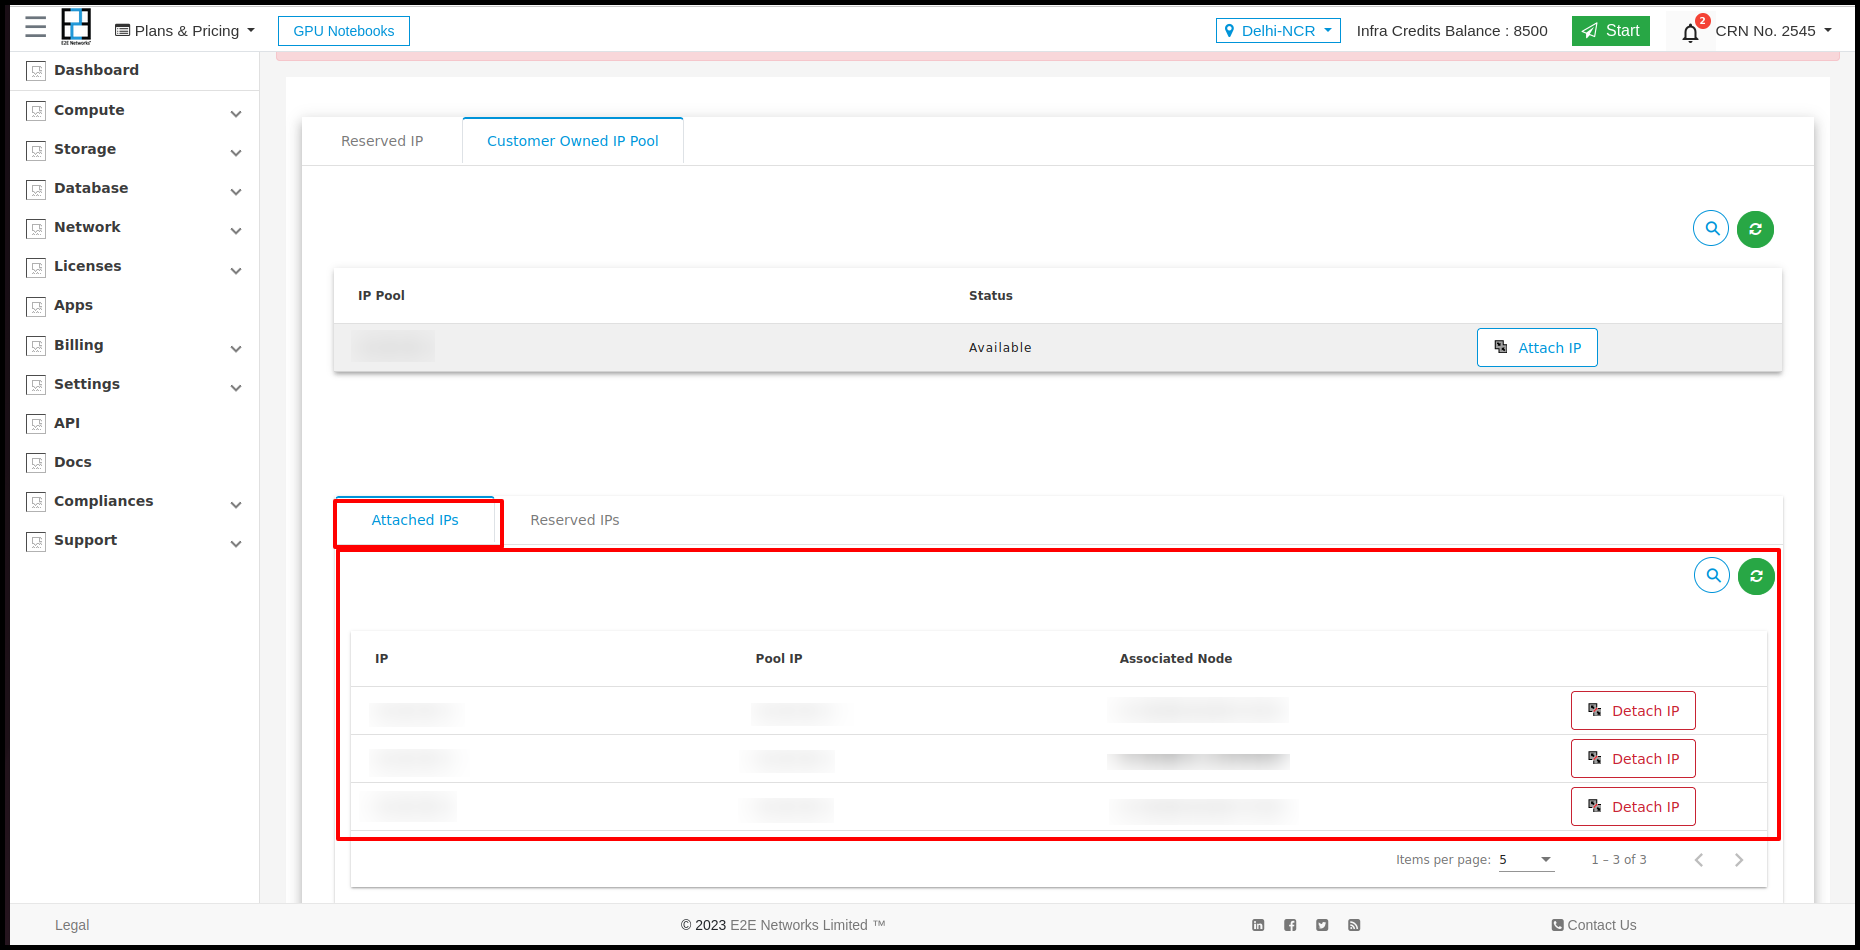
Those attached IPs can be Detached from Detach IP tab.

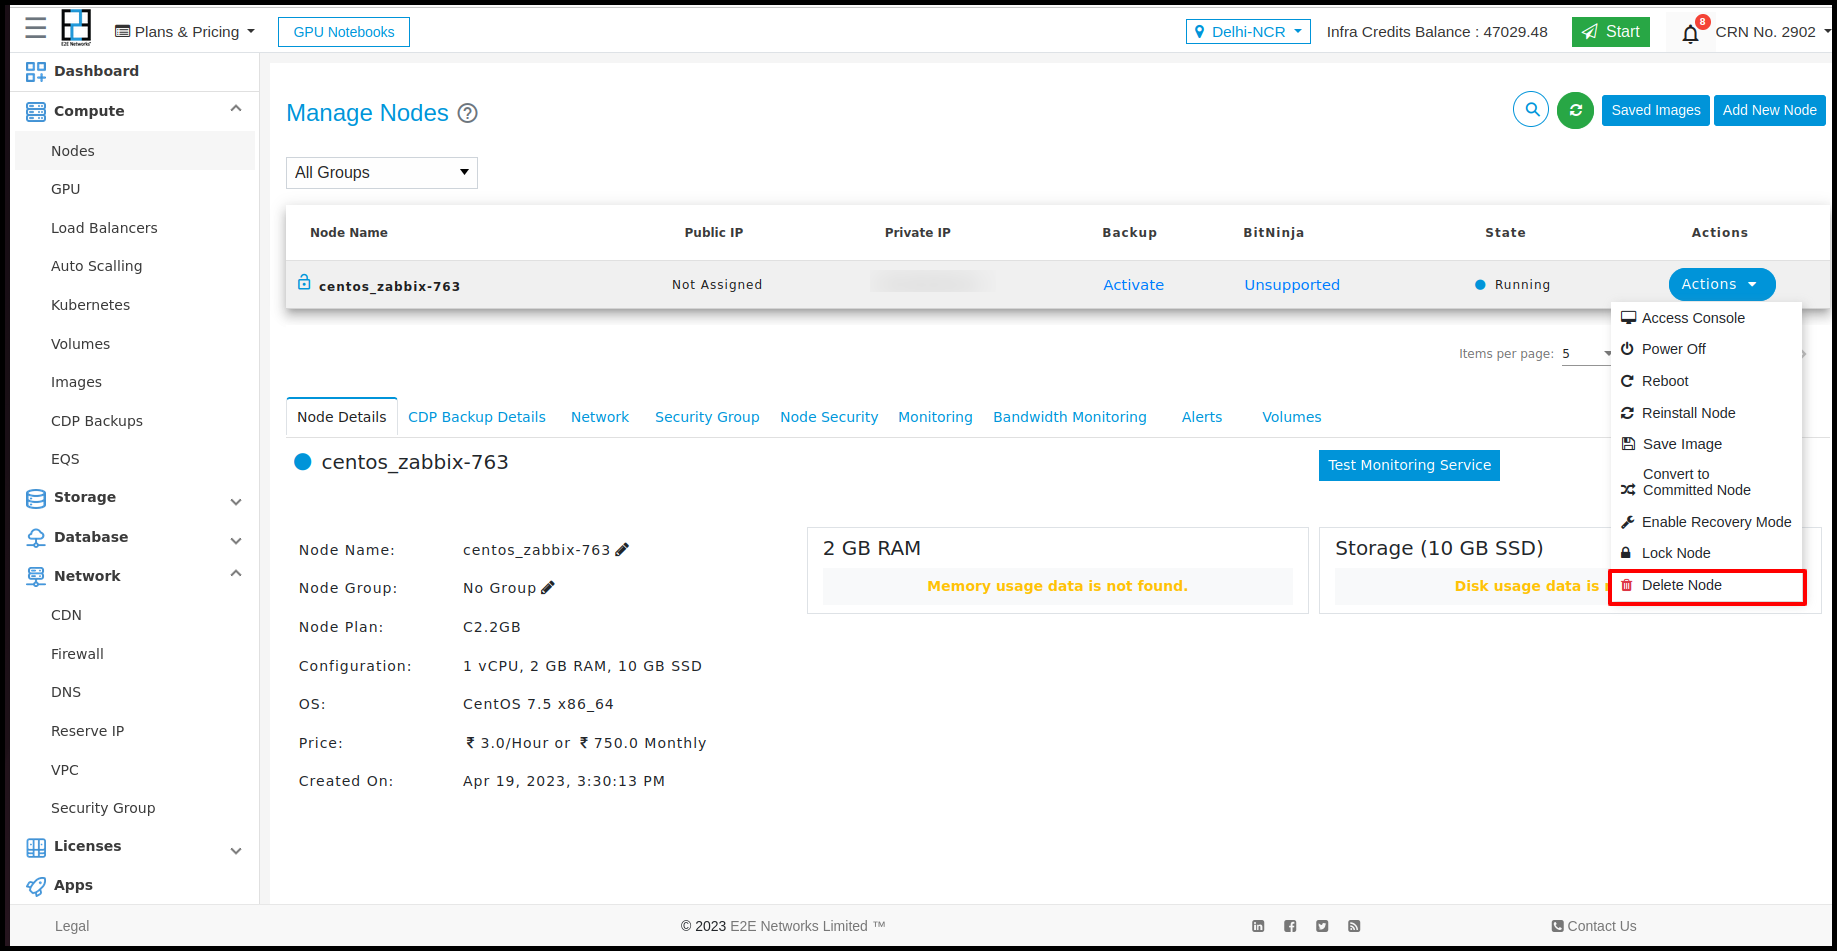
How to manage reserve IP Pool on Node Deletion ?
When you are going to terminate a node by clicking on the ‘Delete Node’ button available in the node Action tab.
The ‘Delete Node’ pop-up window will appear. Here, you have the option to Reserve IP by tick the I want to reserve IP from the pool attached to Node checkbox after reading the information on the pop-up window and click on the ‘Delete’ button.
The Node’s IP address will be reserved for your MyAccount.
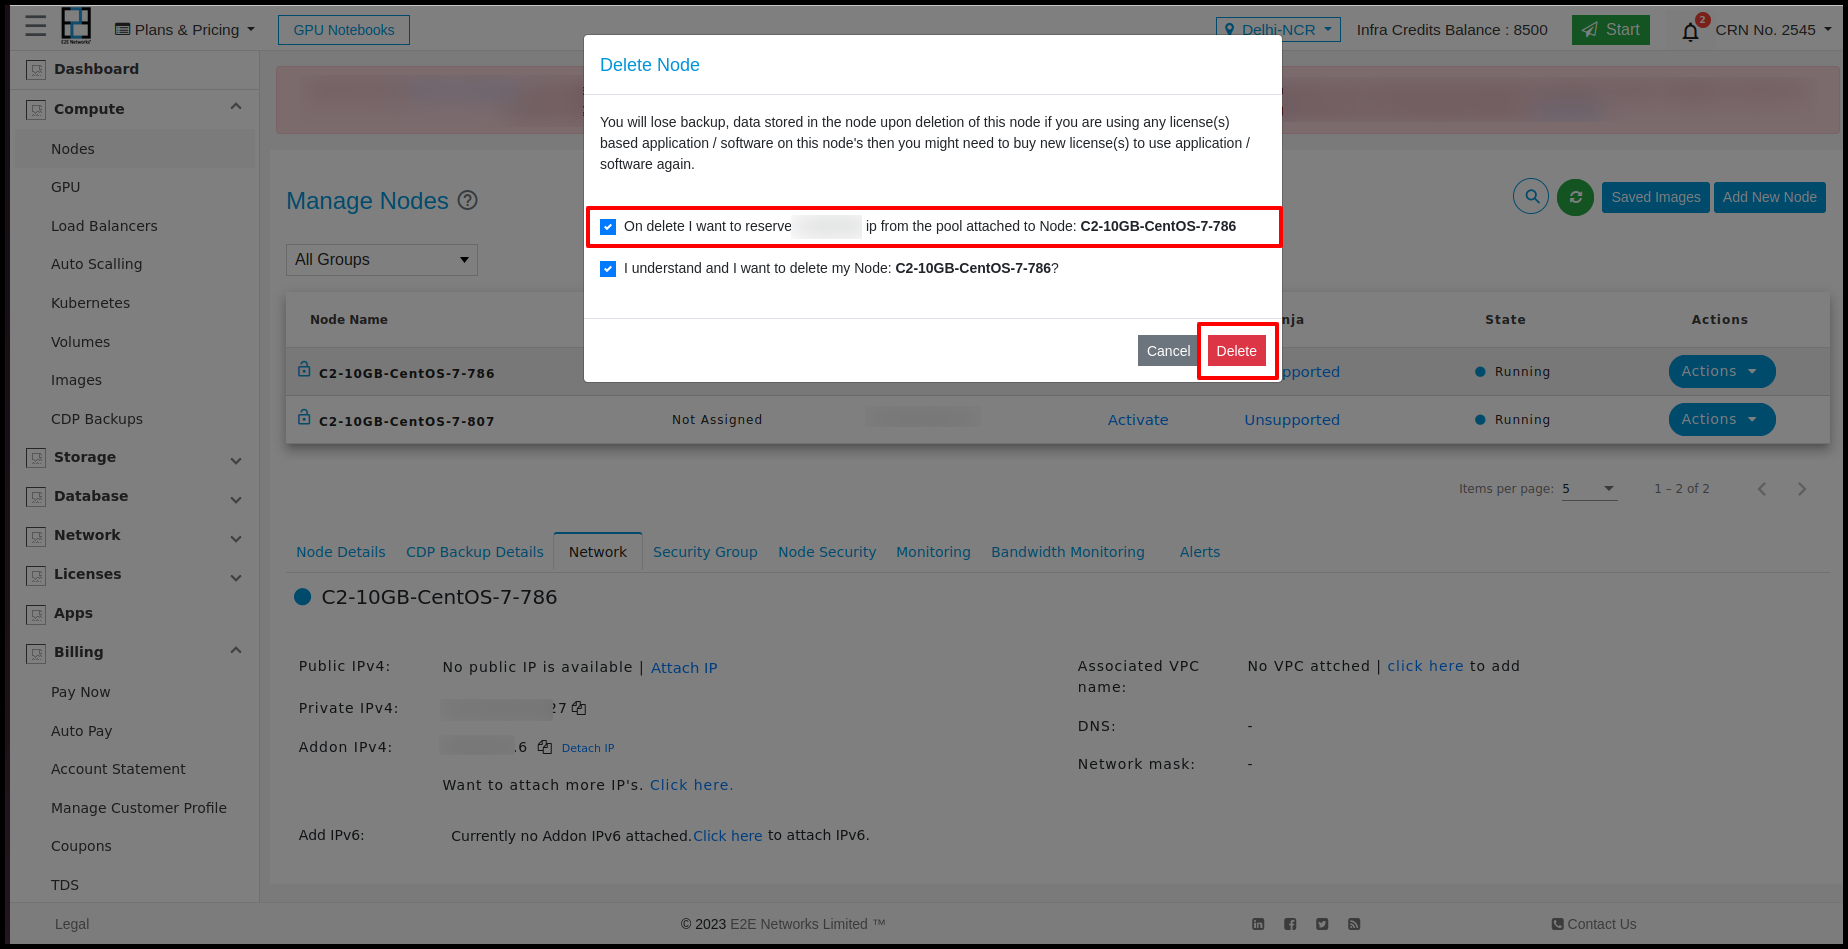
This reserved IP will be listed in the table of the Customer Owned IP Pool Reserved IPs section. This reserved IP status will be ‘Available’ because it’s not attached to any resource.
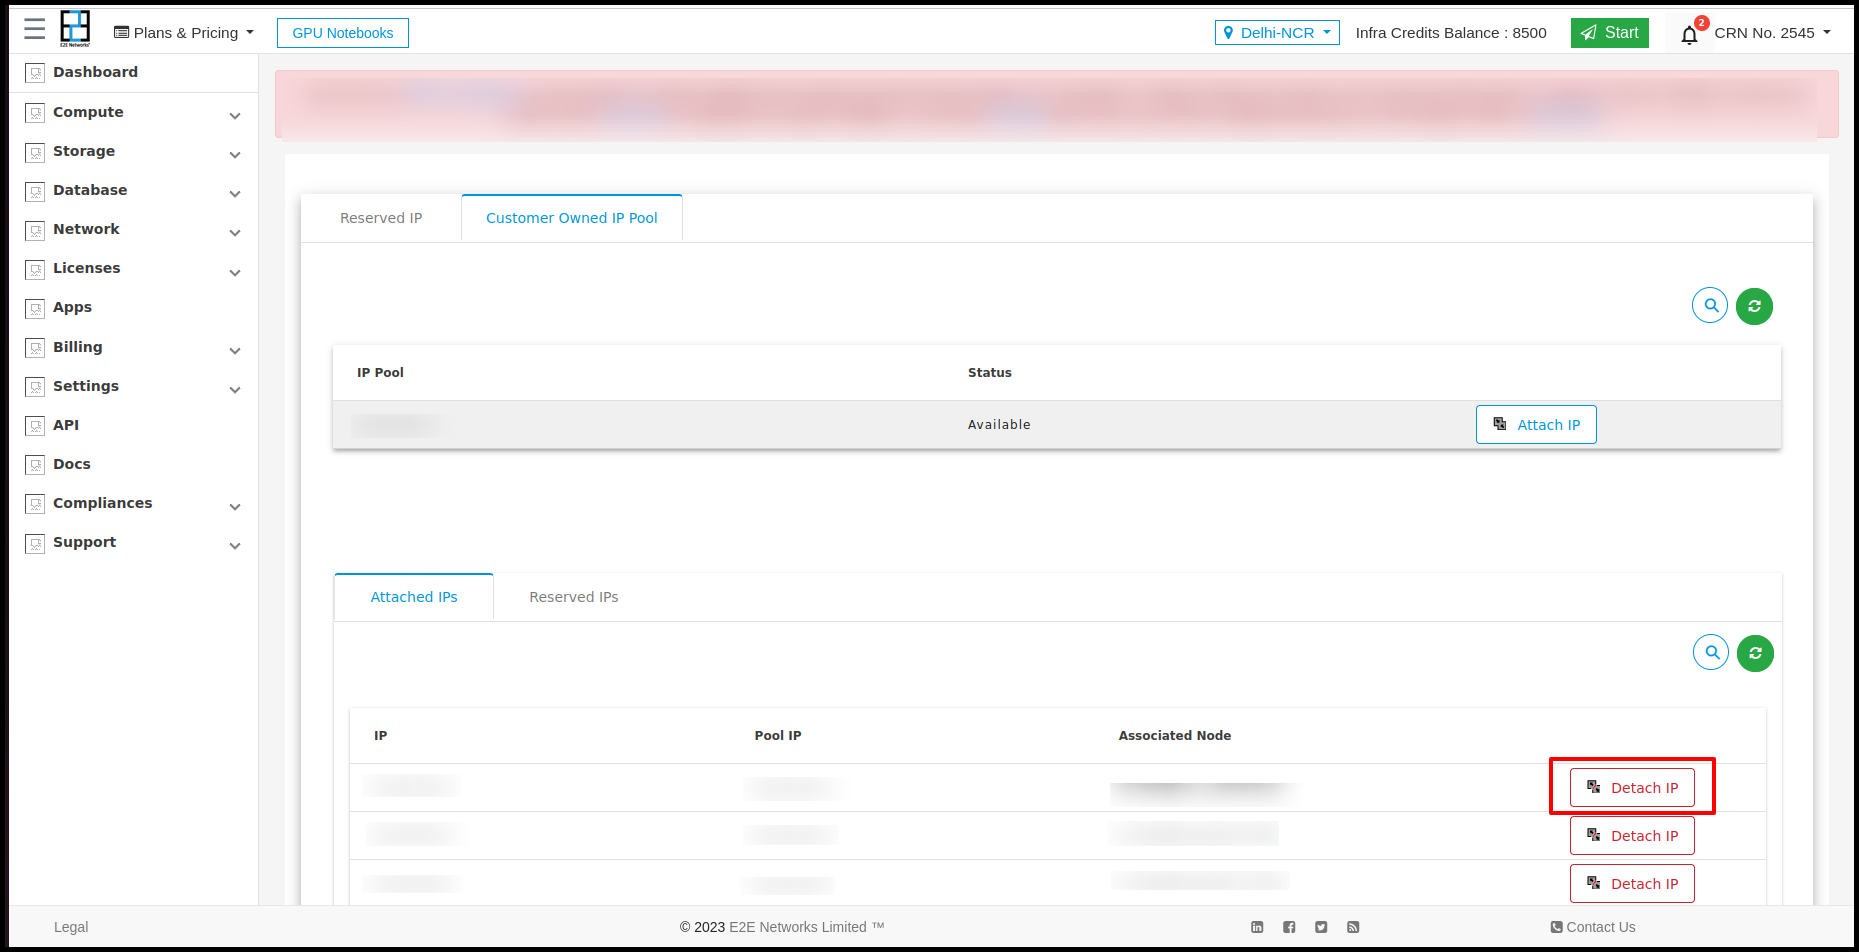
Detach Reserve IP Pool from Node
Click on the ‘Detach IP’ button available next to the public IPv4 address.
The ‘Detach Reserve IP’ pop-up window will appear.
Then, click on the “Detach IP” button after reading the information in the pop-up box.