Jenkins - CI Tool
The IT industry is now quickly moving towards using containers in software development. The reason behind this is that the containers are a very cost-effective solution, and also they decrease the time needed for development. To manage these containers, orchestration tools like it come into play and business needs to set up with. However, before taking you further, let’s get a quick idea about Jenkins and Kubernetes.
It is an open-source tool created by Google; it manages containers and also takes care of their failure. It supports the majority of CI/CD tools and Kubernetes Security tools which allow developers to run tests, deploy builds and update the application without any downtime.
Click here to know more about Kubernetes Architecture and its Components It is one of the most popular CI/CD tools; it is so popular because it monitors tasks repeatedly. During the development phase and shows errors in the early stages of the development.
Introduction
Continuous Integration/Continuous Deployment (CI/CD) pipelines are one of the core components of the DevOps environment. They help streamline the workflow between multiple teams and increase productivity. Jenkins is a widely-used open source automation server that can set up CI/CD pipelines.
Prerequisites
A working Kubernetes cluster and kubectl set up on your local machine/host.
Setup Jenkins On Kubernetes Cluster
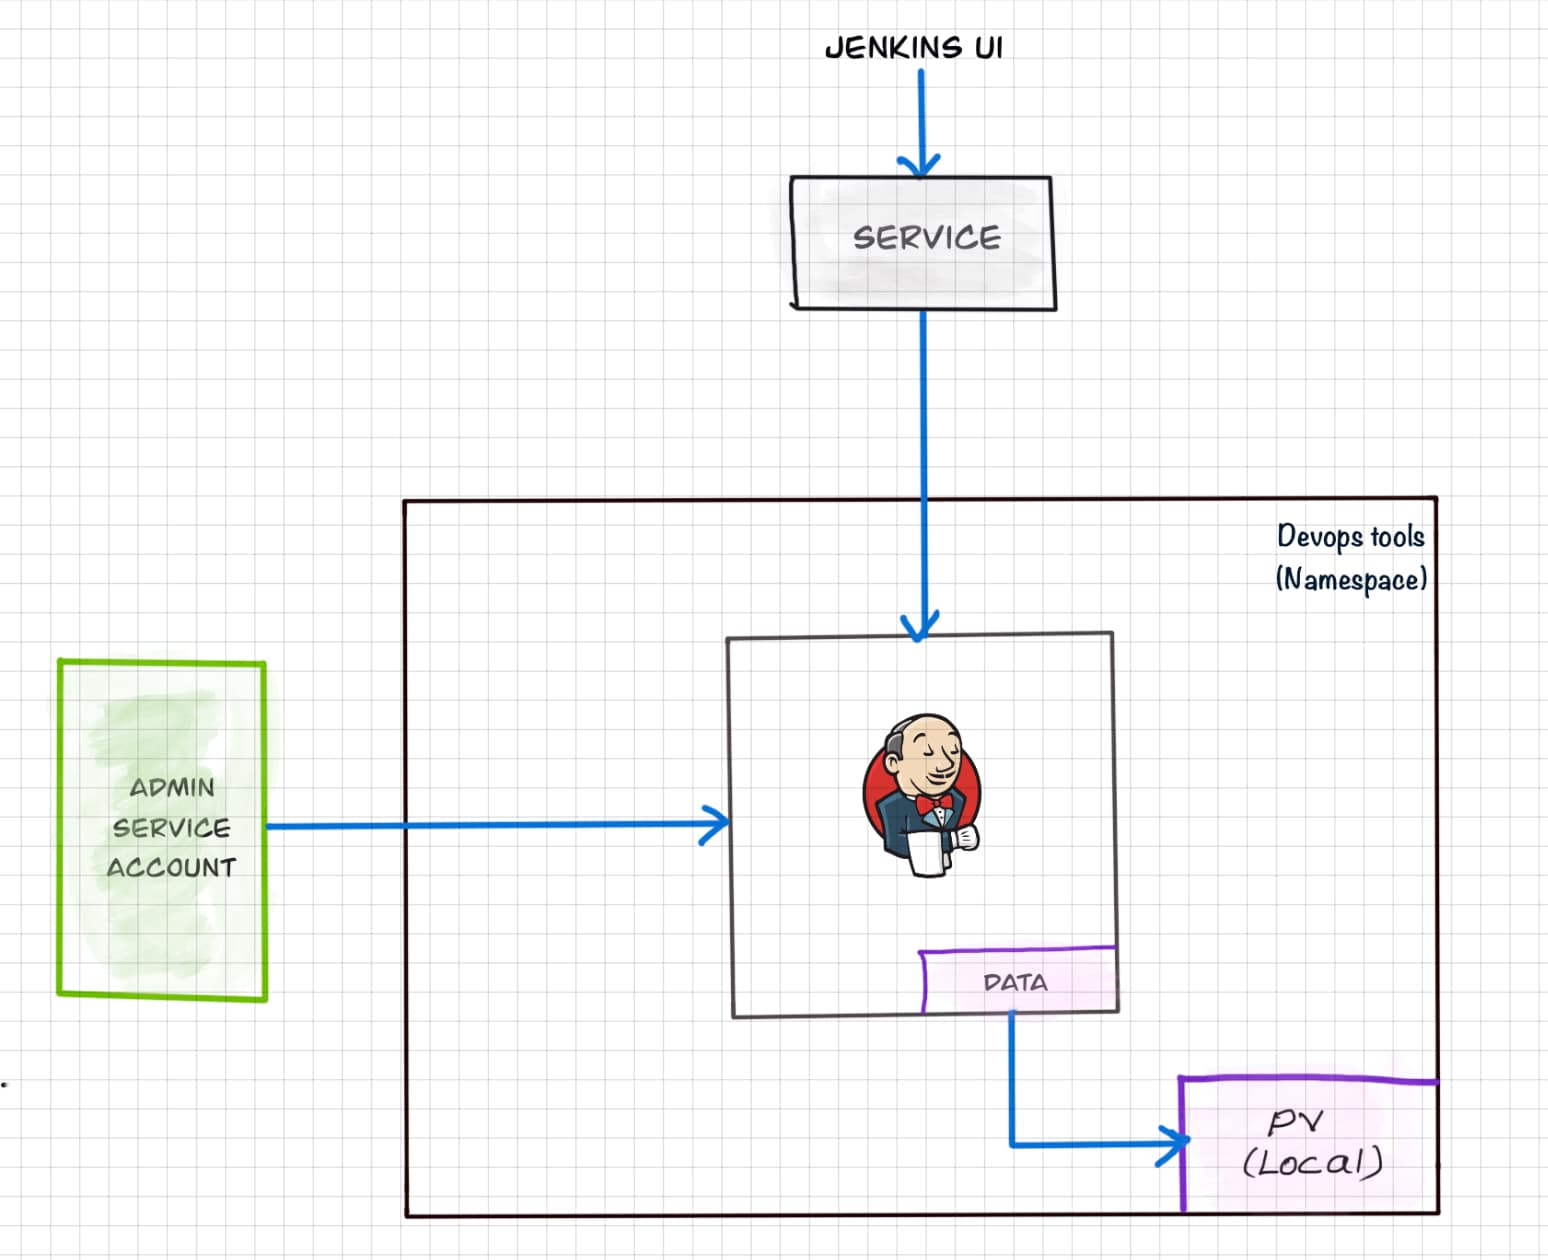
For setting up a Jenkins cluster on Kubernetes, we will do the following.
Create a Namespace
Create a service account with Kubernetes admin permissions.
Create local persistent volume for persistent Jenkins data on Pod restarts.
Create a deployment YAML and deploy it.
Create a service YAML and deploy it.
Access the Jenkins application on a Node Port.
Kubernetes Jenkins Deployment
Here is a high-level view of what we are going to do.
Let’s get started with deploying Jenkins on Kubernetes.
Step 1: Create a Namespace for Jenkins. It is good to categorize all the devops tools as a separate namespace from other applications.
kubectl create namespace jenkins
Next, create the YAML file that will deploy Jenkins. Create and open a new file called jenkins.yaml using vim or your preferred editor:
vim jenkins.yaml
Now add the following code to define the Jenkins image, its port, and several more configurations:
apiVersion: apps/v1
 kind: Deployment
  metadata:
 name: jenkins
spec:
replicas: 1
selector:
matchLabels:
app: jenkins
template:
metadata:
 labels:
 app: jenkins
spec:
containers:
 - name: jenkins
  image: jenkins/jenkins:lts
  ports:
   - name: http-port
     containerPort: 8080
   - name: jnlp-port
     containerPort: 50000
 volumeMounts:
   - name: jenkins-vol
     mountPath: /var/jenkins_vol
volumes:
 - name: jenkins-vol
   emptyDir: {}
This YAML file creates a deployment using the Jenkins LTS image and also opens port 8080 and 50000. You use these ports to access Jenkins and accept connections from Jenkins workers respectively.
Now create this deployment in the jenkins namespace:
kubectl create -f jenkins.yaml --namespace jenkins
Give the cluster a few minutes to pull the Jenkins image and get the Jenkins pod running.
Use kubectl to verify the pod’s state:
kubectl get pods -n jenkins
Note that the pod name will be different in your environment.
Once the pod is running, you need to expose it using a Service . You will use the NodePort Service type for this tutorial. Also, you will create a ClusterIP type service for workers to connect to Jenkins.
Create and open a new file called jenkins-service.yaml:
vim jenkins-service.yaml
Add the following code to define the NodePort Service:
apiVersion: v1
kind: Service
metadata:
 name: jenkins
spec:
 type: NodePort
 ports:
 - port: 8080
 targetPort: 8080
 nodePort: 30000
selector:
 app: jenkins

  ---

 apiVersion: v1
  kind: Service
  metadata:
  name: jenkins-jnlp
  spec:
   type: ClusterIP
  ports:
   - port: 50000
  targetPort: 50000
  selector:
   app: jenkins
In the above YAML file, you define your NodePort Service and then expose port 8080 of the Jenkins pod to port 30000.
Now create the Service in the same namespace:
kubectl create -f jenkins-service.yaml --namespace jenkins
Check that the Service is running:
kubectl get services --namespace jenkins
You will receive an output like this:
Output
NAME      TYPE       CLUSTER-IP      EXTERNAL-IP   PORT(S)          AGE
jenkins   NodePort   your_cluster_ip   <none>      8080:30000/TCP   15d
With NodePort and Jenkins operational, you are ready to access the Jenkins UI and begin exploring it.
Step 2: Accessing the Jenkins UI.
In this step, you will access and explore the Jenkins UI. Your NodePort service is accessible on port 30000 across the cluster nodes. You need to retrieve a node IP to access the Jenkins UI.
Use kubectl to retrieve your node IPs:
kubectl get nodes -o wide
Copy one of the your_external_ip values.
Now open a web browser and navigate to http://your_external_ip:30000.
A page will appear asking for an administrator password and instructions on retrieving this password from the Jenkins Pod logs.
Let’s use kubectl to pull the password from those logs.
First, return to your terminal and retrieve your Pod name:
kubectl get pods -n jenkins
You will receive an output like this:
Output
NAME                       READY   STATUS    RESTARTS   AGE
jenkins-9va733qco1-twnvn   1/1     Running   0          5m12s
Next, check the Pod’s logs for the admin password. Replace the highlighted section with your pod name:
kubectl logs jenkins-9va733qco1-twnvn -n jenkins
You might need to scroll up or down to find the password:
Output
Running from: /usr/share/jenkins/jenkins.war
webroot: EnvVars.masterEnvVars.get("JENKINS_HOME")
..........................
Jenkins initial setup is required. An admin user has been created and a password generated.
Please use the following password to proceed to installation:
your_jenkins_password
This may also be found at: /var/jenkins_home/secrets/initialAdminPassword
Copy your_jenkins_password. Now return to your browser and paste it into the Jenkins UI.
Once you enter the password, Jenkins will prompt you to install plugins. Because you are not doing anything unusual, select Install suggested plugins.
After installation, Jenkins will load a new page and ask you to create an admin user. Fill out the fields, or skip this step by pressing the skip and continue as admin link. This will leave your username as admin and your password as your_jenkins_password.
Another screen will appear asking about instance configuration. Click the Not now link and continue.
After this, Jenkins will create a summary of your choices and print Jenkins is ready! Click on start using Jenkins and the Jenkins home page will appear.
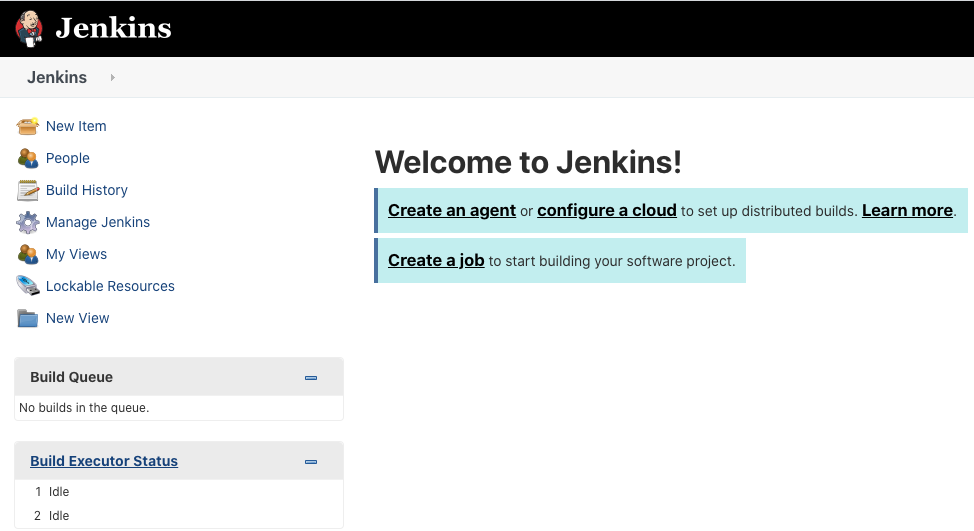
Now that you have installed and configured Jenkins on your cluster let’s demonstrate its capabilities and run a sample pipeline.
Step 3: Running a Sample Pipeline.
Jenkins excels at creating pipelines and managing CI/CD workflows. In this step we will build one of Jenkins’ sample pipelines.
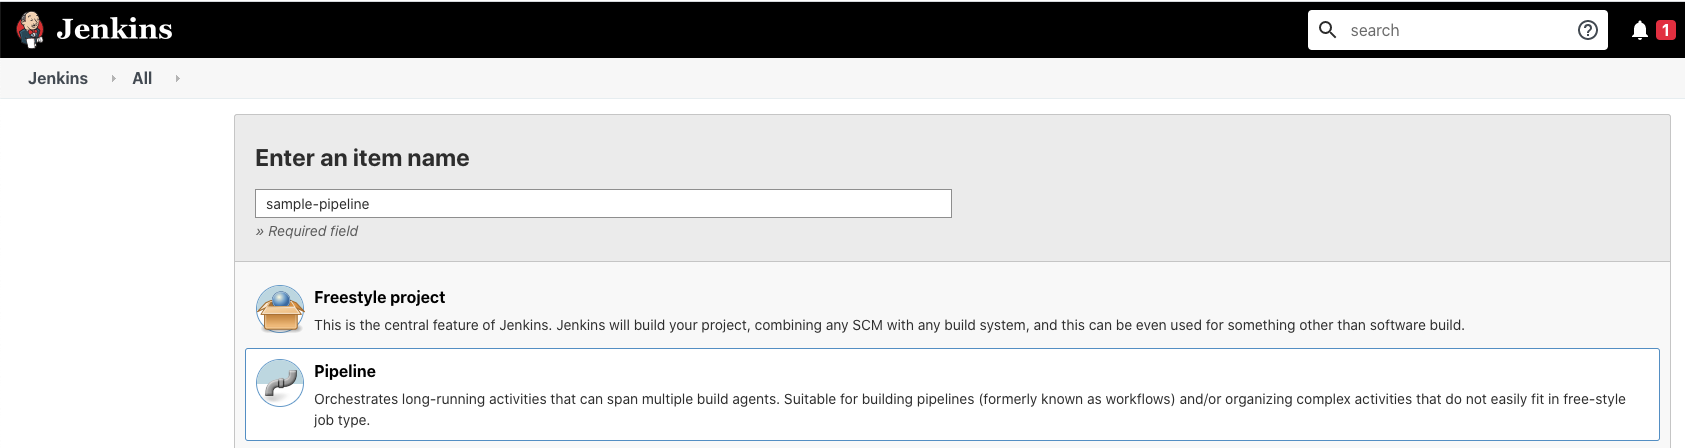
From the Jenkins home page, click on the New item link on the left-hand menu.
A new page will appear. Choose Pipeline and press OK.
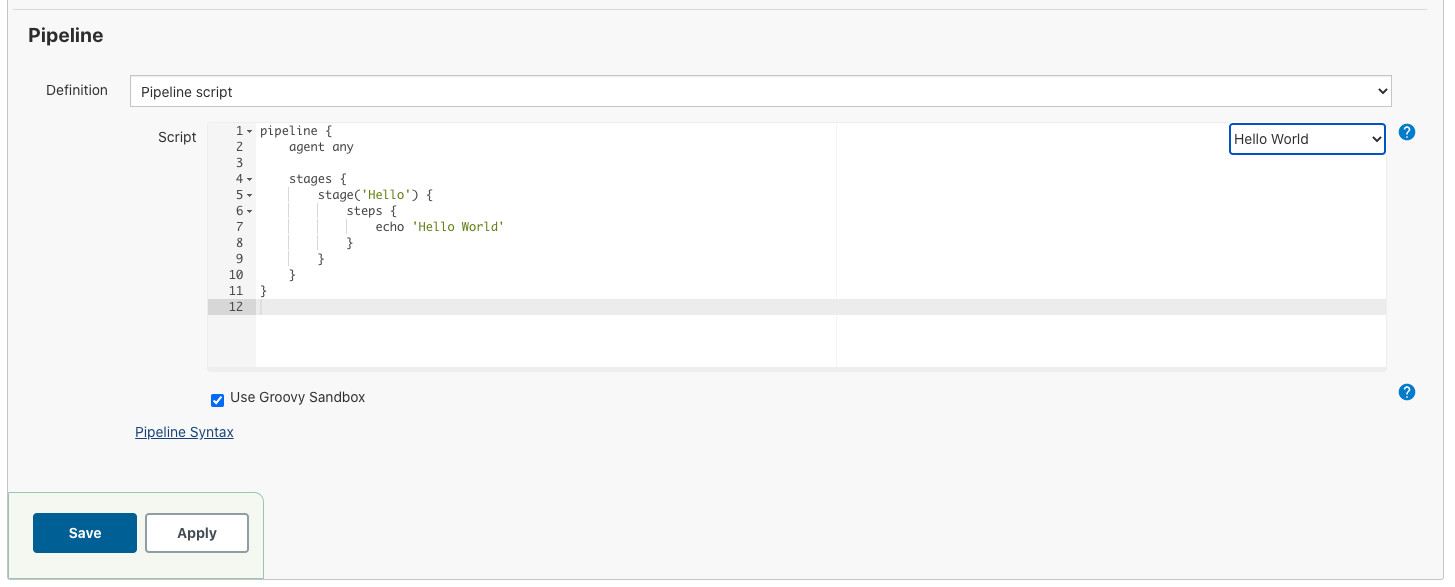
Jenkins will redirect you to the pipeline’s configuration. Find the Pipeline section and select Hello World from the try sample pipeline dropdown menu. This menu appears on the right-hand side. After selecting Hello World, click the Save button.
Jenkins will redirect you to the pipeline home page. Click on build now from the left-hand menu and watch the pipeline begin to run. The #1 signifies that this is the first build. Once the task completes, you will see some stats about the build.
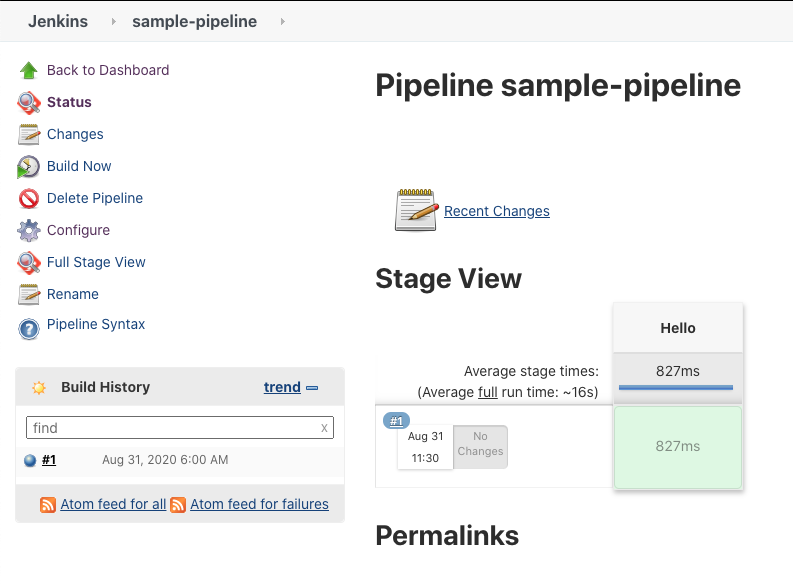
You can also check the console output to see what happened while the pipeline was running. Hover over #1 and a dropdown menu will appear. Choose console output to view the build’s details.
Your Hello World pipeline is not very sophisticated, but it does demonstrate just how well Jenkins can create and manage CI/CD workflows.
Conclusion
In this tutorial, you installed and configured Jenkins on a Kubernetes cluster and then you ran a sample pipeline. Jenkins has a large repository of plugins that can help you perform very complex operations. You can also add your GitHub repositories, multiple types of worker instances, and more. To learn more about using Jenkins, explore the official Jenkins documentation .