Uploading/Downloading files using SFTP
Uploading/Downloading files using SFTP
Grab WinSCP and install it: http://winscp.net/eng/download.php
Once its installed, we need to configure it to connect to the server:
First click on “Session” on the left-hand side, to bring up the Session options.
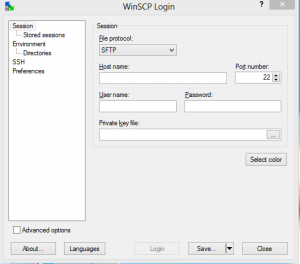
Fill in the “Hostname” as your server hostname or IP address.
Make sure the “Port number” is set to 22.
Fill in “Username” as root.
Leave “Password” field blank if you are using SSH keys. (recommended)
Select “SFTP” in the “Protocol” section.
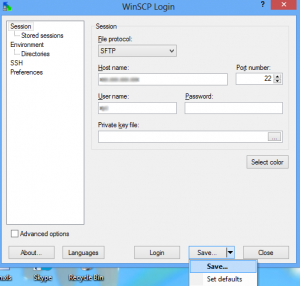
Finally, click “Save” to save this set of settings. Click on “Session -> Saved Sessions”, select your saved session and click on “Login”.
The first time you log in, you may see this message:
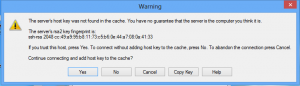
You can ignore this message and click on yes to continue.
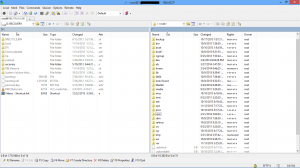
Once logged in, you will be taken to your home directory of the user with which you have logged in, which you’ll see in the right hand panel in WinSCP.
As soon as you login to WinSCP, you will be displayed a WinSCP window containing information about the local and remote computers. You could browse through directories and reach the document root of your website(usually /home/username/public_html/). The left side panel will contain the files and directories present on your local computer whereas the right side panel will contain the files and directories present on the remote computer. For traversing among directories, double click on a directory name. Double click on the parent directory icon present at the top to move up a level in the directory structure.
Note
(Parent directory icon:a folder containing an up arrow, followed by two dots).
From Remote server to local computer
File transfer from the Remote server to local computer (download):
Left side panel: Open a directory folder or location on local computer where you wish to download the file.
Right side panel: To select the desired file or directory folder, click only once on it.
There are 3 methods to download the files from Remote server to local computer:
Drag the remote folder or file you wish to download from remote server to local computer using the mouse.
Select the desired file or directory folder and press the F5 function key on your keyboard.
Right-click on the desired file or directory folder and select the copy from the menu.
From local computer to Remote server
File transfer from the local computer to the Remote server (upload):
Right side panel: Open a directory folder or location on the local computer where you wish to upload the file.
Left side panel: To select the desired file or directory folder, click only once on it.
Note
Before uploading the files it is recommended to remove the spaces, extensions, and capitalization from the filenames.
The same 3 methods that are used for downloading the files from the Remote server to the local computer are to be used to upload the file or folder to the remote server panel from the local computer.