WordPress with E2E DBaaS
Introduction
WordPress is a free and open-source content management system written in PHP and paired with a MySQL or MariaDB database. Its a highly popular content management system (CMS) that is used for almost over 30% of all sites on the internet. In this tutorial, We will go through the steps to set up a WordPress blog with DBaaS service to run your WordPress Mysql database.
WordPress sites uses the Mysql database to store its data. Maintaining the data is very critical for your website and if the database went down there will be downtime for your websites. Using the DBaaS service, You can focus on your WordPress site instead of working on database administration. Performance and Backup of your database will be handled by the DBaaS service.
In this tutorial, We will learn how to Install and Setup WordPress with E2E DBaaS Service
Step 1: Creating a Database service
Many of WordPress uses a Mysql database that is available on the same server in which WordPress installation is done. Doing this would have an impact on resources on your server. Another reason is that you would not be able to horizontally scale your WordPress server when your site becomes popular. By having a separate database for your site will avoid this issue giving you much resources and horizontal expansion capabilities in the future.
To create a Database Service Please refer to below steps
Login into MyAccount Portal
Please Login to Myaccount Portal using your credentials set up at the time of creating and activating the E2E Networks My Account portal.
Navigate to Database Page
Once you have logged in to Myaccount Portal, You can navigate to the database page from the sidebar menu

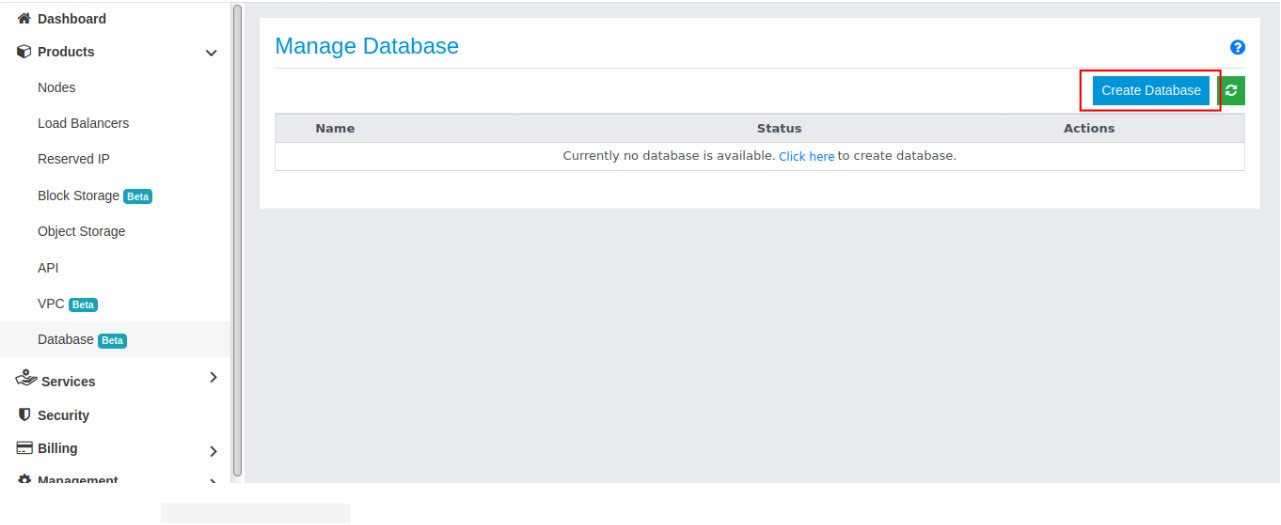
Create Database
On the top right section of the manage database dashboard, You need to click on the Create Database Button which will prompt you to the cluster page where you will be selecting the configuration and entering the details of your database
Database Configuration and Setting
After creating the database, You need to select the required configuration and setting for your database which are mentioned below.
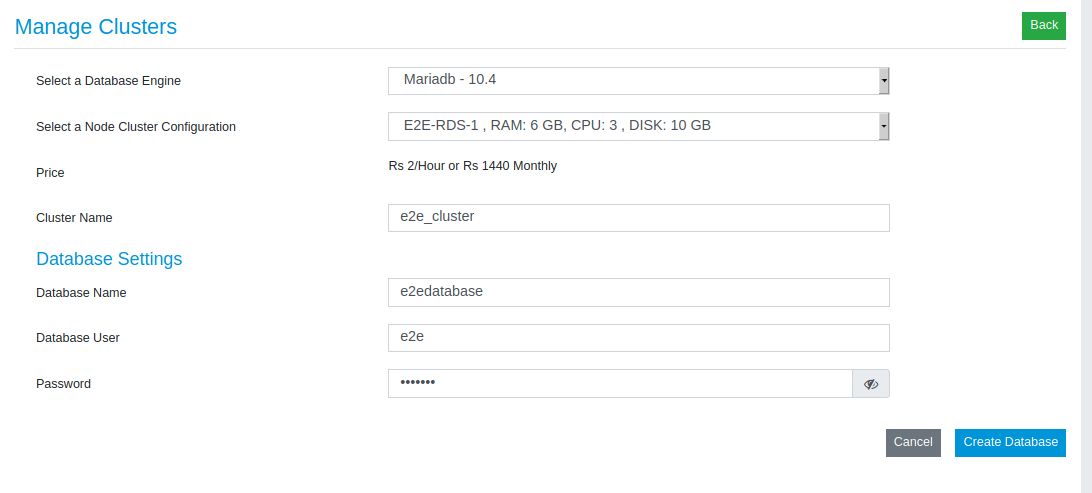
- Database Engine - Database has various database engines available. You need to select the required database engine which you prefer, Below are the list of database engine which we currently support
Mariadb - 10.4
Mysql 5.6
Mysql 5.7
Mysql 8.0
Cluster Configuration - Node Cluster configuration comprises varying combinations of CPU, memory, storage and gives you the flexibility to choose the appropriate mix of resources for your database.
Cluster Name - You need to Provide the Cluster name which you want for your cluster. This name will be visible on the Database page
Database Setting - We need to update the database name, user and provide a secure password for our database. You will be using these credentials to log in to the database server.
With strong password authentication, your database controls and authenticates user accounts. If a DB engine has strong password management features, they can enhance security.
Once you have entered the required details, click on create a database. Your database might take a few minutes to Launch. The database node will be in a setting up state until its ready to use and when the status will change to running.
Step 2: Creating a Node
You will now need to create a Node to host your WordPress site. E2E Networks Provide MyAccount portal which lets you access and manages your E2E Nodes through a simple and intuitive web-based user interface. With your WordPress site hosted on the node, Your site will be up and running and can be accessed over the internet.
You can refer steps mentioned here to Launch a node If you have not already launched.
Step 3: Installing and Configuring WordPress on your node
After creating a Database service and Node, We need to now install a WordPress application on your node and connect it Database service.
Please follow the below steps to install WordPress application on your node
Install Apache Webserver
To install Apache on your node, run the following command in your terminal:
sudo yum install -y httpd
Once the installation is done, To start the Apache web server, run the following command in your terminal:
sudo service httpd start
If you open the browser with your server IP, You should be able to see the Apache Test Page.
Note
Kindly make sure that http/https port 80/443 is open on your node. To manage firewall on your node, Please refer this article
Install php and its Module
To install php and its module on your node, run the following command
sudo yum install php php-mysql php-gd
Install and Configure Wordpress
To download the Wordpress on your node, Dowload and uncompress below file.
wget https://wordpress.org/latest.tar.gz
tar -xzf latest.tar.gz
Once the file is uncompressed, Go to WordPress directory and copy of the default config file using the below command
cd wordpress
cp wp-config-sample.php wp-config.php
Now, To connect the WordPress Application to your Database, Open the config file (wp-config.php)
vim wp-config.php
and edit the below areas of configuration with your Actual database configuration.
// ** MySQL settings - You can get this info from your web host ** //
/** The name of the database for WordPress */
define( 'DB_NAME', 'database_name_here' );

/** MySQL database username */
define( 'DB_USER', 'username_here' );

/** MySQL database password */
define( 'DB_PASSWORD', 'password_here' );

/** MySQL hostname */
define( 'DB_HOST', 'localhost' );
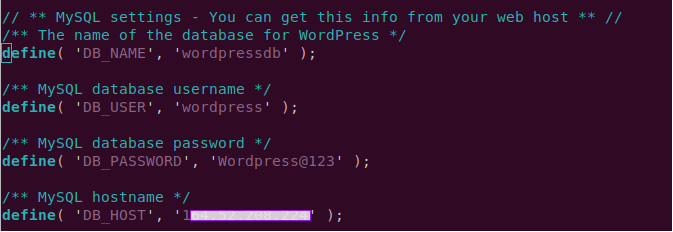
The values should be:
DB_NAME: The name of your database
DB_USER: The name of the user you created in the database
DB_PASSWORD: The password for the user you created
DB_HOST: The hostname of the database that you found (Server IP)
Once the configuration is Updated, You can now setup your WordPress website.
Step 4: Setting up WordPress
After Installing and configuring WordPress to use database service, We need to set up WordPress.
We need to make sure that the Apache web server is able to handle the request for WordPress. To do this, Copy the WordPress application files to the Apache web root directory
sudo cp -r wordpress/* /var/www/html/
Add a folder in WordPress to store uploaded files
mkdir /var/www/html/wp-content/uploads
Assign correct ownership to the root directory for the apache user and group
sudo chown -R apache:apache /var/www/html/*
Restart the apache web server
sudo service httpd restart
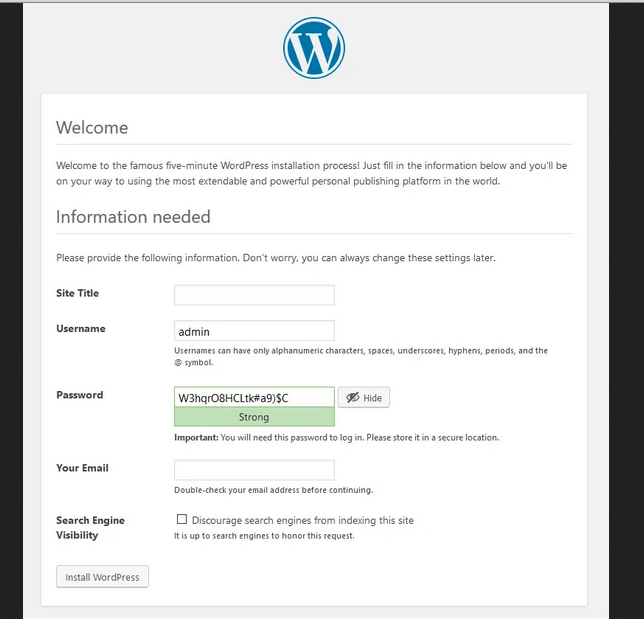
Now, Open the browser with the server IP. You should be able to see the WordPress welcome page and the five-minute installation process. Proceed with the Installation.
That’s it, You have now made WordPress publicly accessible using e2e’s database service and further you can manage the database. Please refer here to learn more about DBaas