Using Screen Command for Persistent SSH Sessions
Screen Command
Losing work due to dropped SSH connections during long operations is common. Luckily, the “screen” command allows session recovery.
Introduction to the Screen Command
In the Linux environment, the screen command provides the capability to initiate and utilize multiple shell sessions within a single SSH session. These sessions can be detached, allowing for reattachment at a later time, effectively preserving the state of the process initiated with the screen command.
When you start a process with “screen” and detach the session, “screen” manages the process. When you reattach, terminals return to their previous state, letting you seamlessly continue where you left off.
Syntax Of The Screen Command
Note
screen [-opts] [cmd [args]]
Step 1: Check the screen version
The screen command package comes pre-installed on the majority of Linux distributions. To check whether it is already installed on our system, we can use the following command
screen --version
If the screen package is not on our system, it can be effortlessly installed using the distribution’s package manager.
Step 2: Installation of the screen command
We need to go to our terminal and enter the below command to install the screen command:
sudo apt install screen
If we are using Fedora and CentOS, we can use the following command to install the screen command:
sudo yum install screen
Step 3: Creating a screen
This command will begin a new screen inside the window
screen
Step 4: Creating a named session
Named sessions prove to be highly beneficial when running multiple screen sessions. To create a named session, the screen command needs to be executed along with the specified arguments below:
screen -S session_name
Replace the session_name with the desired one
screen -S e2euser
Always, it is a good idea to select a descriptive name of the session.
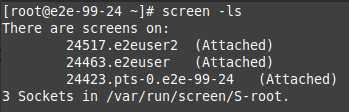
Step 5: Listing screens
It is used to display the opened screens, including those executing inside the background. This command will list every attached and detached session of the screen
screen -ls
Step 6: Attaching the screen
Attach to a detached screen. (Multi display mode).
screen -x e2euser
Step 7: Detach a Screen
It is used for detecting the session of a screen so that it can be re-attached later. Also, it can be implemented using the Ctrl-a + d shortcut key.
screen -d e2euser
Here e2euser is the name of the screen we wish to detach.
Step 8: Re-attaching the screen
It is used for re-attaching the session of a screen that was previously detached.
screen -r e2euser
Step 9: Customize the screen of Linux
Upon initiating the screen, it reads configuration parameters from ~/ .screenrc and /etc/screenrc if the file is present. By utilizing the .screenrc file, located in our home directory, we can customize the default screen settings according to our preferences.
Step 10: Switching among screens
In the case of utilizing a nested screen, navigation between screens can be achieved using the “Ctrl-A” command followed by “n” to move to the next screen.
To switch to the previous screen, simply press “Ctrl-A” and “p”.
To create a new screen window, combine “Ctrl-A” and “c”.
Conclusion
We trust that the steps outlined above have assisted you in effectively utilizing the “screen” command in Linux environments.
If you have any questions or encounter difficulties with the provided instructions, please feel free to seek further assistance by referring to the “man screen” command or utilizing “screen –help” for additional guidance. We’re here to help you navigate any challenges you may encounter.