Qdrant Scaling
TIR provides Qdrant in a distributed deployment mode, wherein multiple pods form a cohesive Qdrant cluster, communicating seamlessly through an internal service. This approach yields significant benefits, enhancing stability and augmenting storage capacities through the distribution of data. This also gives you the ability to dynamically scale the cluster size and upgrade or migrate nodes without downtime.
Upscaling the Cluster:
You can increase the current number nodes in a particular cluster with the following steps.
Note
Note that making extra replicas will not automatically replicate your data. After the scale-up process completes, you will have a new empty node running alongside your existing node(s).
You can only upscale your cluster. Downscaling the cluster is currently not supported
Adding more nodes to your cluster will not automatically replicate/rebalance your data. After the scale-up process completes, you will have a new empty node running alongside your existing node(s). See Making use of the newly added nodes.
Go to TIR
Create or Select a project
Go to Vector Database
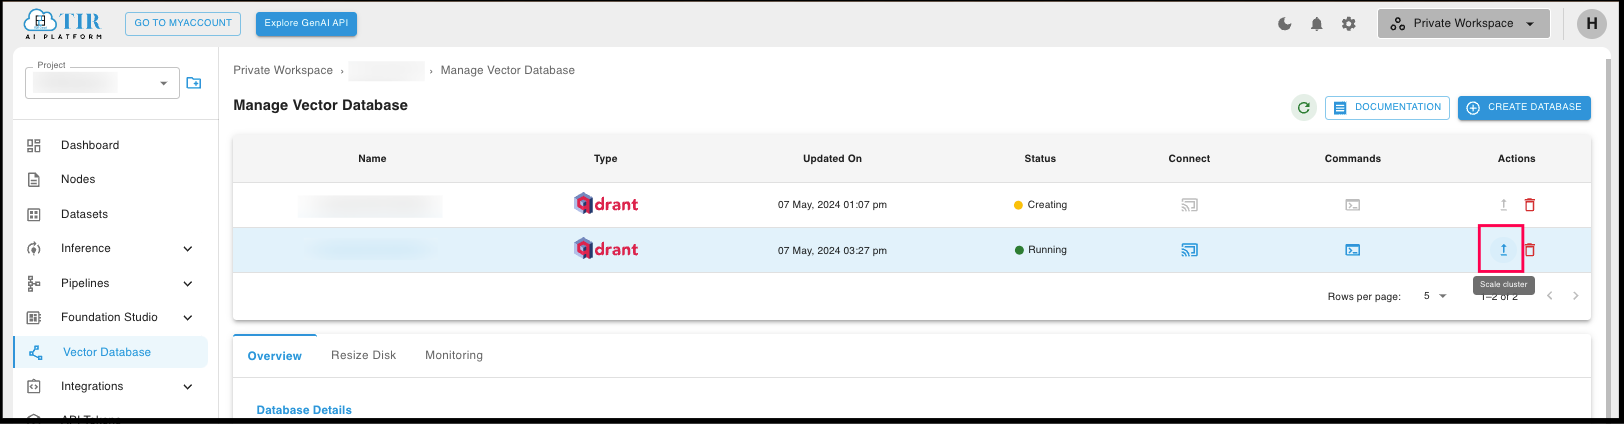
Click on the Arrow icon under the Actions column for the database that you want to scale
Choose the new node count for your cluster and click on Update.

Your updated node count will be visible in the Overview tab.
Making use of the newly added nodes
When you add new nodes to your Qdrant cluster, your data doesn’t automatically migrate to the new node; it begins afresh, devoid of any content. To leverage your newly initialised node(s), consider one of the following options:
You can create a new collection and any point added in the collection will be divided in your new set of nodes depending on the replication factor and number of shards in your collection.
You can replicate your existing data to the new node by creating new shard replicas in the new node.
You can move data without duplicating it onto the new node.
Creating a new collection:
While creating a new collection you can specify the number of shards and the replication factor which denotes the number of replicas for each shard. It is advised to make sure that the hardware can host the additional shard replicas beforehand.
curl -X PUT \
-H "api-key: <your-api-key>" \
-d '{
        "vectors": {
            "size": 300,
            "distance": "Cosine"
        },
        "shard_number": 8,
        "replication_factor": 2,
}' \
https://<your-endpoint-url>:6333/collections/<collection_name>
In the above example we have 8 shards with a replication factor of 2 for 4 nodes. So in total we will have 16 shard replicas. Qdrant recommends setting the number of shards to be a multiple of the number of nodes currently running in your cluster.
Replicating existing data:
In qdrant you can create a replica of an existing shard and move it to the node (alternatively referred to as peer) you have just created.
But before that, let’s get the information regarding the qdrant’s peers and shards using the Get Cluster Info API:
curl -X GET \
-H "api-key: <your-api-key>" \
https://<your-endpoint-url>:6333/collections/<collection_name>/cluster
Now assume you want to move a shard (with shard_id
0) from peer A (peer_id123) to peer B (peer_id456). We can do so using theUpdate Collection Cluster SetupAPI as follows:
curl -X PUT \
-H "api-key: <your-api-key>" \
-d '{
        "replicate_shard": {
            "shard_id": 0,
            "from_peer_id": 123,
            "to_peer_id": 456
        }
}' \
https://<your-endpoint-url>:6333/collections/<collection_name>/cluster
Correspondingly, any shard can be removed from a specific peer using the below API call:
curl -X POST \
-H "api-key: <your-api-key>" \
-d '{
        "drop_replica": {
            "shard_id": 0,
            "peer_id": 123
        }
}' \
https://<your-endpoint-url>:6333/collections/<collection_name>/cluster
Moving Shards:
Qdrant allows moving shards between nodes in the cluster and removing nodes from the cluster. To move shards between nodes we can use the following API.
curl -X POST \
-H "api-key: <your-api-key>" \
-d '{
        "move_shard": {
            "shard_id": 0,
            "from_peer_id": 123,
            "to_peer_id": 456
        }
}' \
https://<your-endpoint-url>:6333/collections/<collection_name>/cluster
Methods for moving shards:
There are different methods for transferring, such as moving or replicating a shard to another node. Depending on what performance and guarantees you’d like to have and how you’d like to manage your cluster, you likely want to choose a specific method.
Stream Records : (default) Transfer shard by streaming just its records to the target node in batches.
Snapshots : Transfer shard including its index and quantized data by utilizing a snapshot automatically.
The API for moving shards through snapshots is given below.
curl -X POST \
-H "api-key: <your-api-key>" \
-d '{
        "move_shard": {
            "shard_id": 0,
            "from_peer_id": 123,
            "to_peer_id": 456,
            "method": "snapshot"
        }
}' \
https://<your-endpoint-url>:6333/collections/<collection_name>/cluster
What’s Next?
This was a quick start guide to get you started with the Qdrant Scaling.
You can explore more features of moving shards and scaling in the Qdrant Scaling Documentation
For more information on Qdrant, head over to Qdrant Documentation