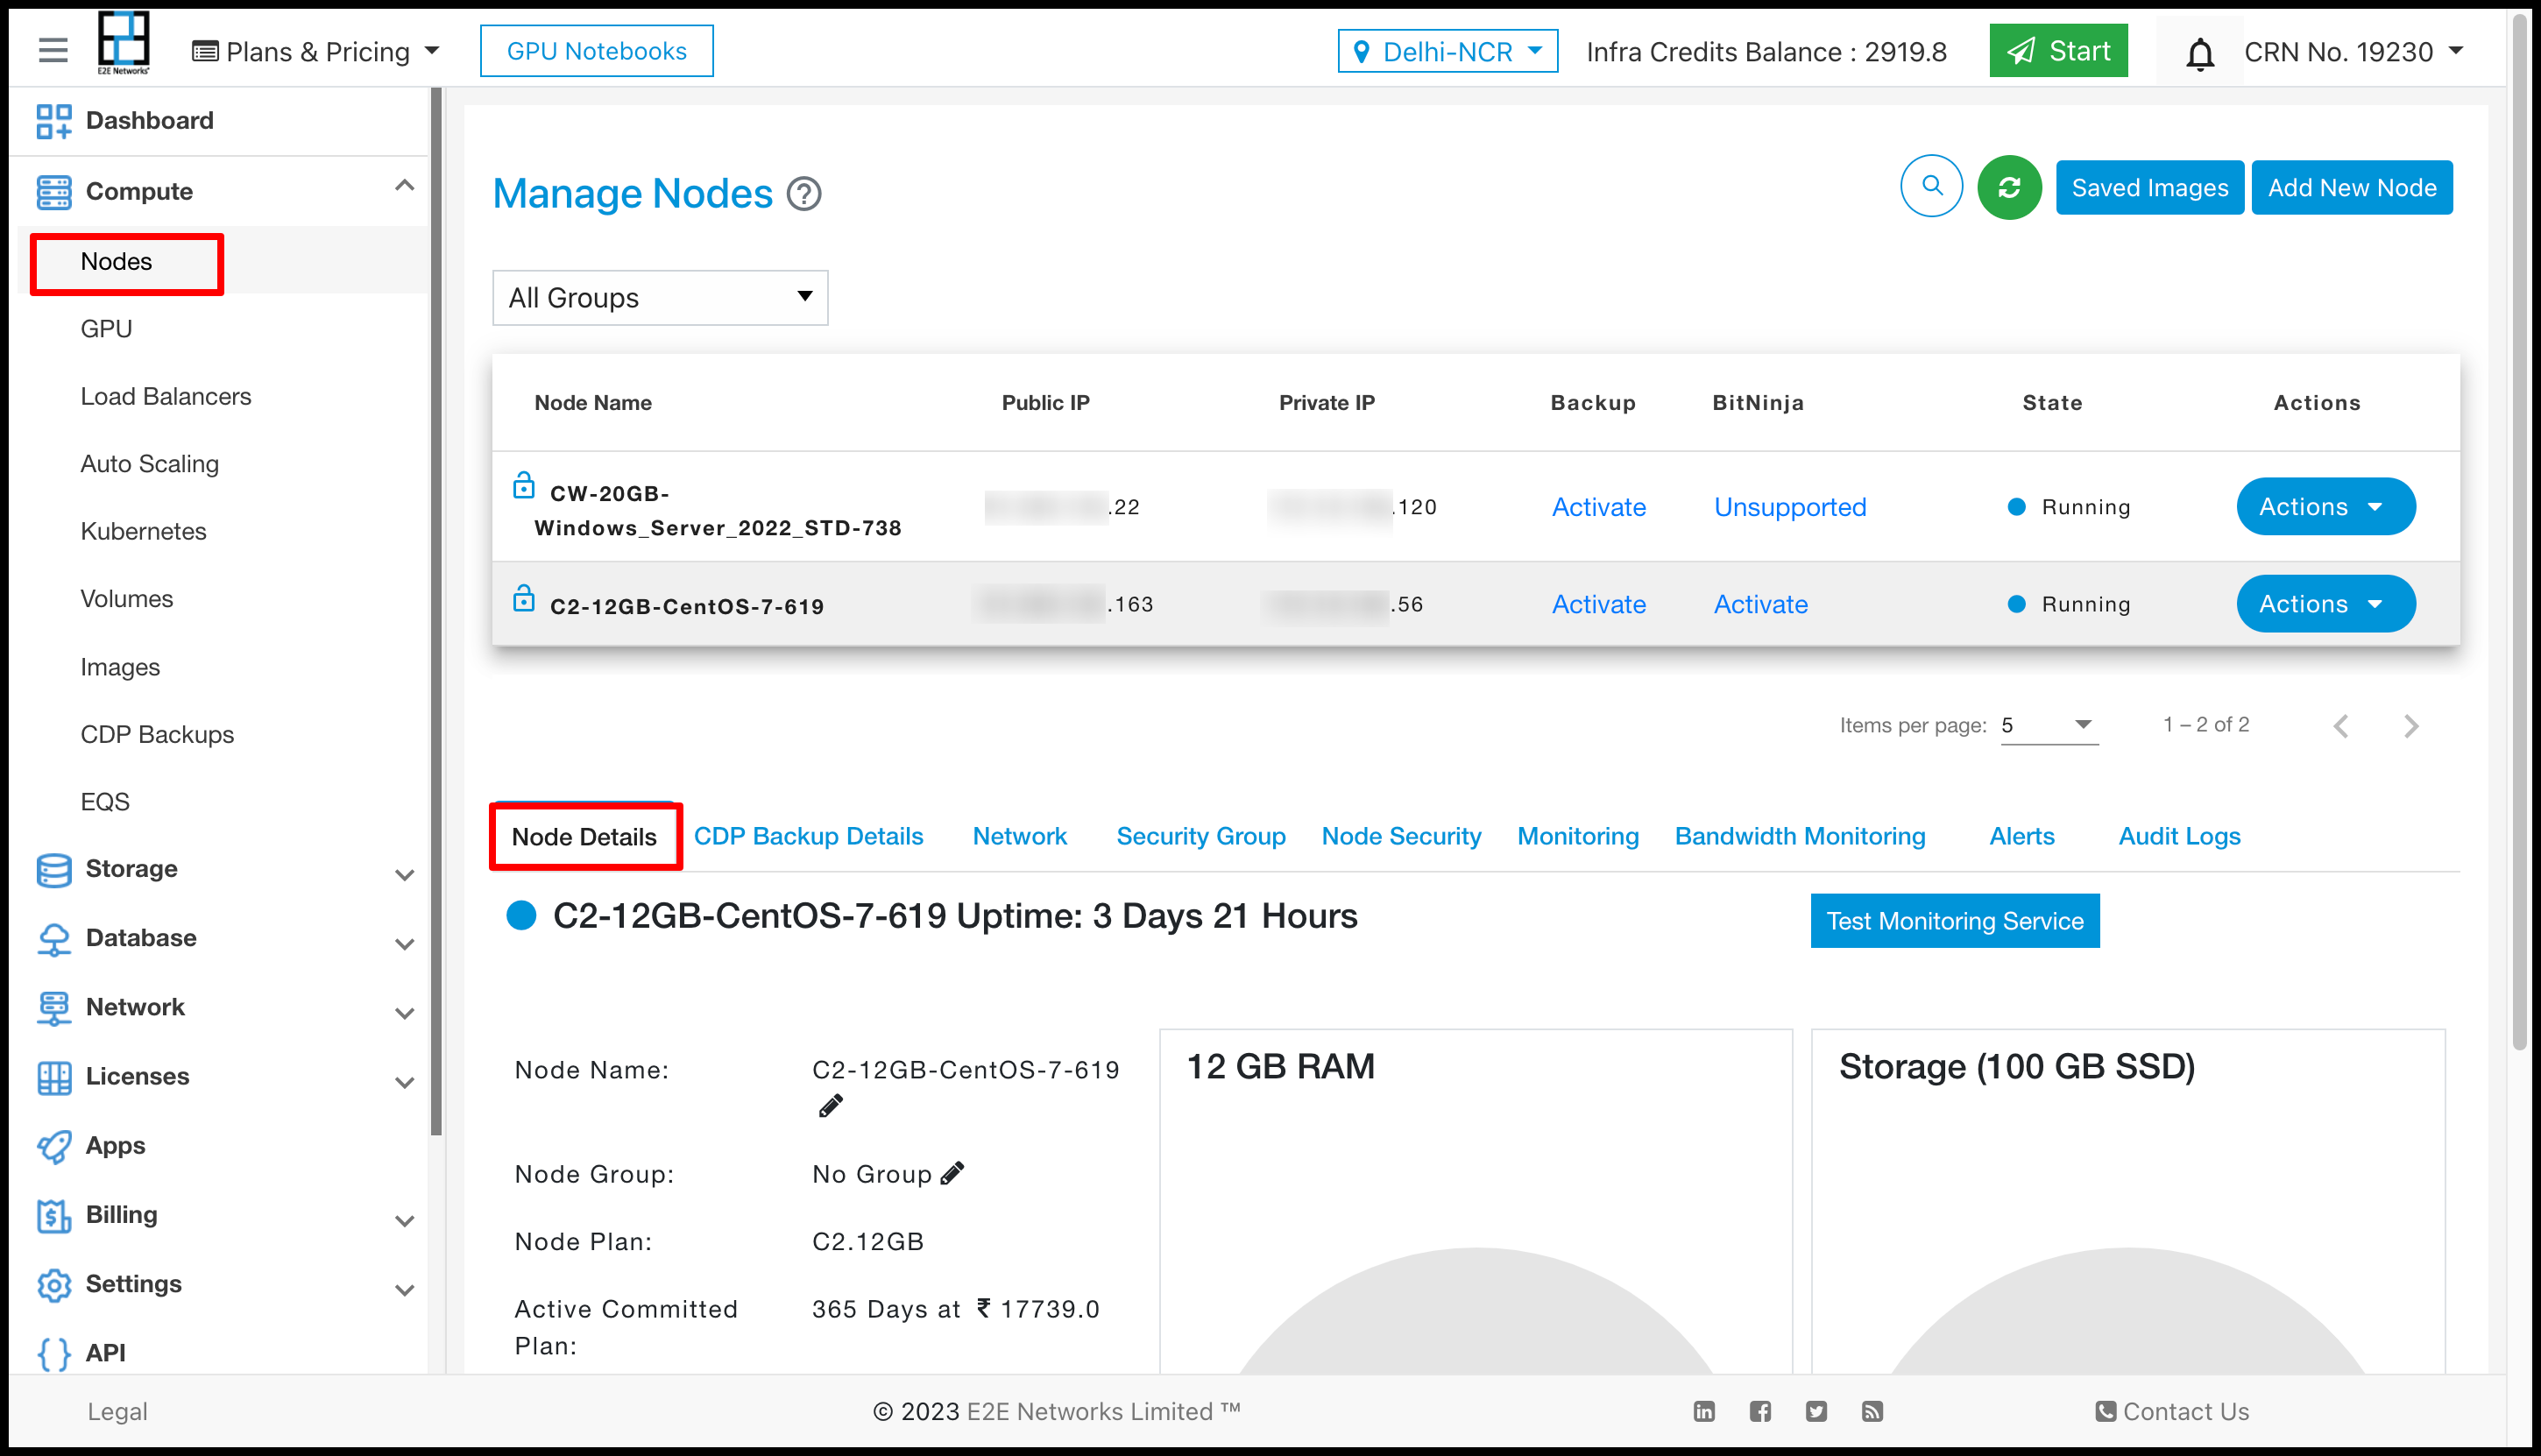
Manage your Nodes
Once you have created a Virtual Compute Node, you can access and manage your virtual compute nodes from My Account Portal dashboard features. Go to your E2E Networks My Account portal to access the dashboard.
After you log in to the E2E Networks ‘My Account’, you can click on the “Nodes” sub-menu available under the “Products” section. You will be routed to the ‘Manage Nodes’ page where you can see all your nodes, except the nodes that are already terminated. Here, You can check the summary & status of all your Nodes.
Additionally, you can also use E2E Networks API , to create and manage your Nodes. Please ensure that you have created your API token using E2E MyAccount before you can start using the APIs.

Node Details
You will able to check all the basic details of your node. You can edit and update the node name and node group details.
Node configuration details
Node plan and pricing details
Memory and storage details
If your node is a committed node then Committed plan & price, period end date, settings information will be available.
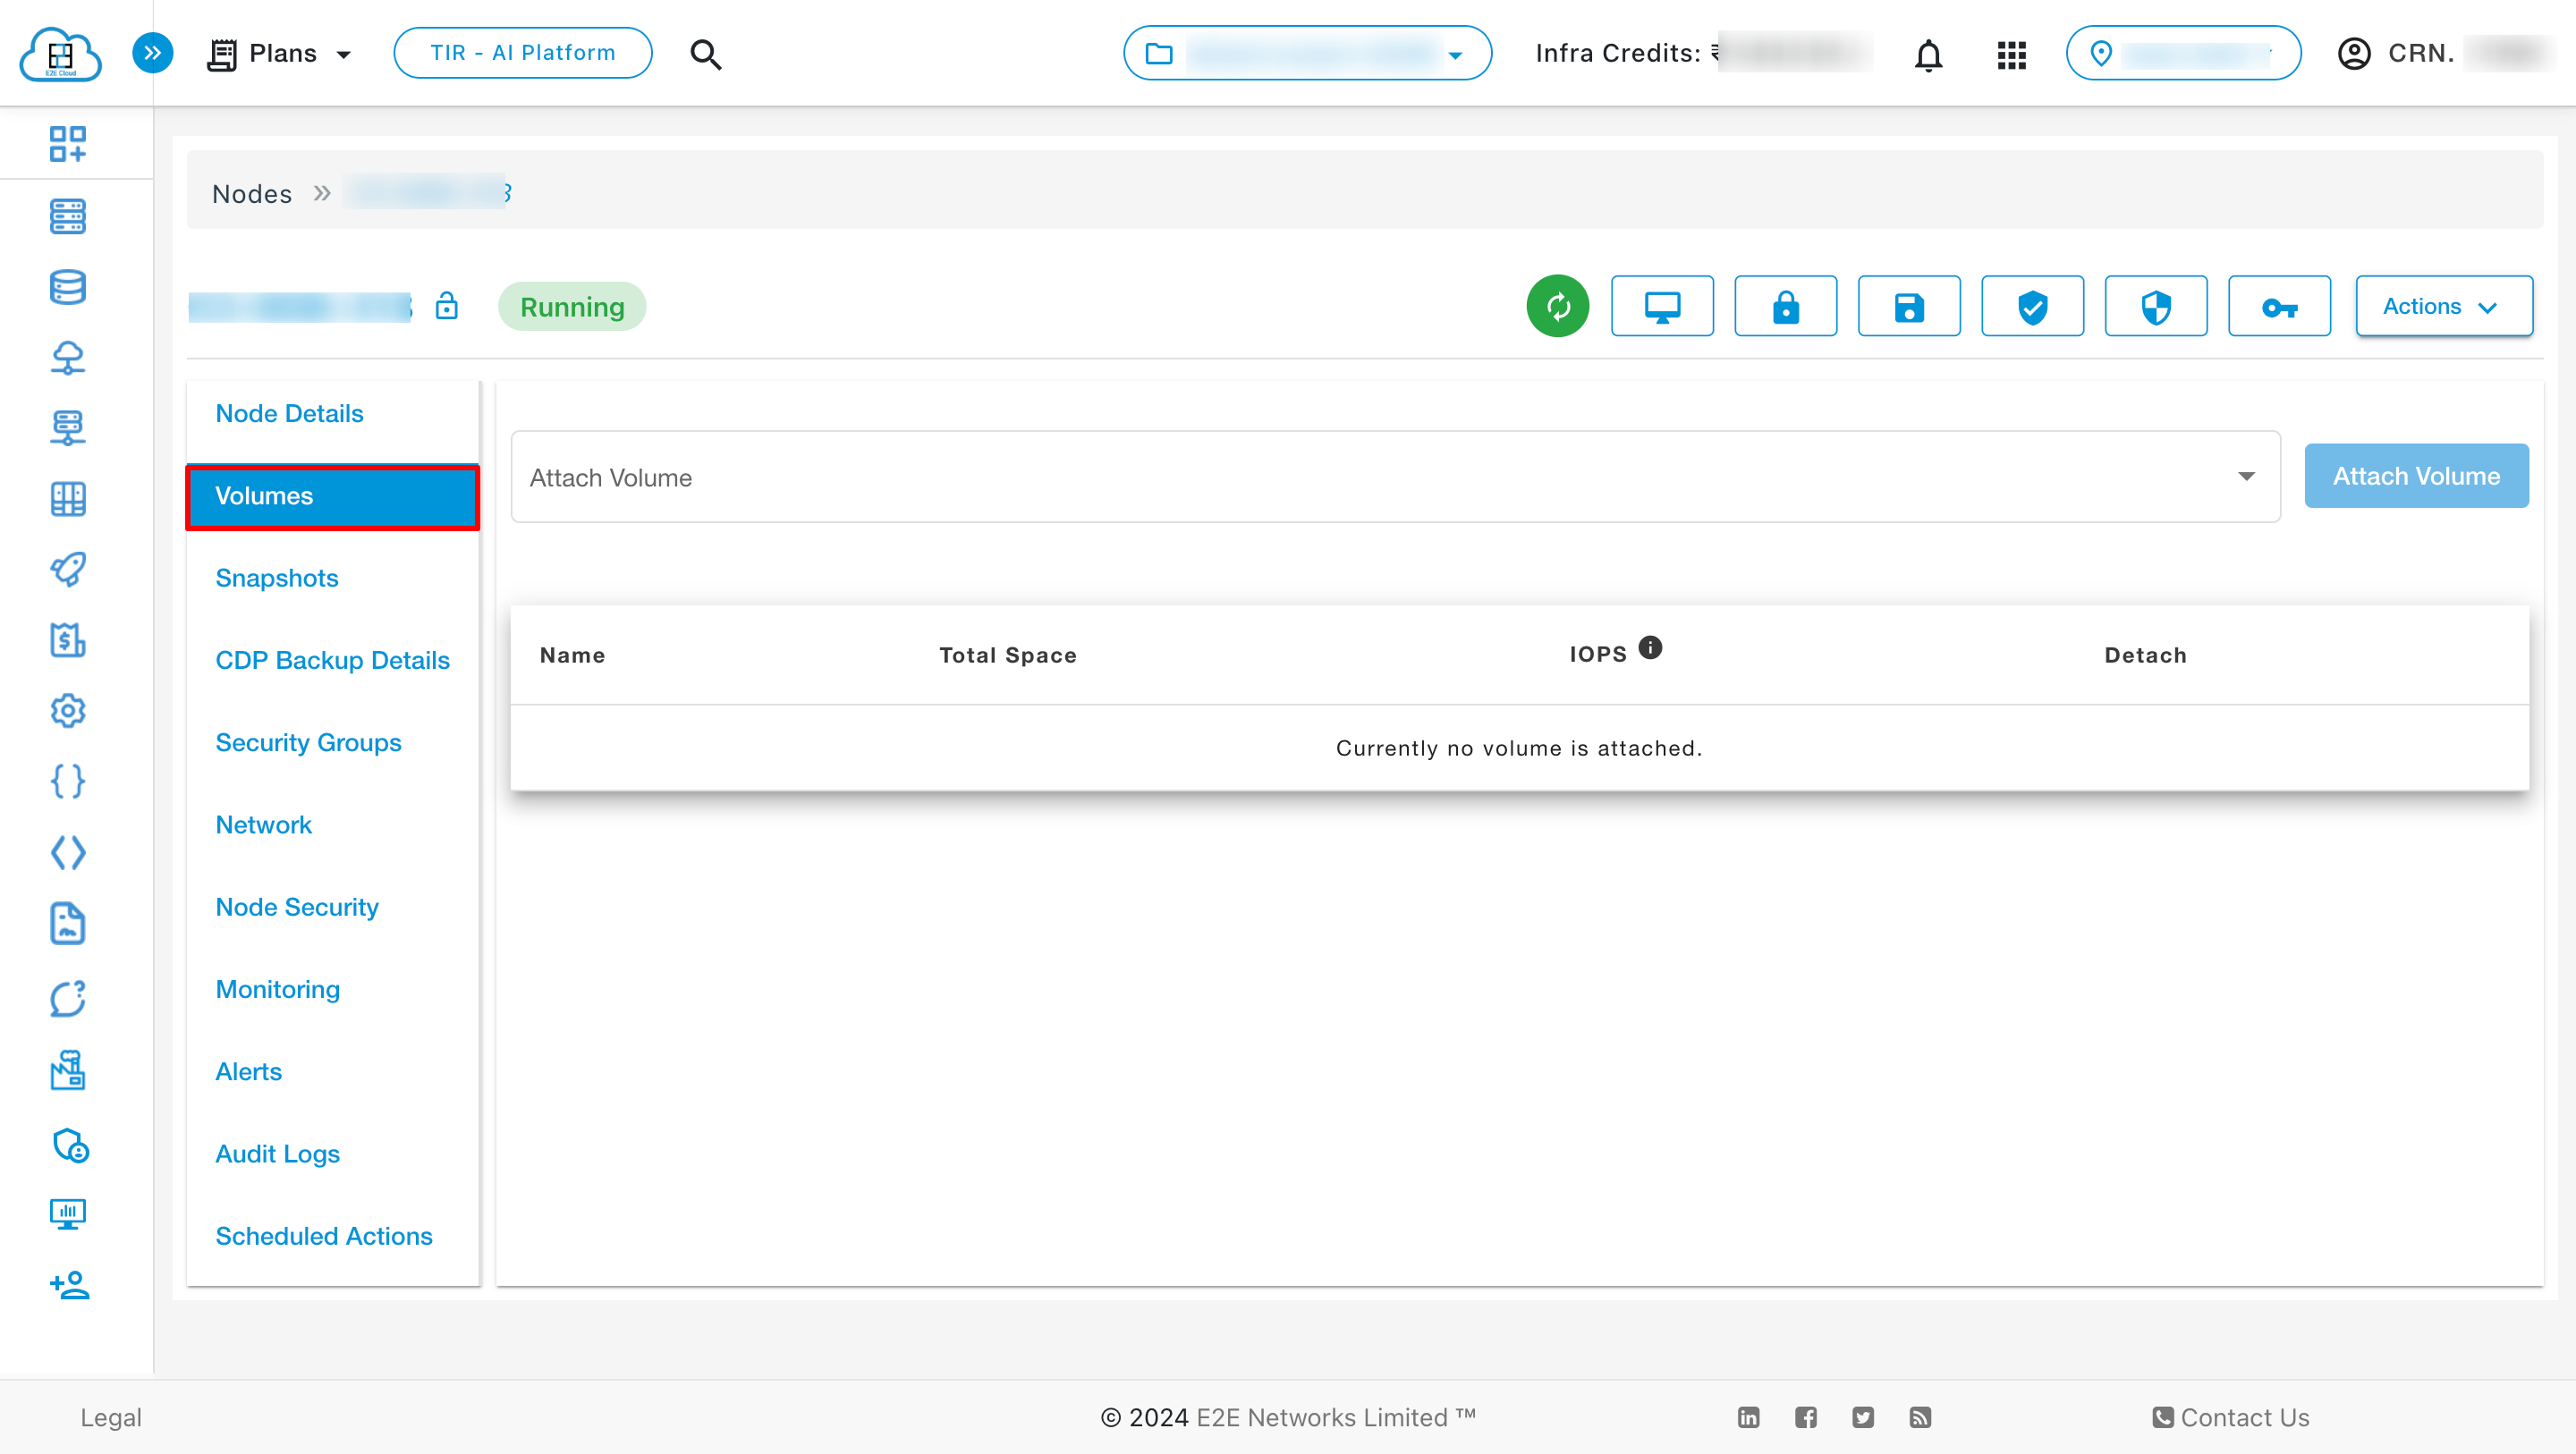
Volumes
Volumes are storage units that can be attached to Nodes to provide persistent data storage. Learn More.
To attach the volumes to your Node click on the Volumes tab.
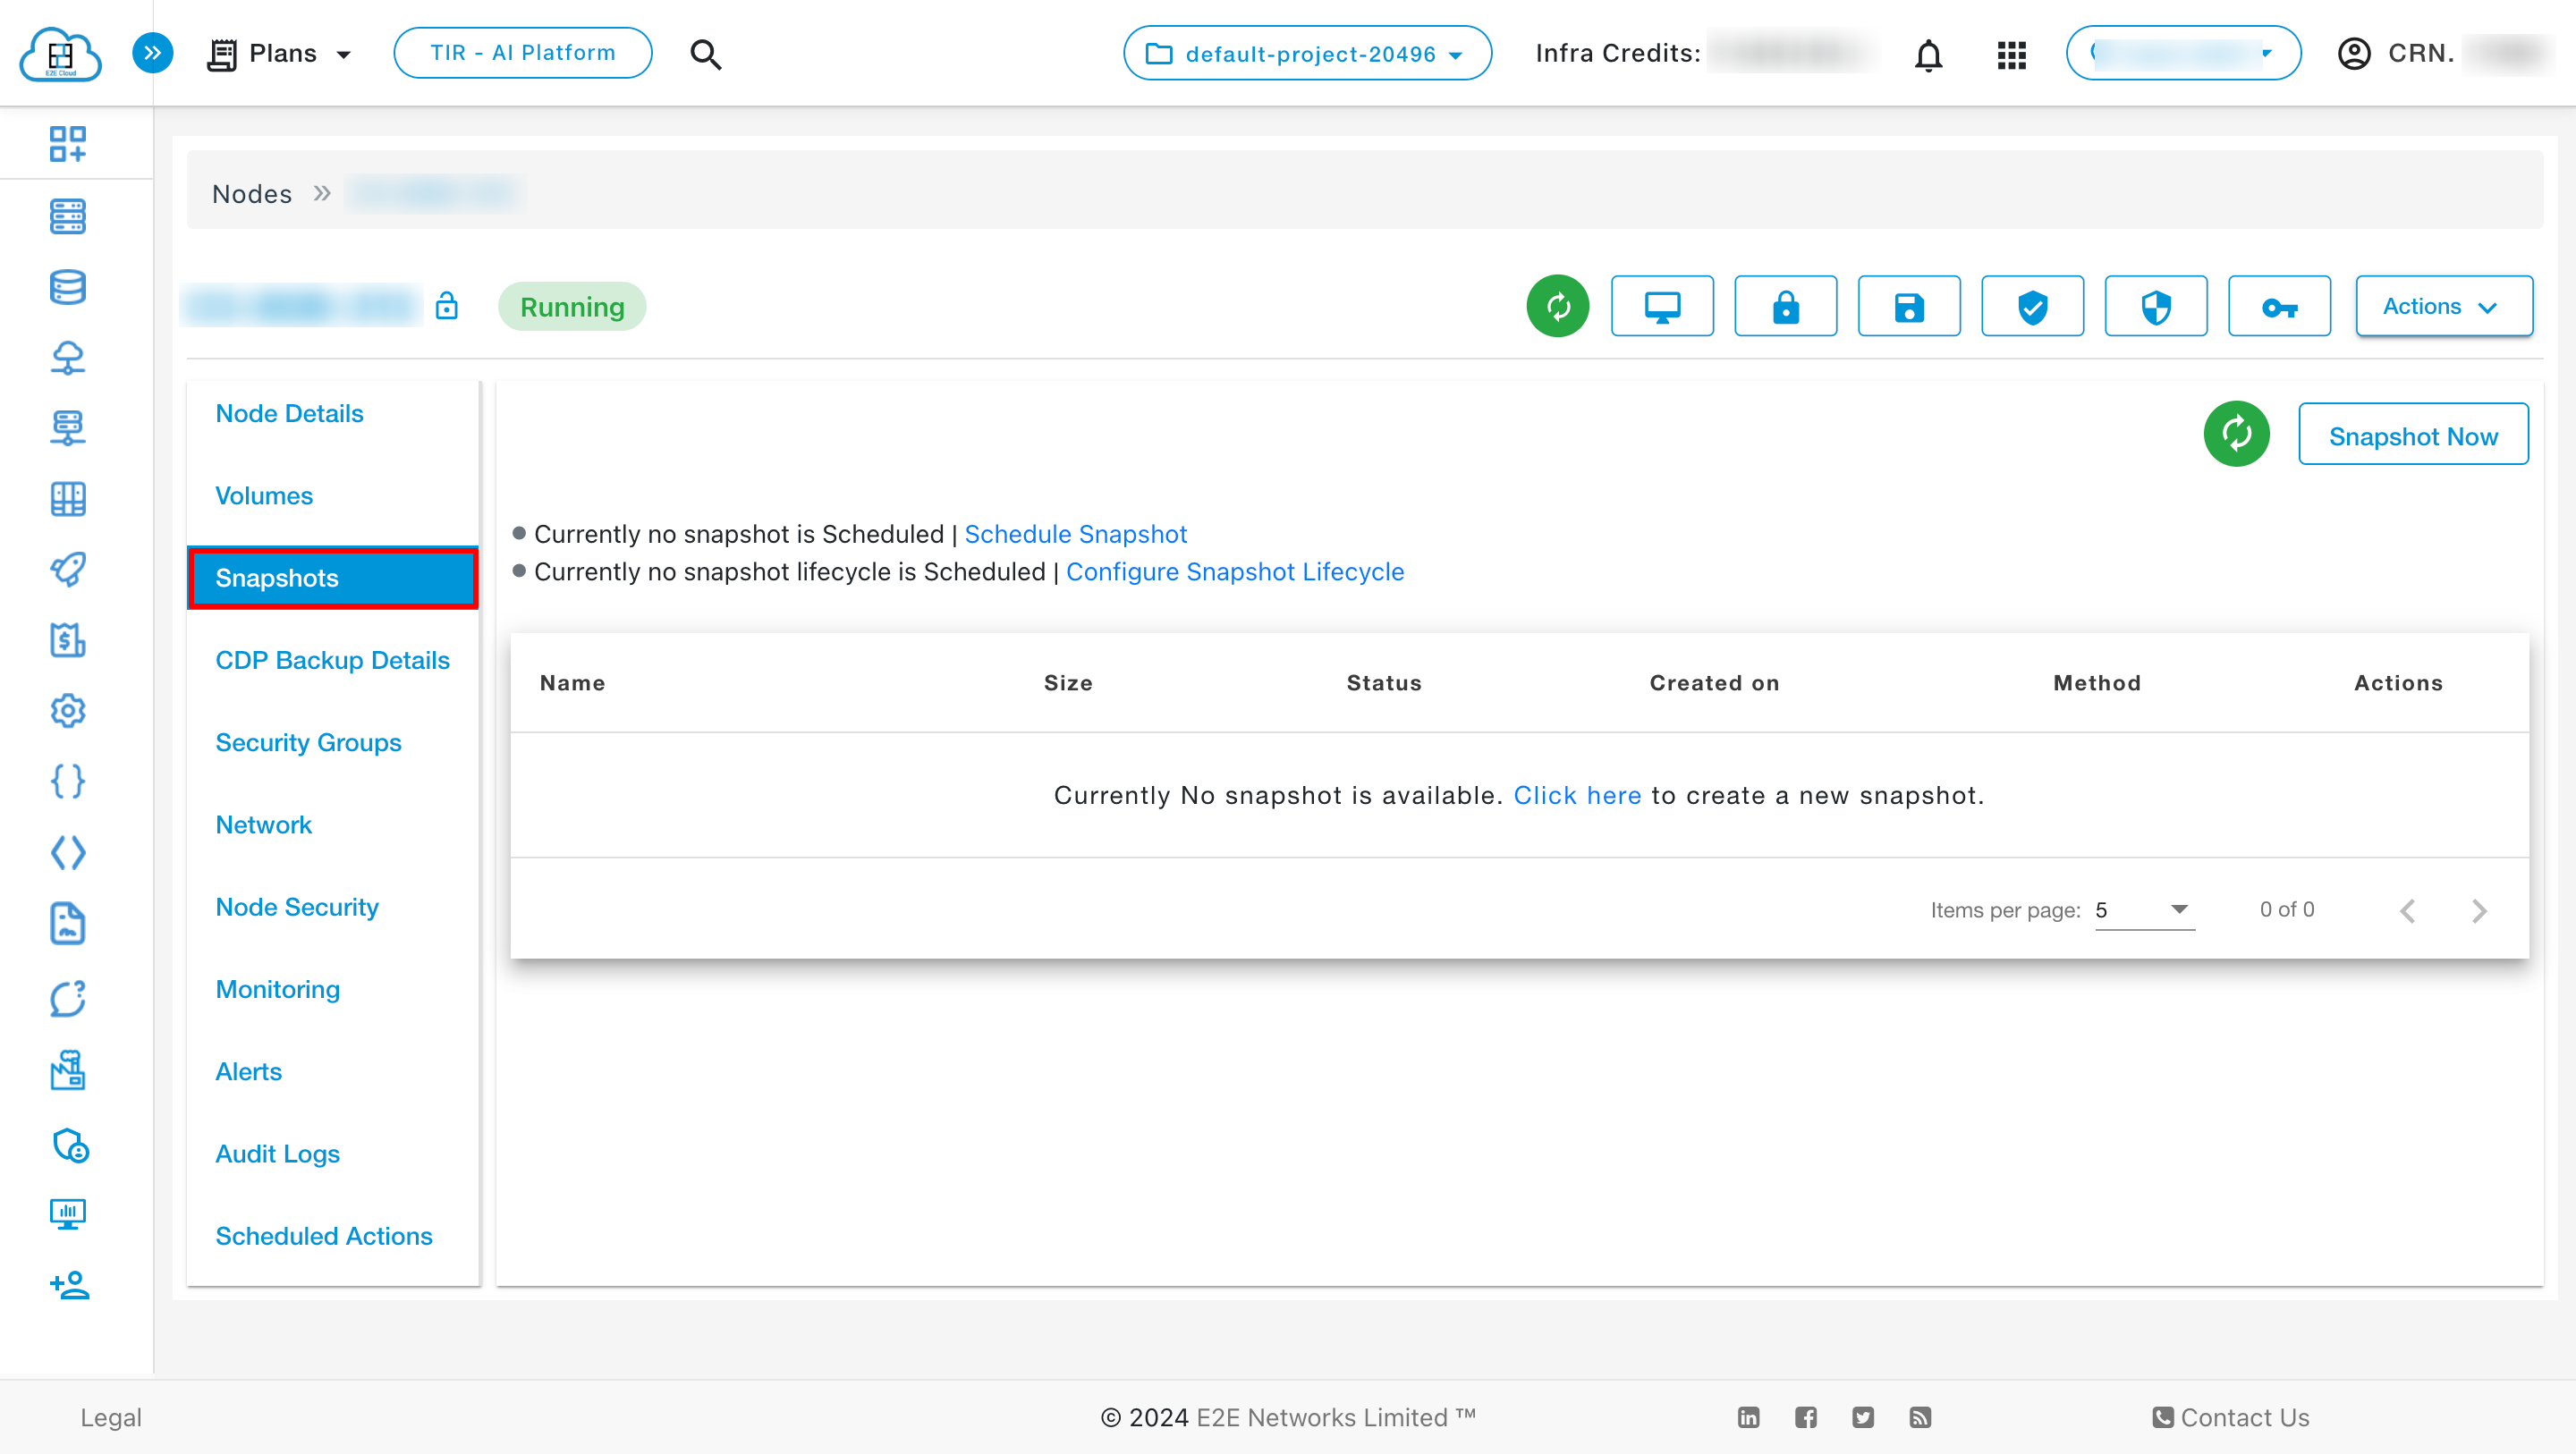
Snapshots
A Snapshot is a point-in-time image of a virtual machine’s state, including its memory, disk, and configuration settings. It allows users to capture the exact state of a VM at a specific moment, which can be used for various purposes such as backups, cloning, and recovery.
To take a snapshot of your Node click on the Snapshots tab.
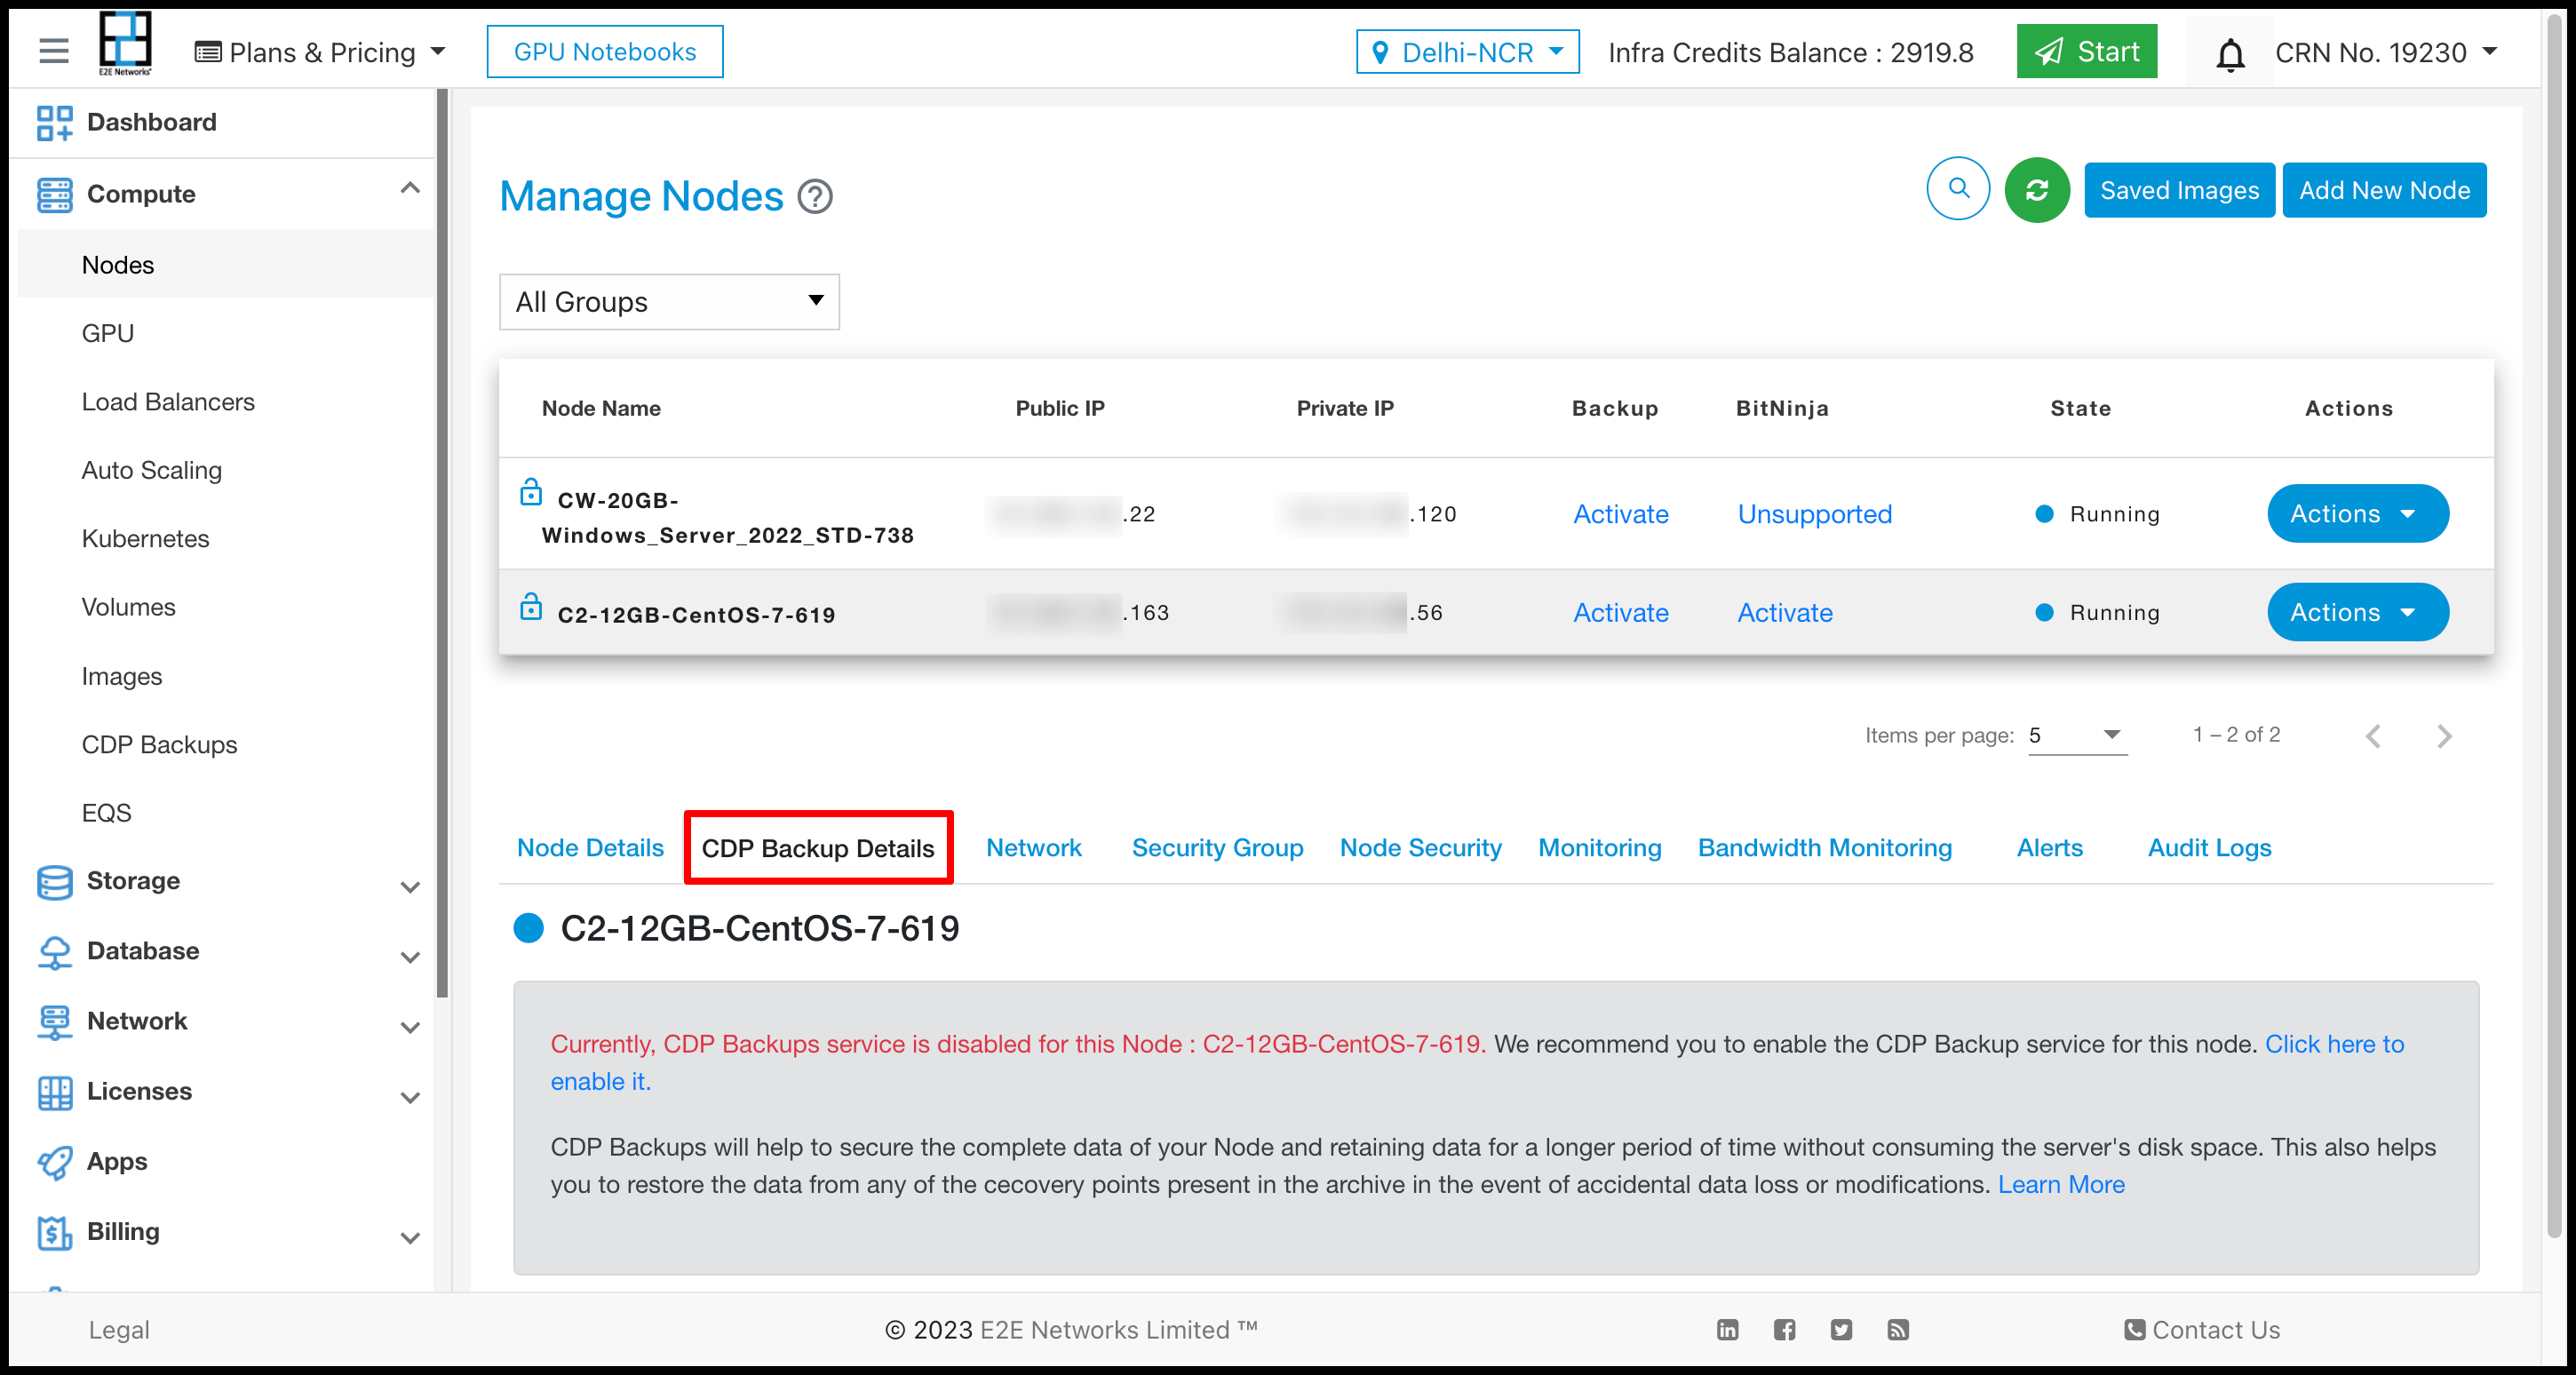
CDP Backup Details
The CDP Backup Details tab provides information about the CDP Backup service if it’s enabled for the node. Learn more.
Backup status
Backup Size
Backup Schedule
Backup Schedule Frequency
Last Recovery Points Created On
Next Backup Scheduled Run
MySQL Database Backup Status
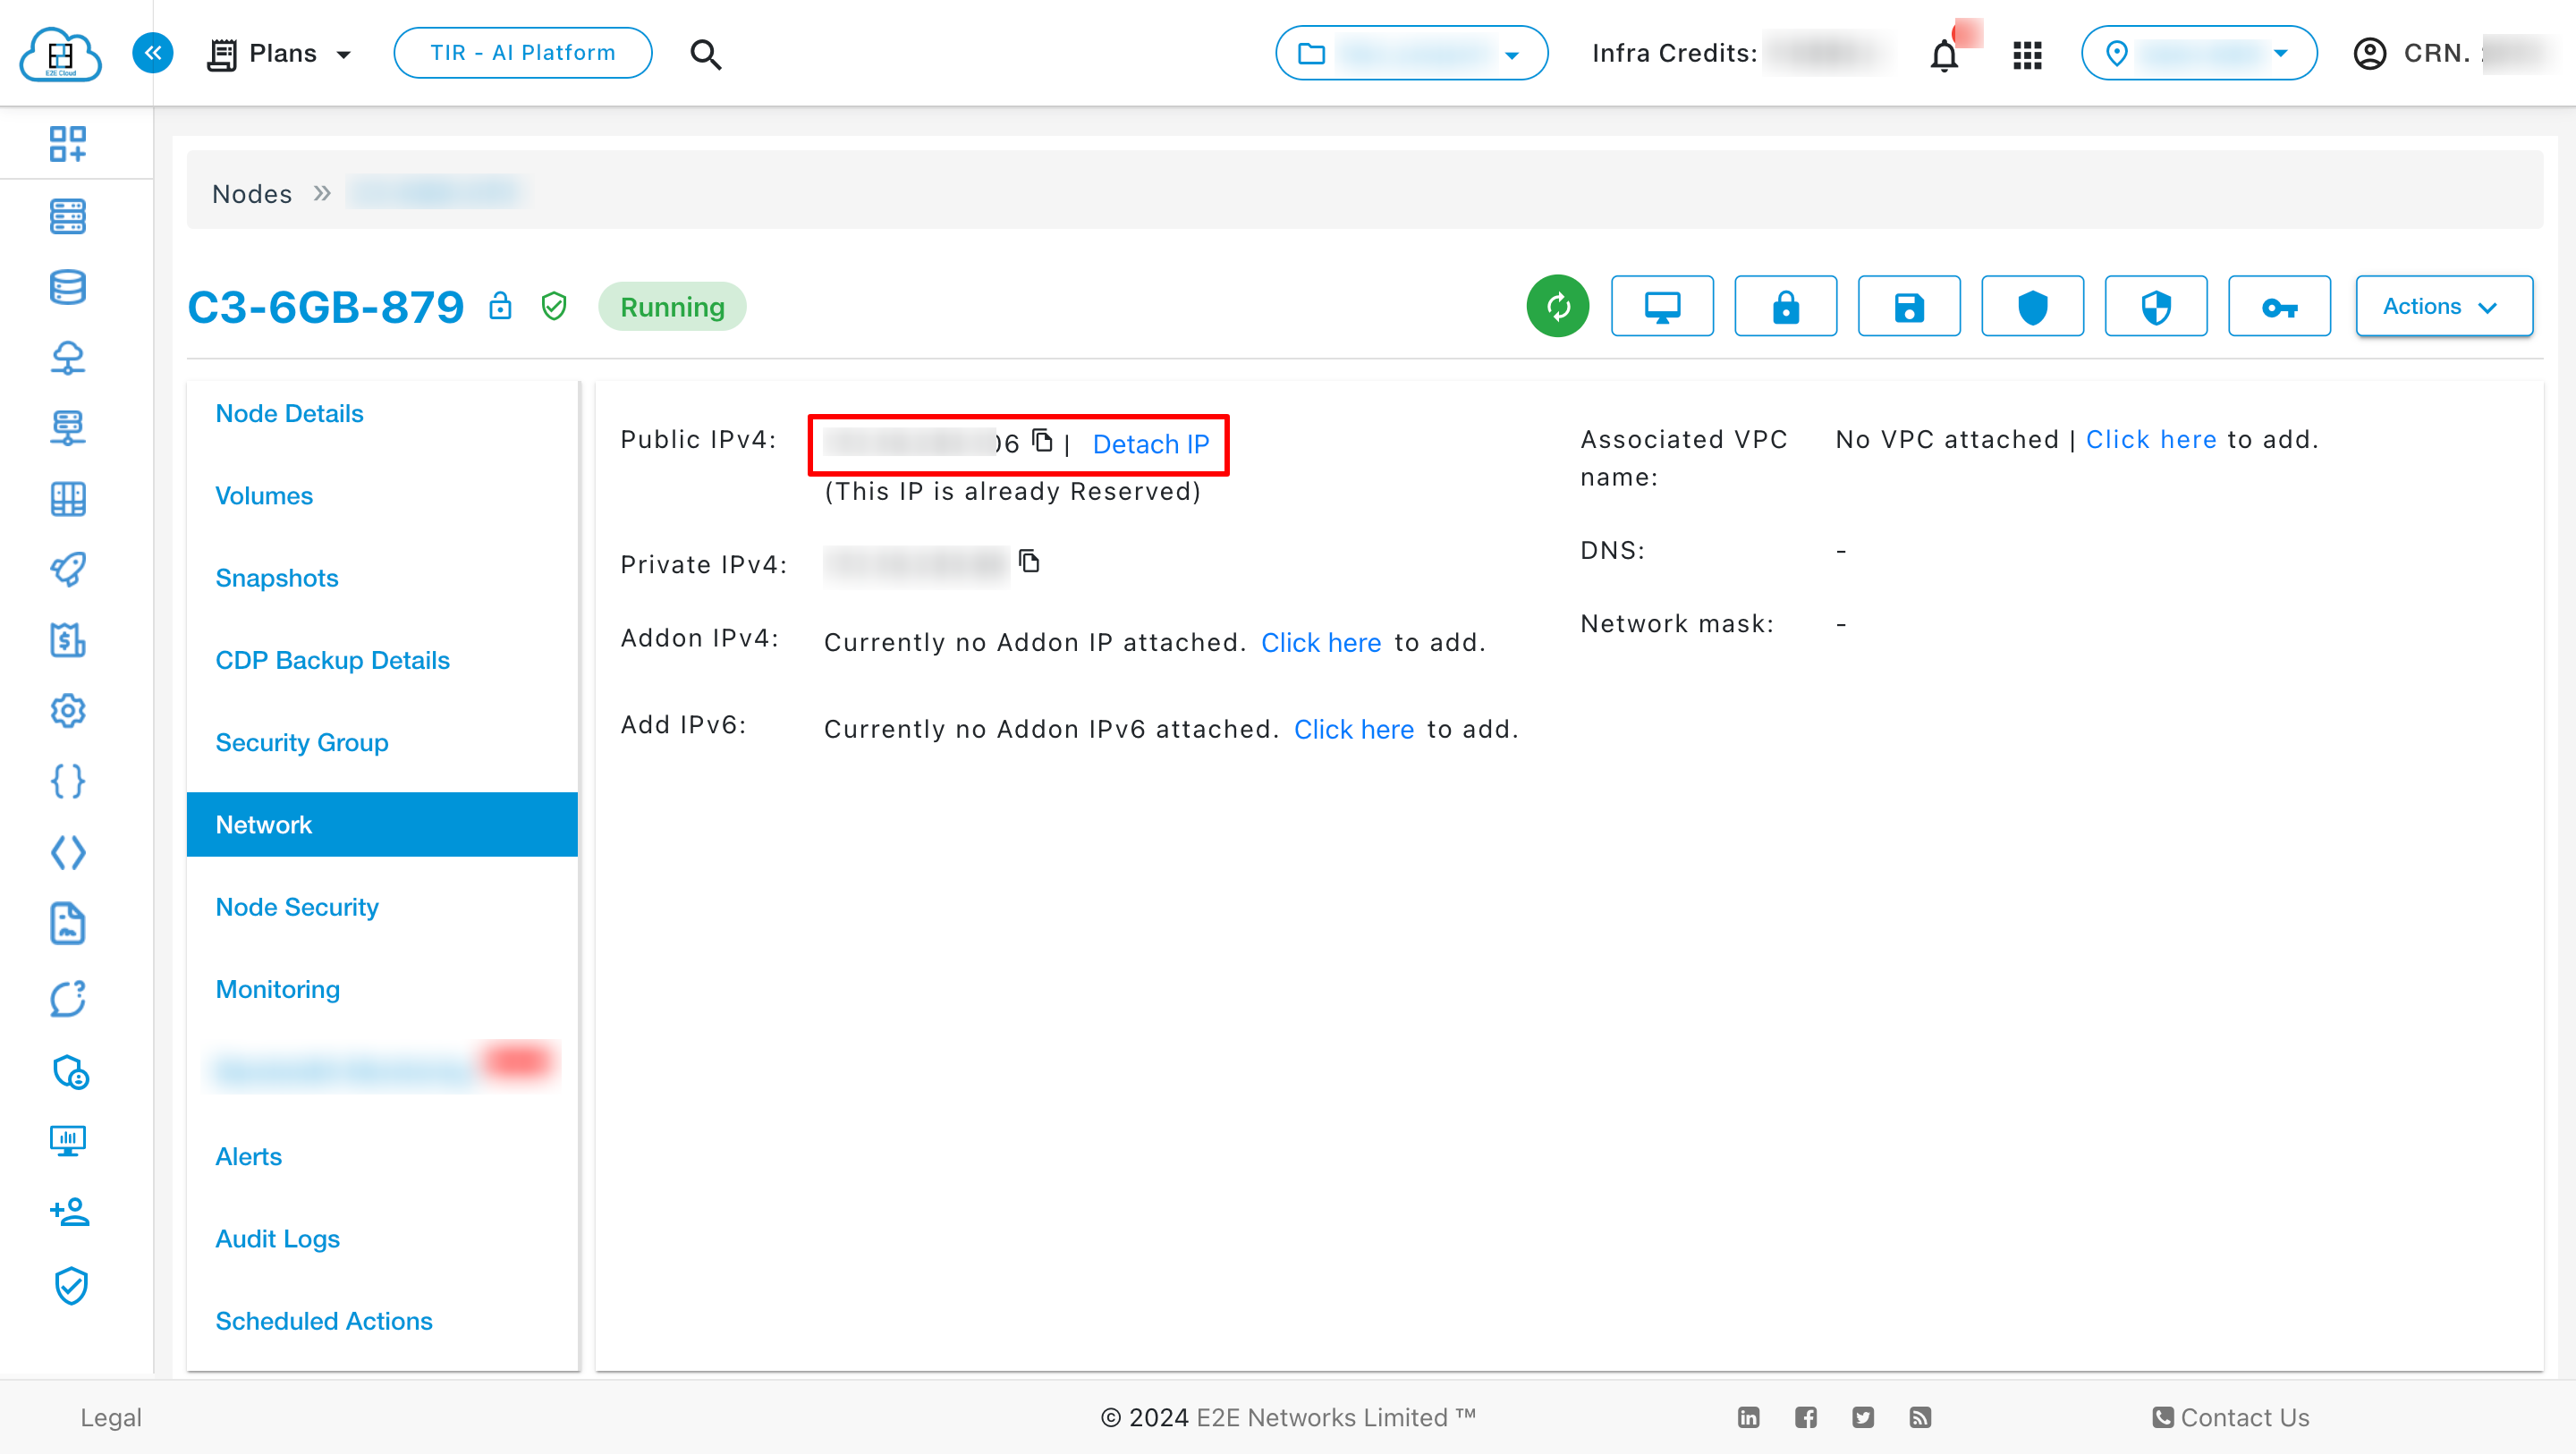
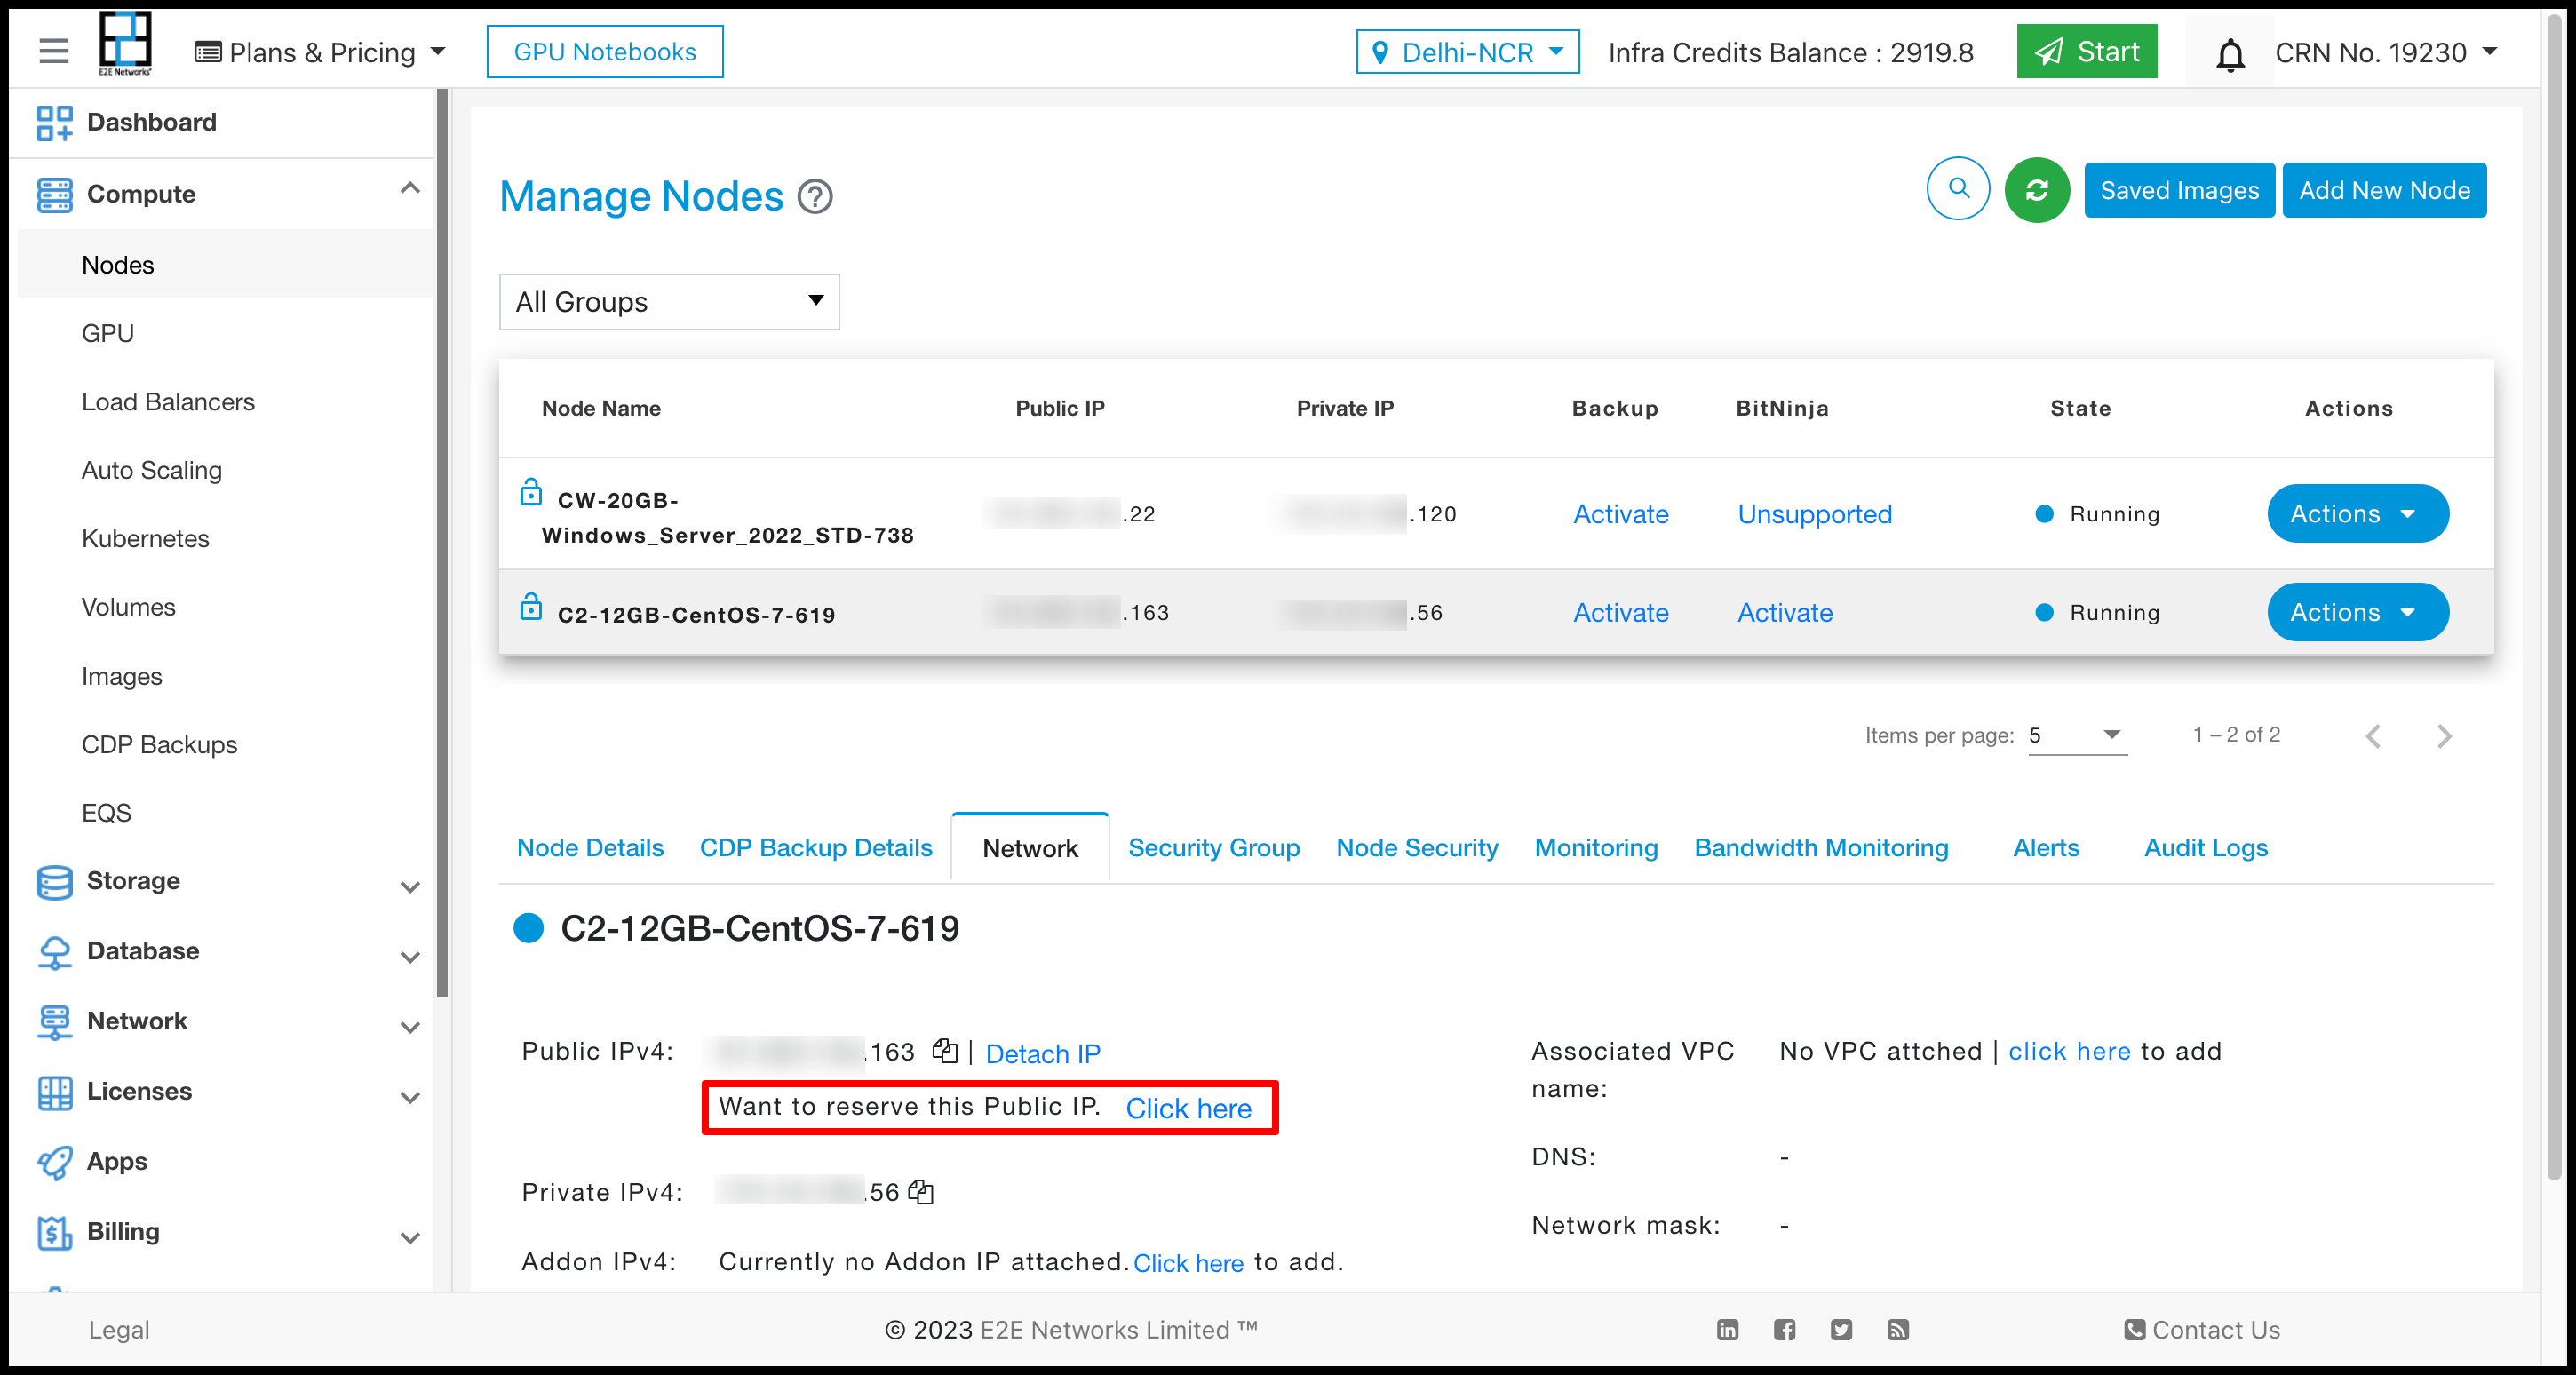
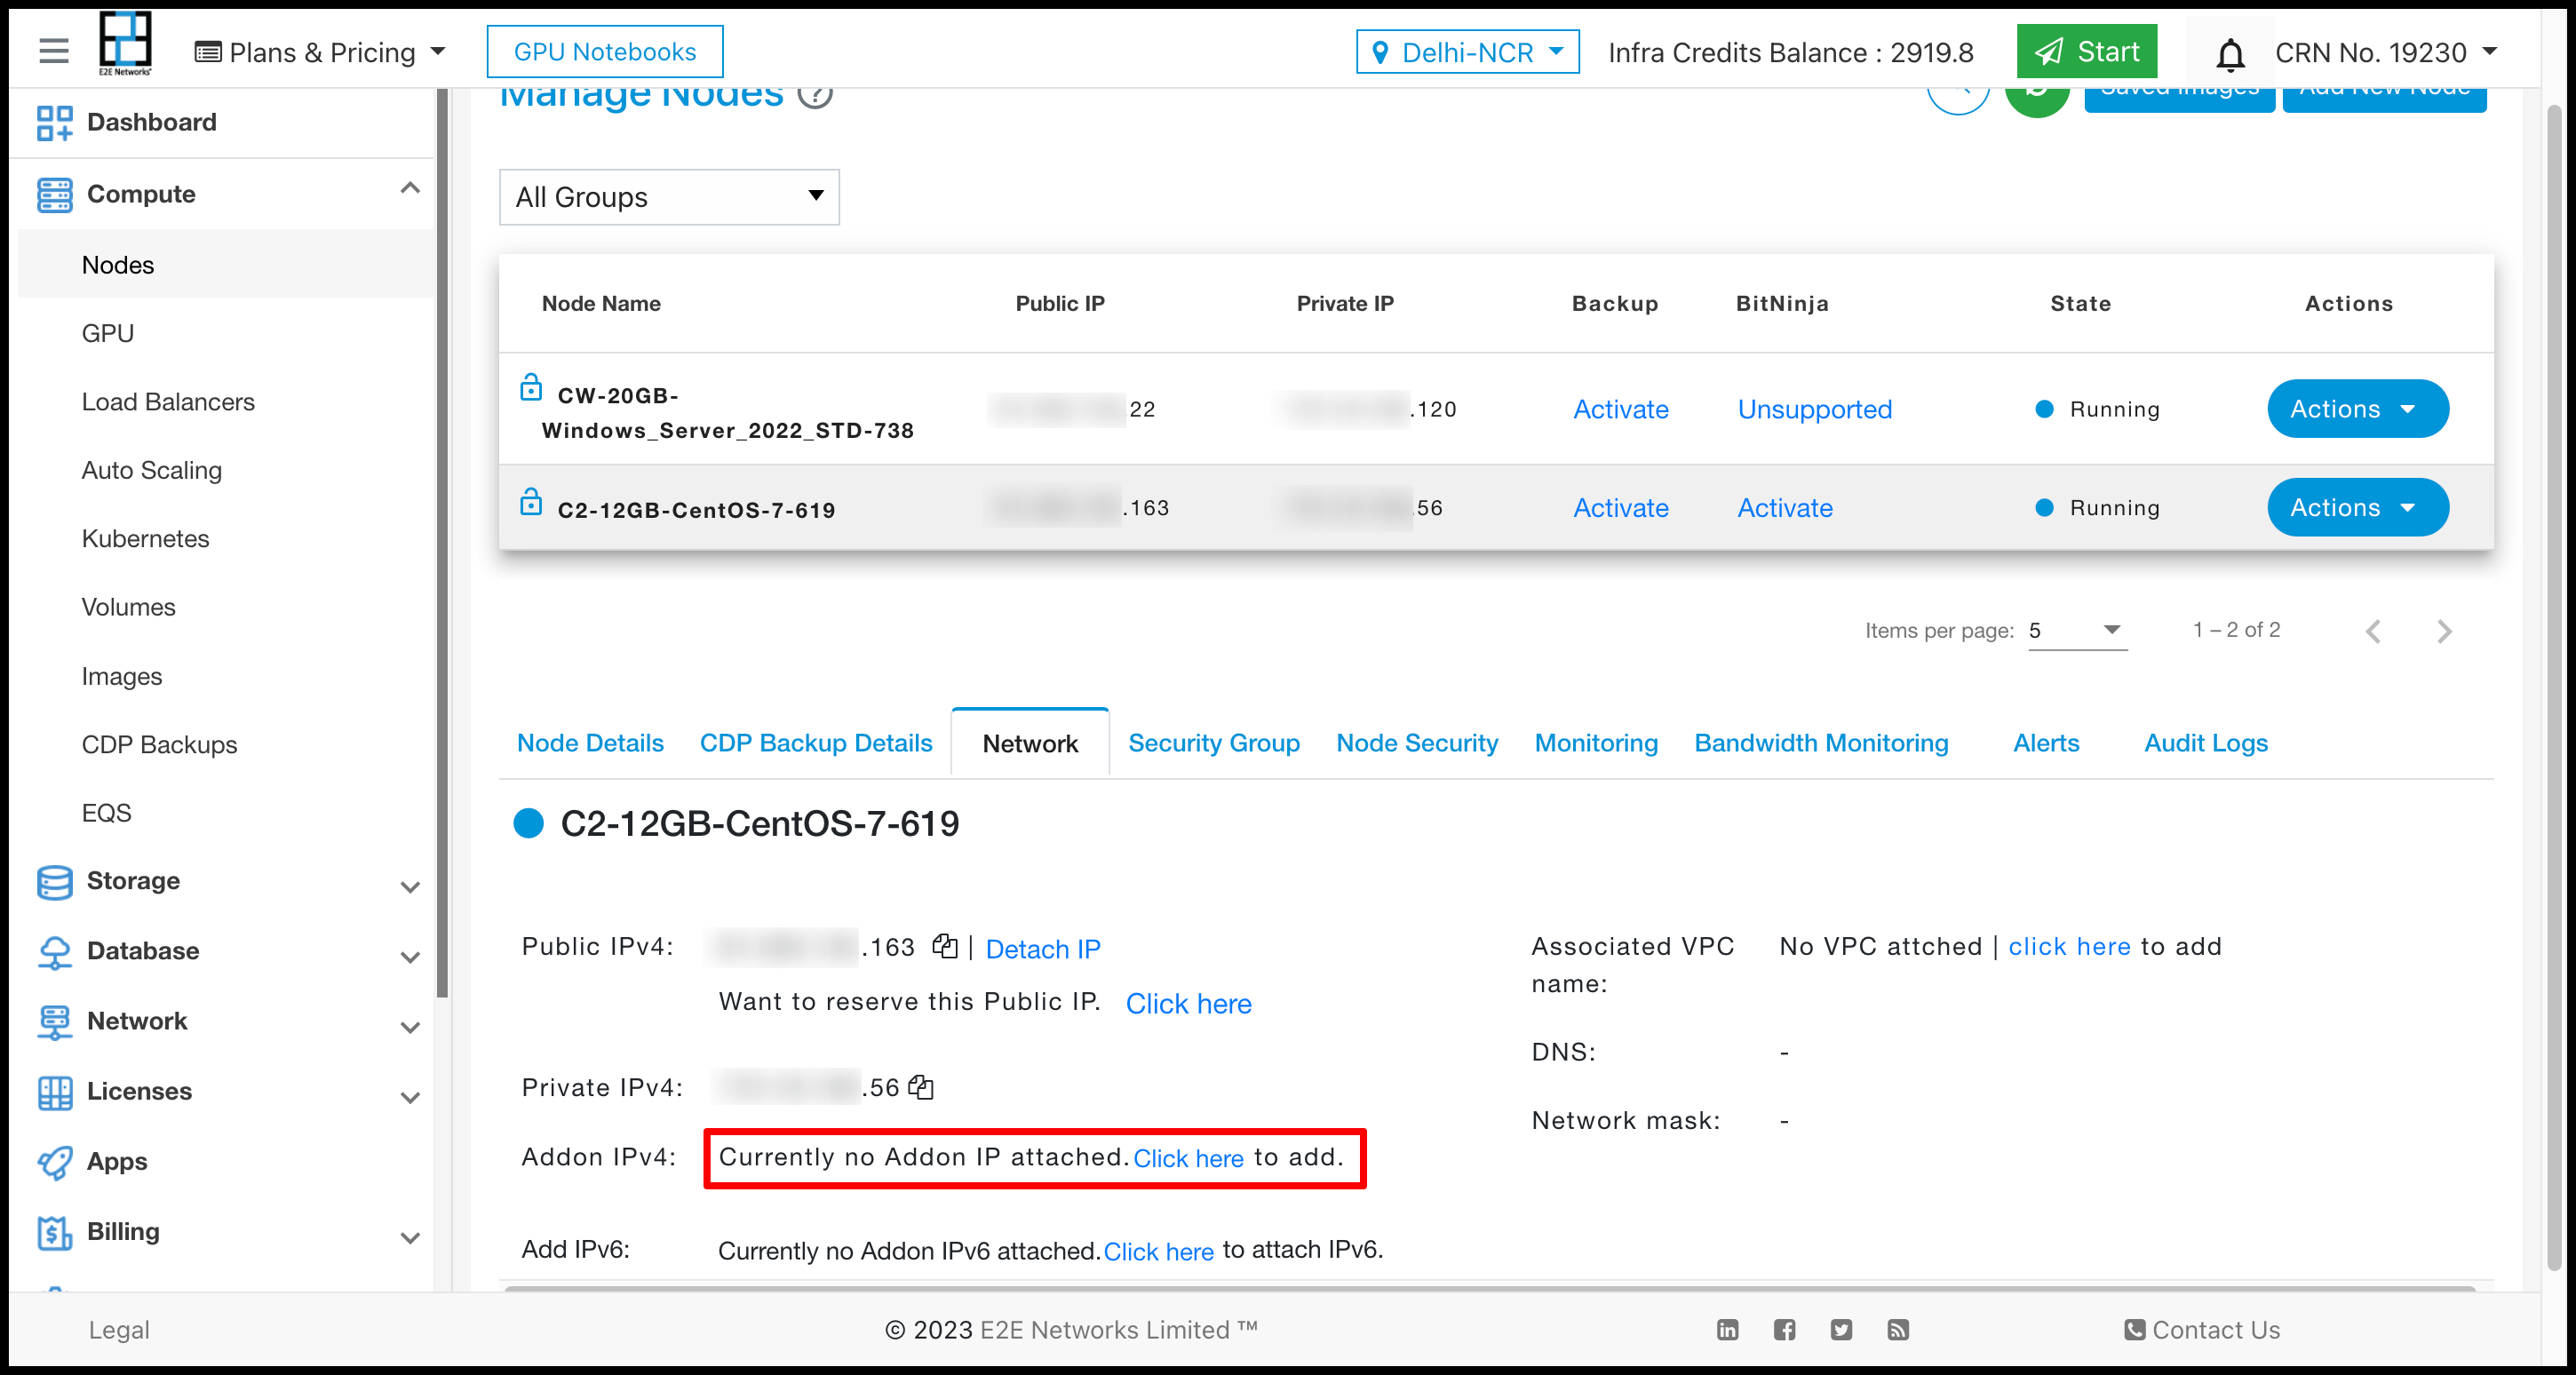
Network
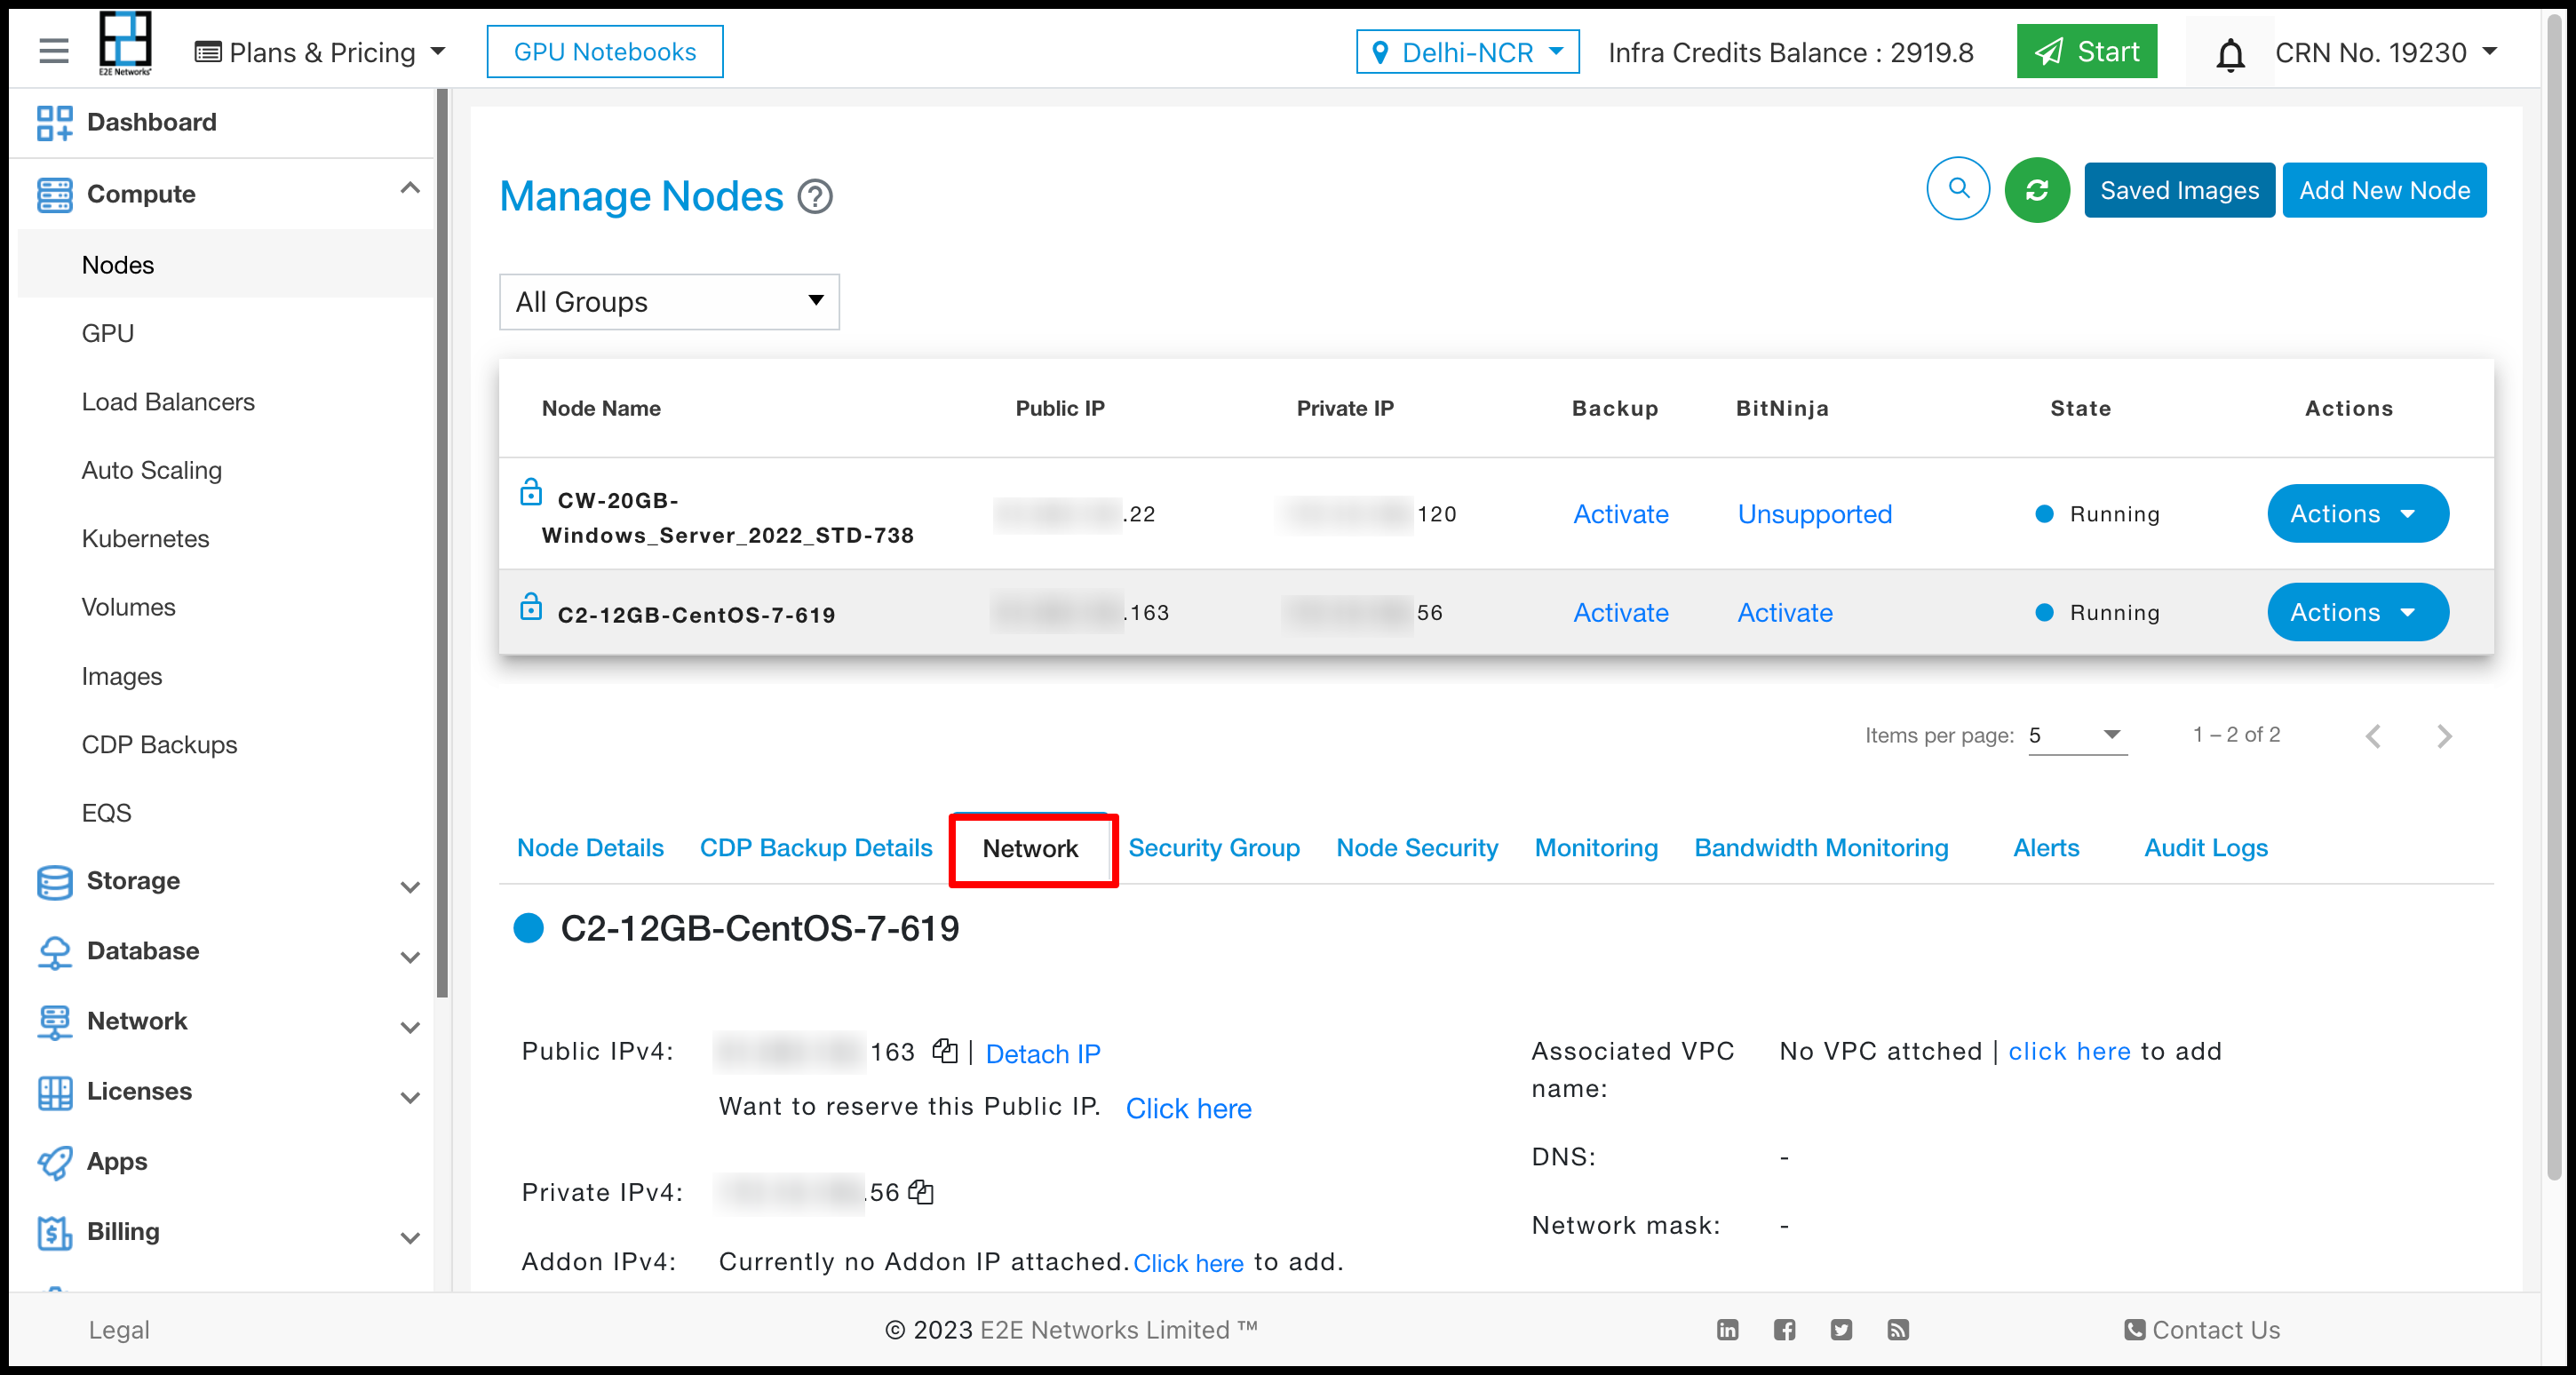
You will be able to get the private, public and reserved IPs information on the network tab, from which public IP, reserved IP, Addon IP, IPv6 IP and VPC can be edited and updated.
Public IPv4 Address
A public IP address is an IPv4 address that’s reachable from the Internet. You can use public addresses for communication between your node and the Internet. When you launch an E2E Node, we assign it a public IP address by default without assigning a reserved IP as primary public IP of yours node.
Detach public IP
You can detach IP as mentioned below.
Reserve public IP
You can reserve default assigned public IP for your account until you do not release it.
Private IPv4 Address
A private IPv4 address is an IP address that’s not reachable over the Internet. You can use private IPv4 addresses for communication between instances in the same VPC. When you launch an E2E node, we allocate a private IPv4 address for your node.
Addon (Reserved) IPv4 Address
Reserved IP address is a public IPv4 address that you can allocate to your account. You can attach it to and detach it from nodes as you require. It’s allocated to your account until you choose to release it.
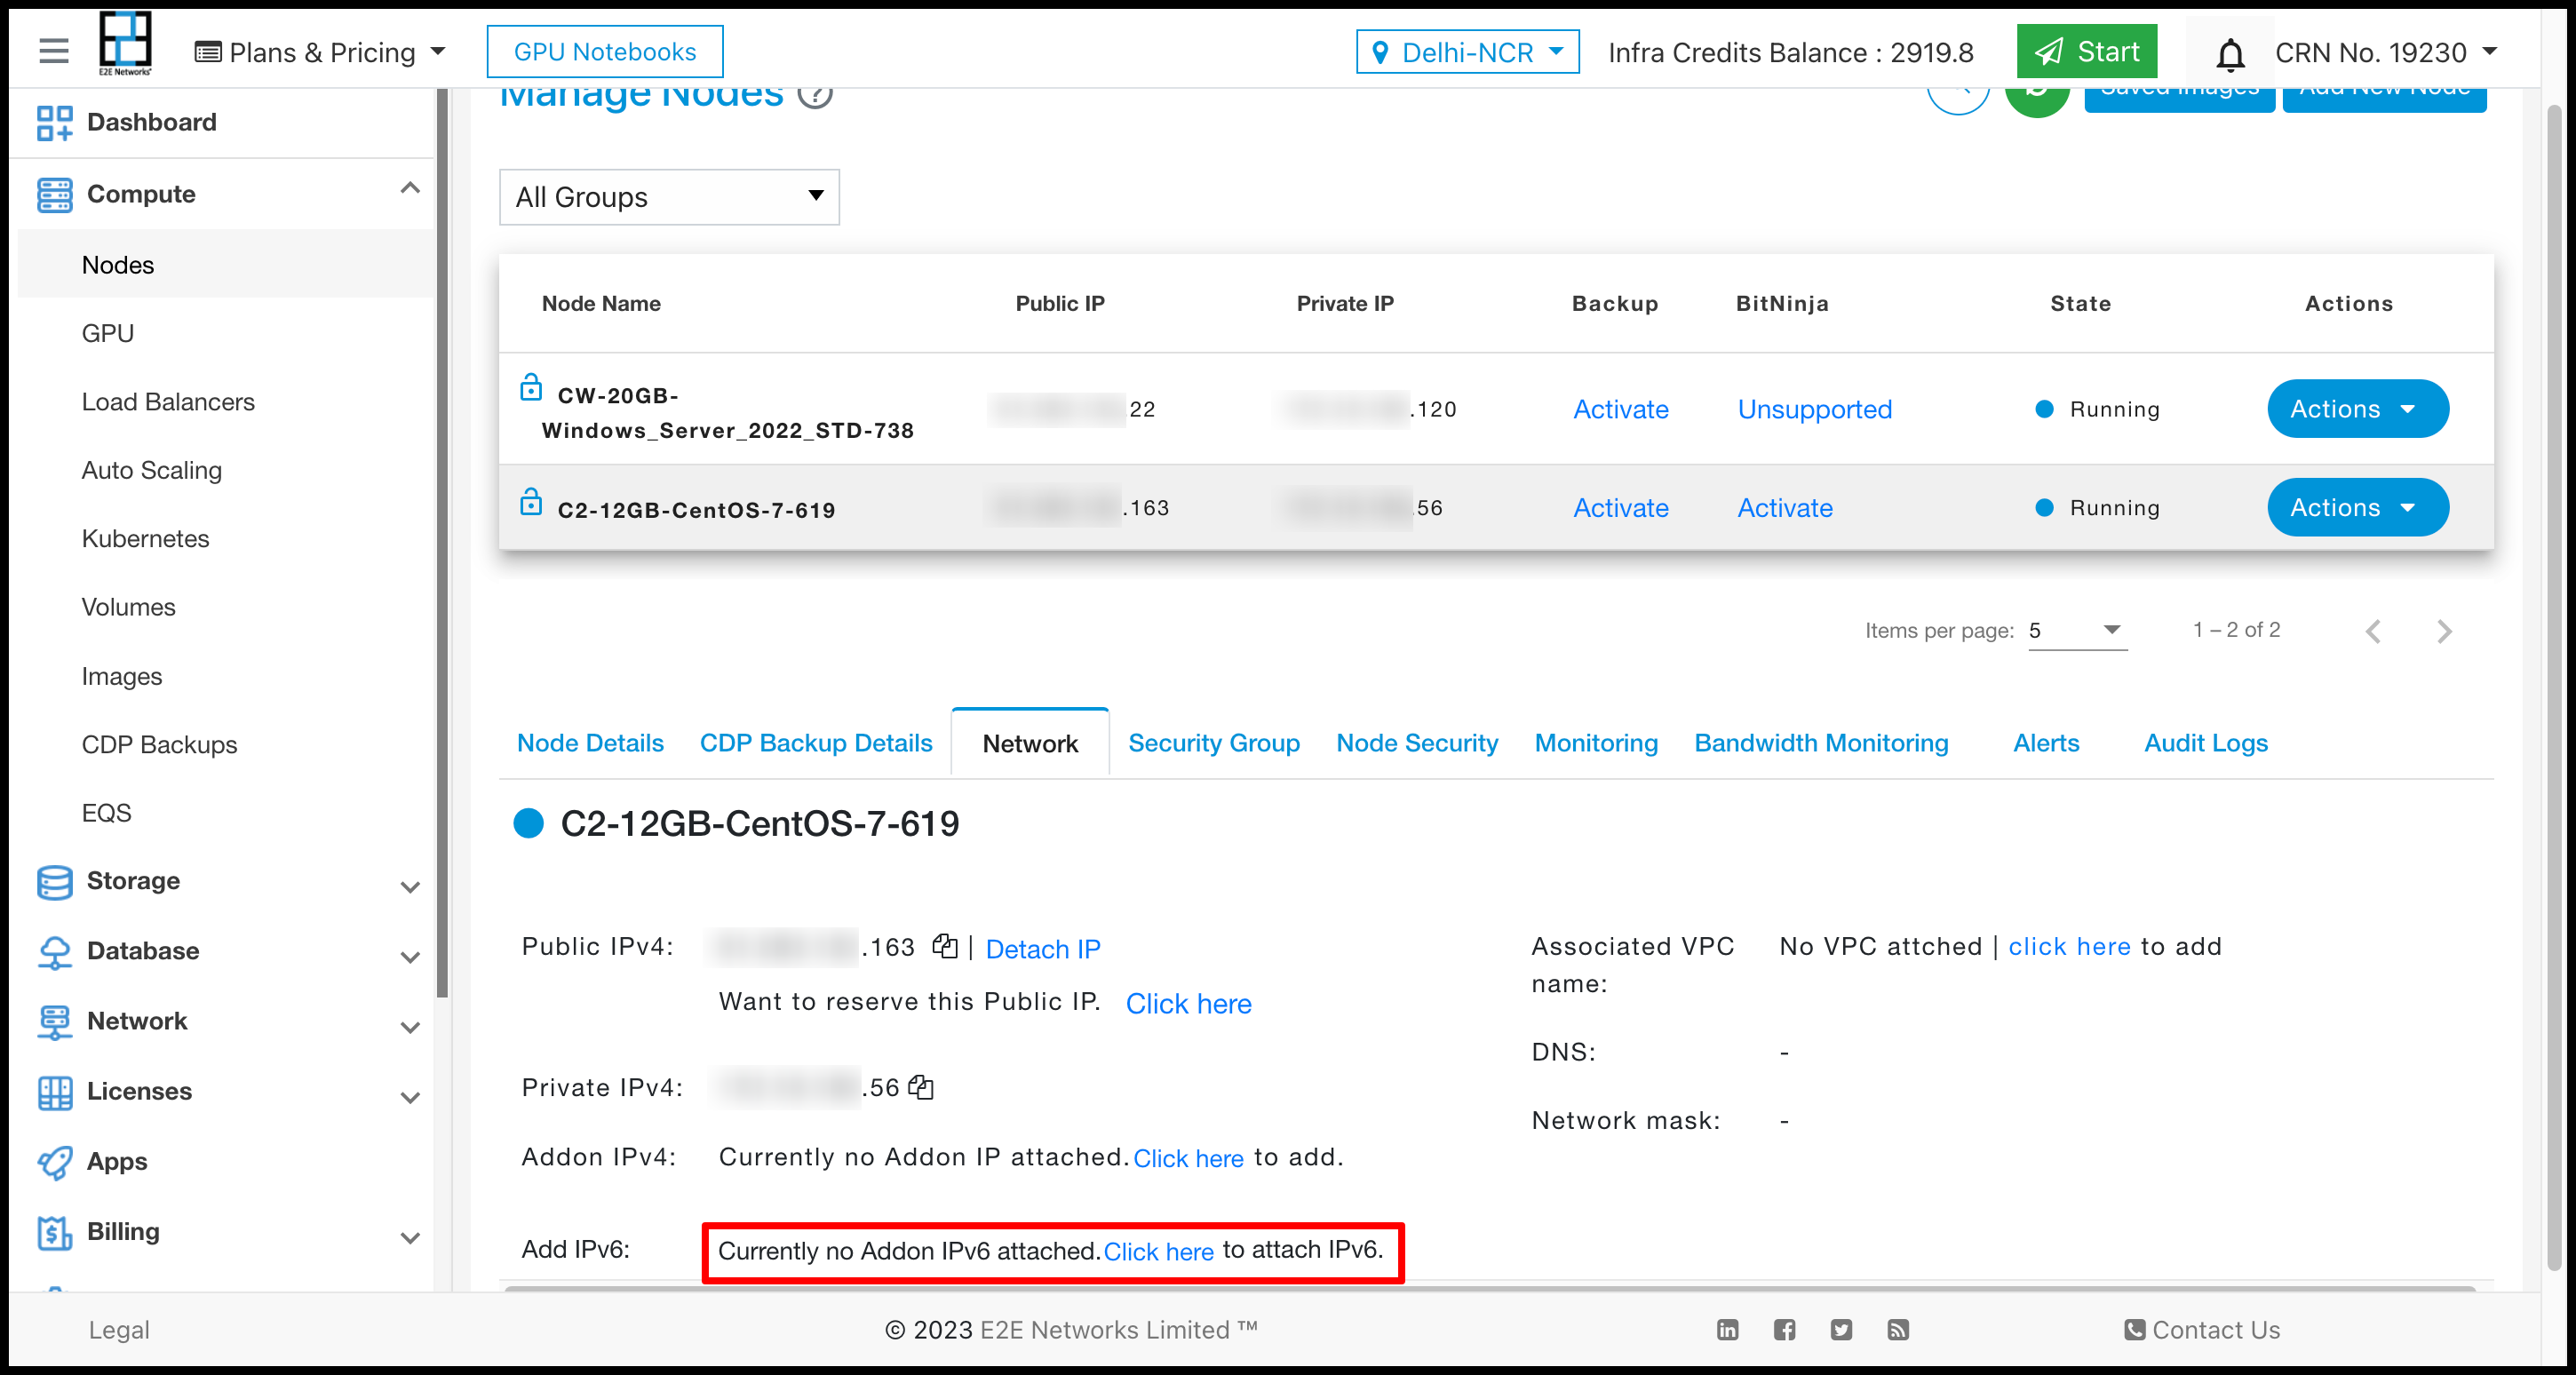
Attach IPv6
To attach IPv6 IP to the running node please refer the below mentioned screenshot.
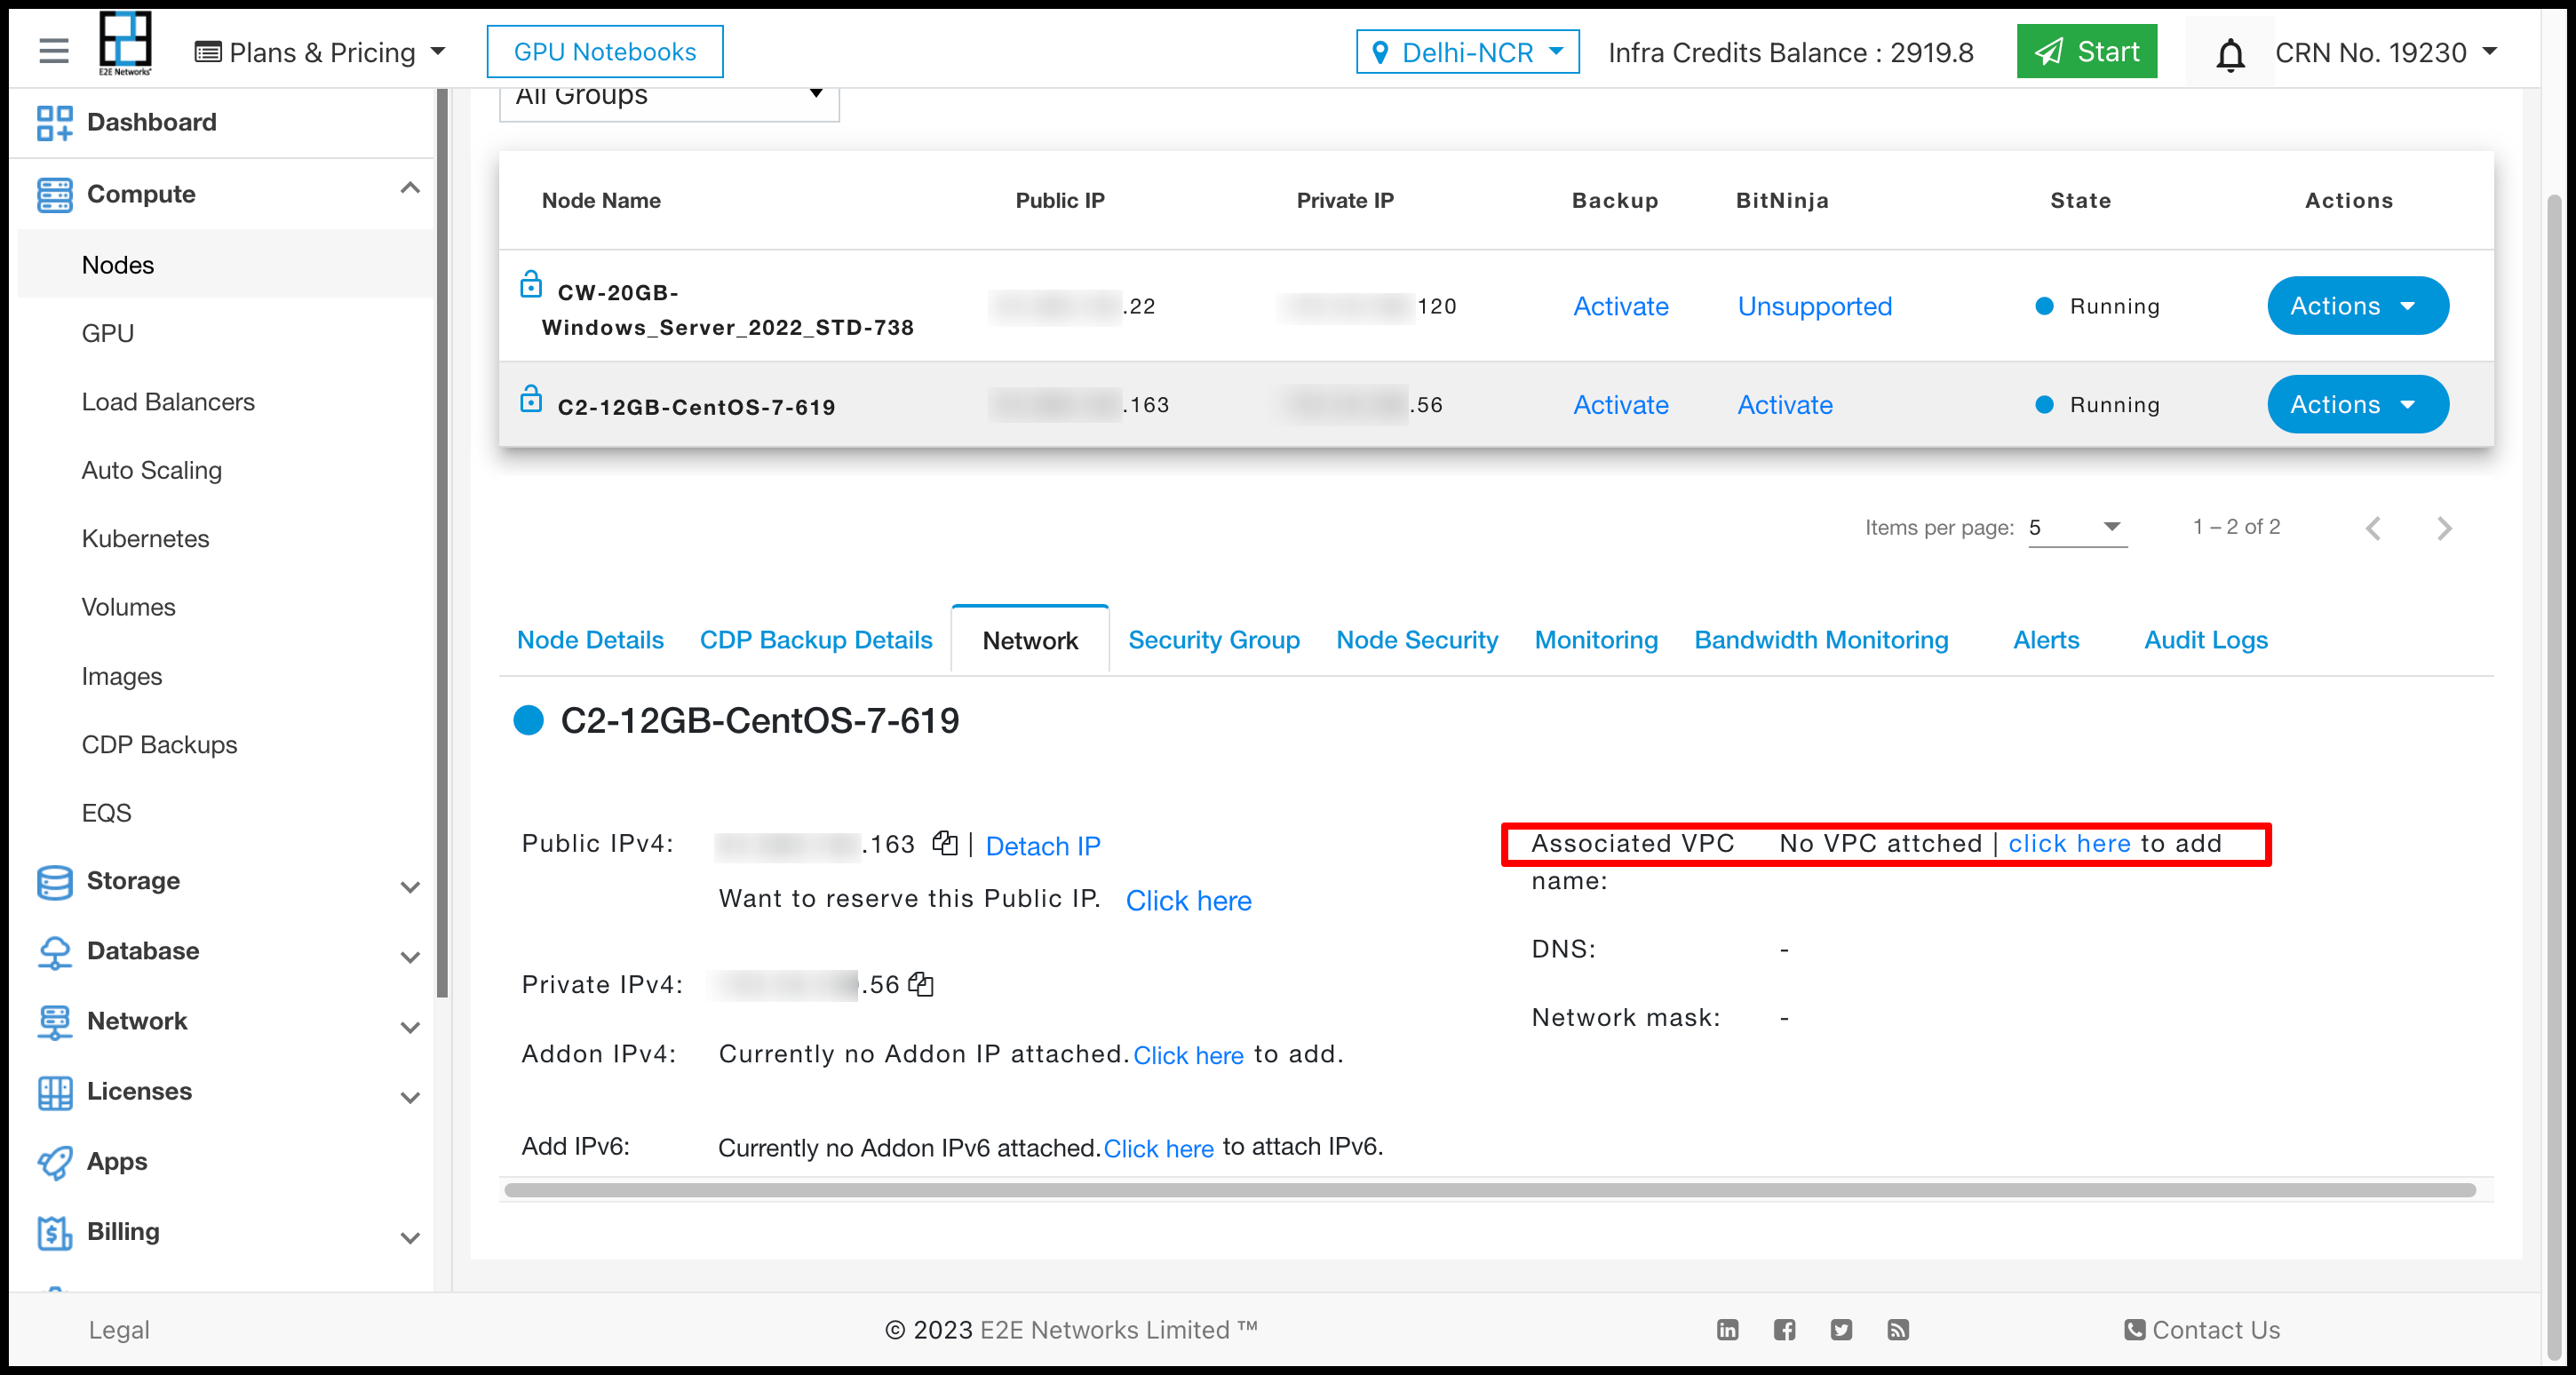
Attach VPC
To attach VPC to the running node please refer the below mentioned screenshot.
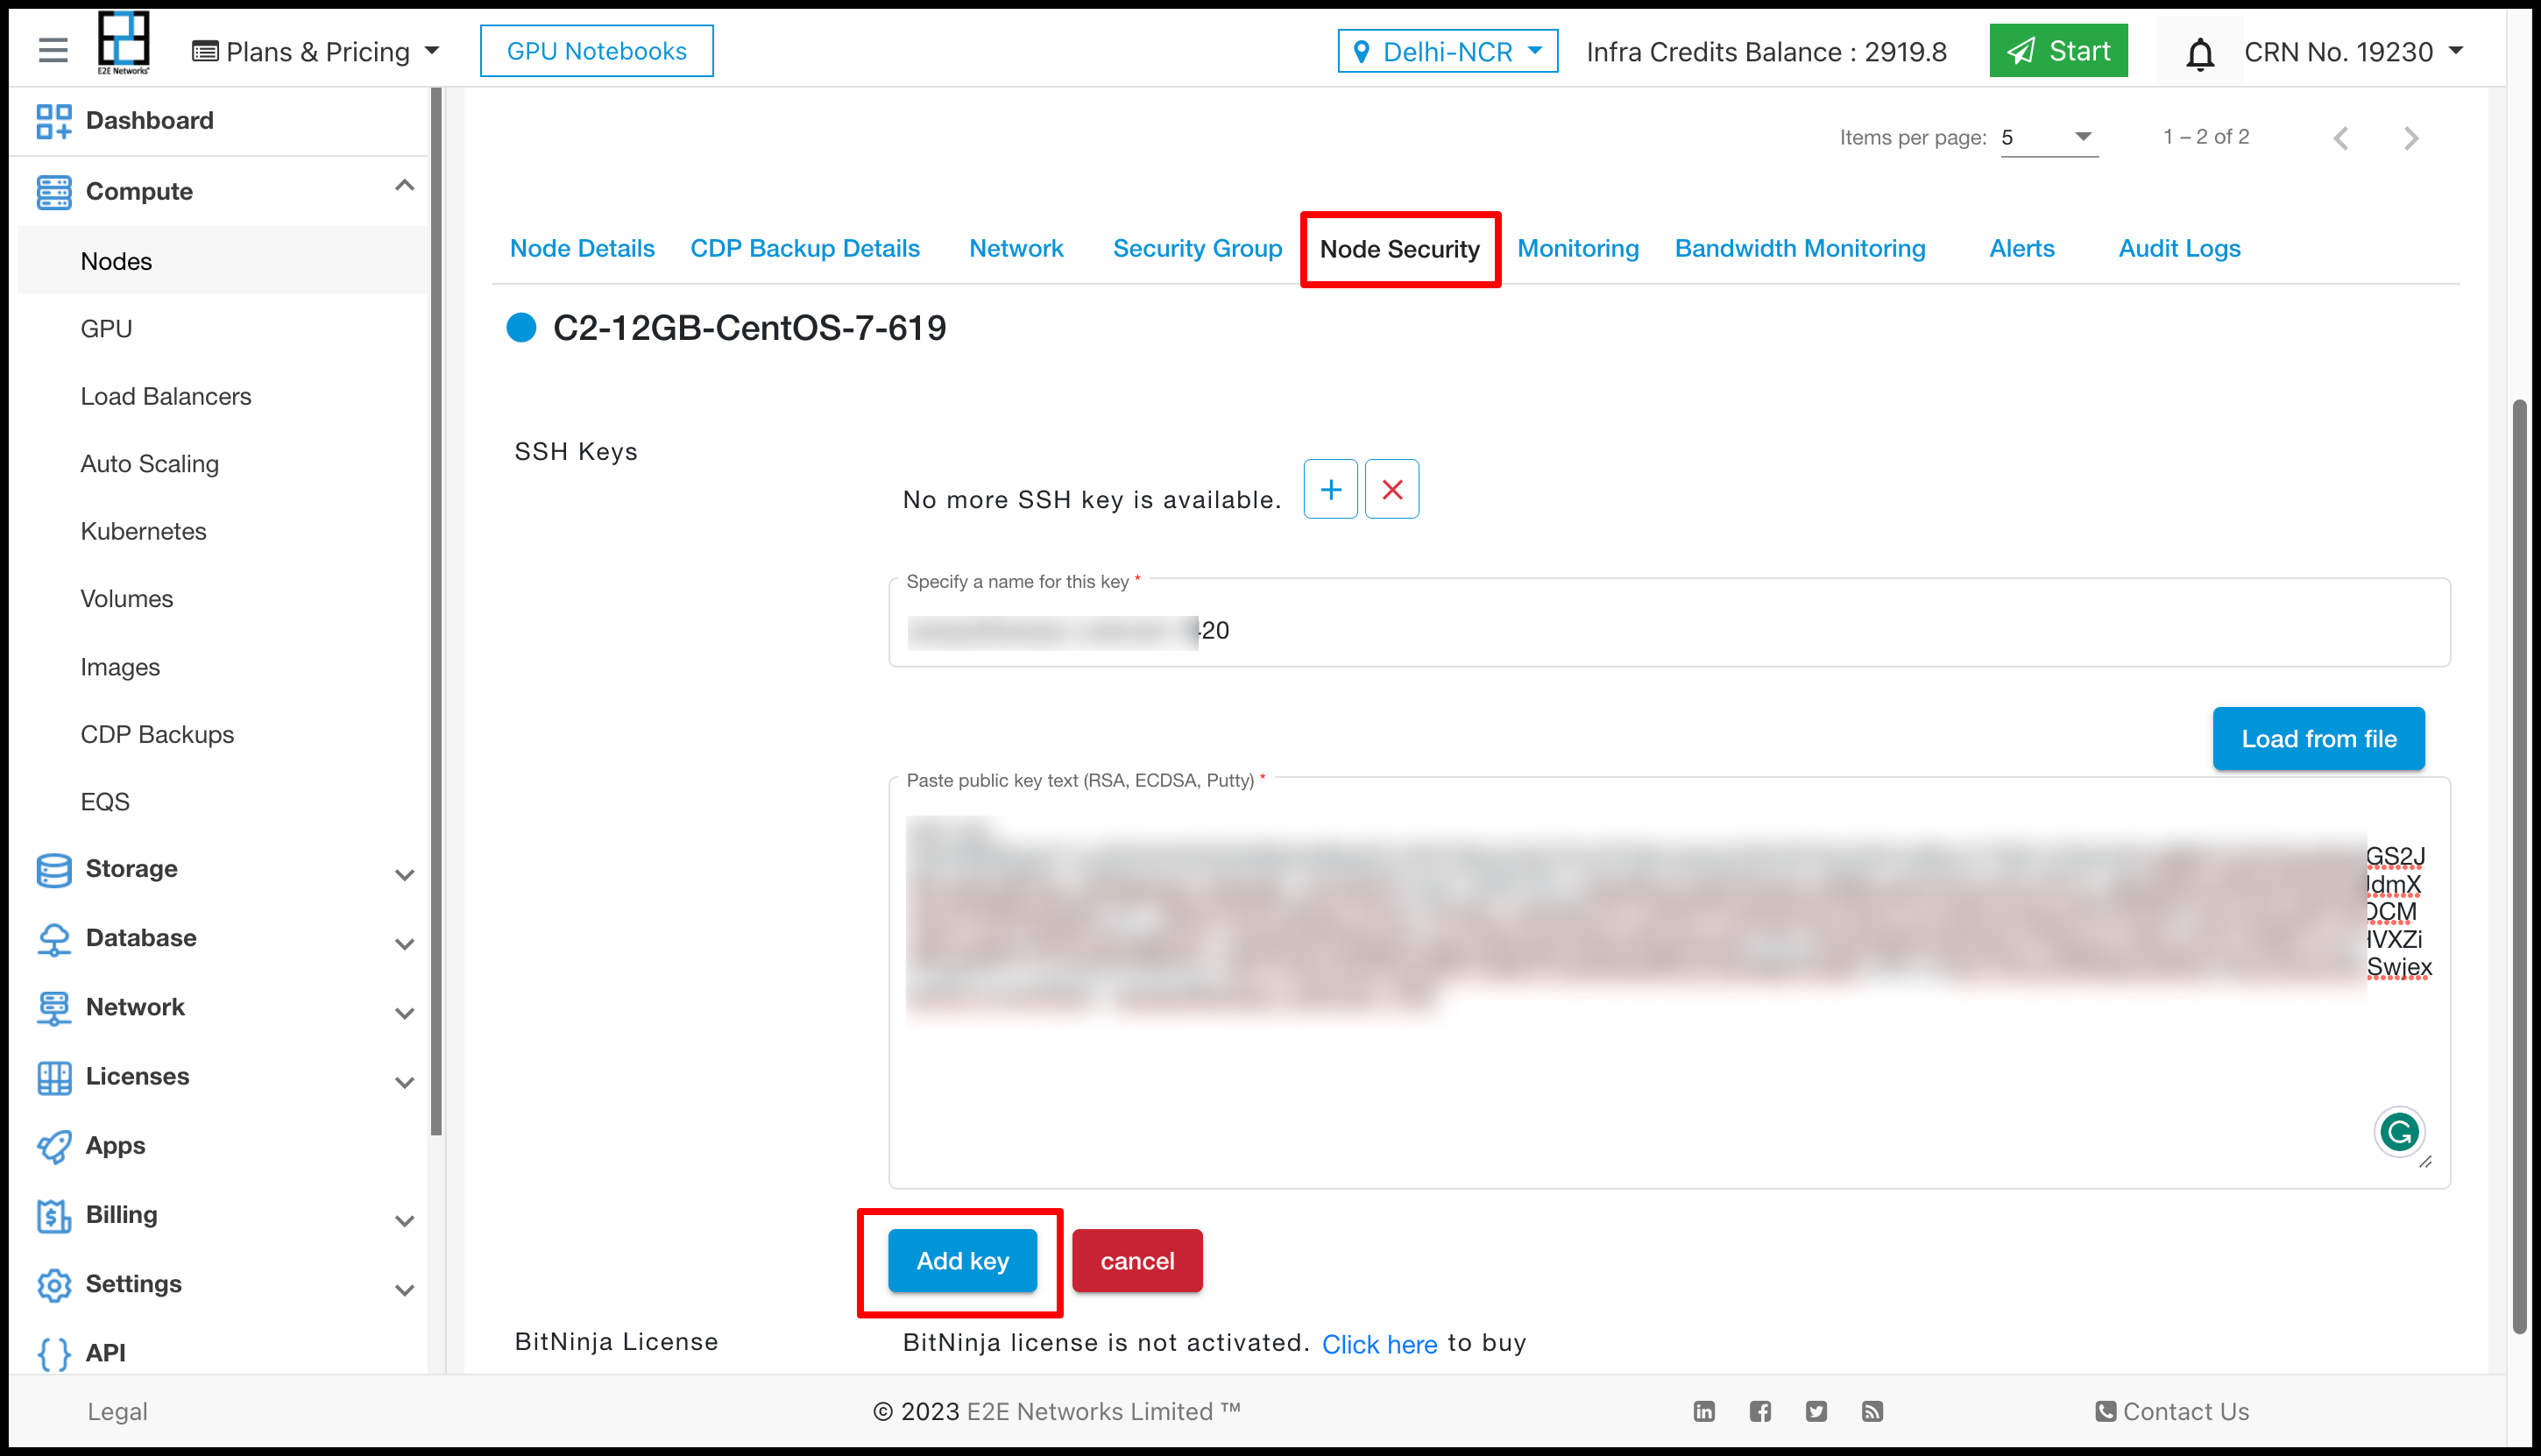
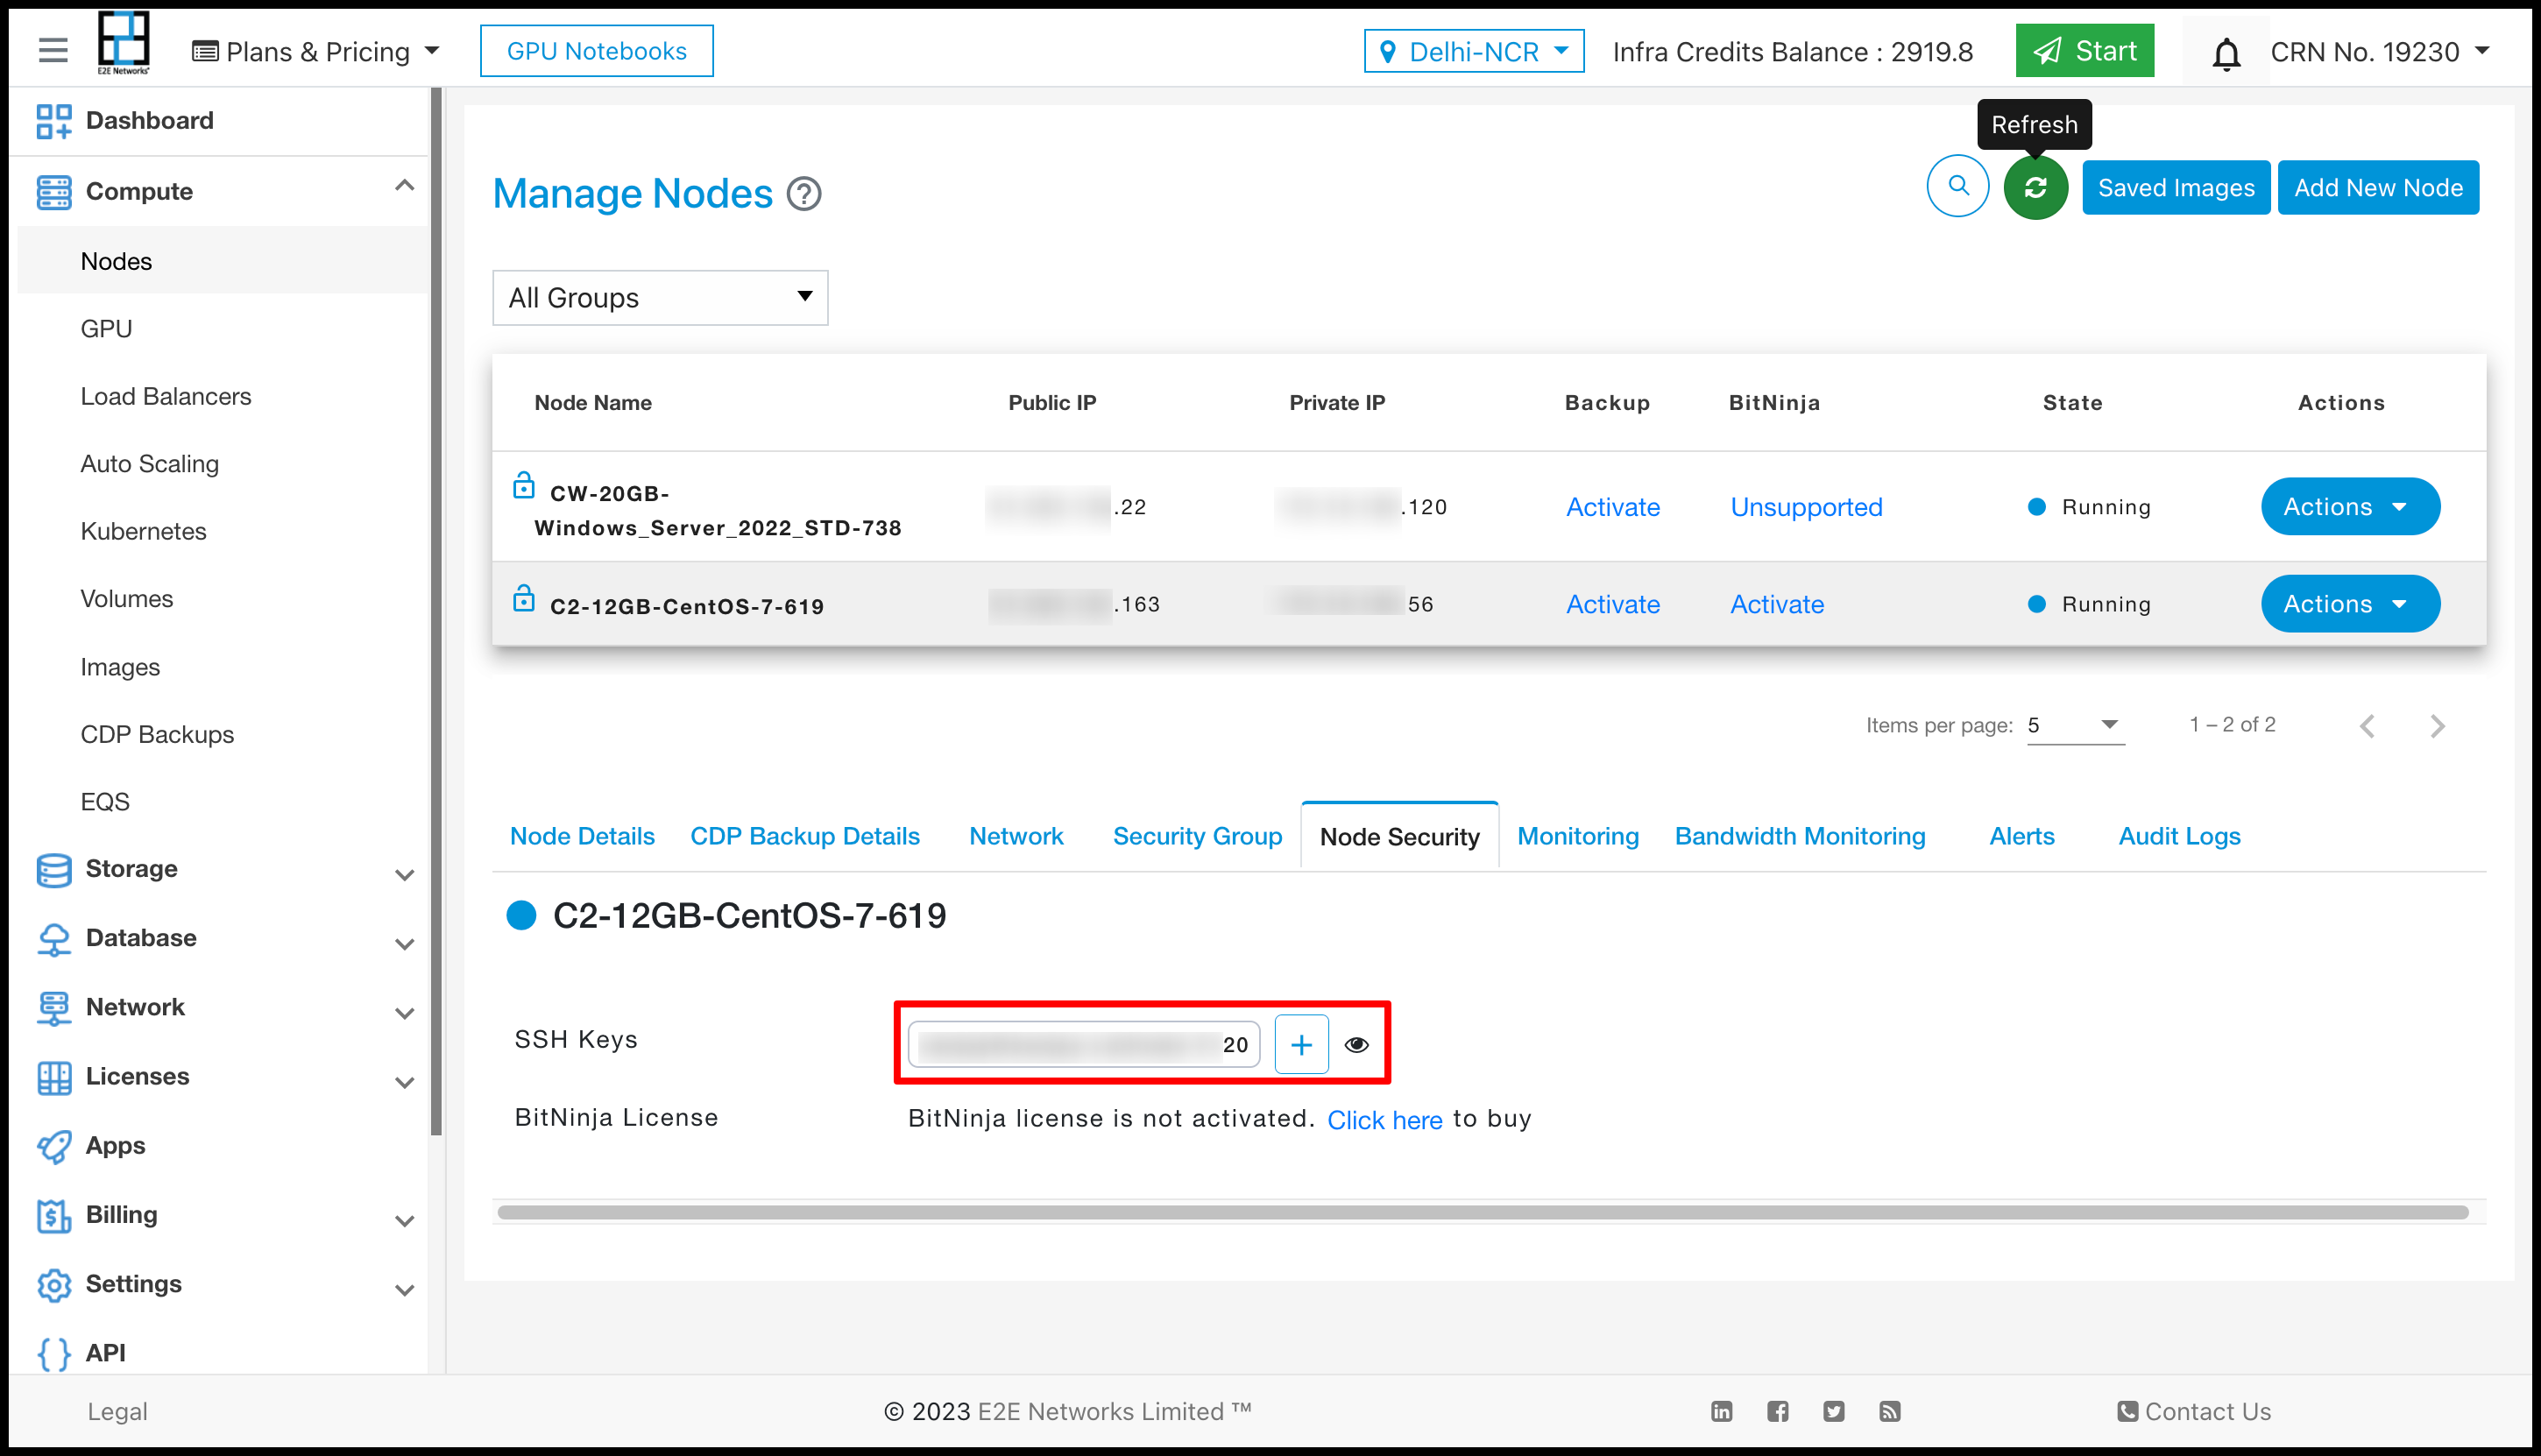
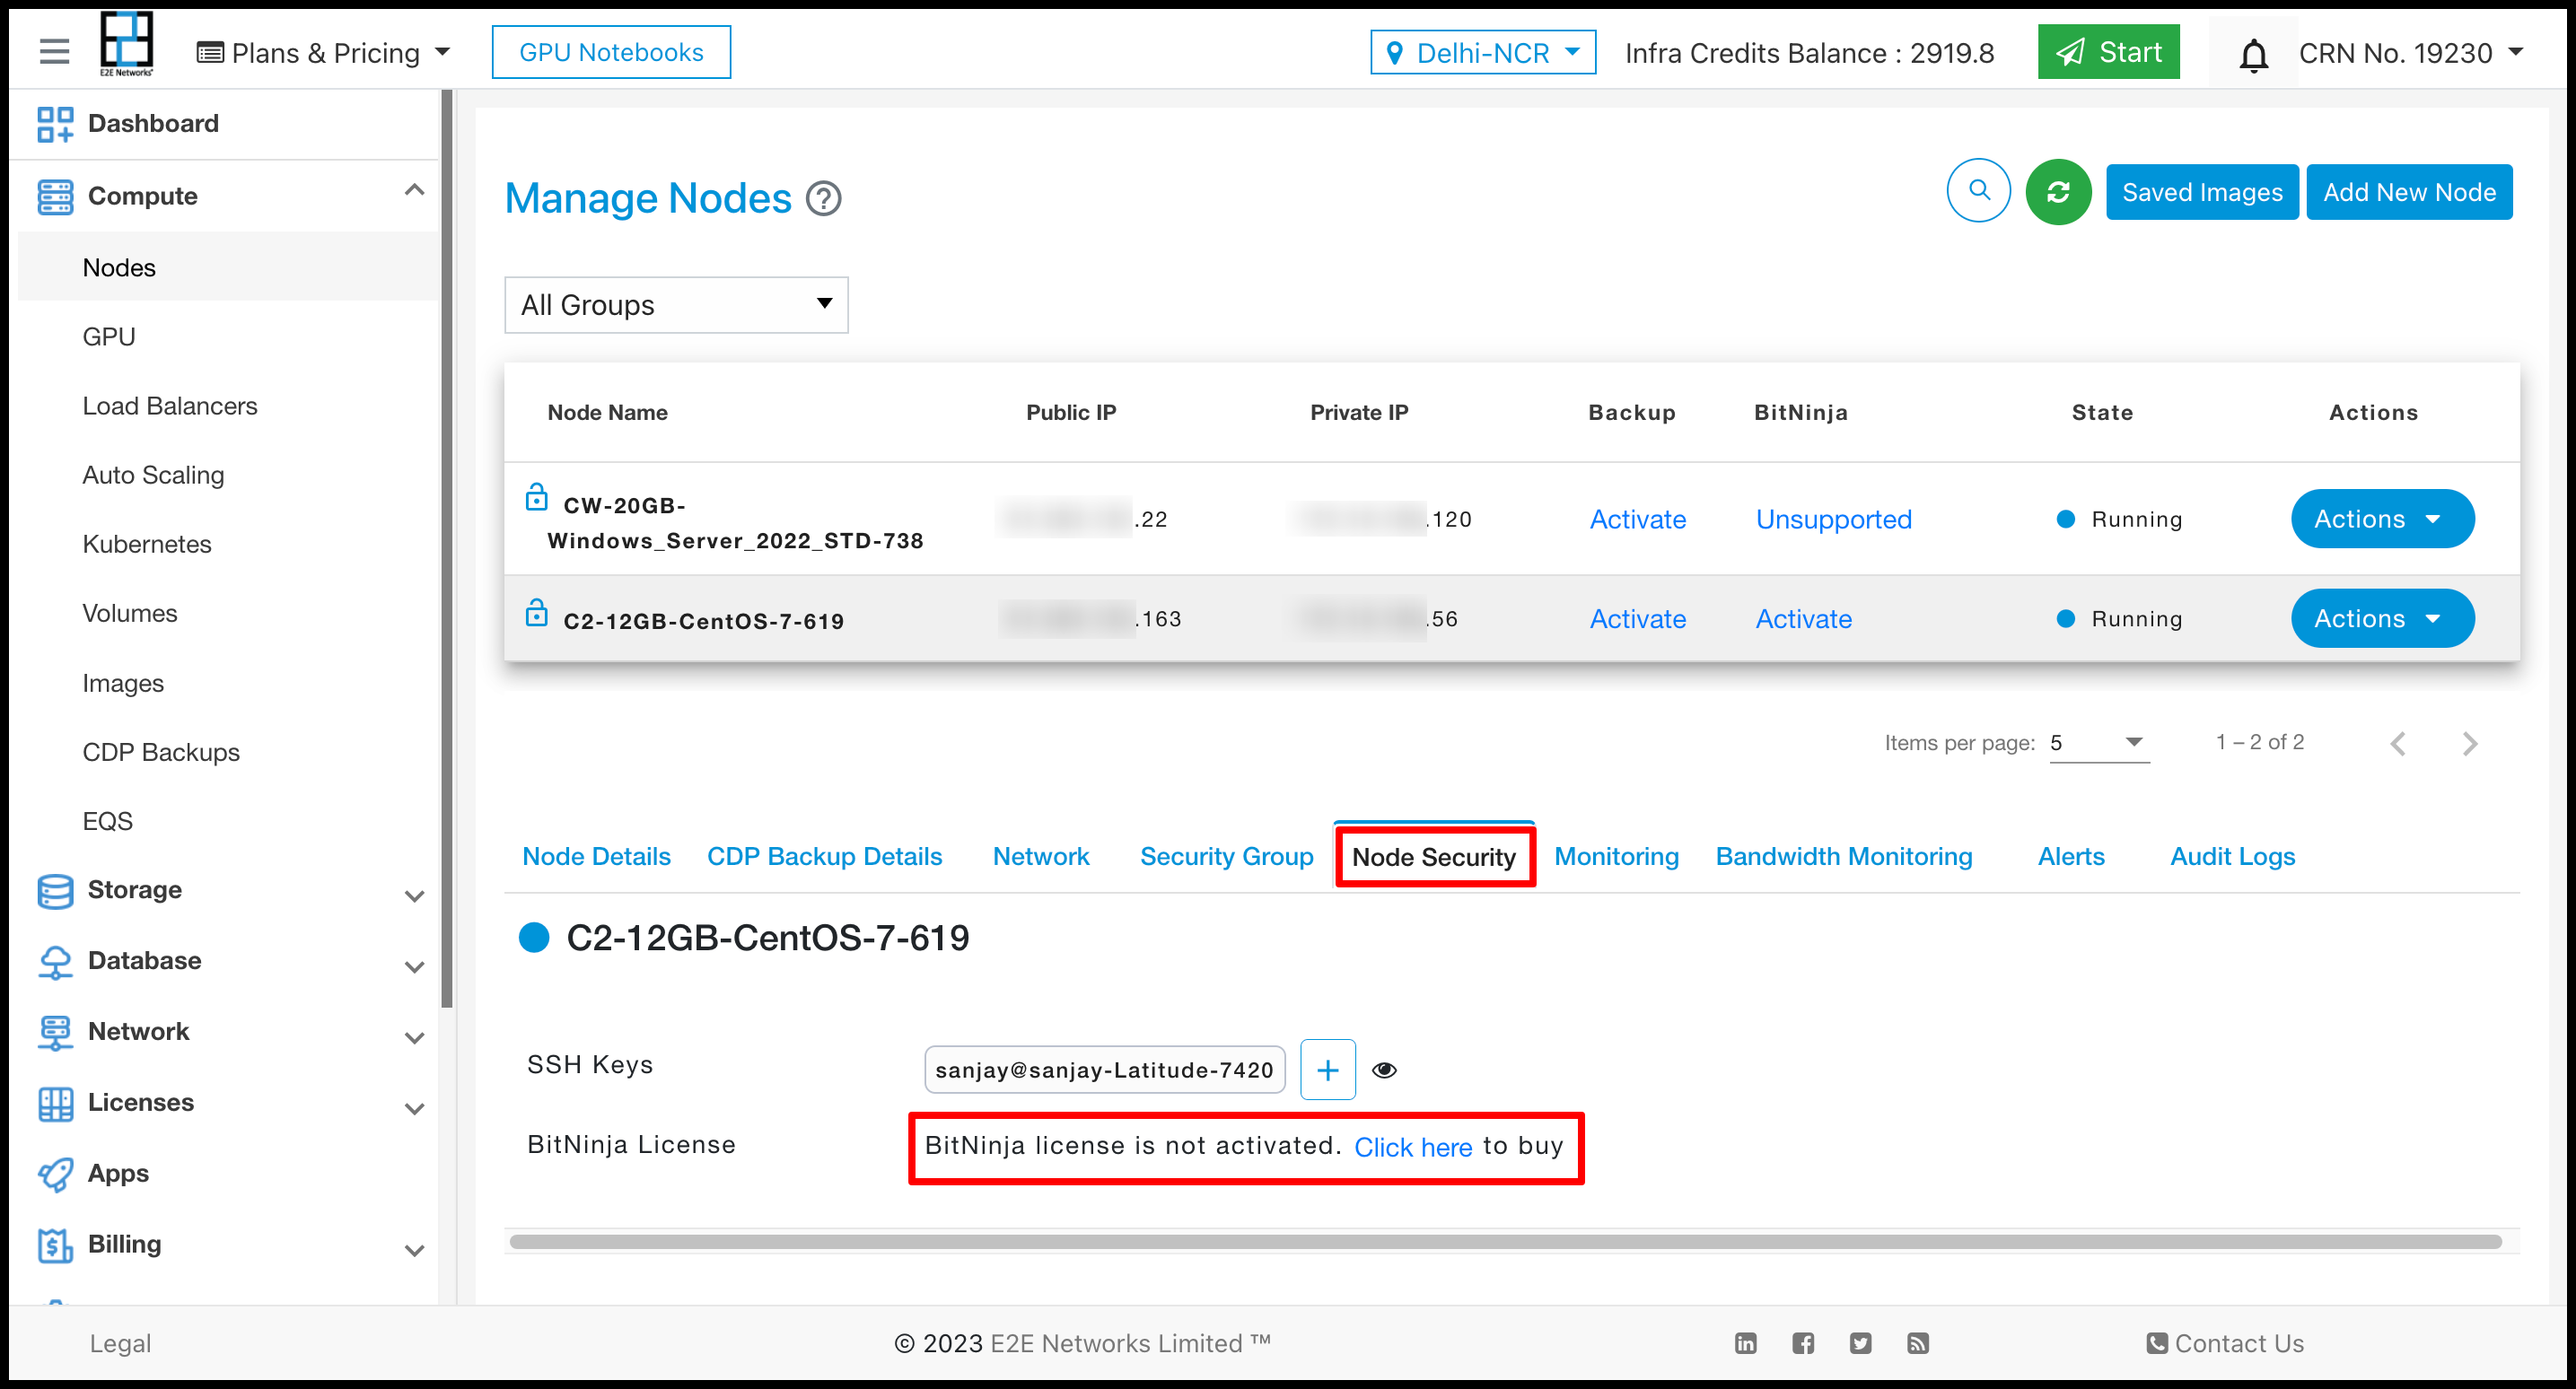
Node Security
Node security information is available in the Security tab.
SSH Keys
SSH keys are a pair of cryptographic keys that can be used to authenticate to an SSH server as an alternative to password-based logins. SSH keys prove to be a reliable and secure alternative. You can also add more ssh key from here.

Note
By default, You will have a Password-based login enabled on your newly launched E2E Nodes.
BitNinja
BitNinja is an easy-to-use server security tool mixing the most powerful defense mechanisms. You can enable BitNinja security tool either at the time of node creation or after the node creation. It will use to protect your node against a wide range of cyber-attacks. Learn more.
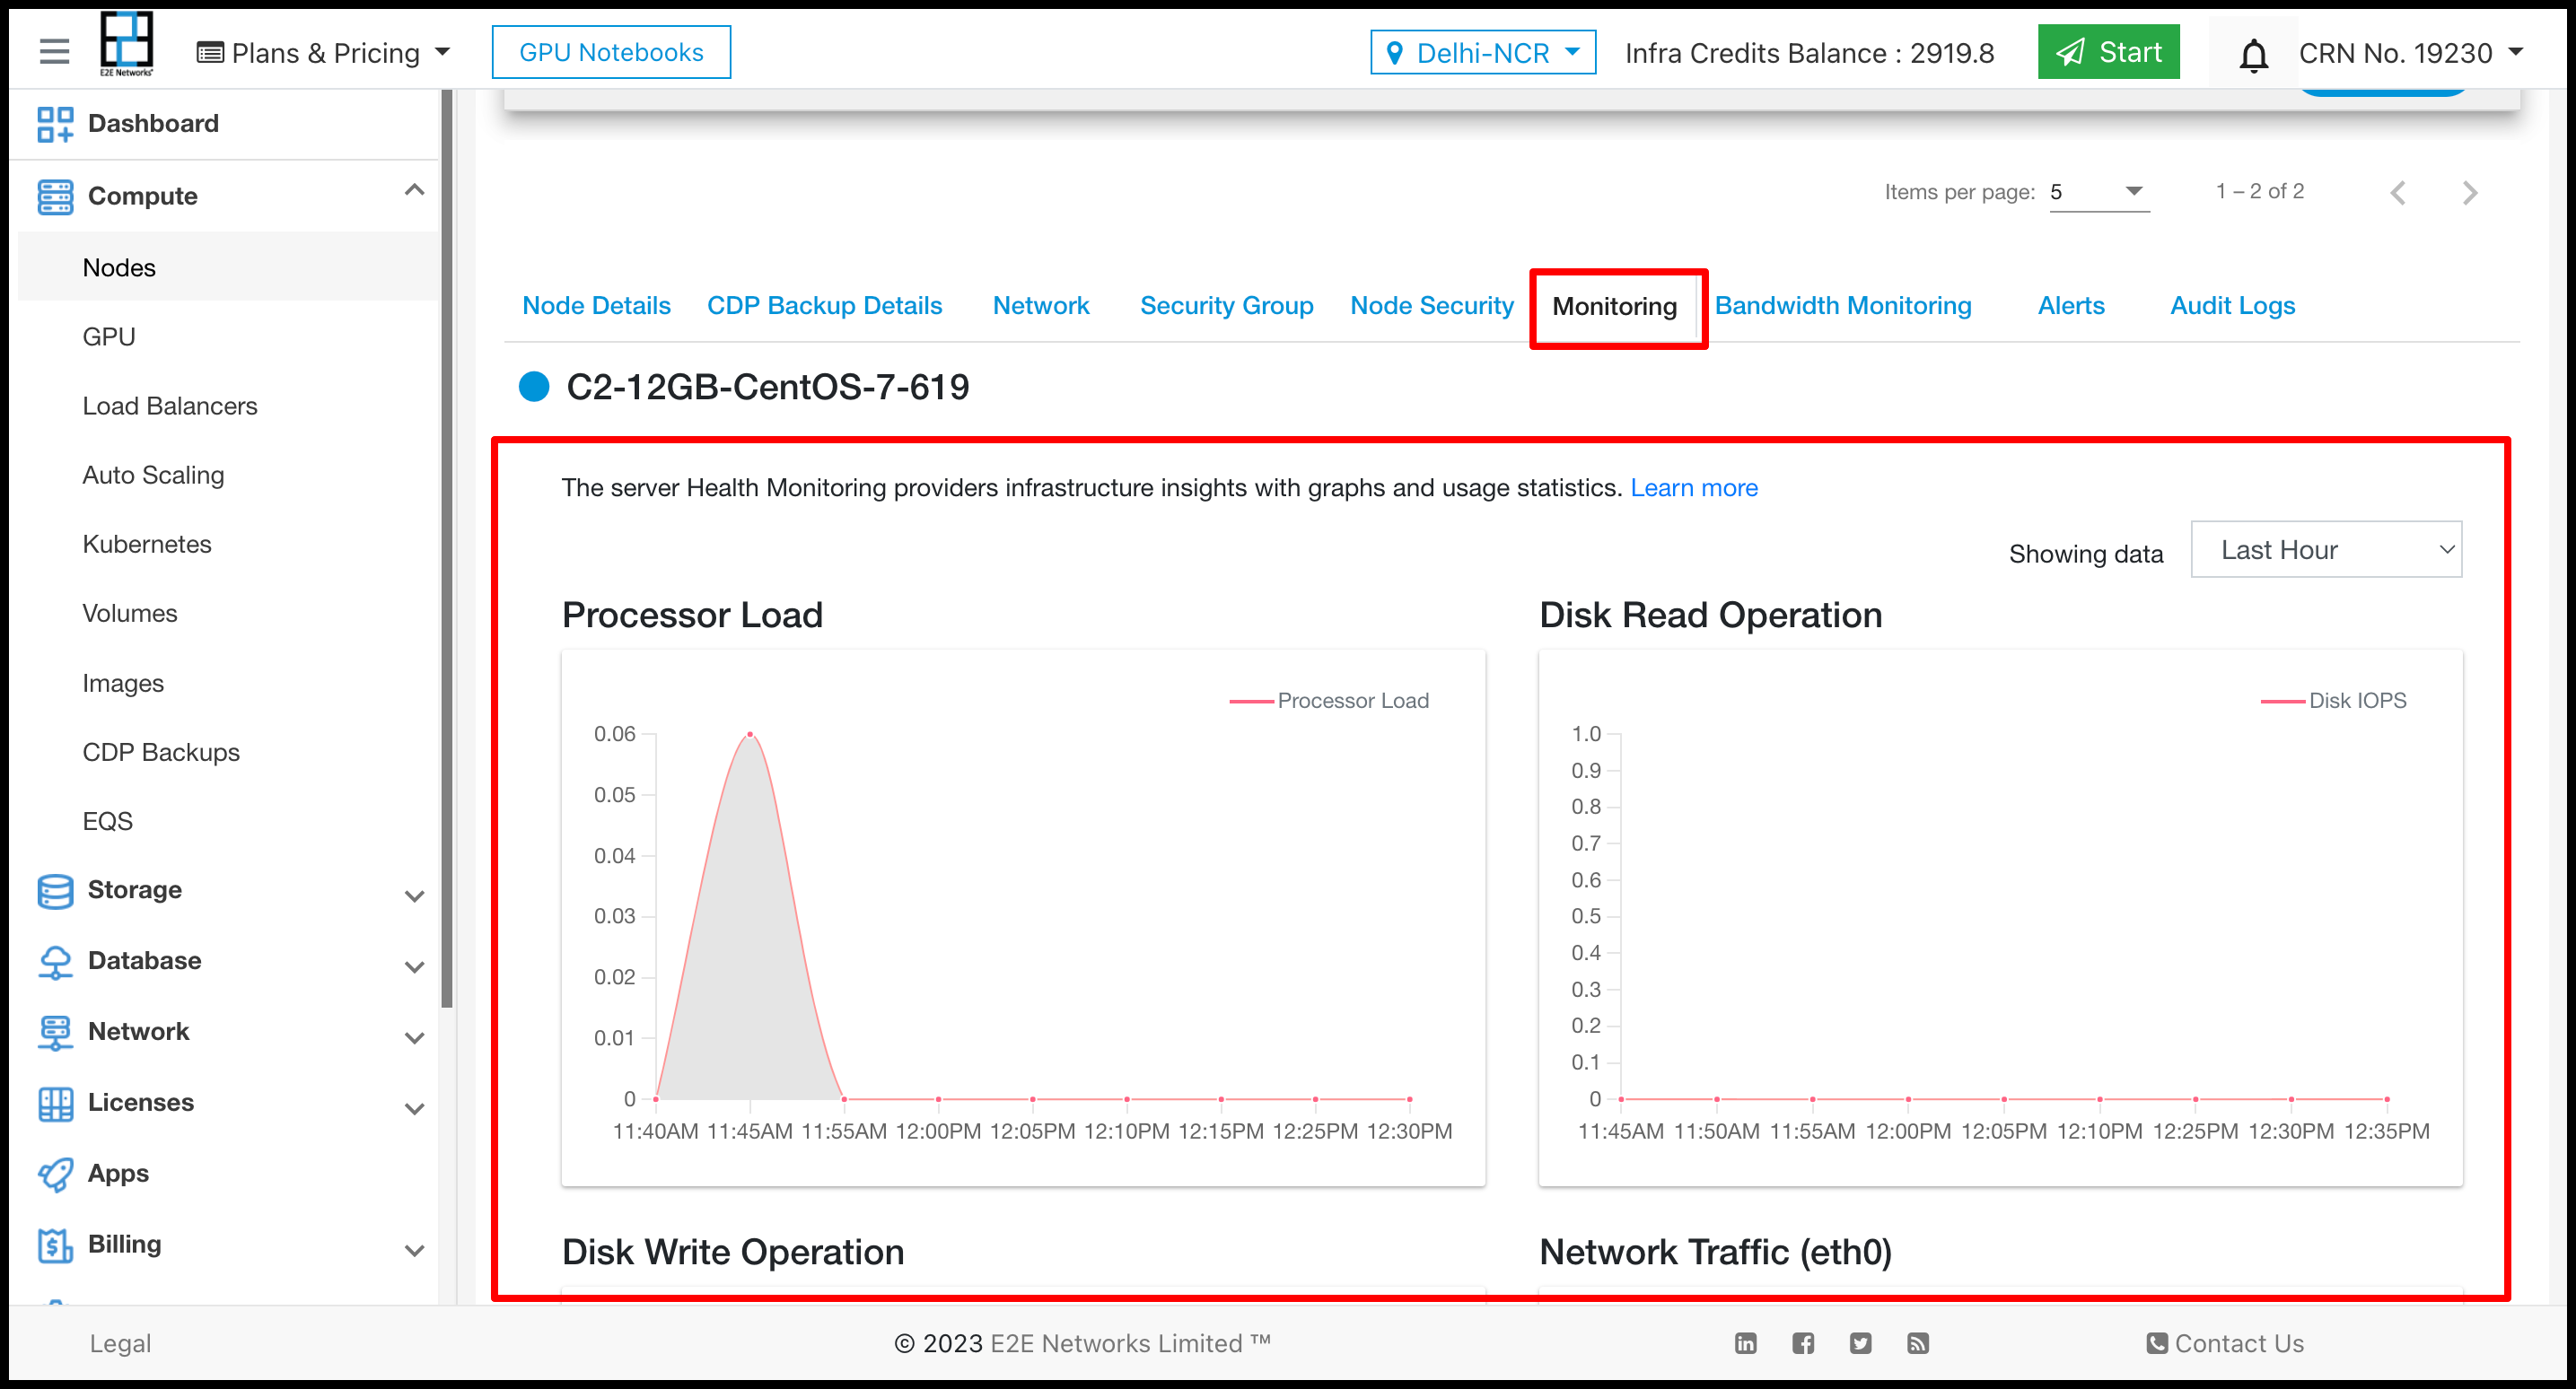
Monitoring
After you launch a node, you can view the monitoring graphs for your node on the Monitoring tab. Each graph is based on one of the different metrics. This information is collected from your node and processes raw data into readable graphs. Monitoring is an important part of maintaining the reliability, availability, and performance of your E2E Nodes. Learn more.
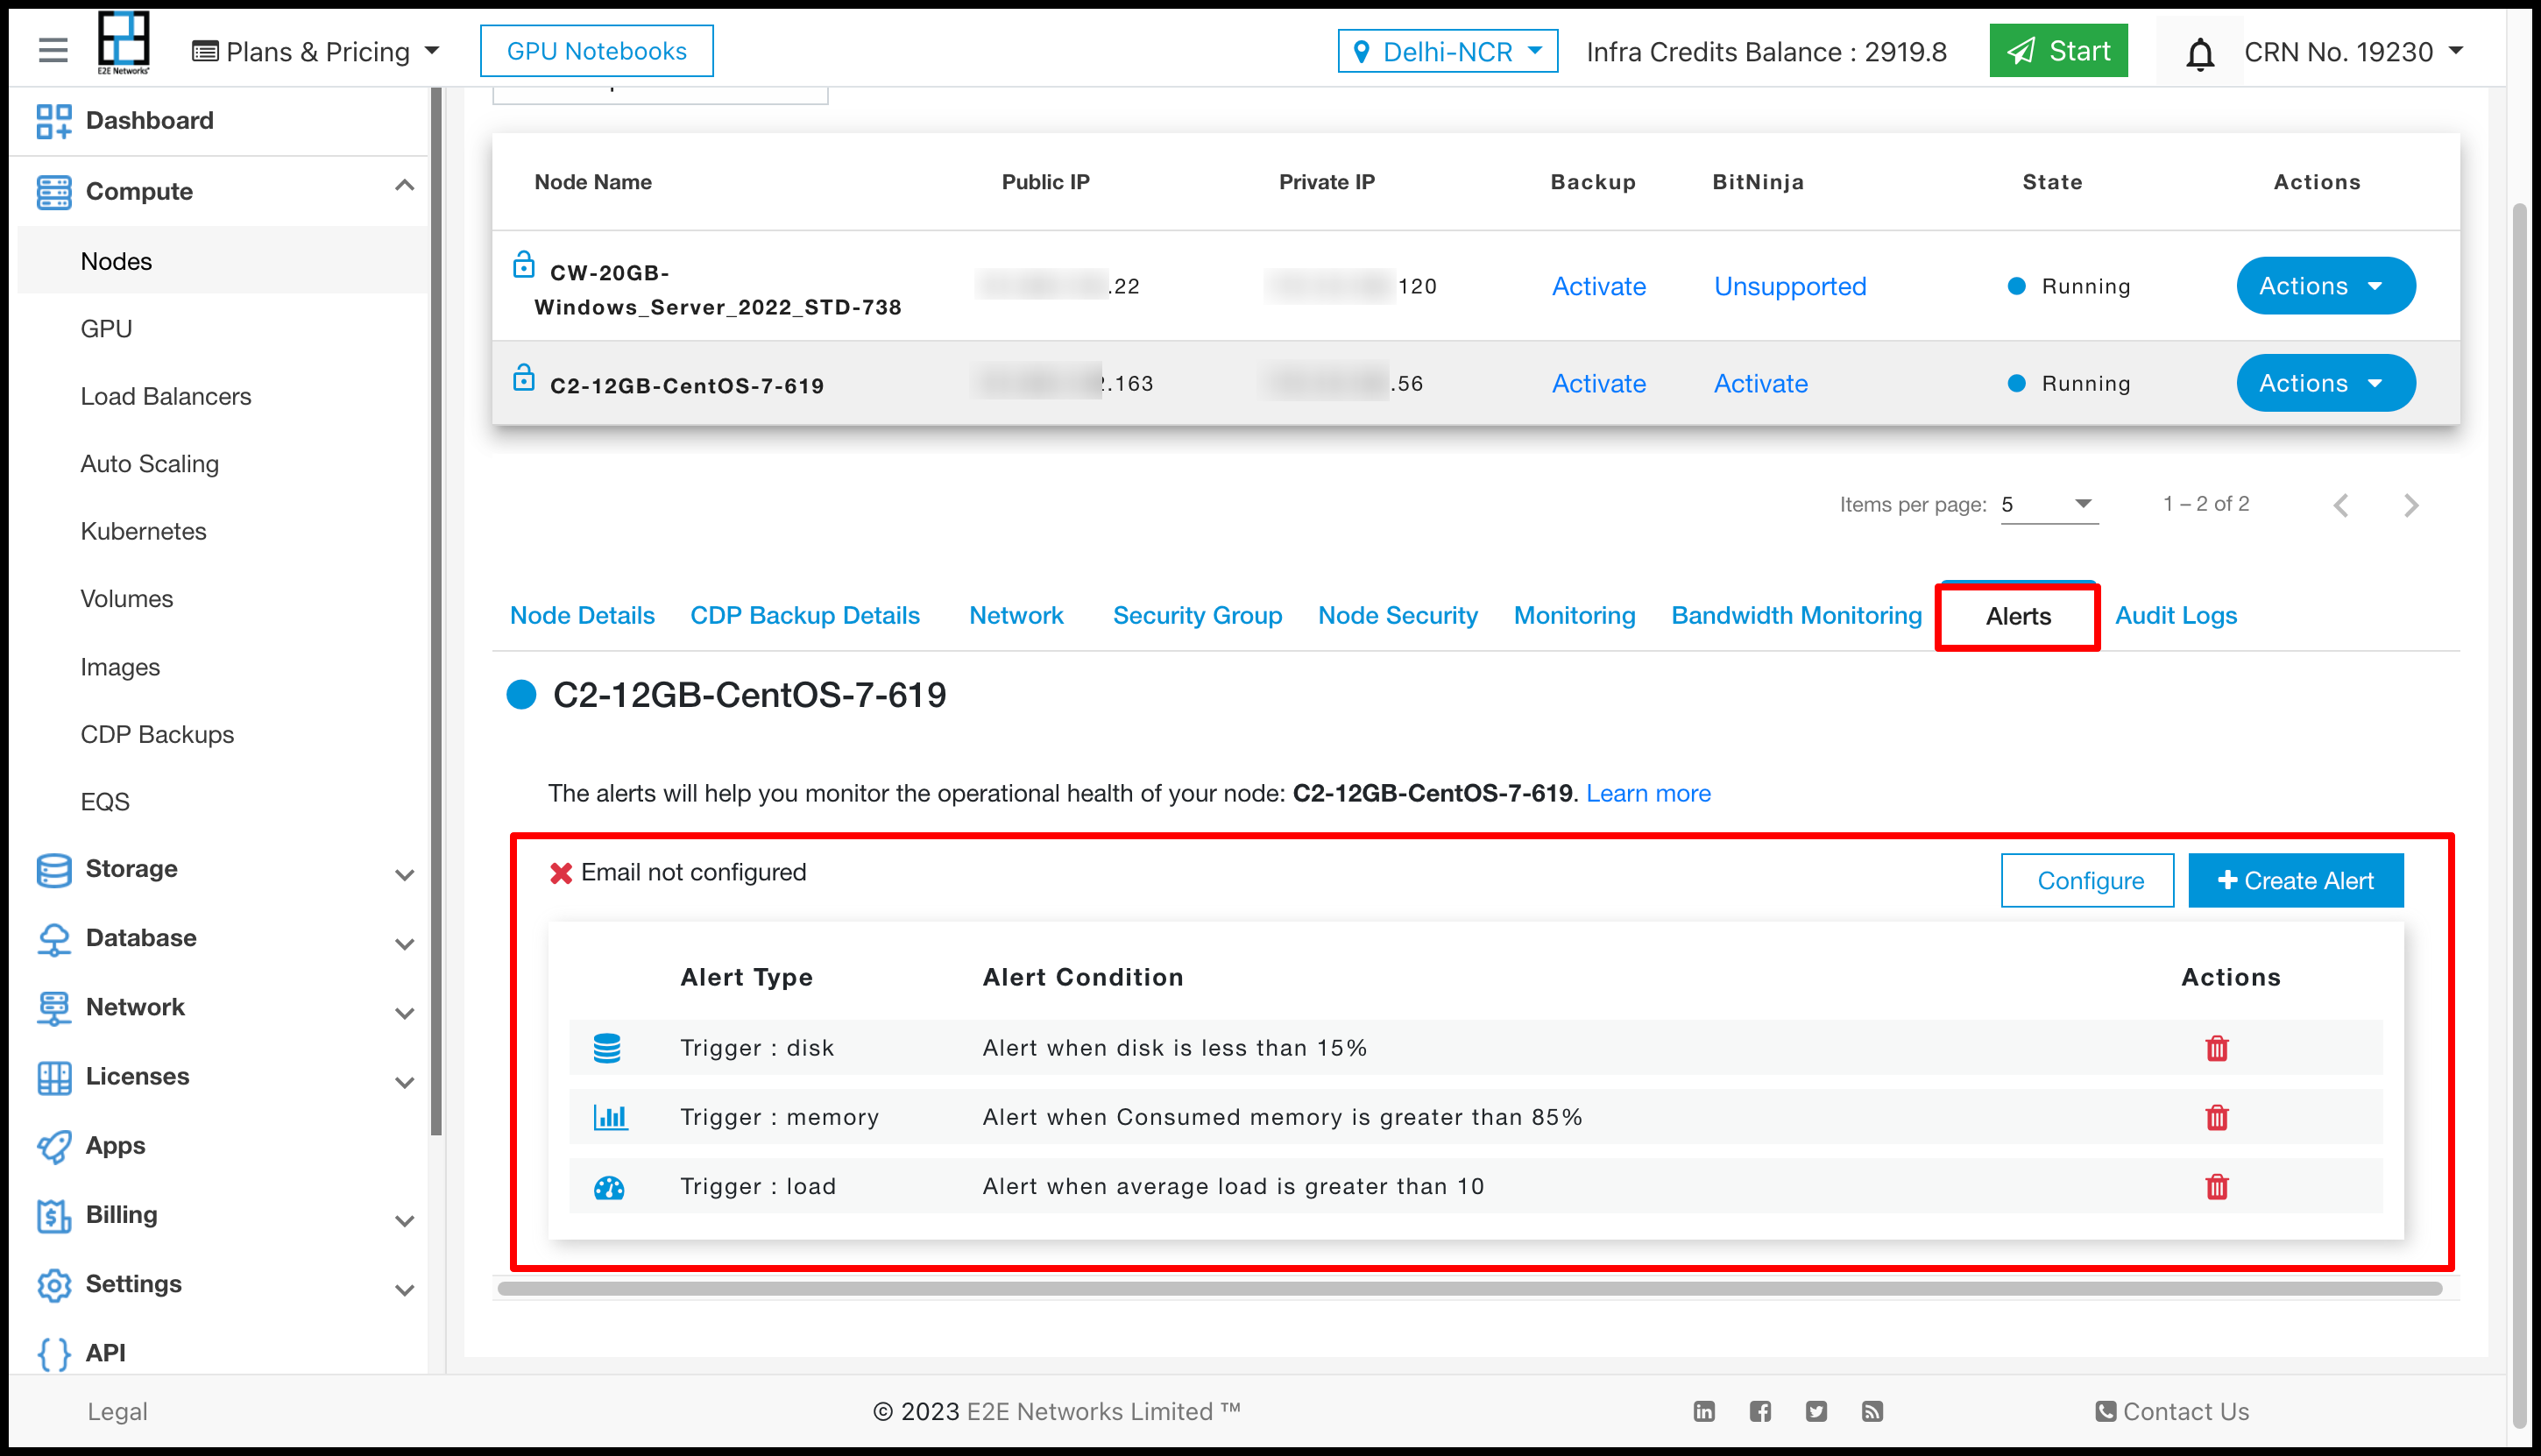
Alerts
Server health alerts are default created for your newly created node using recommend parameters for alert policy. Also, you can set up new alerts by defining trigger parameters as per your use case. The alerting system works by sending automatic response notifications to your defined email list. Learn more
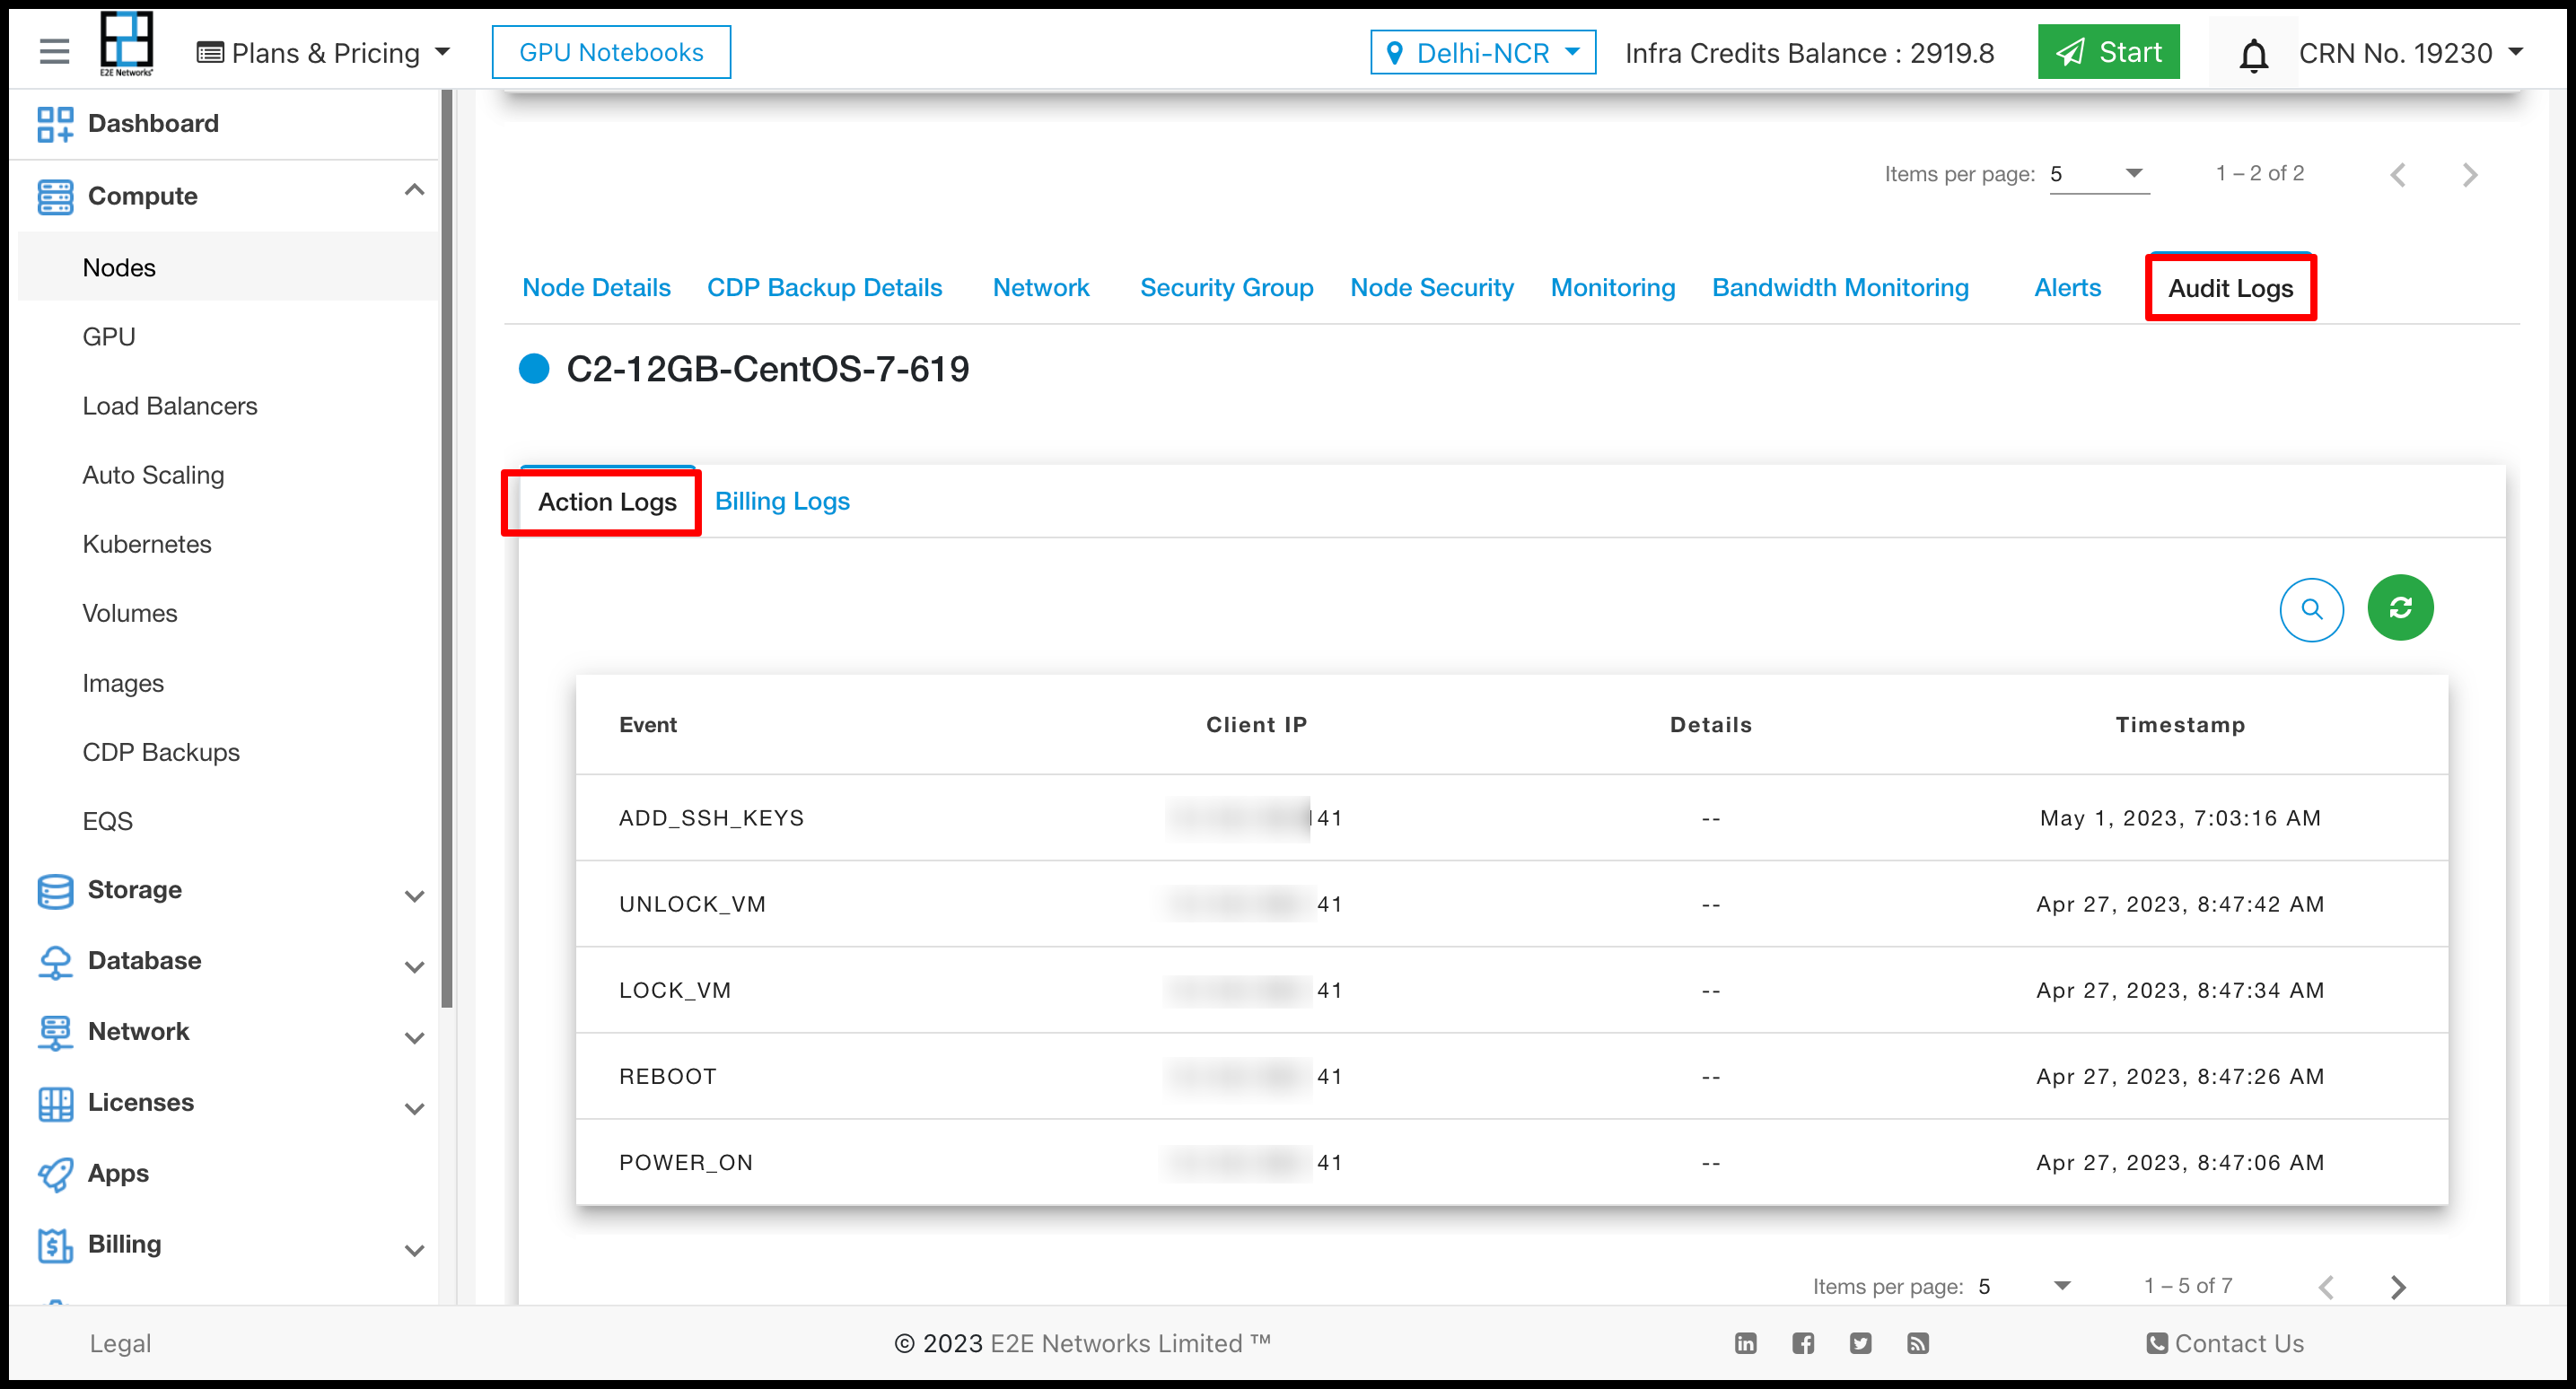
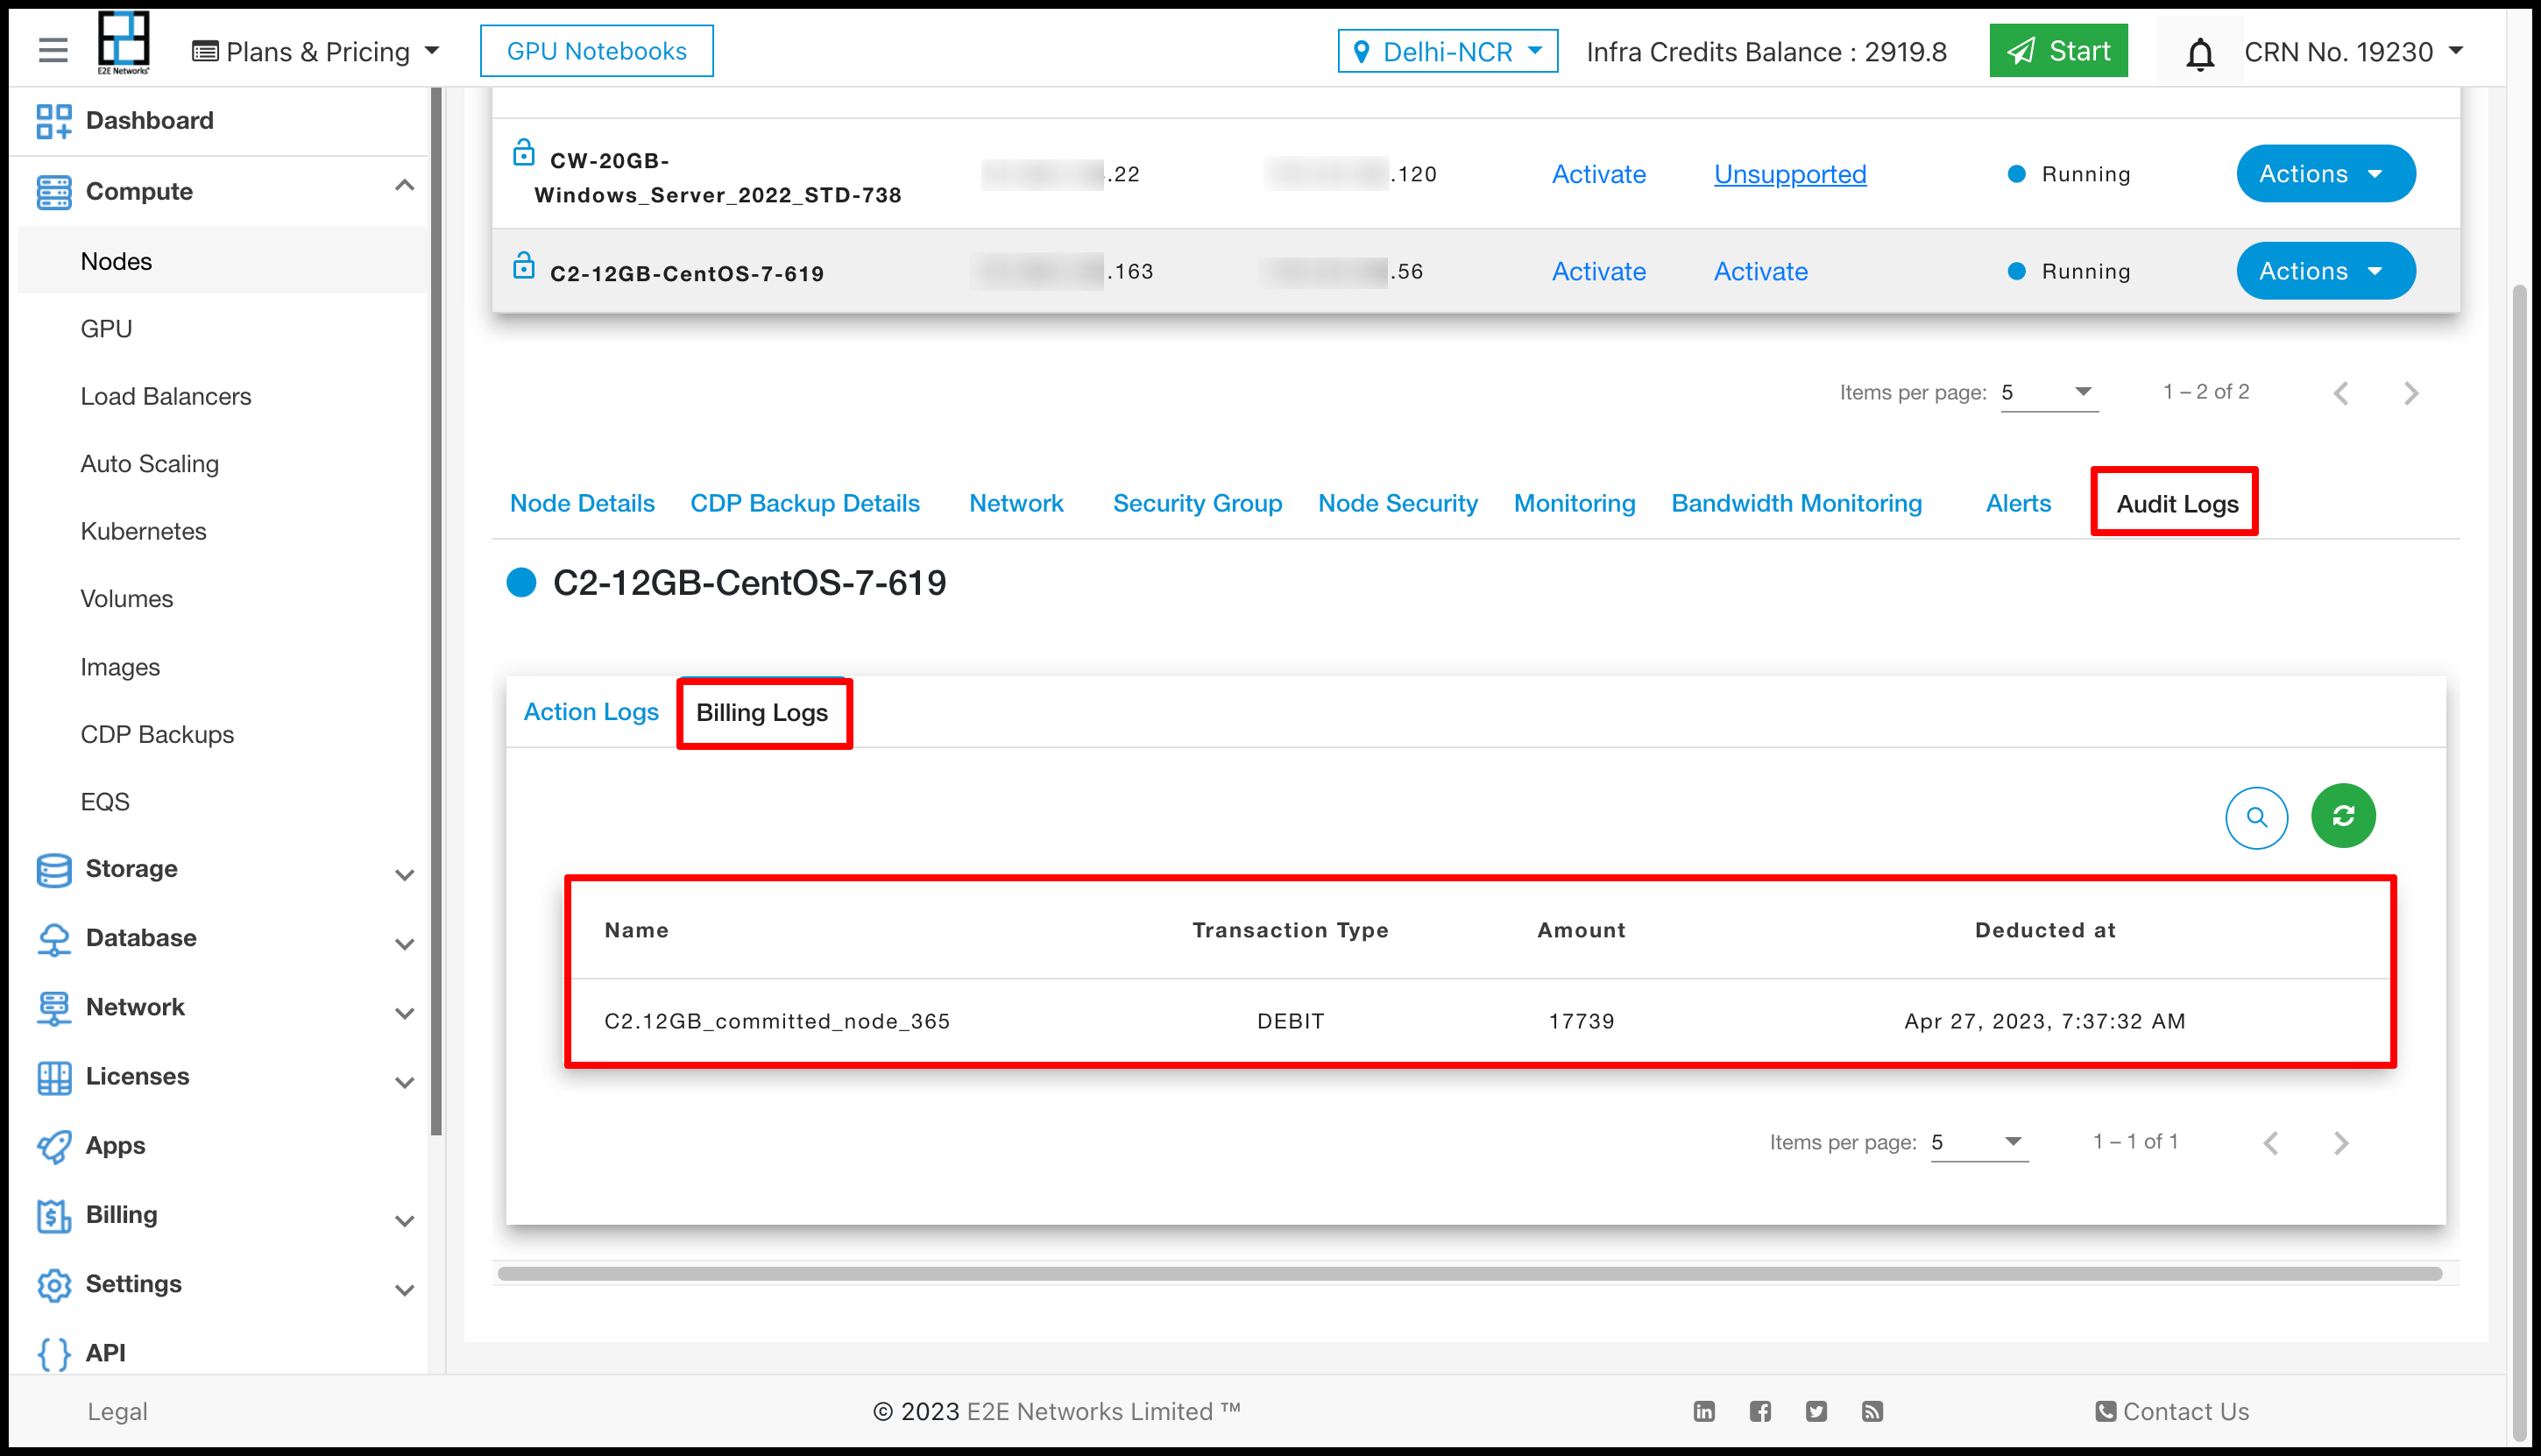
Audit log
In audit log user can see the activities log of Node and Billing of Node.
Actions
You can perform the following actions available for the respective nodes
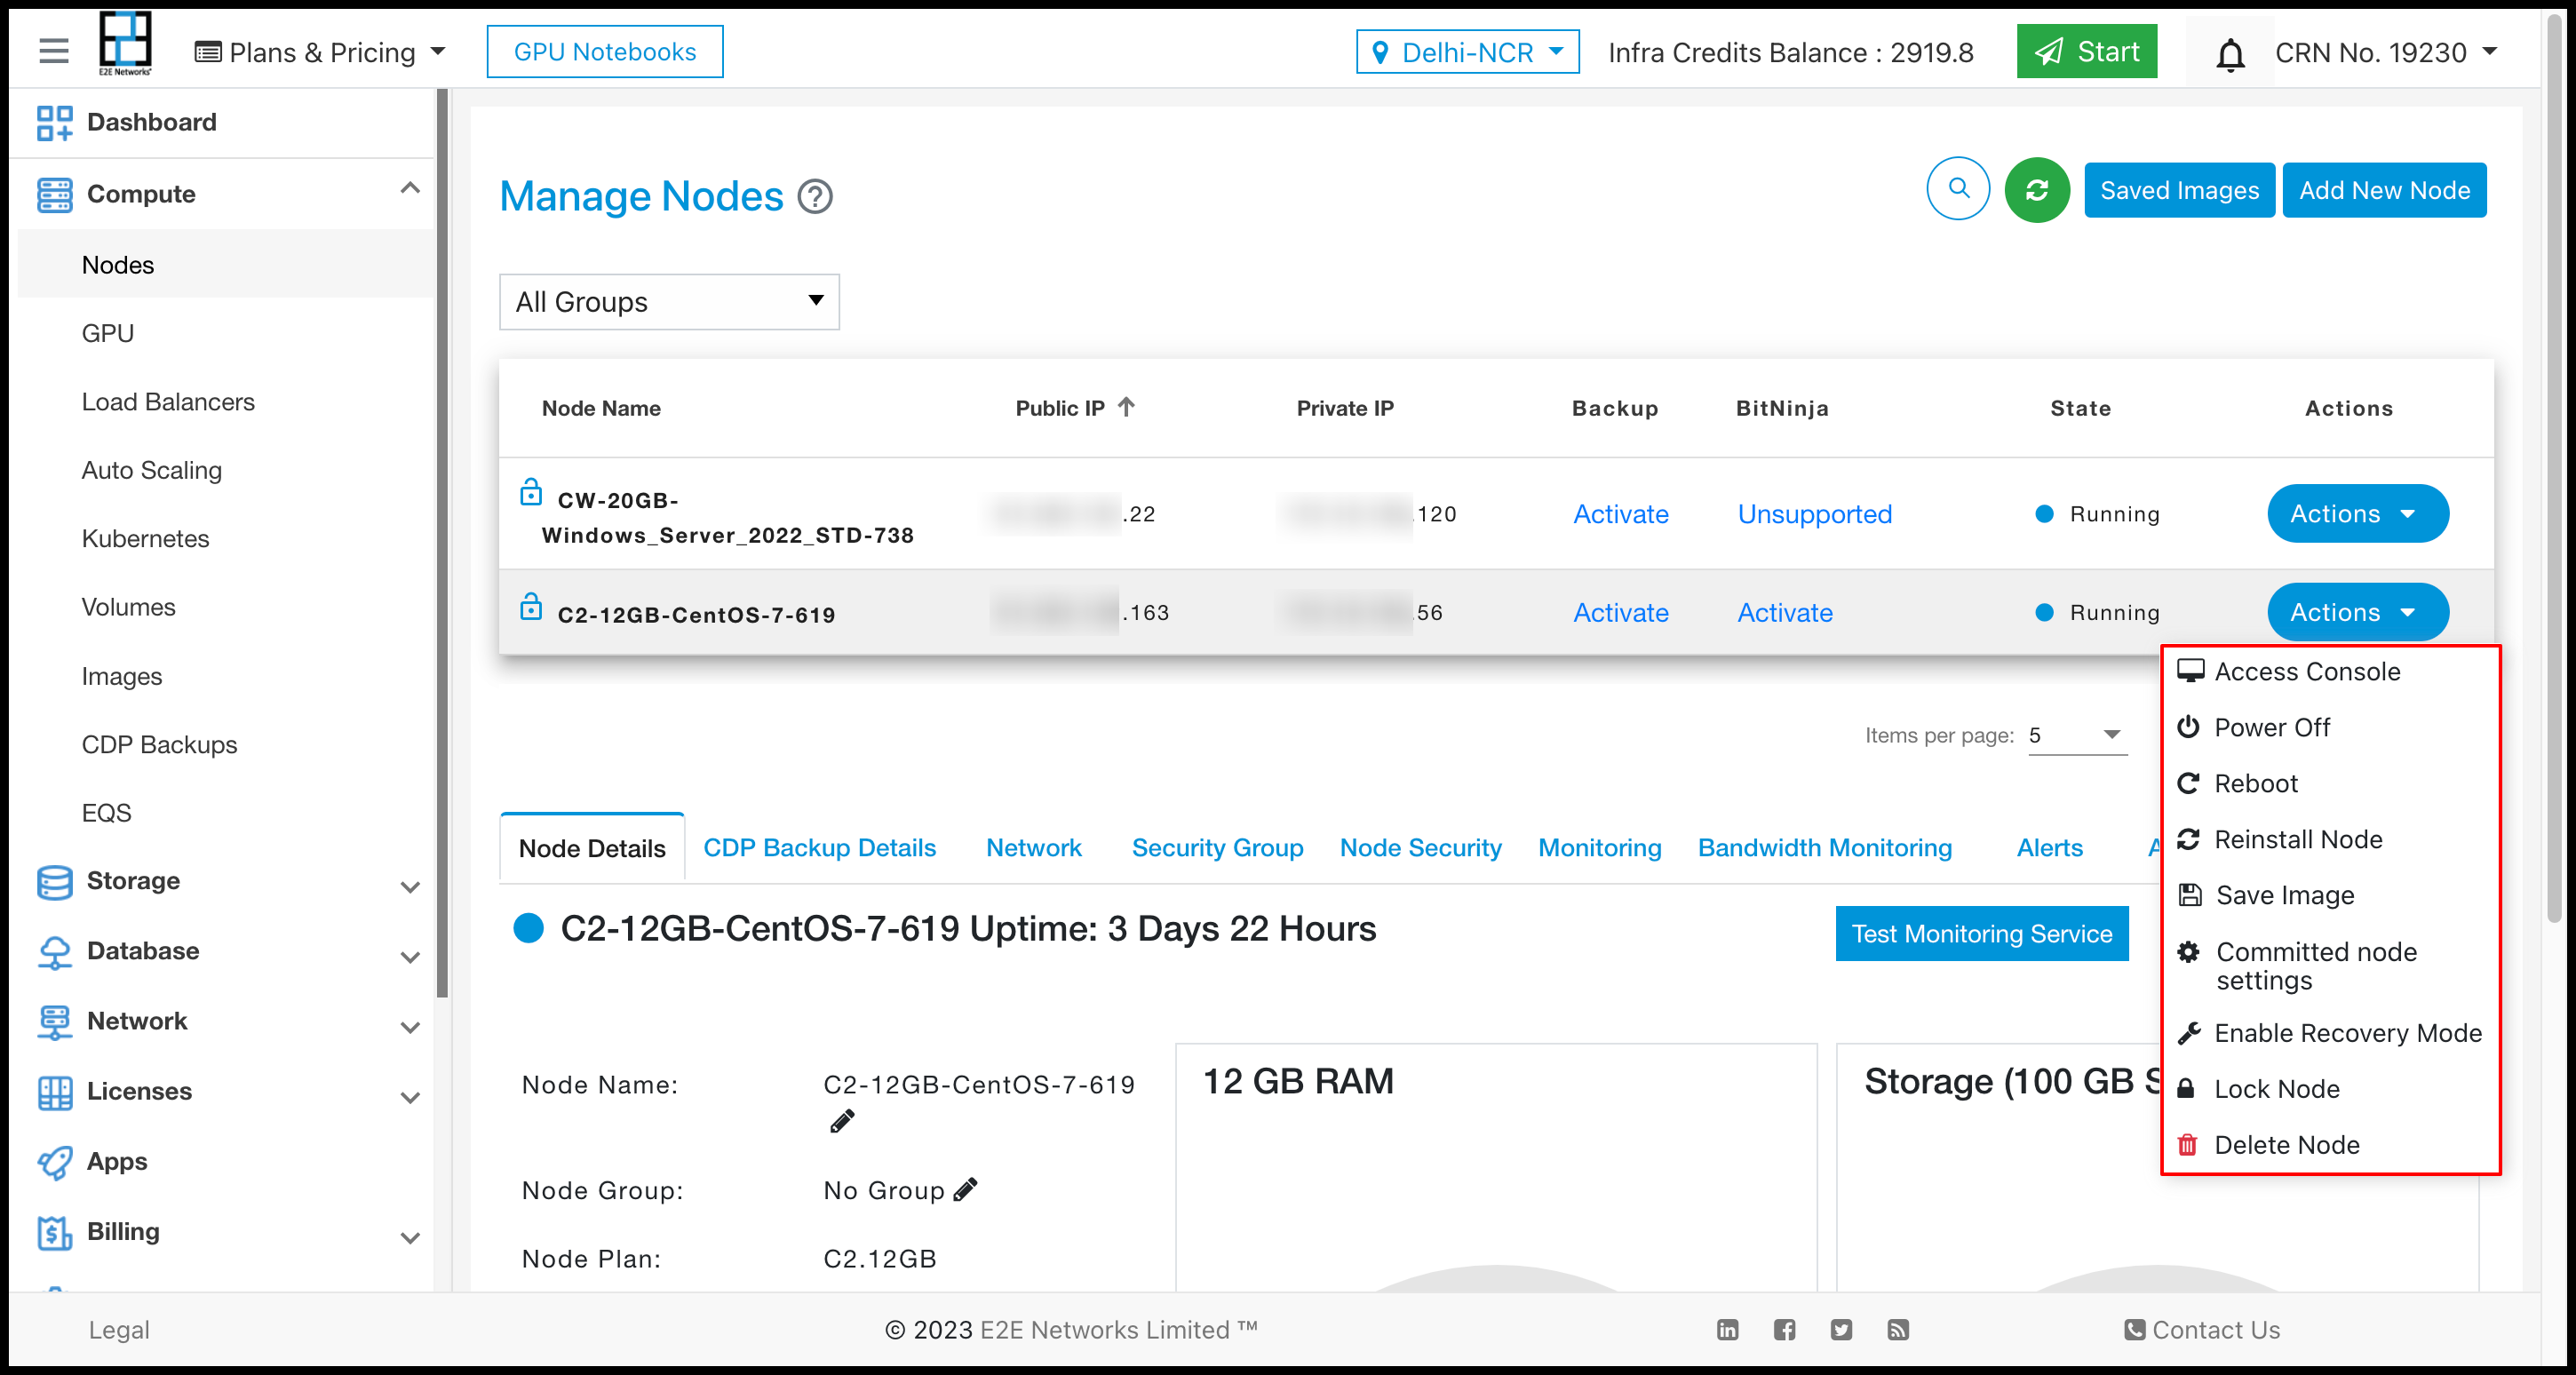
Power Off
Click on the Power Off button to turn Off your node. It will take a couple of minutes to turn Off your node. All the management operations will be disabled on this node till while the function is being performed.

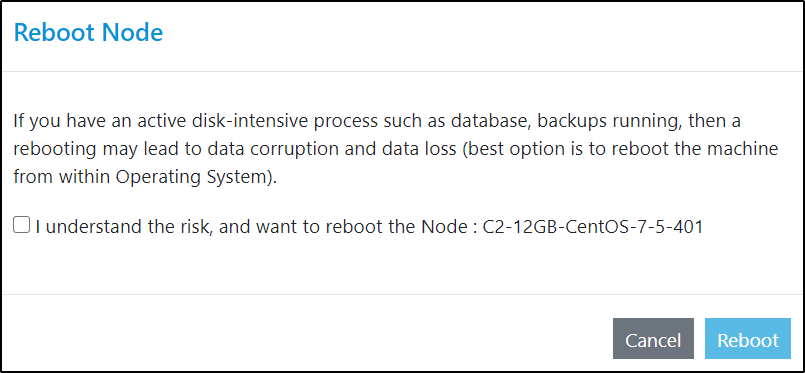
Note
Powering off Node will not stop billing. You will continue to pay for the Node until it is Terminated. If you have an active disk-intensive system running, power off may lead to data corruption and data loss (the best option is to turn off the machine from within OS).
All actions will be disabled except Start, Save Image, Move To Another Project, Convert to Committed Node, Lock Node and Delete Node action when your node is powered off.
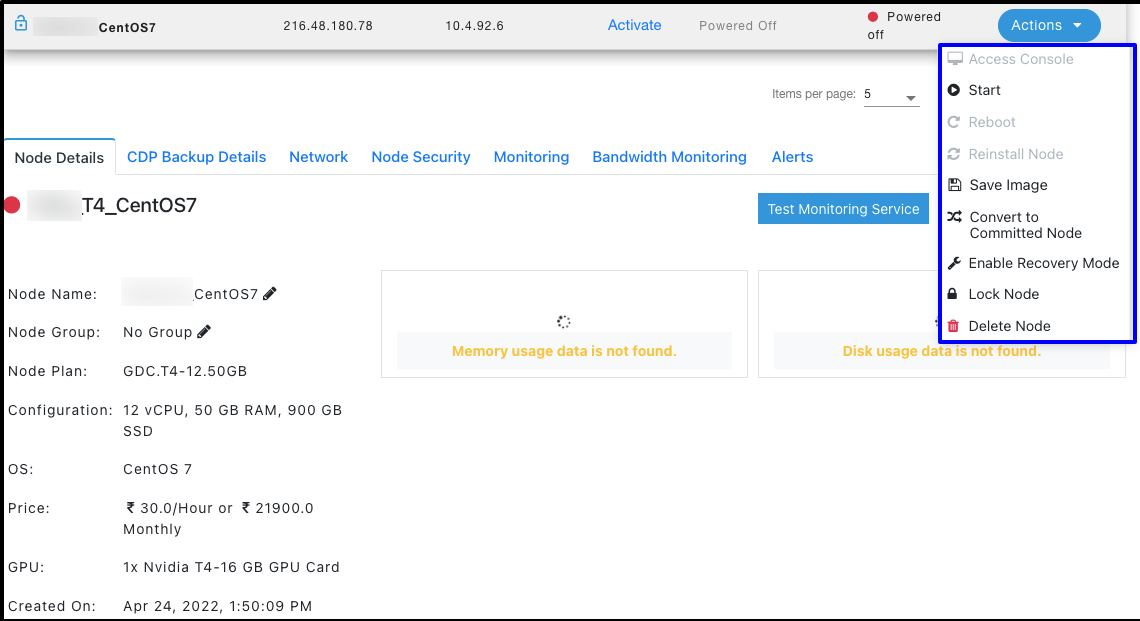
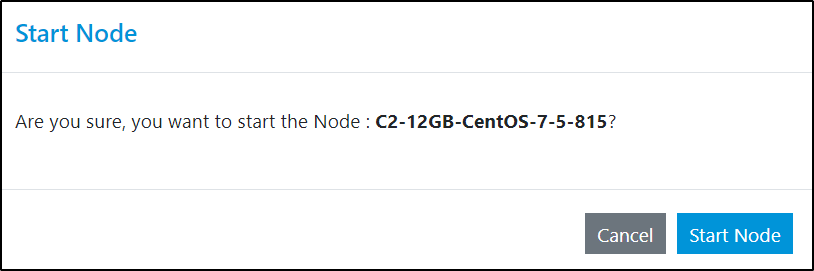
Start
If your server is Powered off, clicking on the Start button will be Power On your Nodes.
Reboot
Click on the Reboot button to restart your node without re-installing the node image. Reboot operation is just like powering off and then powering on the node. It will take a few minutes to restart your node.
Save Image
To save an image of a node, it must be in a powered-off state. Once the respective node is powered off. Click on the Save Image button and create a name of your node image. The save image creation will take a few minutes. Learn More about saved image
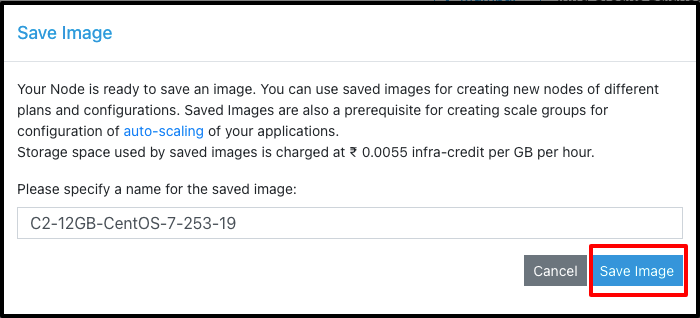
You will see a message ‘Your image is being saved this may take a while’.
Note
All the available actions will be disabled on this node while the saved image is created. To access the saved image click on “Saved Images” button on the top right corner of the node table.
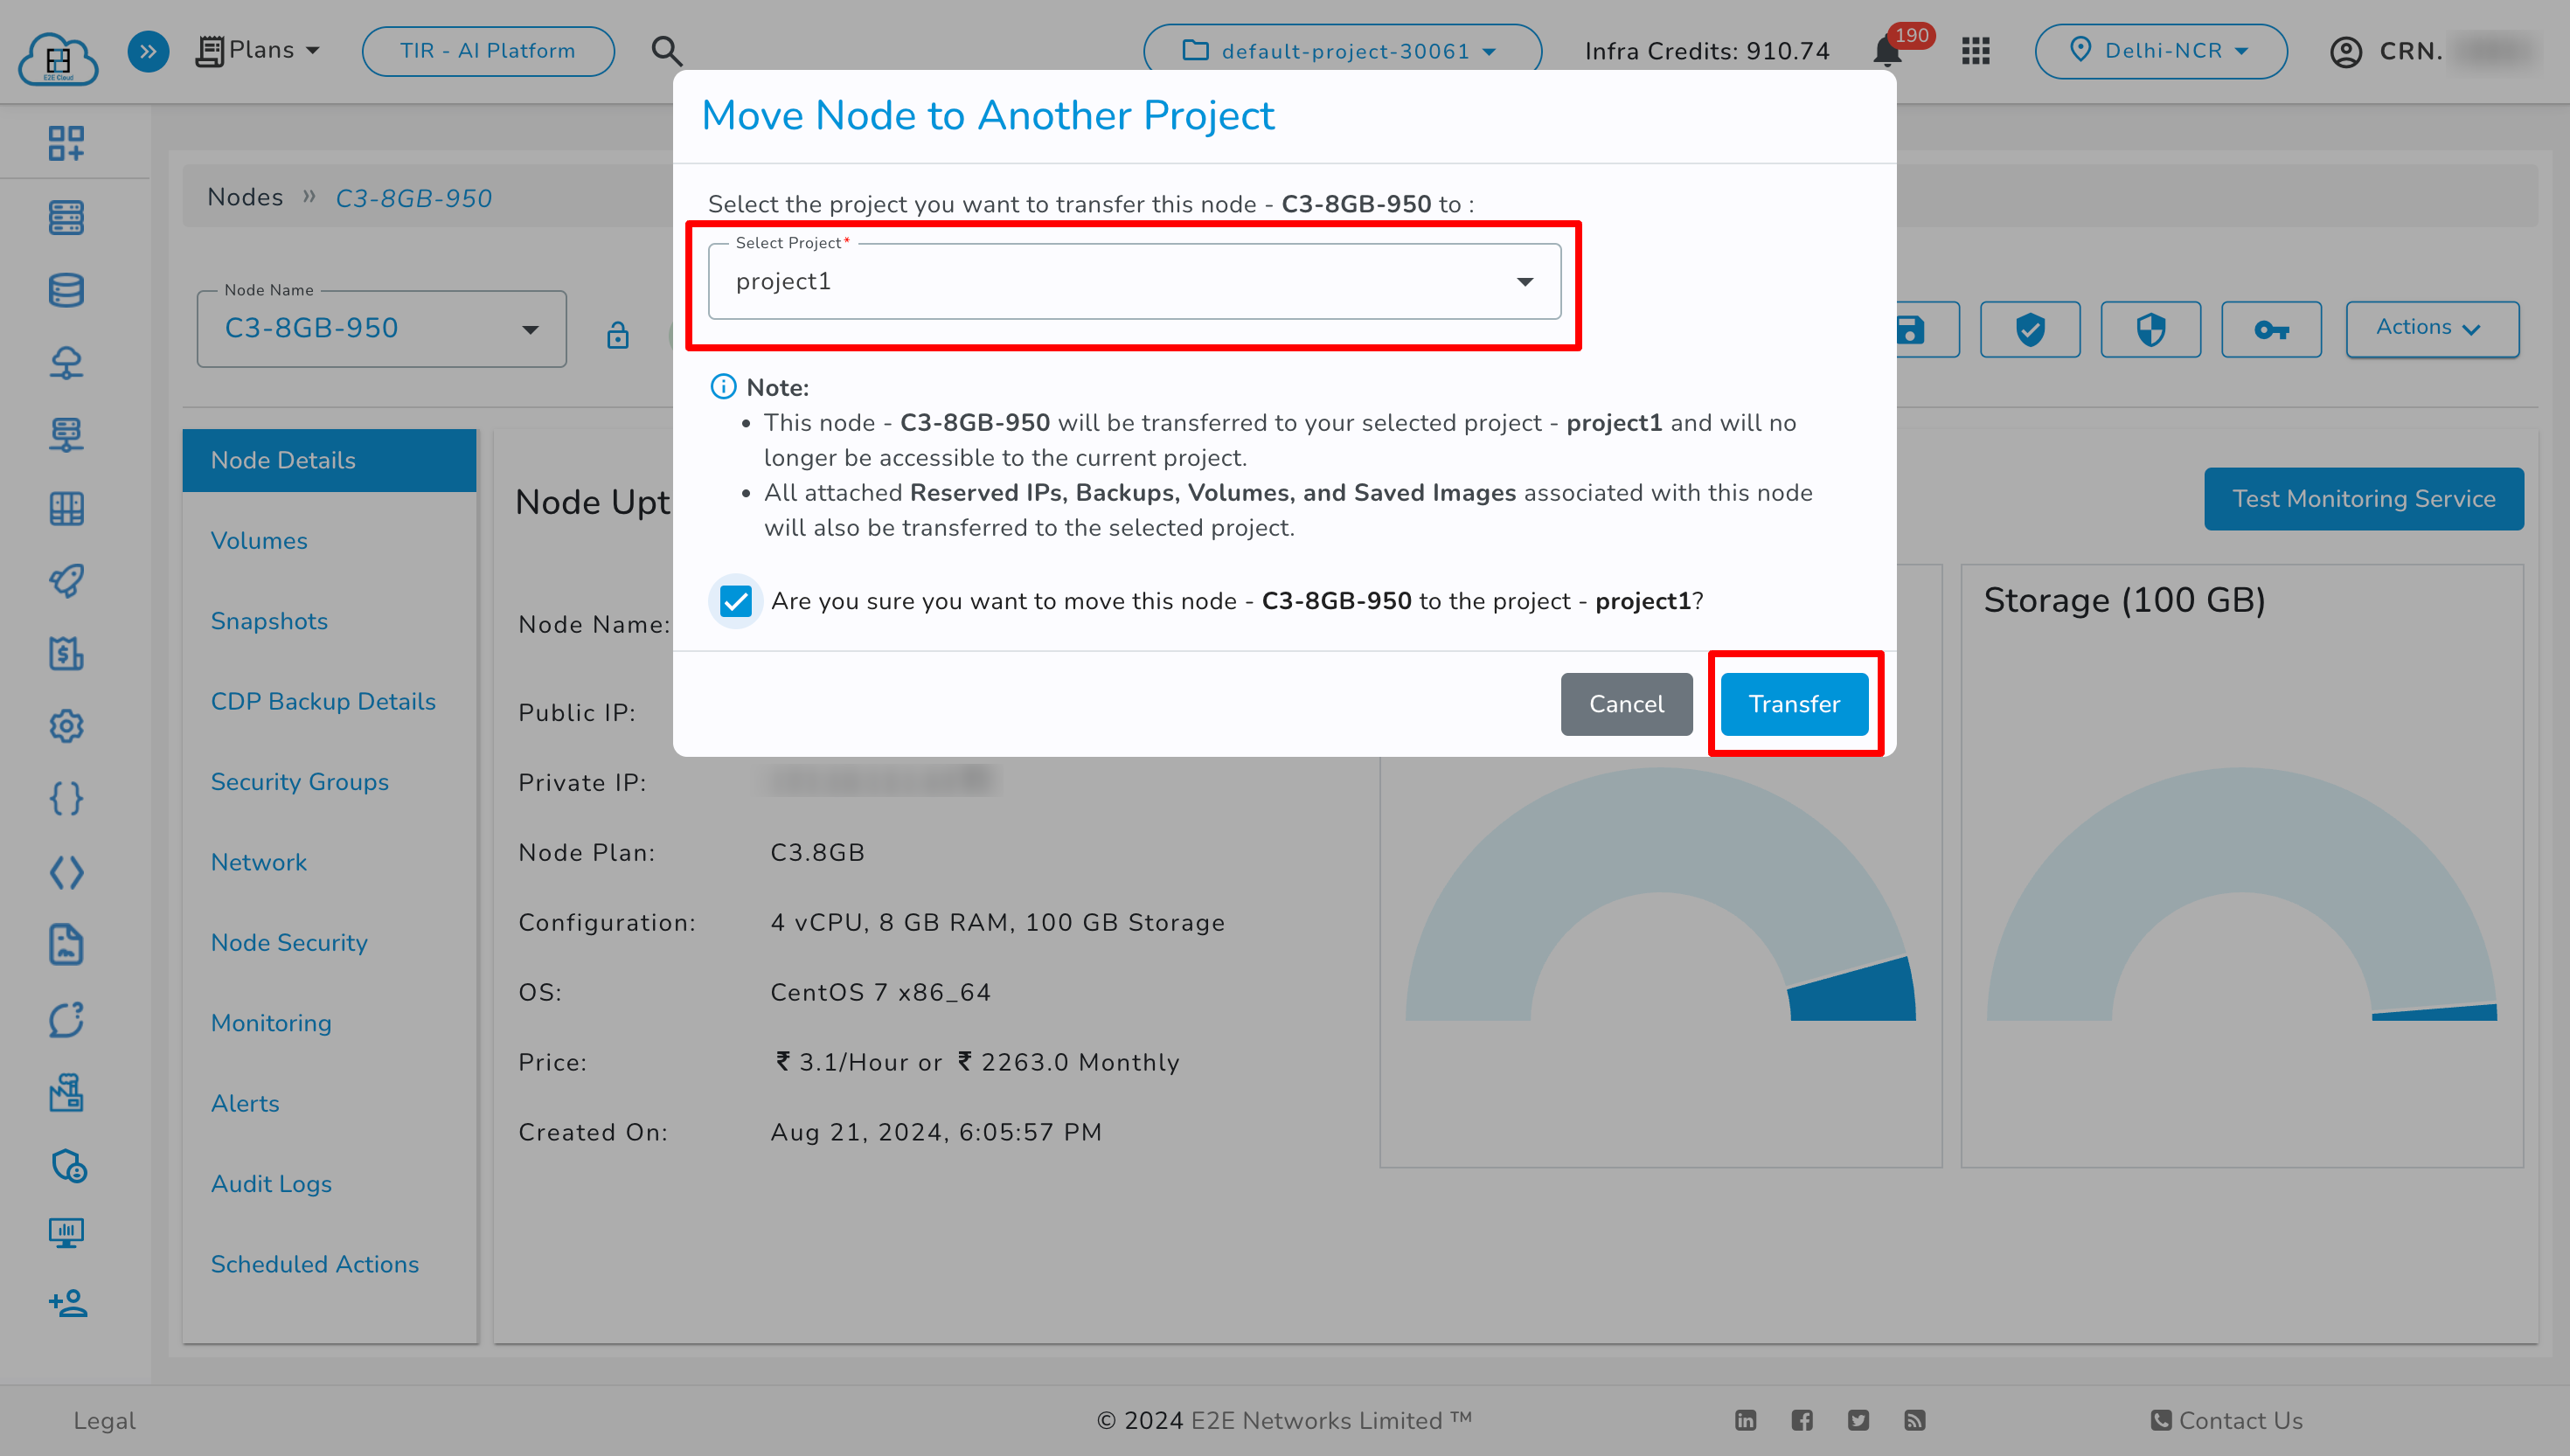
Move To Another Project
Using this action you can transfer your node from node’s current project to another project within the same CRN. On transferring this node, all attached Reserved IPs, Backups, Volumes, and Saved Images associated with this node will also be transferred to the selected project.
Note
After the transfer, the security group attached to the node in the current project will be removed, and the node will be assigned the default security group of the target project.
- To transfer the node
Ensure the node is not in Creating, Terminating, Failed state. Also, the node should not be Locked.
The node should not be attached to a Load Balancer or to a Scalable File System.
Auto-scaling configured using the node’s saved image also prohibits transfer.
The node must not have any Tags, VPC, or more than one security group assigned.
No services with attached tags should be linked to the node.
To transfer a node, click on Move To Another Project from Actions, select the target project, check the checkbox, and click Transfer.
Note
An audit log will be generated for the node and any associated resources in both the current and target projects during the transfer.
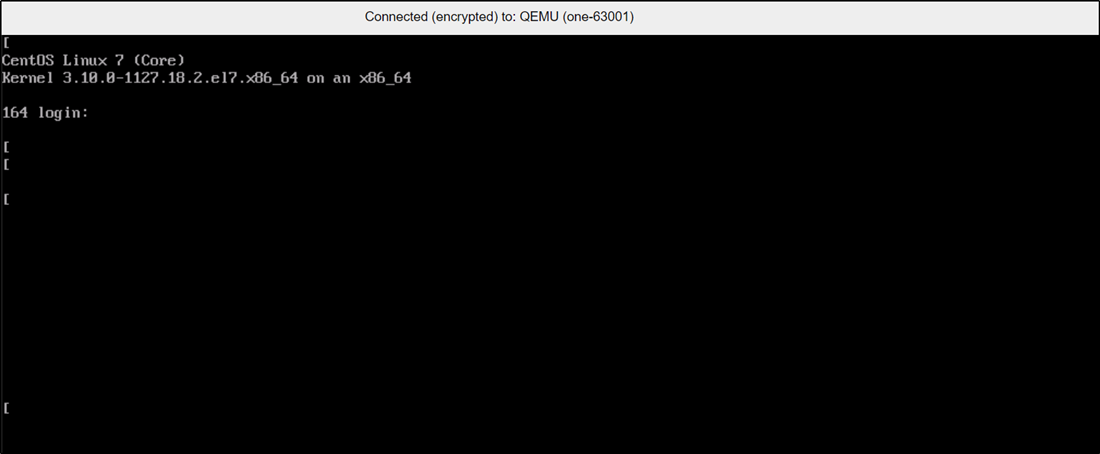
Access Console
Most of the time you can easily access your node using the ssh command, but if you are not able to access your node, you can use the VNC console to directly access your node. It emulates as if you are directly interacting with an actual server present in front of you. VNC access is typically helpful when you wish to log in to revert some settings or to regain control of your node.
VNC access is typically helpful when you wish to log in to revert some settings or to regain control of your node. Click on the VNC Console button for Console access.
This option loads a viewer in your browser that allows you to access your server. Click on the console screen and press ENTER to ensure that the login prompt has focus. You will be prompted to enter your root login access credentials.
Once you get access you can reset any misbehaving configuration files or services in order to restore access.
Window Machine Console
Upgrade Node Plan
You can upgrade your C3 & M3 node current plan to a higher plan, for this, you need to click on the Upgrade Node plan button. Kindly note this action button will be available only if your respective node is eligible for the upgrade or higher node plan is available. Please feel free to contact cloud platform support at cloud-platform@e2enetworks.com if you want to convert or upgrade your node plan.
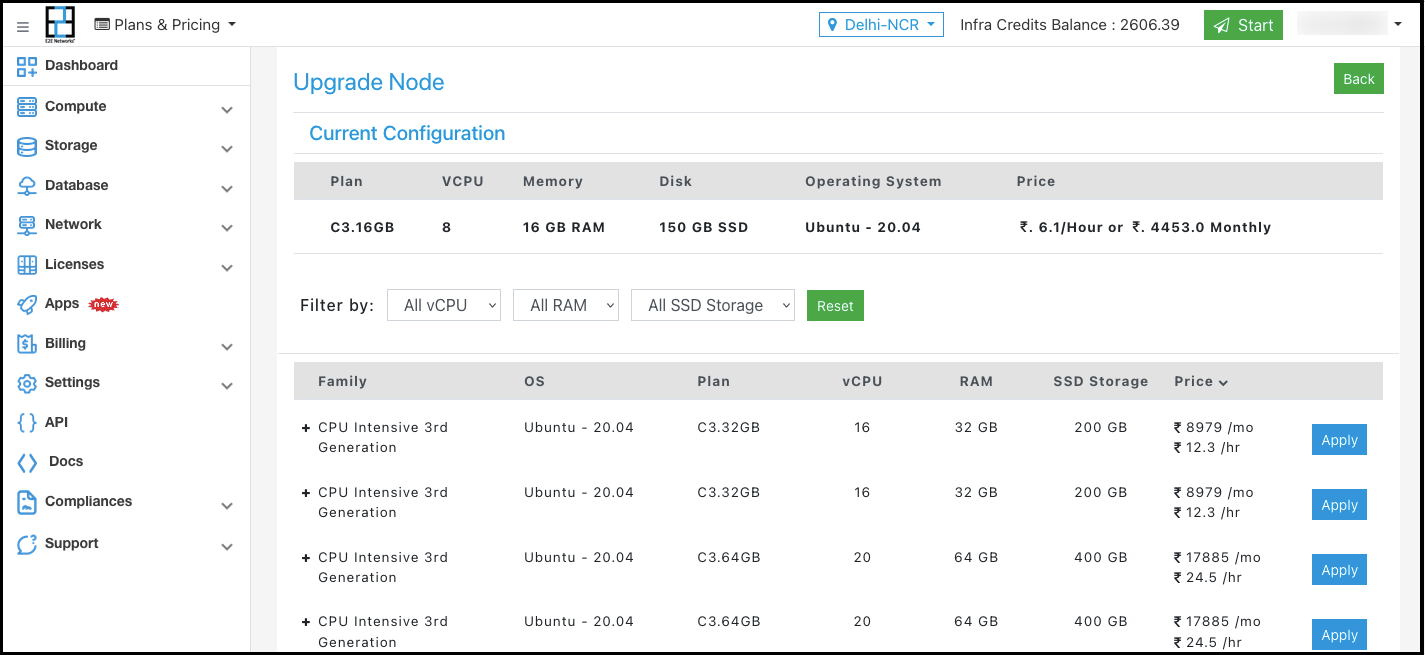
Note
There will be downtime to upgrade your node plan and you will be billed as per the new price of the upgraded plan. Also, The downgrading option of the node plan is not available.
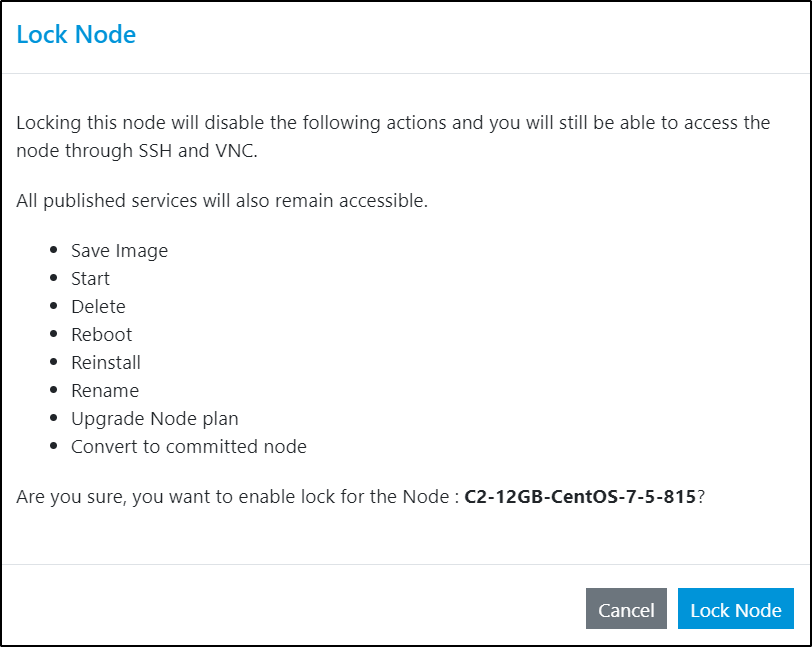
Lock Node
Locking Node feature will disable all the actions mentioned below for a Node.
Save Image
Power off
Start
Delete
Reboot
Reinstall
Move To Another Project
Rename
Upgrade Node Plan
Convert to committed node
Committed Node Setting
This would stop accidental destruction or restrict any changes being made for an Important node.
Reinstall Node
At any time you can clean your server and reinstall a clean OS rather than creating a new node. Click on the reinstall button to place your new, clean node. A confirmation notification will appear ‘Are you sure you want to reinstall OS’. Click Ok to proceed and the state will change to ‘Reinstalling’. After a couple of minutes, your node will be re-installed and ready for use.
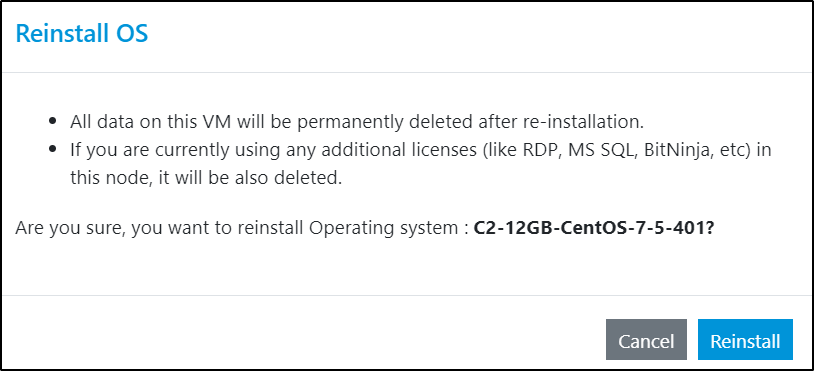
Note
If your node has any add-on licenses, please make sure to reactivate/reinstall the licenses after reinstalling the node. Click here to reinstall the BitNinja agent on your node or Contact the cloud platform support team at cloud-platform@e2enetworks.com to reactivate MS SQL or RDP licenses.
Delete Node
Click on the Delete button to delete your node. Termination of a node will delete all the data on it.
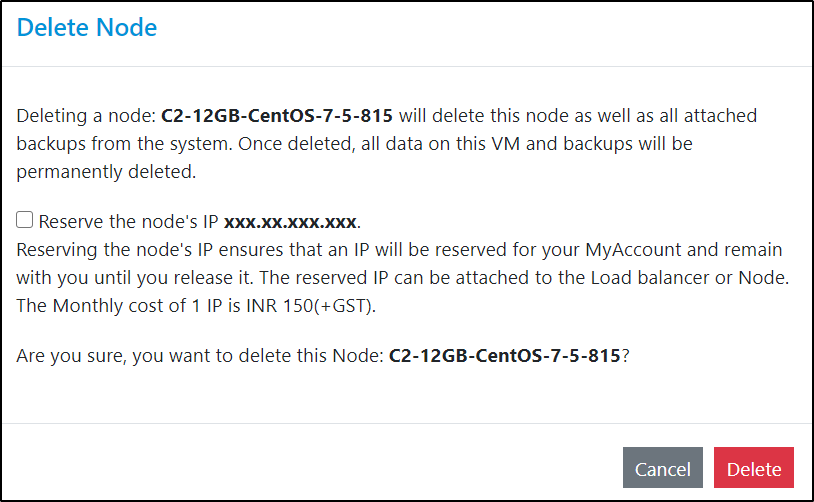
Note
If you are using a committed plan for selected nodes then you would not able to delete the node before the committed period end date.
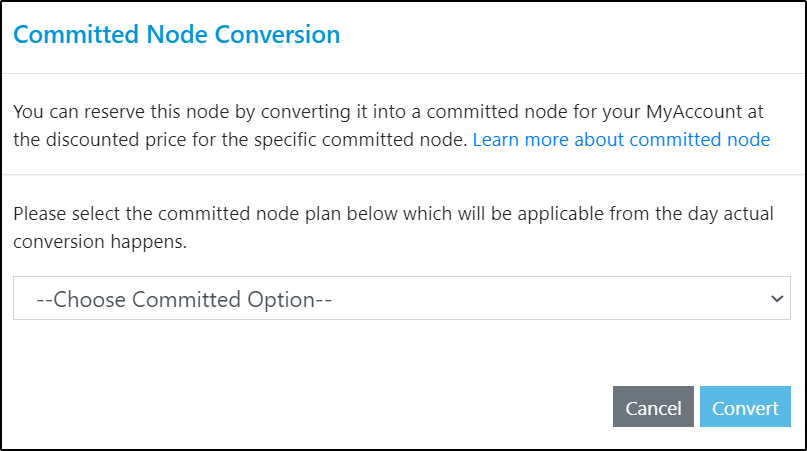
Convert to Committed Node
If your node is currently billed on an hourly basis, you may be able to save cost on some of the select plans by converting to “committed plans”. Committed plans have an in-built discount because the total cost of running the node for the committed period is considerably less compared to the cost of the same node if that is billed on an hourly rate for the same committed period. Learn More.
Note
The committed plans are available only for selected nodes family and configuration. Please feel free to contact our sales team if you wish to convert a node to committed plan but committed plans are not available for that node. We may be able to provide committed plans for that node too.
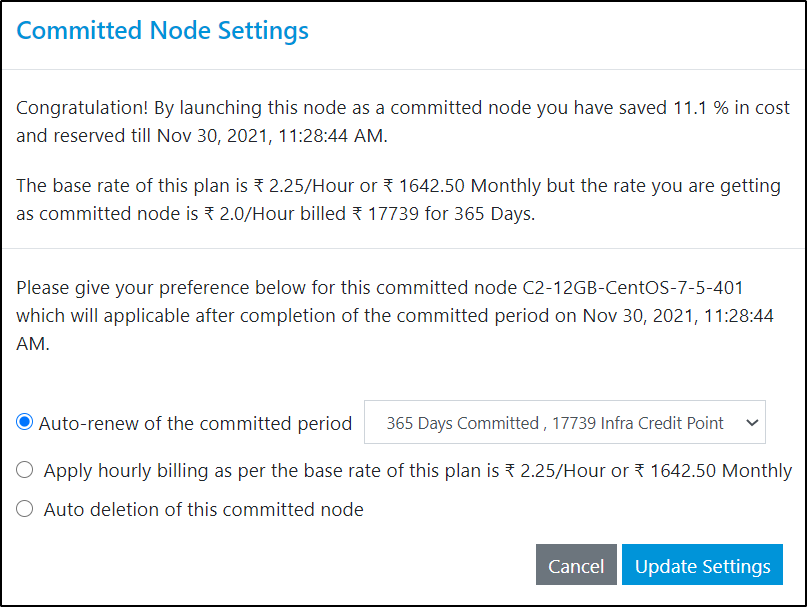
Committed Node Settings
Click on the Committed Node Settings button to configure your committed node instance. This is typically required to configure the node regarding action to be taken after the committed period is over. The default setting is set to “auto-renew” the committed period of the committed node in the same plan, but you may choose to “auto-terminate” or change to hourly billing plan or to some other committed period. Learn more.
Note
Kindly note this action will be available for the nodes that are running under committed plans.